How to install a video intercom in the apartment with your own hands. Choosing and connecting access door intercom intercom installation with your own hands
The installation of the intercom in a private house is an excellent solution to the issue of providing your own security. Today, many firms are provided to this service, however, you can install the intercom on your own.
Preparation for mounting
To perform this work, you need to prepare installation tools:
- perforator with drill set;
- screwdriver;
- shovel and peak for strobs of walls or strokesis;
- Metal Disk OSM;
- screwdriver Set;
- pliers and booths;
- a hammer;
- spatula and mixing tank;
- tools for removing the insulation of wires.
This does not mean that all of the above tools will be useful. Their set can vary depending on the selected method and location of this or that item. The most interesting, even when you have a complete tool machine, be sure to need something from what you forgot, gave a friend or broke it yesterday.
Then you prepare materials and equipment. The recommended set of equipment is specified in the article. Although I recommend to read the articles about electromagnetic and electromechanical locks. The list of materials depends on the installation site of the equipment and the method of laying the cable. The following materials are purchased standard: 
- wire for power supply;
- uTP wire (twisted pair);
- sockets and forks;
- circuit breaker for all equipment;
- set of self-tapping screws, fastener set of dowel-nails;
- isolate, safety glasses and gloves;
- corrugated or direct electrical pipe;
- channel cable;
- putty, alabaster;
- drills, metal discs;
- perflector, hardware;
The list of materials can be continued, but I repeat: it is prepared depending on the preferences of the customer, the installation site of the intercom in a private house and is formed after counting the lengths of the tracks.
Setting the call panel
Installing and connecting the intercom tube
The next step is to install the tube. It can be installed at any convenient location in the house. The holder is also attached to the dowel. Near the Tube Installation Place, the standard outlet 220V must be located, or we will start the power from the shield. For this, all the equipment is connected to a separate automatic and subscribe. It is more convenient and more practical, although harder when installing.
You can buy, or we can connect a video camera to the system through the controller. It will record only coming guests at the time of clicking the call button. Of course, you can configure the camcorder to other modes: a constant cyclic recording, a motion record, a record for a DVR, as they say: who pays that and orders music. Additionally, for night shooting, you can install for the video surveillance camera, and add a monitor to the tube.
Connecting the power supply
 The power supply is included in the electrical system at home and all wires pass through it. As a rule, this unit is included in the kit, so its power is just calculated for a specific intercom. If the power supply is bought separately - you need to carefully examine all the technical characteristics of the call panel and the tube, so that the power supply corresponded to them by power and the installed intercom worked without failures.
Putting we need the following devices: controller, monitor, if there are camcorders. If the set consists only of the intercom and audio tubes, then the power supply and socket are set next to the controller, otherwise it is more expedient to reduce power: what do you think where? - That's right, in the electric boards. And then we need not the kit (as they are already three or more), and the other, sufficiently sufficiently for all devices. The total load is calculated, the tolerance is added, rounded up to the most side and the power supply is bought for our system.
Cable gasket and sealing
When the installation of all elements of the intercom is completed, the most important process begins - the cable laying and the connection of all the scattered parts. If you did not guessed, the control of the intercom, more precisely all the elements of the system occurs in the controller (on sale there are models JSB-CL002, Z-5R, VIZIT , and other firms). He also stores all the data on the keys in memory. It turns out this brain system. Therefore, all wires are summed up to it. It only serves power supply and all methods are supported (batteries are installed). Connection diagram of the intercom standard.

You can use the wires in two ways: open and closed. A closed way is better suitable for the part of the wires that pass on the street. They are allowed underground in plastic or metal pipes to avoid premature damage. The room is possible both open and closed wire laying. However, it will take the walls to be closed, and then climb them with alabaster and putty. It is much easier to produce an outdoor cable laying by running them through corrugated pipes or cable channels.

The intercom is connected to a four-core cable. The wires of this cable are numbered and have each assignment. Thus, the yellow cable at number 1 is responsible for the audio channel and connects to the corresponding contact number 1 on the tube or on the monitor. The black cable is responsible for the overall connection of the intercom and is attached to contact No. 2. Assigning a red wire signal - + 12V, it comes from the lock and connects to contact number 3. The white wire is a video channel, it connects to the contact on the monitor number 4.
For sealing holes, joints, seams can be used by mounting foam, spiteling or alabaster.
Key programming
In order for the intercom to work, it must also be programmed and record the keys in memory. The keys come in different types and types. But there should always be one master key. It is programmed first. If you want to say in other words - the first programmed key will be a master key. Store it separately, do not use it.
On the first switching on the outline panel will react with short sound and light signals. In order to record a master key in the intercom memory, you need to touch the contact reader. In the future, it will be it that will give access to programming or reprogramming the intercom and keys. Starting signals will mean that the key is recorded in memory. Thus, you can write multiple keys, however, the interval between their records should not exceed 16 seconds. Simple and blocking keys are added to the system as well as the master key.
Methods of intercom connections
Different methods, diagrams of intercom connection disassembled in this video, quite visually and understandable.
Check for performance
To verify the operation of the intercom, you need to make a call from the panel, the monitor or tube must play the signal. Then you need to remove the tube, talk to it, check the sound quality and open the wicket. If all the proceeds made manipulations gave a positive result, it means that the installation of the intercom in a private house was successful, and the intercom is ready to use. If something does not fit somewhere - modify. Usually, difficulties arise with a lock, a closer and a door. The lock may not close the door because of the non-adjusted closer, which does not press the door.
More recently, people saw the intercom only in films and allow him to install only very wealthy owners of apartments or houses. With the advent of new technologies, intercoms have become more affordable and began to be widely used both in domestic and industrial premises. Now this equipment together with reliable locks is part of most modern security systems, which makes it possible to increase housing safety or other objects.
Types of intercoms and features of their device
If earlier the eyes and a call were installed on each door, now they are replaced with such modern equipment as the intercom.
There is a large selection of devices that differ from the technical parameters and other features.
The classification of intercoms occurs on the following features:
- Number of connected subscribers:
- Type of communication. For this parameter, the equipment is divided into:

- Monitor type. This parameter applies only to video intercoms. The screen can be:
- black and white;
- color.
- Method of installation. By installation, intercoms can be:

In addition, video intercoms differ in the size of the screen. If the cheapest models of the screen size is only 3.5 ", then in expensive models it is 10", but maybe more. There is a difference in the number of camcorders. The intercom can have both one and several camcorders, which allows to obtain an extensive overview and a better picture. Equipment can also be wired or wireless, in which the external and internal block are interconnected only by a radio signal.
Features of the device
By type of device, audio and video intercoms differ among themselves, but by the rest of the parameters they are almost the same.
Such equipment is budget, therefore is usually installed in the entrances of apartment buildings. The cost of the audio component is low, as it has a limited set of functions:
- alert of the house owner about the visit of the visitor;
- negotiations with the visitor;
- unlocking electric booth.
The budget audio contact includes:

If we talk about the benefits of such devices, then it will be low cost, simplicity of design and easy use. The main drawback is that you cannot see the visitor, and this reduces the safety level of the system.
Video mat
The intercom with a video system is modern equipment, which has many additional functions that increase the safety of the security system.
The video intercom has the following device:

Features of choice
To choose the right intercom, you need to pay attention to such parameters:

Video: how to choose an intercom
Main schemes for connecting intercoms
First you need to decide on which there are connection schemes of intercoms and choose the one that suits you. In an apartment building more complicated than in the private sector, install the device yourself. The easiest is the installation of the intercom without its connection to the electric pump.
In this case, the connection scheme will depend on the type of access door (digital or coordinate). The access door is established by representatives of a specialized company, after which there is a layout on the floors. Usually, the same specialists are connected to individual intercoms. Sometimes there is a need to change the intercom subscriber tube or connect a video intercom in an apartment building.
Connecting the intercom in an apartment building - a difficult task, to cope with which only specialists can
This is the most popular installation option of such equipment. Here, the intercom and lock are connected together, which allows you to open the lock using the button on the inner panel of the intercom or using the code, the electronic key from the outer panel.
When installing an audio intercom from the inner unit, a triple cable is carried out to the outer. A four-core cable is used to connect a video intercom.
During the connection of the intercom, it is necessary to remember that its internal panel is powered by 220 V, and the called is from the inner panel.
The intercom with electric gossip is the most common solution.
Video: Intercom connection with electric lock
This is the easiest way to connect, so even a beginner can cope with it. To connect the external and indoor unit, you must use a four-core cable or two two-tier wires. For two veins, food is served, and on other two - audio and video signals.
Selecting a method for connecting a intercom depends on you. If you are comfortable to go outside and constantly open the gate, you can install the intercom without a electric mold. It is better to install such equipment in a complex with a lock that can be controlled by simply pressing the button on the intercom without leaving the house.
Cut the installation of the intercom without connecting it to the castle can even begin
Installation of intercom
If you decide to independently install the intercom, you must first prepare such tools:

Installation sequence
Although there are different types of intercoms, their installation is performed in the same sequence. When independent installation of equipment, work is carried out in this order:
- Select room for installation. In order for the intercom to have a good viewing angle and it was convenient to use this equipment, it must be installed correctly. The recommended mounting height of the external block of video intercom is 1.5-1.6 m from the ground. When installing the camcorder, you need to watch the overview to cover the doors, house corners or other items. If we talk about installing the indoor unit, then it can be mounted on the wall or installed on the bedside table. The main thing, it should be in a convenient place and that the sound is heard throughout the house.
For comfortable use, the intercom is installed at a height of 150-160 cm
- Cabling. This is the most important stage, to fulfill which it is necessary to have elementary concepts and skills of working with electrical wiring. It is recommended that the cable length does not exceed 35-40 meters. To do this, you can use both a telephone cable and a signal wire or twisted pair. To pave the cable on the walls, you can make a shit, which are then filled with putty, or lay the wire in the box. The cable is displayed in the host panel bracket, which is fixed using self-samples.
The cable may fit into special boxes or in the shocks on the walls.
Video: Installing a video intercom from your own hands
Features of the connection to the access door
In order to prevent the entry into the entrance of unauthorized persons and maintain cleanliness in it, an excellent solution will be the installation of an accessible entrance intercom. Installation is performed by representatives of the company and they also make a layout on the floors. Sometimes there are situations when you need to connect to the access door, so many home masters want to know how to do it. The connection method will depend on the type of device used.
Connect to digital intercom
This is quite expensive equipment, so it is less common compared to the analog models. Such a system allows you to simultaneously connect no more than 255 subscribers.
Up to 225 subscribers can be connected to a digital drive intercom
A two-core cable was held on the storing of the entrance, the apartment intercoms are connected to it. If you decide to replace the intercom subscriber tube, then you need to know that the programming of the apartment's room is performed using a microcircuit located inside the tube. It is installed for jumpers or japmera, with which the number of your apartment is coding. We must disassemble the handset of the old intercom and look at its chip, there is a digital panel. The apartment code will correspond to closed jumpers. According to the same diagram, jumpers are closed in the new audio contact tube, Only in this case, it will work with an access vehicle. When using a digital intercom connection scheme, polarity should be clearly observed.
For example: To connect the intercom, it is necessary to move jumpers, and the amount must match the apartment number if its number 38, then you need to connect the jumpers 32,2,4.
For programming Apartments Need to move three jumpers
Some modern video intercoms have a built-in pairing unit. If it is not, then to connect such equipment it is necessary to additionally use the module of the MPC conjugation. He helps to coordinate the work of the access door and the video intercom in the apartment. Such a block is suitable for video intercoms of different manufacturers, although certain restrictions may be.
The connection process is to connect to the MCC module of two wires from the drive intercom and the cable from the video intercom. The adapter has outputs for connecting the call panel and the camera.
Connecting a video intercom to a digital accessible intercom occurs through the module of ms
The disadvantage of the digital system is that after its repair it is necessary to connect all apartments again. In the event that one of the tenants will incorrectly connect the subscriber tube, the entire system is out.
Connect to the coordinate intercom
This option is used more often, since when the device breakdowns, one of the users the remaining system is working normally. Connecting the coordinate intercom is performed according to the scheme that works on the principle of the automatic telephone exchange. Mandatory element for connecting the intercom to such a system - switch.
To connect the audiophone to the switch, use two tires. At the first of them, contacts correspond to dozens (D0-D9), and on the second - units (E0-E9). For example, to connect Apartment No. 23, it is necessary to connect the plus wire to the terminal D2, and the minus to the E3 terminal.
When connecting the subscriber tube to the incident intercom plus wire is connected to terminal D, and the minus - to the terminal E
If the apartment number is more than 80, the installer makes reprogramming and shifts the numbers. To connect the intercom in this case, you need to know the displacement value.
To connect a video intercom to the coordinate access door, you need to install MSC module. Connecting such an adapter occurs similarly to the connection of MSC module.
Connecting a video intercom to an analog accession intercom occurs through MSK interface module
Cannot be confused by polarity, otherwise the intercom will work incorrectly. The advantage of an analog connection system is that subscriber tubes of different manufacturers are interchangeable.
In the entrances with a small number of apartments, an analog intercom has an embedded switch. This allows you to connect apartments directly to the call panel, which makes it easier and simplifies the installation process of the tubes.
Video: Connection process to accession intercom
Already from the header it becomes clear that to connect the call panel and the inner block of such a intercom, the cable is not needed. Due to this, the installation is carried out much easier and faster.
Depending on the model selected, the range of action can reach 100 meters. When calculating the range of intercoms, it is necessary to take into account not only the distance between the tube and the call panel, but also the thickness of the walls, the presence of other obstacles that interfere with the passage of the signal.
The wireless intercom is most often installed at the entrance to the private territory.
During the installation of such a intercom in an apartment building, the tick panel is installed near the apartment door. In a private house, it is mounted near the wicket. The call panel is also fastened at an altitude of 150-160 cm. If the lock is provided, it is also attached to the door and control it connects to the intercom.
In the apartment, the display with the tube is installed in any convenient location. After that, the performance of the intercom is checked and if everything is fine, its installation is considered to be completed.
The advantages of the wireless video intercom are that it can be installed in any part of the house. To increase the rangethe operation of the wireless video intercom to the call panel can be connected to the directional antenna.
Video: Wireless Video Control Overview
Often, users have the question of how to properly connect the video intercom to the TV. Almost all the time when the owners are at home, there is a TV and a very convenient to see a guest image on its screen.
Most modern intercoms have the ability to connect to the TV, for this they have a special video output. Enough using a special cable to connect the intercom from AVI input of the TV. To receive a good quality signal, you need to use shielded cable to connect the intercom to the TV.
To connect to the TV, you must connect the cable output of the intercom with AVI TV input
After pressing the call button, you will hear the signal, and it is enough to turn on the TV selected for the intercom to see on the screen who came to you. To display the image at once to several TVs, you must additionally install splitter. Note that each new connection makes the signal weaker, so more than 3-4 TVs are connected to the intercom.
Many people who have private houses or cottages are increasingly beginning to think about a convenient security and access control to their territory. The most simple and accessible option today is an individual intercom, which can be easily installed on your own without the involvement of specialists. To do this, you only need to clearly follow the manufacturer's instructions. If you have such a device, you can fully protect yourself from the visit of the unreasonable guests.
What is necessary to install the intercom in a private house
The main task that the intercom should perform is to ensure the safety of the owners of the house and fencing them from foreign courts. It is very important to have an audio or video intercom if older people live in the house or are small children who most need maximum protection. The presence of a intercom will help protect people from danger, which may appear due to excessive carelessness.

Installation of a video intercom in a private house helps to ensure the safety of tenants at the expense of full control over the zone in front of the gate
Thanks to the intercom you will not have to leave the house and go through the entire courtyard to the gate to see who came, as you can communicate with a visitor on audio or video link and skip it if necessary by pressing the button on its device.
But before purchasing such a device, it is necessary to accurately decide for what purposes it will be used and how much you are willing to spend on your safety. That is why each person should know which types of houseophones there are currently what functions they perform which types of locks exist for these devices and how much all this equipment is worth it. It is also very important to know if if necessary, install the intercom in a private house with your own hands.
Types of intercoms and standard diagrams of their connection
In their constructive features, intercoms differ in the type of signal transmitted. Devices can transmit a signal from the call panel to the main audio unit or the current:

Often the audio components are mounted in the entrances of multi-storey houses, where they basically play the warning function. The video intercom is more useful for private houses, as in a high-rise building it is installed only near the door of the apartment and is not intended for public.
In private home ownership, the video intercom will play a big role, since the owner can not only hear, but also to see the visitor and, if necessary, do not let him into its territory.
Modern intercoms except the main elements (calling device, a locking lock, negotiation tubes and power supply) can be equipped with an additional functionality:
- answering machine. If the owner is not at home, then thanks to this feature, he will be able to listen to the records that left people who came, and even get them on a mobile phone;
- sensor movement. This device fixes the visitor who is in the zone of its action. When a person appears near the device, its image is instantly transmitted to the television monitor connected to the intercom;
- memory block. Thanks to this function, the visitor image is recorded on a special device from the moment the call button on the intercom has been pressed. As the memory is filled in memory, old entries are erased and replaced with new ones.
At the request of the home owner, the intercom can be equipped with an unlimited number of monitors and additional video surveillance cameras.
Basically, all intercoms are connected to the call panels using wires. There are also wireless devices, but their range is quite limited. To date, there are three types of wired intercom connection schemes:

Device home intercom
Video intercoms are very popular among owners of private houses. Therefore, we will look at their device in more detail.
The outdoor unit that is mounted at the entrance to the house is equipped with a video camera and a call button. There is also a negotiation device, which allows you to communicate with the owners if the video will be small. The camcorder can transmit a black and white or color image.

From the call panel you can call the monitor and talk to the owners who will see the visitor on the screen
By installation method, the call device can be mortise and overhead:
- mortise panels are more expensive, but they are better protected from hacking and various climatic conditions;
- overhead blocks are available in durable plastic cases, but they are still more wearing and are subjected to various mechanical damage. For such panels, domestic manufacturers offer strong protective overlays, enclosing the device from breakage.
Internal block (monitor)
The internal block is a black and white or color monitor depending on the model. Black and white monitors have already moved into the past and practically not produced. Colored models are equipped with a diagonal diagonal screen from 10 cm and tube or speakerphone button to answer the call. The monitor also has a button to open the lock, the additional functions and buttons or knobs for adjusting sound and image.

Most modern video intercoms have a speakerphone button instead of a tube.
Types of locks for intercom
Electromagnetic or electromechanical lock can be connected to the intercom. Both options work from the network, so we will consider the principle of their action and characteristics.
The electromechanical lock is a modern intercom location device that opens with one click on the button or a special key. It works from the voltage of 12 V, so a lower transformer is required for it.
Advantages of the castle
- Allows you to open a gate or door at a certain distance (when connected to the intercom).
- It can work even in the absence of electricity (without the possibility of remote control).
- It is made with a high level of secrecy and safety.
- It can be equipped with a motor that works from a small electric motor.
- It has an electrical latch that opens with a turn of the handle.
Choosing such a lock for street use, it is necessary to keep in mind that there is a button on its front side, which can be reached by hand, having frightened through the fence, and open the wicket. Street lock with electromechanics is a mortise and overlap.
It is also necessary to know that when the electricity is disconnected, only an overhead castle option will be able to work.
Before purchasing such a lock, you need to find out for what type of door canvase it is suitable and what is the principle of its work. Specialists are recommended for private home the castle "Polis" or Fass Lock.

The electromechanical lock has a manual opening button, so attackers can enter unnoticed, having frowning through the wicket or reaching the button through the slots in the canvas
The electromagnetic lock is designed to close the door or wicket and holds them closed by means of a powerful electromagnetic board that attracts the steel plate installed on the door or gate. The electromagnet is mounted on the door frame or clutch, and the steel plate is attached to the door itself or the wicket.
In the closing mode, the magnet has a current that creates a powerful electromagnetic field, which quickly attracts the steel plate. As a result, the gate, held by the magnet, is in a closed state. In order for it to open, you need to remove the tension from the castle. This is done by pressing the button on the intercom: the circuit opens, the electromagnetic field disappears and the wicket opens.

The electromagnetic lock works only when the voltage submitted to it is, so if you suddenly turn off the electricity, the wicket can remain open
In terms of its design, the locks can be operating to the separation and shift, as well as overhead and mortise.
The most popular are overhead models that work for a gap.Due to the fact that such locks do not contain moving and rubbing elements, they serve for many years and can work in all weather conditions.
But if it suddenly stops the supply of electricity, the lock will stop working and the door will remain open. To prevent such situations, you will have to establish an uninterrupted power system.
Electromagnetic locks differ in strength with which they hold the front door. This value is installed in kilograms and should be much more than the mass of the wicket. For medium-sized wickets, there is enough lock with a hold of 300-400 kg.
How to install and connect video intercom
In order to start installing the intercom, we need the following tools:
- A sharp knife.
- Powerful perforator and borants.
- Electric screwdriver.
- A shovel and peak or strokesis to create a stroke in the walls.
- Bulgarian and metal cutting discs.
- Various screwdrivers.
- Comfortable pliers.
- Good hammer.
- Spatula and dishes for kneading.
In addition, you need to cook:
- Power cable (length is calculated individually).
- UTP cable (twisted pair).
- Several sockets.
- Machine switch.
- Self-tapping screws and dowel-nails.
- Celebrate, protective clothing.
- Corrugated pipe for wires (directly used).
- Cable channels.
- A shlature mixture for embelling stroke.
- Different rolled diameter.
- Perforated ribbon and hardware.
Step-by-step scheme of installation of a video intercom with an electromechanical lock
- Select a convenient and affordable place on a gate or gate to place the call panel. Panel disassemble and place its place of installation. Drill holes for fasteners and wires.

The output panel can be installed at an angle to the surface of the wicket, for which a special adapter has a special adapter.
- From the end side, we start the four-core wire and connect it as indicated in the instructions.
- We carry the cable to the place of installation of the controller, which is a plastic box located near the castle. So we will have to start less wires and it will be more convenient to make connections. The controller can be installed in the shield on the street or clicked into the wall.

The lock controller is a small printed circuit board, which can be mounted in a plastic box next to the lock or clogged into the wall
- Next to the call panel, we set the reader, and from the reverse side of the wicket - the output button. Wires (two veins) from each of the devices we reduce the controller and connect to the appropriate connectors (dallas and "ex. SD" for the controller and "button" for the output button). The wires from the call panel are connected parallel to the output button.
- Check the correctness of all connections. We are promoting the call panel, screw it with the rear wall by self-draws to the installation site. We collect it back.
- Next, we go to the house and install the monitor. Krepim on the dowel bracket, which is included in the delivery set. Nearby should be a socket in 220V. If it is not, you will have to start the power wire from the electrical panel. Then the equipment is better to connect to a separate machine and sign. So it will be much more convenient to deal with the wires in the future. After that, insulating the monitor on the bracket.

The monitor of the video component is hung on the bracket, which is attached to the wall by self-draws
- We make wiring in the house. It can be both open and opened in the wall. But for hidden gaskets, we will have to stick the walls, and then smear them with putty and alabastrom. It is best to make a preliminary closed wiring for the intercom when the house is only built or repaired. If there are no laid cables, but I don't want to spoil wallpaper or paint, select the open type of wiring. To do this, lay cables on the walls outside, running them into plastic cable channels.
- We connect a four-core cable to the intercom according to the following scheme:
- yellow - audio channel;
- black - common;
- red - 12 volts ("plus");
- white - video image.
- Install the lock on the gate. The surface of the response plate must be installed without distortion, as otherwise the lock will not firmly fit to it and close. Since the lock is performed using a relay, a general wire is connected to it, and the positive contact is started on the controller (terminal "+12 V"). All work must be carried out with power off.

The electromechanical lock has a tongue that must be tightly entering the response
- We program keys. In order for the hosts to enter the house, you need to provide them with access keys. Information about each identifier is recorded in the memory of the controller. On the first switching on it will react with infrequent signals with sound and light. First, you need to create a master key according to the special procedure described in the instructions. Then, alternately bring each subscriber key to the reader and wait for the confirmation signal. In this way, we write in memory the necessary number of identifiers, following the time that the time between the entries was not more than 16 seconds.

After programming, information about the access code from each key is recorded in the memory of the controller, and the device is allowed to pass
- Check the work of the intercom. To do this, make a call from the panel - the monitor must file a signal. Remove the phone, say to check the volume and sound quality, as well as try to open the wicket. If all actions have passed successfully, it means that we have installed the intercom correctly and they can be used. Typically, difficulties appear with the installation of the lock and the controller. Therefore, when troubleshooting is detected, first of all, it is necessary to carefully check the correctness of all connections to this device.
Install the power supply. It must serve the voltage to the lock and all devices located on the gate. It is best to use a street execution device and mount it next to the lock. For electromechanical locks, a power supply is 12 V and 3 A, for an electromagnetic locking device, a source is sufficient to 12 V and 1 A.

Castle, controller and other components of the access control system is better to maintain from the source located nearby
We pave the cable. Wires walking down the street, launch under the ground in special engineering tubes from plastic or metal. You just need to pave one four-wire cable for connecting the monitor and the call device and one two-wire cable to supply voltage 220 V. But since cables will go under the ground, it is better to pave them with a margin, given the appearance in the future of new system elements: additional video cameras, gate control devices, Security sensors, etc.

For laying under the ground, the cables are tightened into the corrugations and laid in a tangle trench in plastic or metal pipes
Video: how to install the intercom do it yourself
Device and features of the video intercom connection
To connect a video formophone, you will need a cable with four cores. A special wire can be purchased in the store, where two copper veins are located next to the coaxial dwelling wire. It is called a combined video cable. Usually used Cable KVK-P 2x0.75.

Connecting a video intercom to the call panel is made by a combined video cable, which has one shielded core
Two more wires are added to the lock, which will allow you to control it by the mechanism without leaving home. The call panel is usually screwed at a height of 150 cm from the ground.
If we install the wireless intercom, lay and connect the cable of necessity.We just need to properly let down.
QUANTUM QM-4HP Video Intercom
Many prefer to install in their private house a convenient, practical and reliable video intercom QUANTUM QM-4HP.

QUANTUM QM-4HP is one of the most popular models among owners of private houses.
Its main characteristics:
- four-thymus (approximately 10 cm diagonally) CRT monitor;
- parallel work up to 4 monitors in one system;
- door opening button;
- connecting one call panel;
- installing the video memory block;
- connecting an additional audio tube.
QUANTUM QM-4HP Video Contact Connection Scheme
The video intercom is connected by the standard four-wire diagram, which we described above. Therefore, this model can be used to set the access control system in a private house according to our step-by-step instructions.

Video intercom QUANTUM QM-4HP can be used with an additional video camera and a 32 frame memory block.
In order to install the intercom correctly, it is necessary to accurately follow all the manufacturer's recommendations and understand the intake subtleties of electrical wires and devices. If you do everything according to the instructions, you will not have to attract specialists and spend additional funds to install this device. And in the end you will get an excellent intercom with an audio or video system, which will greatly facilitate life in a private house.
Access door intercoms are instruments with magnetic keys, electric lock-negotiating, push-button and social order controlling in residential and public premises. This device is connected to or to power supply operating autonomously. The device helps to control, in which the user can not only identify the guest by voice or video image, but also open the door without leaving the apartment.
Existing types of accessible entrepreneurs
This is possible due to the advanced features of the intercom.
All components are mounted on the access door and in the apartments of residents. The call panel on which the buttons are located at the entrance. In the intercom memory, a digital code is recorded, which activates the switch transmitting the signal. How digital accessible intercom is working:

Device of a multi-apartment intercom.
The audio device is simple and reliable, but, unfortunately, it begins to obstruct very quickly. There are color panels based on the sensor, since their cost is constantly falling, there are models that have properties to record all incoming calls to the USB flash drive. The user has the opportunity to arrive home, see who came. A similar apartment intercom is almost every entrance in many cities.
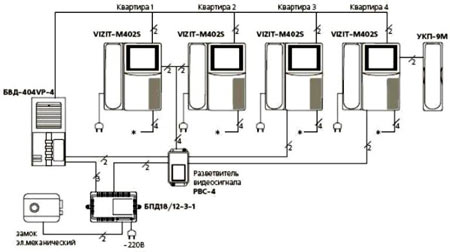 Intercom connection scheme in an apartment building
 Intercoms are divided into the method of codification of applicants and the principle of addressing the number of subscribers who need to be serviced.
Marks of Domofones and the number of subscribers
Multibonensky - installed on objects and in. These devices can serve only one subscriber, for example, in cottages, on security paragraphs, at the entrance to the house or. Multi-Bonentic - intended for the entrances of multi-storey and, administrative buildings.
Not so long ago, these designs could serve only 6 people, but progress does not stand still, and at the moment you can buy intercoms of various configurations that can serve more than 1000 subscribers, and can make dozens of entrances to the entrance.
 Different brands of houseophones
 Installation of the access door should be made by the company's specialists, which will subsequently serve it. Types of devices:

What is the indication of guests from intercom
The intercom with the camera implements the viewing section on the side, ahead, staircase. The feature of the apparatus is a hidden shooting from the inside of the building. Particularly prestigious intercoms can perform audio and video surveillance, they have a control panel with perceiving and particularly sensitive screen. Can write and save events and faces of visitors in the amount of 16 pcs. 
Some manufacturers went further - through the negotiation screen began to use identification using mobile or TV. It is manually executed or automatically: the signal comes to the device and the role of the intercom is connected, and after completing the conversation, it switches to the typical mode. Such properties have in wireless types of intercoms. The aspects listed above affect the price and popularity of blocks. Ordinary audio components, in contrast to intercoms with video or the most elite modifications, have a low vacation price.
Device manufacturers
Metak
DomoFons Metak - Innovative Systems. Buying these devices, we can be confident in their impeccable work for a long time. The principle of operation and installation does not differ from other similar devices. The intercom is the easiest and consists of a tube and panel. The work of the intercom will be correct if it competently mounted.
 This is what the intercom is a metal
 Installation of access door with intercom is made by specialists from the company selling intercoms. Systems have a number of advantages:
- there are no mechanical switches on the panel, which helps to eliminate the problem with key lock and the oxidation of wired contacts;
- doors open with a key;
- you can open an access door using a special programmed digital code;
- simple maintenance, installation and reprogramming.
For the correct operation of the intercom from Metak, you need to fix it correctly, connect and configure. The performance of this work is better to entrust the company in which specialists in the installation and maintenance of access door intercoms of this brand are working.
Vizit.
Manufacturers have developed inexpensive and high-quality intercoms VIZIT.

The external panel of this device is made in the housing that prevents hacking. In this case, the intercom can work in very harsh weather conditions. Vizit intercoms have different nodes and are collected at the request of the client, often the installation of access door is associated with the installation of an audio contact visit. You can choose a control unit to the call block that determines how many subscribers will be connected, camcorders - dome or cabinet, locks electromechanical locks. There are dozens of options for installing equipment installed.
Cyfral.
Installing the intercom, should be carried out strictly according to the instructions. Cyfral is attached to each manufactured kit. You can install the intercom with your own hands by reading this guide, but if your knowledge grabs you, do not risk your safety and integrity of the device, contact the installation company.
These digital intercoms are connected using a telephone cable to which subscriber tubes will be connected in parallel.
When connecting Cyfral's intercoms, you need to program it correctly.
Commax.
Commax Intercomses Releases Korean Firm, they are among the leading manufacturers in the market for the sale of this product. The COMMAX video formophone kit includes:
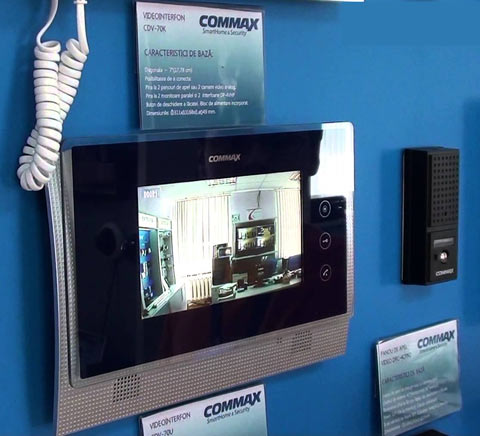 Commax video intercom set
 - call panel with camera;
- monitor;
- electric lock.
Video intercoms "Commax", differ in characteristics, as they are different models:
- may be monochrome or color;
- can be equipped with a tube, or speakerphone;
- there are sets with motion sensors;
- there is a photographing function or video recording, with data saving.
This video intercom can be connected to a conventional intercom using a module-module unit that helps to connect almost any video intercom. This pairing unit will allow not only a video intercom, but also several cameras that are installed in the stairwell and the panel installed directly on the subscriber floor. The pairing unit is connected with an access vehicle, for devices with a coordinate or digital device.
 Connection diagram of intercom through the pairing unit
 Before the modern owner of a private house is not a question: install or not install the intercom system? Control and access control systems (SCS), which include intercoms, are firmly entered into our lives. Nowadays, the hosts of the country cottages are more often asked questions: what to choose which intercom system? Is it possible to install the intercom with your own hands without resorting to the services of specialists?
In this material we will try to tell in detail about the installation of intercoms in the country cottages. Consider the issues of choosing components, consumables and tools. We will tell about the technical solutions to ensure reliable operation of the SUD.
In its functionality, intercom systems can be divided into two main types:
- audio components;
- video intercoms.
Audio components allow you to identify a visitor by voice. The owners of video cameras can identify both vote and visually. In addition, many intercom systems with video cameras can perform the function of the video recorder, recording video information on internal or external media. Oddly enough, the schemes of connecting listed SCS are distinguished to a small degree. The main difference in the installation of video intercoms is the need to transmit the video signal. To do this, you need to pave two additional wires between the calling device and the intercom.
It should be noted that the manufacturers of intercoms offer devices in which the connection between individual elements of the intercom system is carried out by radio channel or through the Internet. For such systems, it is not necessary to lay long wires, but additional communication modules significantly increase the cost of the SUD.
As for the manufacturers of intercoms, such trademarks have a steady reputation on our market as: Commax, CTV, Falcon Eye, Kocom, Tantos other. Products of one price category from these companies have similar functionality and comparable technical specifications.
What components will be required?
The base set offered by manufacturers usually includes an intercom tube with a built-in or external power supply and a calling device in anti-vandal design. The video componial kit includes a video terminal installed in the house, and a call device with an integrated video camera. In both cases, in the calling device there is a built-in contact that allows you to control the electrical lock.
The minimum set of devices allows you to identify causing, but in order to let or not to put it on the controlled territory need a lock. Electric locks are two types:
- electromagnetic;
- electromechanical.
Electromagnetic castles Restored in the locked state when flowing through the built-in electric current coil. Electromagnetic locks due to its design have the following feature: when the voltage disappears, they automatically open. Therefore, to operate this type of locks in the conditions of unstable, a backup source is needed. As such a source, you can apply the battery or use the uninterruptible power supply.
Electromechanical castles Latched mechanically, and open with the built-in electromagnet. There are two varieties of electromechanical locks: electric latches and locks with a cylinder for the key. The last option seems to be more preferable for a country house. It allows the owner of the key to open the wicket or the door on its own, when there is no one in the house.
Electric locks consume quite high current. Therefore, they need a separate power supply. Recently, BUZ drives (lock management blocks) appeared on the market, which can be replaced by the power supply units of electromagnetic locks. Buz is an energy storage device that can be charged from a low-power voltage source. At the time of supplying the signal to the opening of the Castle, the BUZ gives the accumulated energy to an electromagnet.
In our country there is a pretty harsh climate. During severe frosts, the wicket is not always possible to open the usual key. Electronic keys (chips) can be used to duplicate mechanical keys. In order to provide identification using an electronic key, you will need a reader and lock controller.
To open the wicket, from the inside of the house territory, you will need an outdoor installation button with a normally open contact. It is mounted directly next to the gate.
Even for the correct operation of the door lock on the front door or the gate it is necessary to install the door closer.
Let's summarize: the full set for installing the intercom in a private house will consist of:
- intercom pipe;
- call device;
- electromechanical lock;
- power supply or buzz;
- reader;
- controller;
- button;
- closer door.
By purchasing equipment from different manufacturers, pay attention to the compatibility of electronic operating blocks and voltage! Although pay attention to the range of operating temperatures of electronic equipment, which will be placed on the street.
In addition to the listed equipment for connecting the intercom in a private house, the connecting wires will be needed. As a power wire for the power supply unit, you can apply cable with copper veins in double insulation Vgging 2x0.75. As low-current (signaling) wires, you can use a twisted pair used in computer networks. Shielded vita couples have greater noise immunity - FTP. or STP.. Industry manufacturing specialized cables for SCORD. Cable CPV Well suited for audio contacts. Cables with one shielded residential SWEV. and SCVEP Used for video surveillance systems, including video intercoms.
On a note! The letter "P" in the abbreviation of the Cable cable means that the suspension cable. It is suitable for open gasket.
For laying cables in Earth or along the fence, the so-called "corrugation" or straight plastic pipes will be required. Plastic cable channels can be used for outdoor wire laying on the walls of the buildings.
From the smallest detail, you can mention the tips to eliminate the multi-wiring wires, heat shrink tubes of various diameters, insulating tape, terminal, brackets and ties for fastening wires.
Intercom connection tool
To install the intercom system, we need a conventional set of tools for electrical work: screwdrivers, plug, pliers, perforator or shock drill, etc., for soldering wires, you will need a soldering iron 40 - 60 W, flux and solder. It is not bad to have thermofen, devices for removing isolation from wires and crimping tips.
Typical diagrams of intercom connection
Below we present several types of intercom connectivity schemes. But first we note that it is necessary to have at least small cognition in electrical engineering to independently connect. Blind copying of typical schemes can lead to damage to the equipment.
Tip! Before installing any component, carefully read the instructions of the attached manufacturer.
One of the options for connecting an audio contact tube with a call device and an electromechanical lock is as follows:

Note! In this embodiment, the normally open contact control lock is built into the conversation tube.
The output voltage and power of the power supply must match the lock parameters.
The following figure shows a diagram of connecting a video intercom, in which the lock control lock is embedded in the call panel.

To place the power supply unit, the location takes place, you need to lay the cable 220V. To get rid of these problems, instead of BP, the buzz about which was described above. The following figure shows a scheme with a lock control unit.

Buz has small dimensions, and many masters carrying out installation placing energy storage inside the castle.
Attention! The above scheme will work correctly only if the power supply voltage of the call block will correspond to the power supply voltage.
Finally, we present a diagram of connecting a intercom with an electronic key reader and an electromagnetic lock control controller.

Order installation procedure
Before starting installation work, it is necessary to make a plan for placing the elements of the intercom system. It is especially important to consider the place of placement of the conversational tube or video terminal. They should be located in the place where people are most often located during the day. Perhaps such a place will be a kitchen.
By drawing up a plan and evaluating the required amount of wires, make gasket of power and signal cables. Then mounted the elements of the scois. At the next stage, electrical connections and inspection of the monetary efficiency are produced.
Laying cables
Wires and cables should be laid in corrugated flexible pipes, plastic or metal. Corrugation can be used with external wire laying and when laying in the walls, behind plasterboard. For laying cables in the ground, low-pressure polyethylene pipes can be applied. The depth of the cable laying in the ground should be at least 40 - 60 cm. With outdoor laying on the walls of the wire, laying the channel cable.
Attention! Locking cables for the intercom, it should be remembered that low-current and power cables cannot be laid in one pipe. The close arrangement of power and signal cables can lead to tips that will manifest themselves as a sound background of the network or interference in the image.
Three Councils. Leave a small reserve At the ends of cable lines. This will facilitate installation and will make it easier to repair.
If the line has to do from several pieces, perform soldering connections and protect them using heat shrink tubes.
Locking the wire to the electromechanical castle put flexible protection to the place of bend.
Installation of the call panel
When installing a video intercom call panel, try to provide a maximum review before the gate and adjacent territory. It is possible for this token panel will have to deploy to the gate.
Installation of a conversational tube
Usually the package of intercoms includes fasteners and additional accessories. Therefore, serious problems with the installation tube should not be. Fit the power outlet next to the tube and install the terminal at an altitude convenient for all family members.
Installation of the controller
The controller is placed near the call device and the electronic keys reader. The controller can be placed in a hermetic box or hide in a niche for a call device. The main thing is that it is reliably protected from the impact of moisture and direct sunlight.
Connection and commissioning
The connection of the unconfined system blocks should be performed according to the mounting circuit. So that errors do not happen mark the colors of the conductors and their destination in the drawing. If you use cables with multi-propelled cores, please contact them tips. The use of tips improves the reliability of contacts.
As practice shows, correctly collected diagrams of intercoms begin to work immediately and in additional adjustment do not need.
Programming electronic keys
When using the keys reader controller, there is the possibility of "programming" chips. The procedure can be performed using the so-called key wizard or by transferring the controller to the programming mode using jumpers.
Programming with a mater key is performed as follows. Initially, the master key is brought to the reader. In this case, the kotroller is translated into programming mode. After that, the "programmable" key is brought to the reader. At this point, the controller remembers the key number. Thus, the "programmable" key shares permission to open the door.
In the absence of the key wizard, the controller can be translated into programming mode by switching the jumpers. In detail about this procedure, you can learn from the technical documentation.
Conclusion
In this material we tried to tell in detail about the installation of the intercom in a private house. We hope that after reading this text, you received useful information.