Connecting radiators of heating Schemes for the installation of batteries. Rules for the installation of heating radiators Installation of radiator
As they say in the famous saying: "Prepare a cart in winter, and Sani and radiators in the summer." With the need to shift the batteries, everyone faces each other, and, of course, it should be done in the inter-octic season.
Before we proceed to the detailed step-by-step instructions for installing heating radiators with their own hands, let's focus on the technical characteristics of the main species. After all, the installation process depends largely on the design features. Therefore, it is necessary to choose the right radiator, based on the area of \u200b\u200bthe room, the operational properties of the heating system, SNIPs, norms and regulations for installation, etc.
- Cast iron.
- Steel.
- Aluminum.
- Bimetallic.
Cast iron radiators

Established in the apartment radiator heating
Cast iron radiators are perhaps these long-livers in the market. A few more tens of years ago, such batteries were almost in every home and apartment. But today, despite the technical progress and the emergence of newer modern radiators, cast iron products are very popular among our compatriots. What are they so good?
It should be immediately noted that today these heating systems are significantly modified and technically improved. Therefore, speaking of advantages and disadvantages, we will focus on those radiators that are currently represented in the market. One of the main advantages of such batteries is their long service life. Manufacturers give a guarantee for at least 50 years, but with due care, this period may be doubled and even tripled. Of course, during this time, the aesthetic appearance of the heating radiator can morally, but a purely technical possibility of operation for such a long time - there!
Due to the massiveness and high heat capacity of the cast iron, these radiators are capable of retaining high temperatures for a long time after disconnecting the coolant. They are sufficiently resistant to pressure drops and an aggressive environment. But because of its massiveness and heavy weight, the installation of pig-iron batteries is a rather long and time-consuming process. In addition, they are not too different with a beautiful appearance, unless, of course, the cast iron design is not a "highlight" of the stylist concept of the interior.
Steel radiators

Steel radiator in the apartment - Photo
These products refer to new generation batteries and there are two types: panel tubular.
Steel radiators are distinguished by high heat transfer, elevated levels of energy saving, high efficiency. The design is two steel plates interconnected by welding. These products are made with two types of connectivity: side and lower. The selection depends on the initial location of the heating circuit. Their high popularity on the market causes light weight, simplicity of installation and an attractive appearance. When buying, be sure to carefully examine the coating, as it affects further operation.
Tubular radiators are a design consisting of several sections bonded with a welding. Depending on the area of \u200b\u200bthe room and the heating effect, it is necessary to calculate the power of the finished module and select the optimal size. For tubular steel batteries, excellent heat transfer, a high level of operational specifications and a low price.
One of the advantages of these radiators is also their most important minus, if you turn off the heating system - steel radiators lose their heat very quickly and on the contrary "help" the ambient temperature to cool the fluid temperature in the system. If pig-iron radiators are warm for a few more hours, their steel analogs will become cold already in 15-20 minutes.
Aluminum radiators

Aluminum battery for 10 sections
Made from aluminum alloy and painted powder enamel. Due to the high heat transfer capacity, such batteries quickly and effectively warm the room. Smooth, aesthetically attractive and lungs. They are very popular on the market today, however have a number of shortcomings.
The connection of individual sections is performed using a coupling threaded method, which makes it possible to quickly install the battery. High tightness of aluminum batteries is achieved due to the casting method. Each section is molded in a separate form, after which it is connected to one common structure.
By virtue of the chemical properties of a metal, aluminum radiators are not able to withstand a large pressure, which is often created in central heating systems. Therefore, for mounting in an apartment with a central heating system, it is better not to use these thin batteries. They are more suitable for a private house with an independently adjustable water pressure level in the system.
Bimetallic radiators

Device of bimetallic radiator
These products today occupy one of the leading positions in the market. Made of high-quality alloys, they are a double design. The outer layer of the panel is made of aluminum, which ensures ease, a magnificent appearance and high heat transfer. And the core of the structure is performed from the alloy of metals resistant to corrosion and high pressure drops.
Thus, bimetallic batteries combined the best technical solutions from steel and aluminum radiators. The only disadvantage of these products is their high cost, which, however, is justified by the duration of operation and an excellent energy-saving factor.
High technical properties and an attractive appearance allow you to use them as an easily manageable and efficient heating system for the apartment.
Another indisputable advantage can be considered the possibility of self-definition of the number of sections. Based on your needs, room area and the necessary amount of heated air, you personally can collect the radiator consisting, at least three, at least from thirty-three sections, which, naturally, is not available when cast iron or aluminum analogues are selected.
Calculation of the required number of sections

Table of calculating the number of battery sections.
After you have decided on the choice of the radiator, it is necessary to competently calculate its size. After all, even the most effective radiator will not provide heat indoors if its size is not able to heat the room.
The basic value for calculating the size of the radiator and the number of sections is the area of \u200b\u200bthe room. We offer a simplified (household) version of the amount of the number of radiator sections.
Standardly, to provide the necessary heat in the room, is enough 100 W per 1 sq. Metre square. It is pretty mathematical way to calculate:
Q \u003d S * 100, where:
Q is the necessary radiator heat transfer.
S - Room Square.
This formula will tell you what power of the radiator to take for heating the room, if the radiator is a solid unintended design. If its scheme involves increasing additional sections, then add another parameter to these calculations:
N is the required number of radiator sections.
QUS - specific thermal power of one section.
To correctly produce calculations, no higher technical education is required. Enough to take a roulette and measure the area of \u200b\u200bthe room.
Pay attention, this formula is suitable for a standard apartment with a ceiling height of 2.7 meters, if the height of your ceilings is significantly higher - we recommend double the required number of sections!
Where will we post?
Usually radiators are placed where the highest heat loss is expected in the apartment. As a rule, this is a zone under window Or from the corner wall of the house. Even if the apartment is located in a well insulated house and equipped with double-glazed windows, the window is the place where the smallest air temperature will be in the cold season.

Choosing an optimal place for the radiator
If you do not put the radiator under the window, then the cold air penetrating the outside will gradually drop down and spread across the floor. From the lessons of physics, we know that warm air is moving up. So, leaving the battery and climbing the ceiling, it will create a kind of barrier for a cold stream from the street. According to the recommendations of the SNIP, the battery size should take at least 70% of the window, otherwise the warm air will not create the desired barrier.
With too short batteries, a situation may occur when cold zones will be formed on the sides. As a result, there will be a low temperature in the room even with a powerful radiator. As you can see, not always only the battery capacity provides a comfortable microclimate in the apartment.
Installation features: Determine with the layout system
To begin with, it is necessary to decide on the wiring system of the heating system in the apartment: one-pipe or two-pipe.

One-tube sequential scheme. This is the easiest option that will allow you to quickly deal with the radiator connection scheme. The coolant consistently enters the pipe, passes through the structure of the radiator, and then returns back to the pipe.
The two-pipe option in the people is also called the "reverse". This is a parallel connection when the coolant passes on one pipe and returns, already cooled, back. At least such an option will cause some difficulties in newcomers, he has a lot of advantages:
- the room warms uniformly;
- it is possible to install the temperature temperature for each individual radiator to the thermostat.
Select the correct connection type
No less connection is also a connection type: side, lower or diagonally.

Usually the connection type is selected depending on the planning and features of the apartment.
| One of the most common options is the lateral connection that has good heat transfer, but if a long radiator has a long radiator, it may not be overheated from the edge. |
| The lower connection is advisable to choose if the pipes pass under the floor or hidden under the plinth. Nozzles are directed downwards that does not disturb the aesthetic type of battery. However, with this type of connection, heat loss can reach 15%. |
Diagonal connection - the most effective | The diagonal connection should be used if the radiator length is at least 12 sections. Here the pipe is connected to one edge of the battery, the coolant passes throughout the design, and on another pipe returns. The heat loss during diagonal connections usually does not exceed 5%. |


When the choice is made, and you have decided on the view of the radiator and the type of connection, you can start assembly.
Today, cast-iron and bimetallic batteries are most popular among the heating devices for apartments with the central heating system.
We offer in detail familiar with the instructions of each of these options that have a number of technical features.
Before starting the installation for apartments with the central heating system, it is necessary to obtain permission from the relevant authority to carry out installation work. You will have to drain the water from the batteries, which means it is pre-need to turn off the entire riser. This is a prerequisite, the failure of which threatens a serious administrative penalty. After you fill in all documents, a locksmith will come to you to pull the water to the desired floor. Of course, dismantling and installing batteries must be carried out in the inter-drink season.
Damage to the tightness of the heating system in the apartment in the heating season can lead to an accident for which you will be charged an impressive fine. In addition, you will leave the whole house without heating for a long time!
Installation of bimetallic radiators: SNiP for apartment
The market today shows a wide variety of bimetallic radiators, which differ not only in shape, size, but also by type of connection: side and lower. We offer to familiarize yourself with the detailed instructions for installing a bimetallic radiator with standard side connections.
The order of operations when measuring the heating system in the apartment with your own hands (when installing batteries in the new building, the dismantling step can be skipped):
- Disassembly of old batteries.
- Fastening brackets.
- Assembly and installation of radiators.
- Connecting to the heating system.
- Check for strength and flow.
To install bimetallic batteries, we will need the following tools and materials.
Materials:
- Set of batteries.
- Cleaner for brakes and rams (for cleaning the radiator thread).
- Brackets that are selected depending on the material of the wall. Their quantity is calculated depending on the size of the radiator itself. On a standard radiator consisting of 6-8 sections, it is necessary to take 3-4 mounts.
- Signs or adapters. These elements will allow connecting the radiator with a pipe of the heating circuit without welding.
- Fittings (valves, adapters, couplings).
- Maevsky's crane - with this part, if necessary, you can remove the accumulated air from the pipes (the so-called "convulsion").
- Temperature regulator. Allows you to control the supply of hot water into the radiator, which allows you to independently set the microclimate in the house. Of course, it is possible to do without a conventional semoretum crane, but then you will have to manually manually adjust the degree of opening of the crane, in order to avoid temperature jumps. And this, you see, not quite comfortable.
- Pacle, sealing tape.
Attention!!! The heat-tape for the radiator is installed only with a two-world connection system!
| Tools for mounting bimetal batteries | |
|---|---|
|
|


Installation of bimetallic batteries must be made in factory packaging (film). The upper layer of the radiator consists of high quality aluminum, and this material is quite fragile. It is easy to damage during the installation of work tool, so discover only those zones to which you will connect pipes and adapters.
| Installation instructions for bimetallic batteries | |
|---|---|
| Before dismantling the old battery, it is necessary to make sure that the water is merged, otherwise the accident is not avoided. Not everyone has a battery Bulgarian. If you disassembly with an electric tool, it is easy to predict the result. |
| Select a place to install the radiator. It depends on the type of connection, its length. We determine the distance of the floor battery and from the wall.
|
| We make a pencil markup on the wall, where the radiator itself will be placed. And we do not make an eye, but strictly by level. Radiators in one room must be installed at the same level. It is advisable to do from the point of view of efficiency and aesthetics. Now there are points where the brackets will be installed. Drills holes in the wall inserting a dowel. Screw the mounts (brackets). Some models are already coming with a set of fasteners complete. Depending on the length of the radiator, there may be 2 or 4. |
| Assembling radiator.
|
| Turn the assembled battery design to the brackets so that it is tightly supported at all points. There are already special brackets on the rear panel of the radiator, so it will not be difficult. Check out the degree of inclination by the construction level. If necessary, adjust the tilt of the structure. |
| Connect the radiator to the feed and discharge pipe. We produce sealing with flax (packle or seal). |
| We produce test pressure test. You can, of course, perform professional crimping. But for this you will have to call a specialist with a tool or buy an expensive device yourself. And you can enter a simpler way. Slowly open the taps so that the radiator is filled with water. If this is sharply done, a powerful hydrate age can occur, which will disturb the integrity of the structure. Check each joint, connection to leakage. |


We invite you to familiarize yourself with the detailed video instruction on the installation of a steel or bimetallic radiator in the apartment:
Step-by-step instructions for installation of cast iron batteries in the apartment
Installation of pig-iron radiators has a number of distinctive features. First of all, it is associated with the heavy weight of products that cannot be installed alone.
The method of connecting the battery with a pipe will also be different. If steel and aluminum pipes we connect with threads, gas welding will be used here. Before starting installation work, you need to stock up the necessary set of tools and materials.
| Tools for fixing cast iron batteries | |
|---|---|
|
|
|
|


Materials:
- a set of batteries of the desired size;
- sealer (flax or tape FMU);
- accessories (plugs, tees);
- maevsky's crane;
- thermostat;
- fasteners (brackets).
| Installation instructions for cast iron batteries | |
| We carry out the dismantling of the old battery. With the help of a grinder, carefully disconnect the cast-iron design, making sure that the entire system is disabled, and the remaining water from the pipes is merged. |
Before starting the installation, you must perform marking for the battery mounting
General Marking Scheme for Radiator Brackets | We define on the wall place placement of the battery in the room. By installing the radiator clearly in the center of the window, we will achieve normal and natural air circulation indoors.
|
Mount the brackets and install the battery on them | Install brackets into the wall.
|
| We start connecting the radiator to the heating system.
|
| We carry out the installation test. We gradually unscrew the crane and run water. It is necessary to do this slowly, without giving a powerful stream of water to immediately fill the radiator, in order to avoid the hydrowood. |


In conclusion, we want to offer you in detail to familiarize yourself with the video instruction on the installation of radiators with your own hands so that you can clearly see some features of the installation.
The correct installation of the radiator in the apartment is a guarantee of the effective work of the heating system and comfort in the house. Therefore, strictly follow the rules of this instruction and you will definitely work out.
Installing a cast-iron radiator with your own hands - video process from A to Z
Home / Radiators / How to establish a bimetallic heating radiator with your own hands
Each house or apartment needs heating. Sometimes the main element of heating is obsolete or deteriorated, it has to be replaced with a new one. You need to approach the choice of heating equipment. Basically, modern radiators are made from such materials as: aluminum and steel. Bimetallic radiators have both metal in their composition. How to install a bimetallic radiator with your own hands? This is easy, the main thing is to carefully fulfill all the items of the instructions.
Advantages of bimetallic radiators
Bimetallic radiators are in great demand. They successfully replace old cast iron batteries, have an attractive design and differ in economy. True, they are more expensive than aluminum batteries.
Bimetallic heating radiator
The peculiarity of this type of batteries is the presence of two different metals in their composition. The core is made of steel (copper), and the body is made of aluminum.
The advantages of bimetallic radiators include:
- durability (may be stopped for more than 20 years);
- ability to withstand high hot water pressure (up to 30 atmospheres);
- strength, resistance to various mechanical stress (shocks, scratches);
- a small mid-scene distance, which is manifested in a more efficient heating of the room:
- resistance to corrosion;
- high heat transfer;
- stylish appearance.
Thanks to its advantages, bimetallic batteries are used both in private houses and in multi-unit with central heating.
Vacation home
Some bimetallic radiators differ in price. In cheap models, with simultaneous heating of both metals, noise arises due to the fact that they are expanding differently. The expensive models are equipped with a special polymer coating that mitches this sound.
When buying a radiator, you will have to consider the diameter of the supply pipes that will join it.
Calculation of the number of necessary sections
In order for the radiator completely warmed the room in which it was installed, and did not spend an excessive amount of thermal energy, it is necessary to calculate the optimal number of sections. To do this, you need to know the power of the device (it is indicated in its technical passport) and the area of \u200b\u200bthe room (calculated by multiplying the length on its width).

Calculation of the area of \u200b\u200bthe house
The power of each battery section is measured in watts. In accordance with the construction standards per 1 sq.m. It is necessary to 100 W power of the heating device. This digit (100W) is divided into the power of one battery section. The resulting value is multiplied by the room area.
This is how this formula looks like:
- S * 100 / P
- S - Room Square;
- P is the power of one section.
For example, 5x4 meters room parameters. Its area is 20 sq.m. Let one battery selection possesses a capacity of 250 W. It turns out: 20 * 100/250 \u003d 8
This means that the heating of this room will require a battery with 8 sections. If the number is not solid (for example, 8.5), then it is necessary to round it up to a larger value (up to 9).

Battery of 8 sections
But in the apartment with displeasted walls or blurred window processes, the number of sections may not be enough for high-quality heating.
If there are more than 10 sections for heating the room, it is recommended not to combine them into one radiator, but to put two separate batteries. So the heating of the room will be more effective.

Two batteries of 5 sections
Basic battery installation rules
Before you know how to properly install a bimetallic heating radiator, you need to learn about important conditions that are taken into account when installing it. Regardless of the type of battery, in order to provide normal heat exchange and circulation of air indoors, such rules should be followed:
- The radiator should be placed under the window opening center. Its upper lattice should be located at a distance of 5-10 cm from the windowsill.
- Between the lower part of the heating element and the floor, the distance is 8-10 cm.
- The distance between the radiator and the wall must be 2-5 cm.

Distance between the wall and the radiator
All this will have to take into account not only when installing the battery, but also when it acquisitions, as they are of different heights.
If reflective thermal insulation is installed on the wall behind the radiator, which comes in the kit are likely to turn out to be short. It will be necessary to purchase longer retainers.
Battery installation occurs clearly in a horizontal position. It is recommended in each room at home (apartments) to install batteries in the same place.

Installation of the battery
Installing a bimetallic radiator with your own hands
How to install a bimetallic radiator? Each battery is attached instructions from the manufacturer. In accordance with this instruction, its installation should be carried out.
The most reliable option is to entrust the battery installation by a qualified technician, checking the presence of a license for such a type of work. If you wish to install the radiator with your own hands. To do this, you need to adhere to step-by-step instructions.

Installation of battery master
Before installation, the radiator washed. Do not use alkaline tools and abrasive materials. They can damage the surface of the pipe and lead to fluid leakage.
Preparatory stage
Battery installation should be carried out in the summer season. Before starting work, you should make sure that there are no fluid in the pipes, or overlapping it at the entrance and outlet of the heating system.

Installing the battery in the summer
First you need to dismantle the old radiator and prepare a place to install a new one.
Be sure to check the completeness of the battery. It is usually purchased in the already assembled state, but if it is not so, then it is necessary to assemble it yourself. The assembly occurs in accordance with the instruction of the developer using a special radiator key.
Attention! In bimetallic radiators applies left-sided and right-hand thread.

Left-sided and right-hand thread
In order not to contaminate the valve intended for air output, the filter is placed on the feed pipe.
Montage of radiator
The battery installation occurs according to the following plan:
- Marking on the wall of the place to attach brackets. They should be located between the battery sections.
- Fastening brackets. The mounting method depends on the wall material of the wall to which the battery is installed. On the wall of brick or reinforced concrete, the brackets are fastened with the help of dowels or fixed with cement mortar, and on the surface of drywall - double-sided fastening.
- Installing the radiator on the fixed brackets. The correctness of its position is verified using a construction level.
- Attaching the battery to the pipes.
- Installing the crane or thermostatistical valve.
- Installation of the air valve (recommended automatic, for example, Maevsky's crane) at the top of the heating device.
Very important! The air valve is mandatory, as gas formation occurs inside the battery.

Battery Air Valve
Upon completion of the installation, the system is turned on. All cranes are open smoothly. Too sharp opening of the valves can lead to hydrodynamic impact.
After opening cranes, you need to lower the air through the crane of Maevsky. If you have to slow down too often, this may indicate a malfunction - a violation of the tightness of the battery or heating boiler.
If you cover the heating radiator by any decorative element - screen, screen, curtain, or box, this will lead to a decrease in heat transfer. And if sensors are installed on the battery, automatically regulating the heating force, they will respond to a change in temperature not in the room itself, but under the screen.

Battery Temperature Sensors
When operating the heating system, you need to be guided by the following rules:
- Cleaning the battery twice a year - before the start and after the end of the heating season.
- Fully merge fluid from the heating system can be maximum for 14 days.
- It is forbidden to sharply open the shut-off valves.
- You can not paint the hole from which the air leaves.

Cleaning the battery
Knowing how to establish a bimetallic heating radiator with your own hands, you can save on the payment of a specialist. The main thing is to adhere to the rules of battery mounting and the developer instructions. If the battery is installed correctly, and during its operation, all the necessary conditions are observed, it will last long.
Photo Gallery (13 photos)
gopb.ru.
Installation of bimetallic heating radiators with their own hands
Bimetallic radiators are rapidly gaining popularity among buyers. By consumer characteristics, they largely exceed the cast-iron, and are approximately one level with aluminum batteries. At the same time, aluminum radiators are not resistant to pressure drops in apartment buildings, and therefore bimetallic devices are the best choice. This article is dedicated to the installation of bimetallic heating radiators.

Bimetallic radiators according to characteristics are superior to cast-iron, and are approximately one level with aluminum batteries.
Bimetallic batteries have a number of important advantages:
- long service life - about two dozen years;
- high level of heat recoil;
- resistance to hydrodynamic and mechanical impacts;
- attractive appearance;
- anti-corrosion resistance;
- fast response If necessary, change the temperature achieved through the use of channels with a small diameter.
The main disadvantage of the bimetal is the high cost of devices.
The installation of the radiator with its own hands is possible, but will require an understanding of their design features, and preferably some practical skills.
The beamatal heater includes two main elements: aluminum housing and steel (or copper) core.
There are two types of radiators:
- fully bimetallic devices, where the core is pipes for the transfer of the coolant, which does not contact with the material of the case;
- partly bimetallic devices, where the internal channels are equipped with plates from a different metal.
Fully bimetallic batteries are more durable in relation to both mechanical and hydrodynamic effects, and accordingly, more durable.
Calculation of the number of sections
To calculate the right number of sections, a number of factors need to take into account. First of all, you need to know the power of the battery and the area of \u200b\u200bthe room. There are also more complex calculation techniques where additional parameters are taken into account (for example, a non-standard ceilings height, the number of windows and doors, the number of external walls, etc.).

Before installing the radiator, you must calculate the number of sections
The simplest formula for calculating the number of sections looks like this:
number of sections \u003d area of \u200b\u200bthe room X 100 / Battery power.
Standard ceiling height is considered to be a value of 2 meters 70 centimeters.
If there is a 12-meter room and radiators with 180 watts sections, then the formula will look like this:
12 x 100/180 \u003d 6.66.
The resulting value is rounded in the most side and as a result we find out that 7 sections are needed for the heating of the room.
Installation of bimetallic battery
Installation of the heating device with their own hands is carried out according to the instructions set out in the equipment passport.
Note! Installing all the components of the heating system are made in plastic equipment packaging and is not removed until the end of the installation.
Construction regulations
The installation of bimetallic devices should be carried out in accordance with the instructions of the construction norms and rules (SNiP). Specific requirements are set in section 3.05.01-85.

Requirements for the installation of bimetallic radiators
When installation work, you must follow such parameters:
- The distance from the wall is 30-50 millimeters. If the device is too close to the wall, the rear surface of the battery will irrationally distribute thermal energy.
- Floor distances - 100 millimeters. If the radiator is set below, the efficiency of heat exchange will decrease, and the process of cleaning the floor under the battery will find it difficult. Also, the radiator cannot be placed too high, because in this case the temperatures are too differentiated at the top and bottom of the room.
- Distance from the window sill - 80-120 millimeters. If you make a gap too small, the heat flux from the heating device will drop.
Mounting order
The installation of bimetallic batteries should be carried out in a specific sequence:
- we place places to install brackets on the wall;
- brackets fix with dowels and cement mortar (when it comes to reinforced concrete or brick wall) or double-sided mounting (if it is a plasterboard partition);
- we put the battery strictly horizontally on the brackets installed already;
- connect the radiator to the pipes, set the crane or thermostatic valve;
- we put the air valve at the top of the radiator.
Note! The air valve (best automatic) is required to be installed, since a small formation of gases occurs inside the device.
- Before starting work, it is necessary to overlap the flow of the coolant in the heating system at the inlet and outlet or make sure that there is no liquid in the pipeline.
- Even before the installation starts, you need to check the package of the radiator. It must be in the assembled state. If this is not the case, take the radiator key and collect the battery according to the manufacturer's instructions.
- The design must be absolutely hermetic, so during the assembly it is impossible to use abrasive materials, since they destroy the material material.
- Tightening fasteners do not need to forget that in bimetallic devices is used both left-sided and right-hand thread.
- When connecting sanitary fittings, it is imperative to correctly choose the material. It is usually used lynch along with thermally resistant sealant, FUM tape (fluoroplastic sealing material) or Tangit thread.
- Before starting the mounting work, you need to carefully plan the connection scheme. Batteries can be connected in diagonal, side or lower diagram. In the single-tube system, it is rational to install bypass, that is, a pipe that allows you to function normally to function with a sequential connection of the batteries.
- After the installation is completed, the system is turned on. You need to do it smoothly opening all the valves that previously blocked the path to the coolant. Too sharp discovery of crants leads to clogging of the inner pipe section or hydrodynamic shocks.
- Following the opening of the valves, it is necessary to lower the excess air through the air vent (for example, Maevsky's crane).
Note! You can not overlap battery screens or put them in a wall niches. This sharply reduces the heat transfer of equipment.
Properly installed bimetallic heating radiators - the key to their long and trouble-free operation. If there are doubts about the ability to install them with your own hands, it is better to refer to specialists.
klivent.biz
Installation of bimetallic radiators do it yourself
The update of the heating system in both a private house and in its own apartment is impossible without replacing old cast-iron batteries to more practical and modern devices.
One of the successful solutions is considered to install bimetallic radiators with their own hands. Their neat appearance will fit into any interior, and high heat transfer rates will bring the long-awaited atmosphere of comfort.
The scheme of this heating system is quite simple: the design consists of the radiators themselves and the steel pipes adjacent to them, the sections of which are processed by means of point welding.
Installation of bimetallic heating radiators does not require large destruction and is carried out quite carefully.
Basic rules for the installation of bimetallic radiators in the house
Any inept intervention in the heating system may have a pernicious way to affect its further work and quality heating of premises.
Therefore, before performing the main stages of work, it is necessary to familiarize themselves with a number of rules and adhere to them in the future.
What you need to remember the novice craftsman, decided to establish a bimetallic radiator with his own hands?
- The optimal distance from the floor to the lower part of the radiator is at least 60-70 mm and not more than 100-120 mm to maintain high heat exchange;
- The upper part of the radiator should be located at a distance of 50-60 mm from the edge of the windowsill, in order to improve convection and facilitate the process of installing equipment;
- The radiator is recommended to be located in the center of the window;
- The equipment is installed in a strictly horizontal position;
- Heating elements should be installed at one level within each room.
The established bimetallic radiator is prohibited to process with metal coatings, since the additional layer of paint can disrupt the thermostat operation and reduce heat exchange rates by an average of 10%.
In addition, abrasive substances cannot be used to clean the device.
How to install a bimetallic radiator
 The replacement of old batteries to new bimetallic devices can be carried out on their own in the presence of knowledge sufficient for this work.
Installation of the heating system is carried out in several stages.
First, the master should dismantle the old heating radiators and carefully prepare the working area: outline a place to install a new heating device and drilling holes for the brackets.
The support part is fixed on the wall using a dowel or close to cement mortar.
On this, the installation of a bimetallic radiator has not yet been completed. The equipment is equipped with shut-off reinforcement and jumper, and then the heating system pipelines are mounted.
Each radiator is necessarily equipped with an air valve. This item is necessary to remove excess air filling from the system.
In the process of filling the system by the coolant, the stabilizing crane must be closed on 2/3 in order to prevent hydraulic stroke.
At the end of the installation of the bimetallic radiator, the first test of structures is carried out. Do not forget to carefully clean the radiator and remove the remnants of OL and contaminants from the body.
As the system is used, it is also necessary to comply with a number of rules and adhere to some recommendations:
- Purification of the radiator is carried out 1-2 times a year - at the beginning and during the heating season;
- A complete drainage of the coolant from the heating system is permissible only for a period of no more than 2 weeks;
- It is prohibited to a sharp opening of shut-off valves;
- Not allowing the staining of the air hole;
- Some heating systems are advisable to equip special pumps or closed expansion tanks.
Qualitatively performed works on the installation of bimetallic radiators with their own hands and successfully conducted tests will become the key to the long and reliable operation of the entire heating system.
A successful example of the installation of bimetallic radiators can be clearly viewed on the video.
Comfortable air temperature inside residential premises provide a variety of heating systems. The basis of the overwhelming majority of heating concepts make up special heat transfer devices, in everyday life called batteries. Their installation can be carried out personally, if you know the nuances of work.
We have collected and systematized all the information about the options and methods of connection. Taking into account our recommendations, the installation of heating batteries will be carried out without the slightest difficulties. Without problems with her, all readers will be cited by our article.
A detailed description of the options and technology of connection is complemented by visual schemes, photo selection, video instructions.
To understand which batteries are needed, initial knowledge of the modes and conditions of the heating devices will help.
Below is the conducive sets information about the important parameters of the heating systems when choosing batteries:
1. Internally pressure. The value required for the competent choice of the instrument capable of withstanding the pressure in the heating circuit:
- Private house (autonomous) \u003d 1.5-2 atm.
- Private house (centralized) \u003d 2-4 atm.
- 5-storey house (centralized and autonomous) \u003d 2-4 atm.
- 9-storey house (centralized and autonomous) \u003d 5-7 atm.
- House over 9 floors (autonomous) \u003d 5-7 atm.
- House over 9 floors (centralized) \u003d 7-10 atm.
If the technical capabilities of the battery below are the likelihood of depressurization of the device with other negative consequences.
2. Permissible heating temperature. Characteristic, denoting the upper temperature limit, when the battery is exceeded, may fail:
- Autonomous \u003d up to 90 ° C.
- Centralized with plastic wiring \u003d up to 90 ° C.
- Centralized with steel wiring \u003d up to 95⁰s.
Operation with a violation of the temperature regime leads to plating seals, deformation and loss of tightness of the device.
3. The degree of contamination of the coolant.The parameter of which is most commonly owned by the owners and water supply:
- Autonomous Private House \u003d High, Middle, Low When installing filters.
- Autonomous multi-storey house \u003d high, medium, title when installing a filter system.
- Centralized \u003d low, in rare cases average.
Water supplied by centralized networks into the utility systems of heating undergoes comprehensive cleaning. The content of sand and clay suspension in the water produced from private wells, wells, open sources may exceed the allowable limit.
Traditional battery installation sites
For further selection of battery designs, it is required to determine the points. Place them in places of the greatest penetration of the cold. So come to minimize the effect of drafts on the microclimate of the premises. They are still focusing to guarantee accessibility to periodically.
Battery mounted on the bottom create a heat curtain in rooms with panoramic windows, for example, on verandahs
Battery location zones:
- Window niches. The most common location of heating devices.
- Extended interconnect spaces. One of the popular additional options.
- Corners and "blind" walls of angular rooms. It is used to enhance the heating of rooms with increased heat loss due to the intensive impact of winds.
- Bathrooms, pantry, bathrooms, one or two sides of which are combined with a capital carrier wall.
- Unheated entrances, hallways of private houses.
- Apartment corridors of the first floors of high-rise buildings.
The modern performances of heating devices fit under the balcony door or the entrance to the loggia.
An example of the location of heating radiators in the same house:
Gallery of images
The most popular and rational arrangement of the heating radiator - under the window, behind the protective decorative screen
If the location under the window is busy, you can suspend the radiator to the adjacent wall in the immediate vicinity of the window
An ordinary heating radiator with difficulty fits into the interior of the bedroom. Exit from the position - Falish Standard or locker
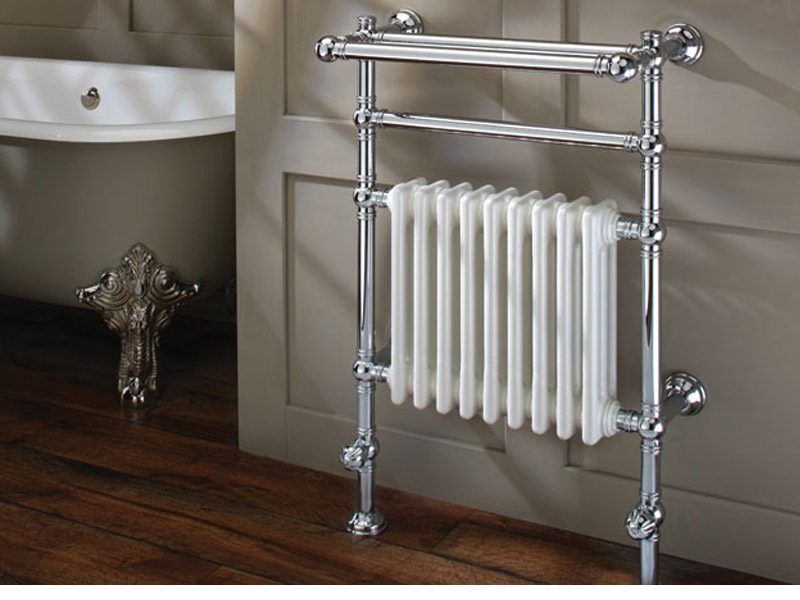
In the bathroom, the heating device performs an additional function of the heated towel rail, so it is often distinguished by the design
Traditional battery location in the living room
How to place a radiator in the children's room
Installation of the battery in the cabinet
Installation of the radiator-dryer in the bathroom
Constructive specificity of heating devices
Constructive batteries are divided into groups, these are radiators, convectors and registers.
Review of sought-after heating devices
The radiator is the most common appearance. This is a heating device consisting of vertical individual compartments sections. In classic collapsible products section - independent work items. They are joined in the required quantity using threaded internal connections. This assembly scheme gives batteries versatility.
Before installing, it is possible to comply with the heating radiator, it is required to calculate in accordance with the necessary thermal power. According to calculations, the number of sections of national batteries is selected. Horizontal cavities of radiators obtained by connecting sections are called manifolds. Top and bottom.
Modern technologies have mastered the manufacture of less universal, but more reliable non-separable radiators with the use of welding and solid casting methods. They do not have joints and seals characteristic of collapsible radiators. Design - for every taste.
Convector - a solid heating device from a tubular or strip heat exchanger with rows of heat sinks. Convectors are available in the following versions:
- Wall.
- Outdoor (channel)
- Plinth.
The register is an unintended heating device from straight smooth horizontal pipes, compounded and combined in a certain way.
Details of the varieties of radiators
Radiators differ by the material used for their manufacture.
Within one variety, different design solutions may be present, sometimes unexpectedly original
The heating instrument market can offer:
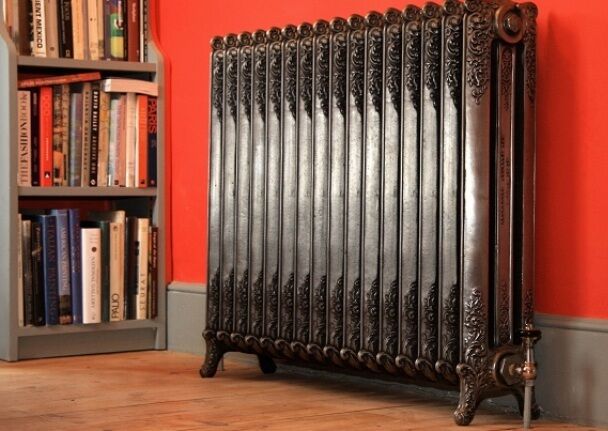
- Radiators cast iron. The genericants of the batteries of this group. Relatively inexpensive. Hold each of the modes of operation. Serve up to 50 years. The main disadvantage - have a lot of weight, which, however, helps for a long time to retain heat when the heating is turned off.
- Radiators steel.Such batteries are structures from steel pipes. They work in all conditions, but less durable cast-iron fellows. Possess low heat transfer.
- Aluminum radiators.Made of light aesthetic material, these batteries give heat better than all. They are racks to all working temperatures, but are afraid of hydrowarders. Aluminum is very demanding for the quality of the coolant.
- Bimetallic radiators.Steel insides, clothed in aluminum, all says it. The main characteristics, like steel, heat transfer - almost like aluminum. Price - bites.
- Copper radiators.This is "eternal" radiators of warmth at least for what premises. The only and most essential minus is the ultrahigh cost.
- Radiators plastic.Innovation in the family of radiators. While they are suitable only for autonomous heating systems of private houses with a coolant, heated no more than 80 ° C.
The most sensitive to the operating conditions. These radiators reliably serve only 15 years. Their use is possible only in autonomous heating systems.
Externally popular models of radiators from different materials are similar:
Gallery of images
The traditional view of the radiator, which rightly served our grandparents. The stylized new new models came to replace the old models
Steel radiators are distinguished by a long service life and resistance to heat carrier characteristics.
A small weight is a truly important advantage of aluminum, especially if the heating device must be installed on a relatively weak support
Cast iron heating radiator
Heating device made of steel
Light Aluminum Battery
Heating radiator from copper
Characteristics of convector species
Convectors are significantly inferior in heat transfer radiators, but in some cases successfully complement or replace them:
1. Convectors wall mounted.The batteries in this design are usually made of steel, so cheap. They are unstable to hydrowards, and their use in centralized heating systems is undesirable.
The convectors are decorated like panels like closed radiators, very pretty, fit perfectly into the interiors of any plan.
But those made in the form of pipes, tidying plates - such batteries are suitable only for installation in the utility rooms.
2. Floor convectors (channel).An excellent solution for creating a heat curtain near the door of a balcony or loggia. Made of durable corrosion-resistant materials, they are unpretentious to the requirements of operation.
3. Plinth convectors.Capable to work in all conditions and modes, these batteries are not suitable for creating a microclimate where all other heaters will look cumbersome.
The plinth type is appropriate in the bathrooms and storage rooms adjacent to cold street walls and unheated entrances.
Brief description of heating registers
Sometime, the batteries of this group were made by hand using conventional welding. Registers can be applied in any heating systems, but due to its noncainting appearance, mainly used in the auxiliary rooms: garages, storage rooms, basements. Sometimes they can be seen in the entrances of old high-rise buildings.
Modern manufacturers "put an eye" on this group of heating devices.
Brilliant chrome metal registers can decorate the design repair of any residential space
Calculation of the thermal power of the batteries
The stage of pre-selection of batteries is completed, one can move to the calculation of thermal power required from them. The basis of calculations is taken by the relative power of 100 W for heating 1 m² of the regulatory room.
The full formula includes many correction coefficients and looks like this:
Q \u003d (100 x s) x r x k x u x t x h x W x g x x x y x z,
S. \u003d Square heated room, where:
R. - an additional parameter for the East oriented rooms or north \u003d 1.1;
K. - amendment for external walls in the room:
one \u003d 1.0;
two \u003d 1.2;
three \u003d 1.3;
four \u003d 1.4;
U. - The warming coefficient of street walls:
low \u003d 1.27 (without insulation);
average \u003d 1.0 (plaster, surface thermal insulation);
high \u003d 0.85 (insulation made by specialist);
T. - Weather indicator of the smallest temperature period in ⁰c:
up to -10 \u003d 0.7;
up to -15 \u003d 0.9;
up to -20 \u003d 1.0;
up to -25 \u003d 1.1;
to -35 \u003d 1.3;
below -35 \u003d 1.5;
H. - Ceiling height index in meters:
up to 2.7 \u003d 1.0;
up to 3 \u003d 1.05;
up to 3.5 \u003d 1.1;
up to 4 \u003d 1.15;
W. - Characteristics of the room located above:
unheard and displeased \u003d 1.0 (cold attic);
unheard, but insulated \u003d 0.9 (attic with a warmed roof);
heated \u003d 0.8.
G. - The degree of quality of windows:
serial wooden frames \u003d 1.27;
Frames with double-glazed windows single \u003d 1.0;
Ramas with double-glazed windows double \u003d 0.85;
X. - The ratio of window openings to the square of the room:
up to 0.1 \u003d 0.8;
up to 0.2 \u003d 0.9;
up to 0.3 \u003d 1.0;
up to 0.4 \u003d 1.1;
up to 0.5 \u003d 1.2;
Y. - The value of the battery surface openness:
fully open \u003d 0.9;
covered with windowsill \u003d 1.0;
Challenged with a horizontal protrusion of the wall \u003d 1.07;
covered with windowsill and frontal casing \u003d 1.12;
Fried from all sides \u003d 1.2;
Z. - battery connection efficiency (1.0 ÷ 1.13; For more details, see Drug below).
The calculated value must be multiplied by the conditional coefficient of 1.15. It will provide some heat supply to be able to more accurately adjust the devices to work in low-temperature mode.
Effective connection methods
Before continuing the study, how to choose, install and connect heating radiators and other heating devices, it is necessary to consider the two main types of pipe wiring of existing heating systems. They differ in the principles of organizing the coolant in batteries and return it to the system.
In practice, the pipe serving heat is called "feed". The pipe that returns the coolant is "reverse". Vertical pipe layout (feed or reverse) is called "riser".
In single-tube heating systems, the coolant is applied unevenly. In the distance from the boiler, the devices he will arrive, there are already somewhat cooling. Therefore, one-tube contours have limitations on the length
Traditional wiring options:
- One-tube. The wiring is arranged in such a way that one pipe is played by the role of filing and returning. The batteries in it are "crashing" sequentially. The coolant is bypassing the heating devices in order to connect them.
- Two-pipe. In a two-pipe wiring one pipe - feed, the other is the return. With this option, the battery heating devices are attached simultaneously to both pipes, parallel to each other. The coolant circulates on all batteries at the same time.
The "z" coefficient in the formula for calculating thermal power depends on the options for connecting heating devices.
The most widely used in practice methods of connecting:
Method number 1. Diagonally. Z \u003d 1.0.
Such a connection order is the most efficient, especially if the heating system works badly. The coolant enters the battery on one side from above, passes through the entire inner cavity and goes from below on the other side.
Thermal energy is transmitted to the entire surface of the heating device. For radiators longer than 12 sections, this method is recommended ultimately.
Method number 2. From the side (from above - input, bottom - output). Z \u003d 1.03.
Until recently, the most common intake of battery connection. It is convenient when installing due to the low length of connections.
For radiators up to 12 sections, almost not inferior by heat transfer to the diagonal method of connection. But this is in the existing operating heating systems. If the systems are functioning sluggish, the hot heat carrier will not reach the finite compartments of radiators.
Method number 3. Bottom from two sides. Z \u003d 1,13.
Despite the smallest efficiency, this connection method quickly arrived in new construction, thanks to plastic pipes. The wiring of heating systems are mounted in the floor, and do not drench the design of the premises. With proper heating systems, all parts of the batteries receive a uniform heating.
The final stage of the choice of batteries
The final stage of choice is based on the obtained results of the power required from heating devices.
The finished one-piece structures of radiators, convectors or registers are selected during the purchase.
From the factory passports of products you can see data about their thermal power. When purchasing batteries, the features of the installation locations are taken into account (for example, possible dimensions of the device).
Inspection radiators and registers with individual parameters, specialized organizations are made under the order. Collapsible radiators should be viewed by the number of sections, relying on their total thermal power.
Approximate separate power of standard 500 mm sections from different materials (Watt with a heat carrier in 70⁰С):
Cast iron \u003d 160;
Steel tubular \u003d 85;
Aluminum \u003d 200;
Bimetallic \u003d 180.
Power of collapsible radiators is regulated by attaching additional or disconnecting unnecessary sections.
When choosing batteries of various structures for one room, it is more correct to start their selection from non-separable products.
It is also proposed to be installed between the battery and the outer wall of the heat transfer screen. For its manufacture, you can pay attention to the modern heat-reflecting materials of the Izospan, foam, aluof.
The air vent - a small size device embedded in that part of the battery where air accumulation is possible. For collapsible radiators - this is a threaded hole in the end of the upper manifold opposite to the supply of the feed pipe
When fixing the heating devices, their deviation from the horizontal level is not allowed. It is allowed to lift up to 1 cm. Side with an air vent for better collection and out of air.
When connecting the heating devices to systems with risers, the centers of the inlet batteries must be not higher than the centers of taps from the feed pipes. If, when connected to the stands, it is assumed to equip heat nodes with cranes or instruments to adjust the temperature, in one-tube heating systems are additionally necessary in their absence.
Bypass is a jumper parallel to the battery connection. This element allows you to organize the management of the heating device. It is a pipe segment connecting the input and output of the battery. The diameter of the jumper pipe should be one standard size than the rising pipe. In two-pipe heating systems, the bypass installation is required.
Due to the highly different coefficients of the expansion of materials, it is not recommended to connect batteries with a plastic liner to a wiring of steel pipes. Conversely, the main plastic wiring excludes the transition to the steel parts of the attachment.
Prior to the end of the installation, it is desirable to pack the packaging shell with the batteries of steel, aluminum and bimetallic not to remove to avoid their mechanical damage.
Preparation of collapsible radiators for installation
If the acquired collapsible batteries do not have the calculated parameters, it should be finalized by disconnecting the extra sections or adding to the desired amount. Between Radiators compartments are tightened with the help of plumbing nipples through round sealing gaskets.
Nipple - short thick-walled tube with outdoor thread. Half - right, half - left. Inside the tube along the entire length there are two opposite longitudinal technological protrusions.
The radiator key can be replaced with a chisel of a suitable length, with a width of sting, sufficient for a confident nipple protrusions. The role of the voice will play the adjustable pipe key.
In the design of the collapsible radiator there is a left thread.
For proper perception of the direction of rotation, unscrewed or spinning nipples is recommended by inserting a key or chisel into the holes of the sections where the thread right. To avoid disconsets of parts, the holes must be alternate through the turnover of another tool.
Fastening collapsible radiators
Radiators collapsible are hung on special brackets. The most reliable arcuate hooks mounted in the capital walls of the premises. This should ensure distances:
From the floor \u003d 6-12 cm, sufficient for cleaning and heating the bottom of the wall,
to the windowsill at least 7 cm to ensure effective convection,
From the heat refrigerant screen or from the wall \u003d 3-5 cm.
Brackets are mounted in such a way as to fall into the intersection space of radiators. For an uncommitable rule, when hanging the batteries, end traffic jams with right thread should be on the right, with left-threads - left.
Marking for hooks is performed in the following order:
- The vertical line of the axial center of the radiator draws the vertical line (when installing the battery under the window, most often is its center) no less than the height of the battery.
- The distance between the intervals of the first second section of the radiator and the latter-penultimate is measured.
- A horizontal line is carried out corresponding to the center of the upper collector of the radiator, a length of at least measured distance (taking into account the general tips set out above).
- The distance itself is deposited to the right and left on the horizontal line spelled symmetrically relative to the axial center line. The two points obtained are the places for the upper hooks. They will keep the weight of the design.
- From the point of intersection of the lines of the horizontal and the axial center vertically, the distance is postponed equal to the intercentrose collector distance (standard is 500 mm).
- Through the intended point, a horizontal line is carried out corresponding to the center of the lower collector of the radiator.
- The distance measured in paragraph 2 is deposited to the right-left on the horizontal line spelled symmetrically relative to the axial center line. The two points obtained are places for lower hooks. They will provide immobility of the design.
- In the outlined points, the holes under the dowels are drilled in which the brackets with carvings are wrapped up or hooks with smooth rods are clogged.
The drilling process is described for cast iron and bimetallic heating devices that have no more than 10 sections, and aluminum radiators consisting of no more than 12 sections. With a larger battery size in the area of \u200b\u200bthe center from above and below, you should add a hook.
Fastening at the place of indisidated species
Brackets for installing non-separable radiators are usually included in the product package. The sequence of marking points of fastening brackets for hanging these batteries is described in the attached installation scheme. The procedure for action is reminiscent of collapsible radiators.
The choice of brackets to secure convectors is diverse. It is due to the location of the heating device.
Brackets convectors hold on the walls, fixed on the floor, suspended from below to the windowsill
By analogy with collapsible radiators, mounted on arcuate hooks, motionlessly sealed in the walls. The total number of brackets is standard equal to four (two - hold the top pipe, two are lower). For nongendry registers, it is possible to use holders for pipes of the corresponding diameter with clamps.
Connecting batteries to heating systems
In connection operations, it is desirable to use a dynamometer tool. The necessary tightening efforts are spelled out in passports of acquired heating devices. To create tightness of threaded compounds, the fluoroplastic sealing material will be needed, a shortly called "FUM Ribbon", and Plumbing Flax.
If the battery connections with the wiring of the heating system are carried out by plastic lining, will additionally be needed:
- The apparatus of welding polypropylene parts.
- Or crimping device for metalplastic pipes.
When solving the heating of batteries, cranes or thermostatic instruments are purchased. Some finished designs are immediately equipped with built-in thermostators.
The required amount of the pipe for eyeliner, the configuration of the connecting parts (fittings) depend on the options for connecting to the heating system and are found out after fixing the batteries at the place. Connection receptions "diagonally", "from the side" or "from the bottom of two sides" are determined at the stage of calculating the thermal power of the installed
High-quality heating is the key to a favorable climate in the house and lack of cold weather even in the strongest frost. Because if you have an old and non-efficient radiator in your apartment or cottage, it is worth replacing it. At first glance, it seems very difficult work available only to specialists with significant experience. But with due respect to the case and the availability of some tools, installing heating batteries with their own hands does not represent a serious problem.
Battery Location Rules and Connection Schemes
In addition to the characteristics, one of the factors affecting the effectiveness of the heating system is the choice of the right place to locate the product. True, in most cases it is predetermined in advance - the new battery is likely to stand on the place of the old cast-iron, which was since the construction of the building. But still we give several recommendations for the competent placement of the radiator.

First, it is advisable to have a battery under the window. The fact is that it is a "bridge", through which the cold from the street falls into the apartment or cottage. The presence of a radiator under the window forms a peculiar "thermal veil" that prevents the process described above. At the same time, the battery should be placed strictly in the middle of the window, and, it is desirable to occupy up to 70-80% of its width. What is and how to install it, you can look at our page.
Secondly, from the floor to the radiator should be at least 80-120 mm. If less, it will be uncomfortable to remove under the battery, a huge amount of dust and garbage will be accumulated. And if the radiator is set above - a certain amount of cold air will be collected under it, which requires warming up and as a result of this worsens the work of the heating system. In addition, negatively affects the efficiency of the battery too small distance to the windowsill.
Thirdly, the distance from 2.5-3 cm is allowed between the rear part of the radiator and the wall. If it is less - the processes of convection and movement of the flow of warm air, and, as a result, the battery works less efficiently and spends part of the heat in vain.

Table. Standard heating battery connection schemes.
| Name | Description |
|---|---|
| Due to the specifics of the location of risers of heating systems in residential buildings, such a diagram of connecting batteries is the most common. It is quite easy to implement, the efficiency of the radiator is average. The main disadvantages of this method of connecting are visible pipes and inability to batteries with a large number of sections. |
| The second prevalence scheme for connecting radiators. The main advantage is uniform circulation of water throughout the battery, and, as a result, high efficiency of work. |
| Such a scheme is often used in country houses - many hosts of cottages prefer to hide the heating communications under the floor so that they do not spoil the appearance of the room. But at the same time, the lower connection of the radiator is 12-15% less efficient than the diagonal. |


Video - Replacing heating radiators in winter
Installing the heating battery with your own hands - Step-by-step instructions
Consider the installation process of the bimetallic battery connected by a side method to a single-tube heating system. It is worth saying that in this case the work was carried out in the building, where the temperature in radiators was relatively low, because the eyeliner and bypass are made of metal-plastic pipes. Before starting an independent battery installation, see the device and characteristics of the heating system at home. It is possible for your apartment or cottage connecting pipes need to be made from materials with greater resistance to high temperatures.

We split the process of installing the heating battery with your own hands into several separate stages:
- dismantling of an old radiator;
- installation of a new bypass and shut-off reinforcement;
- installing the battery and connect it to the eyeliner.
Preparation for work. Dismantling old battery
The installation of the heating battery is begins with their own hands from the preparation of the tool and dismantling the old radiator. In this example, we will talk about the standard product from the cast iron, which still warms many apartments. How are installed You can read in our article.
Step 1. Bring home a new battery. Unpack it, check the completeness - if you bought, in place. Also inspect the radiator itself - whether it does not have any damage or defects.

Step 2. Cut the packaging from under the new battery into two equal parts. Use one as a substrate for the radiator - so you do not scratch it about the floor covering. Will the second part of the packaging for the heating riser - when dismantling with the help of a grinder, a cardboard sheet will protect the wall from pollution.


Step 3. Prepare everything that needs to dismantle the old and installing new radiator - fittings, cranes, pipes, tools. Determine for yourself what and where it should be - the search for the necessary for installation, but the things lost among disorder can significantly slow down the work on replacing the battery.

Step 4. Remove the three-way crane connecting the heating riser, bypass and eyeliner. To begin with, loosen it with an adjustable key. If water starts dripping - immediately tighten everything back - most likely, the riser was not blocked properly. And if everything is in order - work on the dismantling of the crane further.


Step 5. Next, disconnect the old battery and tilt from the riser. First, unscrew the nut on the thread slice. Then determine how much you can cut this thread to then mount the tee connecting the eyeliner, bypass and riser without any problems.


Tip! In some cases, the old paint applied to the nut and the connection of the riser with bypass and eyeliner may interfere with the work. It can be removed using a conventional knife with a retractable blade or metal brush.
Step 6. Remove the battery with fasteners.


Step 7. For a previously defined label on the carving, connecting the heating riser with the battery, perform cropping with a grinder.


Step 8. Remove the old battery and take there, where it will not interfere with further work. Given the high mass of the cast-iron radiator, do it if possible in a pair with someone.

Step 9. Remove the old battery mount from the wall. If they keep especially hard - use the hammer and chisel.


Most often, the replacement of heating radiators has to be encountered during overhaul. They are usually changed after installing windows and window sills.
Radiators create warm and comfortable arrival in the house, and therefore their installation should be competent and durable.
It is very important to figure out how to install the heating radiator correctly.
There are several ways to fasten radiators. Most often they are mounted under the windows, and sometimes on the walls and in the hallway at the entrance. To install the batteries, apply brackets or racks that are fixed on the wall surface.
From two (or one) sides and the bottom pipes are mounted to the battery. In the event that the pipe is provided on the one hand, it is necessary to clearly calculate the number of sections, since half of the radiator can remain cold. Experts recommend not to install more than 12 sections if water circulation is naturally. With artificially created circulation, the number of sections can be increased to 24.
How to install the radiator?

If you want to establish a large number of sections, then you need to worry about how to bring pipes to heating devices.
Holding the number of sections and installing the radiator, it is necessary to take into account the bandwidth of the pipes. It is determined by the inner diameter of the product and the roughness coefficient.
To properly install the heating system, which will ensure the maximum thermal return, you need to adhere to several rules when carrying out the calculations:
- to conveniently be removed under the battery, the distance from the floor to the bottom of the battery should be about 10 cm;
- between the wall and the radiator should be the gap of up to 5 cm. If the distance is smaller, heating does not fit, and the walls;
- from the radiator to the windowsill should be 10 cm.

In order to be able to adjust the thermal return of the heating battery automatically or manually, it is necessary to take care of the installation of thermostat in advance. If the leakage occurs or another emergency occurs, it will be possible to autonomously turn off the heating system. Automatic regulation of the heating system is possible due to the installation of thermostatic valves directly on the valve.
If the installation of the valves is provided on the heating system with one pipe, then in advance it is necessary to take care that the two pipes have each other jumper. In case there are no, the installation of the thermal heads will not be allowed.
In addition to the listed elements, the heating radiator must be equipped with a crane of Maevsky. The crane serves to remove air from batteries and from the entire heating system. This procedure is produced at the beginning of the heating season and then periodically during the operation of the instruments for heating the room.
Stages of installation of heating battery
- To the surface of the wall, you must apply marking for future brackets, and then consolidate them.
- Put on the heating battery along with regulatory reinforcement (if necessary) and the plug crane Maevsky.
- Using the level, it is necessary to secure the radiator on the brackets.
- Connect radiators with pipes of heating system.

To ensure uninterrupted well-coordinated battery operation, you need to make the first launch. If you do not have the necessary plumbing skills, then. In order to properly install radiators, it is better to use the help of specialists. If you mount the heating system incorrectly, the pipe breaks with all unpleasant consequences.
To ensure the unimpeded functioning of thermoclap and increase the thermal return, it is better not to put various decorative lattices on the radiator. The furniture is also better to put away from heating radiators.
Choosing radiators, you need to remember the maximum temperature of the thermal carrier in the centralized heating system. It is usually 65-105 degrees. In apartment buildings, the pressure level is usually 10 atm.
How do bimetallic radiators set?

Since hydraulic strikes are rendered to the heating system at the beginning of the heating period, it is necessary when choosing batteries to give preference to bimetallic batteries or those in which the working pressure is more than 16 atm.
Panel steel batteries are better installed in private houses. It should be known that the stated power of radiators can be significantly higher than it really is.
Currently, bimetallic radiators are considered among the most effective batteries. They possess increased heat transfer. Their modern design will suit almost any interior.
The following tools and materials are needed to install batteries.
- water tanks;
- dynamometric keys;
- perforator;
- building level;
- pencil;
- roulette.
Stages of installing bimetallic batteries

Norms and rules for mounting the heating device: distance from gender, walls, windowsill.
First of all, it is necessary to find out the diameter of the supply pipes. After that, the mounting kit of a suitable size should be ordered. The package of bimetallic radiator includes:
- air duct valve;
- adapter under the valve of Maevsky;
- two adapters;
- plug;
- brackets;
- gaskets under the plug and adapter.
It is necessary to prepare containers in advance, overlap water and drain its residues from the heating system. After that, the old radiator is dismantled by promoting the threaded connections of the discharge and supply pipes.
Places to install brackets. When working, it is recommended to post radiators to pipe liners. With the help of the construction level, horizontal is checked. The mounting is applied to the place of installation and the fastening holes are applied using a pencil.
In the outlined places, the holes of the required diameter are drilled with the perforator. If the number of sections is not more than 8, then three brackets are enough. If sections from 8 to 12, then you need to install 4 fasteners.
The radiator is installed on the prepared brackets in such a way that all horizontal collectors are on the hooks. One of the features of the installation of such radiators is that the entire kit should be in the package until its installation.
On each radiator, the Maevsky valve should be installed, which is included in the package. To tighten the valve, use a dynamometer key. After that, thermostat is installed and shut-off.
Next, the bimetallic radiator is connected to the heat pipelines of the heating system. It is not recommended to clean the interconnected surfaces using a file or emery paper: it will lead to the appearance of leaks.
The technology of installing heating batteries is quite simple. After having studied the sequence of performance and prepare the necessary tools and materials, the installation can be performed independently.