The device of summer tracks with their own hands. Tracks in the country with their own hands: Consider the work process, how to make a track
Provides the creation of tracks. Moreover, the requirements for them are quite serious: they must be reliable, comfortable, functional, beautiful and very desirable - inexpensive. On how to make garden tracks with your own hands with low cost, let's talk in this article.
What makes the tracks
The path of the track is solid or bulk. The following materials are used to create a solid coating:
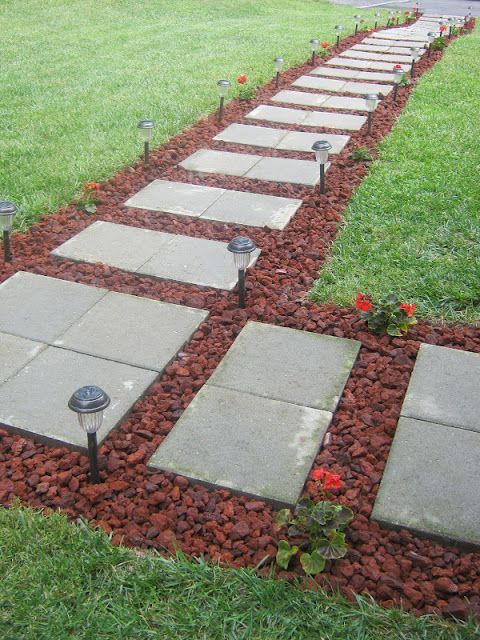
- Concrete. Conceonated tracks are not only the usual gray tape. In addition, that there are dyes and it can be decomposed if desired. There are still forms to fill immediately in place. It turns out homemade paving slabs. Another option is to pour on your own small concrete slabs of the desired size, then put them on the subference. For examples of registration, see the photo.
And everyone has forms for such a path in the farm - cut on the cylinders of water cylinders for water, place them as you need and pour with a solution: beautiful and cheap
 And this is a concrete path with compensation seams. If you look around, it can be seen that the stripes are accepted across. This is to be wet surface to be non-slip
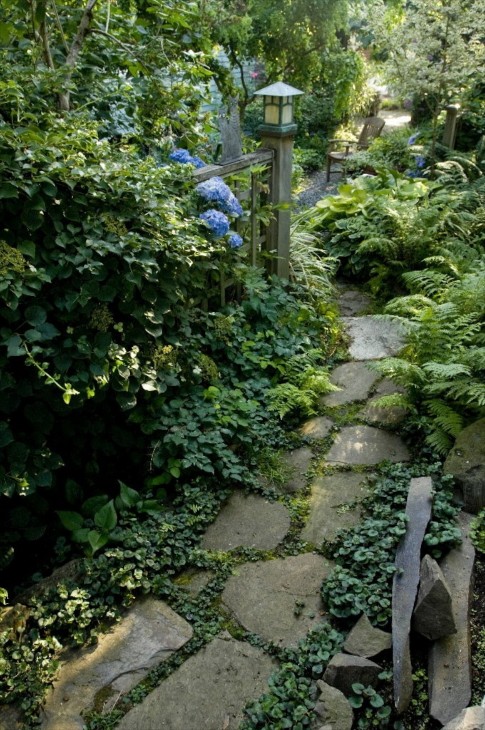
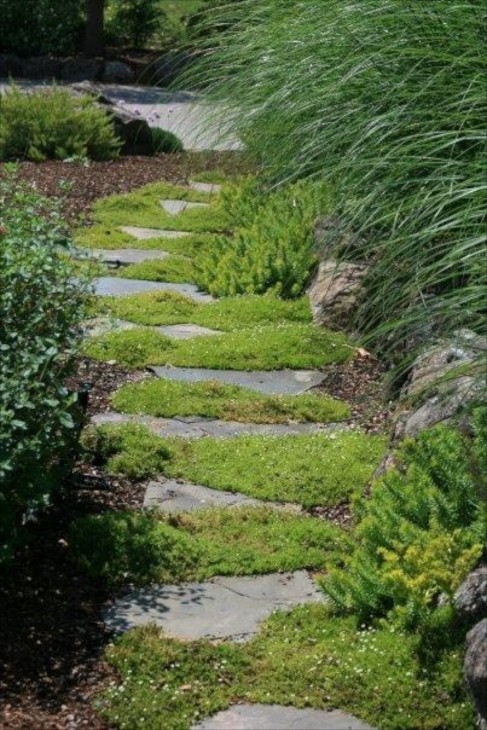
 - Flagstone. This is a natural stone that cut into the plates. It is placed on the prepared basis (about it further), the gaps are filled with backing. It turns out beautiful, reliable, several. No wonder it is the stone tracks from the tumka so love landscape designers.
 Failure is one of the important elements that shape appearance
 - Brick. An ordinary ceramic brick is a beautiful material, but not for the tracks. He absorbs moisture, if then wet freezes, it breaks on the part. If you are going to make a path from a broken brick, then you can only walk on it more or a couple of years. Then you will have to redo. The resulting gaps will need to be covered with coarse sand or small rubble. A clinker brick will serve a lot longer on the track, but this option is not small-time called: the cost of one thing is from several tens of rubles.
These are two types of bricks - ceramic and chipped out of the granite path from clinker brick - beautifully, you can not say anything .... Maybe too beautiful for the garden?
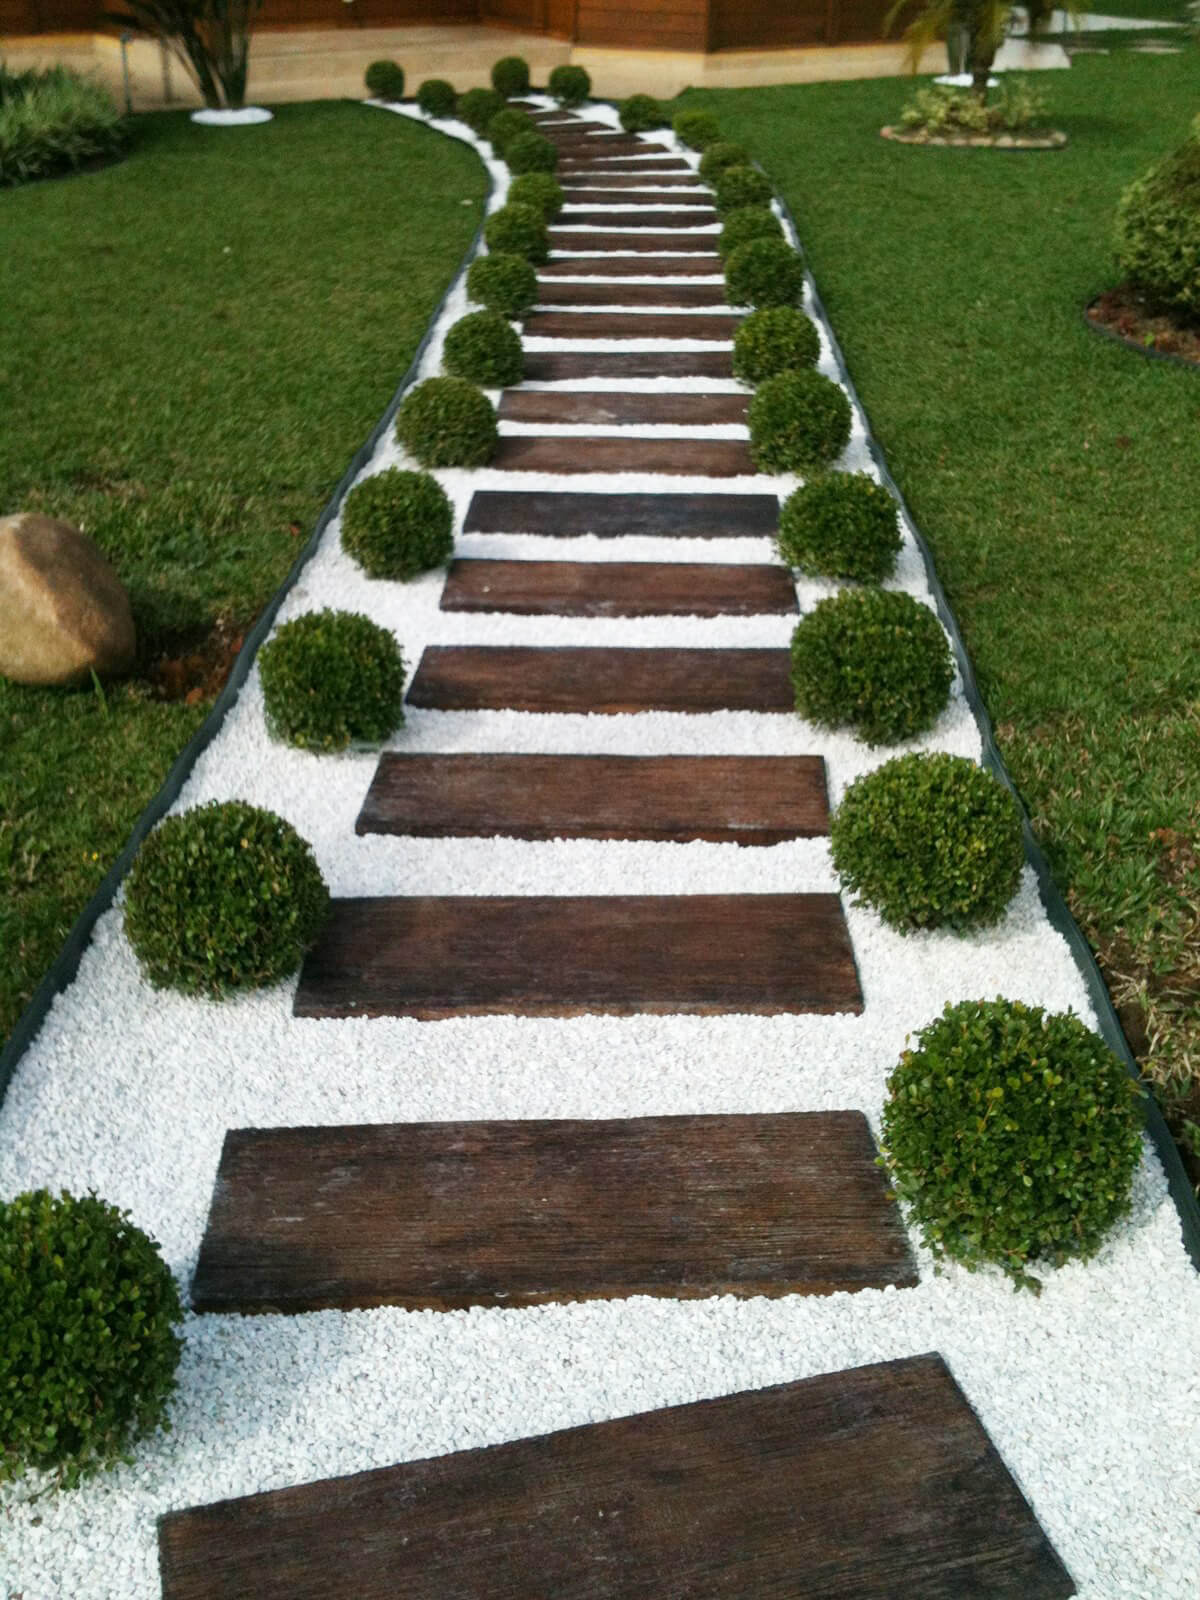
- Wood. Such seemingly inappropriate material, but with proper processing, it can serve for a long time. Moreover, many of the wood made by their own hands can be attributed to the discharge of low-cost. For example, invented the use of hemps and spins of trees as borders or coverage. Also make flooring from well-processed boards - it's better to terrace, but if not, it will be suitable from the old floor.
Combination with pebbles - It is convenient to walk and it is - how to make a walkway out of boards
- Plastic.There is a tile for garden tracks from plastic - polyethylene or polypropylene. It has a square shape and system of locks, which is attached one to the other. It can be stacked right on top of the lawn or the previously trotted in the country or on the trail site. This option is quick and cheap. It can be called "with low costs." It is better, of course, to make the rules to the mouth of rubble and sand, and to lay plastic elements on top. This is a little longer and more expensive. There is still an indiscreet, but very beautiful version of plastic tiles for tracks. There is also a "garden parquet". These are plates or boards of wood-polymer composite - DPK (they are in the photo, look exactly like parquet). This material appeared relatively recently. In appearance and sensations, it looks like wood, and in essence - a mixture of wood flour and polymer. These are very beautiful coverage, but there is no modest value. Although not fabulous.
It is a garden parquet. Elegantly, but it is indisputable
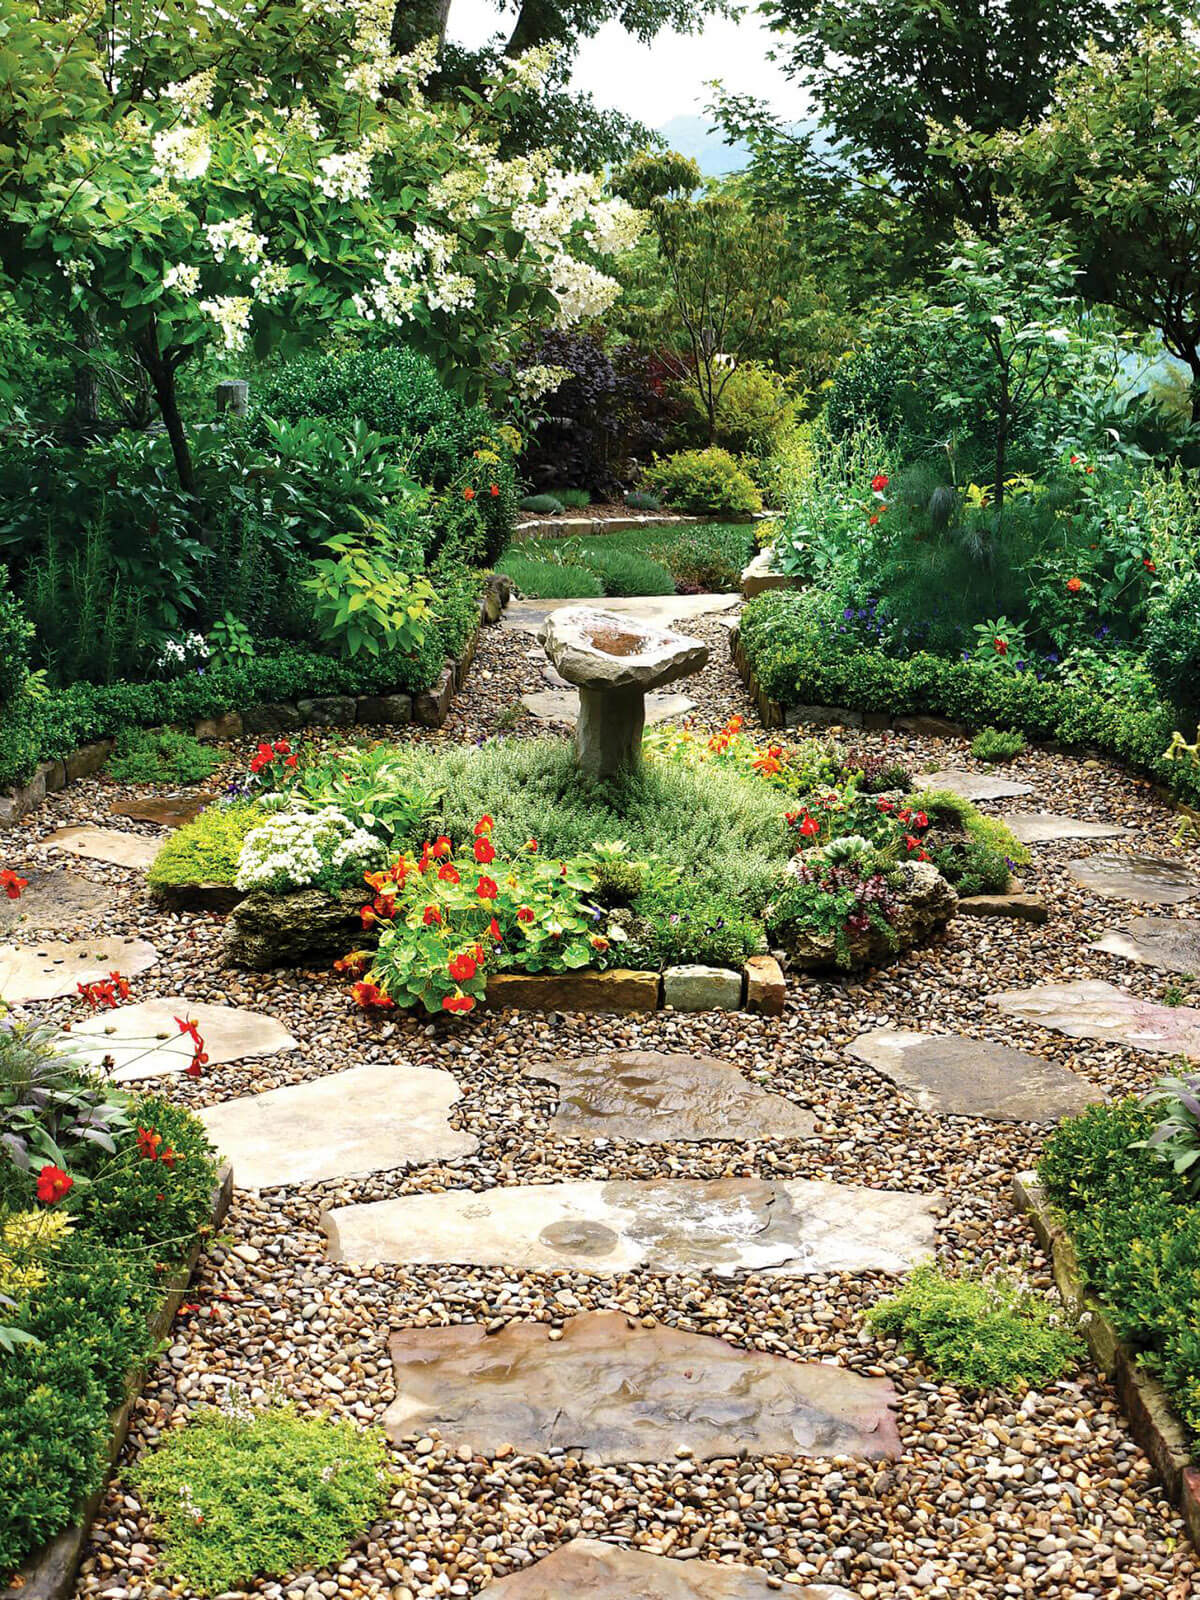
- Pebbles. These are rounded natural stones that can be found on the banks of the rivers or lakes. For making tracks, more flat pebbles are suitable. There are different shades of gray, black, white, sometimes you can find burgundy. Of these stones laid alone to another, the mosaic paths are obtained by amazing beauty. But this is a lesson for the perfected and stubborn. Those who have a patience lack, can find large flat boulders or large pebbles and put them in the sand. It is not so luxurious, but no less reliable. You can also enroll with granite or other similar stones. It is important that at least one face is relatively flat. This flat part and exhibit up, the rest burst. Work is not easy, but on the track you can not only walk, but also ride.
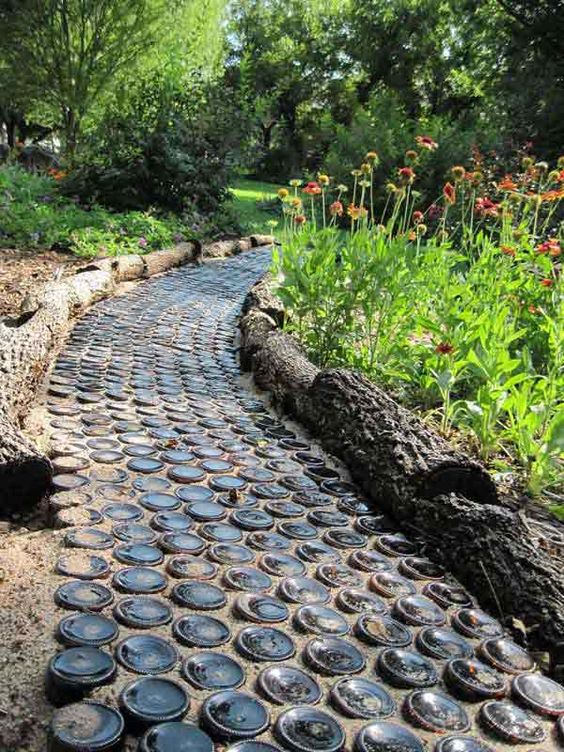
- Screw materials. Country tracks make old tires and bottles.
There are still paths with a full-fledged coating: these are gravel or from rubble. Their feature is that with a small layer of 2-3 cm and with sufficient compaction, it is convenient for them. If a layer is slightly larger, irregularities are formed when walking, and such a walking tedious. Because you have seen in many photos, gravel and crushed stone are used as a backbone, which stacked hard elements from other materials. With proper execution, this is convenient: gravel is well conducted water and the puddles are not formed. Those who do not like the gray color can be advised to paint it: many designers do this when organizing rocaries.

How to make garden paths with your own hands
To know little, from which you can make garden tracks with your own hands. You need to know how to make them right, so that it serves not one season and not two. Laying of different materials may differ slightly, but there are several rules and actions that are repeated in any technology.
The first rule: When laying or forming a coating track, it makes it with a slight bias. If the material allows, a slope of several centimeters do on both sides from the center. If, for example, a concrete track is poured, the slope is formed in one direction - from the house, if it is nearby. The slope is taken to the lower part of the site if the track is located on the slope.

Second rule: Under any coverage requires the preparation of the base. If you put stones (for example) right in clay or loam, use, of course, it will be definitely more convenient to walk, but the stones are "staring" after some time. Simply will lead to clay. When the device is a subfolder, this will require much more time. And if you still do a drain pillow and a side, the water removal will be even more efficient, and everything will look even more beautiful.

Third Rule: The level of covering the track must be a pair of centimeters higher than the adjacent area. Then the water will quickly go, it will be more convenient to clean, and cleaning will need less frequently: it will not fall in the blurred earth or during rains, nor during watering that often makes along the tracks.
Step-by-step instruction
Making garden tracks with your own hands, start with markup. In theory, dimensions and shape should be applied to the site plan, and the markup should occur on the project. But most often everything is done at the place. In order to be viewed, the future track is visually, its contours can be pre-spinning with white sand or something like that. If the form arranges, you can drive the pegs and pull the twine between them, but you can also work on the ot.

Along the beautiful track, you can place a flower garden or flower bed. How to do them, read.
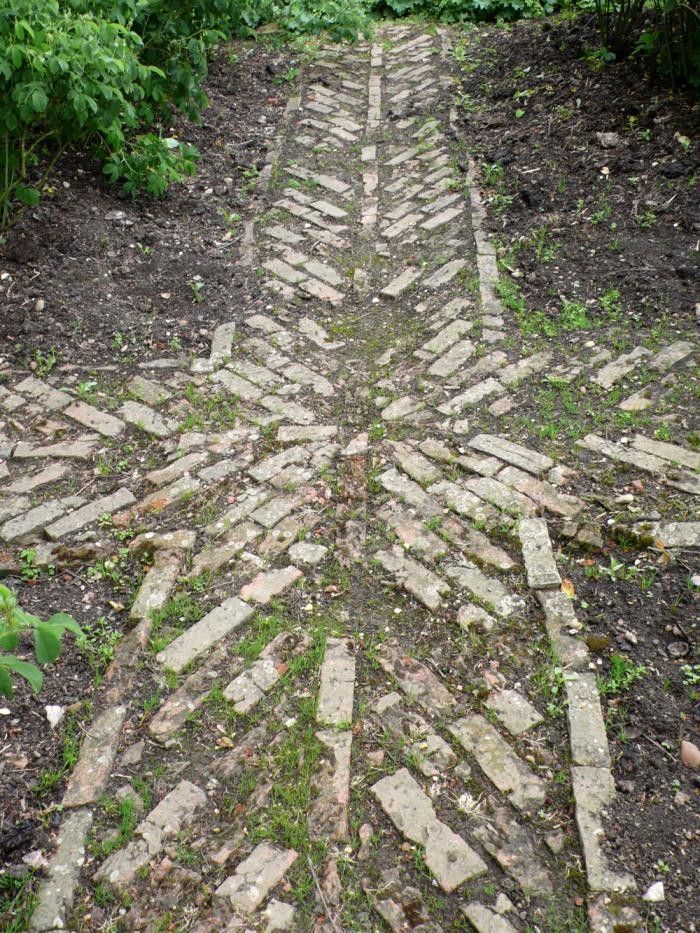
Beautiful track of pebbles do it yourself
If with a tumor, a paving, brick, more and less clearly - everyone has already seen and more than once, as it is done, then how to lay the pebbles in the patterns are incomprehensible.

The photo report on the manufacturing process of pebbles is posted below. It shows the main techniques: lines are applied to the aligned sand, which will spread the pebbles. If these are arcs, they are done using threads and two sticks / nails.

Selecting the stones, they lay them on the edge close to each other, slightly beating in the sand.

The board is placed on the folded pattern, take a rubber image and knocking on the board, scoring pebbles in the sand. So the whole drawing is plunged, following the edges of the pebbles on the same height.

Stones "Complete" in the sand
Take a mixture of sand and cement (sand 2 parts, cement 1 part) and pour gaps, moving with a brush layer.

The fragment of the pebble track is gently watered with water so that the backup does not blur. Waiting for several hours, while a little grab cement, then the surplus is removed with a soft brush.

It is important not to miss the moment: the solution should not get dirty, but also become a stone too. If you pick it up with your finger, it should crumble. It's time to clean the surplus.
Wooden hemp and crushed stone track: video
Old logs or trees can be turned into a beautiful track. From cutting into a scrabacle of the desired length, the facial spice is grinning, all the wood is treated first the composition of the biomoshtics (can be powered by spent oil). After drying, dip in Kuzbas varnish and dried again. Then cover the paint of the desired color facial pieces of hemp - which will be outward. We are dried again and only then exhibit in the sand.
The process is described in detail in the video. This is step by step explains how to make gardens tracks from hemp or logs with their own hands.
We independently make a concrete track
The process is generally similar to the one that is described in the beginning. There are some differences about which and talk.
After the trench is dug, and the bottom is aligned, formwork is installed along both sides. These are boards from 25 mm thickness (in the thicker, it is thinner undesirable, you can use the phaneer with a thickness of 16-18 mm,). Their height is the height of the track. If you form a bias, the boards should be placed with its account - one side is slightly higher, the other is just below.

Formwork is exhibited in level - it will be peeling concrete
To make a formwork, a pegs are driven into the ground with a step of no more than 60 cm. They nourish the boards. The inner surface of the formwork is better to smear through working or other oil: to be removed easily. Next to the bottom, crushed stone and tram. But it is necessary to rub it thoroughly: if you go along the bottom, it should not be seen.
Further, so that the track does not crack, the metal reinforcing grid is stacked on crushed stone. The strut thickness is 4-6 mm, step 5-10 cm. It is sold by pieces, they must be bonded with a steel wire.

Then, to compensate for expansion in the winter period, it is necessary to put a wooden plank with a thickness of 1.5-2 cm. They are made across the tracks, exhibit so that the height of the planks was to flush with formwork boards. Compensation strips are exhibited at least every 2 meters. More often, it is less common - no. Why make more often? For beauty. Squares look better than long rectangles.
A concrete solution of the brand is poured into the finished frame at least M-250 (). For him, take 1 part of the cement, 3 pieces of sand, 4 - rubble. Everything is kneaded into a solution of average yield (thick sour cream) and poured into a formwork. When pouring, you need to monitor so that there are no air bubbles. To remove them, the solution is picked up with a pin, slightly sharing it - plump. Ideal if there is a surface vibrator for concrete - it quickly seals the solution, creating a perfectly smooth surface. If it is not, you will have to double the rule, using the edges of the formwork as lighthouses.

After a few hours, after the concrete is captured, you can process the surface. It can be left as it is, you can spend a rigid brush on it, making transverse strips, you can finally be put in a not quite hardened solution to lay pebbles, stones, tensile, etc. It is not very economical, but reliably. After a couple of days, the formwork can be removed, and on the track can already be walking.
Budget tire track
What is just not made from the auto strokes:, swing, and ... tracks. Everything is simple: the old tire needs to cut off the sides, leaving only the protector. What can be cut off? Bulgarian. Someone manages a knife, but it is only if the cord is not metallic.

The projector is cut across to get a path. Then the sides are made by suns of centimeters 15 - depends on the diameter of the tire. They will be able to deploy rubber.

Do shorts of bent edges - the surface is still non-linear
In this form, it can already be laid on the bed. It will serve for many years. This is exactly the garden tracks at low costs.

Such a coating will endure for many years of active exploitation.
As you understand, options for how to make garden tracks do it yourself a lot. You can tell about all and it is impossible to describe, but we try ...
Garden tracks on the country, the donor site or in the courtyard of private home ownership is not only an important element of the landscape design necessary for a comfortable movement between objects of the territory, but also the method of zoning and decoration. The correct location of the garden tracks will allow you to spend as little time as possible and forces to move between elements of landscape design, and the beautiful, practical and durable execution will allow you to decorate the courtyard or country area, create a creative design on the envy of the neighbors and the pride of your city or country household guests territory. Even in a small private courtyard, the tracks are necessary for safe and comfortable movement between the main and secondary objects of the territory - the building of a country or city house, a garage, a gazebo, household buildings, a children's corner or platform, swings, a barbecue area, a swimming pool or pond.

Requirements for Garden Tracks
If we talk about physical parameters, then the main requirement for tracks of the local area and garden plot is the smallest distance from one object to another. But often this criterion comes against the aesthetics of the landscape - winding tracks look beautiful, romantic and even mysteriously, but at the same time make up a longer way than their analogues with clear straight lines and turns.


Conditionally all tracks of the site are divided into basic and minor. From the path of the path depends on the width of the track - the main usually are made with parameters in 1-1.5 m, and the secondary can have a width of at least half a meter. But much depends on the material of manufacturing a garden path - if the standard size of the workpiece (bricks, concrete or stone slabs, "garden parquet" or any other products with non-varying sizes are followed), then the trail width is formed by their number.


If we talk about the aesthetic qualities of garden tracks, then they should externally correspond to the overall concept of the design of the yard or site. If there is a natural stone in the design of the facade of the house or other buildings, the natural stone is participating, then it will be logical to use this material or combining it with other raw materials and for lays down the tracks.


In addition to its main function, it is possible to provide opportunities to freely move between the objects of the local area and the separation of the site into segments, and otherwise zoning, garden tracks are performed by the role of decorative elements. With the help of the original choice of material or the method of execution of country tracks, you can not only create an exclusive landscape design of your site, but also to implement your creative abilities, design ideas.


Types of garden tracks
According to the material used, all tracks can be divided into the following groups:
- concrete;
- stone (in turn, they are divided into those that are from a plastic stone, pebbles, blocks and other species);
- brick;
- wooden;
- from the cast material (plastic covers, parts of glass bottles, traffic jams, etc.).


Materials of the tracks are selected based on the design of the main building (its facade), other large-scale buildings in the yard or on the plot, performance of the execution, the sizes of the trail and the owners themselves (the stone track will require financial investments, and the bottleneck trail is only time for their collectibles ).

In addition to the material, the criterion for separating the tracks is the method of execution - they are divided into solid and not solid. The name speaks for itself. The view of the tracks will depend on their length and purpose - whether the trails are fulfilled by a practical role or carry a decorative burden.


Also, all summer cottages and garden tracks can be divided into two types - temporary and constant. Most tracks involved in landscape design are permanent. But in some cases there is a need for paving tracks, for example, only for the period of the country's season. The finished tracks are most often made of rubber or plastic and sold on a metro station or blocks (sections, products) connecting to the type of puzzles.

Preparatory work
Regardless which lengths will be your tracks, from which material will be met and how exactly, any execution will require preparatory work. First of all, it is necessary to make a plan for the location of the tracks on the site. This can be done both on a regular sheet of paper and in a special program, which is not easy to find on the Internet. Indicate all the elements of the landscape design on its plan - not only the main buildings and sites, but also the location of the flower, beds, economic objects.


While laying while still drawn tracks from the main objects to the secondary, you can optimize the location of the flower, beds and temporary plantations, in order to reduce the distance between objects or connect some elements to the zone. In the course of drawing up the plan, it becomes clear which segments can be combined by the track leading to them, and for which areas of the courtyard will have to use branching or to host the site. Only on paper it may seem that rarely visited the corner of a garden or yard can do without a walkway - imagine your reluctance to go on the ground after the rain, and you will find resources for the manufacture let it be completely non-trap.

Next comes marking on the ground. This stage should not be neglected in particular in cases where not only the length, but also the width of the tracks will be clearly governed by the parameters of the material - plates, brick or any other standard blanks. The easiest waywork to carry out with the help of pegs with a stretched rope or cord. In order for the outlines of future paths to be more obvious, the boundaries can be outlined by lime.

The ideal option may turn out if together with the markup of the tracks, it turns out and lay the mark on planting trees and shrubs, plants that these very tracks are framed. On the ground everything looks somewhat different than in the program or on a piece of paper. You can lay stones with the inscriptions of the names of trees and shrubs or designate by their layout of future flower.


Drive under any track should be somewhat wider than the laid out trail itself. So that the garden tracks last as long as possible, on the edges it is necessary to lay a border of stones or concrete.


Base
You should not neglect this stage of work if you want the track you have served for many years, and did not start crumbling or sprouting the grass after the first season of operation. Preparing the basis for garden yeast, it is important to remember that they should have a small slope for draining rainwater. The presence of a small drainage trench on the side of the path of the path will be a great help for the entire landscape design of the yard or a plot for rainy weather.


So, it is necessary to carry out the following manipulations to prepare the base for the garden path:
- remove the upper fertile layer of 2 to 20 cm (it all depends on the quality of the soil, length, tires and material for lays down the tracks);
- along the entire length of the walls of the resulting pit, wooden boards are installed, pre-padded under no sand;
- if the width of the track will be limited to concrete borders, then they are set by the level and fixed by reinforcement bars (to prevent shifts), which are driven inside the pit;
- if the ground on your site is very loose and the walls of the trench turned out to be uneven, you will have to drive the reinforcement pins and along the edges of the walls, and then install borders;
- next, the bottom of the trench is poured, small gravel or crushed stone, pre-mixed with cement or sand (the thickness of the layer from 5 to 10 cm);
- for a more thorough tampering of the gravel layer, it is necessary to periodically make it possible.

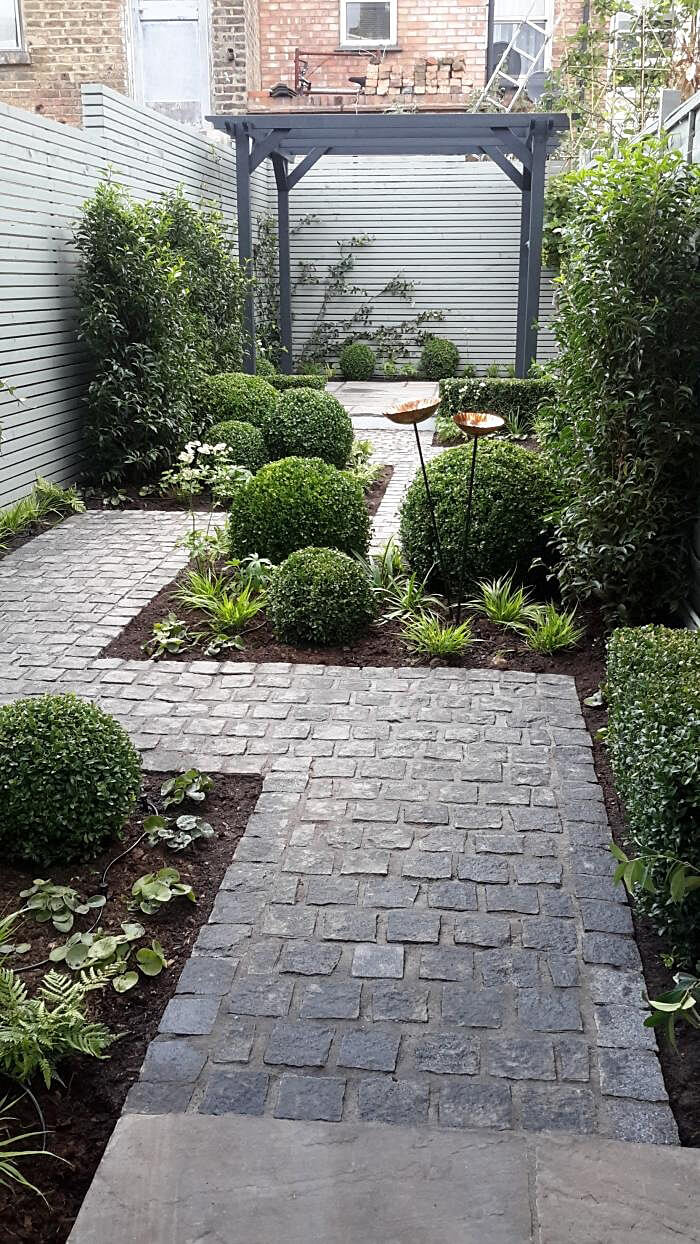
An example of a beautiful and practical garden track
Consider the option of arranging garden tracks from the brick, as the most affordable and easy to use the material (in case you have the opportunity to use the used brick, and not buy material).


The brick garden path is a rather durable, durable and aesthetic surface, which even homemade can be made independently without special skills and experience. The brick path is laid out by the same principle as the pavement tile or paving. In order for the trail to serve as long as possible, choose a high-quality clinker brick and spend all work with a high level of accuracy.


So, you must pass the following algorithm of actions:
- the prepared framework with the rammed top layer of sand must be carefully aligned with the help of the rule (homemade adaptation from the board with an ideally equal surface);
- next, the installation of lateral bricks (with respect to the width of the track), they are mounted by the edge and drive into the sand on half their width with the help of a rubber hammer;
- if your track does not have a curb, then lateral bricks need to be copped with a solution (use formwork, after the removal of which it is necessary to arrange a subftitude of rubble, to ravages it at the end of this paragraph of work);
- next, it is directly laying out the drawing of the track of the brick (it can be put on an edge or put in width);
- usually, to create the most rigid and durable masonry, one row of bricks lay along the trail, and the second is across. Also, to increase the strength of the masonry, the street glue on a cement basis is used (it will help not only bind bricks among themselves, but also prevent the grass to prevent the products through the products).
- the solution will be needed a bit, because It is necessary that he does not speak to the surface between bricks, and was inside the masonry;
- upon completion of the installation of bricks, the slots between them are filled with sand with a large brush;
- in order to give the brightness of the resulting brickwork and extend its service life, the surface must be coated with penetrating primer, and after its complete drying - varnish for street stone.


And finally: several original ideas
In modern landscape design projects for the territories of various shapes and sizes, design styles, you can often find garden tracks laid out in the Steppingstones manner. You seem to move through the elements of the track in the form of separate plates, flat stones or spilles, which occur directly from the lawn or bulk material of the trail base. Beautiful, modern and at the same time, the functional track is easy to make with your own hands, if you use the so-called "steppes" from the concrete of various shapes.


In this case, it seems to combine the material. For example, clear faces and sharp corners of concrete square or rectangular plates or a plane stone against the background of rounded river stone forms - pebbles. In the aggregate, these two types of materials give an organic and attractive alliance to create creative, but at the same time practical surfaces.


And the "steppes" from the wooden plates luxuriously looks on the fine decorative gravel of snow-white shades. Against the background of the bright greenery of lawns, such paths will look especially spectacular ...
Wooden garden tracks are not so rare. Only recently, the so-called "garden parquet" is increasingly used for modern landscape design projects. The material is the standard size of the workpiece that is very easy to connect to the creation of not only durable and wear-resistant, but also an incredibly beautiful coating. The "Garden Parquet" is used not only to create tracks, but also laid out on open verandas, palm, terraces and patio sites or barbecue. The tree in such products is processed in a special way - it does not affect the usual "natural stimuli" - moisture, temperature drops, direct solar rays.


The laid out of the drawings from the round river stone (mostly, the Altai Blue) allows you to create a difficult original tracks, but bring the beauty of the creative process into the design of your yard or the country area. Round row stones of different sizes from very light gray-blue to dark, like anthracite, you can lay out in the bizarre abstract patterns or quite clear prints in geometry. Creating such a track will require not only financial, but also time costs, incredible accuracy and a large amount of free time. But all efforts will be more compensated by an incredible aesthetics of paths, their uniqueness.


Not less than the originality of the effect can be achieved when the pattern is laid out of the remnants of the porcelain tile (products for flooring, street use). The advantage of this method is not only in the originality of the result and freedom of flight of your imagination, but also to save a family budget, because it is not easy to go easy, and fragments from tiles of different shapes, sizes and colors.


The track created solely with a bulk gravel may not be surprised by your guests or neighbors, but will help save a family budget. It is only important to establish durable, solid borders that will keep small fractions of the stone inside the trench.


The tracks must be in every garden. Their presence allows you to easily navigate and freely move around the territory. Make garden tracks with their own hands, with minimal cost, will not be difficult. Instructions, photos and videos of this article will help to carry out your ideas. See how many ideas and diverse inexpensive, healthy materials exist on this topic.
Concrete tracks in the country do it yourself
Concrete is most often used to arrange the tracks and coating around the house. This traditional material is available and cheap. Do with your own hands, classic cast paths from it, can do anyone.
1. Start with marking boundaries. Denote the contour with a wire or a fishing line tied to the corners of the zeal.
2. In the specified borders, make a trench with a depth of 25-30 cm, with a slope of 3-4% in the transverse direction from the track axis or in both parties.
3. Pour the bottom of the trench and put the carrier layer of gravel. Put a layer of sand 5 cm on it. Each of the layers compact the tamper.

4. Prepare the formwork, for which it is for the perimeter to install a metal frame or lumber. Good for this purpose, the edged board is suitable with a cross section of 25 * 150 * 6 mm.
5. Reinforce the body of the future track, use the chain grid or other metal elements for this (slices of wire, old tap pipes).
6. Insert the separation partitions, or special cellular molds treated with a protective solution. It will save concrete from cracking when drying and give the track decorative relief.
7. Create a solution:
- cement (not lower than m 500) - 4 kg;
- sand - 6 kg;
- gravel - 13 kg;
- water - 1.9 liters.
There should be plastic semi-winged consistency. It is advisable to add a plasticizer and an accelerator of rejection of concrete. To give a mixture of the desired color (brick, stone), experiment with the kel.
8. Fill the concrete into the formwork trough the brown with the edge. Equally distribute the spatula, producing vibrating movements. Plug (plug) a mixture with a metal rod (reinforcement), to give it homogeneity.
Tip! To improve adhesion with the base, lay the solution on raw sand, crushed stone, gravel.
9. Finally, align the surface of the flooded track by the rule. The procedure for filling and forming the body of the track, produce sequentially. Go from one separation rail to another, from one boot form - to another, gradually.

10. Cover the path with polyethylene, which will prevent the solution from rapid drying. Concrete is gaining strength of 3-4 days, during which wet it with water. This will exclude cracking and give concrete additional strength.
To achieve an even greater decorative effect, in not to the end, the climbing surface is "inserted" various components: pebbles, colored windows, a seven. The relief of the track gives various strokes, furrows, prints. And for imitation of the antiquity, as if the walkway worshed with moss, kefir or milk injected into the solution.
Garden tracks from bricks and paving slabs - scheme, layers, execution
Durable and inexpensive material for the manufacture of garden coatings - facing brick or paving. This material is resistant to frost and abrasion. Brick is less durable due to greater porosity. However, it has a decorative look and is available in several forms and colors. In addition to natural dark red, there is brown, redhead, brown, anthracite, white color. Brick track can be easily furnished as an arc, or a Christmas tree, which significantly improves the spatial perception of the site.

Tip! Putting a blocking, keep in mind that for the paving the walking tracks or terraces, a blocking of ~ 4 cm is better suited. And on tracks with intense loads, use cubes with a thickness of ~ 6 cm.
Laying tracks from paving
Start by removing the top layer of the soil to the depth, allowing to put all the layers of covering the track so that the last layer of the paving slaves is in the level with the surface of the Earth. More often, this depth is 20-40 cm.
Important! The base under the blocking is the basis of the correct laying. This is a layer that is responsible for the uniform transmission of the load from the surface of the portion of the soil. The role of a drainage layer protecting against the effects of atmospheric precipitation and negative temperatures is also performed.
Production of base under the blocking - 3 important rules
In order for the base under the blocking, it performed its function properly, for a long time, its design and production occurs according to the rules.
1. The thickness of the base layer. We are talking about the right ratio of the base layer thickness for the planned load of the surface of the paving. On tracks, a base is more often used. In the case of coatings on which an intensive movement is planned, the base increases to 25-40 cm.

2. Foundation material. The base under the blocking must be permeable for water, quickly pass through themselves to remove into the ground. For the manufacture of a draining base layer, use: gravel, crushed stone, slag, or a mixture of sand with gravel.
3. Laying the base layers. To ensure uniform styling and sealing the base under the blocking, the material lay with layers with a thickness of 10 cm. Each layer must be tamped, it will be prevented in the future possible drawdown.
Attention! If the ground under the base is characterized by low water permeability, it may be necessary to use an additional drainage layer of geotextiles.
Making sand "pillows"
Create a frame for the future track, according to the type of formwork. In the resulting trough, make a squeeze from the sand. Its task is to introduce and fix individual structural elements. The thickness of the layer ~ 3-5 cm. For greater strength, the sand is mixed with dry concrete in a 3: 1 proportion. However, this kind of material makes it difficult to repair work later. Light a wooden slat with a wooden rail. Watch the sand layer, before the formation of liquid "Cashitsa".
Laying brick blocks
The procedure is to place one element after another, in the direction "from ourselves." At the same time, a slight tapping on the top of the brick / stone with a rubber hammer or a conversion allows you to plant items into a sandy base.

Fixing surface
The final stage of work, consists in the sprinkling of the working surface with quartz sand, which fills the slots between the cubes, cuts and gives the monolith of the structure. The action is repeated several times. In the intervals, the sand is richly wetted with water, swells. Surplus are extruded, dry and removed by a mellow. Between the bricks there is a dense, crafted packing.
Garden tracks from stone
Walkways from wild stone are durable and elegant. Their natural texture and diverse shades of color are perfectly suitable for any atmosphere, look good in conjunction with other materials.
Most often used granite slats. This is a solid and very durable material. It is not harmful to water and frost. Popular colors - gray, redhead, beautiful pink-red granite. Similar properties have basalt (black), porphyr (gray-red-brown stone), Senitis (gray, almost black color), and also: travertine, gabbro, diabases. Sandstone or slate looks attractive in different variations.
In the garden among greens, the informal tracks from the mosaic laid stone plates are perfectly looking. In the intervals between them, they sow grass or low, sharpening plants, for example: Alissa, Iberis, Coid.

The method of laying a stone material is similar to those described above and depends on the location, destination of the track and the permeability of the soil under it. On the lands drained, with a small operational load, stone garden tracks are laid on a layer of a solution of 5-10 cm from sand or gravel / rubble, cement, in proportion 1:12.
However, there are a number of problems associated with the use of wildcam:
1. Incorrect natural forms. Stones are difficult to choose, linake among themselves. Creating a perfectly flat plane is also problematic. This gives difficulties in movement on them, for example, garden technology.
2. The stone pulls moisture from the ground. Therefore, often comes with moss and lichen. It is also easily subjected to pollution that are difficult to remove. To prevent this, wild stone, at least once every 3 years, is treated with silicone or resin-based composition (Dynasil, Lithofin). These tools form a protective layer without creating a slippery surface. At the same time, clog pores and give the effect of "wet stone", without changing its natural color.
Garden tracks from paving slabs
Functional coating from this material is not equal. The price of the material is not fabulous, and the laying of the tiles with their own hands is easy to execute.
There are tiles stylized under antiquity, imitating stone bridge and cutting granite or raw sandstone. There are high-strength clinker tiles obtained by a single firing. From color and textured concrete, elements resembling boards, wooden pavement, or old railway sleepers are manufactured.
In the collections of trading companies there are elements of different thickness and shapes: square and rectangular. Thin 3-5 cm, used for paving decorative tracks, tiles are thorough - for linguing the entrance.

Popular was the manufacture of paving slabs with their own hands. Suitable forms for performing castings can be bought today everywhere. Perform them from high quality, durable plastic, laminate, and wooden. Designed for repeated use. Different dimensions, design, shape, price. The surface of the casting can be smooth or patterned.
Preparation of the filler solution is carried out according to the technology described above.
Paving slabs are quite heavy, so the foundation for them is needed solid. It is recommended to do two layers:
- layer of alignment (sand, crushed stone, 10-15 cm);
- holding layer (sand mix with cement, 3-4 cm).
The layer of the frame is thicker, the more stable the coating - the plates will not be movable!
Care in winter should be taken when cleaning the tile - it is better not to beat with sharp tools, the outer layer is damaged.
Wooden Garden Tracks - Ideas, Performance
Wooden tracks in the garden are not so resistant to weather conditions, like a stone or concrete, but always draw attention to their naturalness, environmental purity and high decorative aesthetics.
Garden tracks from the woods of the tree do it yourself
The path laid out with wooden rounds. The best tree for this work is an oak or larch. Their solid and resistant to atmospheric influences, "survives" not one decade. It remains unchanged without impregnation, due to the large number of tanning substances. Pine and spruce, unfortunately, less durable.
1. Cutting wood. From the trunks and branches of the old tree, cut the fragments, with a diameter of 10-40 cm and a height of 15-25 cm. The optimal ratio of large blanks (25-40 cm) to small (10-15 cm) should be 3: 1. Since the circles are round and form large spaces, different cutting diameters complement each other with subsequent laying.
2. Remove the bark and dry the workpiece for several days in the sun.
3. To protect wood, be sure to impregnate the sleeve with a primer-antiseptic to a depth of 3-4 cm.

4. After drying the impregnation (24 hours), it is desirable to apply a layer of varnish for outdoor use.
5. Installation. Remove the soil to a depth of 5 cm. Perform a submitter from the sand. You can make a cement screed in 4 cm. When setting the track, alternate a combination of three large and one small dice. Between them, it turns out the perfect drawing, almost without crack. Free space between the sleeves, fall asleep with small sand. After some time, it will be necessary, only to replenish its natural decline.
Advice.
Do not place sections close to each other. Over time, the wood swells, the track elements are squeezing.
It is better to have wooden tracks in places of sunny, blown. In the shade, wood absorbs and keeps moisture, resulting in a biological corrosion. Do not forget, wet wood - slippery!
To increase the durability of the wooden track, position below the surface of the drainage layer from the crushed stone with a thickness of 20-30 cm.
With proper operation, the service life of such a track will be 10 years.
Garden paths from the bark of trees
This is a cheap and eco-friendly material. Corn trees, equipped among flowers and decorative shrubs, provide them with nutrients and protect the ground from the freezing. The best, such paths are in places where there are plants preferring to acidic soil (heather, Rhododendron, Hortensia, Eric). The preparation of the track is not complicated. It is enough to make a pit, and fill the bottom of the sand layer (10-15 cm), then put 8-10 cm of the cortex on it.
Tip! The bark naturally decomposes. Once in season, the track out of it, requires additional subtype.
Track from railway sleepers
Railway sleepers - material durable, but hard to reach. You can make tracks from them, laying the plastics, tightly with each other or placing freely, and empty fill, for example, gravel.
Important! Remember, the tracks should not run too close to the trees, especially with a shallow root system. Stripped over time, it can break the surface of the track.
Garden tracks from automotive tires with their own hands
We are all car enthusiasts. The use of old automotive rubber in this case, the perfect budget option in the manufacture of garden tracks. It is the tire that is designed to experience maximum loads.
Designs from it are obtained:
- reinforced;
- resistant temperatures;
- not slippery;
- non-absorbent moisture;
- non-spacing;
- lungs in care;
- simple in manufacture.

The process is as follows:
1. With the help of a knife, separate the rolling track of the auto strokes from the side part. To facilitate the entry of the knife in dense rubber, time from time to time process with machinery or soap.
2. Cut the rings received on the ribbons. For the manufacture of a garden track, it may be necessary three - four such tapes.
3. Pick the ribbons in length and secure nails to a wooden board or bruster, each other.
4. Press the construction to the ground around the perimeter.
Etc. For the time being, it is convenient for us to run on them, but the rainy season begins, and what? .. You have to urgently look for old rubber boots somewhere in the attic, and then the grandmother halos wear. Straits!
Let us consider ways to create good garden tracks, which will serve not one dozen years old, and it will look much more beautiful than old cozy, but such non-plated paths.
For the construction of garden tracks there are a lot of ready-made solutions. What kind of species and now you will not meet on sale! Just eyes scatter. But for summer residents with not very high income, the price of such a material is very "bites out")) Therefore, let's look at simple and economical ways to make tracks in the country with your own hands from the girlfriend.
What to worry?
Immediately the question arises: how to bring? Very good designer reception - to build garden tracks from the same material from which a country house or cottage was built. Moreover, you probably have the remains of building material:, or. For example, if the house is lined with a white stone, then the tracks, "running away" from home to the garden, lay out a stone, and then the stone can be replaced by a blocking, or something else. If your country house, then in the design of the garden track with your own hands, is well used to apply a combination of wooden bars with a stone, porcelain stamprints or gravel. And the brick house will be combined with a robust path of bricks, only a brick for garden tracks need to use paving clinker, because the usual construction will fall apart after a couple of years. In general, look around and show the smelting))Concrete path with their own hands
Many dackets, not being causing custody, build monolithic concrete paths. Durable, but such dull ... However, the concrete tracks can be made: it is beautifully to decorate them at the time of construction with color mosaic, pieces of ceramic tiles or. And to build such paths with your own hands in the country very simple.
- Noting the width and length of the track, its bed is burned by 8-10 cm.
- Then put it with sand to a height of 5-6 cm, the sand is tight and spilled with water.
- After the entire length of the path of the track, the frames are mounted frames, knocked out of the tree or plywood, leaving the distance in 5-7 cm between them. The frame width must match the width of the track. The most optimal and convenient size of a wooden frame for concreting: 60x60 cm.
- Then the frames are poured, and when it snacks slightly, the decorative elements are beautifully laying on top (you can even a conventional sewer).
- After a complete launch of the track (2-3 days), the ground between the plates is planted with unpretentious plants for the lawn. That's all)) - the concrete path with their own hands is ready.
Garden tracks from boards do it yourself
The best material for creating a wooden track will not be rotting wood.
- Wood tracks usually rim up above the earth, strengthening them on durable massive bars treated with special decisions.
- And the bars, in turn, are installed on the gravel layer (5-6 cm).
- Gravel preliminary thoroughly align All over a garden path.
- The flooring do not directly, but with an interval of 1-2 cm Between the boards to ensure a peculiar "ventilation")) thus the boardwalk will serve much longer.
Garden tracks from wooden chocks do it yourself
You can also build a garden track made of wooden chocks or cross-cuts of thick trees previously processed to protect against rotting.
For this:
- According to the launch of the track, the track is hammered by a trench of depth by 5-6 cm more than the height of chocks or wooden "kreagal".
- The bed is falling asleep by gravel (2-3 cm), then sand (2-3 cm), thoroughly tamped, are abundantly poured and installed as close as possible in the beds of chocks.
- After that, gravel in half with sand fall asleep into the gaps and again watered.
1. In the bed of the tracks are tightly installed chocks:

In the bed we install chocks. Photos from the siteinvestrussia-2012.com
2. Align chocks in height with a sledgehaft: 
Align in height. Photos from the siteinvestrussia-2012.com
3. The finished garden track, where the chocks are already transferred to the rammed gravel and sand: 
Result. Photos from the siteinvestrussia-2012.com
Garden tracks based on curly shapes: master class
Here this pretty garden path is built with strong finished polystyrene forms, which are available everywhere in free sale.
The forms for the garden lane may look like this:

Their cost varies from 160 to 900 rubles. We will need you at least 4 identical forms.
You can choose suitable forms using our Market, where products from different online stores are presented. .
Form for sidewalk flower
249 rubles
Russian vegetable
Form for sidewalk wave
189 rubles
Russian vegetable
Form for garden tracks 60x60 cm Form for garden tracks 60x60 cm
799 rub
OBI.
Operating procedure:
1. To begin with, determine the location and width of the garden tracks using the pegs and the rope for this. Here I want to note: similar shapes, like puzzles, easily adjoin each other, and the size is usually 60x60 cm, which is enough for a narrow garden path. If you wish to build a walkway with a sewer - 1.2 m, then fold two forms not along, but an across the bed.2. Now arm the shovel and the propest on the outlined lodge the trench of a depth of 8-10 cm. Thick the land. To do this, it is better to use an electrovibrator; You can make the land and manually, but it will require a mass of effort. In a good ramble trench, fall asleep layer of rubble or pebbles (3-4 cm), and pour river sand from above (5-6 cm). Before laying the shape, sand is abundantly sprayed with a hose with a sprayer. Then lubricate forms with machine oil (for non-dissimilarity, you can use the usual floral) and install them on wet sand.

Shape in the trench. Photos from Sameto.com.ua
3. Prepare the solution: cement - 1 part, sand - 3 parts and crushed stone - 4 parts. Add a special binding mixture for the foundation and, pouring water, start mixing the solution, bringing it to the consistency of thick sour cream. And so that your garden track with your own hands shine with multi-colored paints, add the color of the desired color to the solution.

Cooking mortar. Photos from Sameto.com.ua
4. Then the workshop fill in the form to the edge, not allowing air bubbles, and after removing the excess solution in advance with a plastic rail (for these purposes it is possible to manufacture iron).

Pour the solution. Photos from Sameto.com.ua
The solution "grab" after 30-40 minutes, the form can be carefully removed, shifting them further along the path of the future track and repeat the procedure. Molds are removed from the semi-walled cement quite easily (if you, of course, did not forget to lubricate them))

Remove the shape. Photos from Sameto.com.ua
5. While the solution is not completely dry, you can decorate the path with a piece of colored tile, porcelain stoneware, beautiful pebbles or other material. You just need to press the decorations in the cement a little, and after complete drying the solution will be kept very tight.
Now the most difficult phase of work remained)) - protect your newly created masterpiece from the encroachment of pets or the balletness of children, because the cement solution will only dry out after 2-3 days, and even then, subject to sunny weather. Therefore, think over "defensive events", signs with the inscription or temporary fences.
As you can see, build a beautiful garden path with your own hands is not at all difficult. True, you will have to work for fame)) But you create convenience and beauty for yourself, and not for one year, so it is worth showing the effort and fantasy, so that in the end enjoy the fruits of your work. Good luck to you!
You can also use the following publications:
Landscape design always makes our life better, but sometimes its cost is not affordable to us, so, the garden tracks do it with small costs, this is exactly what is very useful in such a situation. Immediately, it should be clarified that laying of such an allek can be made by different materials. And for this you do not always need to acquire the paving slabs, although it is one of the best options.
We will try to highlight possible popular options and ways to implement them, as well as show you the thematic review - video in this article.
Beautiful garden
Main equipment styling

First - planning
- By and large, the device of garden tracks is reduced to the same technical parameters, except for amendments to one or another finishing material. First of all, you will have to visually determine the place where you are going to lay your allest, and then make an accurate markup in width. For this, the pegs are driven along the entire length and stretch the cord - it should fully reproduce future contours, whether it is direct, rotation or zigzag.
- After that, depending on the soil and the presence on it, the rod, the rift trench with vertically smooth edges, the depth of which can be from 10 cm to 30 cm (removed the rod can be used elsewhere). By and large in such cases, the instruction recommends to cut the base geotextile to cut off moisture and eliminate the germination of weeds through the finishing coating. But we still talk about the budget version, therefore, geotextiles can be omitted and use a dense polyethylene film - turn the edges on the walls of the Rib.
- And the last preparatory stage before installing the facing coating will be a fold of the pillow from sand and rubble with a thickness of 5-10 cm. The sand is usually poured, and from above - crushed stone, but you can do without the other, using granite drops for this purpose. All - now you can proceed to the outer part.
Purpose

The main alley, which passes to the house from the gate, is one of the first elements of the landscape design, which is striking when visiting. Consequently, he determines the first impression.
When installing, it should be borne in mind that this section is the most passable and the load on it will be more than in the garden. Therefore, we need wear-resistant materials - asphalt, concrete or paving slabs - wooden elements with such a load are somehow inappropriate.
In addition, you need to pay attention to the width of the passage - there should be freely to diverge, at least 2 people, which means that the width of the track from the wicket to the house can not be less than 1.5 m.

Secondary garden tracks can be called those that serve for communication between economic structures and aggregates, such as a garage, a gazebo, a barn, a bath, a chicken coop, a well, and the like. The width of such a device can be from 50 cm to the meter - this will be quite enough.
Although, if desired, they can also be done wider if the area of \u200b\u200byour site allows. It is possible that for such a covering you will have to transport any cargoes on a wheelbarrow - in this case, again, the finishing material should be durable - asphalt, concrete, paving slabs.

Between the flower beds, trees or other transitions, there are paths in the garden with their own hands of an intermittent type, that is, such that you can go to rainy weather without seeing the legs.
As a rule, such paths are narrow from 30 cm to 50 cm from rarely located tiles or stones - this is quite enough to pass one person. This molding method makes the coating weakly on a common background of the landscape, while maintaining more green plantings.
Types of coatings

The cheapest track, this is the one on which there is no decorative coating, that is, a path that is natoptan with feet or wheelbarrows, but the soil sends in such places. Consequently, during the rain there will definitely be gathering a puddle. To not be, it is possible to make a drainage, if it allows the level of the site (the presence of a slope), but it is best to fall asleep an additional layer.
As a backfill, sand or explosion can be used (granite, limestone), and so that the mound does not spread, it is fixed by a border of stones or mixboarders (evergreen flower bed).

Gravel, crushed stone and pebbles will always serve as a good base for filling. Accordingly, if this material is taken as a base, then such a path is enough for a long time, but for decorating there may be other elements here, for example, paving tiles, paving or flat stones.
For snowing, they are deepened by 10-15 cm into the ground and stood with a geotextile bottom or a dense polyethylene film to exclude the germination of various weeds (under the crushed stone or pebbling, a sand pillow 20-30 mm height can be added.

Naturally, the embankment is best done above the soil level, and so that it does not spread, it is fixed on the sides of the border or stones. If you decide to decorate rubble tiles (stones, blocking), then these elements need to be inlayed at one level with bulk material - so it turns out a homogeneous beautiful canvas.

In addition, such a chump (pebble) base can serve as a pillow for paving slabs, which will fit without pouring a cement-sand solution (on dry).
But the tiles (blocking) cannot be stacked on crushed stone, therefore, the sand pillow 20-30 mm is poured over it and the decorative coating is already mounted on top of it. Sometimes, for the sake of scenery, in the slots, which remain between the elements, fall in dwarf lawn grass.

The most durable and durable structures are obtained in cases where the formwork is mounted for garden tracks with their own hands and is poured with cement-sandy solution or fine-grained concrete. As a cover, in such cases, the sidewalks, a pavement and a decorative stone (artificial or natural) are most often used and the border is mounted on the sides, which more serves as an element of the decoration, rather than the suspension limiter.
Recommendation. To fill the base that the pavement tile is stacked, a cement-sand solution is used, which add tiled adhesive for elasticity. The proportion of glue in this case should be at least 1/2 share of cement, but it is better if the glue and cement will be one to one.
Materials

If you think about how to make a garden path with your own hands, then the most popular finishing material in such cases will be the paving slabs of different magnitude and different configuration. Such a tile can be made of concrete or burned clay.
With its help, you can create a wide variety of patterns and ornaments, moving by your colors and a feature of the geometric parameters of each element (in the photo at the top of the tile ornament "Gestka"). In addition, the paving slabs can save its appearance and operational strength from 5 to 20 years - everything will depend on the current load and quality of production.
Recommendation. To increase the operational resource, the concrete tile of pastel tones should be selected - it will keep its appearance. And to extend the service life, pay attention to the manufacturer's brand and do not use the ice removal scraper.

Very good in fine-grained concrete tracks, which are poured into special forms that give fragments the most diverse appearance. In addition, it is possible to use decorative cement, changing the flower gamut of the fill in its taste.

The clinker brick does not just have high strength - it is very beautiful and appearance similar to the paving pavement. But for garden tracks use the possibilities of color scheme, thereby diverse.
Conclusion
Of course, the price of each material is very different from each other and not all under the power to spread large amounts for registration. But when decorated, the main role is played by the taste, and not the cost of decorative coverage.
