Calcule Country 6x4 do it yourself. Moodovka do-it-yourself: drawings, technology
If you have become the happy owner of the country area, but the construction of the house is still ahead, it is necessary to take care of a small utility room - the hotel. Moodovka is useful for the storage of tools, building materials, work clothes and just for rest after a hard working day. Of course, you can buy an already ready-made design and put it on the site, but the construction of cabins will cost it much cheaper, besides the wise owner of the country site will never miss the opportunity to gain useful experience and skills. In this article, you will find step-by-step instructions for the manufacture of households.
Calcule is a utility room in the form of a small house where you can store all kinds of garden utensils and construction supplies. But the clear rules for using the hotel does not exist - you can make a barn from it to store unnecessary things or turn into a cozy guest house. Depending on the future appointment of cabins, the peculiarities of its construction differ. So, if it is a barn for tools, then there is no need to warm it too carefully. And, on the contrary - if in the hotel it is planned to sell guests or relatives, to isolation and improvement should be suitable in a special way.
In some cases, you can make a small garage for garden equipment or a motorcycle. Many with the onset of cold weather postpone her poultry, bees or rabbits, placing animals to wintering. However, regardless of how you use the cabinet, it will come in handy in any case.
Types of households
There are several options for the designs of cabins depending on the construction technology. She, in turn, determines the cost of the work and operational characteristics of the building.
Cames are the following types:

To save time, it is possible to purchase former in use for food, but in this case, pay attention to the degree of wear. Carefully inspect the design outside and inside. Consider that the cost of transportation and rental of the lifting crane will be added to its value. Before you decide on the purchase of even the old household, fold all the amounts of the upcoming costs and compare them with the cost of building materials - perhaps, to build food with your own hands will cost cheaper and easier.
Construction technology
Despite the fact that the household is considered a secondary utility room, it is necessary to approach its construction. And start the best from the drawing. The circuit of the cells should include the size of the walls, the area of \u200b\u200bthe roof, floor, insulating layers and the attachment points of the elements. With the sketch you can imagine how the design will look at the site and how can it be entered into the landscape. Only after creating a detailed drawing of the former (or even several), you can calculate the required number of materials (add to the amount of 15% of the stock) and go to the store.

If you plan to store in the household garden equipment or building tools, the windows there are for nothing. In the event that it will serve as a house for guests or summer cuisine, it is better to take care of full natural light (will help to save on electricity).
By the way about electrifying the household. The wiring is also worth displaying on the drawing (better on a separate). More information on this topic can be found in the articles and.
Where to put the household?
When all building materials purchased are purchased, you need to choose a place for mounting the cabins. First of all, the duration of using the construction and the possibility of its transfer to another place should be taken into account. For example, if you are going to build a summer house for a couple of seasons, and then transport it to another plot or sell. In this case, the household is better spaced closer to the entrance to the site or provide it to the car access.
It is also necessary to think over all design options. If there will be a garden inventory and tools in the hotel, it is better to place it closer to the center of the site and create free access from all sides. If you are made from a bathhouse of a bath, you can "hide" it in a secluded corner of the garden behind the trees. The further the cabin-bath will be from a residential building, the better in terms of fire safety.
If the household is planned to be used as a greenhouse, it is better to choose the highest and solar place on the plot. However, regardless of the purpose of the construction, the platform should be prepared.
How to install household:
- The selected area of \u200b\u200bthe square must be cleaned of weed grass and any vegetation.
- Next should be removed the fertile layer of the soil. Depending on the characteristics of the soil, the thickness of the turf can be from 15 to 30 cm.
- Aligning the platform, it is necessary to be causing it with construction polyethylene (a film with a thickness of 200 microns is quite suitable). It is not recommended to use a greenhouse film because it is not durable enough. The film layer should cover the entire area under the future cabinet and enter the edges of 20 cm on each side. Film is the simplest waterproofing for the foundation. It is not necessary to regret it and even more so to neglect this step, otherwise after 2-3 years you will notice traces of the destruction of the foundation.
- On top of the film, pour a mixture of river sand and rubbing with a layer of 20 cm. This will fix the waterproofing and simultaneously lines the surface.
- In order for sedimentary water to be unhindered further from the cabinet and did not delay near her, you can make a small slope around the construction of 2 cm for each meter.
Foundation of Mostovki.
Moodovka is not a very heavy structure, whatever the materials go into the case, therefore it makes no sense to pour a powerful expensive foundation under it. The optimal option is a columnar base. It is inexpensive, quickly and quite simple. Plus, a column foundation leaves the ventilation gap underground, which extends the service life of the structure.
Useful advice: if it seems to you that there is a great solution on such a foundation, there is a great solution - create a formwork on the perimeter, pour the solution across the area to get a curb 7-10 cm high. It is enough to heat the floor. As a heat insulation, use clayzit.
In our case, concrete blocks serve as pillars, but they can be made of bricks, reinforced concrete and other materials. More information on this topic can be found in the article.
Progress:
- Install concrete blocks blocks according to the crash plan.
- Shipping upper ends of the columns with rolled waterproofing (the usual runner fit).
- Using a bar for base and construction level, adjust the position of the columns horizontally so that they are strictly in the same plane.

Frame Motovka
As you already understood, we build frame forms, the material for the foundation of which was chosen a timber with a cross section of 100x150 mm. You can take and slightly thinner - 100x100 mm or 100x120 mm.

How to make a lot:

Roof of Motovki.
How to make a roof of the household:

Roofing material can be any taste. In our case, this is Ondulin - practical and inexpensive. If the household is a residential, the roof should be carefully insulated, since it is usually a majority of heat usually goes. To do this, at the crate, first attach vaporizolation, then the insulation, waterproofing film and only after that - the finish coating (professional flooring, ondulin, metal tile, etc.).

Windows and doors of cabins
As for windows and doors, they should be installed in the same way, focusing on the functionality of the structure. Even if you are going to store shovels and rake in the hotel, you should do at least one ventilation window for venting, otherwise the mold is very fast inside.

The location of windows and doors should be installed on the moment of design so that when building a frame to mount additional amplifying racks in the opening places. If you forgot to provide them in the project, you can organize the openings after the construction of the frame. While working, you must certainly use a laser level or water level so that there is no distortion.
Paul Mobility
With a displeased floor in the hotel, everything is clear - made a boardwall and ready. Another thing is to make the floor so that it can be walking without shoes in winter and not be afraid to get sick. To do this, you must first lay the draft floor, then the insulation and the finish coating.
Ceramzite, vermiculitis, polystyrene foam plates or mineral wool can be used as insulation. To exclude drafts from under the door, it is better to make the bridges at the entrance. It can be cut in the base bar itself or attach separately, having a bar.

How to build floor in the hotel:


Warming and decoration
So that the household turns out to be warm and cozy, the walls need to be highly inlated. To do this, you first close the entire surface with a thick plastic film - it will protect the interior of the wind and moisture.

Then you can put the insulation and turn it out again with a film for additional protection. In principle, this process is no different from the insulation of the roof or floor. To cover the walls outside, you can choose siding or other weather-resistant material. The widest range allows you to choose an exterior option that will fit into any landscape.

Inside, the household can be lined with clapboard or make the interior more cozy, upgrading the wall with wooden panels. All those finishes are allowed here, which are used in conventional residential areas: wallpaper, paint, plaster, tile, etc.
As for household amenities (lighting, water supply, sewage), they must be considered when creating a drawing. With these questions will help deal with Articles "" and "".
The construction of cabins in practice is not so difficult. And if you have conceived to build a residential building with your own hands, then the hotel will become excellent training in front of a large-scale vent.
Customs: Photo.


Having acquired a country site, the first, for which you should take - there is my own hands. Why is the lotovka and why? Because the complete arrangement of the cottage will take more than one day and not even one season, but nobody suffer from the rain in the car so long. The tent is also not a way out: where to wash and cook food in bad weather? And with its own because the prices for ready-made country households are not small and their durability often does not exceed 5-6 months. At the same time, in a small room for temporary short-term stay and household needs (which is there is a lot of food) there is nothing such that a person who does not have to do without construction experience would not be done. In the course of the construction, it is purchased, which is useful when building a house, and other things that is necessary for a full rest at the cottage. AND correctly built by Motovka then will still last last, being very useful on the farm.
Calves are sometimes called today, implying that they are cleaned about the pericing of need. This idea was influenced by people employed on away works, especially builders. There, indeed, upon completion of the object, all temporary trailers are dealt or borrowed. The same builders and thought first to build households at the cottage. In the time of the Khrushchev cottage boom, they also endowed the earth, they took on the ambulance hand to build something like their locker rooms, heated, progress, etc. At that time, building materials for ordinary citizens were not on a wide sale, and the construction of a good country house could delay for years with the full skill and the hot desire of a happy new regional site.
Since it was assumed to use the hotel for a long time, the people soon have developed inexpensive, requiring a small amount of materials, but comfortable and durable. It was a sorry for breaking them, and there were already originally hosted by Hozblok at the cottage of type 3 in 1: a bedroom-refuge, a storage / warehouse, a toilet with a shower. In this form, the country houses lived to the present day, only externally referred to, see Fig: building materials became more affordable, and requests for aesthetics and quality of life above.

Meaning of Motovka
Pioneers-households of the past was often still to disassemble their creations due to the same deficit of materials, if they were not enough for the house. But the modern dacket immediately builds his household for a long time. The current country household is designed to perform the following functions:
- Residential, at the time of arrangement of the site. In the future, the shelter's room is converted into a bath, a warehouse of finished products, a ramper-ram, a tightness with a greenhouse, etc.
- Economic - like a barn for a reference property and gardening inventory.
- Sanitary and hygienic as a dressing room, bathroom, storage room for workwear and shoes, summer kitchen.
- Aesthetic - in order to remove all the unsightly sides of the country's life from the eye.

The meaning of this approach is first, in the fact that the concepts of the purpose of the dacha are changed. The present summer residents necessarily wants to have a rest area with a resting area with / pergola, a decorative pond or, flower bed, mountaineering, barbecue, etc., even if the cottage and the family lives on income from it. Therefore, it is placed on the backyards and the greenhouse to be placed on the backyards, and the recreation area is equipped in front of a beautiful country house, see fig. on right. Rob with bugs leave, where they worked; Resting or receive guests go through a crucible path already in pure, not taucing the cloves of land with a bed.
Secondly, the country house is essentially a bedroom and a living room. In the heat you want coolness, but that the air conditioner (who for winter can just steal) did not break the budget, it takes an expensive and complex capital structure with small heat lines and tightly closed windows / doors. But to whom the hunt to sit locked up in the country and follow, so that the whole company leaves the door to the door? What will this rest will be? It is easier to put on the windows blinds or hang out the marquises - and let yourself be carried out the premises.
The kitchen, shower and toilet in the house in this case, comfort and comfort will not add. The hostess will also prepare more pleasant in the fresh air, and not in a stuff; Suddenly the bad weather, to do cooking already under the roof, it is not embarrassing anyone and so that they are not interpreted and not flashed. In addition, the toilet device is the problem is very complex. The point here in: Requirements of sanitation at the distance from to the sources of water supply and residential buildings relate to the neighbors, plus it is necessary to ensure the possibility of an entrance of a sump. And if you manage to cooperate with the same neighbors, the common septic tank for 4 adjacent septors becomes at the junction of their boundaries "as a native", the reveaning is required less often, it may not be needed at all over the years. And it disappears the need to stare the ground with a gasket of pipes from the house to a septic, which is expensive.
Next, for the shower and kitchen you need hot water. To put a boiler in the house or the stove with a water brake again, it is uncomfortable, to build a house with chimney according to the requirements of the PB is again difficult and expensive, and in the household the furnace fits much easier, because This room does not apply to residential. Finally, in the XXI century we live in summer, electricity for the refrigerator with an electric stub can give a solar battery, and hot water is a solar panel. The current prices for them are sufficiently available, and some designs can be made with their own hands. But they will not add aesthetics to the house, but they will stand on a flat roof of the household, "how were there", and the eyes will not be meditated to anyone.
In general, everything says for summer houses can and need to build with your own hands based on long-term use, But without unbearable and without construction experience. Is it possible? Yes, this article is just designed to help such a case.
Build or put?
The first thing that comes to mind is not it easier to put on a simple gravel subfolder from the transport container? Works like a minimum. No, at least - you wake up over one openings so you could build a house. Finished cabins from different class containers are on sale, see fig., But the prices bite very much.

The reason is a lot of extra for the mass of metal. No one will sell cabins from containers cheaper than they stand like scrap metal, but a lot of iron in a container. However, we still remember about metal cabins, in certain circumstances it may be a good option. But in most cases, especially for beginners, it is easier and more profitable to be wooden foods, they basically and we will deal with.
What to build?
First, we will define with dimensions. The smallest hotel-asylum combined with the pantry has internal dimensions of approximately 2.5x3.5 m. Calcule "2 in 1", with a warehouse separated from the residential room partition, and a snap for the kitchen will already be released 3x4.5 m; About such we will talk more about such a thorough.

In the other case, a small bathroom near the courtyard is needed; One of the well-known designs is shown in Fig. on right. It uses a peat toilet, or powder-closet. Nowadays, there will be a hygiene. From purchased for giving it is better for a bounnitase-bucket with interchangeable absorbing cartridges, but the beythetet can be done both, see for example. Video below. However,
Video: Biotage in the household
Collect together "3 in 1" or even "4 in 1", including a bathhouse, possibly in the size of the size of 3x6 m, and at the same time it is located without much difficulty at a plot of 6 acres. Problems causes a layout, as it is better to plan a lot of 3x6 m, let's talk further.
How to be with the kitchen?

For the summer cottage of the day off, there is no sense for the summer cotton unit: there is no sense: summer kitchen is perfectly placed under the canopy, see fig. on right. If you leave for the cottage, or live there, from spring to autumn, then there is already a household 3 in 1 with a place for the kitchen and oven for heating. Alternative - electrified cabins; Then cook on an electric stove, but at the start of the country arrangement, this case is rare.
Veranda: Immediately or then?
Calcule with a veranda on the summer dacha is beneficial in many ways, if only because it can be equipped with wind-protected kitchen and / or keep a servant, freeing the living space in the shelter. But immediately plan the construction of cabins with a veranda newcomer is not necessary: \u200b\u200bget enough reliable and durable building without construction experience will not work. The beginner builder is better to build a simple "box", and the veranda that does not have power ties with the main structure, then attach. The problem of binding foundations of cabins and verandas in this case disappears, because The other columnar unheard of the overall anti-pillow. The fact that it all means, let's talk later, but for now just in case - in fig. Drawing of cabins-asylum minimal size with a delivisable veranda. It is built on the framework technology, for it and the other it's time to take closely.

How to build?
Shields
The simplest way to build households - team-shield. The shield frames from the boards are assembled on Earth, then knocked in the box, on the left in Fig. The simple floor is laid in it, the walls are trimmed by something: OSP, chipboard, plywood, etc. Then they put the doors, windows (right in Fig.), Fill roof - and ready! For 1 season or of that less: the box of shields is not a frame, there are no individual carrier elements in it, and under the load, the structure is sharpened before the cold, and it collapses. The boards can only be built as a dressing-asylum and if it is just known that the construction of the house will be completed before autumn.

Sip
Nevertheless, the method of shield assembly of prefabricated, fairly reliable and durable buildings, incl. Residential buildings available for construction with their own hands exists. This is an assembly of sip panels (structural-insulated panel, SIP, Structural Insulated Panel). Cames from SIP will cost more than the framework described below, but its construction will give the experience that it may be necessary if you decide to build a year-round cottage or a country house from SIP, the technology in that and the same case is the same. About construction from SIP in RuNet is written enough, but for more information about the panels themselves. Roller:
Video: Sippar Overview
Caution, shields!
Many of the available ready-made cabins are shielding, with all flowing. Suddenly you decide to purchase ready-made firewood, cut off suspicious on the following signs:
- Good forms of any design, as a rule, do not have overlays on the outer sheel of the walls, pos. 1 in fig. Right, in contrast to chlippy shields, pos. 2 and 3. These boards are stuffed on the joints of the shoes so that the product can stand transport.

- With the same purpose, the angles and the openings of the Haltural households are strengthened by temporary coarse lining, pos. 3. Good forces transportation withstand and without amplifying angles, and windows with glasses are supplied in a separate packaging. With Halturoy, this focus does not pass: when transporting with empty openings, the booth is already thrown out so that the windows will not stand at the place.
Frame as a base
The operational load takes the durable hard framework. For such a simple structure, like a lot, it turns out to be inexpensive and few times. Frames are built either "from the cell" to the left in Fig. - The floor is fill in the already assembled frame - either the "cage" of the power links is collected on a solid base, to the right there. The latter requires a slightly more labor and materials, but less skill, therefore we will end in more detail in this method.

Bar and log
 Lubricated and brusade cabins are luxuriously look, see fig. On the right, but at cost and labor intensity are not inferior to the house of larger size, and are built on the same technology. They rarely build them, mainly if further supposed to convert the cabins to the bath; Frameworks are not suitable for this. In this case, the household is immediately built at the place of the bath and equip the drain on all the rules, and the oven, shower, bath equipment are purchased and put the fault when the house is ready.
Metal +.
If you know how to drain and handle the welding machine, then it may be easier for you to collect cabins in a metal frame. At the same time, firstly, the need disappears in the foundation - the structure will be reliably standing simply on concrete blocks attached under the corners. Secondly, suddenly the hotel will not need, it will be able to sell it without any problems.
Based on the baseline in the metal frame, the power scheme of the container is taken to the left in Fig. Below, only on the frames and the angular racks for the sake of savings will go promsion 80x80x (3-4) mm. The upper and lower crates are made from a paired corner of 60x60 mm or the appropriate brand. The floor is styled as described further for frame forces, in the walls put wooden frames with windows and door openings and, possibly, with insulation, in the center in Fig; About frame designs Also, see below. Usually, there are usually forms of this type outside with a straightener, on the right in Fig. But this design allows you to make the trim of any type, a double roof and give the structure a fully wooden view while maintaining metal strength.

We build a frame household
So, we came to the conclusion that our household will be a frame wooden. Step-by-step instructions for the construction of frame for 3x4.5 m long time wanders on Runet. Initially, it seemed to be drawn up quite intelligently, but with multiple rewriting, errors and arbitrary abbreviations were embryo. Following such instructions, a beginner builder in the process of work will fall into a dead end or, acting in its understanding, will receive the structure of the curve and fragile. Unfortunately, the source text seems to be completely lost, so you will have to refer to existing sources, but with explanations and notes.
The first of them is: to build a lot "for 2-3 days" will not work. Working from dawn to dawn without smoking and carefully, not allowing slipping, building will take half leave in a row or 1-1.5 months, If you work on weekends. The last option is preferable, because Vacation is better to spend on the house and arrangement of the site. In general, the first country summer will be anything, but not boring.
About impregnation
In the process of work, all wooden parts before installation in place must be impregnated with biocides (antiseptics) and hydrophobizers (water-repellent compositions). For a lot of motor oil, a spent engine oil is suitable as the other. The crown, the bottom strapping, gender lags and blackboard, see below, are also very desirable to be treated with bitumen mastic (40% bitumen and 60% Whitespit or solvent). Impregnate non-blanks, and already sliced \u200b\u200binto the size of the part, with all the recesses, grooves, etc.
Foundation and foundation
Actually, any foundation is laid by T. Naz. pickup, but in this case, because The structure is small, you can simplify the work if the plot is not too "humpbala". The basis of the location is built in the sequence in rice:

- Lay the columns undelated foundation, pos. one.
- They collect a total reference frame from a bar of 150x100 mm, T. Naz. Lower crown or, for a frame structure, just a crown, pos. 2-4.
- On the crown, the lower carrier frame of the frame, or the lower strapping, with gender lags, pos. five.
The choice of the type of foundation is unequivocal: for such a small and lightweight building, any other will be unnecessary and expensive. About the device and the embezzlement of columnar foundations, here we will focus on the features for this type of construction, to know the newcomer.
Kotlovan under the foundation rotate with capture (removal) from 0.5 m around the perimeter for the contour of the building. Remove humus; If the power of the fertile layer exceeds 30 cm, digging on the bayonet shovel. Otherwise, the pillars are cut on the bayonet, i.e. up to 30 cm deep. Next, the pitting is littered with geotextiles (so that the backfall is not spread) and first pour a sand pillow of 10 cm in common, on a powerful humus, or in pits under the poles. Putting the pillars, the pillow shine to the soil level; Its appointment - together with the anchors (see below) counteract the forces of frosty radiation. The sandy recession is trambed twice, before installing the column and after it.
Pitch settings - in the range of 1.2-1.7 m, so that the whole number of spies between them fit on the buildings; For householders 3x4.5 and 3x6 pitch 1.5 m. Poops of pits under the poles, it is necessary to consider that the outline of the foundation should perform for the contour of the building by 10-20 cm. At the bottom corners of the frame "flock" all operational loads; If he falls on the poles flush on the outside, it will be difficult for them to "spread" in the post, and the structure can move the sideways.
Laying brick poles, as recommended in sources, in no case: the best working brick in the ground will begin to crumble a maximum in 3-5 years, facing dry molding - in the first winter, and the resistant clinker high-life will cost more special concrete foundation blocks 200х200х400 mm. The pole will follow 4 blocks laid on the cement-sandy solution in pairwise ones; For details, see the Stated foundations. Thus, the pillar will turn out to be a 400x400x400 mm cube, of which 200 will be in the ground (bayonet 30 cm minus pillow 10 cm), and 10 cm will take place from the outside. For cabling 3x4.5 m, the sizes of the foundation along the contour will thus be 3.2x4.7 m, and the dimensions of the pit in the plan - from 4.2x5.7 m.
Now let's see again on the pos. 1. See? The middle row pillars are narrow, from a pair of blocks each. This is actually incorrect even for places with soft winter, all pillars must be the same. Not so expensive the foundation blocks in order to save them in the most important part of the structure.
Poles lay first on dry and align horizons with hose gurolar; Customized in height, slugging sand under low pillars. In the rectangle, exhibit the diagonals and sides. Rely only on the equality of diagonals it is impossible, you instead of a rectangle can get an equifiable trapezium! Tringing the pillars, the upper pairs of blocks are removed and put back on the solution.
Further prepare the basic (short) crousse of the crown, try on the place and laid perpendicular to the long axis of the building, pos. 2. Talking on it, cut into the size of the other bars of 150x100; The crown is going to the plastics, i.e. 150 mm side oriented horizontally, pos. 3. All connections - in Polterev. Do not forget about impregnation! According to the fit, the bars are removed, the pillars are covered with 2 layers of rubberoid (this is waterproofing from T. named. Capillary tree winding), bars are put back and, checking the crown with diagonals and fractions of the sides, the joints of the bars are crossped with 80mm nails, in a pair of diagonally in each Shake, pos. 4. At this stage, an anchor base is also being strengthened.
Anchors
The foundation anchors are the very "steel rods from 1 m" from the descriptions that it seems to be tinted in the poles. In fact, the household, the pressure of which land that elephant of the crusher is easier and more reliable to fix M-shaped indoor crutches, driven into the ground, pos. And in fig. To this paragraph. Make crutches from corrugated 16-mm reinforcement. Their lower ends sharpen to make it easier, and, most importantly, even more, went to the ground.

Close anchors from the inside, under each Costa's mustle in a bar of the crown make a groove of 20x20 mm: inscribed along the edges and choose a bit. Do not cease with the propuls, unnecessarily weakened the crown of anything! Close anchors according to the scheme, pos. B and B for cabins 3x4.5 and 3x6, respectively, and in 2 receptions: first do not finish 10-15 mm, and then, fluralizing again and overgrowing, if necessary, the crown, according to the same schemes, finish tightly; Preferably - with 1 sledge hammer. Additive in Fig. About the angular nails will come in handy below.
The next stage is the imposition of the lower strapping on the crown and the installation of lag of the floor, pos 5 in fig. With a base device. The strapping is made as well as a crown, but from a bar 100x100 mm. Collect flush with the outer edge of the crown; Thus, a step of 50 mm is formed inside, on which lags will be skilled. By applying a frame, the strapping is fastened by 80 mm nails, and as a crown, and sewn to the crown with nails of 150 mm, as shown in Fig. With the location of the anchors.
Lags are made from a 100x50 bar or 100x40 boards, they cut them into a quarter or a third of them, i.e. Us lagows will be 25 or 30 mm high. Step Installation Lag - 400-700 mm. It is chosen so that the spans between the lags were the same width. If the purple floor is from a simple cutting board, it is better to stick to a smaller value, and if the t-shirt will go on it, then the step of the lag can be increased. In any case, it is desirable to take a multiple 150 mm, it will be much simplified and save flooring, see below. Each lag is naked to the strapping of 2 nails 80 mm, along the nail in the Us, and in the center to the crown of 150-mm nail, and the total nail to the lag.
Underground
At the same stage, it is desirable, and for the location "from spring to autumn", heated at least briefly, be sure to make the insulation of the sample, otherwise the floor will replenish. For this, the openings between the foundation pillars are filled with something (brickstone, brick battle, paving slabs), in the pose. 5 in fig. With the base, on cement-sandy solution, and the subfield fall asleep with a clay. Careless builders often simply lean around the trimming of the proflist or the slate fight, indulging in the sand, and sprinkle outside the ground. It is possible to fit if the foam is not sorry.
There are some subtleties here. First, the assignment of the filling of the openings is only to keep the clamzite from the spreading, but it is impossible to cover them from the inside from the inside: the underground should be ventilated, otherwise it will turn into a condensate collection. Therefore, in each span, it is necessary to leave or produced, by a pair of about 4x6 cm on the span (convenient, if filling with a boot or brick fighting), or the gap at the top 4-6 cm. If the spans are faded, it is necessary to insert pipe cuts in advance.
Secondly, it is necessary to fill out the openings from the inside so that the filling does not chop out. Then then, when the hands are reached and the structure will fall, it will be possible to make a real beautiful base.
Frame
The first is the corner racks of the frame of a bar 100x100, reinforcing temporary pits (pos. 1 in Fig.), On steel corners and screws (5-8) x (60-70) mm, pos. 2. Self-tapping screws are tightened after the rack is adjusted on the plumb and backed by bodies. The height of the rear racks is approximately 2.2-2.4 m; You can take from the drawing of the household-mini, see above. The front, with the width of the structure of 3 m, take 0.5 m longer. If you consider the dimensions of the racks yourself, note that the maximum tilt of the slate or ondulin roof is 14 degrees, and the optimal one is 7-9 degrees.

Then impose the longitudinal top side beams of the box (it is not necessary to talk about the solid upper strapping in the form of a carrier frame in this case), attaching to the empty of the corners, as below, and cut into the polytera beams. The crossbars are fixed with nails of 80 mm, paired diagonally into each insert. After that, they put intermediate racks and the appropriate upper crossings corresponding to them, pos. 3.
At this stage, construction can be somewhat simplified and reduced. On pos. 3 It can be seen that the intermediate racks are also from the bar 100x100, but for a small cabinet it is unnecessary, 100x50 bars or 100x40 boards will go on the intermediate racks, the same as on the lags. Put them across the bars strapping. In order for the design does not lose strength, you need to perform the following conditions, see Fig. on right:

- Splip-adjacent to the corners should be the same width.
- Corner and adjacent windows / doors spans should be backed by bows from the same board.
- If the corner / prigible span is obtained 300 mm or less, but such a situation should be avoided by placing doors / windows at a sufficient distance from the corners.
Now you need to replace temporary bodies permanent, from the same boards 100x40, and put rafters, pos. 4. There, by the way, it can be seen that the builders stole: one of the angular spans is empty, although nothing prevents to back it. The boards of the trenches also put across the bars; Fasten with nails 80 mm, paired at each end. Next, the installation of door jambs (you can immediately with the door of the door) and window frames, pos. 5. Ends the installation of the box bonding the lower belt with the crown of 150 mm nails with a step of 200-250 mm.

Rafyla
How to crash and put rafters, shown in Fig. The installation step of the rafter is about 0.5 m. Additional suspensions are made from scraping board. In this design, they are very desirable, because It is not possible to firmly attach every rafter to the top belts. Svet rafted approximately 30 cm; The same will be the side skes of the crate under the roof. If the hotel is constantly in the Testament (let's say, in the forest), then without suspensions, the rafter can be done.
Perhaps a dull single-piece roof will not suit you. At such a case in fig. Below are the schemes of rafting farms suitable for the country's house and, of course, there are consumers. Designs, circled green, are good because simple, economical and allow to reduce the height of angular racks to 1.9 m while maintaining a sufficient height of the ceiling of the cabin.

Roof
After assembling the frame cover the roof so that the rain does not wet not yet the finished floor. Its crate to the slate roof is gained at the intervals (on the left in Fig.), And under the ondulin solid, because Ondulin - material soft. Working with him, of course, it is easier than to carry heavy fragile slate sheets, but the slate roof is much cheaper and more reliable.

As laid and fastened sheets of slate roof flooring, clear from fig. Below, but when it purchases it is necessary to take into account some circumstances. The first, on sale most often happens Slate 6, 7 and 8 wave. The 6-wave sheets are easier, but the price of the square of the roof of them will be significantly higher than from 8-wave. So, if there is little money, and work is not afraid, take the 8-wave.

The second, slate sheets are produced different steps, the height of the wave and thickness. If you take a used or at all, the rotor hit, it may turn out that the sheets are not joined. Therefore, when purchasing, you need to pay attention to the label, there is always a set of 1, 2, 3 and 4-digit numbers, for example. Sheet 40/150 - 1750 - 8 or 6-GOST 40/194/1750. 8 or 6 then there will be the number of waves, 40 - the height of the wave, 194 or 150 is its step, and 1750 - the height of the sheet, this is its standard value. If there is a smaller 4-digit digit, then this is the width of the sheet.
Floor
The floor of the cabinet consists of 2 flooring, the lower draft and top-piston, with heat, hydro and vaporizolescence between them. It is impossible to simplify anything here, otherwise the room will turn out raw, uncomfortable and soon hesitates. In addition, the crown with the strapping and the boardwalk form a rigid box, without which the base will be released fragile. So it is necessary to approach the flooring of the floor with all thoroughness and attention.

How the black floor is arranged, it is seen from fig. The cranial lumps are allowed throughout the circuit of openings between lags; "Nail" 70-mm nails with a step of 100-120 mm. It is needed to turn on the boards of flooring into the power scheme. On the draft floor they take only the tipped board 150x (30-40) mm! At the cleaning floor, you can still save, typing it out of a simple cutting board, but the "black" floor is filling only a tongue! The sequence of flooring is as follows:
- Boards put along the openings between lags.
- From the first, in the installation order, the boards are cut off swings.
- The following boards, up to the penultimate inclusive, put, tightly bypowing the groove on the comb's comb.
- The last board is cut into the size in the width from the ridge side, i.e. Cut crest with part of the plastic.
- It is obliquely put it so that the grooves found on the crest of the previous one, and we press the place with force; Perhaps you will have to knock in Cyans.
- The boards of the finished flooring of the flooring nail to the cranial bruster with nails of 70 mm in a step of about 100 mm, and a pair of nails in the middle of the middle bruster of the crown. The indent of the nails from the edges of the longitudinal boards is no less than its thickness, i.e. 40 mm. It is desirable to withstand it for a cranial bar, driven by nails.
When the draft floor is ready, pos. 1 on the trail. Fig., His cells are covered with a pergamine or its analogues, it is vaporizolation. Save, isolating the bottom with polyethylene, it is impossible, because He misses both pairs and moisture. Pergamine is sewn to lags by a construction stapler or nailed with small nails, laying pieces of plywood under their caps. In any case, it is impossible to sew / nasty to the flooring - what will it be for insulation, at the bottom holes?

Now it was a turn of insulation of sex. Recall once again, it is necessary in the summer household, so as not to refuse. Will you not keep it in winter in heated room? Warm mineral wool pos. 3, but you need to take mats from a long-fiber suitable for residential buildings. The short-fiber minvat will constantly dust by mic champs, very harmful to health!
Next, the floor is covered with solid, or with the inverted sheets from 15 cm, polyethylene film, pos. 4. Now the half perception of polyethylene will have to do: condensate, which still broke into the floor, will evaporate through it, not having time to cause diploma, and the liquid spilled on the floor will also evaporate or stroke before leaving the insulation.
The last "floor" operation - finishing flooring. It is also advisable to do from the punching, but, as already mentioned, a simple clean-cutting board of 150x40 mm will go. "Clean" boards stelite across the lag, i.e. Perpendicular to "black", pos. 5. The finishing flooring is "solid", from the edge to the edge of the frame of the lower strapping. Make t. Floating floor, as in a residential building, in the hotel it is impossible for considerations of the strength of the structure.
In places where the floorboards fall on the frame racks, the grooves 50x100 are chosen in the boards, and the corners are 100x100, so it is impossible to take a 100-mm board on a clean floor, the block corners will come out with hanging. They nail "clean" boards in the corners of pairs of 70-mm nails diagonally (in the board and in its corner), and on other intersections with bars and lags - pairs of the same nails across the board.
Sheaving

The outer covering attaches the final strength of the structure, so it is also made from the boards, and siding, etc., which then wants, is swaying over it. They are trimmed either with a tongue or a quarter board, so that water flowing along the walls does not leakers inside, i.e. Up the row of the tongue or inner quarter, see fig. on right. If further external finishes are not assumed, then you can heal the cutting board in Vnakroy, the "Christmas tree". Top to donomose, capturing and lower base belts. Before covering to the frame, parchment is attached with a stapler, pos. 1 and 2 in Fig. Now you can put the windows; Before installing platbands, the cracks in their and doorways are fought, pos. 3.

What is before the inner skin, then here - as God put on the soul: plywood 4-8 mm, OSP, chipboard, laminate, etc., with or without insulation, pos. 4 and 5. At the same stage, they are paved in the walls of the corrugations with cables tightened in them, if the cabins are electrified.
Warming, if necessary - the same as for the floor. Corners It is advisable to cover with plinths. In Khrushchev times, it was often necessary at all without interior decoration, simply there were no materials. Now it is easier with them, who would have not been nostalgiced at that time.
Partitions
 Frames of partitions, if such provided, collected according to the scheme, similar to the sidewalls of the frame, see fig. On the right, only from the rails of 40x40 mm. Drinks put only in extreme cells. Internal doors often have to be located on the wall to the wall, then an additional rail is added to the cell with the doorway (shown by the arrow), without it the door in the platband will not become. The frames of partitions put in place, 70 mm nails with a step of 200-250 mm are nourished directly to the walls, and they are trimmed with the same material that the inner walls. Corners are strengthened by plinths over the entire contour.
For reference
The width of the entrance doors canvas is 800-1100 mm, internally charged 750-850 for residential and 600-750 mm for household, utility and bathrooms. The maximum width of the shadow window sash is 900 mm; Preferably - 600-650 mm. The minimum is considered to be a 400 mm wide width, but can be done already. Door height - 1900-2100 mm; Windows - 600-1300 mm. The height of the window sill above the floor is 750-850 mm.
More angles

Remember how we put the corner racks of the frame: on steel corners. You may already noticate that the external, the most loaded corners of the framework from the point of view of construction mechanics hanging, i.e. Weakened. Therefore, it seems to be quite ready for a lot in Fig. In fact, it is not yet ready to take on all that it is prepared by fate and weather, its outer corners need to be supported by the overhead boards.

How it is done, can be seen in Fig. On the left: the corners are squeezed by pairs of boards from top to bottom. Handling diagram of nails (150 mm): 1st in the crown and lower strapping, then in a row with a step of 200-300 mm to the racks, then 1st in the upper horizontal bars. First, the boards on the short sides of the building are flush with the edge of the corner, and then on the long sides to cover the ends of the adjacent.
About shutters
The fact that the cabins are very desirable to provide shutters, obviously: winter element is able to beat the glass and without the participation of hooligan. But to do in the downtime, swinging shutters complicated, and the blinds are needed to them, because Hot summer in the room without ventilation system will be stuffy. Therefore, the optimal version of the shutter for cabins - folding, see fig. They shadow windows like marquises, protect the glass from damage better than swing, and make them easier.

Trailers

Building trailers are 6-12 m long and a width of 2.4 m. The length of 6 m long-length is very convenient for the cottage: it is placed in it a lot of things, and it is placed without problems and 6 acres. It took only increase its width to 3 m, because The walls of frame forms are thicker than in a standard trailer. Cames of such type, see fig. It is constantly on sale, and disagree well.
However, with the development of subsidiary needs, with often insufficient possibilities, build a landscaped home on the site, problems arose with layout. Typical Construction and Traveling Cell Spashing, Pos. 1 in fig. Below, it is only a bedroom and / or changing room. For kitchens, canteens, bathrooms, offices, even bars and billiards, produced and produced trailers of other types of size, but there is no place to collect a private town on the site.
Attempts to use in the layout of households sanitary-ergonomic techniques and norms for residential premises lead to the fact that, in addition to the bedroom, the place remains only on a tiny vestibule, in which they will not turn in warm clothes, and the warehouse in which nothing except the shovel and Grabel, It does not fit, or a toilet without a shower, where, sitting, the door cannot be closed - the knees rests on, for example, in the center in fig.

Since there is a mobile mobile in essence, it will be quite justified to apply reception and passenger transport standards for its planning. The trouble will be only with the doors, more precisely - with the direction of their opening, because They are swing, not sliding. But the doors, it is generally the second after the headache of the planners.
An example of a rational layout of 6x3 m is given to the right in Fig. above:
- Bedroom 1.7x2.7 m MORE railway coupe. It will fit the bunk bed, a small dining table and a chest of drawers. For the night on the floor, you can put another clamshell, for which, among other things, enough space in stock.
- The bathroom is placed an angular shower of 1.1x1.1 m, bounitas and a corner washbasin-halfulpan, such as the same on the railway. Not luxury, but you can wash and please.
- The largest area is relieved under the kitchen block combined with a pattern, these are 2 raisins of this principle. Compact refrigerator are placed, a summer cottage stove is placed on a 3-5 kW of thermal power (enough for heating in the off-season), and the place remains to change clothes; And warm.
- Exit from the bathroom is also in a warm room, which is important after the shower in cold weather.

The case is more complicated with the location of a smaller size; Here you have to combine stall-refuge with the kitchen. An example of the planning of this kind of "household studios" 3x4.5 m is shown in Fig. on right.
And then?
Guess what the next thing in the country is, as they say, already shouting: "I am a building!" Perhaps when the house is not ready yet, and the bath is only in dreams? True, shed. Or a poultry house, or a pigsty that in the design almost the same thing.
Situation peak. How to build it? Where is the time to take if it is so necessary more than there is hours in the days? And most importantly - from what? No extra money and not foreseen.
From the pallets from the building materials - pallet. From the construction site, it was certainly unnecessary, and buy used not to consume: disassembling pallets for non-measured lumber in holes from nails absolutely unprofitable, so you often served your pallets are often savable, just to get rid of.
Almost all publications affecting the number of repressed can be attributed to two groups. The first of them includes works by the accusers of the "totalitarian regime", calling astronomical multi-million figures shot and planted. Having studied archival documents, such a researcher is surprised to make sure that the scale of the repression, which we "know" due to the media, do not just disagree with reality, and overestimated ten times.
After that, it turns out to be in front of a painful dilemma: professional ethics requires publishing data found, on the other hand, as it were, with the defender of Stalin.
According to this certificate, in just this period, the OGPU, the "Troops" of the NKVD, a special meeting, a military board, by the courts and military tribunals, 3 people, including, was sentenced to the death penalty, and to content in camps And prisons for a period of 25 years and below - 2 people, to reference and expulsion - man. On the allegedly repressed team composition of the Red Army from May of the year to September in the amount of 40 thousand people.
It was such a, round figure, called for the first time the magazine "Spark" (No. 26, G.), for him already "Moscow news" and next, other publications. Where did this figure come from? But from where. May, because of the mass appeals of citizens, the People's Commissar Beria was forced to release order No., which determines the procedure for issuing certificates to relatives of repressed. People's Commissar of the Interior of Beria Lavrenty Pavlovich. The order of the NKVD CCSR No. "On the issuance of information about the location of the arrested and convicted" The establishment of this order was motivated by the fact that in the period of mass repression a large number of persons were unreasonably convicted, therefore a message about the actual fate of the repressed could adversely affect their families.
The memorandum of the General Prosecutor of the USSR R.A. Rudenko, Minister of Internal Affairs of the USSR S.N. Kruglov and Minister of Justice of the USSR K.P. Gormshenin about the number of the memorandum of the Prosecutor General of the USSR R.A.
Rudenko, Minister of Internal Affairs of the USSR S.N. Kruglov and Minister of Justice of the USSR K.P. Gorshenin on the number of convicts of the OGPU convicted Troops, Troops of the NKVD, a special meeting, military board, ships and military tribunals for counter-revolutionary activities in the enterprise. Often think that repression is when the Commissioner in the leather and the dusty helmet shoots the next hundred "political" at the wall. But in fact everything is more complicated. Speaking about the time frame of repression often take the period from the year. That is, from the revolution to the death of Stalin.
There is a small question to such researchers: how, fuck, the loss of civil war considered something?!? A small number of repressed sufficient enough to live in fear. And the fact that the design bureau appeared in prison this is the rules? Why is this history of domestic aviation begins with prison?. The numbers given in this document does not dispute (in the open) even society "Memorial". Liberals act differently - constantly called overestimated figures of sense sentences.
And instead of a person executed by court sentences from to February 1, everywhere tube about "dozens of millions of shifted". Now my articles can be read on Yandex.Dzen-Channel. The percentage of "repressed" from the total number of inhabitants of Gulag: the composition of the Gulag of the NKVD of the NKVD for counter-revolutionary crimes ().
The amount of% to the entire composition of the camps. Total, certificate of the number of convicts for counter-revolutionary crimes and banditry contained in the camps and colonies of the Ministry of Internal Affairs as of July 1 (26). By the nature of the crime in camps in colonies% of total. The total number of convicts "These are the documents of the NKVD, and therefore they are falsified. - They declare. - Where did the figures come from, which are given in them? ". Well, especially for these incredulous Lords will give a couple of specific examples, where "these numbers" come from. In this case, the total number of "repressed" does not exceed 3 million.
However, to finally clarify this issue, additional work with sources is needed. Let's see what percentage was "repressed" from the total inhabitants of Gulag's certificate of the number of convicts for counter-revolutionary crimes and banditry contained in the camps and colonies of the Ministry of Internal Affairs as of July 1
Categories. POST NavigationConstruction of a private house usually begins with a "construction trailer". On the market you can find a lot of offers for the purchase of new or used wooden cabins. It also appeared in everyday life as such as the container unit. It is made of metal, has a large number of options for the acquisition and can be used as an element of modular housekeeping.
But it is the carriage car that is their own hands on a wooden frame - the most economical and optimal solution for the mastic owner. After completing construction, it can be used as a guest house, a barn for inventory and equipment, re-equip to a bath or transport to the country area and build a house from the carcing.
The car is my own hands: draft Motovka
From the future use of cabins depend on its size, device and finishing materials.
The inner partitions are not needed as a small shed. There is also no need for insulation of walls, gender and roofs.
If it is planned to use cabins as a seasonal residence (for example, a summer garden house), then you can provide internal planning. Warming is better to spend at the construction stage - when using heaters, there will be a better heat in the spring and autumn, and in the summer it will not be very hot in the sun.
For the construction trailer, the inner lining may limit itself to inexpensive and simple materials. Re-equipment in a garden or country house will require only refinement in the decorative decoration.
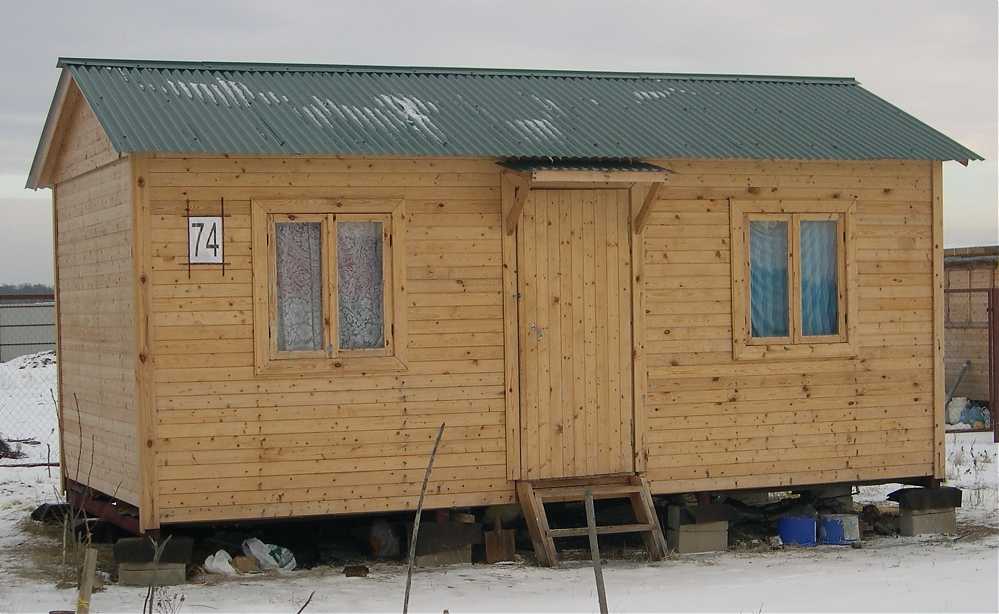
It is best if the inner space is divided at least two rooms. For example, a house in the first photo can be represented in this form.
Projects of householdes
A small tambour-entrance hall and a large room with one small window - a typical building trailer with your own hands.
And this is an already improved option with three windows, which can be called - a house with a living room and a bedroom.

On this scheme, the household consists of three rooms - a vestibule and two equivalent rooms.

And of course, before the start of construction, the simplest drawing is needed indicating the main dimensions.

Drawing of hotel
foundation
How to build a lotovka - Step-by-step instructions for the construction of the household starts with the foundation.
Feature of a small wooden design in its insignificant weight. But even this does not mean that it can be placed directly on Earth. To protect against the effects of soil moisture (including precipitation in the form of rain and snow), it is necessary to rummaged base.

which can be painted or saked with vinyl wallpaper.
But it is more common with a wooden clapboard.

The inner partition should be provided for still developing the project of the household, but it is not too late to equip it and later. The main thing is that it is fastened to one of the lag of the floor from below and the ceiling beam bruis from above.
Outside and from the inside the windows and doors are fixed. Remove angular joints outside with straps or wooden profiles, and from the inside by plinths and cartoons.
Complete finishing with grinding of wooden coatings, primer and paint processing.
Having bought a plot, the land, think about what needs to stay somewhere during the construction of the house. Such a temporary inhabitant in the country or garden plot is the lot. A small insulated structure, the size of usually 3 * 6 or so. There are a lot of offers on the market: from wood and metal. But the quality of them is more than doubtful, in construction uses the cheapest materials. This is easy to make sure, considering the costs that you incur, if you decide to make food with your own hands. With the same dimensions, you have cheaper, most likely will not work, and if saving, then small. You will consider normal materials, and not the cheapest. But on quality and strength, homemade cabins are many times superior to the purchased.
Movie on the site first (or second after) The construction that appears on the site
What and how to build
Almost all cabins are built on frame technology. As building materials for the frame, a wooden bar minimum is 100 * 150 mm or profiled metal pipe 60 * 60 * 2 mm.
To cover the selection of materials is much wider. Use:
- edged board;
- sheet material - ,;
- proflist;
- siding.
In any case, the casing is done on both sides - outside and from the inside. The outer can be metallic, and inside more often do or lining or puff or osb.
Between the two shelves laid thermal insulation. Though the structure and temporary, spring and autumn, and sometimes summer nights can be very cold. Therefore, without insulation - in no way. Insulation can be anyone. Better - mineral wool, cheaper - foam. The best characteristics are extruded polystyrene foam, but also the highest price too. Only choosing the insulation, keep in mind that the foam sounds almost flutters, so they will not be able to sleep very nervous. Therefore, the optimal choice is mineral wool. What layer? If by the mind, then in the middle lane of Russia, it is desirable 100 mm, but at least 50 mm.
Please note that the floor is needed. Especially - Paul. The bottom is very pulling. Therefore, it should be double: first the draft, on top, across the board, put lags, between them the insulation, and then the finishing floor.
Layout and drawings
Despite the construction is considered temporary, often thickly it turns into a bath or guest house. Therefore, even in the hotel there is such a concept as a layout. Even temporary housing should be relatively comfortable.
Calcule-car
There are two main types of cabins: the wagon and a sprawler. In the construction of the type "Wagon", the entrance is on the side, inside there is no separation, in the extreme case put a partition - by 1.5-2 meters from the entrance. This room is used as a tambour dressing room and a warehouse for storing the tool. This is the easiest possible options.

In the drawings there will be graphic and digital designations, their decoding in the photo below.

Dispense
The most popular planning is pamping. This is when the entrance is in the middle. Moreover, the middle is fenced off and used as a tambour, storage room, etc. The purpose of the other two rooms can be different. Someone both uses ak bedrooms, someone one as a kitchen.


Customs with toilet and shower
Not everyone agrees even at a construction site or dacha, even temporarily, to lead the Spartan lifestyle. Requires at least elementary amenities. Although, probably, it is better to build them separately.

San block is located with the edge - a more wise decision, especially if you make a separate entrance

With toilet
By choosing a drawing, do not forget when developing a frame for the scene, that at the place of the walls of the walls necessarily put racks. If the doors are attached to the racks, they must be reinforced - dual.
Foundation for housekeeping
Since the structure is temporary and lung, the foundation usually serve as columns or blocks. More often - blocks. Preferably - concrete, standard. No - you can any construction, but high density and not hollow.

They are put on the prepared grounds. If the soils are normal, you can simply remove the turf and align the platforms. For greater reliability, they dig a small pit for each block of a depth of about 20-25 cm. It is covered with a crushed stone of the middle faction and the trambet is well. Blocks are exhibited on such a substrate.
Note! The upper edge must be set to level (be in one horizontal plane). It is also necessary to check the foundation geometry: the corners strictly at 90 °, the diagonals are equal.
With the width of the cabins, no more than 2.5 m and use in for a frame of a wooden bar, block blocks in each corner, as well as under those places where partitions are departed. If the building is without partitions, the setting step - every 1.5-2 m - depends on the cross section of the bar and the planned trim, as well as the weight of the roofing material. With a width of 3 m or more, an intermediate bar is required, and the basis for it. In this case, three rows of blocks are obtained.

So that in the premises did not pull dampness, waterproofing is placed on the blocks. You can - two layers of rubberoid, it is possible - other waterproofing material, even films. Another option is to mark with bitumen mastics. This can be considered the foundation ready.
Step-by-step instructions: photo reports with explanations
Understand some things in description difficult. How much do not read, but until you do, or at least do not look at how others do, you will not understand. That is why the photo of the construction of cabins are helpful: you can consider how the nodes did and find a solution for ourselves. This is a kind of allowance for those who decided to build on their own.
Construction of wooden hotel
There was a lot of wood from wood at the cottage. Dimensions 3 * 6 m, warmed - for temporary accommodation for the construction period at home. Used the following materials:

Since the prices for materials are very dependent on the region, there is no point in talking about the cost of construction. But on this list you yourself can determine with quite great accuracy, how much is the lots built with your own hands.
Please note that there is no roofing material in this list (Ontulin planned) and there is no glass. Also not purchased lining for interior decoration.
Before the construction of all the wood, with the exception of the lining, was treated with antibacterial impregnation "Sezheng Ultra". Covered in two layers. So the processing quality should be normal.

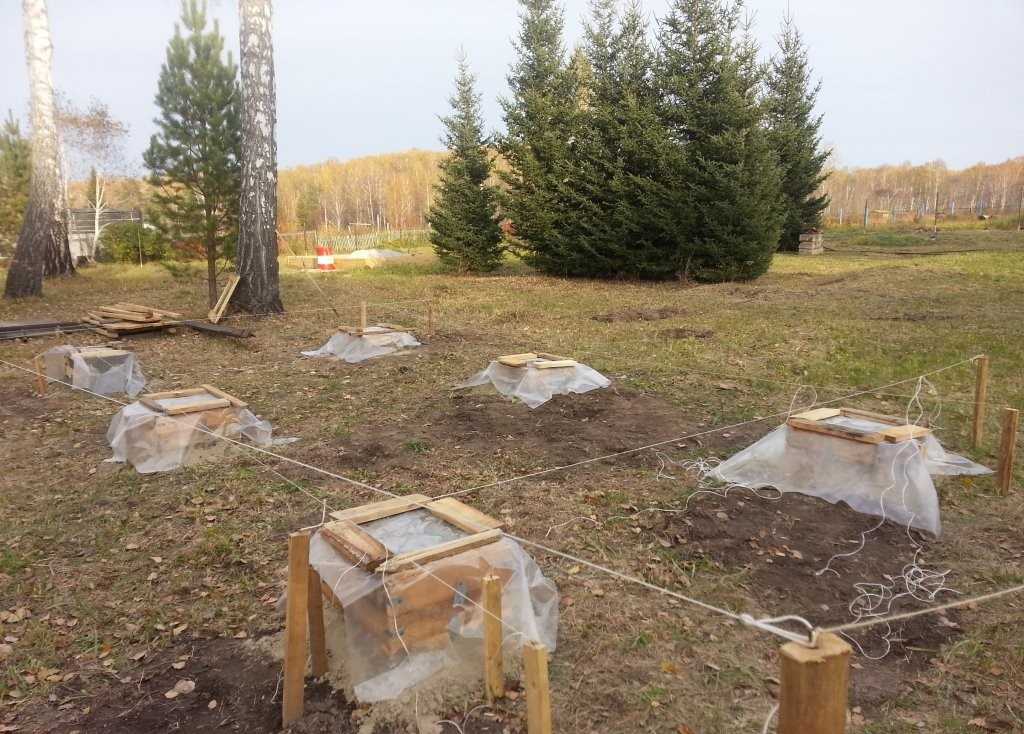
Put the platform under the structure. We decided to put the blocks on the sandy submet. Pile of pits of centimeters 25-30 dug, poured sand, rammed. Exposed blocks. At first they put two extremes, put the board smooth on them, on it - level. So put extreme blocks. Then under height of the board were customized intermediate. So on all parties.


The next stage was laid in gender lags. They were put in 50 cm, through one we will put and racks. Delivered from the board 50 * 100 mm set on a narrow part.

We decided to collect racks with rafters immediately on Earth, strengthen the connections to the corners, and then install it in the finished form. Collected from the same board 50 * 100 mm.

Know the front rack - it is longer, rear and rafters


They knocked the racks with long nails. Then for reliability, all the place of attachment was reinforced with corners and plates. They were already sitting on the self-tapping screw.
On the sides of the lag, Bruks 50 * 50 mm. It turned out "nests" under the laying of foam. It was put on the mounting foam: and hermetically and reliable. From above, knocked the floor board.


Now I went directly to the trim. On the short side, the lining from packs of 3 meters, six-meter nailed to long nailed.

Having made the trim to half, the crate under the roofing coating. The board was nailed 25 * 150 mm in 30 cm increments, along the edges, step 20 cm (so that the Sve as it stand). Then continued to cover.
In places where windows will stand, put the mortgages - the board that lies across the rack. It will rely on the window frame. Bucked with nails, through, but additionally, the connections were reinforced by the corners.

When the rear and deaf side walls were sewn almost to the vertex, rubieroid rolled the roof. He will lie until you buy Ondulin.


Outdoor casing is almost ready. Doors bought without decoration - only frame, crumpled fiberboard

While we finished navigating the wallboard outside, the work was also boiling - put the foam. The width of the sheet is 100 cm, the distance between the racks turned out 95 cm. We account for thin strips to cut off.

So that it is not "rolling", we grab from thin corners from above, which is fastened, naturally, only to the rack bruis.


Started the skin inside, but the lining ended. While switched to painting outside. It turned out quite well, it seems.

I purchased the lining, finished the inner finish.

Bounded the manufacture of partitions. It was collected from the same boards - 50 * 150 mm. The locations of the joints are traditionally reinforced by the corners. Washed - clapboard.


Began warming the roof. We used the same foam and the same technology - pinned with corners.

The joints with the insulation of the walls were repaired by mounting foam.

After you started the clapboard.


Ceiling trimmed
We started laying roofing. Purplified Ondulin and laid it with a sharp one wave. Fucked in each wave with special hardware purchased with Ondulin.

Ontulin mount on the roof of gardening
Then they started bringing to the mind of the inner premises. The septum was also insulated with foam, they were listened with the second side with clapboard.


So simpleness looks in the final version
The lining inside is covered with water-based varnish. It gives only a slight tint in a little bit darker. Films on wood seems to be no. If you look straight, then it seems in general that the tree is not covered. Only if you look at the side at a certain angle, shine is visible.

On the floor, varnish is already with a film: so that the wood does not grieve. Covered in two layers.
After starting the finishing of the sinks. They were sewn all the same clap. In general, working with the clap took the most time.


And this is a side view.
Metal frame for cabins
Metal was chosen as a basis as more reliable and durable. The very idea was played, that, perhaps, it will have to drag the former. If the frame will be made of metal, nothing threatens her.

The dimensions were determined based on the length of the busties of the corner: 11.7 m. The following dimensions were identified: 2.8 * 5.8 m, height - 2.5 m. The frame was welded from angle with a shelf 75 mm, 6 mm thick.
The foundation is made on the columns, cast on their own: the construction began in autumn, and nothing else can do nothing. So it was decided to pour reinforced columns: six pieces. At first, the plot was placed, after which the places for the foundation columns were determined.

The holes are 50 * 50 cm, the total depth is about 30 cm. On the bottom of the crushed stone with a layer of about 10-15 cm and talked tightly. From above as much sand, also with a tuck. As a result, the subftip came out in one level with the soil.
Ruberoid is laid on the bottom, so that the moisture does not leave the concrete, and he "rushed" normally, and not dry. Next, the formwork is collected and fittings are laid in it.

Dry plot, water goes fine, so there should be no problems. So the fittings, or cooked, whether it is scrupted - it is not clear.

All the concrete is covered with a film: the end of October, and that concrete was a normal fortress, it needs to be caught.
Frame frame was cooked for a long time - all winter: frost, workload at work, did not give to act with the necessary periodicity. The base from an angle of 75 mm, 6 mm thick, was allowed to increase 40 * 2 mm.

Start of the frame of the Metal Corner - Lower Vent
The side parts were cooked entirely, then with the help of 4 people put in a vertical position and so fixed. On the racks to which the frames of the windows and the door will be attached to the profiled pipe 40 * 40 * 2 mm.

The most inconvenient point is to measure the diagonal alone. They are constantly monitored, but to do one uncomfortable. But it is necessary to set everything, otherwise there will be a skew.
To give a greater rigidity, welded a metal strip in the corners. They received, dissolve the corner (40 mm). It was possible to buy a strip, but used cutting a corner.

Strips for rigidity in the corners of the frame

View "From the inside of the angle"
It was difficult when the frame was put: in the cold only in thick gloves, and it is difficult to hold in them hard. Therefore, they pinned with boards, and anything you can. But the angle was strictly kept.

To the frame there was a rigid fastening, welded metal plates angle.

The entire frame is gradually assembled.


Reply plate at the corners: at the top and bottom

We weld a few beams above. Now the framework for the hotel is worth "Iron

Now the trim remains. It can be any: at least the same lining, a block house, at least an economy version - plywood and OSB. To mount the bleach to the corner it is more convenient to fasten the timber, and it is already attached to him and everything else. The same situation for the rafter system: on the perimeter is screwed into the screws with preliminary dialing the bar, it is fixed with rafters.