What material is used to make the floor on the balcony. How to lay a wooden floor on a balcony: tips and tricks
Probably not the most reasonable option - having a balcony in your apartment, turn it only into an open area for drying clothes, into a smoking room, or even into a kind of "barn" where all unnecessary trash is collected and layered for years, with which for some reason it's hard to part. In the conditions of cramped apartments in urban high-rise buildings, this is an unaffordable luxury. It is worth making certain efforts and efforts, spending a certain amount - and the balcony can become a very neat and completely functional room. Moreover, with a certain approach to its arrangement, it will equally fully serve at any time of the year.
Probably, it will be superfluous to say that a prerequisite for turning a balcony into an additional usable area will be not only, and not so much its decoration - it is completely pointless to deal with this issue if high-quality insulation has not been carried out. An integrated approach is important here - from installing glazing capable of resisting the penetration of cold, to thermal insulation of all surfaces - the ceiling, floor and walls. Construction crews willingly undertake to carry out such work - the experience of similar alterations of the balcony has already been accumulated, and there are no problems with the necessary materials either. But is it worth paying extra, if certain operations are quite possible to perform on your own? Believe me, there is nothing particularly complicated here, and if you follow the manufacturability of the recommendations, then everything should work out. A separate publication will be devoted to the thermal insulation of walls and ceilings, and this article will tell you how you can carry out the insulation of the floor on the balcony with your own hands.
How are the floors of the balconies insulated?
Before proceeding to the practical implementation of the planned insulation of the floor on the balcony, you should immediately decide on the type of thermal insulation - the technology of the work and the list of necessary additional materials and components will largely depend on this.
So, the following materials can be used to insulate the floor on a balcony or loggia:
Heaters based on polyethylene foam
Roll materials made on the basis of polyethylene foam have a small thickness, within a few millimeters, and they are rarely used independently in a balcony - usually they are included in a complex of insulation layers together with other thermal insulation materials. However, for southern latitudes, perhaps, such insulation is sometimes enough.
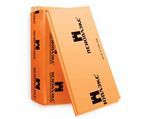
It is best to purchase foil-clad material - like the well-known penofol. When laid correctly (with the foil side up), the surface provides additional heat reflection towards the room, that is, thereby considerable energy savings will be achieved. In addition, the foil layer itself is an excellent hydro and vapor barrier.

Penofol is produced in a range of thicknesses from 2 to 10 mm. There are three main types of material:
- Penofol "A" - the foil coating is applied on one side.
- Penofol "B" is a double-sided reflective coating.
- Penofol "C" - on the one hand, a foil coating, and on the other - a layer of glue, covered with a protective backing. Such material, although more expensive than type "A", is much more convenient to work with.
Penofol canvases can, depending on the thickness of the material and on the specific conditions, be laid end-to-end or overlapped. The joints, for complete sealing and elimination of heat losses, are glued with foil tape - this is how a single reflective insulated surface is created.

The main characteristics of penofol are given in the table:
| Parameter name | Type "A" | Type "B" | Type "C" |
|---|---|---|---|
| from - 60 to +100 | |||
| Thermal energy reflection coefficient,% | 95 - 97 | ||
| Thermal conductivity coefficient, in a dry state at an average operating temperature of 20 ° С, not more (W / m × ° С) | 0,037 - 0,049 | 0,038 - 0,051 | 0,038 - 0,051 |
| Water absorption by volume,%, no more | 0.7 | 0.6 | 0.35 |
| Water vapor permeability, mg / (m × h × Pa), no more | 0.001 | ||
| Compressive strength, MPa | 0.035 | ||
If not only insulation is planned, but also the organization of heating the floor surface, then for some systems of "warm floors" a reflective thermal insulating substrate is an indispensable element of the overall structure.
Penofol prices
Expanded polystyrene
Expanded polystyrene boards are among the leaders in popularity among all insulation materials. This is due to its high thermal insulation characteristics along with a very low weight and ease of use. In addition, ordinary foam is widely available, both from the point of view of deficiency-freeness - it is produced everywhere, and from the standpoint of low cost.

There are a number of complaints about the material, in terms of not very high strength, and, most importantly, a certain insecurity. So, low-quality foam plastic can emit fumes that are harmful to human health, and it can in no way be classified as non-combustible materials.
In addition, this insulation has practically zero vapor permeability. But, however, for floors on the balcony, this factor will not be decisive.
If you plan to use expanded polystyrene as the main insulation of the balcony, then it is still better not to skimp and purchase its extruded version - EPS. This material is literally in all respects (if you do not take into account the cost), surpasses ordinary polystyrene, including ensuring the safety of its use in apartments.
Comparative characteristics of foam and extruded polystyrene foam are shown in the table:
| Parameter name | Polyfoam (PSB) | Extruded polystyrene foam (EPS) |
|---|---|---|
 |  |
|
| Thermal conductivity (W / m × ° С) | 0.036 ÷ 0.050 | 0.028 ÷ 0.034 |
| Water vapor permeability (mg / m × h × Pa) | - | 0.018 |
| Water absorption in 24 hours, in% of the total volume | 0.4 | 0.2 |
| Ultimate bending strength MPa (kg / cm²) | 0.07 ÷ 0.20 | 0.4 ÷ 1 |
| Compressive strength at 10% linear deformation, not less than MPa (kgf / cm²) | 0.05 ÷ 0.2 | 0.25 ÷ 0.5 |
| Density (kg / m³) | 15 ÷ 35 | 28 ÷ 45 |
| Operating temperature range, ° С | -50 to +75 | -50 to +90 |
Insulation with expanded polystyrene may well be performed in conjunction with other thermal insulation materials.
Styrofoam prices
expanded polystyrene
Want to know more about Styrofoam?
This material is used to insulate almost all building elements without exception - it is only important to choose the right brand. The features of expanded polystyrene are described in detail in an article completely devoted to its extrusion variety -.
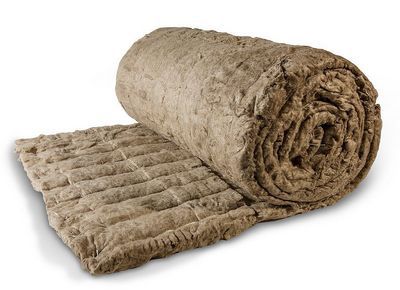
Mineral wool
If you look at it, then high-quality mineral wool will most likely be recognized as the best option for insulating a balcony. This thermal insulator has a lot of advantages, since the mineral wool has an extremely low thermal conductivity, low density and mass, but it “keeps its shape” well enough and has a certain elasticity that allows it to fill insulated spaces with practically no gaps. It is very convenient to work with cotton wool, but only on condition that the material is of high quality, and certain precautions are taken by the master.

The fact that cotton wool should be of high quality was mentioned at all for a reason. This material also has its drawbacks, which are predetermined by its fibrous structure. First, thin fibers can break with sharp edges that can damage the skin or cause persistent irritation of the mucous membranes. And secondly, synthetic binders containing formaldehyde are used to form blocks of mineral fibers. Low-quality material can "sin" with a high content of this component, which is extremely hazardous to human health.
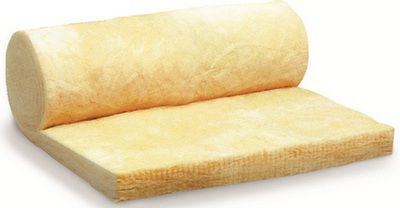
There are three types of mineral wool, which differ in the raw materials for the melt and fiber formation.
- Cotton wool based on blast-furnace slags should not be taken into account at all, since we are talking about insulation in residential premises.
- Glass wool in the ecological sense is much cleaner, but differs in the fragility of fibers, that is, it is necessary to work with it with special precautions, and the insulation "cake" should exclude the penetration of insulation microparticles into the air of the room. Glass wool is often chosen for reasons of economy - it is usually much cheaper than basalt.
- The most "prosperous" in all respects is the so-called stone wool, which is obtained from melts of basalt rocks.
Comparative characteristics of mineral wool are shown in the table below:
| Parameter name | Slag | Glass wool | Stone wool |
|---|---|---|---|
 |  |  |
|
| Limiting temperature of application, ° С | up to 250 | from -60 to +450 | up to 1000 |
| Average fiber diameter, μm | from 4 to 12 | from 5 to 15 | from 4 to 12 |
| Material hygroscopicity in 24 hours (no more),% | 1,9 | 1,7 | 0,095 |
| Taunt | Yes | Yes | No |
| Thermal conductivity coefficient, W / (m × ° С) | 0,46-0,48 | 0,038 -0,046 | 0,035-0,042 |
| Sound absorption coefficient | from 0.75 to 0.82 | from 0.8 to 92 | from 0.75 to 95 |
| The presence of a binder,% | from 3 to 10 | from 2.5 to 8 | from 2.5 to 5 |
| Flammability of the material | NG - non-flammable | NG - non-flammable | NG - non-flammable |
| Heat capacity, J / kg × ° С | 1000 | 1050 | 1050 |
| Vibration resistance | No | No | moderate |
| Elasticity,% | unspecified | unspecified | 75 |
| Sintering temperature, ° С | 250-300 | 450-500 | 600 |
| Fiber length, mm | 16 | 15-50 | 16 |
| Chemical stability (weight loss),% in water | 7,8 | 6,2 | 4,5 |
| Chemical stability (weight loss),% in an alkaline environment | 7 | 6 | 6,4 |
| Chemical stability (weight loss),% in an acidic environment | 68,7 | 38,9 | 24 |
Features of mineral wool
To properly carry out thermal insulation with mineral wool, you should familiarize yourself with its characteristics in more detail. You will find the necessary information in the article of our portal dedicated to. Information about one of the popular domestic brands of mineral wool will probably also be useful -
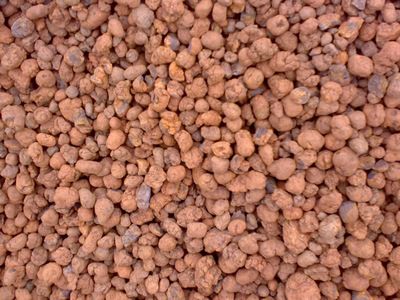
Expanded clay
Not as widely as mineral wool or expanded polystyrene, but it is still used to insulate the balcony floor and expanded clay. Its resistance to heat transfer is inferior to the indicators of the materials listed above, for example, such as mounted, but expanded clay has other indisputable advantages - environmental friendliness (well-purified natural raw materials are used for production) and absolute incombustibility. The material is relatively light, although, of course, its density, even just bulk, is still higher than that of polymer or fiber insulation. This may somewhat limit its use on balconies, where it is more reasonable to load the slab to a minimum.

Expanded clay is produced in various fractions. The largest granules can reach up to 40 ÷ 50 mm in length, the smallest - 0.1 ÷ 5 mm. The insulation technology is also based on the size of the granules. So, expanded clay can be used to prepare a concrete solution of a leveling screed with a simultaneous insulation function, for dry backfill between floor joists, as shown in the figure above.
The main properties of expanded clay of different fractions are shown in the table:
| Description of characteristics | Fraction size | ||
|---|---|---|---|
| 10-20 mm | 5-10 mm | 0-5 mm | |
 |  |  |
|
| Bulk density, kg / m³ | 280-370 | 300-400 | 500-700 |
| Strength at pressure, N / mm² (MPa) | 1,0-1,8 | 1,2-2,0 | 3,0-4,0 |
| Frost resistance 20 cycles, weight loss of gravel in% | 0,4-0,2 | 0,2-1,2 | Not regulated |
| Thermal conductivity W / m × ° С | 0,0912 | 0,0912 | 0,1099 |
| Water absorption,% of the volume | 10 - 15 | 15 - 20 | up to 25 |

One of the options for warming the floor with expanded clay is the "dry screed" technology
Recently, the technology of "dry screed" is gaining popularity - leveling and warming the floor with fine expanded clay backfill, followed by laying gypsum fiber boards on top of it. Sometimes this approach is also used on balconies, however, in the conditions of the traditional tightness of this room, such insulation will be quite difficult to perform with high quality, and this does not seem to be the optimal solution.
Expanded clay prices
expanded clay
Preparation for floor insulation on the balcony
The fundamentally "classical" scheme of floor insulation on the balcony can be depicted as follows:

Schematic diagram of "classic" balcony insulation
1 - reinforced concrete base.
2 - waterproofing, preventing the capillary spread of moisture into the insulation layer.
3 - lags. As a rule, the floor on the balcony is raised to the level of the threshold of the door leading to the room, so the height of the lag may be different. Often, their two-tier arrangement is used, when the upper logs are perpendicular to the lower, supporting ones.
4 - a layer of insulation material laid out between the lag.
5 - a waterproofing vapor-permeable diffuse membrane that does not prevent the free exit of moisture from the insulation. It can be used when mineral wool is used as a thermal insulation layer, and its use does not make much sense with expanded polystyrene. Often this layer above the insulation is made of rolled foam, thereby creating additional insulation and a "screen" reflecting thermal energy.
6 - plank flooring or sheet material (plywood, OSB) for laying the topcoat.
Often, if it is supposed to make a comfortable room out of the balcony, "active insulation" is also used - an electric floor heating system. Under these conditions, it is probably most convenient to use film infrared heaters. This is not shown in the diagram, but an example of such an approach will be given below.

In order for the insulation to be of high quality, and the floor to be reliable, it is necessary to do some preparatory work.
Floor revision and minor repairs
The article has already mentioned that thermal insulation of the floor is carried out in the overwhelming majority of cases simultaneously (in parallel) with the insulation of all surfaces of the balcony, otherwise the work simply loses its meaning. That is, it is possible to "take out of the brackets" the strengthening of the entire structure, the erection of external walls (if there were none), the installation of frames, etc. In short, let's focus only on the floor.
It is very good if the balcony was "well-groomed", that is, its floor is in good condition - the surface is flat and intact, without defects. Often the floor is tiled, and if the tile is soundly, does not "play", then it is quite possible to leave it in place without resorting to dismantling.
However, there are also less "rainbow" pictures, when the concrete base has cracks, potholes, chips, and there are cracks between it and the walls. All this must be eliminated before proceeding to the next stages of work.
It would seem - why, because all the same, the surface will be covered with insulation? Nevertheless, this is important - it is undesirable to leave the sinuses in which moisture can accumulate, as they can become foci of erosion or the appearance of microflora colonies - mold or fungus.
- If there are small protrusions on the surface, they can be gently chipped off to the general level.
- Cracks must be cut to a depth of 10 mm and widened for deeper and denser filling with repair compound. This can be done manually, or by using a sander with a circle over the stone.

- The places to be repaired are thoroughly cleaned of dirt and dust. Small solid fragments should not remain in the cracks - they are cleaned with a stiff brush and then finally removed with a vacuum cleaner.
- After that, it is necessary to prime the emergency areas with a deep penetration compound.
- After the primer has dried, all cracks and potholes are tightly filled with a repair compound - special putties for concrete or even just a cement-sand mortar. Do the same with slots around the perimeter of the slab. Wide gaps can be filled with sealant, and in some cases it is even more profitable to use polyurethane foam.

- After the repair "patches" have dried, they are cleaned to the general floor level.
Waterproofing the floor surface
If, again, the base of the floor is of good quality, and the neighboring insulated balcony is located below, then the issue of waterproofing the surface will not be acute - it will be enough just to carry out priming. It is a different matter when the bottom of the concrete canopy of the balcony is open to “all winds”. In no way can we exclude the possibility of capillary penetration of moisture through the reinforced concrete structure. Well, the harmfulness of excessive moisture has already been mentioned above, and in addition, some heaters (mineral wool, for example) may lose their thermal insulation qualities from saturation with water.
In a word, in order to protect your insulation "pie" from waterlogging, you need to carry out waterproofing. Just covering the surface with plastic wrap is not an option. Yes, the insulation will remain dry, but moisture will begin to accumulate in the thin gap between the film and the concrete slab, and sooner or later will make itself felt. A better approach is needed.
This can be done in several ways:
- Cover the surface with a layer of penetrating waterproofing compound, type "Penetron" or "Hydrotex". These compounds, getting into the pores and microcracks of concrete, completely "lock" them, blocking the spread of capillary moisture.

Penetrating waterproofing "Hydrotex"
- Apply coated waterproofing. The range of such compounds on a bitumen or polymer basis is quite wide, there is plenty to choose from. They are used in accordance with the instructions attached to them, cold or heated.

- Cover the entire surface with roll-on waterproofing, also on a bitumen or polymer basis. In this case, it is necessary to achieve a snug fit of the material to the base, without leaving "pockets".

Now, after the waterproofing is completed, you can proceed to work on the insulation of the floor itself.
Prices for "Hydrotex"
Hydrotex
Insulation of the floor on the balcony - options
The insulation layer will certainly take up a certain height, and the finishing floor will be raised above the concrete base. It has already been said that this rise is usually calculated in such a way that the floor on the balcony is flush or slightly below the threshold of the door from the room. At the same time, they also solve the issue of leveling the floor horizontally - balcony slabs often "sin" with a difference in height - with a decrease from the wall to the edge.
The installation of the lag can be done in different ways. The easiest way, but probably far from the most convenient and accurate, is with inserting inserts or wedges under the bars in order to achieve the desired uniform level.
In the modern assortment of hardware stores, you can find many convenient devices - brackets or adjustable threaded racks, which allow you to accurately and reliably install the logs. One of the simple options will be discussed below - using U-shaped racks.
Insulated floor on U-shaped racks-brackets
This is one of the easiest ways to position the floor perfectly horizontally, so that there is enough space under the surface for laying the insulation material.

The stand itself is a U-shaped metal part, which is attached to the floor surface with a transverse shelf, and on the two side ones there are holes for self-tapping screws that will hold the log beams in a given position.
Usually on sale there are similar drains with a height of 167 mm, and designed to use a bar with a cross section of 40 (width) by 70 (height) mm. However, it is possible that other sizes may also be found. In addition, you can find examples of this type of work, both according to the same principle, but instead of similar racks, the craftsmen used steel corners, installing them in pairs, on both sides of the timber. The only difference is that there will be more trouble with fixing the fasteners to the base of the floor.
In the example under consideration, basalt wool of the "Light" type is used for the insulation layer - low density, about 35 kg / m³, 100 mm thick. The task of the master was to provide reliable thermal insulation in two layers, with a general rise in the height of the floor surface, taking into account the thickness of the plywood (15 mm) by 210 mm, in order to reach the level of the concrete step of the threshold.
You may be interested in the information on how to do it yourself
The sequence of work and features of the operations performed are shown in the following illustrated table:
| Illustration | |
|---|---|
 | So, for installation and careful leveling of the floor surface, in addition to the beams, it is required to prepare rack brackets. It is not difficult to calculate their number - the installation step on the longitudinal log is 500 mm, plus one rack for each transverse jumper. Since we are talking about a balcony, that is, a narrow room, we only need three logs - two along the walls, and one in the center between them. |
 | Each jumper will rest on one of its own U-shaped rack, and it is convenient to fix them to the lags using ordinary metal corners. The step of installing the jumpers can be of the order of 600 mm. But at the same time, the lines of joints of plywood sheets should be taken into account - they should fall on these jumpers. It is best to draw up a plan in advance to scale - this will make it easier to calculate the installation locations of the floor frame parts and cutting the plywood sheets. |
 | It is assumed that all preparatory work has already been carried out. Nevertheless, before starting work, you should thoroughly clean the surface, remove small construction debris and dust. |
 | In accordance with the drawn up plan, the floor surface is marked. First, you should mark the lines for installing the lags, which will run along the walls. At the same time, we take into account that the logs are never attached close to the wall - there should be a gap of about 50 mm between the installed timber and the wall surface. On the wall, using a water or laser level, a "zero line" is outlined and beaten off - all the upper ends of the log beams and crossbars will be aligned along it, so that a common horizontal plane is obtained. |
 | For convenience, marking lines can be drawn with a marker directly on the surface of the concrete base - it will be easier to navigate this way when attaching the brackets. |
 | After the lines of the edge lags have been drawn, it will not be difficult to draw the central one - exactly in the middle between them. You can immediately draw lines for mounting the crossbars - with a set pitch and taking into account the joining of the flooring sheets. |
 | Risks are placed at the points where the brackets will be attached to the floor. The brackets extreme on each log should be located as close as possible to the perpendicular walls - an indent of about 50 ÷ 70 mm is left. If the balcony is long and the log beams will have to be joined, then a stand is also installed at the junction point, regardless of the step - the end of the log should not sag. The posts on the lintels are installed exactly in the center. |
 | The bracket is installed in the center of the marked crosshair, and through the holes in its lower shelf, the points for the dowels are marked with a marker. At the designated places in the concrete base, holes are drilled with a perforator for installing dowels. |
 | Racks-brackets with their transverse shelf are attached with dowels to the surface of the concrete base. Before firmly tightening the mount, it is imperative to check the evenness of the alignment of the brackets strictly along the line, preventing them from even slightly turning around the axis - otherwise the installation of the bar will be problematic. |
 | As a result, you should get such an even row of racks-brackets. |
 | A very common mistake of novice craftsmen - they fix the lags by themselves, and only then they begin to deal with the issues of insulation. As a result, cavities not filled with thermal insulation may remain, and the racks themselves without insulation inside turn into cold bridges. To avoid this, it is better to carry out insulation work in parallel. In our case, you can do this: Strips with a width of about 150 ÷ 200 mm are cut from basalt wool slabs. They are marked (cut with a knife) slots for the vertical shelves of the brackets. Then the strips of insulation are literally put on the racks. The result is a continuous insulated strip with plates sticking out of it. |
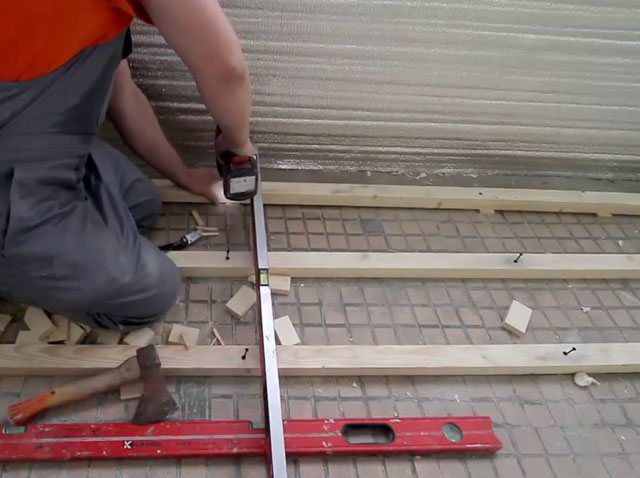
 | Now you can start installing the first lag. The bar is inserted between the shelves of the brackets. To begin with, on one side, its upper edge is set along the intended "zero line", and the lag is temporarily fixed with one self-tapping screw, without a strong tightening. |
 | Then work continues on the opposite side of the bar. A building level is set on the lag, and it is displayed exactly in a horizontal position. For control, you can be guided by the "zero level" mark - everything must match exactly. When the desired result is achieved, the lag is also fixed with a self-tapping screw. Now you can screw in and tighten two self-tapping screws from both ends of the timber. |
 | To securely fasten the beam, it must be fixed on both sides of the bracket. However, the extreme lags will be close to the wall, and you can't get there with a screwdriver, let alone a screwdriver. This means that we are using a different technological method. A 6.5 mm metal drill is inserted into the drill. Then a through hole is drilled right through the metal plates and the beam installed between them. You need two such holes for each rack, and it is better to arrange them diagonally. Then M6 bolts 60 ÷ 70 mm long are inserted into these holes, a washer is put on each and a nut is attached, and then it will be easy to tighten with a 10 spanner wrench. |
 | As a result, on each rack along the wall, the log gets the most reliable fixation. This attachment point will look like this. |
 | In a similar way, a "suite" of racks, an insulating belt and the log itself are installed on the other side, along the opposite wall. In this case, the relative position of the beams is necessarily controlled - their upper faces should also be located in the same horizontal plane. |
 | Along the designated center line, a number of racks are installed for the middle log - this is well shown in the figure. |
 | Further - everything is in the same sequence: a layer of insulation and fixing the timber. But there is also a significant difference - there is much less hassle with installing the log vertically, since the plane is already set by the extreme bars. And fastening here is much easier - no screws are required, since you can firmly tighten the lag on both sides with self-tapping screws, at least two on each side. |
 | Longitudinal logs are set in three lines and are fixed. The struts are strong enough to withstand vertical loads. But when force is applied from the side or at an angle to the vertical, it can be seen that a certain "degree of freedom" is still preserved. And in order to achieve complete stability of the frame, it is necessary to tie the logs with crossbars. |
 | There is one bracket for each of the jumpers, exactly in the center. The same technique is used - installation of the rack, then an insulating layer, which must be tightly docked with the already laid longitudinal strips of mineral wool. |
 | A jumper of the required length cut off from the bar (so that it fits exactly, but without effort between the log beams) is inserted between the shelves of the bracket, but is not immediately attached to it. First, you need to set its upper edge flush with the lag bars and fix it in this position with metal corners using self-tapping screws. |
 | Well, when it is exactly baited, you can carry out the final fixing, including the bracket. |
 | In fact, the assembly of the frame is completely finished. You can move on to full insulation. |
 | Between the already installed strips of basalt wool, we still have quite extensive "windows". According to their size, the required fragments are cut out of the blocks, so that they stand close, without the slightest gaps. It is not difficult to do this with mineral wool. |
 | Then the second layer is laid - already between the logs and crossbars. When cutting out fragments, they are always made 10 ÷ 15 mm larger - this will ensure the tightness of the laying of the insulation layer, the gap between the beams. |
 | Workpieces of the required length and width are cut from plywood sheets and measured on site. A gap of about 5 ÷ 8 mm must be left between the edge of the plywood and the wall. In the process of trying on, you should immediately outline the lines along which the rows of screws will be screwed in - so that they fall in the center of the longitudinal and transverse beams. |
 | The surface insulated with mineral wool, as already mentioned, should be covered with a layer of vapor-permeable diffuse membrane on top. Then cut and fitted plywood blanks are sequentially stacked on top, and fixed to the frame beams with self-tapping screws. The self-tapping screws are screwed in with such an effort that their heads "sink" into the plywood surface by about 1 mm. Between adjacent fasteners, a pitch of approximately 150 ÷ 200 mm is maintained. |
 | As a result, we got a horizontally verified and very stable plywood coating with high-quality insulation. The gaps between the plywood and the surface of the walls can be filled with polyurethane foam, and after hardening, the excess protruding can be cut off. The resulting plywood surface will be an excellent base for almost any type of topcoat for insulated balcony floors. |
Insulated floor with infrared heating
Now let's consider another interesting example of floor insulation on a balcony. The initial conditions and the tasks facing here are somewhat different.
The arrangement of the floor is carried out in a complex with insulation and decoration of the entire balcony, with the general goal of turning it into a full-fledged comfortable room. The floor already has sufficient waterproofing. Moreover, it was previously laid out with ceramic tiles, and the base was leveled horizontally. That is, there is no problem of setting a lag by level in this case. Extruded polystyrene foam - "Penoplex" 50 mm thick will be used for insulation. Such a layer will create reliable thermal insulation against the penetration of cold from below, and besides, it will not allow unnecessary energy losses from the "warm floor" for absolutely unnecessary heating of the floor slab.
In addition, it is planned to use infrared film heaters, and according to the technology, an insulating reflective substrate should be used under them. In our case, we used "penofol" 3 mm thick.
The order of work is in the illustrated table:
| Illustration | Brief description of the performed operation |
|---|---|
 | In the initial positions - the floor is ready for work, materials are available. |
 | The installation of the frame begins. It will be two-tier - at the bottom, transverse support beams will lie on the floor surface, and on top of them, perpendicularly, there will be logs in three rows, two along the walls and one in the center. The floor does not need to be leveled, but in order for the surface to end up being even and stable, all the frame parts must be made of high-quality timber with precisely expelled dimensions in the section - 50 × 50. |
 | To begin with, transverse beams are cut along the width of the balcony from the wall of the house to the outside, minus about 100 mm, so that there is a clearance of about 50 mm on each side. |
 | The cut beams are laid out parallel to each other in increments of approximately 500 mm. In this case, great accuracy with respect to right angles is not required, but it is better, of course, to use a square. If the balcony has a complex configuration, then this is taken into account when laying out - beams are added at turns. |
 | After the beams are laid out, longitudinal logs can be cut and laid perpendicular to them. The extreme logs should be about 50 mm from the walls |
 | After laying the logs, they are attached to the transverse beams with self-tapping screws. |
 | The resulting lattice frame is gradually gaining integrity, but it is not yet fixed to the floor surface. This will be done in the next step. |
 | Holes are drilled through the beams in the floor surface for the installation of spacer anchors. Each beam is anchored on two opposite sides. |
 | Anchors are hammered into drilled holes ... |
 | ... and then tightened to ensure that the assembled frame is securely attached to the base floor surface. |
 | The frame is assembled and fixed. You can proceed to its insulation. |
 | Penoplex plates are used for insulation. They are cut into fragments with the expectation of laying on beams between the lags. |
 | It is not necessary to achieve a tight fit of expanded polystyrene to the logs - this is almost impossible to do. On the contrary, it is better to leave gaps of the order of 5 - 7 mm. |
 | It is necessary to fill the entire space with insulation material, including the gaps between the logs and the wall. With proper cutting, there should be practically no waste - there will be a place for any trimming. |
 | All left gaps, including those between adjacent fragments of "Penoplex", are neatly filled with polyurethane foam after installation. It is necessary to achieve complete sealing of the created insulation coating. |
 | After all the gaps are filled, they wait until the foam has completely solidified, and then cut off the protruding excess flush with the surface. |
 | You can move on to the plywood flooring. Plywood sheets with a thickness of 15 or 20 mm are cut to the required size. |
 | The cut fragments are laid along the lags, adjusted to each other ... |
 | … And then attached to the joists with self-tapping screws with a pitch of 150 mm. The heads of the self-tapping screws must be recessed in plywood by 1 mm. |
 | The insulated plywood base is ready. You can proceed to the installation of an infrared "warm floor". |
 | First of all, the entire surface of the floor is covered with penofol, the foil side up. The edges of the backing must be fixed, for example, with double-sided tape. If you have to connect two penofol canvases, then they are stacked end-to-end, and the seam is glued with tape, ideally with foil. |
 | Infrared film heaters are rolled along the length. |
 | Usually, with a standard balcony width, two heater sheets can be installed. Between themselves and along the edges, to the substrate, they are fixed with tape. It is forbidden to superimpose one canvas on another. |
 | Further, all the operations necessary for the installation of a film infrared "warm floor" are performed: - the unused ends of the busbars are insulated; |
 | - wires are laid and a temperature sensor with a signal cable is installed. |
 | - the cable part is switched according to the diagram. |
 | - the wires are commuted at the terminals of the thermostat control unit. The unit itself is installed in a place prepared for it, convenient for everyday access. |
 | After the completion of installation and switching, a test run of the heating system is carried out, literally for a few seconds. After making sure that the "warm floor" is working - the appearance of heating, the power is turned off. A full-fledged start of the system can only be brought about by the field of laying the topcoat of the floor. |
 | Film infrared heaters are quite safe, but do not forget that 220 volts are used there. And in order to avoid emergency situations caused, for example, by careless spillage of water on the floor, it is better to insure yourself and cover the system with a layer of waterproofing. For this, a polyethylene film with a thickness of about 200 microns can be used. It is spread over the entire surface of the floor, the excess can then be cut off. |
 | It is important to achieve maximum sealing. To do this, the film is attached to the walls with waterproof tape so that there is no gap left. When using several canvases, they are laid with an overlap of about 200 mm, and then the seam is also sealed with waterproof tape. |
 | On top of the film, you can lay the selected topcoat, carefully so as not to damage it. In this case, the owners chose laminate flooring. |
 | The result of the work is a beautiful, reliably heat-insulated warm floor. The final touches remain - to finish the wall decoration and to mount the baseboards. |
In the process of presenting the sequence of works, the installation of an electric "warm floor" was considered in passing. This is a topic for a separate conversation, since this issue has a lot of its own nuances.
"Warm floor" on a wooden base? Yes it is possible!
Both water and electric "warm floor" can be mounted on a wooden base. How to do it - read the special publication of our portal.
And at the end of the article - another way to insulate the floor on the balcony, a video lesson from a professional. study the link.
Balcony - storage of old, unnecessary things. However, it can be turned into a graceful extension of the apartment. Any transformation begins with laying a solid foundation, which, in the case of a balcony, is the floor. To lay a wooden covering on it or tile it - the choice is up to the owner of the house.
Any new floor option requires initial preparation of the concrete slab. This requires a thorough cleaning. Instead of a scoop and a broom, it is more convenient to use a vacuum cleaner. If there are cracks in the concrete, they should be repaired with a putty, and the cracks between the slabs should be closed with polyurethane foam.
Preparation of the base
The main thing to start with is to level the surface.
We will use a simple and affordable way, self-leveling floor.
Below is an instruction on how to do it correctly.
- We carefully prime the surface. After the material has dried, clean the floor with a vacuum cleaner.
- We carefully follow the instructions and prepare the mixture in a bucket. For mixing, a drill with a whisk attachment is usually used.
- We begin to pour the composition, gradually moving from the far corner to the exit. In the process, we spread the liquid with a metal spatula with a smooth edge.
Use a long-handled spatula to spread the mixture
- When the surface is completely covered with the mixture, a needle roller is required. They need to walk on the surface several times. This procedure will remove accumulated air bubbles.
- You can walk on the floor after 4 hours. Complete drying will take several days.
Attention! The finished mixture must be used within 30 minutes after mixing.
Insulation of the base without changing the height of the ceiling
If you want to insulate the balcony floor and cover it with laminate without any problems, you should use electricity. Or rather, the installation of a warm floor. Of the materials available in stores, the most suitable is an infrared heater. To lay it, you do not need to make a screed that will raise the floor by 10-20 cm. Let's get to work.
- We start by laying penofol, or other heat-insulating material, over the entire area of the self-leveling floor.
- We distribute the heating elements in the same way, on top of the insulation.
- We protect the copper contacts from the edge adjacent to the parapet with bitumen insulation.
- We bring in electrical wires from the opposite side. We solder them to the contacts.
- All remaining conductive contacts are also closed with an insulator.
- We supply power to the thermostat. We connect the temperature sensor and place it under the heating elements, fix the wire with tape.
- We check all connections, we carry out a test start of the system.
- The final step is to lay the laminate flooring. Detailed instructions for the process are given below.
Attention! Incorrect installation, poor moisture protection can lead to short circuits. This will lead to the failure of the heating elements. We'll have to open the laminate and change or remove the warm floor.
Infrared floor heating
Insulated raised base
Glazing will increase the temperature on the balcony, but only by 10-12 degrees. An additional measure is the increase in floor thickness. In addition, new cladding methods will be added.
- We mark the position of the three longitudinal lags. The side bars should lag behind the walls by 5 cm, and the central one by 40-50 cm. We draw the lines on which the logs will be located.
- We calculate the junction of the plywood, draw a line. There will be a transverse lag here.
- We mark the attachment points of the brackets. They should be 50-60 cm apart. On the line of the crossbar, the brackets will be located one at a time between the logs.
- We fix the brackets to the walls with dowels.
- We cut off two parts of the insulation, the length of the entire balcony and the width of 20 cm. We lay them along the edges, cutting the holes for the brackets.
- We lay two extreme longitudinal logs. If the length of the timber is not enough, their joint should fall in the middle of the holder.
- We fix the timber with a self-tapping screw, at a height of 10-15 cm from the floor. Align it with a level and fix it from the opposite edge.
- It is impossible to screw the self-tapping screw from the side of the wall, the distance is too small. The rest of the fastening of the bar to the holder is made with a bolt and nut. To do this, you need to drill through the log and screw two bolts into each bracket.
- Align the second lag relative to the first and secure it.
- We attach the holders for the intermediate log. We lay a strip of insulation.
- We align the timber with respect to the already installed ones. All fixing is done using self-tapping screws.
- We mount the transverse log. We install the brackets according to the prepared markings. We attach the bar itself to the longitudinal logs on metal corners. We fix the lag in the holder with self-tapping screws. On the opposite side, relative to the central log, we repeat the process
- In the same way, we make 4 more lags.
- Fill the empty space with insulation to the upper edge of the bars.
- We lay plywood, leaving 5 mm from each wall for its expansion.
- Two sheets of material, at the junction, should take half of the transverse log. This will allow them to hold on tightly, and eliminate the risk of edge breakage.
- We fasten the plywood sheets with self-tapping screws to the logs at a distance of 15 cm from each other.
- We recessed all the fastener caps into the material.
Below is a table with the materials that will be required for all foundations. It will also indicate the quantity and approximate cost of raw materials.
| Material | Quantity | Unit price |
|---|---|---|
| Cold base | ||
| 2 bags of 25 kg | About 800 p. | |
| Insulated base without raising the floor | ||
| Warm infrared floor | 3-4 sq. meters | 800 p. per sq. meter |
| Penofol | 3-4 sq. meters | 64 r per sq. meter |
| Insulated raised base | ||
| Beam for logs (length 3 m, size 45 by 70 mm) | 5 pieces. | 79 p. per meter |
| Bracket (holder) made of galvanized, 166 mm high | 30 pcs. | 60 p. |
| Plywood FSF 6 mm thick | 2 pcs. | 790 p. |
| Metal corner | 12 pcs. | 3 p. |
| Dowels 6 x 60 mm | 60 pcs. | 50 kopecks. |
| Self-tapping screws 4 x 30 mm | More than 100 pcs. | 30 kopecks |
| Bolt with nut 6 x 60 mm | 12 pcs. | 2.5 p. |
Cold floor covering
The floor of an open balcony is constantly exposed to harmful effects. In the summer the sun is roasting it, the rain is pouring in, and in the winter it is covered with snow. When choosing a coating, these factors should be taken into account.
Facing tiles. Installation instructions
Such a coating will cope with any threats, moreover, it is easy to clean. You can limit yourself to tiles of one type, or lay out a pattern that will delight the eye. The base has already been prepared, we are starting to finish.
- We start marking from the corner farthest from the door and adjacent to the parapet. This is where the first row of tiles will be laid.
- With a spatula, with a notched edge, apply the tile adhesive. It needs to be distributed over an area of 3-4 tiles.
- We lay the tile on the rough side and press it tightly. The adhesive should fill all voids evenly. If you miss this moment, over time, the corners of the tiles will begin to break from the load.
- For the evenness of the seam, plastic crosses are applied to the corners of the tile. After the glue hardens, they must be removed.
- The next step is filling the joints with grout. Its color should be in harmony with the rest of the surface.
- After a day, the remains of grout and glue are removed. Thorough cleaning is carried out.
- The skirting board is glued.
Attention! It is better to choose tiles with a rough surface. It will be less slippery, especially in winter.
Reference. The tiles can also be laid on the plywood base of the raised floor. However, the tile adhesive should be replaced with mastic so as not to spoil the base.
facing tiles
The right way to mount a deck board
For those who did not like the tiles, there is another option - special boards. This composite material is able to withstand moisture and temperature extremes. The installation process is simple and takes little time.
- First, you need to lay logs along the width of the balcony, every 50 cm. The ends of the bars should lag behind the walls by 10 mm. This compensates for the expansion that will occur over time.
- Each log is attached to three anchor bolts.
First of all, it is worth choosing a material with a minimum thickness of 3 mm with a special nap. Thanks to the hairs on the rough side, the floor will be softer and warmer. Also, the size of the piece should allow it to completely cover the entire area of the balcony floor.
Before flooring, the roll should be unrolled and allowed to lie on the balcony. This will allow the material to level out and "get used" to the operating conditions. In a couple of days, you can start working.
- All rows, after the first, are mounted so that each next board is displaced by half the length of the previous one. The material must be cut with a jigsaw with a special file. It has no slope of teeth and will not chip on the face of the laminate.
- A staple or nailer is used to install the last row. It is inserted into the slot and fixes the board in the slot.
How to lay your own laminate flooring
Attention! Linoleum, parquet, laminate flooring in a non-glazed balcony threatens to quickly deteriorate the coating.
Pros and cons of coatings
Naturally, there is no absolutely right choice. When choosing a material, you should pay attention to the amount of light falling on the balcony. Consider options, future use of space, level of your own skills. However, knowing the positive and negative features of the material, you can get a result close to perfect.
Terrace boardMaterial pros Minuses
Moisture resistant laminate will not deteriorate when exposed to water.
Exposure to sunlight, temperature and humidity changes will not affect the material.Violation of assembly technology will lead to a squeak when walking, or swelling of the coating.
Material is highly toxic in case of fire.
May break if heavy objects fall on it.
Has a high resistance to aggressive external environment.
You can make a unique design. Ease of assembly.
Reliability and durability of the coating.Will greatly increase the load on the slab, which can lead to its destruction.
Low cost.
Ease of application.
You can quickly change the color if you want.
Facilitates cleaning.The paint fades in the sun.
The coating will begin to deteriorate after a year of operation.
Lack of insulation.
Unattractive appearance.
The apartment becomes a home for many years. The more comfortable the dwelling, the more pleasant it is to return there after work. On your own, with a minimum investment of money, you can easily get an additional room, a flower garden or just a place to relax.
Video - DIY wooden floor on the balcony
You can equip the floor on the balcony with your own hands in a variety of ways and materials. The choice depends on the skill, financial capabilities and taste of the property owners. Before deciding what to make the floor on the balcony from, you need to decide on the purpose of this room and the conditions in which it will be used.
Options for using a glazed balcony.
The determining factor in deciding what to cover the floor on the balcony is the presence or absence of glazing. For there are practically no restrictions.

Open balcony views.
If the floor is very curved and needs to be raised higher, then brackets and corners can be used. The video is below.
The cover for their arrangement is chosen as for ordinary living and auxiliary rooms in an apartment. However, when there is a fire hatch in the floor for evacuation, then the laying of the finishing material should be carried out taking into account this nuance. The floor on an open balcony is exposed to factors such as moisture, solar radiation and significant temperature fluctuations. Based on this, the coverage for open space must be selected thoughtfully and carefully, taking into account all possible restrictions. Consider how to make the floor on the balcony with your own hands, without resorting to the services of hired workers.
The sub floor can be leveled using wedges. The video is below.
Finishing the balcony floor with linoleum
Choosing a covering for arranging a balcony, many opt for linoleum. This material has an affordable cost and a variety of colors. Linoleum on the balcony looks solid and presentable, not inferior to ceramics and laminate. It is so easy and simple to work with it that even a person who is far from construction and repair business can lay it. Another important factor in favor of linoleum is that it can be laid on any curved surface. It is necessary to buy linoleum for a balcony in such a way as to avoid additional work on thermal insulation. It is better to take a material with a warm backing. The insulated material absorbs the cold coming from the concrete slab.
In order to cover linoleum with high quality, you will need the following devices:
- roulette;
- marker;
- glue;
- scissors;
- stationery knife;
- Scotch.
It is desirable to buy material of such a width as to cover the floors with one continuous strip. So it will be possible to avoid the process of manufacturing joints. After purchase, the roll must be rolled out and left for a day. This will prevent wrinkling after installation.
Cover the floors with linoleum as follows:
- Clean the stove from debris and dust. Shoot down the fragments protruding from it. Seal large potholes and holes with cement mortar. After the mortar has set, treat the subfloor with a liquid primer.
- Take measurements. Measure not only the length and width of the sub-slab, but also its diagonals.
- Transfer measurement data to linoleum. If necessary, cut off the excess immediately to facilitate work.
- Place the workpiece on the stove. Fine-tune it with a knife and scissors. Glue one end of the cover to the board.
- Roll the linoleum into a roll to the place of gluing. Applying glue to its seamy surface, glue the material over the entire area.
- Tightly fix the covering around the perimeter. Duplicate the connection with scotch tape, placing it on the walls.
- Where the hatch is, make slots, which are closed with a decorative sill made of metal or plastic.

Linoleum on the floor.
A good linoleum can last for several decades, provided it is carefully and carefully treated.
Balcony decoration with ceramic tiles
As a rule, this is how the loggia is arranged. Its floor plate has a secure stop on 3 sides. For the balcony, the tile must be chosen the thinnest and lightest, so as not to provoke deformation of the supporting plate. Laying a tiled floor on a balcony with your own hands requires certain building skills, care and patience. But the end result is worth it. If you decide which floor is better to make on the balcony, then there is no more practical solution than ceramic tiles. With its help, you can create your own unique pattern on the floor. It is a strong and durable material that is resistant to all external factors. In order not to make the structure heavier, the leveling of the slab on the balcony under the tile must be carried out with light gypsum mixtures with the addition of expanded clay. This technique will immediately resolve the issue of how to insulate the floor on the balcony.
For work you will need:
- level;
- Bulgarian;
- roulette;
- perforator with mixer;
- steel and rubber spatulas;
- tile adhesive;
- grout for joints;
- plastic crosses;
- liquid primer.
Before laying the floor on the balcony, it is necessary to glaze it, if it is provided for by the project. The relevance of this event is determined by the fact that the arrangement of the floor on the balcony involves the sealing of the joint between the plastic sections and the slab. It is this task that the glue and tile put on the screed will perform.
The work is carried out in the following sequence:
- The screed is being equipped. Its height is determined by the degree of inclination of the base plate. After hardening, the surface is treated with a liquid primer.
- Floor tiles are laid. The correctness of work is controlled using a level and plastic crosses. Correction is done with a mallet. The outermost tiles are cut off.
- The final finishing of the balcony floor is carried out by grouting. Already 2 hours after the end of this process, the tile covering is ready for use.

Floor tiling.
The heating issue can be solved by installing an electric heating system under the tiles.
Using a decking board
Decking on the balcony is used in cases where this room does not have glazing. The main enemy in this situation for flooring is snow and water, which will accumulate on its surface. The deck consists of polymer plastic with the addition of wood flour and dyes. This material is absolutely insensitive to moisture, ultraviolet light and temperature changes. It can be used to disguise the fire hatch and defects in the base plate.
In order to make a decking from a decking, you will need:
- puncher;
- level;
- roulette;
- hacksaw for metal;
- Bulgarian;
- profile pipe.
The terrace board comes with special fasteners, with the help of which the installation is easy and simple.
The deck should be laid as follows:
- Assemble the frame from the profile board. It should be noted that the made flooring must have a slight slope for water drainage.
- Measure and cut the workpieces to the desired length. Process their edges from irregularities and burrs.
- Fasten the clips to the frame. To do this, it is better to use stainless self-tapping screws for metal, so that you can easily dismantle the laid floor.

Terrace board.
Periodically, you need to clean the base plate, as dampness and all kinds of debris will accumulate under it. To prevent the formation of mold, it is advisable to treat the reinforced concrete slab with an antiseptic.
Arrangement of balconies with carpet
For obvious reasons, this finish can only be used for the floor on a closed balcony, where protection from snow and rain is guaranteed. Balcony carpet can be used as a temporary or permanent covering. In the first case, it is laid directly on a concrete slab without rigid fixation to the base. When the material is laid down with the expectation of long-term operation, then the subfloor on the balcony is made of plywood. This must be done in order to protect the material from the dampness and cold of the concrete slab.
In order to do this work, you will need the following materials and devices:
- hacksaw;
- screwdriver;
- roulette;
- building level;
- stapler;
- hammer;
- glue;
- timber according to your size;
- drying oil;
- antiseptic;
- primer;
- expanded clay;
- Scotch.
The work can be carried out at any time of the year. Knowing how to properly make a carpet floor, you can complete it within 1 day.
Finishing is carried out in the following sequence:
- The concrete slab is treated with an antiseptic and a deep penetration primer. The level of its slope is checked, measurements are taken along the length and width.
- A frame is made from a bar. Its horizontal line is verified using props and rails. Small expanded clay is poured into the frame cavity. It will act as a heat insulator and regulator of the humidity level.
- A membrane film is fixed on top of the frame from a bar. It is fastened with a stapler.
- Blanks are cut from thick plywood sheets. They are attached to the frame. For this, it is better to use wood screws. The joints between the plates are sealed with sealant and glued with tape.
- Adjusted to size and laid on the prepared carpet floor. Its attachment is carried out with glue or staples. At the same time, in order to avoid folds, the carpet must be fixed over its entire area.

Carpet flooring.
In some cases, the floor on the balcony is made of chipboard as the basis for the carpet. This material has a low thermal conductivity and rather well retains the cold that comes from the reinforced concrete slab. Chipboard has a fairly large margin of safety to lay it even without a frame. You can create an additional layer of thermal insulation using foam plates laid on the floor. But first you need to level it with cement mortar. In this case, laminated chipboard, which is used for the manufacture of furniture, can be used as a topcoat. Doors and countertops are used for this purpose from cabinet furniture that has served its life, or products made to order.
Anything you want can be laid on a well-prepared sub-floor.
Most people strive to equip a comfortable living space in their apartment or house. At the same time, every corner, including the balcony, should organically fit into the integral living concept of coziness and comfort.
When new buildings are commissioned, the balcony is most often a concrete slab with. Going out on it in the cold season, a person gets from summer to winter. Therefore, the natural desire of the owner is the loggia, as well as giving more functionality to this place in the house. The wooden floor on the balcony is the warm basis of this closed or open area, since wood is the most human-friendly, environmentally friendly warm material, which, after appropriate processing, becomes resistant to moisture, insects, low and high temperatures.
Wooden floors are sustainable and beautiful
How to make wood flooring with your own hands on a balcony, loggia, outdoor terrace?
You need to start from the bottom. Most floors are based on concrete screed, which is characterized by the formation of cement dust that pollutes the rest of the room. Therefore, it is better to cover it after proper treatment.
Preparing the base for the floor
To prepare the concrete base of the floor, you can do the following:
- First, you need to clean the screed from dirt, debris and dust.
- Cement, seal up with polyurethane foam all cracks, chips, holes at the level of the future floor.
- Make a flat surface by cleaning the concrete base from the remnants of mortar, polyurethane foam.
- Then the surface must be treated with an impregnating primer.
Base waterproofing
An important step is to prevent the unpleasant consequences of high humidity. These works can be done by hand using different methods. Waterproofing methods:
- Covering the base with a thick foil-coated bubble wrap with your own hands is quite simple. In this case, special attention should be paid to the tightness of the material at the joints, carefully attaching it with construction tape;
- Roofing material is usually laid on a bituminous base, which must be treated with a burner, heating the bituminous mastic.
- When painting, it is important to use the correct special paints that have a guaranteed waterproof composition. It is better to paint with a wide brush, covering the surface of the base and part of the wall from below.
- You can apply waterproofing to the base of the loggia, balcony and open terrace of the house with your own hands using a plastering method. In this case, special attention should be paid to the choice of special solutions for these purposes, protecting against moisture.
- The concrete base can be coated with a special impregnation. This liquid must be applied in several layers. This provides a deep penetration of this composition into the depth of the slab by 20 cm and the creation of a powerful protection against water. After such processing, all elements of the structure made of wood: logs, chipboard, lathing, boards, plywood will be in favorable conditions.
- Nowadays, the method of "liquid rubber" and "liquid glass" has become very popular, which makes it easy to process a concrete base. At the same time, the rubber coating has a more elastic breathable structure.
The wooden floor on the balcony, depending on the conditions in which it will be used, may differ in its characteristics and method of installation. It is important from the beginning to correctly determine the functions of this corner of a comfortable home. For outdoor terraces, it is better to use “garden” parquet tiles.

It is important to make high-quality waterproofing
"Garden" parquet tiles
This coating is most suitable for a house or apartment with an open terrace. This material has excellent characteristics for outdoor use:
- high resistance to temperature extremes in the external environment;
- water-repellent properties and increased moisture resistance, since during the manufacturing process it is subjected to heat treatment;
- the structure of such a wooden covering is pleasant to the touch. Walking barefoot on such a floor is a lot of pleasure;
- parquet tiles have an attractive appearance and are easy to clean as they do not accumulate dust and dirt.
Installation of this parquet tile is easy and convenient to do with your own hands, since its design provides for:
- special locks for connection;
- standard sizes 500 × 500 mm, 300 × 300 mm, which facilitate easy installation on waterproofing.
It is important to make accurate measurements of the area of the loggia or balcony, taking into account the uniqueness of their configurations. In addition, it is necessary to prepare the base with a slope to collect rainwater into the drainage system. With proper installation, such a floor will serve reliably and for a long time, bringing a lot of pleasure to the residents, and also fully justifying the rather high price.

Insulation of the floor with foam on top of the waterproofing
Wood coverings on a closed balcony and loggia
In the closed space of the loggia, on a wooden frame, logs, you can install floors from boards, chipboard, plywood, covering them with linoleum or other materials.
The lathing, depending on the functional purpose of the floor, can be filled with various insulation materials: polystyrene, expanded clay, mineral wool, foamed polyethylene with a foil surface.
Depending on the functional purpose of the balcony or loggia for the house, the design of the floor covering may differ.
In the case of the predominant use of this zone in the summer, it is advisable to use a thin insulation covered with foil during installation. At the same time, the wooden floor on the balcony does not rise high above the concrete base. For this, logs with a thickness of no more than 2-3 cm are used.To make such a coating with your own hands, you need:
- After fixing the foamed polyethylene on the walls of the loggia, lay the same insulation on the waterproofing of the base, leading its edges onto the wall to a height of 150-200 mm. In this way, the wall insulation is blocked;
- Fix the logs along the wall of the house, on which a board, chipboard or plywood, cut to the width of the balcony, is then laid perpendicularly. The floorboards must be nailed through the end face.
When it is necessary to expand the living space at the expense of the loggia, then the floor level of this zone must be raised to its threshold. In this case, the logs rise to a great height due to their thickness or with the help of racks, brackets. These elements are of different types: racks, U-shaped holders, metal studs.

Styrofoam can also be used as insulation under a wooden floor
Laying technology and materials for a wooden balcony floor
You can make a new floor on a glazed loggia with your own hands without much physical and material costs. For this you will need:
- moisture resistant substrate;
- floorboard, plywood, chipboard;
- metal corners, wood screws, dowels;
- wood stain, varnish, impregnation for wood;
- wooden beam - logs for mounting the frame;
- insulation.
From these materials, you can make a covering from boards, a floor on a balcony from plywood, chipboard. In this case, it is recommended to use moisture-resistant plywood or chipboard with a minimum thickness of 15 mm. It is important to calculate the thickness of the timber and coating materials in such a way that, in total, their height would coincide with the height.

Floor boards are laid on pre-fixed joists
Step-by-step installation of a wooden floor
- Lay a moisture-resistant substrate on the cleaned waterproofing surface;
- Lay out logs, transverse jumpers from a bar - in this way, a crate is formed.
- After precise adjustment of the timber, it is necessary to treat the wood with wood stain, varnish, impregnation for protection.
- Wait until the material is completely dry, and then unfold the frame and connect the bars to each other using corners, wood screws and a level. In this case, it is important to pay special attention to the parallelism and flatness of its different parts.
- At the next stage, the lathing is attached to the concrete floor using dowels and corners.
- The frame is insulated using the available insulation: mineral wool, expanded clay, polystyrene, foamed polyethylene.
- The floorboard is fixed perpendicular to the joists, filling the width of the balcony. The guide board is firmly fixed on one side with the front facing up. Further, the rest are sequentially attached to it. When installing chipboard and plywood, all sheet edges must firmly rest on the joists. In this case, the heads of the screws should not protrude above the level of the floor plane.
Thus, subject to the technology, it is possible to install the floor of the glazed balcony and open terrace without special building skills. For this, it is important to prepare the necessary material in the required quantity and strictly consistently carry out certain actions.
Careful work will allow you to get an excellent result, corresponding to the image created by your imagination. The main thing is to clearly understand the functional purpose of the wooden floor of the balcony, loggia or open terrace of the house.
The balcony floor is an important detail. It must be strong enough to support the weight of the items stored on the balcony, beautiful, functional and warm.


The task is not only to choose a decorative finish, but also to lay the most functional floor. It can be laminate, tile, linoleum, carpet, board. Let's see which option is right for your balcony.
Someone has a fairly strong and even floor, others definitely need decorative details. Modern coatings are quite original with imitation of different surfaces and even 3D drawings.

Parquet
It always looks stylish and aesthetically pleasing, it looks interesting in both classic and modern interiors. Most often, they offer a large board with an already laid out pattern, most often imitating a tree pattern. One-piece is much more expensive, it is more difficult to lay it out, but an interesting pattern is formed. You can really try something unusual on a small balcony space. On the computer, you can use different programs with the layout of the image from the tree.
Parquet board is much cheaper and easier to care for. Some designers combine multi-colored planks on the floor, sometimes update and paint.
The joints simply fit together, without glue and nails, so it comes out smoothly and beautifully, nothing clings or interferes. 
Laminate
The price range of the laminate allows everyone to purchase it, combining quality and appearance. The color and texture of the laminate can imitate tiles, stone and even leather. Even a light laminate can be laid on the balcony, if only it suits the temperature conditions.
It also fits with the help of a locking system. Can be shiny, matte or embossed.

Mats
The mats look interesting on a spacious balcony in an Asian or minimalist style. They are woven from flax, reed, hemp rope. They take different forms, and for those who like to create masterpieces with their own hands, there are master classes on the Internet. Advantage of mats in foot massage.
Cork covering
The good thing about such a surface is that it is warm and pleasant to the touch. It is good to walk on it barefoot, which is important on the balcony. There is no special load on the spine when walking, the cork is slightly springy. Now there are different colors, so you don't have to paint or cover the cork at all. It is convenient in installation, during repair it is enough to change the damaged piece. It will also last long enough.

Ceramic tile
This is a more familiar coating for a bathroom and toilet than for a loggia. But even for such a case, there are options, porcelain stoneware, for example, is able to withstand a fairly large weight and at the same time looks original in design. Such a floor is cold, but not afraid of moisture and dampness. It is durable and looks neat enough.

Linoleum
Very common for balconies: a quick way to tidy up the floor, easy to roll out and fit. Combines the advantages of many, but at the same time is affordable.


Wood
Traditional and classic version. Only the features of the balcony require special characteristics. This is strength, durability, naturalness.


With the help of wood, you can adjust any style, adding grace and naturalness to it. This coating will always be warm and pleasant to the touch. Do not forget about protective varnishes and antifungal compounds to make it last longer.


Warm floor
Underfloor heating is very relevant for balconies and loggias, because the heating system is often not installed there. Glazing doesn't always help, especially in winter.

Electrical appliances are not always more reliable, therefore it is easier to carry out a warm floor system.
Replacing the floor
Repairing and replacing the floor is a laborious process, but it is worth it, because it is on it that you have to walk every time you need to go to the loggia. It will be much more pleasant to do this barefoot, without thinking about the fact that you will catch a cold or about unpleasant sensations.


Before replacing the old coating with a new one, it is better to consult with professionals, certain buildings require a special approach to repair. Therefore, you need to clean up anything with the utmost care.


You can try self-leveling floors, which will be unusually combined with the design of the entire room.


The disadvantage of the tile is that it is cold enough, so it is suitable only for the warm season.

The combination of furniture and floor looks beautiful, especially if it turns out to be in tone.

Be sure to prepare the floor for any coating, make it even and preferably insulated.

Photo: uhouse.ru, babyblog.ru, yaplakal.com
.