How to put the walls with minimal costs of nerves and the maximum effect. How to put the walls shtchecking walls with their own hands
When carrying out repair or construction work at their final stage, it is necessary to carry out the putty of the walls. Wall alignment with putty is necessary if you want to get smooth and beautiful walls under painting or pasting with wallpaper. All work is carried out in several stages, each of which is perhaps even a newcomer. Of course, without possessing practical experience in equalizing the walls to putty, do not do without flambers. But adhering to the presented recommendations below, you can minimize errors.
When going to do the alignment of the walls with the help of shtclothesia, it is necessary to decide in advance with the type of putty. The choice of one or another putty affects the type of materials for the finishing finish, the initial quality of the surface of the walls, as well as the target premises. Relying on these parameters, and you should choose a putty.

Today on the market you can find many putty from various manufacturers. But all putty can be divided into ready and dry. The principal difference between them is to be prepared at the place of dry putty. Otherwise, they are similar. But it should be noted that for ready-made putty, it is characterized by a higher quality, as they are preparing strictly according to the technology directly in enterprises.
Selecting the putty, it is necessary to pay special attention to its type. There is a start-up (leveling), finishing and universal putty. Each of them is intended for a certain type of wall leveling.
- So starting spacure Properly use to eliminate deep irregularities. This type of putty can be applied to a stratum from 10 mm to 30 mm, while not afraid of the surface cracking.
- In contrast to starting putty finishapplied a thin layer to 10 mm and have a smallest grain.
- Universal spacure They have the strength of the starting putty, but at the same time fine-grained and can be used for finishing alignment.

Deciding with the type of putty, choose it. It may be plaster, polymer, cement or lime putty. Each of the listed putty is applied according to the final finishing and target premises. Consider each of them. Read more:
- Gypsum spacure. Applied to any finishing finishing materials. Practically does not sit down. You can apply a layer of more than 2 mm. But the main disadvantage is a ban on the use of high humidity and sharp temperature differences. Therefore, it is not used for external work and for decoration in the bathroom, bathroom and kitchen.
- Polymer spike. Applied under any finishing finishing materials. Does not sit down. You can apply a thin layer. It does not depend on temperature drops. The disadvantages of these putty are a very high price and high risk of buying a defective putty.
- Cement spacure. These putty are suitable for any finishing finishing materials. Most often, this type of putty is used for rooms with high humidity. Unfortunately, the main disadvantages are the surface cracking, low elasticity, a long period of solidification and a large shrinkage. As a result, repeated shtpocking is required.
- Limestock spacure. These putty in their composition are both sifted tolerated lime and cement or various polymers, therefore possess all the advantages and disadvantages of cement putty. It is used most often for finishing facades and walls, plastering plaster. This type of putty is recommended to use for a decoration with lime colors.
Important! Lime and cement putty are the only ones that are suitable for painting lime paint. This is due to the fact that they have an alkaline reaction, are able to provide "breathing" walls, especially if used to finish aerated concrete vapor-permeable walls. Gypsum putty opposite have an acidic reaction and can be used to finish concrete walls, drywall, etc.

It should be noted that when the walls are aligned with putty, the cost of all works by and large depends on the volume of the putty used and its price. To save on this point of the estimate, you need to carefully read the brand of purchased putty and learn its flow per 1 m2. Of course, for the quality you have to pay, but if the budget is too small, you will have to search for a compromise on the issue price / quality.
Regarding the volume of consumed putty, then on average, about 15 kg of putty leaves on an area of \u200b\u200b9-10 m2. The layer thickness ranges from 2 to 5 mm. At the same time, after drying the first layer, it may be necessary to add additional shtclosure of individual sites, and this is another couple of kilograms of putty. Applying the second layer of putty for final alignment is especially important when preparing walls under painting.
Tools and additional materials

To fulfill all work on the alignment of walls, a putty will need a specific tool and additional materials. Everything you need can be unhindered in any construction store. From the tool you will need:
- spatula 15 - 20 cm;
- spatula 45 - 60 cm;
- angular spatula;
- rule;
- capacity to mix putty;
- drill and nozzle mixer;
- special grater with attachment for sandpaper and paper itself shallow and medium grain. You can also add petals to protect against dust.
Of the additional materials you need primer and rollers for applying it. It will also not be superfluous to be plastic film to the floor for its protection against accidentally fallen putty.
Work on the alignment of walls with putty begin with the preparation of the surface of the walls. There are no special secrets here. If you have to put the walls of the brick from the brick just built, then it is best to do after they are plastered. For concrete walls, shuttering is not so important.
Cleaning walls from the old coating
In the house where the walls had any finish coating, you will have to first remove it. An example of the preparation of such walls can serve as the following photos, demonstrating the cleaning of walls from old water-emulsion and gypsum putty.

The process of cleaning the walls is pretty simple. As in the case of the removal of old wallpaper, the surface of the painted water-emulsion wall with an old gypsum putty is wetted with a small amount of water, and then with a spatula, it scraps. But in contrast to the removal of the wallpaper, it is best to make a small plot with water.

After a couple of minutes, as soon as the putty will absorb water, it can be considered.

In cases where the walls were painted acrylic paint or alkyd paint, everything is somewhat more complicated. First you have to remove the paint itself using a special cleaning. Of course, this is not the most pleasant cleaning method, especially in closed rooms. Therefore, the paint can simply knock down a hammer from the wall.

Cleaning the wall, you can start up the second phase of preparation - coating it with primer. This is a mandatory stage and neglect them is not worth it. The primers of deep penetration will not only increase the adhesion of the surface, but also penetrate deep into the wall, filling the crack and partially eliminating small damage. Primer is quite simple. Initially, it is poured into a special container in which a brush or roller is painted and then rolled through the wall. To increase the effect of adhesion, the primer can be applied in two layers. After applying the primer, we leave the wall to dry for 6 to 10 hours. After that, you can proceed to align the walls with putty.

But before you need to learn a few simple recommendations that will allow high-quality and without any particular problems to cover the walls.
- Perform the shp clashing of the walls is best in one reception. It is short enough to be needed than any rules. The thing is that putty sufficiently dries enough, and after 20 - 30 minutes it will already be impossible to apply high quality on the wall. Therefore, you should make some small trials to determine how much speed you produce them.
- If you had to do a long break, then before you begin to further shtklivania, it is necessary to richly moisten the edge of the putty and then continue the shta.
- If you need to align the walls with multiple layers of putty, for the first layer, you can use a universal or starting putty. And already the last layer of apply a finish putty.
Aligning walls with putty do it yourself
After preparing the walls, you can proceed directly to the alignment of the walls with putty. All work will be held according to a specific scheme. Algorithm of actions Next.
1. Before you start kneading putty, you need check evenness of walls. For this we take the rule and apply it to the wall at different angles. Vertically, horizontally and diagonally. Applying the rule thus can notice all the irregularities of the wall. Where there is a gap between the rule and the wall, there will have to fill it with putty.
Important! Checking the walls for the presence of irregularities and noting for yourself these places, it is necessary to take into account the following. If most of the protrusions are located vertically, it should be applied to the spacing below. And if horizontally, then right left or vice versa.
2. Checking the walls for irregularities, establish to the spacure. As already noted, the first two or three knees must be made by trials, gradually increasing the amount of putty. For the convenience of a dry putty set from a bag, you can use a special plaster bucket.

On average, for more or less uniform solutions, a newcomer will need 4 - 5 putty putty. The amount of water for one knead you need to look at the packaging. Different producers it can be different.

We mix the solution with a drill and a mixer nozzle. We bring the solution to the consistency of thick sour cream. So that the putty is easily filmed from the spatula and at the same time did not slip or did not flow with it herself. When mixing the putty, it is necessary to achieve a monotonous solution, without lumps. If any, we try to break them and wash them.

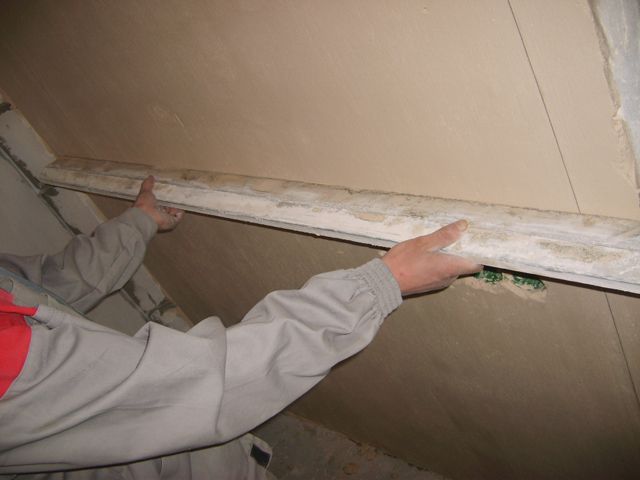
3. With the help of a narrow spatula we put a putty on a wide. We try to evenly distribute putty along the edge of the spatula. After that we apply a spatula to the wall at an angle of 50 - 60 degrees and stretch the putty along its surface. Holding a spatula in various ways. An example of how it can be done is shown in the photo.

The main thing is that the spatula will be reliably fixed in the hand, and when applied to the putty, a sufficient amount of effort was made to smear the putty on the surface. Place start from the corner of the room. To create smooth and neat slopes and angles, use a special corner spatula.
4. Having developed the first spatula, we repeat the entire procedurewith a set of putty and apply it on the wall. But we do it on a new section of the wall, next to the already applied layer of putty. At the same time, partially occur on it, as if continuing the previous layer. I remember the irregularities of the wall and put the putty appropriately.
5. Processing the wall of the wall with an area of \u200b\u200babout half a meter, we take the rule and apply it at an angle to the wall. Then we spend along with a slight force along, removing the excess putty.
6. We repeat the entire putty algorithm until we work out the entire cheap. After that, repeat it.
After there were punctured walls, leave them to dry over two days. After drying, it will be possible to more carefully evaluate all the shortcomings and flaws at the first putty. We again apply the rule to the wall and we find irregularities, if any. Next, you can go in two ways.
First - Fill out the deepening of the new layer of putty. Second - Wiring the protrusions with the help of a grater, and then, if necessary, apply the finishing layer of putty. Consider the second option, as it will allow the most qualitatively performing the alignment of the walls of the finish putty.

- We take the grater with the slices of sandpaper fixed on it.
- Accurate circular motions believes excess putty in those places where there are influx or bugs.
- At the end, we fix the emery with zero grain and we take place again at the stripped places.
- Upon completion, check the surface of the wall and, if necessary, we apply a finishing layer of putty. Before applying the finish layer, the wall must be moistened with water or primer to soften the previous layer and increase the adhesion. The finishing layer should be applied with special care, so that there are as few lights as possible.
Wall alignment with putty: video lesson
Work on the alignment of walls with putty - one of the easiest and easiest and easy to build. Of course, without experience it will be difficult to make perfectly smooth walls from the first time, but a little practice will quickly give a positive result. If you are not friends with a tool or you do not want to get dirty, you can find good masters for quite reasonable money. Moreover, the price alignment of the walls is not high in the region of 125 - 130 rubles per m2. That in comparison with, for example, plaster is quite cheap.
Hello dear blog readers! A huge number of people, before sticking wallpaper, they think - whether it is necessary to put off and primer walls. Even, it seems, the primer and putty the walls under the wallpaper are easily fulfilled, but are they important and needed? Is it worth spending your time and means? It is about this that we will talk further.
Summary of this article:
What is needed to sharpen the walls before sticking wallpaper?
Place the walls before sticking wallpaper is necessary, first of all, to completely equalize the base of the walls. Thanks to this procedure, the wallpaper will fall in a smooth web during the sticking and after drying, small tuberculos and other irregularities will not appear, in contrast to the unprepared surface.

Also, in favor of the shtlocking of the walls, the transparency of some modern types of wallpaper says. If the walls were not prepared for sticking wallpaper, then after drying the glue, dark spots could be seen through the wallpaper, which were on the walls, and here they are visually and destroy all your repair efforts.

As is known, mixes for putting the walls, presented in the construction market, for the most part have a light, most often even white shade. It is this property and protects the wallpaper from various kinds of transluents.

Then, the putty of the walls gives some lull of the entire room, i.e. Creates a good effect of sound insulation (noise insulation).

In addition, spacure walls create a solid flat surface, the clutch with which the wallpaper cloths will be most reliable as possible.
No need to forget about good hydrostility (waterproofing) walls after putty. The spacure walls repel moisture, which makes it possible to significantly save on the flow rate of wallpaper glue.
What better to choose a putty for walls under the wallpaper?
Modern mixtures for spatleing walls under wallpaper differ in both external characteristics and in their composition.
According to the external characteristics of putty for the walls, the division is as follows:
- Mixes in the form of paste, which are already on the finished form and do not require further preparation.

- Dry powder mixtures that require the addition of liquid when preparing.

In composition, mixtures for putting out walls under wallpaper are divided into:
- Polymer mixtures, or as they are also called acrylic (latex). They are easily applied on the wall, also easily rubbing and polished in the future.
- Gypsum and cement mixtures. They are the best and most common. They are easy to use and very reliable. For their preparation requires water.
- Dispersed water mixtures. They have a very viscous consistency and sold already in the finished form. The only minus their use is a small shrinkage after complete drying.
Most of all, cement and gypsum dry powder mixtures are suitable for the correct and trouble-free plaque walls. They are simple in applying, and, possessing the properties to repel moisture after drying, do not enter into a chemical reaction with wallpaper glue, which is divorced when cooking with water.
What kind of tool is necessary for the shtlocking of the walls under the wallpaper?
First of all, it is necessary to choose a container to knead the solution. It should be simultaneously spacious and comfortable.


The power tool will need a nozzle called a mixer. This is a special building nozzle, similar to a little on a kitchen whisk for a mixer or blender. It is with its help and it will be possible to achieve the desired consistency of the solution.

Also an important tool for plating walls under wallpaper is a construction level, with which you will succeed exactly perform all the work. It can be like a laser version and water, oil, or alcohol.

If the surface of the wall is very uneven, then the mixture of the mixture will be applied to a thick layer. Here, the rule will come to the rescue - suitable as wooden and metal.

Of course, not to do without spatulas of various sizes. In hard-to-reach places there will be a small spatula, and on spacious sites are large.

Tassels or rollers are also very important tools needed when putting the walls under the wallpaper. With their help, it will be applied to the surface of the walls a special primer of deep penetration.

Do not forget about emery paper, the so-called sandpaper (emery). It needs to be stocking necessarily, and both fine-grained and coarse-grained. With its help, grinding, you will need to bring the spacious walls to the ideal.

It is also useful to clamp for the sandpaper, or as it is also called a manual skin. With it, it is much faster and more convenient to engage in grouting or grinding of spacious walls.

Preparation of the surface of the walls under putty
The process of preparing the walls to apply putty can be divided into the following steps:
- Removing the plating layer from the walls. Do not be surprised, many people still prevail the fat layer of whitening from Soviet times on the walls. So that it is better left, you need to moisten it with water, and after a while it's just to erase with a large car sponge, difficult to achieve a spatula or scraper.

- Cleansing the surface of the walls from the old layer of wallpaper. Here, too, do not do without moisture, it is necessary to abundantly moisten with warm water layer of old wallpaper, going through them with a moistened roller. You can make small notches on the wallpaper, so that they absorb water faster, something sharp. Further, waiting a bit, remove the wallpaper with a large spatula or scraper, starting with the joints.

- Removing the old layer of paint. Here you can simply mechanically roll the paint, but it is very laborious and long. The easiest solution is the heat treatment, i.e. Heating the surface of the walls with old paint with gas burner or hairdryer. After heating, the paint swells and is easily removed with a scraper or spatula.

- Grinding walls. The primer mixtures are very important - they create a dense film, the clutch with which subsequent finishing materials are very reliable. Also saddled walls are less susceptible to different kind of fungi and dampness.

After the qualitative implementation of all these preparatory stages, your walls are fully prepared for putting out putty.
Working with starting putty wall: Highlights
The main points, with the starts of the walls of the walls under the wallpaper that you need to remember and follow, the following can be distinguished:
- To avoid cracking of the solution after drying, each layer of the starting putty must be applied neatly, not thicker 3 mm each.

- The base of the walls under the starting putty must be necessarily qualitatively primed in advance, only so the grip will be as strong as possible.

- A black shuttle will sit even stronger if the painting grid use under it. Thanks to it, it is possible to overlap with the shtlocking rather large wall defects. It is very easy to put on the grid on its own, moreover, thanks to the painting grid, putty savings occur and the flow rate decreases.

- A very smooth surface is contraindicated with starting putty, for example, plasterboard, which has a very flat structure. You can immediately apply the finishing layer of putty, the starting will be held less firmly, because She loves a more porous structure of surfaces.

- After applying each layer of starting putty, it is necessary to drive the resulting layer, so each subsequent layer will be fixed as securely as possible with the previous one.
After applying each layer of starting putty, it is necessary to drive the resulting layer, so each subsequent layer will be fixed as securely as possible with the previous one.
Independent putty walls for lighthouses under the wallpaper
When putting the walls along the beacons with their own hands under the wallpaper, the metal profiles can act, most often used for fastening plasterboard sheets, also any other comfortable wooden or metal rails.

Initially, one rails are located at the beginning and at the end of the wall, using the construction level to accuracy - it can be like laser, water and alcohol.

The rails themselves can be mounted on the wall as with a dowel with self-drawing, and using a mixture of plaster, which after frozen is quite reliably holding lighthouses.

Further, between established beacons, the most ordinary rope is stretching, or any other thread existing in the farm. After that, the control check is made by the construction level of the correctness of the resulting design for putting the walls.

Then, intermediate lighthouses are installed, the rules are long. It is on them that will go to the rule, throwing the putty from the bottom up.

With independent putty of walls along the lighthouses, the starting putty is also used, each subsequent layer of which is necessarily pretty nevertheless to the primer of deep penetration.
Finish putty walls with your own hands under the wallpaper: instruction with photos
It is not so difficult to produce the finishing putty of the walls with their own hands under the wallpaper. If you coped with the starting putty, then the finish will definitely not give you any trouble and difficulties.
All operations in the finishing putty, in principle, are similar to work in the start of the shtlocking of the walls, with the exception of one point - each subsequent layer of the finishing putty should not be thicker 2mm, in contrast to 3 permissible MM during starting shtchevania.

The main condition for the start of the finish putty is a qualitatively prepared surface of the walls, i.e. All possible remnants of the starting mixture on the surface of the walls must be removed with a wide iron spatula, and the wall itself should be high-quality sandwiched and is projected.
An ideal result with finishing putty walls can be achieved using several carriers with powerful light bulbs. Directing light streams from several sides at the same time, you can understand where the formed shadows understand where the most uneven areas.

And on the contrary, if the shadows are not formed at all, then work on the finish putty can be considered perfectly fulfilled. Next, it will be necessary to minimize the surface of the fine-grained skin and apply a primer.
How to properly apply putty on the walls with your own hands - the technology of applying a solution under wallpaper
To properly apply putting on the walls before sticking wallpaper, you need to follow certain rules:
- It is necessary to use in the process of work on the shtlocking of the walls under the wallpaper not one spatula, but two. One should be big and wide, the second is small and comfortable. It is best to use a spatula of stainless steel.

- Due to the use of two spatulas, there is a significant savings of the leveling solution, because The remains of the mixture with a large spatula when applied, are chosen by small, and again start in the case.

- The direction of movements with a hand with a spatula must be cruciform, i.e. After the layer is applied from the bottom up first, smoothly wrap the left, then pass the spatula to the left, after the same place, only already wrapping to the right. With such cross-shtlocking, the surface of the walls is perfectly smooth in the end.
The leveling mix must be applied to the lungs, but at the same time smooth movements of the hand, preferably at one occasion. The spatula when applying must be kept a little at an angle (from 60 to 80 degrees, depending on the thickness of the required layer) so that the leveling mixture is evenly distributed over the wall.
The most common mistakes when putting the walls under the wallpaper with your own hands
Here is a list of those errors that are found most often when putting the walls under the wallpaper:
- After applying the starting layer of the putty, most people are labeled not to sand, but simply go through it at least a wide spatula to knock the remains of the frozen mixture, then, when applying the finish layer, it will all manifest.

- Lack of priming the starting layer of putty. Again because of the laziness for the most part. Everyone thinks and sweat.

- It is not necessary to start the shtlocking of the walls from the angle. As a rule, it is the corners of the most curves of the places of your walls. It is necessary to retreat a little from them and begin putty on a flat surface of the wall. The angles should be removed at the very end.

- Dirty packaging for mixing the solution. All the unnecessary, in unclean containers after kneading the solution will reach the wall when applied, and leave traces behind them.

- Also, various garbage particles can enter the solution when mixing with a poorly purified mixer - a perforator nozzle or a drill for mixing the mixture.

- Very liquid solution. Such a mixture will simply drain along the wall. The ideal is considered a consistency like a thick sour cream.

- Damaged or twisted spatula. If a wide spatula has obvious damage, then it is not worth using. The perfectly smooth surface is not achieved by such a spatula.

Step-by-step and understandable instructions for self-putting walls under the wallpaper
For the correct self-fulfillment of works on the putty of walls under the wallpaper, you must follow the step-by-step instructions:
- Preparation of the surface of the walls. At this stage, it is necessary to remove everything excess from the walls - old paint, wallpaper, any irregularities.

- After the procedure for the removal of all unnecessaries, the wall is necessary to progress the primer of deep penetration.

- Next is the applying of the starting layer of putty. The maximum thickness of the applied solution during the starting putty of the walls should not exceed 1.5 cm. The applied solution may consist of a plurality of layers, but in the aggregate should not go beyond the above thickness.

- If there is still a layer of putty for complete alignment of the walls, it is best to enhance the reinforcing grid or painting. The previous layer of putty is ground, a little mixture is applied to it, on which the painting mesh is attached. Next, on top of it, the necessary aligning layer of putty is applied.

- Contribution of corners, both external and internal. These angles can be brought when putting off with a special coal spatula or ordinary wide.

- Next follows the finish putty of the walls. Before it starts, the previous layers are reinforced and cleaned. The finish putty is applied in the same way as the start-up, only smaller layer - to 2mm.
As a result, the obtained spacure surface is thoroughly polished and shredded by eating light circular motions.
How to put concrete walls under the wallpaper with your own hands?
In order to correctly perform putty work under the sticking of wallpapers with your own hands on the concrete surface of the walls, you must adhere to the following sequence of actions:
- Surface primer. A wide roller is carefully applied to the primer of deep penetration on the surface of concrete walls. After complete drying of the soil, you can safely begin to the next item.

- Next, we fall asleep into the clean container the dry leveling mixture for putting the walls, we take a perforator with a special nozzle mixer, and thoroughly mix the mixture until the consistency of the solution, similar to a thick sour cream.

- Checking a small spatula The quality of the resulting mixture if there are small lumps or seals, we continue to mix the construction mixer until complete readiness.

- After thorough mixing, we get from the container a small amount of solution with a small spatula and distribute it evenly along the entire length of a wide spatula.

- A wide spatula with an aligning mixture applied to the surface of a concrete wall at a small angle and begin to smoothly, without a special pressure to lead the spatula to the left, then up and right - cruciform.

- With a small spatula, removed from the largest mixture, carefully combine it again on the edge of a large spatula, and from the container we apply additionally on the remaining length of new portions of the solution evenly.

- We continue to align the concrete walls until complete readiness.

- After drying, you can proceed to grout (grinding) walls. To do this, we wear sandpaper on the schochotler (special clamp for sandwich with a comfortable handle) and circular motions to grind the surface of concrete walls to the perfect result.

Shpocking of brick surfaces on their own under the shoes of wallpaper
There are a number of consecutive rules for the shpocking of brick walls under the shocking of wallpapers with their own hands:
- Brick walls that planned to splash, be sure to be pretty well. To do this, it is best to use deep penetration primer.

- After drying the soil, a starting solution is prepared for alignment. In the finished form, it should be similar to an ordinary sour cream, in its consistency.

- The finished solution of putty with a large spatula is evenly distributed over the surface of the brick wall with a smooth layer.
![]()
- For one sitting, it is recommended to cut the brick wall at once, i.e. from the beginning to the end. So, as a result, the most uniform and smooth application of the mixture is obtained.

- After drying the starting layer of putty, the primer is necessarily applied.

- Next, we prepare the finishing solution to align the brick walls, its consistency should be slightly fat than when preparing the starting mixture, because The finishing layer will be much smaller. The finish putty is applied on the same principle as the starting.

- After complete drying of the covered surface of the brick walls, it must be sanded to an ideally smooth result.

- At the end, you can check the surface thoroughness by applying the rule. If it fit completely, not leaving the gaps, then you can consider the work done with the bang.

Proper applying putty on wooden walls under the wallpaper with your own hands
To properly apply a putty with your own hands on the wooden walls before sticking wallpaper, you must follow the following instruction:
- Wooden walls, like any other, are necessarily subjected to the process of primer at the very beginning. The primer will provide the maximum strong clutch of the surface of the tree with the layers of putty. In addition, the soil protects the tree from the processes of rotting, aging and the formation of fungus.

- After complete drying of the ground layer, the base (starting) putty layer is applied to 3mm.

- The dried starting layer is polished by coarse sandpaper with circular motions without a strong pressure (it is best to use a manual schotter - clamp for the sandpaper).

- Further, a deep penetration of a large roller is applied on the spacing base layer of the putty, and in the corners of the room - a painting brush.

- Following, one, or two (if necessary) layer of the finishing solution, no more than 2 mm thick, is applied to the dried basic projected layer.

- In the finals of all done manipulations, the finishing layer of putty is maintained by the sandpaper and grimitically rushing.

- After drying the surface, you can safely begin to stick the wallpapers on wooden cake walls.
Professional putty plasterboard with their own hands under the wallpaper
Place plasterboard walls under the mixture of wallpaper must be required for three reasons:
- Once, the wallpapers, picked directly on the plasterboard, are obsidese morally or physically. This is where they will not be able to ride them - along with old wallpaper will be a layer of plasterboard layer.
- If you chose a light wallpaper for your interior and blew them directly on plasterboard, be prepared to see all the fasteners of drywall - dark heads of self-tapping screws, screws, etc.
- Again, if the wallpaper you chosen for sticking are not dark, then their shade, when you find it right on plasterboard sheets, it will be slightly shared and tint.
To professionally perform work on putting the walls under the wallpaper from drywall, you need to follow the following rules:
- Be sure to progress the drywall several times before putting out the plasterboard. It absorbs the ground mixture very well.

- The starting solution can not be applied at all, it is better to immediately use the finish mixture.
- Next, it is necessary to warmly drown all the heads of self-tapping screws in drywall so that they do not interfere with putty.

- At the joints of the sheets of plasterboard, to avoid cracking, it is necessary to put on the painting grid.

- After completing the finish putty, the surface is thoroughly rubbed and ground.
After drying, you can safely stick the wallpaper on the shtaplava plasterboard.
How to independently make putty smooth angles of walls under the wallpaper?
Works on self-putting of the angles of walls in the room, are different, depending on the type of corner. As you know, the corners are internal and external.

When putting the inner corners, you first need to align the adjacent surfaces that constitute these angles. To do this, we apply a wide spatula, starting from the corner first in one strand, then to another.

After drying the mixture in the corners, be surely styled first with coarse-grained sandpaper, then gradually reduction, fine-grained. Be sure to use the schocoter, because Without it, the leveling of inner corners will be very complicated.

When self-putting out the outer corners of the room is easiest to take advantage of special metal corners, which are available in free access in any construction store.

They have small holes throughout their length, in which the mixture falls when putty, which ultimately ensures the strength of the corner structure.
They are mounted very simply - first to the outer angle are applied with a spatula slightly mixture over the entire length, further, directly on the mixture is superimposed with a metal corner, after which it is pressed, and the residues of the protruding mixture are smoothed by the spatula on the side of both adjacent walls.
Independent manufacture of putty made of dry construction mixture
To make high quality, and most importantly, we will make a putty on the walls on the walls to the walls, from ready-made dry construction mixtures it is necessary to follow the step-by-step instructions:
- Next, you need to pour the required amount of dry mixture, which is indicated by the manufacturer of the solution on the package. Be sure to read these recommendations before starting work.

- As a rule, it is desirable to produce such a number of leveling mixture to have time to fully spend it in about 35-45 minutes. Next, the mixture just dries off and will lose its properties.
- With the help of a building mixer, we thoroughly mix the solution to a homogeneous mass, which should be similar in its consistency to home sour cream.

- In the solution should not be present trash, various safes, lumps, etc.
- Then it is necessary to give a solution to break for about 15 minutes, after which it is a construction mixer again.
Calculation of the required amount of putty for alignment of walls under the wallpaper
To produce correctly calculations for the required amount of putty during self alignment of walls, the following data must be having:
- The number of windows and their dimensions
- Height of the room
- The condition of the surface of the walls - for porous concrete walls, many layers of putty can be needed, while for drywall minimum number of layers.
As an example, we calculate the amount of putty for the room having the following characteristics:
- Room dimensions - 2x3m
- Number of windows - 1 with dimensions 2x1.5m
- Premises height - 2.5m
- Number of doors - 1 size 2x1m
- Condition of the surface of the walls - almost smooth non-porous concrete surface
First of all, we calculate the area of \u200b\u200bthe walls of the room by the formula:
P \u003d 2x (AKHV + A1XV) -SHS1-DHD1
Below will decipher the designation to be clear what:
R - Square walls of the room
This part of the formula (AKHV + A1HB) is multiplied by 2, because the walls in our indoors are paired, i.e. two in parallel.
A and A1 - width and premises
In - the height of the room
C and C1 - width and height of the window opening
D1 - height and width of the doorway
We substitute our data in the formula and get the following result:
P \u003d 2x (2x2.5 + 3x2.5) -2x1.5-2x1 \u003d 12.5m 2
Next, we need to calculate how many starting putty will need to align the walls with a layer, thick, for example in 2mm. To do this, pay attention to the packaging of the putty. There, the manufacturer clearly indicates the consumption of a mixture with a thickness of 1mm to the area in 1m 2 - on average it is 0.8kg. Knowing this, we can perform calculations by the formula:
K \u003d RHEHZ
Deciphering indicators as follows:
K - Number of putty
P - Square of the walls of the room (above already calculated)
E - Estimated layer thickness for wall leveling
H - the consumption of the mixture specified by the manufacturer on the package
We substitute our data in the formula and get:
K \u003d 12.5х2х0.8 \u003d 20kg
As a rule, putty is sold in construction markets in bags, volume in 25kg, i.e. In our case, one bag will be quite enough, even with a small margin of 5kg.
After that, we calculate the amount of finishing putty required for the final alignment of the concrete surface, for example, a layer of 1mm. Again, you need to refer to the manufacturer's recommendations on the flow rate of the mixture on the package - on average for the finish putty, it is 1kg on 1 m 2 layer in 1mm. The finishing putty is a bit more dense in its structure than the start-up, which is why the values \u200b\u200bare different.
We substitute our values \u200b\u200bin the tighter the most formula (K \u003d RHEHZ) and get the following results:
K \u003d 12.5x1x1 \u003d 12.5kg
In this case, most likely it is more profitable to buy not a whole bag of finishing putty, but for weight to take 14 kg with a stock. This should be enough.
If you plan to apply the finish putty into several layers, then the result is the result by the formula to multiply the desired number of layers.
How to calculate the amount of primer required when putting the walls under the wallpaper?
When the walls are working on the shovel of walls in the future, it is in no way to do without primer compositions that are sold in plastic and other tars of various litters.
They are already on the finished form, and do not require any manipulations for cooking. Simply, before use, shake the container well with the primer, and feel free to use.
For most people, when independent putty of the walls, the question arises - how much to buy primers to make sure enough and not too much is too much too much?
All this can be easily calculated. For calculations, we will need the following data:
- Room dimensions - Length and width
- The number of windows and their dimensions
- Height of the room
- Number of doors and their size
For example, we calculate the required amount of primer in 2 layers for the same room for which the above calculated the number of necessary starting and finishing putty.
The formula for calculating the required amount of primer is as follows:
R \u003d RHLHM
Decoding designations as follows:
G - the required amount of primer
R - Square walls of the room
L - primer consumption indicated on the packaging by the manufacturer
M - Number of alleged layers of primer
R \u003d 12.5х0.2х2 \u003d 5l
As a result, it turns out that 5l primer will be quite enough for our premises, for high-quality preparation for putty.
What better to use the primer when putting the walls under the wallpaper?
In order to choose the best primer for self-putty walls under the wallpaper, you need to understand what it happens at all and what is different from each other. That is why you briefly run through the species, characteristics and properties of various primers:
- Grinding with color pigments (pigmented). Working with such a primer is a pleasure. Immediately you can see what areas are poorly projected, and what are enough.
- Primer with mineral supplements (mineral). It includes multiple mineral chemicals useful for your walls. It protects very well from the appearance of fungal infections.
- Soil with antiseptic effect (antiseptic primer). Great for premises with high humidity, such as bathrooms, kitchens, etc. It copes very well with the prevention of mold and fungus.
- Acrylic primer. This is the most common variant of used primers for all types of rooms. She, simply speaking, is universal.
I understand a little bit in the types of solutions to progress the walls under the sticking of wallpaper we can conclude that the best and universal primer is for use under wallpaper is acrylic primer. Choosing it, you definitely do not lose.
Was it harmful to health spacure walls?
Modern types of putty for alignment of walls under wallpaper, like most building mixtures, consist of a number of chemical elements, with which the necessary viscosity is formed, good grip, elasticity and elasticity.
Many people are interested in the question - do not cause harm to respiratory and other bodies, as well as skin cover, particles and pairs of these most chemical auxiliary elements that are part of the construction dry mixtures for putting the walls, if inhaling and concerned them in the process of putty itself and in the period Drying walls?

If the mixture manufacturer is a major and serious manufacturer, respecting himself and other people, then its products will certainly be subject to the necessary certification of quality and does not carry absolutely no harm to the health of people who enjoyed it.
Moreover, the certified putty is not only harmless to people, but it also does not cause damage to the environment.
Therefore, it is best to purchase construction mixes for putting the walls in large outlets, and always check the presence of the necessary quality certificates. Certified putty and walls, screaming to her, definitely will not harm your health and health of your loved ones.
Video Tutorial: Wallpuck Walls under the wallpaper with your own hands
In the conclusion of this article, I want to state that the primer and putty of the walls under the wallpaper with their own hands are quite fulfilled tasks. Negone, it is better not to neglect these procedures. Of course, you can roll out the wallpaper without putty and primer, but how much they will last in this case it is not known. Therefore, make everyone by the mind, but according to the instructions. Huge good luck!
Below leave your comments, wishes, ask questions, express your opinion - it is very important to us!
Grinding of walls, plaster, putty - basic operations in the process of bringing surfaces to the stage of readiness for further painting or shook wallpaper. The simplified scheme of the work is as follows: plaster, primer after plaster, shtclotka, grinding, coating with paintwork material or overlay wallpaper. The putty of the walls after the plaster is considered the finish preparatory operation.
Even due to the fact that today plastering is ensured by a wide selection of materials for internal works and outdoor decoration, and making work, it is possible to achieve an ideal plane (there is no question whether it is possible to put the walls, for example, after finishing with plaster plaster, the procedure is optionally incorporated in order Performance of repair work) - Financial costs for such work on plaster are extremely high.
The classification of putty materials was carried out in several criteria. The sequence of grouping is determined by key factors and properties of shtlock, ridicule the mixtures in the following classes:
- Oil-glue. If you need the cheapest mixture - the group is suitable. It is not known whether the prospect of oil solutions will continue, because they are already considered the past century. The main disadvantage is the manifestation of yellow spots through the paint layer and wallpaper.
- Gypsum-cement. Materials are an order of magnitude more expensive. Designed for a complete set of finishing operations of a general orientation. In the products of domestic production, most often, more cement, rather than gypsum. In terms of cement and plaster basis, the main purpose of the powder was determined for the masters - covering the layer of plaster, you are most likely putting off the wall with the composition of the wallpaper.

- Water-dispersion. Also, from the discharge of gypsum-cement, however, it is necessary to be made in an injury with aqueous polymer emulsion, respectively, Tara - Vötra. The advantage is that it is not necessary to study on the packaging, what to do and in what proportion to breed putty - the products are already ready for use.

- Acrylic. After putty, there will be all the advantages of the above-mentioned groups (except for oil).

Stages of the workflow
Cleaning the surface
When the walls are put, after the old plaster, taking the wallpaper and the layers of paint need to be removed. Eliminate remnants of unnecessary material helps a special bow. After manipulations, the walls should dry - they are left for about a day.
Behind drying should be careful visual check: the missed small parts are written to the mounting knife or thin blade.

Inspection of the relief
The embossed plane is inspected by a flashlight, an intention to the construction rule: it is applied to the surface, the lantern shine along the wall. The smallest deepening and protrusions are apparent. Rough bumps should be repeated in place to repeal or acute spatula, and the excavations indicate the contour with a simple pencil.

Preparation of instruments
Before starting the repair process, the entire set of tools is scrupulously wipe the wind from dust, washed with dishwashing tools and dried with a dense rag that does not leaving the fibers on the sprayed items. It is worth carefully certified in the lack of residues of the solutions of previous dampers on a mixer from a drill and a container for kneading - the lumps of old solutions need to be seen.

Preparation of a spike mix
The process of preparing the solution is not complicated:
- In the tank gain flow water (the construction bucket is filled with a quarter, usual - by a third).
- We gradually fall asleep dry powder, while the Top "Iceberg" will not be above the water.
- Wait until 30 seconds. Until the powder does not make water and does not seek: dry formations should not be left.
- The rapidly verified movement with the help of a drill nozzle is raised for 2 minutes. (Drill is preferable, but manually is also allowed).
- Expect 30-60 seconds ..
- Made re-hoarse. The consistency is adjusted to the perfect - the solution is ready.

Under no circumstances, it is impossible to breed the finished solution with additional water or dry powder. We will have to work with what happened. In the case of shortcomings, the plaque is serpt the excess fluid, it is always possible to go through the area by abrasive and dosing, where it is necessary.

Do not forget about the expiration date of the finished solution after the kneading: it is better to knead several portions. Each portion is placed on a wide spatula smaller, calculating the amount that will be needed for one smear.
Relief leveling
Small grooves and cracks are smeared with a medium or wide spatula based on the size of the defect. The grout is made by wide movements of the cross, with the same effort to a smooth surface without influx and pupils.

A common mistake among inexperienced masters is slow, pressing, stretching the spatula. The putty of any brand is endowed with a thixotropic characteristic, which leads to imminent proper dispersal with a periodic identical force effect from several sides.
On the video: the process of putty the walls with their own hands.
Throwing the layer of putty
When solidifying the putty, it is necessary to use all precautions, as for pouring plaster: through air flows, direct solar rays, thermal waves from a fan heater or a hair dryer are absolutely contraindicated. Cracks in the wall as a result of drying are already unpleasant, but spoiled with an improper drying, the plaque layer may rush, which manifests only at the stack of wallpaper or painting.
It is necessary to adjust the introinate circulation of air, without drafts and temperature surges. More specifically, you can turn the room door, but leave the closed balcony. For the corridor, it is possible to circulate air from the living rooms, tightly shutting the door to the street, a kitchen and a bathroom.
In the instructions for use, the drying period is most often indicated by 16 hours, in fact - 10-12 hours. However, it is desirable to grind the layer not earlier than the day: the shtatlevka will ribrate, hardens, and subsequent operations will be easier.

Shpocking under the wallpaper
In order to further stick the wallpapers, the shp can be carried out initially with a wide spatula, overlapping each of the next layer to the ¼ of the previous one. Formed "sausages" do not rub. Holding a spatula at an angle of 21-30 o, it is necessary to observe a constant pressure, which will help distribute the material with a uniform layer from 2 to 4 mm. The less the angle of inclination, the more it leads to the formation of a thick layer, the more - to the thin. However, dependence is characteristic of variations in the specified degree gap, when exiting its framework on the surface, bugs and gaps are formed.

The subsequent step is drying the layer, removing the influx of a fuguntome with abrasive and recovering smoothness with the help of the construction rule and the lantern. Defective defects eliminate: protrusions - abrasive, recesses - additional tissue. It is possible that an inexperienced master can approach the wall up to 5 times until the surface becomes perfect.
Upon completion of manipulations and long frosting along the wall, a fuguntome with a dimension range of 80-120 is passed (with an increase in the number of abrasive grain decreases). Initially, the entire surface is worked out with circular mahams, after which, weakening the grip, the movements of the cross will, in order to remove the circular manipulation contours.
Then the wall is revealed by the construction rule with the lantern. If there are no lengthy folds from under the rules - the surface is ready, after a day, the walls of the walls are carried out and you can proceed to sticking.
Putty with subsequent painting
The technological process is distinguished by shtchevyannia, followed by plating wallpapers with one operation: after final leveling and rubbing the wall with an abrasive material is covered with finishing plaster. Special attention is paid to the wall, if it is painted with enamel, in particular acrylic, then the finish mix should be white, durable and specially intended for this purpose.
Grout occurs with an abrasive with small grain no less than 150.

For a mirror painting, the wall to the whole of them is polished by a milfly falcant with a suede material (felt and felt pieces are not suitable). The used suede crap will not cope with the task - it will have to change to a new one. Also for painting the wall should be trunk in accordance with the instructions specified on the packaging.
Nuances of shtlocking corners and slopes
Inexperienced masters are often recommended to apply larger norm on the corners of the material, followed by the abrasive product. But when it is planned to be planned to set back to any section of the gun - the physical costs can be reduced, at the same time increasing the effectiveness of the result.

Work plan:
- When silicone is spent - a tube must be promoted, remove the residues and wipe the cloth impregnated with acetic solution.
- During putty, the angle bypass by the party, leaving empty.
- The wall dried up - a tube needs to be filled with a putty and slowly squeeze into a slot. It is recommended whenever possible to do the procedure from the bottom-up for one approach.
- Next, we work out the corner spatula, leaning on the surface, similarly to turning into lighthouses.
- After drying, the protrusions will need to be removed by the abrasive grid.
Instead of silicone tube, you can use the syringe used when baking cakes. With rubber or foam lining and fixation, the tape confectionery syringe is fixed in a pistol like this.
At the angles of slopes, the master operates the corner spatula to choose from any of the methods known to it, the protrusions are knocked down by an abrasive grid, smoothness imposes the construction rule. There is no significant difference in the process of placing the plate layer on the walls and in the corners, but the corners are difficult to bring to the ideal - a professional will be necessary to approach up to two times.
Tips for Masters on Shptelling (2 VIDEO)
What might take (25 photos)


Splashing of the walls is made as a final operation of their preparation under the sticking of wallpaper and painting. Although modern plastering technologies and materials are able to give surfaces suitable for any types of finishes, it is worth the work of this level very expensive. Therefore, the walls still put the walls, especially since the putty of the walls does not apply to the number of complex and especially responsible works.
Place the walls are independently advisable due to the following reasons:
- Painting and sticking - Lightweight types of finishes; In a dry, not affected by the fungus and not poured room, the putty allows you to align and turn the walls without a complex and expensive breathtaking.
- The putty can be repeated repeated, bring, eliminate flaws on it from ineanion without reducing the final quality of the coating.
- Putty materials are inexpensive, not difficult in work, and their consumption is small.
- Plastering of homemade curvilinear elements of the interior of drywall is independently impossible, and to order an extremely road; The putty is not more difficult than putting the walls.
- The price of work on the putty of the walls of the hired brigade is comparable to the cost of plastering, and may exceed it.
On the cost of putty work is worth talking especially.
Price spacure
For a putty 1 square. M Wall construction organizations prescribe from 70 to 90 rubles / sq. m. It seems to be cheap and angry, but if it comes to the contract, different subtleties appear, such as irregularities of more than 3 mm, radiators of heating, slopes, the same arches. As a result, if the plaster did not make these masters, below 250 rubles / sq. m does not go out, and this is the price. Especially bad homemade workers: "Molished themselves? 400 per square without warranty (this is already the price of ceiling plaster) plus the slopes of 130 per random meter and corners of 90 for it. "
But, maybe if the old plaster is still strong, just a little bit of bread and lagged, order a meal repair? Call the master - from 1200 rubles, plus materials he himself will choose, plus the work piece by the hole. Generally, even if you still have never heard the words "Rule" and "Spatula", put it better. Spaklyka - from the discharge of work, in the process of which learn, and the resulting skills will be useful for repair more.
By the way about the words
Plotleyvka or shplanke - how to talk correctly? On the packages in the construction store it is written so so, then. Maybe this is for different works? Do not make a mistake.
Putty and putty - the same, and right all the same shplanke, although academic dictionaries and puttyle do not prohibit. Etymology (origin) of this word is not simple, but instructive, so for the sake of it costs the little to distract before work.
Organized Russian mass construction - wooden. The gaps in the wooden walls in front of the trim were embedded with a cleavement paneling - Plashevali. By the way, tightly in the grooves Plock pushed the special tool - Lebyazy. Hence - Lebesit. In modern Russian, this word is completely different, but as it came to life, a separate story.
With the development of stone architecture, a German instrument appeared in the area of \u200b\u200bfinishers - Spathel; "Schapathel" in Russian transcription), which, in turn, is a direct descendant of a Latin spoon (Spatha). To distinguish the preparation for the finishing of stone walls from wooden, it turned out to be enough to add only one letter to the familiar word, and there was a putty.

But then, it turns out, is it more correct than the twin? From the spatula! In Romano-Germanic languages \u200b\u200b- is definitely yes, but not in Russian.
It's not about what language is good or worse. On the classic Chinese, the language of the most primitive, insulating, type, the great literature was created. German can be very musical, just read in the original Heine.
Romano-Germanic languages \u200b\u200bhave developed under the strongest impact of Latin and follow the Roman principle of "Rem Veda Sevutur" - the word follows the thing. They call the process on the instrument generally accepted, and the meaning in the context is obtained using official words or their absence and alignment of words in due order.
East Slavic languages \u200b\u200bdeveloped independently and walked from the process, actions. As the word "ax" acquired his sound and writing - the subject of a large study, but it happens from the concept of "disseminating with a powerful direct blow", and not from "compact, durable, solid, sharp." It saved our tongue from articles, service and modal verbs and made almost indifferent to the order of words ("yellow shoes" and "yellow shoes" - try to say the same English), but extremely sensitive to the impact on the root of the word. The difference between the ax, a knife, a saber and the chisels is so deep that it is better not to climb there. Neglect of this circumstance, especially in combination with the long-term influence of the West (mastered lords, a large flow of illiterate labor migrants, etc.) can be an externally full and even singeling language to make viscous and inexpressive.
Specifically in the case - in the Russian word "spiteling" organically enters only two cases: either it means that the operation is performed over the spatula itself, and not it, or as a figurative expression. By analogy: the walls are laid out, and not bricks; Nails are clogged, not hammer. You can nail, but not a nail or box; You can molt, but destroying or sharing, and not creating or collecting together.
Adding "sh" to the "Packing" did not touch the word root, and its semantic load remained the corresponding essence of the expressed concept. The use of "putty" in professional speech is justified as a figurative: it already means that there are plasterers, and not a simple mortal. In the same way, for the sailor, it will not be a mistake if it calls the bench with a can, and toilet is a gentle.
Note to linguistics: the Russian language experienced the strongest impact of the East, but the local language is an incorporating type, the root in them is the Holy Saints. Therefore, Russian, borrowing from the Tatar, which turned out to be useful, survived the linguistic invasion without prejudice to himself and even with benefit.
Tool

The putty tool is similar to the plaster, but only externally, see fig. First, the blades of the spatulas must be thinner to be slightly curled when the knob is on the handle. This will simply allow the viscosity of the solution to get a thin layer of uniform thickness. Hold the pressure is easier than the gap between the lower edge of the plastering falcon and the wall and its tilt, so the putty does not require such a thin skill.
Secondly, the blade of the spatula must be perfectly even (it is checked by a look along with a cold weapon blade) and smooth, preferably - with rounded edges. The blades of expensive spatulas are cut out of the leaf with a laser, and those that cheaper - carve a stamp; Their blade often goes rough. You can send it, walking with a blanket piece by a piece of shallow emery skirt. The price tags and labels from spatulas are removed, washed, and the velcro tracks remove 646 or 647 solvents.
Further, for grinding the walls after putty, a girlfriend, for an abrasive grid, it is no longer a mesh: you need a grid fugun (grater, holder) with clips. Grind the skin, especially gypsum putty, is urgent not recommended: putty spacious lumps will scratch the coating.
Then, there will be more plastic bucket, desirable - economic, with rounded inside the bottom angle. And most importantly, the tool for putty must be kept separately, absolutely clean, wiped with a clean clutch or microfiber, and after work it is clear and wipe dry. It is not that cement from the former knees, but just dust and a pile with hairs may not allow to bring the surface to perfection.
Materials
What putty is better? The corresponding ultimate goal: the most expensive and high quality acrylic costs about 300 rubles. For the bag, and it is enough for a typical living room, if only there devils on the walls peas were not thoughd. So you can not hurt your head on the putty on the putty, but it is, which is what it is for what, and who does it, you need.
Note: "Starting" and "finishing" putty - just the terms for brevity. Any putty is applied in two layers - leveling (starting); It may not be solid, and the cover is finishing.
Composition and purpose
Oil-glue putty

In modern construction and repair of putty on the olife is rarely used for wall leveling
The cheapest spacities are oil-glue on the olife. They are considered talked their own, but not because the olive is harmful to health, it is not true. Olife is harmful to modern wall decoration, it absorbs even in a strongest concrete and then appears with stains through the paint, except for oil, and wallpaper.
Nevertheless, reset the oil-adhesive putty from the accounts early: it improves the waterproofing and protects the plaster with the surface layer of the base wall from the destruction of evaporation. Therefore, for basements, bathrooms, Saraiov and Chulanov, kitchens, oil-adhesive putty is very good, especially since their walls or facing, or paint oil technically, not decorative.
For wooden plastered on drash walls, oil-glue spacure is generally indispensable: it will protect the dranched crate and felt lining from rotting, and nails from rust. Acrylic can not so, and wooden plastered walls will serve for a long time, without losing sight, only under the putty on the olife.
Gypso-cement
Gypsum concrete putty are a bit more expensive and suitable for all finishing works of general purpose. Released in the form of dry mixtures mixed on the water. It is observed, and not posted like plaster. Putchals for residential premises are indicated by the LR and KR indices; For premises with high humidity - VH. The purpose of gypsum-cement dry spacion mixes is primarily to put the walls under the wallpaper. An overview of the most popular dry gypsum concrete putty is given in the next paragraph.
Water-dispersive
Water-dispersion putty are also gypsum-cement, but they are already involved in the water-polymer emulsion and sold in plastic buckets. It is more expensive than dry, but you don't need to cook them: dial and smear. You only need to not forget the bucket open, otherwise the coating will be fragile, although the mixture seems to be still not seized.
Water-dispersion putty have exactly a weathered viscosity, due to the preparation of industrial method, increased strength and smoothness. They are easy to apply, when grinding, random rods of the Fugank will not eaten pits. Water and polymeric putty can be confidently recommended by a novice: with a little bit of conscientious attitude to work, it is possible to get a good wall under painting in three approaches.
Acrylic
Acrylic putty have all the advantages of the above (Oil stands by a mansion) and only one disadvantage: cheap low-quality paint is kept on them badly, they are very smooth. If it is not sorry to put a little "top", then place an acrylic under painting is best.

Range
The most popular putty is old, but it only is suitable for wallpaper: open dust and is wiped even with his finger.

But Cheap, and the record holder for economy: consumption - 1.2 kg / sq. M. The manufacturer is trying to correct the situation by releasing the Vetonit LR FINE (which also gave rise to a myth of "starting" and "finish" putty), but it is somehow suitable for painting only in dry heated rooms.
Interested in the wind, it must be remembered that this putty due to the content of a large share of gypsum of water treatment: when wetting it in the paste. But it fills the depressions well, and it is easily removed easily, therefore optimal as a temporary option on the eve of serious repairs.
Warning: do not attempt to correct the shortcomings of the winds with a thin layer of a solid putty on top. Wetonite is the weakest of putty, and nothing but it will not be firmly held on it.

Knauf spacure Uniflot and Fugagips are adapted to seal the seams and wells on the drywall. They are also suitable for walls, both under wallpaper and painting, but more expensive, and consumption is about 1.7 kg / sq. m.
Unisa - the putty of high whiteness mainly under painting; Under the wallpaper, the strengthened composition of the UNIS Kron ("Heavy Unice") is underway. Suitable for dry heated residential premises. Smoothed in the absence of experience with some difficulties, so that the flow comes out not small, but for 3-4 approaches a careful and diligent newcomer can get an ideal surface. Unice is perhaps the only truly finish putty - under it I need the basis of Knauf, but not old.

Domestic, more cement than gypsum, "prospectors" - in their field are superior to Knauf. This area is the outer walls, cellars, raw rooms. For decorative painting, it is little suitable, but the hardest facing is kept on them as glove. Perfectly combined with "Hercules", see the next.
"Hercules" is a putty "basement", for completely raw and "killed" walls. Due to high adhesion and thixotropy, it is indispensable for sealing cracks and chosel in concrete. On rough, but not the "humpback" concrete walls under the trim, the facing and technical painting "Hercules" with the "prospector" can be done without plaster.
Putty work
On plasterboard
Plasterboard spacure - part of the technological cycle of plasterboard works, therefore.
General operations
Cleaning walls
If the putty is made according to the old plaster, wallpaper and paint, of course, you need to remove. To do this, use the appropriate workouts according to the instructions. Then the room is dried (as a rule, for this, a day is required) and carefully examine the walls; Small residues are removed by the mounting knife or thin flexible spatula (not putty!)
Relief check
The relief of the walls check the plastering rule and flashlight: putting the rule, highlight casual to the wall. The slightest bugs and wells are visible as on the palm. Bouguras and sharp protrusions right immediately knock down a reference or a sharp plastering spatula, and the wells to circle a pencil on a light circuit.
Tool preparation
Immediately before work, the entire tool is thoroughly wiped with a dust with a rag, wash with detergents for dishes, and dryly wipe the covered X / W closer or microfiber. It is well wiped with shopping wipes like "Freken side", etc., but only new. Special attention should be paid to the mixer for a drill and a bucket for the kneading - lumps of former compositions, if you find it, you need to disembark.
Alsystem
How to breed putty? Very simple, but not shutting up gradually with water:
- In a 1/4 bucket, if construction, or 1/3, if the economic, pour clean water.
- The stream is a jet (do not fluff) the mixture, while the top of the heap does not appear above the water.
- Waiting, from 5 to 25 seconds, while a pile is not soaked with water and does not see; Dry lumps should not be visible.
- Quickly, for 1-2 minutes, but carefully mixed, it is extremely desirable - a drill with a mixer.
- Waiting for another 0.5-1 min.
- Rest of the same way as the first time. All, the mixture is ready.
Warning: Neither water or dry composition is unacceptable to the spacion mixture. As it came out, we work. Nothing terrible, putty is quite tolerant to the amount of water, and in drying it is always possible to wipe with abrasive and smear.
Note: before kneading, pay attention to the suitability of the mixture after kneading, and knead the portion to work out with a reserve of 25-50% in time.
Set of expense
Consumable portions of the mass are imposed on a wide spatula of a medium bed at the calculation to apply for one wave.
Relief leveling
The wells and cracks (hillocks and "snot" consider it already shot down) ruby \u200b\u200bor average by gaining consumption with a wide one, or a wide spatula, depending on their size. The grout leads in sweeping movements with a uniform pressure, while the mixture will not be flushed with a wall without scoring and influx.
Slowly and adding to pull the spatula - a typical beginner error. Any putty to some extent possesses thixotropic properties, and with a periodic equal effect on the strength of the different sides, it will quickly disappear as it should.

Drying
When drying putty, it is necessary to apply a full range of precautions for drying plaster: drafts, direct sun, directed heat streams from a fan heater, a hair dryer or an electrocalorifer are not allowed. Cracks when drying are still half-wing, but the wrong dried putty can be sworn, and it will be revealed only when painting or sticking.
Rooming the room should be ensured internal, without noticeable air current and temperature drops. That is, the manner open the door doors, but not balcony. In the hallway - open the doors in the living rooms, and the kitchen, bathroom and the entrance tightly close.
How much does the putty dry? In the instructions of drying deadlines, more than 16 hours are not detected; Most often - 10-12 hours. But the grinding is better to do not earlier than a day: it is not necessary to hire, there are nowhere to hurry, let the coating get a strength to the strength. It will work easier and it will turn out to work.
Putclone under the wallpaper
By sticking, they put off first with a wide spatula stripes with an adhesive by 10-25%. "Sausages" do not reach. The spatula is kept at an angle of 20-30 degrees; The main thing is to admire the pressure, then the layer will be released unchanged thickness of 2-4 mm. The smaller angle of the spatula gives a layer thicker, and vice versa, but within the specified limits, otherwise the layer will be either a bug, or torn.
Next, the putty is dried, the influx is removed by an abrasive fuguex and check the rules with a flashlight on the evenness. If necessary, remove the bugs by abrasive, and the wells are mad. With full initial inability, it may be necessary to 5 approaches, until the wall is displayed in the plane (for zero, as the builders say).
After removing on zero and solid drying, the wall passes a grid fugue with a grid of the 80-120 number (P80 - P120). The greater the abrasive number, the smaller it is grain. First pass through the circular motions, and then with a smaller pressure of the rotary (swearing on hand) to remove circular traces.
Again check the rules with a flashlight. There are no flows out of it from under it? Ready, drying another day and. "Ate" somewhere superfluous? Our song is good, went the next approach.
Putty under painting
It differs from the putty under the wallpaper with an additional operation: after the output to zero and the grouts, the finishing layer of plaster is applied by abrasive; Under enamel, especially acrylic - special, durable and white, see above. Retire it already grid numbers at least 150. Under the mirror painting, it is also additionally polished with a dotochertic coat with suede; Felt and felt are not suitable. If the plaster has previously milk, the suede crap must be replaced with a new one. Before the walls are stuffed under the paint according to the instructions for it.
Video: Spike lesson
Putclone corners
The beginners are usually advised at the corners to leave overwork, and then duplicate abrasive. But, if it is assumed before the putty, it is assumed to be silicone from the gun, work can be significantly simplified, at once its quality.
Entered and evil linguists: silicone - the word new, independent origin. His root has not yet managed to spread and generate the concepts of different from the initial values. Therefore, it is completely legitimate to Silicone in Russian, as well as marry the mounting foam. Highly developed language is a delicate matter.
The proposed procedure is as follows: 
- On the consolidation of silicone, the tube from under him immediately disassemble, remove the remnants and wipe the rags, richly moistened with table vinegar.
- When putty, you leave the seating area, as shown in the figure.
- Upon drying of the walls, the tube fill with putty and squeeze it into the groove of its "sausage"; It is desirable - one movement from bottom to top.
- We pass the corner spatula with a support on the walls, like when plastering on lighthouses.
- By drying, we enhance the abrasive influx.
Note: if there is no sorry for some money, instead of a silicone tube, a plastic confectionary syringe can be used. On gaskets made of microporous rubber or foam, with an additional reinforcement of the tape, it becomes like a native gun. The syringe is also completed with a set of nozzles, so you can make a wall in the form of cake or cakes, and then paint.
The walls of the walls are not only a mandatory step of capital repairs, but also the necessary procedure before partial cosmetic changes in the interior.
In order to enjoy the process and the result during painting and cladding of walls with your own hands, you need to learn how to make shtclosure, otherwise irregularities, wrinkles and snaps of appealing on freshly stained walls can become a long-playing demonstration of a homemade masters.

Types of putty materials
Putty - the material that covers the wall during the expression is sold in the finished form or in the form of a dry mix. The range of sale is different not only in quality, but also in composition.
Gypsum dry mixtures are considered the most versatile, which are suitable for processing any surfaces, are easily applied and in drying, retain the form. For maximum moisture resistance, cement mixtures are used.

There are also gypsum-cement-free solutions on a polymer emulsion that combine all positive effects of plaster and cement putty. Capacity with such a putty must be kept closed, it dries quickly and loses in quality.

The highest quality indicators for acrylic mixtures: they cost more, sold in a dry and divided form.
Dry putty powder is divorced in water using a building mixer, dilution nuances usually can be deducted on the package.

The main thing is that there is a homogeneous mass, not too liquid to drain from the walls, and not too hard - to ensure perfect clutch with the surface.

It should be remembered that ready-made spacious solutions, regardless of whether they are prepared from a dry mixture or open a container with a finished putty - are short-lived, they are not suitable for use after 24 hours.
Steps of Shpalian
To prepare for putty, it is necessary to clean the walls - remove the layer of old wallpaper, paints, with mold treat the surface with special solutions.

After cleaning, you need to wait the time you need for drying of the walls and the ceiling. Then it is necessary to make a single-layer or two-layer primer, which will create a protective moisture-resistant layer and facilitates the adjoining of the spike material to the surface.

During the alignment of the walls of the walls, two spatulas are used, the one that is more sizes - to take a portion of the mixture and the other - to apply it. The dimensions of the tools depend on the size of the processed area. Special angular spatulas are used to treat corners.

The mixture that must have a consistency of sour cream is applied to the wall with smooth movements by semicircle.
With an uneven surface of the walls, a special painting mesh is attached to them, on which the first layer of putty is applied. Explicit and localized defects are processed separately.

After drying, the second layer is applied, the surface of which is evaporated with the level and plumbing. Then - the final thin layer, which can be made of special mixtures providing maximum smoothness.

The last stage of the alignment of the walls is their processing with grinding skins on a special holder. When putty under the wallpaper, it is necessary to use skins with a graininess from 80 to 120, if painting will be made, more grainy skins are applied - P120-150.

Close to the perfect smooth surface of the walls is not only aesthetic, but also a hygienic requirement for repair, and minimizes the accumulation of dust and the likelihood of the formation of harmful fungal cultures in the house.
Decorative plaster with your own hands
After the non-good primer skills and putting the walls are mastered and the experience of breeding and applying various mixtures is acquired, it is possible to start a more interesting and creative process of making decorative plaster - textured outer layer.
Note!


Modern mixtures intended for putty contain polymers, which in the drying stages provide plasticity necessary to obtain decorative uneven textures. In this case, you can use both ordinary rollers and special stencils.

The most economical of a variety of options will be the manufacture of simple plaster putty, with the addition of PVA, water and paint glue.

The variants shown in the photo are able to raise the imagination and inspire on the bold experiments of all who have already mastered the basics of cosmetic repairs.

Photo putty do it yourself


Note!


Note!


