Is it possible to glue an old tile. How to put a tile: put the old tile, wall on the floor laying, new glue floor on the wall
Savings - philosophy, principle and engine of progress. New technologies appear under economic slogans, ingenious methods are being developed, allowing to reduce labor costs, money and an important factor - time. In terms of the glory of savings, sometimes the strictest prescriptions of construction standards are forbidden to glue the floor ceramics to the previous coating from a similar material. However, it was she who forced folk craftsmen to think over the problem "Is it possible to put the tile on the tile". And since they had to "break" their heads, and the output was found - a reliable way to build a new coating on top of the laid tiled floor.
Economic Backgrounds Conservation Coating
The idea that the hard, even, non-transmitting water ceramic floor can be dismantled before changing the coating, could not do not occur in calculating masters, as:
- dismantling takes a lot of time and effort;
- together with the tile, fragments of the cement-sand tie will fall. It will need to pour out entirely or locally. With plywood or plasterboard flooring, too, will also come to complete unfortunate with the consequences of complete alterations. And polymer training will also be rented;
- dusting will be significant. Before repairing, it will be necessary to release not only the room itself, but also adjacent rooms. Even if they hide furniture and equipment with polyethylene in neighboring rooms, it is not a fact that the contaminated finish will not suffer;
- garbage disposal, cleaning;
- a construction of a new screed with the acquisition of materials is coming, with labor flow and again to wait for solutions or binders.
It is not wonderful that the amount of complications persistently said the idea of \u200b\u200brefusal to repair. But if the old coating appears to rework, the minimization tools should be found. Those. Get the opportunity to put ceramic squares, hexagons and rectangles on probably not too presentable precursors. The task was to eliminate the purely technical obstacles that prevent the incarnation of the plan.

Sometimes it becomes necessary to put the tile on the wooden floor. Due to the fact that the wood has to change the dimensions from the instability of temperature and humidity, it may seem impossible. Tell how to do it correctly and avoid trouble in the article :.
What are the difficulties?
In a slightly obsolete technological decree, according to which the ceramics before laying a new coating should exist unconditionally, there are good reasons:
- the rough base should be monolithic, and not folded from individual, not enough major elements;
- the rough surface should be frost and roughness, which is required for reliable adhesion with it adhesive, which is not characteristic of ceramic products.
Monolithium will not cause fears from the floor owners with a competently laid previous tile, as a rule, quite new. If the ceramic coating with the underlying basis really creates a single whole, it will adequately fulfill the carrying function. In the reverse case, the binder layer, located between the old coating and its base, will lay out an overlooking load. As a result, elements of both coatings will fall.
With porosity, everything is more complicated. In it, both the main snag for those who thought about the question "Is it possible to put the tile on the tile". The main plus of construction ceramics is a high density with a minimum amount of pores that can absorb moisture.
Moisture absorption or across scientifically absorbent coefficient is directly related to the amount of pores. In the tile for interior decoration, it varies from 0.5 to 3.0%. Moreover, in 3% case, it is complemented by the top of the icing, leaving the porous back to the optimization of adhesion. But the glue you need to penetrate through the miniature canal in the body of the basement, to fix it in it and attract the finish coating. So, the pores need to be simply open or create, but at the same time to increase the roughness. How?
In order to increase the porosity and ensure the necessary roughness of the roughness were invented by three options:
- Stripping the upper layer of reference ceramic floor with grinding machine-grinder.
- Formation of notches, preferably combined with the previous agent.
- The use of concrete contact with the Ceresit marking of the ST-19, enriched with needle quartz, or his fellow with ordinary sand. There are analogs with the brand of Knauf, Bolls, etc. After applying data of the primer materials, the surface acquires the required roughness, due to which it is possible to use conventional glue for tiles, such as Ceresit CM-11.
Best of all, if all three effective methods are used to couple. Then the clutch will be excellent.
Even the flawless laying of the tile will look no ideal if the finishing phase does not pay enough attention to the tile seams. Learn how to choose a tile grout and what is the difference between cement and epoxy options in the following material :.

Contraindications for such work
The means are invented, but their application is not always feasible, which is necessary to take into account even at the stage of the origin of the idea. The following contraindications are determined whether it is possible to put the tile on the tile in a particular case:
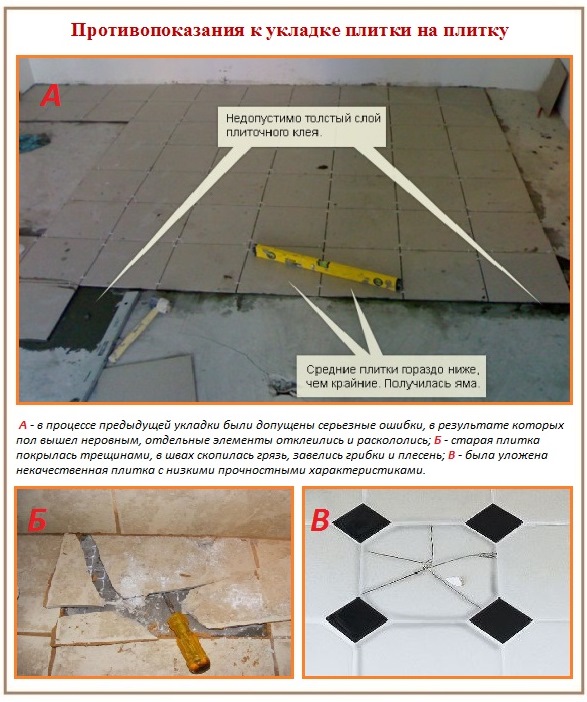
- The tile was laid on poor-quality glue, as a result of which the predominant part of the elements was spilled from the base at all or partially. The same could occur due to non-compliance with the instruction of the glue manufacturer or in violation of proportions. To identify the specified reason, a peculiar diagnosis is carried out using a wooden handle of any of the tools. Through a simple tapping, we find out whether each tile is equivalent to it. I heard the ringing, it means that inside the emptiness, rattling is heard - he dugged at all. Only a deaf sound will convince strength and reliability.
- Paul lined unevenly. In general, the drops of 4 mm per 2 m applied to the surface of the rail, because The primer and the binder will play at the same time the role of the leveling interlayer. But if the violations are more, take the perforator.
- The tile is very old and covered with a grid of cracks, in which, no doubt, a long-term dirt has accumulated, immested fat, melted fungi.
- Under the old ceramic coating there are communications, and the revision luchs for them last time forgot to build. Such a floor dismantle, "without waiting for peritonitis," and arrange everything according to the rules.
- After the floor in the placed room will be higher than the overall level of floors. Such an excess is extremely undesirable, because ceramics are put mainly in the bathrooms, in shower, in the kitchens. In a word, where the floors should be made below 3-5 cm so that the random spilled water was not able to flow freely beyond the space.
If the listed obstacles have not been detected, you can start preparing the floor and to the next laying behind it. It should be proceeded if the floor temperature is not lower than + 5ºС, and in the total indoors no less than + 10ºС.
The process of facing tiles over the tile
Fundamentally from the standards described scheme differs only by preparation. First, by tradition, a small plan is drawn with all the constructive features of the room. Then it takes a fitting with the layout of the material "in dry" to see how the ceramic floor will look like, to arrange the filtered pieces of tiles in the places remote from the review. The layout of the tile should be made so that the seams of the upper elements rest on one-piece tiles. Those. It is necessary to shift the upper seams relative to the lower or try so that the coincidences are the minimum quantity.
- We carry out a thorough audit with a detailed climbing elements in the center and in the corners. Revealed unreliable tiles gently dismantle with the help of chisel and hammer, the bare area is poured with cement mortar. We are waiting for frozen. The time of hardening the solution is proportional to the thickness of the cement-sand fill. 10.0 mm will stick 1 week.
- Cutted seams are cleaned by the chisel, fill in the tile glue or the same solution that was used to fill the plots.
- We clean the glossy surface of the tile of the grinder, choose the grinding wheel with medium grain. It is advisable to make notches.
- Thoroughly wash the old ceramics first simply with water from dust, then soapy. If there is solar dirt and fat stains in the water add soda. At the end several times wash off clean water.
- We process the old ceramic floor with concrete contacts Cerezite ST-19. We apply it evenly, distribute a brush or roller. The material is sold in finished form, packaged in buckets of 15 liters. Consisted approximately 300 grams. On m². Before applying to the floor, conjugate structures, pipes, it is recommended to close with polyethylene. Otherwise, random blots and pink smears will be difficult to remove. We are waiting for drying 3-4 hours. If the tile is planted on the tile glue, it is not necessary to moisturize it before laying.
- We apply the glue by the manufacturer thick on a small section of the floor. The glue quickly loses elasticity, because we process the platform less than 1st m².
- We glue the first tile with effort. While the glue does not begin to capture, its position can be corrected. Similarly, we also put the elements surrounding it. On the perimeter of each of the tiles it is necessary to leave the deformation seam on the linear extension. Its value depends on the size of the elements, it is usually 1-4 mm. For the formation of seams, we use crosses from plastic.
- A day later, the grooves around the tile will need to be filled with a suitable polymer-cement composition or a solution of equal parts of sand and cement.
Fighting tile glue should be naturally without artificial heating and ventilation. Moisten the coating planted on the glue after laying is also not necessary.


It is extremely important to accurately comply with the prescriptions of manufacturers of materials, nor on iota does not depart from the briefing. With a scrupulous observance of the rules after 3 or 5 days on the finished surface, it will be possible to safely walk. And on the questions of neighbors-friends "whether it is possible to lay a tile on the tile" to give an honest affirmative answer.
Video examples of mounting
Hello! We make repairs in the bathroom and collided with a problem. Old tiled floor is very durable, smooth, smooth. But the decor and the color is absolutely not like a purchased wall cafier. Before that walls were simply painted, but we were easily painted paint. But to knock down the floor covering, you will have to work well perforator, then re-align the base and so on. It is long and expensive. We want to put a new tile on the old one.
Tried to look for answers to the forums. Some participants argue that it is quite acceptable. Others are recommended not to save and solve the problem overhaul. And what do you say?
Answer
Good day! As practice shows, most of the homeowners prefer not to carry out dismantling work. In the case of the tile of this, it can really be avoided and that is why.
Cafe as an outdoor material is a thin plate from the burned clay mass of high density and strength. The coating is produced in a huge variety of sizes, but with two types of surface:

Laying the tiles, according to the recommendations of the manufacturers, should be carried out using the contact adhesive on the cement, less often with a polymer basis. Cement-containing dry mixtures are produced by absolutely all manufacturers of building mixtures (from fastening to Knauf), since the composition is quite simple, but the quality of the material is largely depends on the quality of raw materials. Polymer products refer to a highly specialized series and are produced only by the most major concerns of the chemical industry (Eurocol, Uzin, Kiilto, etc.)
The tile is most often put on cement dry mixtures. With their help, it is possible not only to partially align the rough base, but also to fix the floor covering almost on any basis of sufficient strength (at least 150 MPa) and stiffness.
Old ceramic floor can be believed to attribute precisely to such floors. With one essential condition - a smooth glaze or varnished (enamel) surface has a practically zero clutch coefficient. But first it is necessary to create a so-called adhesion bridge. Or, simply speaking, make the top of the tile rough. This is achieved in several ways:

You can use any other primer compounds with marking "For Innoble Surfaces". They allow even putting the tile on the street and are suitable for various complex grounds, including ceramics, stone, bitumen, asphalt, old glue and much more.
- Removal of surface enamel or glazed layer with a grinder with a special nozzle for granite and stone. This method is used infrequently due to the formation during the operation of a huge amount of dust. However, it allows you to put a new tile on the old with a guarantee that no element will "fly away" in the future.
- Carving notches on the surface of the coating by any instrument - an ax, a grinder with a diamond cup, and the like. This method in combination with priming is considered quite reliable, moreover, tested by time.
Thus, gluing a new floor tile on the old one is resolved under the condition of the presence of a rough surface. If the coating is not smooth, you can simply use the reinforced tile glue.
Before work, be sure to check the floor on:

Next, you need to clean the surface, degrease, process the primer concrekontactor or make notches with the subsequent removal of the floor from the garbage and dust. After that, tile glue is applied in accordance with the instructions and laid ceramics.
If you want to shoot a glazed or enamel surface completely, do not forget to carefully deny and clean the base, degrease and primed after removing the smooth coating. Only after that it is possible to lay a tile laying on glue.
Tip! If you need repair masters, there is a very convenient service for their selection. Just send in the form below a detailed description of the works that you need to perform and offers to you in the post office with prices from building brigades and firms. You can see the reviews about each of them and photos with examples of work. This is free and does not oblige anything.
When repairing always want to save. When repairing a bathroom or bathroom especially, because there are the most expensive finishing works. We will tell when you can lay the tile on the old one, and when it is impossible.
Tools for work
- Spatulas (smooth, embossed)
- Master OK
- Building level
- Bulgarian and Velcro Disk for Entry Paper
- Platecores
- Rubber hammer and nippers
Leave old tile
To determine the state of the coating, it is enough to "catch up" with a wooden or rubber hammer. Void must be absent.
Surface preparation
If you decide to leave the old tile, then you can proceed to the preparatory work:
- Removal of the upper (glossy) layer on the tile. Roughness will provide reliable adhesion with adhesive composition. The upper glaze is removed by a grinding machine. The grain of the circle will fit the average. Full surface stripping is not required, 60% area for contact with adhesive composition is sufficient.
- Application notes (1-2 cm. From each other). With the help of a grinder or manually using chisel and hammer.
- Use of primer means, concrete contact. After applying the composition, the surface is fully ready for applying conventional adhesive for tile. This method is considered the most modern. The only minus is the cost of buying an additional material.
Tip! To achieve the best results, experts recommend using all the preparation options at once. This will provide excellent clutch.
The main stages of laying tiles
- Removal of small scratches and chipping cement solution. Cleaning, degreasing the surface. Soda solution is well cope with fatty solar stains. Dry and pure tile is fully ready for work.
- Drawing with brush or primer roller (concrete contact). Watch that the makeup does not hit the plumbing pipes, pipes. It will be difficult to delete it. Preload these elements with polyethylene film. Time for drying composition 2-4 hours. This stage can be replaced with a partial removal of a gloss using the tool or take them off.
If necessary, align the surface to the primer, applied the leveling mixture. The solution quickly freezes and does not give a shrink. - A wide sleek tool is applied tile glue. The relief is attached to a toothed spatula. Tile laying is made.
Tip! Tile glue is applied to the area of \u200b\u200bnot more than 1m2. Since the substance quickly loses its elasticity. Adjusting the position of the plates is possible until the glue will not begin to capture.
The first tile experts advise to lay near the wall opposite the entrance. Initially, the whole parts are stacked later.
When laying a new tile layer - coat seams should not coincide. Plumbing support only on whole elements. Do not forget about deformation seams between fragments of facing. They should also be left between the cafeter and the wall. In these places they will close the plinth. The width of the seam won on the size of the material. This is usually from 1 to 4 mm. For the convenience of fixing the width, it is good to use crosses for tiled seams. After a day, the seams are filled with grout.
Surface moisturizing after the completion of work is not required. Drying with any devices is also not needed, glue will dry by itself. Wipe tiles with substances without the content of abrasive components. It is possible to start 3-5 days.
When the styling on the old tile is not possible
- Survegencies of the floor, a strong bias. It will reasonably remove not only the finish, but also the entire screed or at least to do.
- Under the coating there are hidden communications without free access. It is necessary to make revision hatches. Luke Door Finishing Tiles hobs the presence of holes and will not spoil the appearance of the room. Large-scale work on dismantling in this case is fully justified.
- Fragile, brittle tile. The base for laying should be monolithic and durable. The surface prone to cracks and chips is categorically not suitable for laying a new layer. It is possible to dismantle a separate "unreliable" fragment. After removal, the place is poured with cement mortar and left until complete burials. Layer 1cm. It will be stuck at least 1 week.
- The presence of emptiness under the decoration layer. In this case, the basis will not power the load and will very quickly collapse.
In old houses, no rare wall curves and maybe you need.
The technology of laying "Tile on the tile" is different from the usual only preparatory work. If you neglect by this stage, then not avoiding the large-scale and costly alteration. Compliance with all the other and the use of quality materials will noticeably speed up the process and ensure the desired result.
Tweet
Stamp
Like
Decorative ceramic tile is perhaps the most popular finishing material for seating floors in the bathroom, hallway, corridor and kitchen.
This is explained by his practicality, hygienicness and enviable durability.
Laying tiles - work is not out of the lungs, and requires certain knowledge and skill, and so that everything happens as neat as possible and aesthetically, you need even at least a small experience.
Very often it happens that the owner of the apartment would like to replace the old sex tile to a new one, but he is simply scary to take on this occupation. Dust and garbage, labor-intensive work on dismantling - all this stops. In this case, the question arises about the possibility of laying tiles to the old, long-laid.
The answer is unambiguous-technologies of laying a new modern tile on the old tile exists and is actively used during repairs.
But before deciding to embody this idea, it is necessary to consider the advantages and disadvantages of this method, to calculate real opportunities in annex to the specific conditions of their own apartment.
If the old tile coating was once laid on conscience, then it is already in itself a good durable basis for the new.
There will be no need for very laborious, costly, dirty and noisy work on the dismantling of the old coating.
In addition, the removal of the old tile will necessarily entail large-scale work on the repair of the base, the device of new waterproofing, leveling the level of cement screed, etc.
In some cases, laying the tile on the old tile base is the most appropriate and from the point of view of the impossibility of its removal due to undergoing water supply or sewer communications, and capitally installed plumbing equipment.

However, it should be remembered that such a technology is not always applicable:
If the old coating is strongly loosened, the cement-glue mixture is crushed under it, it will be necessary to carry out a complete dismantling.
Laying the new tile on the tile on the floor on top of the fragile base, simply doomed to failure - long this gender will not last.
In high-rise buildings of the old building, the level of the Metlah tiles of the floor in the bathroom or in the bathroom can differ quite horizontally.
Thus, to give the room accuracy and geometric correctness, you will have to pierce a screed, and for this you need to dismantle the old tile.
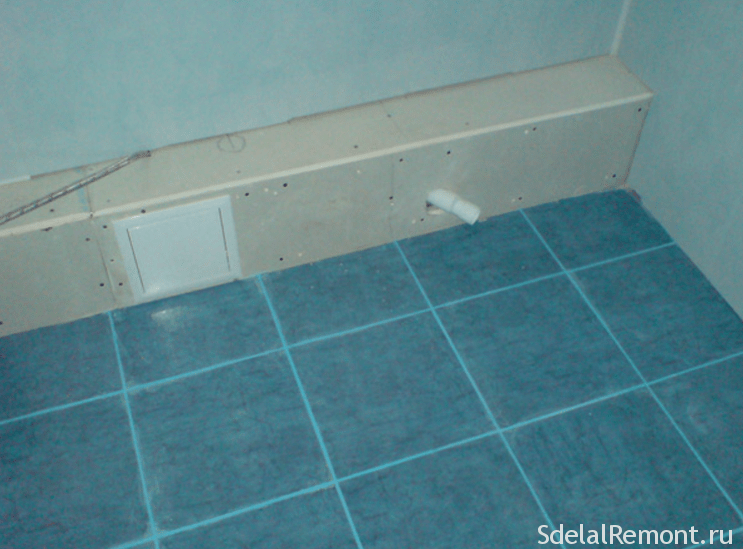
Another "underwater stone". The second layer of tile will inevitably lead to an increase in the floor level.
But in the bathroom or in the toilet, it must be lower than in the corridor, and is additionally protected by a 1.5-2 cm booster - to avoid the likelihood of random flooding of residential premises.
Thorough promresses should be held, before being taken for such work.
The first is a thorough edge of the floor!
 If it is still decided to lay the decorative tile on the old tile coating, then the most important condition for the success of the work will be thorough preparation of the foundation.
First of all, it is necessary to climb the entire old floor on your knees and inspect each tile.
If any of them "play", have significant cracks, creak when pressed - they are subject to removal.
Just visually estimate the state of the old coating will not work - it is necessary to catch the entire tile with a hammer.
If a ringing sound is heard - this indicates the detachment of the cladding, which means that it will not serve as a reliable basis. We also have to remove these fragments, clean the released surface, lift and align to a common level with a sand-cement solution.
It is clear that this is done only if it is single tiles. When such a flaw is taking a massive character, you should not doubt - you need to remove the entire old tile completely.
How to prepare the surface to lay tile
The main enemies when laying a new tile coating on an old is a glazed surface, significantly reduced adhesive characteristics of adhesive mixtures, and a banal former dirt, which also prevents the high-quality tile grip with the base.
To increase the strength of the stacked coating, they are advised on an old tile with a glossy slippery coating to make notches, screw holes, and even better - to carefully treat it with a diamond disk "Bulgarian", up to the ceramic basis. After that, the surface is necessary to spend the most thorough way.
Special attention - cleaning the old coating from dirt. During the time that it was on the floor, it necessarily formed a practically invisible fatty raid, which can not act on the adhesive composition not the best way.
Degreasing is carried out in different ways - someone applies organic solvents, gasoline, acetone. Those who do not want to breathe chemistry can be advised to rinse the floor thoroughly several times with warm water with the addition of caustic soda.
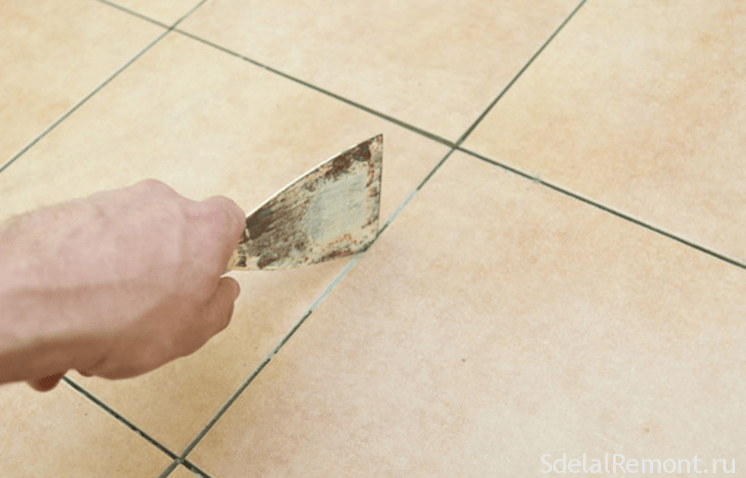
We should not forget about the state of interputric seams. This is the traditional place of the accumulation of dirt and fat, and their cleaning must be carried out.
If the old filling of the seams began to sharpen, it should be removed to the maximum possible depth, and after washing to lift with tile glue or cement mortar to the coating level.
 It is the opinion that, subject to the progress of the old tile cover, "concrete contact", you can do without prior to giving it roughness.
However, the ideal option will still spend both both - this will serve as a guarantee of success.
As applicable in this case, primers, except for "Benonokontakta", are called "Ivsil Basis-Beton", "Plovetonite-primer supercontact", "Cerezite CN94".
All further work can be continued only after complete drying of the primer layer. A grainy surface should be obtained by texture with sandpaper.
Some craftsmen, in addition, practicing a thin layer of tile glue - about 2 mm, and after it is frozen, it is processed to laying the tile.
Is there any glue?
Laying the tiles on top of the old tile coating in its technology is not very different from the usual, although there are still their nuances:
- The height of the comb on the soldier should be about 10-15 mm.
- When laying out the starting row, it is better to place a new ceramic tile so that the seams do not coincide with the old.
But is there any glue applicable for such work?
Is it worth listening to those who claim that after processing "concrete contact", the glue brand does not have a fundamental importance?
Probably, it is still worth considering the issue of choosing glue very responsible, especially since we will mainly go about laying the tile indoors with high humidity.
What advise experienced masters?
 Good characteristics that will make a reliable and resistant coating, has glue "IVSIL PROFIT".
It is true, more developed for porcelain stoneware, but in the case of stacking over the old tile is an excellent option.
High adhesion, even to the smooth lower tiled layer, has "Cepese CM17". Its purpose is precisely complex surfaces, and the new coating will be reliable and durable.
A lot of good reviews earned the adhesive composition "Vetonit Renovation". Even some finishers claim to him that it may not be necessary to impart roughness to the old cafél - such a glue composition of plasticity and adhesion.
Of course, such adhesive mixtures intended for particularly durable coatings and complex surfaces are more expensive. However, the savings in this matter can be destructive, and it is better to be restrained, acquiring really reliable material.
So, put a new tile on the old ceramic coating - a permissible option, if we observe all the indicated rules.
Sometimes the choice of this technology is the only right solution, both from the point of view of efficiency and in terms of repair work. And if the question arose before you, whether such a floor finish is permissible, boldly fight for business - everything should work out.
Everyone can occur such a moment when it is necessary to update the bath or kitchen, and in particular replace the tile. But it may happen that it will be difficult to eliminate the old coating, or maybe there is no desire to spend time on it. In this situation, one question arises whether it is possible to put a tile on the old tile or not. And we will answer this question. Yes, it is possible, but there are certain rules that will be discussed below.
When is it possible to lay the tiles on the old tile?
It is worth knowing that the possibility of laying a new coating on the old base is not always possible. And therefore, first of all, it should be determined when, after all, you can spend such stacking:
- If the old coating is tightly held on the ground, does not leave and there are no signs of its failure.
- At the same time, the removal of the old layer would be avoided, because later a lot of garbage and dust are formed.
- With a high-quality assignment, the subsequent dismantling may entail damage to the floor, as follows, there will be a need for additional repair.
- And the last reason is that dismantling can significantly reduce the floor level that it is not always desirable.
At the same time, it is necessary to consider the reasons for which the new tiles on the old one cannot be possible. Among these:
- If there are significant damage on the old surface.
- If there is a risk of deformation, damage to the tile, or its separation from the floor.
- If when checking the tapping, the sound is heard characteristic of the presence of a cavity under the material.
- Ate the room is small, and it can not be done even less. Especially very important at low ceilings.
- In the case when under the old coating there are any communication systems, for example, plumbing pipes or electrical wires.
- If necessary
- And the last factor becomes the fact that if we put the tile on the floor on the old tile, the floor level will be too high and exceed the threshold. In this case, you will need to raise the door frame. But it will be better to remove the old coating layer.
 If a separate tile does not keep it, it should be removed
 Necessary materials for work
- First of all, this is a primer of concrete contacts Cerezite ST-19, or a similar mixture with the same operational characteristics.
- And the glue mixture for the tile is recommended by Cerezite CM-17 or CM117, it is less susceptible to yield.
The first question of everyone, why concrete contact contact is chosen, because we work with tiles. We will explain this mixture in its composition has small particles of cement, pisch and similar mixtures, which create some roughness on the surface, in this situation glossy.
 Different manufacturers of Betokontaktov
 It is because only in terms of using such a primer can safely guarantee successful work. In another way, the coating will not be durable, and not durable. If you do not donate and at all in a few days.
Be sure to dry well beetokontact before laying a new tile.
A small advice, always buy a little more materials than necessary on the basis of calculations. At least 10-15% more, which is enough. Such a step is necessary in order to eliminate the shortage. All there are failures, and when trying to put outdoor tiles on the old tile, you can damage several instances of the material, incorrectly cut or just drop. Therefore, it is better to always have a small margin.
How to put a tile on the old tile: Step-by-step instruction
Now let's go directly to the most important point, the question can we have already answered the tile on the tile, we will now understand how to do it. Like all work, this is also divided into several stages, which we will consider in more detail below.
Surface preparation
To begin with, it is necessary to make sure that the old coating is strong enough. If, one of the tiles cracked, or slightly, then it must be removed. Also, earlier it was mentioned about the possible availability of emptiness, if there are those present, then the material on these places should also be removed. Further, all empty places need to be sealed with a cement mortar, and give it to dry.
After you begin to lay outdoor tiles on the tile, you need to completely clean the coating from dirt and dust. Pay attention to the grout of the seams. If there are cracks on it, then definitely delete it.
The next step will be the coating of the base of the primer, which will help create a roughness. Such a step will significantly increase the adhesion of materials. Despite the fact that the primer of this kind is quite expensive, it helps to significantly speed up the process of masonry and increase the quality of work.
There is also another way of preparation that eliminates the use of expensive primer. In this case, it is necessary to remove the layer of glaze from the old coating. This procedure is easily carried out using the Bulgarian and the standard emery circle. The surface must be well scratched, which increases adhesion for a large number of times.
In addition, there is a manual way, for him also uses sandpaper, or a special grinding grater with the presence of a special nozzle.
And the last option becomes the creation of notes on the tile. With the help of the grinder, only 60% of the glaze layer is removed, there are notches on the rest of the surface. You can perform them by any tool that will allow it to do. This method is the most time consuming and takes a large period of time. That is why experts are not very often used.
Laying tiles on old tile on the floor
It's time to disassemble directly how to put a tile on top of the old tile. In particular, we offer a step-by-step algorithm of actions that highly qualified specialists shared with us shared:
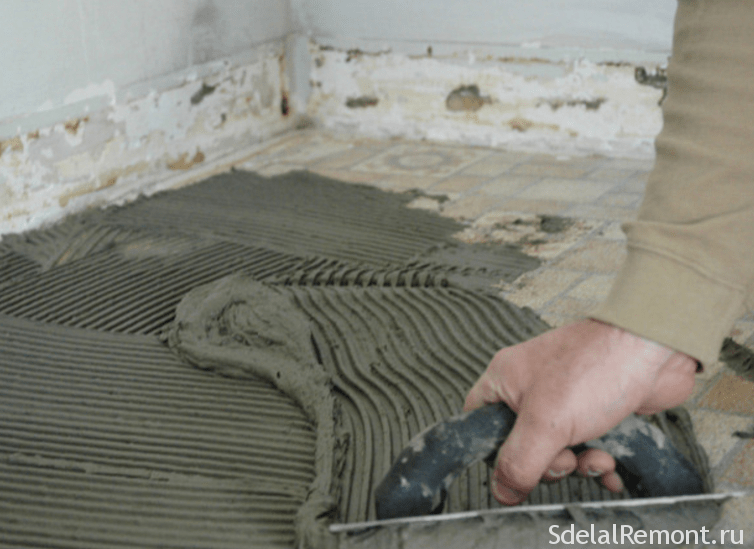
- If you decide to put a new tile on the old tile, with the stack itself it is necessary to process the glue mixture only the base, it is not applied to the material itself.
- In addition, in the case of using a standard mixture, it should be more carefully prepared because it is necessary to maximize the level of adhesion.
- All surfaces besides being processed must be covered to protect against primer exposure, it also concerns communication systems.
Thus, we fully revealed the topic and answered the question whether it is possible to put ceramic tiles on the tile. In addition, we recommend that you watch a video in which it is clearly shown and describes how you can put a new tile on the tile.