Advantages of wooden wall panels. Molding MDF panels to the wall - how to fix and how to make the fastening of wooden wall panels to the wall
MDF panels are often used as an element of interior decoration. Such popularity is explained by various positive characteristics, among which it is worth noting an attractive appearance and environmental friendliness. The use of these panels allows you to quickly and inexpensively separate the premises in your apartment, but how to mount them to the wall? We will tell about this in today's article.
How the MDF panels are attached to the wall, how to attach
Before starting repair, many people wonder - how to fix the MDF panels to the wall? To date, there are only two ways to install this finish material:
- directly. In order for the work to be competent, it is necessary to choose not only high-quality glue composition, but also prepare the surface.
- installation on the crate. In this case, the pebble can be manufactured in two versions - wooden and metal.
In the same way, the panels are attached to the ceiling. About the ceiling finish. Consider the positive aspects of both ways:
- if you choose the option with the crate, then it does not matter for you, in what condition the walls are located. In other words, you do not need to be pre-plastering, putty, etc.
- the metal case is advisable in rooms where high humidity is present. Also in such premises it is recommended to use;
- it is explained by the fact that the metal frame is less susceptible to the influence of moisture, and it does not change its configuration under this effect;
- the use of the crate is advisable and if you intend put thermal insulation material Under the finishing of MDF panels. Thanks to the crate, you will have a lot of space between the wall and the panels themselves;

- printing panels saves space in the room, which is very important for small rooms. But it is very important to prepare the walls in the right way, because to glue the panel where it will do, it will not work.
To sort out all the subtleties and nuances of both ways, consider each of them in more detail.
Knowledge about how to mount the MDF to the wall will help you choose the option suitable for you and your room.
For more information about the mounting of the MDF panels to the wall, see the video:
Types and manufacture of crates
To begin with, consider how to mount the wall using the crate. We have already said that the pebble can be made of wood or metal, so we will look at each of these options. Let's start with the most accessible in terms of finance - frame from wooden elements.
How to mount wooden

The manufacturing process is as follows. First you need to go to the construction store, where we need wooden bar.
The ideal option will be a timber with a cross section of 3 × 3 cm. When choosing, it is also necessary to pay attention to the condition of the timber itself - it should be even, without chipping and visible deformations.
Humidity is also of great importance - this indicator should not exceed 15 percent. Also in the store you need to purchase antiseptic flame-painting - this is such a special composition that allows you to protect the tree from fungus and mold. In addition, this composition reduces the risk of wood fire.

The composition is applied to the bar using a conventional brush. If something is unclear, then the whole information you are interested in directly on the container with this composition. Now you can move to the measurements. With the help of a conventional roulette, we measure the width and length of the walls, to then cut the bars of the desired size.
Remember that the length of the bars should be slightly smaller than the distance between the walls. If you make mistakes in these measurements, then the bars will have to be squeezed between the surfaces, and this will inevitably lead to the damage of the material.
The doom can have a vertical and horizontal direction. It all depends on how you will mount the elements of the MDF to the wall or to the ceiling. MDF for ceiling.
Remember that if the panels are fixed across the walls, the elements of the crates should be located horizontally, and vice versa.
Next, go to the cutting of our bars. Work is simple, but here many newbies manage to make mistakes. To avoid this, placing the hacksaw strictly perpendicular to the material - this is how you will achieve perfectly even ends.
The method of attachment of bars depends on the material of the walls of the walls. If the walls are wooden, then Bruks are attached by ordinary self-drawing.

Fastening self-proof
If the walls are made of brick or concrete, then you need to use the dowels. Bruks should be located strictly parallel to each other, so watch this point.
It is also important that the bars are on the same plane, so check them using a level. After making the frame, you can move to the laying of the heat insulating layer.
A good option will be the usual mineral wool in rolls, which can be chopped into pieces of sizes we need.
Now you can go directly to the mounting panels on the crate. There are several ways to fix the MDF leaf panels to the wall. The first method is mounting with kleimers Which look like a bracket.

It is also possible to secure 3 × 20 mm screws and finish nails with a small hat. The choice of one or another option is a purely individual case, because each person has its own preferences and skills. At the end of the work, the corners on external and internal angles are mounted.
It is best to just glue them to the panels, because any other fasteners elements will be visible on the surface, which will worsen the appearance of the finish.

Metal fasteners
Now consider the option using the crate made of metal elements.

Begin From fastening a used profile. We note around the perimeter line, after which it makes the fastening of the elements to the surfaces. They are also attached on a dowel or self-tapping screw - it all depends on the material of the walls of the walls. Next, we celebrate the lines along which the profile elements will be fastened.
Each profile bar must be from another half a meter. In order for the frame to be smooth, direct suspensions are installed along the marked lines, with which not only alignment is carried out, but also the strengthening of the entire design. Next, the elements of the main profile are inserted into direct suspensions.
The mount is carried out in small self-drawing, and the ends of the suspension bend. It is also necessary to ensure that all elements are on the same plane.
For these purposes also used level. Installation of MDF panels to a metal profile is best done using klyamimers.
Single standard brick is the most common among all kinds of bricks. Its size.
Putchable is necessary when conducting finishing works. Learn how to breed putty.
For the creation of concrete and cement mixtures, crushed stone of various fractions use. Turning to familiarize yourself with the weight of rubble.
We connect them with the profile with small screws. Well, if you have a screwdriver with a magnetic nozzle, which will allow you to do all the work much faster. The final stage will be the fastening of external and internal angles to the MDF panels. As in the first case, glue them to liquid nails.

Gluing sheet panels
Now consider how to fix the MDF panels to the wall, using the glue composition for this.
This option is possible if the surface of the walls are perfectly smooth, and their finish is quite reliable.
Otherwise, the panels will lag behind the wall along with the plaster or the coating, which is present there. In this paper, there is nothing complicated, so you will probably cope with your own if you comply with the following recommendations and procedures.
To begin with, we study the condition of the wall. If there are any sites cracksthen need them treat plaster.

In general, the preparation of the wall occupies almost more time and forces than the installation itself on the surface. After leveling the wall, go to the primer.

Use the composition with deep penetration, which will improve the adhesion of glue and the surface of the wall. To work, we use the usual roller, after which all the walls are covered with primer. You also need to measure all walls. This is necessary so that you can cut the MDF of the desired parameters.
The process of cutting can be carried out manually using the metal hacksaw, but it is best to use the electric bike.

On the reverse side we apply glue composition. Remember that the panel must reliably clung to the surface, so for a better effect, we apply the glue points and on the wall itself around the perimeter.
The gluing panels is quite simple. Make an element to the wall, after which we press it for 10-15 seconds. Thus, work is carried out all over the perimeter of the wall.
The finish stage will be gluing external and internal corners. Glue them to the same adhesive composition that we used when working with MDF panels.
There is a variant in which both methods of fixing panels are combined. For example, many masters glue to a wooden crate using liquid nails or other adhesive compositions. This option has the right to life, especially when further dismantling of the panels may be required.
I would also like to dwell on how edit the plinth to the wall. Many people do not particularly think about this, attacking them on ordinary liquid nails. But this is not the most successful option, in our opinion. Better attach them to the wall on special brackets, resembling hooks.

Their width is 10 cm, but to mount them to the wall you need 50 cm from each other. The method of fastening also depends on the material of the wall, so either self-tapping screws or a dowel are used.
We take the plinth, after which they tightly stick them to these corners. The joints are masked using the corners, and the sections are closed with plugs. The plinth can be painted in the future, or to apply a varnish composition.
Wall panel mounting tools
Before starting the mounting of the MDF panels to the wall, you need to make sure that you have everything you need. It will take the next set of tools:
- hacksaw. We will need a hacksaw with small teeth for cutting wood, as well as handling for metal work. At the same time, if we plan to make a tree crate, you will need a hacksaw not only with small, but also with large teeth;

- building level And the usual measuring tape measure. All these elements are necessary for the measurement, so they should be in stock without compulsory. You will also need a regular pencil, as well as a square, with which you can control the evenness of the ends of the BRUS;
- gun for applying glue. With this device, it is much easier and faster to apply adhesive composition on the MDF panel and the surface of the walls.


You will also need a building knife, with which we will cut the corners of the desired size. Naturally, we will need a sufficient number of fasteners - self-tales, dowels, etc.
There are many rollers on the Internet on the process of fastening panels to walls in various ways. It is enough to type the request - "MDF panels for walls, how to fix the video", after which you will be asked for many different options for this work.
Conclusion
Molding MDF panels to the wall is a fairly simple process, with which absolutely any person can cope. It is only necessary to have a minimum idea of \u200b\u200bworking with instruments, as well as the ability to apply these knowledge in practice.
If you follow the advice and recommendations that we have submitted to you in this article, then you will absolutely achieve a positive result. Despite the simplicity of work, the MDF panels look very aesthetic in any room, so their use justifies themselves.
Molding MDF panels to the wall - a process that does not differ in difficulty if you know all the features of technology. I will tell you how to cope with work with minimal time and money costs, both options have been repeatedly tested by me in practice, which allows you to claim with confidence that the MDF fastening forces by any developer. It is important to comply with all the recommendations set out below and have a set of necessary tools and devices at hand.
Methods for fastening panels
We will analyze what methods of fastening MDF panels to the wall, there are only two of them:
- Cutting devicewhich can be both wooden and metal, below we will analyze both options;
- Split panels - It is important to choose quality composition and properly prepare the basis.
If you do not know which option to choose, then you need to get acquainted with the benefits of each decision:
- When building the crate, the condition of the walls and their plane does not matter, because you will build, which will task the position of the future surface;
- For wet rooms, a frame of a metal profile is more suitable, since it does not change its parameters when the moisture drops and is much slower damaged by water;
- If it is necessary to lay the insulation for the finishing, the lamp will become the perfect design option, it is very convenient to put any thermal insulation material for it;

- Printing is ideal for places where you need to save as much space as possible. Elements are glued directly on the wall, and such a finish does not reduce the useful area. In this case, the surface condition is of great importance - glue panels where it is impossible.

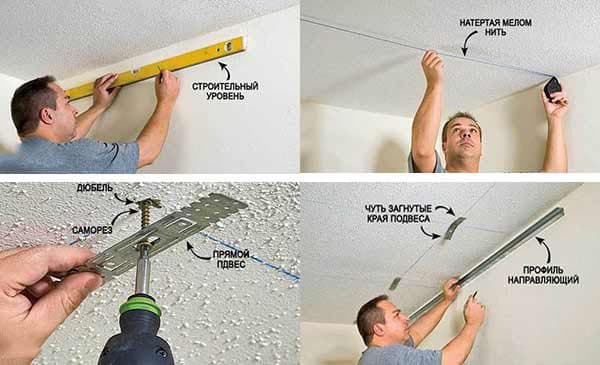
METHOD №1 - Construction of the crate
We'll figure it out how to fix the MDF panels on the wall using a special frame, which is made either of the tree or from the profile. Let's start with the consideration of a more budget and affordable option using a wooden bar.
The workflow is as follows:
- First of all, you need to buy a bar, from which the doome will be constructed, the pine version of the cross section is most often used, as the design should be durable. Choosing a specific option, pay attention to such indicators as humidity (it should not be above 15%) and geometrical parameters - elements must be even, deformations should not exceed several millimeters on the tempo point meter;
- Then it is necessary to carry out wood processing with flame breeding composition. This is necessary in order to prevent the material to be defeated by mold and tree, as well as increase the resistance of the bar to fire. The work is made with a simple brush, all the features of the process will tell the instruction that is mandatory on the package;

- Next, it is necessary to carry out measurements using a roulette, the length of the bars must be several millimeters less than the distance between the walls or from the floor to the ceiling, otherwise you have to squeeze the items. It is important not to confuse anything so as not to spoil the material, and this often happens if it is inattentively measured;
Important!
If the MDF panels are located horizontally, the lamp must be vertical.
Conversely - for the vertical location of the panels, you need to make a horizontal framework.
You need to know in advance how to finish will be made.

- The dimensions are neatly marked on the bar, after which the sawing of elements into pieces of the desired length is made. When cutting special attention to the correctness of the arrangement of the hacksaw, it should be perpendicular to the bar, often inexperienced masters cut the material as it fell and all the ends curves;

- The mounting of the bars is made either using fast installation dowels (when you have a concrete or brick base), or with the help of self-tapping screws (if you have wood walls). When working, constantly monitor the position of the elements so that the plane turned out to be smooth. It is best to check both each individual bar, and a few already fixed racks, and do it in different levels of the level in order to accurately prevent flaws;

- If you decide to additionally heat the surface, then this should be done after the construction of the frame. It is best to use a rolled mineral wool to work, which is easily cut and with which it is very convenient to work, simply fill it with the space so that it stands tightly, after which you can begin to the next stage of work;

- The mounting of the panels can be made in three ways, and the first of them is the use of kleimers, so called a special fastener, which is a bracket. The second option is thin screws of 3x20 mm, which are twisted in the groove or thorn, and the third - thin finish nails with a reduced hat. Choose a solution that is more convenient to you personally, it's easier for me to use cloves, work with them much faster;

- Lastly, the internal and outer corners and connecting staps are attached at their presence. The easiest way to glue these elements, even small finish carnations will be visible, and with the help of glue you can achieve an ideal appearance.

As for the option with a metal frame, it is suitable for rooms with moisture drops, since the galvanized profile perfectly transfers adverse effects and is not deformed over time.
We'll figure it out how to mount the wall panels from the MDF on the design of metal profiles:
- To begin with, you need to purchase the required number of the main and used profile. Wounded elements are installed around the perimeter and determine the plane of the future surface, and the main carry loads and hold the entire design;
- The work begins with attaching a used profile, for this, the line is stolen around the perimeter and the elements are fastened to the walls, sex and ceiling. It is used to work either dowels, or self-tapping screws, it all depends on the grounds on which installation is carried out;

- Then there are lines, along which the main profile will be located, it should stand at a distance of 40-50 cm. Along the lines are attached direct suspensions that will help align the surface, as well as strengthen it and make stacks. With these elements, the leveling process will be very quickly and very high quality;

- Next, the main profiles are inserted into the resulting design, the direction of the crate depends on how the final coating will be located, above we looked at this aspect. The fastening of profiles is carried out with the help of small screws, which in the construction environment are called clouds or seeds;
- The suspensions are coated to the profile, after which it is determined by the level of the correct position in which the elements are fastened. Extra ends simply bend outwards so as not to interfere when carrying out further work, cut off all the ends does not make sense, and it takes this process too much time;

- We'll figure it out how to mount the wall MDF panels to the metal frame. Seammers are used to work, which are screwed to the profile with all the same seeds - small screws. Work is best done using a screwdriver with a magnetic nozzle, so you will lose much less fasteners;

- The last stage is the same as in the case of a wooden frame: you need to glue all the decorative elements and put the plinth.
Method number 2 - gluing panels
Fastening the MDF panels to the wall without a crate will be an excellent option where the walls are smooth, and the finish is reliable on them, because you will have to glue items, and if the base is weak, then they can simply fall off after a certain period of time.
We will understand how work is carried out with their own hands, there is nothing difficult in the process, the main thing is to comply with a few simple recommendations and use only high-quality materials.
The sequence of operations is as follows:
- First you need to check the base for damage and unreliable areas, if any, they need to be embedded. All problems must be eliminated in advance, the better the plane and less flashes are prepared, the more attractive the final result will be. Sometimes you have to spend on equalizing the base more time than the main work;
- Then the surface is processed by the primer composition of deep penetration. It is necessary in order to strengthen the base and improve the adhesion of the adhesive composition to the surface. The composition is applied with a roller or painted brush, it is important to cover the whole wall evenly, but it is not necessary to admit the flows either;

- The material is prepared - the MDF panels, if necessary, the elements are cut into pieces of the desired size, cutting is made using a metal hacksaw or an electrollizka, it is important to accurately measure and cut the plates to accurately;
- On the reverse side, glue composition is applied, you can make points on the surface, you can apply the rim around the perimeter and the point in the middle, the main thing is that there were a lot of gluing places;

- The element is gently pressed against the wall and is fixed for a few seconds in this position. The work continues until the entire surface is closed;
- Lastly, the corners and connecting strips are glued, for this it is used as the same composition as for the main coating. Liquid nails are most often used - their price is democratic, and quality meets the highest standards.

Important!
Sometimes a combined method is used when the MDF panels are glued to a wooden crate.
This option is good when you need to insulate the surface or in cases where the coverage may subsequently need.

What will take for work
Naturally, you will need a certain set of tool, I will list what should be at hand without fail:
| Hoven | If you glue the panel, then you will only need a handbreaker with a small tooth, and the option for metal is suitable. But if you do a frame of wood, then you need another hacksaw with a larger teeth |
| Measuring tool | First of all, you need to have a roulette, a building level and a pencil for marking. In order for the ends to be perfectly smooth, you need to additionally purchase a square, which will simplify the work and will deny the corners |
| Screwdriver and perforator | If you use the screws, then without this power tool can not do. And for the attachment of the dowels, a more powerful option is necessary - a perforator with a brown of the desired diameter |
| Glue gun. | It is needed if you stick items. The device is a bit, but it is much more convenient to work with it. |

If you do not have the same perforator or a screwdriver, then you have no sense to purchase them for a pair of hours. Wide a tool from acquaintances or rent, it will cost much cheaper.
Cutting the corners of the MDF is best not with a hacksaw, but a sharp construction knife, so the result will be much better, and the ends are much more careful and even more importantly - so that the blade is sharp and tough and not bent when Nazhima.
Output
On my subjective view, work on the MDF mount is one of the simplest and lungs, you just have it to make it once that it is later quickly and efficiently produce cladding both walls and ceilings. The video in this article will tell you additional information on the topic, and will also clearly show some important moments of the workflow. If you have any questions, then ask them in the comments under the review.
Most of us, and especially those who make repair personally, dream of its early completion. But the speed in this difficult case does not always cause confidence and confidence in quality and reliability. In fact, there is a method of updating the apartment for short lines, which practices wall panels.
Possessing indisputable advantages, natural wood confidently secured on the market over 5 years ago, although it is one of the most expensive materials. Today they are successfully practiced both to repair residential premises and finishing offices. Wooden wall panels occupied the position of the most durable, universal and convenient finishing material, which is possible to update any part of your home.
Wooden wall panels in the interior
Wooden wall panels in the interior do not have a clearly delivered direction, as they are used almost everywhere. It all depends on your imagination and lifestyle. This material is well known for its heat isolate properties and ease of care. A tree in life is a more aesthetic and classic option, most often used in libraries, as well as cabinets.
Wood panels are made of many valuable species, are separated by red wood, cherries, nuts, rider veneer, fir tree and lime. In order to give the panel of the decorative shade, use mirror inserts, artistic handmade elements, gilding, colored varnish, intarsia and threads.

Types of wooden panels
By today, there are three types of wooden panels:
- Natural tree is the most expensive type of panel. But despite this, he compensates for its cost to appearance and many years of service.
- MDF is an average practical option. Perfectly fits into the interior of office premises and apartments. It has a high level of heat - sound insulation, and also reacts positively to temperature differences and mechanical loads.
- Fiberboard / chipboard is the most fiscal option. The affordable price and ease of installation attract the consumer to it, but do not forget about his fear of moisture.

Each of these species is able to be processed in several ways. Accordingly, based on the selected method, the appearance of the wooden panel depends.
- Lamination is a gloss surface coating, but before that, the material is processed by several additional protective properties.
- Sampling is the meaning of the development lies in the fact that at the time of applying the upper layer. Exceptionally valuable breeds of natural wood are used. It differs from all non-standard, attractive views.
- Vacuation is best used in the processing of natural wood. Most often, it is varnish that is used to cover wooden products. With it, the primary image of the tree is maximally transmitted, and moisture resistance increases.
Advantages of wooden wall panels
In addition to wooden panels there are also PVC (polyvinyl chloride) panels they are plastic. The technology of their production includes solid polyvinyl chloride with minimal use of softener. Not so long ago appearing on the market, PVC has gained high popularity. Firestroke, stable with direct contact with water, do not burn in air and durable panels, still have one weak place - fear of strong frosts. The permissible temperature from the manufacturer is 15 ° C below zero.
In turn, wooden possess all the same, only there are several more positive qualities.
- Wooden wall panels are hygienic and aesthetic product, well absorbing sound - and thermal insulation.
- Decorative wooden panels are not demanding in leaving them. Their high and hygiene properties allow them to be easy to care for them. When damaged, any item easily attaches to replace.
- Wooden panels fit into any interior. The use of a large variety of wood in the creation of the panel, simplifies its selection to the style of your repaired room.
- Decorative wood panels are easy to install. They are often compared with the assembly of the designer. Before installing the panel, it is not necessary to perfectly align the wall. The more they in the area, the faster you will finish them to collect, and it will also help to avoid a large number of joints.
- By installing wooden wall panels, you can not worry about the forgotten television cable, purchasing a new technology or an additional outlet. Any Internet Cable, Alarm or Air Conditioning Tube will be installed, not harming panels and wall.
It is important to know before starting repair.
With the help of wall panels you can hide the main drawbacks of the irregularities of the walls. If you think that buying a material, you can immediately be taken for its installation, then this is not quite so. You need to start with the fact that this is a good reason to change the old wiring. The walls in any case should be prepared, although it is not about labor-intensive and expensive work, but only enough:
- using cement, to smell all the cracks, in order to further under the panels, your wall did not collapse;
- to avoid the appearance of mold and fungus, cover the walls of the primer.
After the work done, a good moment comes to insulate your home. Fill in the opening between the wall and the wooden panel of the foam, the house will be much warmer.
Calculation of the desired number of panels and their components
When calculating, do not forget to consider the dimensions of the door and window openings of the room. It is best to carry out the calculation for windows and doors separately and then order the dimensions you need.
The number of component elements depends on the number of external and internal corners of the room and of course on the characteristics of the finishing of door and window ambrazur.
Installation of wall wood panels
The first thing to do before installation is to unpack the panel and leave them for a day in the room. Thus, they adapt to the humidity of the air where they will be installed.
- We, using the level, check the walls on even the level.
- If necessary, align the walls of the room.
- Fresh frame of wooden panels to the wall. In this case, there are several mounting options: with the help of mastic we glue the frame; clips landing; Used conventional nails.
- Next, we mandally measure the wall so that in the future each wooden panel lasted smoothly.
- Install the first wooden board of the room from the corner of the room.
- It is important that the longitudinal groove be turned to you.
- The wood panel is attached to the carcass with nails, and everyone else is as dense as possible, be sure to fit into the groove.
- In conclusion, the wall is treated with decorative handlers.
Having understood with the foundations of the installation of wooden panels, consider the four possible ways to install them. After all, each of them has their advantages and disadvantages.

Installing wall panels with adhesive compositions
Basically, this method is used in repair with perfectly smooth walls and the absence of special construction tools.
- In order to avoid absorbing glue, but by this and its excessive spending, you first need to predict the wall.
- As a rule, the adhesive fluid is applied to the wall unilaterally. With a spatula or roller, carefully apply an earlier and dried surface of the wall.
- Launching the desired section of the wall with glue, install the panel, connecting the groove and the comb, which will save you from the neglect of the screws.
If it is necessary to place the shelf or hangers on the wall panel, it is usually not a decorative zone, but a rough wall. To do this, drill deep holes for screws and dowels. Well-chosen object and its color scheme, not only hide the usual zone, but also quite well can fit into the overall interior.

Installation of wall panels with construction brackets
This method is used in cases where the walls of the room are smooth, and the process itself does not require much effort, since the construction brackets are easy to use even for a beginner.
- Taking advantage of the level, the first thing to be done - from the corner of the room to draw the location of the initial panel on the wall.
- On the markup line, install at least 4th brackets, securing them with ordinary nails.
- We set the first panel so that its comb entered the bracket.
- Further action we bring the next wooden panel in the groove already installed.
- For optimal consequences of all work, it is recommended to post a line on which you can install brackets, attach them and enter the following wood panels in them.

Installation of wall wood panels on mounting profile
The method used is well practiced in the conditions of irregularities of the walls, as well as with too high humidity, not allowing to use the standard crate of wooden panels.
Metal mounting profile is very similar to the profile for plasterboard designs. He will definitely not get mold and very patient to temperature drops and high humidity. That is why their advantage is manifested in the fact that the use of such fasteners is recommended both in the house and on the street. The installation of wall panels on a metal frame, is not much different from the layout on a wooden crate.
- First you need to clearly fasten metal rails, and then install the corner profile.
- Configured the primary angular panel to him, rushing to metal brackets
The current method of installing panels prevents them in charge, as well as in cases of necessity, contributes to the rapid dismantling of the whole wall. In addition, the mounting profile, despite its price, is the most reliable, durable and durable among all.

Price of wooden wall panels
A clearly supplied price for the production of this category is not, as it all depends on many characteristics and factors. You can offer a price per square meter and some kind of specific wall panel. Basically, it all depends on the following parameters:
- panel size;
- surface treatment method;
- the number of array in products and wood breed;
- the presence of sealer parts;
- implementation of effects (gilding, patina, etc.);
- the presence of carved elements.
How to fix the MDF panels to the wall: Step by step instructions +
Greetings, experienced and novice homemade masters! This article is devoted to the features of the walls of the MDF walls - panels. Competent installation, taking into account all the subtleties of technology, the key to the result that will delight you for many years.
MDF wall panels can be mounted in two ways: to the crate or directly on the wall with glue. Before choosing the installation technology, I recommend to evaluate the condition of the walls in the room, taking into account two factors:
- MDF is made of wood fibers, so the material is recommended to secure from contact with moisture and surfaces damaged fungus.
- Panels need to be attached to a flat surface.
If the walls released from the old finish are practically perfectly smooth and dry, you can mount the MDF panels without crate, for glue. It will take at least time, but excludes the possibility of insulation of the walls and replacing individual panels in the case of their mechanical damage.

Uneven walls require fastening of cladding from wooden rails or metal profiles. In a house with brick walls or in wet premises, a wooden crate to use is not worth using - a great risk of a fungus, which over time will damage the finish.
Tools and materials
For trimming panels, as well as markup and editing of the crates, we will need:
- plumb (easy to make from durable thread and compact load like nuts);
- roulette (at least 3 meters), construction level and pencil or marker;
- electric drill + wood drills and concrete, screwdriver (you can use an electric door with speed adjustment + nozzle for self-tapping screws);
- metal square, hand saw or electrolovka, hammer or gun for brackets.

For fixing the rails, panels and decorative corners, you need to stock:
- wooden or plastic mounting wedges;
- self-masses with eraser nests or dowel-nails (for crate);
- self-pressing for fastening the extreme panels of the trim;
- kleimers (special clamps for fixing panels to the crate);
- small nails or brackets;
- So "liquid nails" will be needed for MDF panels or glue for a thick consistency tree.
ATTENTION - this stage is carried out only when we want to "plant" the glue panels directly to the wall, if you choose the option of fastening the panels to the crate, then the wall preparation phase can be ignored. To begin with, the walls need to be cleaned from the old finish, make sure that there is no mold and moisture, if necessary, to carry out antifungal treatment and dry the surface. If the irregularities of the wall are too big, then you will have to shock the surface and primed how to do it here.

The first thing you need to know is that the insulation of the walls can be performed in two ways:
- after fastening the crates, fill the cells with foam or other thermal insulation material;
- before mounting the crates, stick a foil foam with a thickness of 3 mm
Depending on how you secure the panels vertically or horizontally, mounted and the crate or horizontal or vertically.
For a wooden crate, I recommend using rails with a cross section of 20x40 mm. It is advisable to pre-process them with an antiseptic. Wooden frame can be mounted using a dowel-nail or self-tapping screws, but the metal is to roll only only self-draws, otherwise the profile can be accidentally brought.

The length of the fastener is selected based on the thickness of the shawlocks and the thickness of the plaster layer. It is important that the fasteners of 30-40 mm went to the base of the wall. The doomle is attached to the wall in 500 - 600 mm increments.
The vertical elements of the crates are installed in the corners - online, strictly under 90 degrees to each other, as well as as framing door and window openings, columns and protrusions.

It is important to constantly check the frame plane and the "evenness" of the planks relative to a friend with a level.

For alignment under the plank, you can put wedges of wood or plastic wedges. Inaccurate joints of wooden plates should be aligned with a planer.

The lower and upper horizontal rail on each of the walls should be attached with a slight indent from the floor and the ceiling, respectively, the plinth will be mounted on them. Then the horizontal framing of window and doorways is performed. The remaining horizontal elements are set at a distance of no more than 500 mm from each other. Ultimately it should work like this:

The frame of a metal profile is mounted on the same principle and looks like this:

Installation of MDF panels on the frame
The mounting panels can be started from any angle. At the first panel, it is necessary to cut off the comb using an electric bike or a hand saw, pre-placing the item along the entire length. I want to pay attention to one important point: before mounting the panels on the wall carefully count, what period will remain after the last option - if the clearance is very narrow, it is better from the first panel to cut off the strip to the wider so that the finish looked beautifully.
The first panel must be cut into the cut side of the adjacent wall and with the help of self-samples to attach to the horizontal framework of the frame with an indent of 1 cm from the edge.

On the side of the groove panel, the panel is attached to each rail to kleimers, which can be knocked off with a bracket or small carnation to the central hole. In order not to accidentally damage the edge of the panel with a hammer, put the passatati to the hat half of the clogged nail and naughty.

Each subsequent panel is inserted by the crest in the grooves of the previous one and is fixed using klyamimers. The last element is cut in width, and its edge is attached to self-drawing to the vertical rake of the crate.
Installation of MDF panels on glue
Here everything is simple - the previously prepared wall is pre-ground. "Liquid nails" for MDF or wood glue is applied to the back side of the panel with large points. Then the panel should be pressed against the wall and catching up for a dense fit, then tear off the wall. The glue squeezed on the surfaces should toll a little to then grab better. After 3-5 minutes, the panel is pressed again to the wall. It must be carefully sharpened to ensure a dense fit to the wall.

Important: The first panel on each wall is fixed along the vertical mark, made using a plumb. The subsequent panels are inserted into the groove of the previous element only after the glue takes sufficient strength (this moment must be specified on the package).
After all the walls are covered with MDF panels, the ceiling and outdoor plinth is attached. Then the internal and external angles are closed with a special decorative element - a splitting corner for MDF, selected precisely in the tone of the finish. A split corner is attached to glue, which is most convenient to apply a thin snake along the entire length of the element.

The end result should be like this:

Qualitatively to carry out the walls of the MDF panels can even beginner in the independent repair area. If installation is selected with a crate, it is important to correctly calculate the number of necessary material and fasteners. I advise you to pre-draw a detailed scheme, putting all the sizes.
on the topic "How to mount the MDF panels to the wall with your own hands":
http://postroju-dom.ru.
| Name | Dimensions (mm) |
Slot | Coating | Packaging | Chop in 1 pack |
Price rub / UP |
| 4.5 x 30 | T20. | Zn, yellow | box | 200 | 390 | |
| Self-tapping screws for MDF, DVP, chipboard, taut, incomplete carving with notches, centers, torx slot, without bits | 4.5 x 35. | T20. | Zn, yellow | box | 200 | 420 |
| Self-tapping screws for MDF, DVP, chipboard, taut, incomplete carving with notches, centers, torx slot, without bits | 4.5 x 40. | T20. | Zn, yellow | box | 200 | 470 |
| Self-tapping screws for MDF, DVP, chipboard, taut, incomplete carving with notches, centers, torx slot, without bits | 4.5 x 45. | T20. | Zn, yellow | box | 200 | 500 |
| Self-tapping screws for MDF, DVP, chipboard, taut, incomplete carving with notches, centers, torx slot, without bits | 4.5 x 50. | T20. | Zn, yellow | box | 200 | 550 |
| Self-tapping screws for MDF, DVP, chipboard, taut, incomplete carving with notches, centers, torx slot, without bits | 5 x 60 | T25 | Zn, yellow | box | 500 | 1580 |
| Self-tapping screws for MDF, DVP, chipboard, taut, incomplete carving with notches, centers, torx slot, without bits | 5 x 70. | T25 | Zn, yellow | box | 200 | 740 |
| Self-tapping screws for MDF, DVP, chipboard, taut, incomplete carving with notches, centers, torx slot, without bits | 5 x 80. | T25 | Zn, yellow | box | 200 | 870 |
| Self-tapping screws for MDF, DVP, chipboard, taut, incomplete carving with notches, centers, torx slot, without bits | 5 x 90. | T25 | Zn, yellow | box | 200 | 1100 |
| Self-tapping screws for MDF, DVP, chipboard, taut, incomplete carving with notches, centers, torx slot, without bits | 5 x 100. | T25 | Zn, yellow | box | 200 | 1200 |
| Thickness plate (mm) |
Plate material (mm) |
Level length self-press (mm) |
Diameter of drill self-press (mm) |
| 3 | ships, chips, cellulose | 30 | 4,5 |
| 6 | ships, chips, cellulose | 35 | 4,5 |
| 9 | ships, chips, cellulose | 40 | 4,5 |
| 12 | ships, chips, cellulose | 45 | 4,5 |
| 15 | ships, chips, cellulose | 50 | 4,5 |
| 18 | ships, chips, cellulose | 60 | 5 |
| 21 | ships, chips, cellulose | 70 | 5 |
| 24 | ships, chips, cellulose | 80 | 5 |
| 27 | ships, chips, cellulose | 80 | 5 |
| 30 | ships, chips, cellulose | 90 | 5 |
| 36 | ships, chips, cellulose | 100 | 5 |
| 40 | ships, chips, cellulose | 100 | 5 |
The dimensions of the finishing material plates may vary depending on the humidity of the environment, therefore, the most loaded points of fastening of wood-plate materials are points located around the perimeter of the plate. Interior decoration of walls with MDF panels: doom, thermal insulation, installationThe number of attachment points (the number of self-tapping screws) is determined by the size and thickness of the plate and in most cases is at least 20 per square meter, provided that the size of the self-press is properly selected. In the middle of the plate is allowed a smaller density of the location of the attachment points than around the perimeter. When laying between the plates, it is necessary to leave a compensation gap, eliminating their contact even when swelling. |

Usually, when buying MDF panels for finishing walls, the buyer offers special fasteners - kleimers. It remains to resolve the question: "How to fix kleimers to a frame or other surface subjected to cladding?".
The standard solution for facing the MDF panels looks like this. At first, on the wall of the dowels mounted wooden frame from bars with a cross section of 40x40 or so.
How to mount the MDF panels
After that, kleimers are easily navigated by carnations to 20, which come in a set with whimimers. But this design is not flawless. A tree with time cracks while dried. Of course, it is most likely that cracks are formed in places of the greatest voltage, where nails are clogged. Therefore, instead of nails it is recommended to use small screws.
But what to do, if you do not have a wooden frame, and a frame of a metal profile, which is usually used for plasterboard covering. The wall of the profile is very thin, so it turns out to be attached to the whimmer with a small tape of a tree. Cutting from the Hat is already absent and screwed together with a kleimer - a liquid design. They advise the use of self-seeds. But they have a big hat that prevents the panel in the castle of the previous one. In general, it turns out but bad.
How to fix the MDF panels to metal profiles? I prefer to do so. If there is an opportunity, the bottom and top of the panel are fixed with screws on a tree, but not through a kleimer, but the panel itself.


As a rule, when subsequent finishes, the HAPP of the upper self-press will be closed by a lodge, and the lower, plinth. Of course, for this it is necessary that the upper and bottom profile go from the very edges of the wall. Perhaps it will be a guide profile. Next, the remaining connections of the panel profile perform adhesive. I use liquid nails.
If you cannot use the screws (there will be no cartel, and there is no profile at the bottom), then I do everything on the glue. In this case, the work goes extremely slowly, because you need to wait at least 10 minutes so that the panel grabbed.
Facing walls with MDF and PVC panels
A very effective way for a short time and without mud to decorate the walls of the hallways, kitchens, bathrooms or loggia with finishing panels (Fig. 117). There are three types of such panels:
- The set of the panels, externally resembling the lining, are attached to the crate or straight to the wall by clemmers (fasteners), have a length of up to 3000, the width of up to 300, the thickness of 8 to 25 mm. Connect panels with each other by inserting spikes in the groove, depending on the form they form a seamless or suture.
- Square tile panels. Mix the same way as robes. From these panels can be postponed on the wall pattern. Dimensions of tile panels: from 300 × 300 to 980 × 980 mm.
- Leaf panels. They look like a large piece of organity, only with a pattern. Sheets are attached to the wall or laminating nails and / or glue. The joints close the sealant or closed with plastic slats. These panels are much more typical (their dimensions are mainly 1220 × 2440 mm, and the thickness is from 3 to 6 mm).
Before starting work for acclimatization of PVC panels, they need to withstand several days indoors where they will be installed. During this time, they will acquire dimensions characteristic of this air temperature and the likelihood of the appearance of slots between the rails will decrease. In PVC panels, the temperature expansion coefficient is fourteen times higher than that of steel, with a change in temperature from -10 to + 40 ° C, they are lengthened - up to 9 mm on a three-meter rail. The expansion of PVC panels is not so much so much, since the rail width does not exceed 300 mm, but still it is. Therefore, you should know that using these panels in the kitchens, in the bathrooms, and especially on loggias, with a significant decrease in the air temperature on the wall, the slots will appear, which will disappear when the temperature is raised. Ideally, these rails need to be mounted at a temperature somewhat lower than the one at which they will be operated, then after acclimatization plastic, the plastic stretches and so breaks the slot that the wall will be monolith.
The MDF panels are not expanded from the temperature, but they have another drawback: some of them have low moisture resistance. It should be noted that the MDF panels are made not only in the form of thin, similar to the cardboard sheets, which we are accustomed to call with an organity, but also in the form of thick (16 mm) dense sheets that are similar to a wooden array. Wall panels, which are based on chipboard, can only be used in dry, and DVP - in moderate wet rooms. Before starting work on facing the ceiling of the MDF panel, like panels from PVC, you need to withstand in the room where they will be installed. Exposure is needed for leveling of the moisture content of the panel with humidity indoor.
PVC and MDF panels are mounted in one scheme
1. Preparation of the surface.
For panels mounted on a wooden or plastic crate, you do not need to pre-prepare the wall. Is that "to pay" cracks.
For panels glued to the base base, the old wall painting is cleaned. Clean the whole wall from old paint is not needed. Only those parts of the wall are considered, where the paint or the whitewas is shuffled. Modern adhesives for PVC panels penetrate through the old paint and curb the walls with the "body". To check the bearing base for gluing, make a test using Scotch. Stick a piece of scotch to the wall and cut off sharply if it does not remove the old painting, then the base is suitable for the adhesive installation of the panels. If, together with the scotch, the old painting is torn - the wall needs to be cleaned or do the crate on it.
2. Installing the crate.
The doomle is attached perpendicular to the direction of installation of the panels (Fig. 118). Material of the crate - dry wooden bars 40 × 25 mm or ready-made PVC profiles (Fig. 119).
At first, in the level or on the plumb, two decisions are installed at the top and bottom of the wall, then two cords are stretched between them (with large sizes - three cords, two along the edges, one in the middle) and all other intermediate decides are exhibited. To equalize the bars of the crate "into the plane", the lining from wood, fiberboard or plywood are installed. The setting step of the intermediate reshetin should be 500-600 mm or less so that the wall panels do not strongly beaten from pressing hand.
3. Installing the frame.
For mounting wall panels, special challenges from PVC profiles are used (Fig. 120), with which you can bind the wall of almost any complexity. At first, an angular profiles are mounted on the wall to the walls of the crates (or directly on the base of the wall with glue installation). Accordingly, the internal angles of the walls are internal, and on the external - external angular profiles. Under the ceiling and on the floor, plinning profiles are installed or, as they are also called, moldings. If the ceiling of the room will be separated by the same wall panels, then the ceiling is mounted internal angular profile. Corner profiles can be replaced by J-profiles. When putting panels in length, n-profiles are used.
All the challenges are attached to the wall or crate in the same way as the wall panels.
If you forgot to buy these good items, you can install panels without them. The locations of the docks are then closed with gluing on top of the universal corner panels, or attaching a plinth for floors of suitable color.
4. Installing panels.
The panels are cut with a saw with small teeth (for example, with a metal knife). The transverse cutting panel should be started from the thickened part, where the "spike" is located. The longitudinal cutting of the panels is more convenient to make a knife on the guide rail. In this case, the PVC panels can be cut off first with one, then on the other side. Thin MDF panels are cut off with a knife and laid out, thick - it is better to cut with a hacksaw, an electric bike or a disk saw.
The length of the PVC panel needs to be cut down smaller than it requires a wall, retreating from the edges of 4-5 mm. This gap should be left when they are introduced into the receiving chute J-profile or molding. When temperature expansion, the gaps will compensate for the lengthening of the panel, that is, with an increase in the air temperature in the room, the panel will extend, but it does not strengthen the receiving gutters of framing profiles and is not fined (Fig.
The magnitude of the gaps of 4-5 mm is valid only for full-size panels. If the panel is shortened, then the gaps can be reduced accordingly the pruning value. For example, when trimming the panel halfway - the gaps can be reduced to 2-3 mm.
Provide the gaps and in the event that you decide to postpone the trim of the corners to "then" and cover them with a versatile corner. In this embodiment, the clearance is left between the end of the panel and the ceiling (floor). The clearances are left at the installation of MDF panels, although they are not as affected by temperature expansion, but they can change their dimensions (swell) with excessive humidity.
The first panel is set in J-profiles (moldings or internal angles) by three sides: two ends and that side, where the panel has a spike. Spike preferably cut off. The fourth side with the groove remains free and attached to the crate. The second and subsequent panels are joined "spike in the groove" and are attached to the side with the groove to the crate.
The last panel cuts into a width, and from the ends it is shortened by about 5 mm. Then it moves until it stops into the receiving jet of J-profile (molding or angular profile) and goes into the groove with the penultimate panel. When the second end of the panel does not interfere with the second J-profile shelf, it is shifted in the opposite direction. When putting panels in length, or when changing the direction of installation of panels from a longitudinal to transverse, a n-profile is used, a special reshetin is installed under it.
There are several ways to fasten the panels (Fig. 122):
- On the glue to the base surface of the wall. If the wall is quite smooth, then glue for PVC (MDF) is applied to the facing panel and it is simply glued. The glue is applied to the entire back of the panel with zigzag stripes.
How to mount MDF panels to the wall: Step by step instructions + video
Glue is quite elastic and does not prevent the temperature expansion of the panels;
- On the glue to the leveling crate. The glue is applied to the panel only in the places of fitting it to the crate. The gluing area in this case is small, therefore additional mechanical mounting is recommended;
- Direct mechanical mounting panel to the grade brackets stapler, nails or self-drawing. The method is quite simple and reliable, but has a significant drawback, the mount prevents the temperature elongation of the panels. It is recommended only for rooms with a stable temperature and humidity mode. Indoors with sharp drops of temperatures, for example, on loggia, it is possible to block panels;
- Mechanical fastening of cladding to a wooden clammer crate. This method of compound does not prevent the temperature elongation of the panels. Clammers are attached to the trint of nails, brackets or screws (if the heads will not interfere with the attachment of the next panel);
- Mechanical fastening by clemmers (sometimes they are called clips) to a plastic crate. The most progressive type of fastening. The panels will not be perfectly, the mount does not interfere with the temperature elongation, and during installation there is no instrument, the facing is simply fastened to the crate. If necessary, facing can be dismantled and installed elsewhere.
5. Ending.
If you initially used framing profiles, then you can only wipe the set by a cloth. So that the panels did not attract dust to remove static voltage the surface of the panels is recommended to be treated with antistatic.
If the panels are mounted without framing profiles, then the angles of the adjoints are closed by universal corners. The corners are glued to the facing by the appropriate adhesives, for example, "liquid nails" or "moment of installation" for MDF and PVC.
During operation, you must protect the panel from shocks and damage by sharp objects. When caring outside the panels, you can use a soft cloth or sponge. You can not use abrasive or caustic cleaners.
The modern interior provides for a beautiful and original finish, which emphasizes the style of housing. Therefore, the wall panels of MDF have been greatly popular with the designers. Unlike a wooden board, they are inexpensive, produced in different colors and easily installed, giving the room a refined view.


Features
The MDF is a unique building material produced in the form of panels of wood-fibrous raw materials of medium density. Since the plates are made by dry-pressing wooden chips at high temperatures and pressure with the addition of the carbamide resin, they are obtained by superproof and durable in operation.
Decorative finish with such panels has many advantages.
- Simple installation. The material can be attached to any direction: diagonally, across or along the wall surface. In addition, it is not necessary to carefully prepare the working base for installing panels. The condition of the walls in no way affects the quality of the facing.
- Aesthetic look. A huge range of color palette and textures allows the use of MDF for any style design. In addition, during the installation between the plates and the base of the walls there is a small space that can be used to hide insulation and wiring.
- Good thermal insulation. The material is characterized by excellent heat power, so after mounting the MDF, the room acquires additional insulation.
- Easy care. To clean the panels from dust and pollution, it is enough to wipe them with a soft sponge moistened in warm water. If damage occurred during operation, then there is no need to completely change the trim. For this, the panel with defects is removed and the new one is attached to her place.
- Durability. Such cladding reliably serves more than a dozen years.


Despite the presence of positive characteristics, the MDF is also characteristic of some disadvantages.
- Low moisture resistance. Under the influence of moisture, the material is prone to deformation. Therefore, special plates with a protective layer are recommended for decoration with high humidity.
- Instability to mechanical damage and loads. Decorative panels need careful installation and care.
- High risk of fire. Electric wiring, which is paved under the trim, should be placed in the fire resistance of the box.
- The formation of hollow walls. Since MDF is fixed on the frame, it turns out "emptiness" between the trim, therefore, when the furniture should be fixed on the walls, then you have to use long nails or dowels.


Before you purchase facing plates, it is important to consider that they are produced different sizes depending on the model range of each brand.

As a rule, the market most often found products with a thickness of 7 mm to 14 mm and dimensions of 2600 × 200 mm, 2600 × 153 mm, 2600 × 325 mm. Wall blocks are usually attached to glue or crate made of wooden bars and metal profiles. In this case, the installation of plates on a wooden frame is made much simpler, but before installing the installation, wood should be covered with antiseptic solutions protecting it from the formation of mold and fungus.
To date, MDF Plates have been widely used in various spheres. They are squeezed by walls, door leafs, window sills, ceilings, and also made from the material. Screens for heating and ventilation systems and arches. This finish looks gorgeous in the modern interior, since the panels imitate not only expensive wood, but also natural stone.


Calculation of the number of material
Installing MDF, as well as any other material, you need to start with a preliminary calculation of the number of panels. For this, primarily determine the area of \u200b\u200bthe room: all the necessary measurements are made, and the perimeter is multiplied by height. It is also important to take into account the presence in the door of the doors and windows. Their quadrature is calculated similarly, multiplying the height of the width, the result obtained is taken away from the total area of \u200b\u200bthe room.
Then, knowing all the numbers, you can go for the purchase of wall panels. Since the products are sold different sizes, you will have to additionally calculate how many square meters in each plate. Usually manufacturers are written on packs. If, for example, a panel of 900 mm wide and a length of 2600 mm is purchased, then 2600 mm is multiplied by 900 mm. As a result, it turns out that in one plate 2.34 m2. Then the room is then planned for the trim, it is necessary to simply divide by 2.34 m2, and the desired number of panels will be obtained.


Preparation of instruments
An important point before the start of the MDF is considered to be the preparation of the instrument. Since the installation of wall panels does not represent a special difficulty, it is quite realistic to perform with his own hands without resorting to the help of specialists.
To work quickly and efficiently, you need to have the main set of tools at hand.
- Roulette. It will be best to use a 5-meter roulette.
- Level. It can be used in the store and make it from Jute, by the end of which the nut is tied.
- Drill with a complete set of nozzles. It will excellently replace the screwdriver and simplify the task of fastening the plates.
- Metal square. For installation, the one that has various boats and is usually used by locksmiths. With the help of the kitchen, the panels for cutting slopes will be measured.
- Hacksaw or electrolybiz. It is recommended to stock at the same time both. At the same time, the knife should be chosen with small teeth having a transverse and longitudinal washed.
- Bulgarian. It is needed for cutting metal products if the frame is planned to be collected from the metal.

In addition to the above, you will also need conventional tools that have each in the house: a screwdriver, knife, hammer, drill and marker.
Methods of installation
Before sheening the walls of the MDF, it is necessary to determine what way they are fixed. You can install the decorative panels using glue or crate. Each of these methods is characterized by its montage technology.
Before choosing, you should estimate the condition of the surface, given some nuances.
- Plates are produced from wood fibers, so the material must be protected from contact with the bases damaged by mold. Installation and walls in rooms with high humidity are not recommended. In addition, the panels are required to be attached to an even base.
- In the event that the walls are well cleaned from the old finish, dry, then they can be installed MDF on glue or liquid nails without assembling the crate. This will simplify fasteners, but will exclude the possibility of replacing individual plates in their mechanical damage.

The installation of wall blocks on the frame is as follows: the guides that serve as the basis for installation are fixed to the surface, then the MDF is fixed to the metallic profile or bar.
This technique is characterized by weight gain.
- The lamp hides the base defects, so the walls do not need to withdraw the level and level. This, in turn, saves time and finance significantly.
- Educated "emptiness" between the trim will serve as an ideal place for laying important communication systems and laying the heat-insulating layer. In addition, additional sound insulation is created, which is especially important for apartments, in which inter-partitions have poor noise absorption.
- The ability to quickly repair the finishes if individual panels are damaged.


As for the disadvantages of such a sheat, it significantly reduces the area of \u200b\u200bthe room, and if it is necessary to hang furniture objects or decorative elements on the walls, it is necessary to consider that the design will not power such loads.
In contrast to the previous method, landing for glue does not have significant minuses. The MDF plates are fixed directly to the wall, the binding element in this case serves glue. To fix the panels with each other additionally, kleimers also apply. Due to this option, the area of \u200b\u200bthe room does not decrease, the installation is carried out quickly, without damage to the material with self-draws or nails. But if during operation, the surface of the facing was damaged, then not one fragment of the finishing will be restored, but the whole wall.
Dealted with the choice of one or another method, it is worth considering not only the features of the room, but also to calculate the costs of the trim. For example, in some cases, it is much saved to perform the shplanie of the walls, and do not build a framework. For large rooms, of course, it is best to install a crate, as ideally align their walls will be problematic.

Performance
The MDF panels due to its operational characteristics and aesthetic appearance were widely used in finishing work. Wall panels, you can not only separate the ceilings of the corridor, passing, but also to the original doorway or the slope of the windows. From the material also at home easily manufactures accessories for furniture and corners of walls. Since the product is simply in the installation, all the work is quite realistic to perform with your own hands. Before carrying out the MDF mount, you should prepare the surface to finish, clearing it from the old coating and eliminating all defects.


In independence, it is planned to cover on a concrete, a tree or brick, the reason must be projected, it will protect the finish in the future from the appearance of mold and fungus.
For additional thermal insulation of slopes, walls, walls and door openings, it is recommended to lay insulating material, it will not only serve as a good insulation, but also cope with the task of vapor and waterproofing.


To set the panels to the slopes, they can be fixed along or across, it all depends on the size of the slope.It looks original, made of a combination of light and dark pieces of plates. The installation of panels on the walls and the ceiling is carried out both on the glue and on the pre-assembled frame. To do this, the starting profile is fixed first, and then the guides, the length of which must be properly shown on decorative parts. To beautifully make an angle, it is necessary to cross the material before installing, twisting its edges.
Cut or cut panels recommended using special tools for working with wood. The best option for this is an electrolybiz, but if it is not at hand, it will fit with small teeth. Deciding with the direction of the MDF covering, the panels are measured and cut the desired length. At the same time, the first plate is necessary along the entire length of cut off the thorns, if this is not done, then when installing the corners there will be difficulties.


Okeekhet
Choosing a method for attaching MDF to the crate, you will have to first make a durable frame from metal products or wooden bars. It should pay attention to the fact that the wooden structure requires the pre-impregnation with antiseptic solutions that will protect it from rotting and mold. If laying of thermal insulation is planned, then the thickness of the BRUSEV is chosen according to the thickness of the insulation. To cover brick walls and rooms with high humidity, wooden frame is not recommended.
So that wooden bars are not deformed when installing, it is worth choosing a well-dried tree.The design is fixed perpendicular to the direction of installation of the panels, leaving a small supply from the floor of 5 cm and from the ceiling of 3 cm. First of all, the vertical elements are placed on the edges of the recesses, in the corners and next to the openings. Planks must be located apart from each other at a distance of 700 mm. For fasteners, the design usually use self-tapping screws or nails with a diameter of 4 to 6 mm.


UD racks and horizontal CD profiles are used to assemble metallic design. The shadow step is similar to 600-700 mm.
CD profile is inserted into the rack and all attach to the wall with self-draws. Metal profiles can be cut with a special disk saw. If the panels are separated by the ceiling, the framework must be assembled only from horizontal elements using additionally fasteners.


Packing panels
After the frame design is ready, proceed with panels. MDF plates are fixed with each other with a tongue lock consisting of aleutment and crest. The details are fixed by small nails to a wooden crate, they are ripped into a hammer. Materials are used to install the material on metal products, they are placed in the groove of the plate and fixed with self-draws.
With a vertical installation of MDF begin to fix from the corner, smoothly redirecting to the left side. The first plate is fixed to the bruster with nails, and on the side of the groove the fixation is carried out by kleimers. Then the crest of the next plate in the groove first is stacked. The last panel should be cut down in length, leaving a small margin of 5 mm, and its comb is cut half. It must be inserted into the groove of the previous panel and consolidate the free edge.


Slices of wall plates are used to cover slopes. To beautifully close the trim, special angles use. They are planted on liquid nails or glue, decorating the edges near the doors and windows. In addition, MDF is great for finishing the ceiling surface, in this case the panels are installed in the direction perpendicular to the base of the walls.