Homemade in the country with their own hands from the tree. Useful homemade for giving and gardening with their own hands
The private sector is associated with a severe permanent job. To plant a garden, trace the growth of plants, collect harvest. All this, of course, you need to do. But if you correctly organize the whole process, then the work will be in joy. And there will be many more free time for recreation. And they will help in this homemade for the garden and cottages, with their own hands made. Someone will objected that everything can be bought already ready in the store. This is true. But, first, to buy all the money is not enough. And secondly, the process of making from the primary materials of something useful can bring a mass of positive emotions.
Russian people have always distinguished resourcefulness and ingenuity. And a huge amount of homemade made by their own hands for giving and gardening, whose photos can be found in our article, this is confirmed. We will offer for consideration only a few options that will be suitable on any site.
Klumba-konta
Many gardeners recently have preferred flower beds located in boxes. They are raised above the ground and fenced on all sides. Thanks to this, the care process is facilitated, and the bed looks more attractive and interesting. Use such structures can be used (or even recommended) on scant nutrients soils.
Self-masses for the garden involve the use of infringement materials. Therefore, for the construction of the box, you can use boards remaining, for example, from the construction of the house. If there are no such, you will have to purchase them in the store. Of these, the box of arbitrary sizes is constructed. The dimensions will depend on the size of the site, its style design and plants, which is planned there to plant. The height of the sides makes about the knee so that the layer of fertile soil is thicker.
Metal mesh with a small cell is fixed to the manufactured box on the bottom. It will be protected from the penetration of rodents and moles. If there are no such a plot, then you can do without a grid. From the beds-box can easily make a small greenhouse. Its height is selected taking into account plants planted there.
Drip irrigation
Self-masks for the garden will simplify such a heavy process as watering plants. Make a drip irrigation system. This will require a large barrel (metal or plastic), hose, capillaries (you can make holes with a certain interval in the hose) and various connections (tees, clamps, and so on).

The barrel raise about 1.5-2 m from the ground. For this, metal corners can be welded a special stand. Due to this, the system will have stable pressure. The trunk hose is underway from the barrel. It necessarily installs the filter so that the garbage does not climb the system. Capillaries fed from the main hose.
Write your own hands
Self-timers for summer cottages and the garden will allow you to create something necessary and useful on the plot from the remedies and materials. For example, from old plastic bottles, which are always thrown out, you can make the rod for the garden and the garden. It will allow processing and watering plants of different heights. A sprayer is attached to the watering hose. To a long stick (the longer, the better), the same spray nozzle is screwed up. The lever is fixed with a threads pressed.
In a bottle of 1.5 liters in the neck, a hole was made with a hot nail. The bolt is inserted into the hole and the nut is fixed with the outer side. Bolt must be drilled through the drill. A hose dresses on it and fastened by a clamp. After applying the pressure into the system, the nozzle is unwind, and water is sprayed.
Tires
Old tires from passenger cars are one of the most popular and affordable materials for the manufacture of homemade for the garden. Of these, you can make even a compost pit. You will need only 4 pieces.

One of the tires that will serve as the base is cut. One sidewall is cut off from it. Two sidewalls are cut off the rest to get rings. Next you just need to install the tires on each other in the allotted place.
Bench
After all the work on the garden, you can relax. And on this subject, you can also choose the appropriate option made by your own hands homemade for giving and gardening. Having a small set of tools and materials, you can make an attractive bench of the streamlined form. It will become a place where it will be possible to relax and relax.

Materials will be needed:
- A sheet of plywood (better from pine) measuring 90 x 90 cm and 1.6 cm thick.
- Reiki from the same tree in the amount of 7 pieces (2 cm thick, 9.4 cm wide and 140 cm long).
- 2 x 6.9 cm boards and 100 cm long in the amount of 3 pcs.
- 2 x 6.9 cm boards and 140 cm long in an amount of 9 pcs.
The parts will be fastened with 0.5 x 5 cm screws. In addition, we will use glue to connect wooden elements, wood varnish, turpentine.
The plywood sheet is cut into three parts. They are fascinated by a template for cutting the sidewalls and central crossbars. The shape is cut out with an electroller. On the back there are 3 recesses for the rails that will keep the design.

Self-timers for the garden will help make their country life more pleasant and easier.
Cottage is a place to relax the soul and improving the body. Away from the city bustle, where the air is clean, so nice to actively spend time, grow an excellent harvest. And stayed by plenty, relax, as it should!
But to relax with comfort, you need to work a little to create beautiful, useful and comfortable things. Homemade for giving and gardening with their own hands - cheap, reliably and angry!
Furniture made of wooden pallets (pallet)
After the construction of the house there is a lot of construction debris, which can be useful! Brick and wall blocks are brought on pallets. They are a return tair, but reluctant to mess with this issue. Having attached a minimum effort to make the original wooden furniture for the cottage!
Look at this stylish coffee table for the living room. Recognize? This is an ordinary pallet! Make this subject of the interior is easy. Take the coarse sandpaper and clean the surface of the boards, of which the container is slipped. Then the smallest sandpaper will be needed so that the surface becomes smooth. After sanding, thoroughly erase fine dust consisting of particles of wood removed.
Color your new table with oil, acrylic or other wood paint. If the pallet was incomplete from decent boards and you like the natural texture of a tree, then it is better to cover the table with varnish. For convenience, you can fasten small wheels from below.

From this container make more complex products - sofas, dressers, cabinets. Look a few photos for inspiration.
Agree, it is a chic and stylish headset! If you ourselves make soft seats that go to them below the dore from the same tissue to tie to the frame. Otherwise they will shift.

Bed and a large headboard for her with shelves is also made of pallets. A good orthopedic mattress will allow for such an original base to sleep perfectly.

Such an open-air area in oriental style will not leave anyone indifferent.

Swing
In your family there are children or will guests come to you with kids? Then no swing do not do! In order not to spend a lot of money, you can use unnecessary things.
For example, from the old chair in a matter of minutes, you can make a great seat for a swing, scuffing legs. And to be beautiful, paint it fresh paint.

By the way, not only the children like to shift. Adults also get pleasure from it. Look at this option of swing from the rathanag, whose legs came into disrepair. Soft pillows of gentle colors, ribbons, lace cloth - everything is for the creation of a romantic atmosphere.
If there are large trees in the garden, you can hang such a construction to thick bitch, then you do not need to build complex fasteners, it will be quite strong rope.

Second life of an old bath
There are many possible options. Here is some of them.
Flower garden. One of the easiest ways to use an unnecessary bath. It is enough to make a good drainage drainage from a broken brick or clay, add a nutritious substrate and plant plants.

Water. The easiest option is to bury the bath in the ground and pour water there. But you can decorate it so that no one can guess what you built a pond in the country. A small fountain, natural stone for framing, backlight and favorite plants will help create a unique area for relaxing on the site.

Furniture. Yes! It is difficult to believe in it, but the bath turns out excellent furnishings - sofas and chairs. And do not worry if your bathtub has a cast iron. With the help of a grinder, you can cut part of the board to get a sofa or chair.


Flower flower beds
Flowers can be made very original.
Vertical landscaping with colorful rubber boots. In their soles, make holes for outflow of excess water and arrange drainage from clay. Fill the shoes with the soil and fall out the plants. Remember that any container not deepened in the ground quickly heats up in the sun, the earth dries in it. Therefore, on hot days, water green pets minimum 1-2 times a day.

You can also use other shoes.

If the site has an extremely unattractive stump from the old tree, to emerge which is not possible, do not be discouraged. It will work out excellent raised flower bed.

Some gardeners love their stumps, decorated with plants, which even covers them with varnish to slow down the process of destruction.
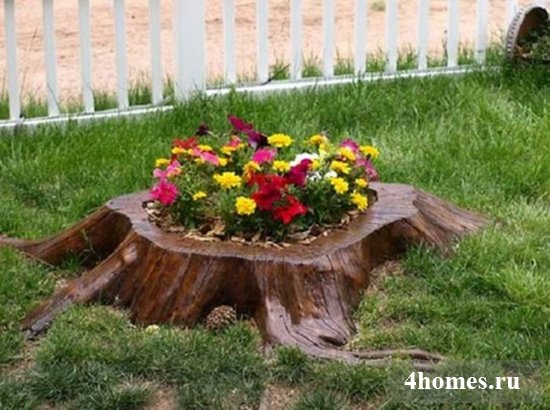
Instead of stump, the basis can be a picturesque log.

Flowers can be arranged in various service things - suitcases, bags, furniture, auto strokes and even in a car!

Try to make a raised warm bed, framing it with a neat wooden frame, stone or brick.

From plastic bottles
An excellent material for homemade in the country and garden are plastic bottles with their own hands. They can perform useful features or be a decorative element to decorate the landscape.
Bottle-sprinkler - an indispensable assistant in the garden. Make small holes in the tank, wear it onto a pipe or hose and secure. It remains only to open the crane to let the water.

With the help of the bottle, you can organize a root watering for plants. Make holes in it. So that the earth will not be clogged, wear old polyamide tights on the capacitance. Discover the bottle so that the neck remains above the ground. There you will pour water from the hose or it will be filled with itself during the rain.

This method of watering will not at all enter you financial expenses, and benefits will bring tangible. From the bottle, water will be made gradually small portions, not falling on the above-ground part of the plants. And this is very important for many fruit and decorative green pets: tomatoes, cucumbers, zucchini ...
Filling the bottle with water you can safely leave for a week to the city, and the plants will not suffer from drought. More water before turning to the roots, it time to warm up.
Frame with glass or plastic bottles of flower beds and beds.

It looks carefully and carries practical benefits. If you broke the bottle into the ground, they will become an obstacle to spread the roots of perennial weeds. And if most of the package remains on top, then you can pour into the perimeter of the earth and flower bed or the garden gets slightly raised. It will be easier for her to care.
From plastic bottles are made durable wear-resistant sweaters. They have an attractive view due to bright colors.

Homemade for giving and gardening with their own hands make a special comfort in your personal green corner. They please the eye, serve in furniture or are assistants in the struggle for the harvest. And they also protect you from all kinds of adversity. After all, it is known that things made by their own hands have a special force.
Let your cottage be hospitable at any time of the year!
The summer cottage is the territory where it is possible to give itself freedom to carry out numerous experiments and torturing. This is manifested not only in the interior design, but mainly in the design of the garden or the garden. The inventive and ingenious hosts are not long been guided by expensive and standard methods for the arrangement of their sites, since there is a lot of alternative solutions in fact for all areas of activity.

There are several varieties of vertical beds that allow you to optimize the use of free space. Non-standard designs are an excellent opportunity to create an interesting garden design, garden, cottage plot.

This variety of beds in most cases is used to grow decorative plants or spicy herbs.
Materials for manufacture:

The length of the drainage tubes is regulated in accordance with the wishes of the landlord. However, it should not be made bulky beds, because they may complicate movement on the territory.
Creating a garden

Stage 1. Create a container. To do this, we take the drainage pipe, cut down along and put on two sides with special plugs.
Stage 2. We take prepared metal holders, put them on the resulting carcasters for the beds.
Stage 3. We do in the pipe hole. They are made in those places where metal fasteners will be.
Stage 4. Delighted through the cable holes made or durable rope.
Stage 5. Fix the cable / rope with fasteners.
Step 6. Fill out the seeds obtained by clay and soil.
Stage 7. Look at the garden beds.
Stage 8. Let the pipes to the selected place. Sometimes there is a special wooden crossbar for this, or rather the design in the form of the letter "P".
Stage 9. Alternatively, you can make a special design for pipes.

Important! The gardening from the drainage tubes is not distinguished by resistant to a strong impetuous wind, so it should be selected for it, which is not blown away from four sides by the winds. Otherwise, the frame quickly collapses, with all your efforts.


The garden, made of a plastic bag, is another modification of vertical beds. It is extremely compact, functional and interesting outwardly. You can make such a bed in a couple of hours.

Materials for manufacture:
- durable polyethylene film;
- sewing machine;
- priming;
- seedling.
In order for the garden to turn out to be strong, it is recommended to pay special attention to the thickness of the polyethylene film, which in this case will act as "frame" design. The minimum film thickness is 0, 2 millimeters.
The process of creating a polyethylene bed

Step 1 . Cutting 2 rectangular segments of the film, the size of which corresponds to the size of the generated bed. For each side, you should leave the allowance equal to one and a half centimeters. The recommended bed diameter is twenty centimeters.
Step 2. We cross the rectangles among themselves, leaving unconceded only the top of the bag.
Step 3. Send a handle to the future bed, the strength of which will allow to withstand the weight of the bag filled with soil. It should also be considered that when watering the weight will increase.
Step 4. Fill the bag of fertilous land.
Step 5. Make horizontal cuts on a bag in twenty centimeters. They are needed in order to plant seedlings in bed.
Step 6. Space seedlings.
Step 7. Regularly water the soil and add the necessary fertilizers.
With these simple actions, you can get cheap and useful beds.


An integral element of each country area is a compost pile. This is a place where all sorts of biochemical reactions occur, providing fertilizer creation.
To create fertilizers that will satisfy all requirements for them, you should thoroughly consider several key steps: creating a container and directly correctly manufacturing the most compost. We will tell about each of them.

Stage 1. We take eight reference columns of the same length.
Stage 2. Processing the bottom of the wooden columns by motor oil or tar.
Stage 3. Drop the columns to the ground so that they are reliable and stable. If the compost box is located next to the fence, then 4 columns (that is, one side) you can attach to the fence. This will avoid the need to dig 4 yams.

Stage 4. Between each two neighboring columns you feed the crossbars in such a way that in the end it turned out three independent sections. Be sure to leave the slots that will perform the functions for ventilation holes.

Stage 5. In two sections, horizontally nail the boards up to half the pillars height. In these places it is assumed to create two small doors.

Stage 6. The remaining section will be a large door, so you should navigate only one board. It should be located at the very bottom in a horizontal position, that is, as ordinary crossbar.
Step 7. Install the covers. To do this, you can use one large one-piece board.
Stage 8. Install the workpieces prepared in advance.
Stage 9. We provide doors with handles and leaks.
Stage 10. We process wood using special impregnations.
Stage 11. Color the box in any color that matches preferences.

Many gardeners mistakenly believe that any components can be hung in a compost bunch. In reality, "ingredients" should be carefully chosen to create the right biotrement.
Among the required components of the compost heap, the following components:
- peat;
- ash;
- needles;
- tree branches;
- leaves;
- hay or grass;
- wood ash;
- roots of plants;
- raw vegetables and fruits, etc.
All items in randomly mixed in a heap. To accelerate chemical reactions, it is recommended to cover a bunch of tarpaulos (this is especially true in the absence of a box).

A trip to the cottage with the family suggests the presence of entertainment elements on the site that will delight children. The most common way to take young dachensons are swing.
To build a swing on your own - the task is not easy, but quite perfect. Of course, you can always take a stick, tie it with a rope and hang the design on a tree, but it is difficult to call full swings. Real craftsmen prefer to build comfortable designs with a comfortable seat for seating.

Constructive components:
- two logs;
- durable rope.
Indicators:
- log diameter - 85 mm;
- length logs - 700 mm;
- distance between ropes - 500 mm.
Creating a swing
Stage 1. Extend the ropes between the logs.
Stage 2. Watch the ropes each log.
Stage 3. We release the rope out.
Stage 4. Tighten the ropes on 3 nodes.
Stage 5. Fix the swing on the tree.
Important: Such swings are calculated only per person.
Garden Material Garden
There are several types of garden tracks that can easily be done with their own hands.

Step 1. Remove the sidewall from the tire using a knife or saw.

Step 2. Cut the tires.
Step 3. Will withdraw the space with corrugated stripes.
Step 4. Color the paint path.
Step 5. Sprinkle a stone crumb.
This is an economical option for those who do not want to break their heads and spend time on a full-fledged garden path. The tire track is usually used for gardens, as it is easily fit into the ground.

Stage 1. Drag the plugs in different colors.
Stage 2. Dump a small trench.
Stage 3. Drive support to strengthen the future track.
Stage 4. Construct formwork using boards.
Stage 5. Install the struts on the edges of the trench.
Stage 6. We put in the ridge of the trench crushed stone and carefully tamper.
Stage 7. We make a solution from sand, cement, glue and water.
Stage 8. Pour the solution into the trench.
Stage 9. Press the traffic jams in an arbitrary order. It is interesting to watch even colorful stripes.

These are the most simple and rapid ways to make a garden track, not acquiring expensive materials.
Tools do it yourself
The expression "in the farm will use everything" turns out to be more relevant when it comes to canices. From this plastic container, you can make a large number of indispensable tools that are actively used in the process of dacha.


For the manufacture of this tool, we need only a sharp knife and directly container.
Stage 1. Cut the bottom of the canister.
Stage 2. We note on the container the cut line for the scoop so that the knob from the canister is a handle of the future tool.
Stage 3. Cut off the extra material.
Due to these simple actions, we get a great scoop with a comfortable handle.

Materials:

Manufacture
Stage 1. Carefully my canister so that there is no smell in it.
Stage 2. Cut the vertically to the canister into two parts.
Stage 3. On the table, we make a groove using a woodworking machine.
Stage 4. We apply glue to the Faneur and insert the canister into the lower part.
Stage 5. Color the resulting shelf with a canister.
Of course, such a design will not withstand greater weight, but it is quite good to store small parts.

Materials:
- 40 kanisters;
- scissors;
- rope;
- paper;
- marker.
Stage 1. I pierce the top of the canister.
Stage 2. We make stencils from paper.
Stage 3. Apply it to the canister, we supply the marker.
Stage 4. Cut large holes with scissors.
Stage 5. We fold the prepared canisters into several rows, taking each row by waying the rope under the tank handle.
Stage 6. We reinstall all the rows around the perimeter for greater strength.
Stage 7. If the cabinet is planned to lean to the wall, then weiss it to the surface.
Stage 8. We put heavy items in the lower row - stones or bricks.
The result is quite a spacious and functional rack that will help get rid of the question of storing many small details.

Be destroyed and bold in the incarnation of your ideas. Good luck!
Video - homemade for giving with their own hands
Video - do ourselves for giving
Just imagine an incredible, exquisite smell of spicy herbs in your kitchen! Always fresh and fragrant greens will not only become a useful ingredient and decoration of your dishes, but also a real designer solution for your kitchen.
 Installation of flooring in the bath is one of the most important and most responsible stages when erecting a bathroom. After all, nothing is nice to jump on the raw and cool floor with a preheated shelf. In addition, the sauna with a cold base warms up much longer. To avoid all these unpleasant phenomena, laying outdoor coating should be carried out with the various nuances, and this procedure should be treated as responsibly and seriously.

It is difficult to find a man who would not have dreamed of having your garage - an inventory for the soul and the place of collecting the same home mechanics as he. Of course, some beautiful sex representatives love to "dig" in the garage or bring orders there. It is for these purposes that many owners dream to buy racks for the garage.

Nowadays, interest in household sites has increased significantly and this is not unreasonable. After all, grow a crop on its plot - this is the guarantee of confidence that the product is clean and will not bring harm to health.

As often in the gardens and at the cottages, old furniture lives, moved from apartments for the city. Not a country house, but some furniture nursing home. Of course, it is a pity sometimes parting with a bubbic sofolic sofa, a scribbling table, ancient chairs.

Potatoes firmly strengthened in our diet. Without it, it is difficult to imagine the welding borsch, or soup. A, Favorite since childhood - Potato mashed potatoes with a mell? Even when watching an interesting film in the theater, the hand itself stretches into the package with crispy chips.
 One of the leading places in Siberian Gardening belongs to the Altai Territory. Recently, many gardens and berries have laid. However, despite the relatively rapid growth of space, gardening products in the region are still not enough, and its quality is often low.

The favorite thing of many dachnikov is to reflect the territory of its site. Many people think about how to decorate the gazebo in the country of their own hands, turning it into a fragrant flower garden or in a fabulous palace. We bring to your attention the most common options for how to decorate the gazebo in the country of their own hands.
It is no secret that today there are almost any products for the garden plot stand in stores netplash. So, for example, to acquire various accessories will cost what is called - "in a penny". And if you make them "from scratch", then you will spend no less, because the starting materials still have to buy.
So why not save and do not organize homemade for the garden with your own hands from what is usually at hand, or is it inexpensive? Especially since everything can be done truly beautiful and neatly. And in addition, it is also functionally.
In this article, we will look at the most useful homemakes with their own hands for giving and garden, which are characterized by simplicity and originality.
Beautiful "utility" for garden and garden
It is worth noting one important point - you need to understand that only a small part of the list of crafts will be dismantled, which can be done. Just these options are like start, "push" for fantasy.
After all, it is important to understand the principle of how easy it is to organize everything, and then it all depends only on your imagination. And let's start a review.
Pond from the old bath

If you have a small reservoir of this type on the site, it will perform several functions at the same time - you will get acquainted with them in the table below.
Agree, the challenge is worth it to implement it. It is more for this that you need only an old bath, which in most cases on the plot is available.
Pond is done on such a scheme:
- Digging with your own hands in the right place to the pitwhich in its parameters should be a little more bath size.

Tip: To choose the choice as much as possible.
The pond is undesirable to arrange too close to the dining table, for example.
The fact is that various midges, bees, etc. can periodically fly to water.
And the insects will be dishoned during lunch, it's not very pleasant as you understand.
- Put a few boards on the bottom of the pit - There will be a bath on them.
- Insert the bath in the pit and equal it. We close its drain hole with a plug. In this case, the outer edges of the plug preferably to treat silicone so that there are no water leakage from the container in the future.

- I fall asleep the earth all the free space between the metal and the soil.
Well, then it remains only to re-establish the design. To do this, you can decompose beautiful stones around the perimeter or, for example, to plant flowers. In addition, you can create edging from boards or any wooden sheets, panels that are more or less resistant to moisture.

As for the filling of the capacity, then for this you can use both water from the central water pipeline and natural streams. For example, to the bath you can bring the edge of the gutter of the hydroelectric system at home and the pond will be filled with rainwater.
In principle, similar homemade for garden for the garden can be corrected a little - to use any tank, barrel, etc. instead of the bath.
Now let's look at another very comfortable craft.
Pallet bench
Surely at some point you will want to sit in the garden - near the artificial pond, for example. And here you will need such a useful design as a shop.
Acquire a new product - expensive. It is much easier to make a bench out of the pallet - if there is no available, then, as a rule, a considerable amount is emitted near the large warehouses and industries.
A bench is done quickly.
- Make a transverse incision on one of the sides of the pallet to the left of the strengthening bars.

- On the other side, make exactly the same operation, only on the other side of the bars.

- We divide the product into two parts.

- Insert blocks of bars between the boards, as shown in the figure below. We get a back and seat.

- We fasten wood with self-draws in all connecting points.

- The remaining wooden elements put under the seat and with their help adjust the height.

As you can see, everything is quite simple. Now you can paint the bench and mount other homemade for the garden and giving.
Now consider a very functional, original and cheap craft.
Hanger - the element is very necessary. After all, you can hang not only clothes, but also a considerable part of various gardening inventory.
Of course, the "primitive" version of this design is ordinary nails or self-tapping screws. However, it looks quite inexperienced, and in addition, nails have a property to gradually be covered inside those holes in which they are clogged.
And loosening means that such "hooks" will periodically fall to the ground. We offer a more original and reliable solution - make a hanger from old rake.

It will take only metal parts, without a wooden handle. Even if there is no such element in the presence in the sheds, then buy it in the nearest market is not a problem. The price of rake is acceptable for everyone.
The hanger is mounted:
- We bind the wire to the two edges of the line on which the teeth are fixed. In this case, a piece of wire should be one. That is, it turns out that fasteners, in fact, reminds how paintings or mirrors hang on the rope.
- In the wall or at any desired place we drive a big nail and hang rake on it.
The hanger is ready - we can hang on the teeth of the robble, anywhere: blades, caps, etc.
Now let's apply the old shoes, which is usually very much in the country.
Flower pots from shoes
The ideal option is the presence of rubber boots, but in principle, the usual leather shoes will fit.

From such shoes you can make non-standard floral pots, which perfectly fit into the style of almost any garden.
The scheme of work here is this:
- You feed the nails or screw the boots to the fence or any other suitable plane.
- I fall asleep into each Earth's boot.
- We do several holes in the soles - they are needed to exit an excess amount of water.
- Squeeze flowers in pots and enjoy the appearance of the invention.

Note!
Any garden homemakes can be "improved" to infinity.
The main thing in this business is to properly organize a "basic" thought, an idea.
And the invention can be decorated with anything and as a soul wishes - there are no restrictions.
Remember this is a simple rule when planning "utility" for your garden or garden.
On this we will finish our review of useful and original crafts for the garden site and summarize the article.
Output
As you can see, the homemade of the gardener is pretty good, and they can be done from almost anything. We hope that this article will be the catalyst of your ideas, and you can beautifully decorate your site. Well, if you want more information on this topic, we advise you to see the video in this article.
