Warm extension to a wooden house with their own hands. How to make an extension to a brick house: Nuances of wall docking
Insufficient area is a strict phenomenon in private houses. Therefore, the construction of the building has to make changes. One way is a skeleton extension to the house.
When erecting an additional room, it all depends on its purpose. After all, various requirements are presented to the veranda, kitchen, bathroom and additional residential premises. For example, attachment of another room in difficulty can be compared with the construction of a small house. Increased requirements for thermal insulation of walls, foundation, ceiling and floor are imposed.
With an extension of the summer veranda will be easier. This is a light unheated building, for the construction of which does not require a powerful foundation. By and large, the construction of the terrace is reduced to flooring, the construction of the roof and walls. However, sometimes house owners prefer a veranda in the form of a glazed gallery. The main thing is that the extension does not get out of the overall style of the house.
Requirements for the construction of an extension depend on its purpose
The complexity arises with a bathroom and kitchen, especially when the water supply to the house is already listed and will need to put additional highways in new rooms. There may be problems with the heating system. Take care of communications before the establishment of the foundation, this will save time and money in the future. In the extreme case, refer (equip) the output points of heating and water pipes.
In independence, what premises are you going to add to the house, the construction is reduced to the standard steps:
- Design;
- Fill / Foundation arrangement;
- Construction of a wall frame and its skin;
- Installation of the roof.
It turns out that the attachment of the extra room to the house does not differ from the construction of any other building. And the reliability of the whole structure will depend on the quality of the foundation. The statement is true for each building.
The frame extension, which is addicted to a wooden house, as a rule, differs in a slight weight, therefore, it makes no sense to pour a monolithic base in a couple of meters deep. For a delivisable veranda of wood or glass, there will be a fairly columnar foundation from bricks, stone or concrete.

For the construction of an additional room often use a belt foundation
The basis for the future building is selected based on its weight. The following types of foundations are used:
Ribbon. As a rule, it is used when the construction is distinguished by increased mass. Swipe the appropriate calculations at the design stage;
Foundation column. It is applied when an extension to the house of the frame does not differ in weight (veranda, bathroom, summer kitchen);
Pile and pile-painted foundation - a complex design of reinforced concrete products, which has a considerable margin of strength and the same price. During the construction of the attachment, it is rarely used.
For the construction of additional premises, tape and columnar bases are mainly used. But many prefer the foundation of a ribbon type, the arrangement of which is reduced to the following steps:
- 1. To the ground, in accordance with the project, we apply markup. She outlines the border of the attached room;
- 2. On the markup lines, dig a trench for the future foundation. Its depth should be the same as the founding of the house itself. Width by 15 cm more future walls;
- 3. We fall asleep into the trench crushed stone and the sand with a thickness of 15-20 cm. This pillow must be mixed, the onset and coat with a layer of rubberoid and similar waterproof materials. This will protect the foundation from groundwater;
- 4. We draw the formwork - its height is equal to the height of the future basis;
- 5. In the trenches to make the base, additional rigidity set the reinforcement;
- 6. Pour concrete. It can be made independently in proportions 1 part of cement, 3 sand and 6 rubble. But if the area has large volumes, you can order the required volume of the solution.

Trench rolls over the markup line
In hot weather, the foundation is advisable to water water. This will prevent the appearance of microcracks during the pouring of concrete. Strength The base will drop over a month, but the formwork can be removed after 14 days.
Wall frame - Required materials and stages of construction
As a rule, a tree is used to create a frame. Follow the timber (15 * 15 cm) and future lags for the floor (10 * 15 cm), the quantity depends on the size of your construction. In addition to wooden blanks, we will need insulation, vaporizolation and consumables. The latter includes anchor, self-tapping screws, bolts, sealants, fire-fighting solutions and antiseptics.
Work on the construction of walls begins with the bottom strapping. First put the beam along the wall of the building. Then, along the perimeter of the foundation, put the rest of the bars and freamed them to the base of the house using anchor bolts. Bruxia is interconnected with metal corners or brazers. In the strapping at a distance of 50 cm we make scubons or drove under the future vertical racks.
Supports are installed in the grooves prepared for them and secure with the help of screws, additionally, they are fixing with steel brackets and stops. After we finish with the installation of racks, proceed to the installation of the upper strapping. Its assembly is not fundamentally different from the bottom. But above the strapping it will be necessary to fasten the horizontal beam-timber to the wall, this is the future base under the solo system. Under it install racks based on the strapping. To the wall of the bar fix the anchors.
After completion of work with the upper strapping, we remove the drives that support the racks. In the frame "skeleton" of the extension add a frame of doors and windows. The basis of the future room is mounted with a house by vertical rack vertical. It is attracted to the building anchor bolts.
Let us give the design additional rigidity. For this we share it with the outer side of the plywood or boards. There are no harsh requirements, the choice of material remains for you. By and large, after the construction of the roof, flooring and windows setup, we will get a summer terrace. In winter rooms, we still have to work on insulation, but it is better to deal with the roof above your head.
The roof over the extension can be erected with single or double. However, the roof with two slopes is characterized by weight and some complexity in construction. Therefore, the roof with one slope for the additive room is considered a completely decent option.
The construction of the roof begins with rafters: put them on one end to the upper strapping, the second on the horizontal bar, fastened to the wall of the house. Fix using a bracket. Some complexity may occur with an angle of inclination. But as a rule, it is thought out while designing and reflected in the project documentation. Stropile legs are stacked so that they perform at least 30 cm wall. This will protect the material of the walls from the effects of precipitation.

The roof of the extension is better to cover the same material as the main
The roof of the extension will be stuck in the same material as the main house. But it will take it a doom, the frequency of which depends on the type of roofing. For a soft roof, the lamp should be practically solid. You can even use Phaneur and its analogues. But for slate, professional flooring or metal tile, the distance between the shells of the big role does not play. Sometimes, when the rafters are close to each other, they are completely without a crate.
Before laying the roofing material, the frame of the future roof is covered with a layer of waterproofing. Its type depends on the coating. As with the construction of an ordinary roof, laying the roof starting from the lower end of the rafted. We warm the roof by posting mineral wool, foam, etc., after which we sew their boards. At the final stage, with the help of boards, we create a ceiling and decorate it with finishing materials (drywall, GVL).
Insulation of the floor and walls of the attached room
Having finished with the construction of the roof, proceed to the internal work. They start with flooring. First of all, lay the ceiling beams - they fall on the foundation over the waterproofing layer. If you plan to use the room during the cold season, the floor must be insulated.
To do this, bottom to lags are sewn boards. It is better to use the shurtpers and self-drawing. As a result, we should get "baths" between lags, in which we will launch vaporizolation, and on top of it insulation.
The thermal insulator is the foam, mineral wool and their analogues. On top of them, we spread another layer of the heat insulator and close it with plywood or sexual board. The draft floor is ready, in the future it can be made with the help of special coatings.
For the insulation of the walls, the same materials are used in the same sequence:
- 1. To the outer walls of the wall with the help of a construction stapler, fastening vaporizolation;
- 2. We put between the racks of the framework of the insulation. If mineral wool mats (analogs) are used, we mix them relative to each other, overlapping the seams, we exclude possible thermal losses through the joints.
- 3. After laying the heat insulator on top of it stretch (sew the stapler) vaporizolation;
- 4. Internal walls are sewn chipboard, plywood, plasterboard. The excellent option is the lining, it itself is a decorative material that does not need extra finish.
Complete the construction of the frame extension of the installation of windows and doors. But the room is still not suitable for operation - ahead of the interior decoration and summing up communications.
Today we do not have an ordinary homemade, but a very complex project: we will tell you how with the help of direct hands you can make an extension to the house yourself!
First of all, construction begins with the plan of the room. Having calculated the required area, I put the markup on the ground with a size of 3 m per 5 m and dug a trench for a tape foundation with a depth of 50 cm and 40 cm wide. Then she put a bundle from the reinforcement rods and the brackets welded to the rods. Next, the article will be a description and photos for what I made these brackets. The process of manual kneading concrete of the Sovkov shovel and his fill does not want to remember and remember)) Only I will say: it would be better if I called a mixer with a ready-made concrete and flooded))). Having placed a formwork from the boards, I brought the foundation for 20 cm above the ground level and leveled in terms of the level. The M-400 brand cement mixed with sand screening in proportions 1 to 3. The result of the strength turned out to be impressive. 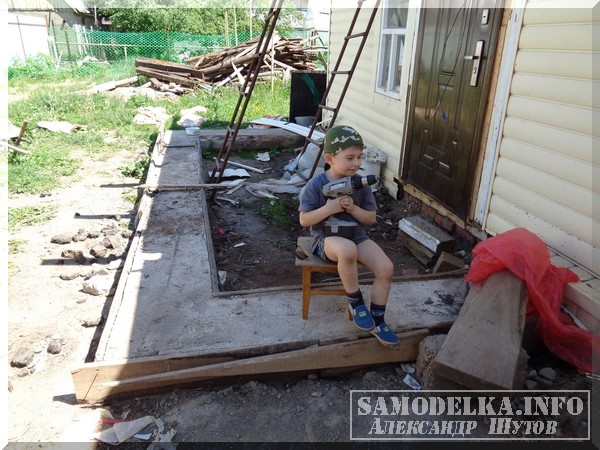 After pouring the concrete, it began to fill the podium from concrete to install a 1m gas boiler for 1m by paving it in two places with a grid and exposing a formwork.
Bay brackets sticking out of the foundation concrete, I got pillows for laying on them for floors (lag). I needed a bracket to avoid falling for pillows to the ground and as a consequence - skewing floors. I placed them in accordance with the installation guidelines. That is, at a certain distance from each other and strictly in terms of level. 
 On this foundation work was finished. Next proceeded to the construction of the walls. First of all, it made waterproofing the material of the walls from the foundation spreading the runner throughout the area. After all, concrete spends moisture very well and if not to make moisture insulation, mold may appear on the walls, the walls themselves can crack.
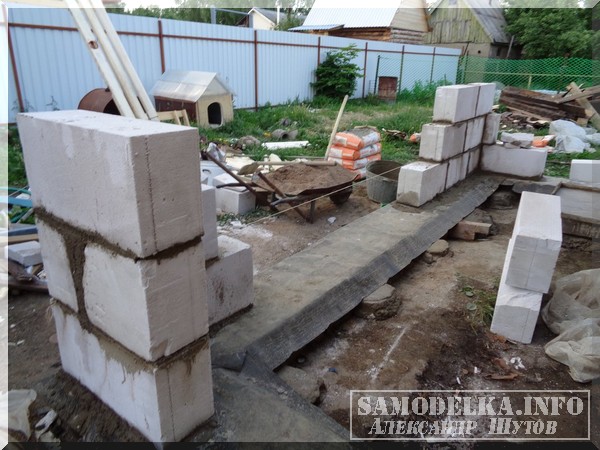
  The next my step was the markup for the wall itself. The distances of the parties from the wall to the opposite wall did not differ and the diagonals of the corners were the same. Significantly corners, started laying foam blocks with a size of 20x40x60 cm.
 The plans were the outside of the walls of the walls by siding, so the block was put up with a light rail and a corner of Siding so that after decoration siding an extension did not "dance" from siding at home. A mixture of cement and sand used in a proportion of 1 to 3. Special mixes and glue were used among themselves. Before laying on the solution, the blocks were wetted. It makes it great easier for the masonry process. Rubber hammer blocks sat down in place.
 Any masonry is erected from the corners, so I did not exception and entered accuracy with recommendations adjusted for doorways. To obtain the blocks of less length, an old knife was used) she coped perfectly with his work. But there are special saws a.

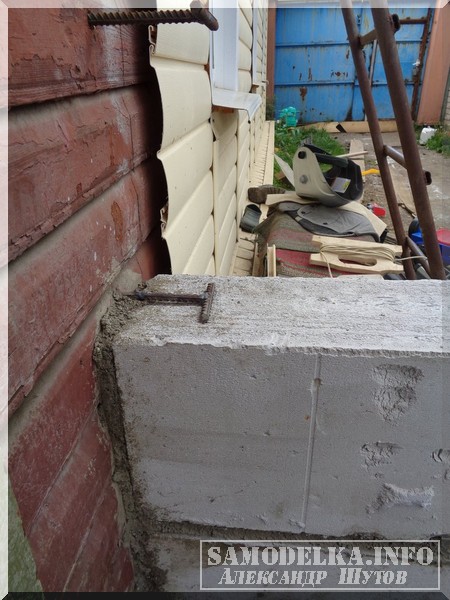
 For a ligament of walls with the main house, T-shaped staples made of fittings and drumped the wall rode them with the calculation of the sink between the blocks.
 Built walls taking into account window and door openings using a construction level of a meter long and a plumb. Those. The blocks laid strictly vertically and horizontally. This is especially important for door and window openings. The seam thick can be adjusted to the height of the blocks relative to each other.

 When the height of the walls reached the desired level, from a metal corner of 5 cm in size for 10 cm, P-shaped channels for laying blocks above door and window openings were made. The length of each was the sum of the length of the opening and plus 40 or 60 cm for laying on the wall. To do this, put on the block corner with a long side to each other and welded them with each other using a welding machine and fittings for obtaining a gap between them. The clearance is needed to screw the screws into the blocks during the installation of doors and windows.


 Next, just put the channels on the blocks and screwed them with self-draws for full fixation. It would be possible to turn them differently and put the blocks from the top, but I was in the bottom in them put the board for fastening the window frames and doors.

 By laying foam blocks on top of the chambers, I walked the bar 100x150 cm. And laid it up on top. Self-storms for 200 mm screwed to foam blocks and brought the timing with reinforced corners. It is necessary for ceiling beams and a rafting system.


 Printing to the wall of the house of the bar 50x75 mm. I got a support for ceiling beams. Important!!! For each roof, the thickness of the beams and rafters for the roof, as well as the distance between them is calculated individually. Beams 50x75 mm. She screwed to bruster with corners.

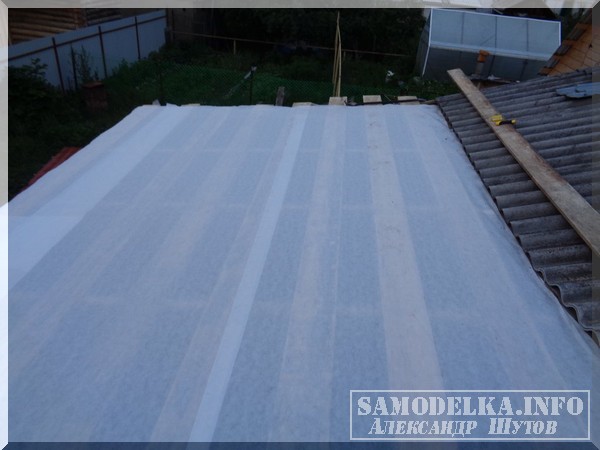
 Since the height of the annex was the same with the level of the house, I had to remove part of the slate after mounting the beams to get a roof slope over an extension. After that, rafters were collected. For mounting rafters, nails were used by 250 mm.
 She put on the rafters a crate of 25 mm boards by 150 mm, put on the rafters to the heat pumping and began laying the metal tile.
 Metal tile was purchased from almost the factory and had the length I needed. She did not even have to cut either customize to each other in length. Having plays on the roof and slipping them under the old slate, I lined them relative to each other and walls. After attachment, cut off the extra pieces of the crate.
 Put lagows on the pillows, laying the floors from the board with a thickness of 40 mm.
 Next, the doors were installed and
Filimonov Evgeny
Reading time: 8 minutes
A.
Frame extension to the house
How to create a frame extension to the house, reliance of the foundation, walls, floor and roof. Stage of work, insulation tips. Types of extension.
Over time, living space gets used to and want to expand it, for this case it will take a frame extension to the house, which will be an excellent solution. So that all underwater stones did not bring problems in detail in detail, for which an extension is intended. How to choose the right to choose the basis, the features of the creation of a ribbon and columnar foundation. What to choose a tree or concrete for the floor, as the wall and framework occurs. How the reliable overlap and roof occurs. What is the literacy of the insulation of the floor and walls.
What is the technological feature of an extension, which exist ways to install the frame extension to the wooden floor. The stage of the construction of a frame house with their own hands. How to create a construction project, as an additional living room, kitchen or bath, features of mounting veranda are erected.
How to make a selection of a frame extension to a wooden house, fastening to a wooden structure, the importance of finishing. What materials and tools are used, as planned by the site, how to choose a floor material: concrete or tree.
When, for various reasons, it is necessary to expand the housing of the private house, then the most economical and simple in the technological plan is a frame extension. Its advantage is the speed of erection with their own hands with minimal skill working with a carpense tool. Step-by-step instructions of construction stages will help make a useful and beautiful extension that will serve many years.
To the annex subsequently did not have to transform, even at the planning stage should be considered the nuances of the structure.
First, decide on the target appointment of a new room.
- Additional room. The construction of an extra room is equivalent to building a small area at home. All designs of the new structure are required to be thoroughly insulated, otherwise the heating of such a room will be ineffective due to the great heat loss. Do not save on waterproofing and insulation of the foundation other than the dampness and mold on the walls will make it impossible to accommodate in such a room.
- Kitchen or bathroom. Take care of bringing engineering communications before starting the construction of the foundation. Places of passage of water supply or sewer pipes through the foundation you need to warm well. It is easier and cheaper to do at the construction stage.
- Veranda It is a lung extension to the house of an open or glazed type. Used for summer holidays. The structure does not heal, so the design is extremely simple: flooring, walls and roofs on supports. Do not forget about harmony, the veranda must be combined with the house on the scale, style and construction materials.
We select the foundation
The veranda can be attached or built-in. If the second plan on the construction stage of the house, then it will be necessary to build a separate foundation for the first. With a clearance of a wall of about 40 mm. Otherwise, when shrinking, the monolithic base will be collapsed due to a different weight of the veranda and at home. Given the seismicity of the soil and the weight of the future building. The lightweight foundation, built on the ground prone to the bent, will "behave", and the extension will move away from home. Such a base is designed for light walls, shrinkage is inevitable under the weight of brickwork.
Different materials are used for construction: concrete, brick, stone, piles of wood, metal or concrete.
It is important to choose the right depth and type of foundation under the extension:
- tape;
- slab;
- columnar;
- pile;
- wall-and-wood.
In private construction, in the construction of the base under the veranda, the columnar or tape construction is most often used. Consider in more detail the step-by-step instructions for arranging foundations.
Ribbon foundation
For large and heavy buildings, the ribbon type of base is chosen. It is advisable to perform it from concrete in such a sequence.
- With the help of a beep and pegs make marking on which the trench will be dug.
- The soil is chosen to the depth of the sole of the foundation of the house. The sand is poured onto the bottom, they are tamped. From above laid a layer of rubble, which is also sealing with a manual tamper.
- Prepare formwork equal to the height of the future base. It is placed inside the perimeter waterproofing and a welded fittings are installed on the rubble layer.
- Concrete solution in proportions 1: 3: 6 (cement, sand, crushed stone).
- Pour the finished mixture on 1/3 part of the formwork. After the frozen fill the remaining height. The solution is sealing the vibrator to remove air bubbles. Or tapping a hammer along the walls of the formwork.
- The upper part is aligned by level. Clean the film. While the solution gains strength, periodically wet the surface to prevent the occurrence of cracks.
Opinion expert
Filimonov Evgeny
Ask a question expertImportant. Before the construction of walls on the foundation, it is necessary to apply waterproofing. Use rolled materials or mastic.
Foundation columnal
For a light frame veranda, it is appropriate for the construction of a columnar base, which is erected from bricks, boob stone or concrete. Or combine these materials. Pits under the poles dig into the depth below the soil freezing. The step between the columns is about 60 cm.
Sequence of work:
- square pits are digging 50 x 50 cm. Sand poured onto the bottom and thoroughly tamper;
- put a layer of concrete solution, and after complete grapplation proceed to the construction of brick supports. Enjoy the level so that the laying was strictly vertical;
- concrete support is manufactured similarly to the basement type of foundation: wrapping the inner part of the formwork with waterproofing and the reinforced frame is inserted. The form is filled with concrete, and the top is aligned by level. Wet concrete a couple of times a day to avoid cracking;
- after complete drying, the formwork is removed, waterproofing is applied to the pillar, they are covered with several layers of rubberoid - the material will protect the wooden floor rear from wet;
- the remaining empties are filled with backflow: soil mixed with rubble, its tamper is carried out every 15 cm layer.
Gender: Tree or concrete
A concrete or wooden floor is arranged on the tape type of foundation. The base on the pillars is obviously calculated for the arrangement of the wooden floor.
Consider both technologies:
- Concrete. Inside the foundation, the ground is chosen to a depth of 35 cm. Clamping a sandy pillow, well tumped. Next, you can fall asleep with rubble, but to insulate the screed use clamzit. Just 20 cm layer. From above stacked the reinforcement grid. With the help of the level, the lighthouses are exhibited, for which the cement screed is filled. Top stacked tiles or wooden flooring.
- Wooden floor shut down on overlapping beamswhich are laid on the base over waterproofing. The beam with the foundation is associated with through fasteners, anchors or self-drawing. In the corners are connected by direct lock and additionally fixed the corners. Next, the lags are mounted, the insulation is placed and the floor covering is laid.
Construction of frame and wall
Wall structures are brought from a bar, attacking the strapping previously collected by the coronary beams. The elements of the walls are collected on a flat platform in a horizontal position, and then the finished wall shield is mounted in a vertical position or each bar is connected to the beam sequentially.
Step-by-step instruction:
- On the lower bars of the strapping every 50 cm make cutting for vertical racks.
- Mount the rack by fixing the corners and screws.
- Collect the top strapping.
- The veranda matches the house, attaching a vertical timber to the wall.
- All racks adjacent to the house, fix the anchor bolts.
- The ready-made "skeleton" of the verandas is better to immediately decide on the outside plywood, boards or OSB. It will give the design of rigidity.
- After the construction and insulation of the roof, insert windows and doors.
Overlap and roofing
A single roof type is combined with almost any roof of the house, therefore is the most common configuration. His and consider it.
- Slinged with one end is covered under the row of the roof of the house, and the other veranda on the wall. Fixed with metal corners. The main thing is to choose the angle of the slope.
- Stropile legs should be abroad for the wall at least 30 cm. Such a roof will protect the walls of the veranda from atmospheric precipitation.
- The question coated roof is solved in advance. Typically choose the material to cover the house. Under the soft roof on the rafted, the solid material is placed: Faneru, OSB sheets or frequent doom. Slate or metal tile laid on rafters, if the lags are installed with a small step.
- The design is covered with waterproofing, which is selected individually to the coating material.
- Styling the roof starts from the bottom of the rafter.
- For insulation, mineral wool is used, which is placed between rafyles. Sewing the ceiling by boards or panels and decorate.
Wall insulation
Mineral wool uses as insulation material for walls. The mats are easily and quickly stacked between a frame bar, as can be seen in the photo. When laying insulation in several layers, the mats shift relative to each other to eliminate heat loss through the docking seams.
Opinion expert
Filimonov Evgeny
Professional builder. 20 years of experience
Ask a question expertThe insulation from two sides is closed with steam and wind insulation material, which will protect the material from the accumulation of moisture, and on top are trimmed with finishing material.
The inner walls can be sewed chipboard, plasterboard and covered with wallpaper or lining with lining. For the outer wall use wood, siding or materials that match the finish of the house.
Wall cake in the direction to the outer wall looks like this:
- inner cladding;
- vaporizoation;
- insulation material;
- wind insulation;
- exterior cladding.
The floor on wooden lags are insulated similarly to the walls: mineral wool is placed on the draft floor between lags, pre-covering the boards of waterproofing membrane. On top of the insulation, the second layer of waterproofing is laid, and then aligned with plywood. After that, they mount the piston floor covering.
Concrete floor can be insulated similarly to a wooden, apply a dry tie, make a concrete tie and equip water or electric heating.
Homemade masters often overlook the need to comply with safety requirements. Use the means of individual protection and well-established reliable tool and then from the construction of an extension you will remain only the most warm memories.
Often, when drafting the project of the house, developers are so enjoyed by architectural aesthetics, which is overlooked another important point - the practicality of its operation. Therefore, unaccounted construction nuances in many cases have to be adjusted after the construction of the house.
The lack of useful areas belongs to the same problem, which can be eliminated by the construction of an additional construction adjacent to the wooden house.
Preparation for construction work
Of course, as in any other case, directly construction work is preceded by preparatory activities, during which all the nuances of the upcoming work are considered. As for the construction of the construction adjacent to the wooden house, here are important factors that determine the entire construction process are the following:
- it is necessary to determine the choice of location of the construction and prepare its project;
- select material for construction;
- make a estimate;
- pick up the form of the foundation and methods of its connection with the main one;
- think out ways of messages to build with the main building and placement of communications.

When choosing a foundation, ideally, preference is given to the form that was laid during the construction of the main building. But the guarantee of the durability of the construction will be the construction of a monolithic and belt foundation. For light designs, the column version is suitable, but this is only if there is a solid soil in the construction site, which is not so often occurred. In the presence of groundwater, suitable close to the surface, and the sandy soil is optimal, monolithic and tape foundations will become.
An important component of construction work is the moment of connecting two foundations. In most cases, the process is carried out by clogging into the old design of pipes and reinforcement and their subsequent installation into a new one. Thus, simultaneous shrinkage of the house and an extension is achieved, as well as a reliable installation of a new building associated with the house.
An important moment before the construction is and determining the place of connection of the new extension with the main house. Optimally simple option can be the creation of a doorway at the location of the main building window.
It often happens that the construction of a private house was carried out without the construction of economic supplies, but then the need for them arose. Modern projects of houses often assume only the utilitarian function of the house - there will live there. And what, that a person will still lead any economic activity - no. In addition, sometimes an urgent need to increase and a living area of \u200b\u200bthe house occurs. An extension of foam blocks, brick extension, wooden - the creation of these structures will help solve this issue once and for all.
Types of attack
The type of buildings determine depending on what it should be in it. It can be room, toilet, garage, kitchen and anything. By the way, in the middle lane of Russia, it is often possible to meet a building in the form of a greenhouse in which fruits and vegetables can be grown even in winter.

 Diagram of the device garage-extension
 Indeed, in this case, all the necessary engineering communications can be left out of the house. Of course, the construction of the structure must necessarily be coordinated, even if we are talking about wooden terraces or simply adds to the veranda to the house.
Creating a project and selection of location of an extension
Projects and construction of such structures suggest the following steps:

As for the choice of materials, it is better to be guided here to follow the following rule: it is necessary to create projects and produce the construction of an extension from such materials from which the house itself is.
 Device frame house in context
 For example, if you need to attach the terraces to a wooden house, then it is better to be wooden. Of course, this rule is not always possible to follow.
Suppose a person wants to breed chicks, he needs high-quality, unproduced, warm an extension of the brick. In this case, this option should be preferred, despite the fact that the house is wooden.

 Options for the location of the attachment to the standard wooden house
 Calculation of estimates
Actually, the estimate itself is not so difficult, it must be taken into account as follows:

 An example of a veranda restricted to the wooden house
An estimate for construction should be made immediately after projects will be prepared, regardless of whether the terraces will be attached or simply wooden shopping blocks. This will avoid unpleasant surprises in the future.
Construction of the foundation and compound of foundation

 In Russia, quite often to wooden houses attach the baths
 Even the construction of an ordinary terrace to a wooden house involves the creation of a new foundation under it. An option with the elongation of an old foundation disappears at once: it is impossible to do this, but to connect both foundations into a single whole then - this is not only possible, but also necessary.
For example, even under the wooden terraces will need to do exactly such a foundation as the main house. So, first you need to decide on the type of foundation itself.
 General scheme of a frame of the frame of the frame house
 Actually, there are 3 options for foundations that can be used as a base for an extension:
- Monolithic;
- Columnar;
- Ribbon.
A columnar foundation is used in Russia extremely rare, as it can only be installed on very hard soils such as mountain.
It can be applied, for example, to build a gazebo, however, such buildings are usually not attached to the house, but put next to it. By the way, for the arbor, instead of the foundation, you can take old tires - this will be quite enough.
 Focosle blocks masonry scheme
 The monolithic foundation will be the most durable, however, its installation is not always appropriate.
Monolithic - the most solid foundation, as they say, "on the century". However, the cost of its construction, as it is easy to guess, will turn into a round sum, and labor costs will be quite and very impressive. In general, it is better to choose a classic ribbon foundation that is perfect for any extension to a wooden house.
Placing communications

 Example of an extension of a garage to a wooden house
 As noted above, it is easier to place any communications in an extension easier, because the room will be adjusted directly to the house itself. What does it say?
For example, it is enough just to lengthen the existing water supply, sewer or heating system - all, no butt and exhaust welding work. It also applies to the laying of electrical wiring, which can be carried out with the help of a perforator, probably even the most negligible worker.
Another thing, if we are talking about really complex engineering systems. Suppose it is necessary to carry out a branch from the main gas pipeline. First, no one will give it on your own.
 Device attached to the house veranda
 Secondly, it will require, speaking without exaggeration, colossal cash spending. So, it's worth thinking. For example, in Kuban, you can often find an extension kitchen to wooden houses.
And even if the gas is held in the house itself, the gas cylinder or the same electric stove will still be in the extension (the oven is also the common option). Such nuances must be considered.
Message with other rooms
The question of how to make an extension to the house, even if we are talking about such a form of work, as an extension of the veranda or another extension from the bar, should assume and solve the problem with the message between the attached construction and the rest of the house.
This problem has 2 solution options:

 Covered terrace - great extension option
 - An extension to the house from a bar can have a message with a house with the help of a doorway made in the main wall of the house;
- The entrance can be carried out by the street (an extension to the house from the bar makes it easy to carry out both options, but there is no other material from the tree).
In the first case, the solution will be convenient, because, in fact, the living area increases the entire house. But there is one extremely important nuance: the process of coordination in this case can stretch for many months, because it is necessary to make changes to a lot of documents.
Yes, and the carrier wall of the house may seriously suffer. If the owner of the house is ready for such developments of events, then it is, of course, it is better to prefer this particular option, and not any other.
Perform a cutting of a loose in the bearing wall with marginal caution!
If the cash is not enough and the desire to pass the bureaucratic circles of hell is no, then the option with the entrance from the court will be not so bad. Moreover, in terms of cost it will be much cheaper.
Video
You can watch the video on how to make a frame extension to a wooden house.