How to build a rural house of your dreams? Start. Shepelev A.M.
In this book, known since the Soviet times Master Shepelev A.M., tells in an opportunity for an ordinary reader about the construction of wooden houses and all that is needed to stay in his own home. It is enough to look into the main sections of the site:
to understand - without this book you can not do if you are the owner of a private house and a household plot or are going to be such.
The author is divided by secrets with his readers who you will not find in any modern literature, because he worked and wrote in Soviet times, when there was no need to monetize his knowledge and the master was simply shared by what he knew what he had learned for his Long life, practical skills and experience.
After reading the materials of this book, yes, just Poland, you want to do something to try to do something. Try, do not be afraid that you will not work. After all, as the People's saying says: "The one who does nothing ..." is not mistaken. Even if at the end of the work, your first experience you will understand that they made some errors, then you have the opportunity to correct them, because only a sapper "is mistaken." But acquire invaluable practical experience. And even if the next time we invite a professional for some kind of work, you will already be something to understand in construction work and you will already look at them at a different angle and with another approach to evaluate the quality of work performed.
If you do not dismiss on some work, but you can prefer to trust it with masters, the theoretical knowledge that you will emphasize in this book will have an invaluable service. And although you will not set one step with professionals, then you will control the quality of the work performed you will be incommensurable easier.
Current page: 1 (Total of the book 32 pages)
A. M. Shepelev
How to build a rural house
In our country, much attention is paid to an increase in housing construction on a village, which is mainly conducted by industrial methods, according to standard projects. However, individual construction is currently developing. The state provides a loan for these purposes and in accordance with the main areas of economic and social development of the USSR in 1981 - 1985 and for the period up to 1990, it has assisted to individual housing construction in small towns, urban-type settlements and in rural areas.
In the construction of the village, parts are successfully used from reinforced concrete and other similar materials. But both traditional materials such as brick, natural stone, tile, forest, reed, straw, clay, are still quite wide, especially in individual construction. Estimation of the centuries from local materials on the village were built, and now they build durable, beautiful, warm and durable residential buildings and other buildings. When erecting a residential building or utility room, rural builders (and above all individual developers often need not only in materials and tools, but also in a qualified council.
The fact is that the construction has to perform many different works - earthy, stone, concrete, carpentry, carpentry, furnace, roofing, plaster, painted, glass. And only the correct execution guarantees a long service life of a built house. Reveal the technological "secrets" of various construction work - this is the goal that the author of this book set itself.
General information about the designs of the house
The house is best to build on the project. Creating projects, architects provide maximum amenities for people living in it, offer the most progressive designs, i.e. durable, cheap, durable and challenge. Various projects of houses can be found in the local councils of national deputies, in construction organizations and libraries.
Projects provide for the construction of a house from some one material, such as brick, concrete, slag concrete, wood, etc. But it can be built from any other material.
Consider the draft Central Institute of Model Projects The USSR State Building, recommended by the Architecture Department for the Executive Committee of the Moscow Regional Council of People's Deputies for Individual Construction in the Moscow Region.
Three-room house (Fig. 1, 2), chopped out of logs, with terrace and pantry, basement under kitchen, furnace heating and remote dressing room. Building area of \u200b\u200bthe house with a terrace - 71.4 m2; Living area - 31.0 m2; Useful - 39.2 m2; Available - 9.5 m2; Cubature - 182 m3.
In the house three rooms in size 8.13; 10.29 and 12.56 m2; kitchen - 5.76 m2; Hallway - 2.45 m2; Seni - 4.4 m2; Pantry - 4.72 m2 and terrace - 12.54 m2. In the plan, these numbers are rounded.
The project provides for a plan of the house, its cuts, the foundation plan, cuts of walls, overlap, attic, basement, floor, details of the platbands, the design of the terrace, cornice, etc., as well as the area of \u200b\u200bbuilding a site.
In terms of development, the location of the house, a household barn, which can be a garage, restroom, green plantings, etc.
On the main facade of the house and in the cuts there are arrows with pluses, minuses and numbers indicating meters or centimeters. The arrow with a plus and minus 0.00 is at the floor level and is called a zero mark. The numbers coming from this mark are called minus, and up - plus.
Fig. 1. The main facade and the plan of the residential building (sizes in cm and m) s 1, 6, 7 - rooms; 2 - kitchen; 3 - corridor; 4 - pantry; 5 - terrace

Fig. 2. Yard and side facades, foundation plans and plot (sizes in cm)
MINUS 0.60 Mark shows the distance from the ground level to the top of the floor or foundation; Minus 1.30 says that at this level, counting from the floor, lay the pillars under the foundation; Minus 2.40 shows the mint of the basement walls.
Plus Plus 0.80 Determines the level of the window sill, which is above the floor by 80 cm. The level of the upper part of the window opening is indicated by a mark plus 2,20. If it is plus 80 cm from this mark, then we obtain the height of the window opening, equal to 1.40 m.
The ceiling level is indicated by the mark plus 3.15, and the upper part of the auditory window is plus 3.75. The level of the roof of the roof is at the level of 5.35 m, and the top of flue pipes - at 6.05 m.
Other marks are given in the cuts. For example, the height of the terrace is 2.40; The height of the ceiling from the floor is 2.90 m and so on.
The cuts of the house are shown in Figure 3. For the house of the rafter, they make a cross section 18x6 cm, overlapping beams - 18x8 cm and so on.
Consider individual parts of the house.

Fig. 3. Cuts at home (sizes in cm and m)
The foundation for the outer walls is made of a boob stone in the form of columns of 60x60 cm in size with a depth of 70 cm (with high groundwater standing, the depth of the embedding can reach 120 cm). Internal pillars can be blown by 50 cm. The poles from the boot do not reach the ground level by 10 cm. Above this mark is posted base - brick columns in 2x1.5 bricks and between them - the wall in one brick, called the Zabirka. For ventilation, the underground from two opposite sides in the Zabirka is provided by two 14x14 cm holes, but more often 25x25 cm. Sources are opened, and the autumn is closed and insulated. On the inside, the base is insulated slag, sand, land, but not clay.
The top of the base is aligned with cement mortar, insulated with two and three layers of roofing or rubberoid (better on mastic). The waterproofing is laid on the waterproofing antiseptic material (pack or felt), then two layers of roofing or rubberoid and on top of all this lining - antiseptic (antiseptic or bitumen mastic) dry board with a thickness of 5 - 6 cm and 20 cm width. Lining protects the lower log logs from rotting And it can be changed during destruction.
Walls (Fig. 4) chopped, wooden, made of logs with a diameter in 22 cm bran and peeled to one kant. Isolated from the foundation lining, a layer of pakley, felt, etc. (2 cm) of the lower (bustling) crown made of thicker logs with a step in two edges (the width of the lower edge is at least 15 cm). From the inside, the heat bar is strengthened to the lining board; The space between it and the lower crown is filled with palauls. The thermal insulation material is put on the first crown, on it - the second crown, etc. after laying five crowns, the assembly of commoners is provided, on which the subsequent crowns are then laid. Window and doorways must have a sedimentary gap and be higher (greater) the height of the window or door boxes per 1/20 of their height, i.e. by 7 - 8 cm. If this gap is not, then the crowns above the windows and doors with time Due to the sediment (drying of wood, heat insulation seals), forming large slots over simplers. The gaps are filled with pacles or felt, and only after a complete precipitate in the gap can be inserted a bar. In Figure 4, the sediment gap is 7 cm.

Fig. 4. Wall cut (sizes in cm):
1 - sediment clearance 7 cm; 2 - antiseptic board-lining 5 cm thick; 3 - thermal timber; 4 - floor, 4 cm thick boards and lag 16/2 cm; 5 - antiseptic board-lining 4-5 cm thick in the thickness of two layers; 25x25 cm brick column; 6 - crushed stone spilled with a lime solution with a thickness of 12 cm on the rammed soil; 7 - brick base, 8 - rammed crushed stone on clay preparation; 9 - butt post; 10 - felt or panels Accepted; 11 - thermal timber
The attic overlap is shown in Figure 5, a. The height of the premises in the house is in purity of 290 cm, but, given the sediment, the ceiling beams with a cross section of 8x18 cm should be cut on 5 - 10 cm above. Locked the beams strictly horizontally, at a distance of 100 cm from each other. On the sides of the beams, the bars are nourished ("skulls") with a cross section of 4x5 cm, for which the rolls are placed from plates with a thickness of 8 cm. Cropped ends of the plates should lie flush with the lower sides of the beams, forming a smooth overlap. Instead of plates, two-layer pavements with a thickness of 8 cm are sometimes used. The rink is falling asleep by slag, dry ground (layer 15 cm).
So that the backfall does not wake up, the slots of the roll should be caught clay. If sawdust will be used, they must be pre-mixed with the lime-bent and plaster, and then pour the slag layer (3 - 4 cm).

Fig. 5. Paul details, attic and above basement (sizes in cm):
a - attic overlap: 1 - 4x5 cm bars; 2 - 8x18 cm beams after 100 cm; 3 - rolls from plates d \u003d 16/2 cm; 4 - clay lubricant 2 cm; 5 - Filing of 15 cm; b - floor of the first floor: 1 - clean floor 4 cm; 2 - lags from plates d \u003d 16/2 cm; 3 - lining - a scenar sawmed board 4 cm in the thickness of two layers; 4 - brick column 25x25 cm, l \u003d 15 cm; 5 - rubble with a spray with a lime solution of 12 cm; 6 - the rammed soil; B - the part of the flooding of the basement: 1 - pure floor 4 cm; 2 - Sand 5 cm; 3 - rush in trim d \u003d 14/2 with clay lubricant 2 cm; 4 - Luke cover (boards - 2.2 cm, felt - 2 cm, boards - 2.2 cm); 5 - blocking 6.4 cm; 6 - 8x18 cm beam; 7 - Card Bar 4x5 cm
The terrace with the pantry has a cold overlap of plane testes or boards, which are naked to beams, with one cannon, or the boards of the desired section.
Underground. So that the underground was dry and clean, the soil must be aligned, tumped, looped with a layer of gravel or rubble (at least 12 cm) and flooded with a limestone or cement mortar. If the soil is not sufficient enough, it is necessary to put a layer of fatty clay (25 cm), it is good to catch it, fall asleep on top of a gravel or rubble layer (at least 12 cm), tamper and pour lime or cement mortar, the latter is more durable and waterproof.
Floors (Fig. 5, b). In preparation, the underground posted brick columns. The size of 25x25 cm, isolated from above two layers. Nutrition, on which a grinding or antiseptized lining (dry board with a thickness of 4 cm), and on it - lags from plates. There is a clean floor of a 4 cm thick, with selected pins or quarters. The boards are tightly split, nails are nails and, if required, stained.
Basement (Fig. 5, c) is located under the kitchen; The walls are laid on a depth of 240 cm, believing from the level of pure floor. With a high level of groundwater, the basement under the house is not recommended, because there will always be raw. If the developer wants to have a basement, then it must be taken particularly thoroughly (see "Food storage rooms").
The roof is covered with asbestos cement tiles on a solid crate.
Partitions can be pure into a spool or plastered on both sides.
The doors are provided for single-pylene, but there may be shields. In the Seine - board, on the knaps. Size - 200x85
Double binders, open in different directions, with the windows in each room. Size - 140x100 cm. In the extensions of the window are filled with single binders.
Heating is provided by the furnace. One oven heats three rooms. Since the front wall of the furnace, which goes into one of the rooms, may not be able to heat it enough, then additionally from the kitchen slab push the shield with three channels. You can arrange water heating.
The terrace can be made after the construction of the house, but it should be taken into account its precipitate.
The scene is used to remove from the house drained from the roof of water. It is arranged from oily clay with a layer of 15-20 cm (with a stone coated), concrete or other materials. Its width is at least 1 m.
After the construction of the house, but not earlier than the year, proceed to his windowakat, and in a year or two, after complete precipitation, - to the finishing: trim, plastering, plastering and staining, device of platbands, eaves, frontones, etc.
The design of platbands, eaves and terraces is shown in Figure 6.
For the construction of the house on the discussed project requires the following materials: logs of the desired length with a diameter of 22 - 24 cm - 40 m3; Lumber Different - 20 m3; Stone butt - 10 m3; Red brick - 7.5 thousand pieces; Crushed stone brick, stone or gravel - 6.5 m3; Lime boiled - 2.1 tons; Gypsum construction (old name Alebaster) - 2.5 tons; Mountain or river sand - 12.6 m3; Flat asbestos cement tiles (for roofs) - 1100 pcs.; brackets and bolts - 116 kg; Construction nails are different - 101 kg; Window glass - 17 m2; Tol or rubberoid - 105 m2; Roofing steel - 30 kg; Olife - 68 kg; Belil and other paints - 42 kg. If the house is not painted outside, then the oils and paint will need less.

Fig. 6. Putnocks and their parts, the framing of the roof and the fencing of the terrace
All materials should be stored so that they are not exposed to wet, rotting and destruction.
The logs and lumber are placed in the stacks on the lining, so that there are gaps between them to blow air accelerating drying. On top of them are covered.
Lime boiling, plaster and cement are stored in dry sheds in barrels, bags or boxes raised from the level of land at least 50 cm.
Tol, rubberoid, roofing tiles, nails, glass, metal stored in the sheds. Tol and ruberoid - be sure to vertical, olif and grated paints - in the closed container.
The brick is stored in stacks, gravel, crushed stone and sand - in piles protected from various pollution.
Building and landscaping
An individual developer usually has to be engaged not only by the construction of the house, but also the planning and improvement of its site.
At the same time, it must fulfill architectural, fire-prevention and sanitary and hygienic requirements that create the best conditions for living and leisure.
Building and layout of the site
Building and layout of the site can be different (Fig. 7). Typically, the width of the site does not exceed 25 - 30 m, and the length - 50 - 60 m. The houses often have on the site so that their facades are not only facing the street, but also almost close to it, which is not entirely true. The house must be put no closer than 2 - 3 m (and better 5 - 7 m) from the edge of the street, or the so-called red line. In this case, in front of the house you can plant green plantings, but not closer to 5 m from the house, otherwise there are many shadows and dampness may appear in the room. The fruit garden can be placed both around the house and in the depths of the estate. The garden is best placed in the depths of the site.

Fig. 7. Examples of building and planning of the manor site (sizes in m): A - normal option; b - with a vegetable garden along the long side of the site; in - without a garden with the placement of the house in the depths of the site; g - with garden, vegetable garden, berry shrub, flower bed and well; d - plot for two houses; 1 - residential building; 2 - Economic Shed; 3 - garden; 4 - Garden; 5 - restroom; 6 - compost pile; 7 - Playground for children's games; 8 - well; 9 - berry shrub; 10 - Flower Garden
With each house there are various economic buildings (for transport, fuel, livestock, birds). They are recommended to be attached to the depths of the site, and those that are visited more often, on the contrary, close to the house.
Each site should have undolved road rains with turning platforms for driving cars and narrower tracks for people's passage.
In the presence of water supply column for water put near the house. Well also approach the house.
A few words about the location of the rooms in the house. Dining room, or a common room, windows should go out into the street; Veranda - in the north side, and the windows of the kitchen - on the economic courtyard and the playground for children's games (without breaking away from work, the hostess can see what is happening in the yard and in the playground). Fireproof rules require that the distance between the combustible buildings was at least 15 m; Between heralds (walls and roofs are not unguarded, and overlapping combustible) - not less than 10 m.
Residential house and all other areas of the plot must have a threat. Flameless materials should be kept away from the combustible buildings or in the non-aggravated rooms built for them.
Improvement site
The plot is primarily aligned (eliminate pits and hillocks) and, if necessary (if it is in lowland and close soil waters) dried. With drainage work (around the entire site or only at home or other buildings), the channels with a slope for water drain and make drainage. The depth of the channel depends on how much groundwater should be reduced; Its width - 50 - 70 cm. However, with a deep channel and a weak ground width, it can be more.
From the foundation of the house, the drainage should be at a distance of 2 - 3 m, and its bottom - on the same level with the basement sole. The bottom of the ditch isolate the clay layer at 15 - 20 cm, they burn it, arranged as if the tray. It is recommended to put large stones in this tray, and even better to arrange fires from stones along the walls of the ditches, cover them with large stones, making the arch. The layer of large gravel or rubble (25-30 cm), and from above it - the revealed ground is poured onto these stones. Water, filtered through gravel or crushed stone, enters the tray and flows in the right direction. You can put on the bottom of the ditch of a bitch or a large twig with a layer of 50 - 60 cm, clearing it from foliage, pour a layer of gravel or rubble, then the soil.
Draisual work can be carried out using special drainage pipes.
To collect tales and raindrops at the lowest location, the pool is built (well). The size of the pool depends on the size of the site. So that the water does not go to the ground, the bottom and the walls should be well to isolate. The floor of the pool falls asleep with a fat soft clay layer 20 - 25 cm and are carefully compacted. Then with an indent for 20 - 25 cm from the soil put bricks, concrete, wooden (from logs, boards, bars, tightly adjacent to each other, with well-cocked and cleaned grooves) walls. The space between the walls fall asleep fatty clay, carefully sealing it. The floor is made from the same material as the walls. Brick walls and gears should be placed with cement mortar 1: 3 (see the preparation of solutions, see further), dry well, cove your bitumen for one, and even better than twice. The pool is covered with boards or concrete slabs and fall asleep the earth, leaving only the hatch for the fence of water. It can be left open for waterfowl, but in this case water will evaporate.
Part of the comfortable work on the site is the construction of roads. For construction, you can use a stone, concrete, brick-iron, cement contract, soilasphalt, etc. The width of the road - 2 - 2.5 m, tracks (sidewalks) - 0.5 - 1 m. The base for them is usually a tightly rambered ground . If the soil is sandy, it only needs to be aligned and tamped if clay or other, make the so-called preparation. So that the water is not delayed on the ground, roads and tracks give a convex form or a bias of 2 - 3%.

Fig. 8, fence (sizes in cm):
and - from the stake with landing along it shrub; b - from the brick; in - from reinforced concrete
For water drain on both sides of the road (tracks) digging cuvette-grooves with a slope in one direction. There are cuvettes from the road at a distance of 40 - 50 cm, from the tracks - by 25 - 30 cm.
Preparation for the road (if the ground is not sandy) prepare so. At first, large gravel or crushed layer 8 - 10 cm layer, trambet, pour a second layer of a smaller gravel or rubble with a thickness of 5 - 7 cm, again tram, and the sand layer 2 is 5 cm, which also tram. After that, the road is laying out a large stone, a brick-iron, concrete slabs, coated with concrete, cement loads or a soilsofalt.
Under the tracks, the same training is needed as under the road, but a smaller thickness. In addition, it is not recommended to lay stones, bricks and other materials directly to the soil (it does not always filter water) - a sandy bench is needed. For the track device, it is recommended to use a different color stone.
Plots are usually limited to the fence (Fig. 8). The fence from the stakenice or brick, made in a cage, from reinforced concrete (solid or lattice) is always quite beautiful. Wood and metal fences are recommended to paint with oil or any waterproof paint.
OUTBUILDINGS
The location of household buildings near the house is nonregienically. Usually, indoors for animals and birds build no closer to 15 meters from the house. Depending on the destination, they can be of different sizes: cowners - 8 - 10 m2 at a height of 2.5 m; Pigarns - 3 - 5 m2 (for sow - 6 m2) at a height of 2.2 - 2.6 m; For one sheep or goat - 1.5 - 2 m2 (height like a pigsty, but maybe more).
Near the economic buildings should be made the flowing pad, to upset her so that the animals do not go through the entire estate.
Options for household buildings for the content of various animals and birds are shown in Figure 9.
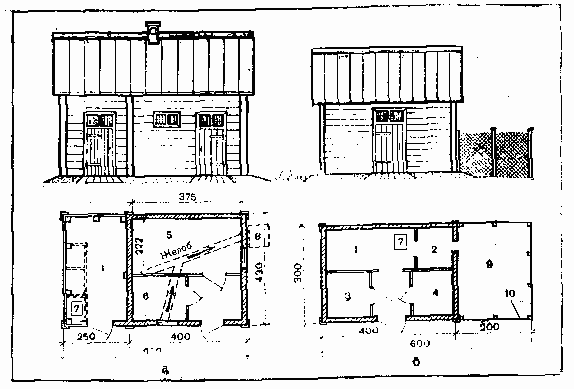
Fig. 9. Options for household buildings (sizes - in cm):
a - with hlevar for coarse livestock; b - with a hlevar for small cattle and birds; 1 - Economic Shed; 2 - a poultry house; 3 - goat room; 4 - Pig room; 5 - cowboat; 6 - Shepherd; 7 - Luke in cellar or glacier; 8 - - Zhiyessaric; 9 - plowing platform for poultry; 10 - Wire mesh
Inside the room or outside of its limits, the ziyessaricer, walls and the bottom of which are well isolated soft clay or make completely concrete.
Construction of your own house is a rather responsible and complex event. However, there are also their advantages. Alone built housing will be better and cozy. And what could be better than this, especially in a rustic house, when this urban bustle is so tired.
Instructions for the construction of a wooden house with their own hands
- The first thing you need to decide is with the material from which you will build a house. That is, choose one of two or a tree or a stone. The tree is cheaper material, and most importantly, living in such a house will be much more comfortable.
- In the trimmed logs make special grooves. This will allow the cross-closet, to get a solid connection. We fold them before you do not get the necessary height. But at the same time, it is also worth noting the fact that even despite the fact that you will receive a truly reliable laying, there will still be sluts between the logs. They can be corpusing with any fibrous material. That is, you can use the packles and straw and dried moss. Thus, you can close all the slots.
- The next stage will be to convene the roof. It is recommended to make it a double, since it may be much less effort to create it, and the main thing it will cost you much cheaper, compared with more refined options for the roofs.
- The space between the walls overlap the logs, after which we make the roofs. Smooth bars from the ends of the walls must be strengthened in such a way that they in the middle of the space closed with each other. Now we need to do the flooring. We choose the fault material and stelim the floor for the attic.
- It is necessary to make a steep and even, which will allow water to dry water during the rain, and it will not be snowdrifts during the snow.
- Install the door windows. This work can be done depending on your preferences. But in any case, they should be durable and strong.
- You do not need to forget about the basement, since in the winter period there will be enough heat for storage of vegetables, as well as blanks, and in the summer period is quite cool, which will allow you to keep refreshing drinks and perishable products.
A. M. Shepelev
How to build a rural house
In our country, much attention is paid to an increase in housing construction on a village, which is mainly conducted by industrial methods, according to standard projects. However, individual construction is currently developing. The state provides a loan for these purposes and in accordance with the main areas of economic and social development of the USSR in 1981 - 1985 and for the period up to 1990, it has assisted to individual housing construction in small towns, urban-type settlements and in rural areas.
In the construction of the village, parts are successfully used from reinforced concrete and other similar materials. But both traditional materials such as brick, natural stone, tile, forest, reed, straw, clay, are still quite wide, especially in individual construction. Estimation of the centuries from local materials on the village were built, and now they build durable, beautiful, warm and durable residential buildings and other buildings. When erecting a residential building or utility room, rural builders (and above all individual developers often need not only in materials and tools, but also in a qualified council.
The fact is that the construction has to perform many different works - earthy, stone, concrete, carpentry, carpentry, furnace, roofing, plaster, painted, glass. And only the correct execution guarantees a long service life of a built house. Reveal the technological "secrets" of various construction work - this is the goal that the author of this book set itself.
General information about the designs of the house
The house is best to build on the project. Creating projects, architects provide maximum amenities for people living in it, offer the most progressive designs, i.e. durable, cheap, durable and challenge. Various projects of houses can be found in the local councils of national deputies, in construction organizations and libraries.
Projects provide for the construction of a house from some one material, such as brick, concrete, slag concrete, wood, etc. But it can be built from any other material.
Consider the draft Central Institute of Model Projects The USSR State Building, recommended by the Architecture Department for the Executive Committee of the Moscow Regional Council of People's Deputies for Individual Construction in the Moscow Region.
Three-room house (Fig. 1, 2), chopped out of logs, with terrace and pantry, basement under kitchen, furnace heating and remote dressing room. Building area of \u200b\u200bthe house with a terrace - 71.4 m2; Living area - 31.0 m2; Useful - 39.2 m2; Available - 9.5 m2; Cubature - 182 m3.
In the house three rooms in size 8.13; 10.29 and 12.56 m2; kitchen - 5.76 m2; Hallway - 2.45 m2; Seni - 4.4 m2; Pantry - 4.72 m2 and terrace - 12.54 m2. In the plan, these numbers are rounded.
The project provides for a plan of the house, its cuts, the foundation plan, cuts of walls, overlap, attic, basement, floor, details of the platbands, the design of the terrace, cornice, etc., as well as the area of \u200b\u200bbuilding a site.
In terms of development, the location of the house, a household barn, which can be a garage, restroom, green plantings, etc.
On the main facade of the house and in the cuts there are arrows with pluses, minuses and numbers indicating meters or centimeters. The arrow with a plus and minus 0.00 is at the floor level and is called a zero mark. The numbers coming from this mark are called minus, and up - plus.
Fig. 1. The main facade and the plan of the residential building (sizes in cm and m) s 1, 6, 7 - rooms; 2 - kitchen; 3 - corridor; 4 - pantry; 5 - terrace
Fig. 2. Yard and side facades, foundation plans and plot (sizes in cm)
MINUS 0.60 Mark shows the distance from the ground level to the top of the floor or foundation; Minus 1.30 says that at this level, counting from the floor, lay the pillars under the foundation; Minus 2.40 shows the mint of the basement walls.
Plus Plus 0.80 Determines the level of the window sill, which is above the floor by 80 cm. The level of the upper part of the window opening is indicated by a mark plus 2,20. If it is plus 80 cm from this mark, then we obtain the height of the window opening, equal to 1.40 m.
The ceiling level is indicated by the mark plus 3.15, and the upper part of the auditory window is plus 3.75. The level of the roof of the roof is at the level of 5.35 m, and the top of flue pipes - at 6.05 m.
Other marks are given in the cuts. For example, the height of the terrace is 2.40; The height of the ceiling from the floor is 2.90 m and so on.
The cuts of the house are shown in Figure 3. For the house of the rafter, they make a cross section 18x6 cm, overlapping beams - 18x8 cm and so on.
Consider individual parts of the house.
Fig. 3. Cuts at home (sizes in cm and m)
The foundation for the outer walls is made of a boob stone in the form of columns of 60x60 cm in size with a depth of 70 cm (with high groundwater standing, the depth of the embedding can reach 120 cm). Internal pillars can be blown by 50 cm. The poles from the boot do not reach the ground level by 10 cm. Above this mark is posted base - brick columns in 2x1.5 bricks and between them - the wall in one brick, called the Zabirka. For ventilation, the underground from two opposite sides in the Zabirka is provided by two 14x14 cm holes, but more often 25x25 cm. Sources are opened, and the autumn is closed and insulated. On the inside, the base is insulated slag, sand, land, but not clay.
The top of the base is aligned with cement mortar, insulated with two and three layers of roofing or rubberoid (better on mastic). The waterproofing is laid on the waterproofing antiseptic material (pack or felt), then two layers of roofing or rubberoid and on top of all this lining - antiseptic (antiseptic or bitumen mastic) dry board with a thickness of 5 - 6 cm and 20 cm width. Lining protects the lower log logs from rotting And it can be changed during destruction.
Walls (Fig. 4) chopped, wooden, made of logs with a diameter in 22 cm bran and peeled to one kant. Isolated from the foundation lining, a layer of pakley, felt, etc. (2 cm) of the lower (bustling) crown made of thicker logs with a step in two edges (the width of the lower edge is at least 15 cm). From the inside, the heat bar is strengthened to the lining board; The space between it and the lower crown is filled with palauls. The thermal insulation material is put on the first crown, on it - the second crown, etc. after laying five crowns, the assembly of commoners is provided, on which the subsequent crowns are then laid. Window and doorways must have a sedimentary gap and be higher (greater) the height of the window or door boxes per 1/20 of their height, i.e. by 7 - 8 cm. If this gap is not, then the crowns above the windows and doors with time Due to the sediment (drying of wood, heat insulation seals), forming large slots over simplers. The gaps are filled with pacles or felt, and only after a complete precipitate in the gap can be inserted a bar. In Figure 4, the sediment gap is 7 cm.
Fig. 4. Wall cut (sizes in cm):
1 - sediment clearance 7 cm; 2 - antiseptic board-lining 5 cm thick; 3 - thermal timber; 4 - floor, 4 cm thick boards and lag 16/2 cm; 5 - antiseptic board-lining 4-5 cm thick in the thickness of two layers; 25x25 cm brick column; 6 - crushed stone spilled with a lime solution with a thickness of 12 cm on the rammed soil; 7 - brick base, 8 - rammed crushed stone on clay preparation; 9 - butt post; 10 - felt or panels Accepted; 11 - thermal timber
The attic overlap is shown in Figure 5, a. The height of the premises in the house is in purity of 290 cm, but, given the sediment, the ceiling beams with a cross section of 8x18 cm should be cut on 5 - 10 cm above. Locked the beams strictly horizontally, at a distance of 100 cm from each other. On the sides of the beams, the bars are nourished ("skulls") with a cross section of 4x5 cm, for which the rolls are placed from plates with a thickness of 8 cm. Cropped ends of the plates should lie flush with the lower sides of the beams, forming a smooth overlap. Instead of plates, two-layer pavements with a thickness of 8 cm are sometimes used. The rink is falling asleep by slag, dry ground (layer 15 cm).
So that the backfall does not wake up, the slots of the roll should be caught clay. If sawdust will be used, they must be pre-mixed with the lime-bent and plaster, and then pour the slag layer (3 - 4 cm).
Fig. 5. Paul details, attic and above basement (sizes in cm):
a - attic overlap: 1 - 4x5 cm bars; 2 - 8x18 cm beams after 100 cm; 3 - rolls from plates d \u003d 16/2 cm; 4 - clay lubricant 2 cm; 5 - Filing of 15 cm; b - floor of the first floor: 1 - clean floor 4 cm; 2 - lags from plates d \u003d 16/2 cm; 3 - lining - a scenar sawmed board 4 cm in the thickness of two layers; 4 - brick column 25x25 cm, l \u003d 15 cm; 5 - rubble with a spray with a lime solution of 12 cm; 6 - the rammed soil; B - the part of the flooding of the basement: 1 - pure floor 4 cm; 2 - Sand 5 cm; 3 - rush in trim d \u003d 14/2 with clay lubricant 2 cm; 4 - Luke cover (boards - 2.2 cm, felt - 2 cm, boards - 2.2 cm); 5 - Venting 6.4 ...
A. M. Shepelev
How to build a rural house
In our country, much attention is paid to an increase in housing construction on a village, which is mainly conducted by industrial methods, according to standard projects. However, individual construction is currently developing. The state provides a loan for these purposes and in accordance with the main areas of economic and social development of the USSR in 1981 - 1985 and for the period up to 1990, it has assisted to individual housing construction in small towns, urban-type settlements and in rural areas.
In the construction of the village, parts are successfully used from reinforced concrete and other similar materials. But both traditional materials such as brick, natural stone, tile, forest, reed, straw, clay, are still quite wide, especially in individual construction. Estimation of the centuries from local materials on the village were built, and now they build durable, beautiful, warm and durable residential buildings and other buildings. When erecting a residential building or utility room, rural builders (and above all individual developers often need not only in materials and tools, but also in a qualified council.
The fact is that the construction has to perform many different works - earthy, stone, concrete, carpentry, carpentry, furnace, roofing, plaster, painted, glass. And only the correct execution guarantees a long service life of a built house. Reveal the technological "secrets" of various construction work - this is the goal that the author of this book set itself.
General information about the designs of the house
The house is best to build on the project. Creating projects, architects provide maximum amenities for people living in it, offer the most progressive designs, i.e. durable, cheap, durable and challenge. Various projects of houses can be found in the local councils of national deputies, in construction organizations and libraries.
Projects provide for the construction of a house from some one material, such as brick, concrete, slag concrete, wood, etc. But it can be built from any other material.
Consider the draft Central Institute of Model Projects The USSR State Building, recommended by the Architecture Department for the Executive Committee of the Moscow Regional Council of People's Deputies for Individual Construction in the Moscow Region.
Three-room house (Fig. 1, 2), chopped out of logs, with terrace and pantry, basement under kitchen, furnace heating and remote dressing room. Building area of \u200b\u200bthe house with a terrace - 71.4 m2; Living area - 31.0 m2; Useful - 39.2 m2; Available - 9.5 m2; Cubature - 182 m3.
In the house three rooms in size 8.13; 10.29 and 12.56 m2; kitchen - 5.76 m2; Hallway - 2.45 m2; Seni - 4.4 m2; Pantry - 4.72 m2 and terrace - 12.54 m2. In the plan, these numbers are rounded.
The project provides for a plan of the house, its cuts, the foundation plan, cuts of walls, overlap, attic, basement, floor, details of the platbands, the design of the terrace, cornice, etc., as well as the area of \u200b\u200bbuilding a site.
In terms of development, the location of the house, a household barn, which can be a garage, restroom, green plantings, etc.
On the main facade of the house and in the cuts there are arrows with pluses, minuses and numbers indicating meters or centimeters. The arrow with a plus and minus 0.00 is at the floor level and is called a zero mark. The numbers coming from this mark are called minus, and up - plus.
Fig. 1. The main facade and the plan of the residential building (sizes in cm and m) s 1, 6, 7 - rooms; 2 - kitchen; 3 - corridor; 4 - pantry; 5 - terrace
Fig. 2. Yard and side facades, foundation plans and plot (sizes in cm)
MINUS 0.60 Mark shows the distance from the ground level to the top of the floor or foundation; Minus 1.30 says that at this level, counting from the floor, lay the pillars under the foundation; Minus 2.40 shows the mint of the basement walls.
Plus Plus 0.80 Determines the level of the window sill, which is above the floor by 80 cm. The level of the upper part of the window opening is indicated by a mark plus 2,20. If it is plus 80 cm from this mark, then we obtain the height of the window opening, equal to 1.40 m.
The ceiling level is indicated by the mark plus 3.15, and the upper part of the auditory window is plus 3.75. The level of the roof of the roof is at the level of 5.35 m, and the top of flue pipes - at 6.05 m.
Other marks are given in the cuts. For example, the height of the terrace is 2.40; The height of the ceiling from the floor is 2.90 m and so on.
The cuts of the house are shown in Figure 3. For the house of the rafter, they make a cross section 18x6 cm, overlapping beams - 18x8 cm and so on.
Consider individual parts of the house.
Fig. 3. Cuts at home (sizes in cm and m)
The foundation for the outer walls is made of a boob stone in the form of columns of 60x60 cm in size with a depth of 70 cm (with high groundwater standing, the depth of the embedding can reach 120 cm). Internal pillars can be blown by 50 cm. The poles from the boot do not reach the ground level by 10 cm. Above this mark is posted base - brick columns in 2x1.5 bricks and between them - the wall in one brick, called the Zabirka. For ventilation, the underground from two opposite sides in the Zabirka is provided by two 14x14 cm holes, but more often 25x25 cm. Sources are opened, and the autumn is closed and insulated. On the inside, the base is insulated slag, sand, land, but not clay.
The top of the base is aligned with cement mortar, insulated with two and three layers of roofing or rubberoid (better on mastic). The waterproofing is laid on the waterproofing antiseptic material (pack or felt), then two layers of roofing or rubberoid and on top of all this lining - antiseptic (antiseptic or bitumen mastic) dry board with a thickness of 5 - 6 cm and 20 cm width. Lining protects the lower log logs from rotting And it can be changed during destruction.
Walls (Fig. 4) chopped, wooden, made of logs with a diameter in 22 cm bran and peeled to one kant. Isolated from the foundation lining, a layer of pakley, felt, etc. (2 cm) of the lower (bustling) crown made of thicker logs with a step in two edges (the width of the lower edge is at least 15 cm). From the inside, the heat bar is strengthened to the lining board; The space between it and the lower crown is filled with palauls. The thermal insulation material is put on the first crown, on it - the second crown, etc. after laying five crowns, the assembly of commoners is provided, on which the subsequent crowns are then laid. Window and doorways must have a sedimentary gap and be higher (greater) the height of the window or door boxes per 1/20 of their height, i.e. by 7 - 8 cm. If this gap is not, then the crowns above the windows and doors with time Due to the sediment (drying of wood, heat insulation seals), forming large slots over simplers. The gaps are filled with pacles or felt, and only after a complete precipitate in the gap can be inserted a bar. In Figure 4, the sediment gap is 7 cm.
Fig. 4. Wall cut (sizes in cm):
1 - sediment clearance 7 cm; 2 - antiseptic board-lining 5 cm thick; 3 - thermal timber; 4 - floor, 4 cm thick boards and lag 16/2 cm; 5 - antiseptic board-lining 4-5 cm thick in the thickness of two layers; 25x25 cm brick column; 6 - crushed stone spilled with a lime solution with a thickness of 12 cm on the rammed soil; 7 - brick base, 8 - rammed crushed stone on clay preparation; 9 - butt post; 10 - felt or panels Accepted; 11 - thermal timber
The attic overlap is shown in Figure 5, a. The height of the premises in the house is in purity of 290 cm, but, given the sediment, the ceiling beams with a cross section of 8x18 cm should be cut on 5 - 10 cm above. Locked the beams strictly horizontally, at a distance of 100 cm from each other. On the sides of the beams, the bars are nourished ("skulls") with a cross section of 4x5 cm, for which the rolls are placed from plates with a thickness of 8 cm. Cropped ends of the plates should lie flush with the lower sides of the beams, forming a smooth overlap. Instead of plates, two-layer pavements with a thickness of 8 cm are sometimes used. The rink is falling asleep by slag, dry ground (layer 15 cm).
So that the backfall does not wake up, the slots of the roll should be caught clay. If sawdust will be used, they must be pre-mixed with the lime-bent and plaster, and then pour the slag layer (3 - 4 cm).
Fig. 5. Paul details, attic and above basement (sizes in cm):
a - attic overlap: 1 - 4x5 cm bars; 2 - 8x18 cm beams after 100 cm; 3 - rolls from plates d \u003d 16/2 cm; 4 - clay lubricant 2 cm; 5 - Filing of 15 cm; b - floor of the first floor: 1 - clean floor 4 cm; 2 - lags from plates d \u003d 16/2 cm; 3 - lining - a scenar sawmed board 4 cm in the thickness of two layers; 4 - brick column 25x25 cm, l \u003d 15 cm; 5 - rubble with a spray with a lime solution of 12 cm; 6 - the rammed soil; B - the part of the flooding of the basement: 1 - pure floor 4 cm; 2 - Sand 5 cm; 3 - rush in trim d \u003d 14/2 with clay lubricant 2 cm; 4 - Luke cover (boards - 2.2 cm, felt - 2 cm, boards - 2.2 cm); 5 - blocking 6.4 cm; 6 - 8x18 cm beam; 7 - Card Bar 4x5 cm