How to make a staircase to the attic with your own hands. Features of a folding ladder to the attic and the subtleties of its installation Do-it-yourself attic stairs from the corner
The staircase to the attic is a simple structure that you can easily create yourself. It can be solid - made of wood or metal, or it can have a lightweight and convenient folding shape. What options are suitable for your attic and how well the attic staircase with a hatch is made and assembled with your own hands, read our material.
The exit to the attic is almost always in one of the living rooms of the upper floor of the house. Therefore, you have to either sacrifice space and spoil the interior, or use a portable stepladder. The last option is not only troublesome, but also quite risky, since unstable steps can break off, and in order to hold the ladder itself, you often need to invite your family to help.
We invite you to make a choice in favor of a more reliable option - the design and implementation of a new modern attic staircase. The types and recommendations for creating a solid staircase to the attic with your own hands, which we give below, will help you make the right choice.
Attic stairs: an overview of options
The main elements of the ladder are the bowstring and kosour (side parts); tread (steps) and riser (for stationary stairs).
I. Capital steps
If there is enough space in your home, then we advise you to build a fixed staircase to access the attic or attic. This option is reliable, practical and durable. Capital steps can be made on the basis of a metal frame or high-quality wood.
Monolithic stairs can be marching, with one or more bend, and spiral (spiral). Marching options have steps in the form of rectangular plates (boards), which evenly tend upward with the same distance. The spiral staircase is folded around the central base, has steps narrowed towards the inner edge and is located in a spiral. The latter option is more compact and can be built even in small rooms, without sacrificing space.
The "pluses" of the capital option include durability, reliability and comfort in use.
Capital stairs, in most cases, do not provide a hatch for access to the attic, therefore, it is more suitable for houses with a warm roof. For a cold roof, the exit to the attic must be closed with an airtight hatch. The standard dimensions of the hatch are 120x70 cm. It makes no sense to make a smaller passage, as this will make it difficult to get into the attic and to install the steps.
The material for the hatch is wood, metal or plastic. You can order a blank for the hatch at the factory of metal-plastic structures with installation or self-assembly. The hatch can be automatic or manual opening. With the latter option, a special pole is used that opens the latch (lock) and lowers the door with a ladder.
II. Portable ladders
Portable steps - the closest analogue of "good old" ladders. Such a ladder will be reliable only if you make a folding version with a platform. However, it is difficult to call such a construction convenient. You will have to make additional efforts to get into the opening of the attic, and the issue of storing such a staircase will cause a lot of trouble.
III. Folding loft ladders with hatch
A very convenient and easy-to-implement type of attic staircase - folding steps connected to the hatch. Due to the convenience of design, this type of steps has become the most popular among professional craftsmen.
Today there are many types of folding ladders, among which you can choose the most suitable option (telescopic, scissor, folding, etc.).
The folding mechanism is suitable for any attic space with a hatch, on which the staircase can be fixed.
- Scissor rungs. This type is made of metal. The steps themselves can be wooden. The ladder is a collapsible mechanism. When folded, the structure takes on a very compact shape and size, therefore it is perfect for a small attic hatch;
- Telescopic steps. They are a system of retractable sections (like a folding telescope). This option is made of aluminum and also looks very compact on a small attic door;
- Folding (folding) stairs. This type is the most popular, as it is characterized by practicality, durability, economy and ease of installation. We will describe it in more detail below.
In general, most ladders schematically look like this:

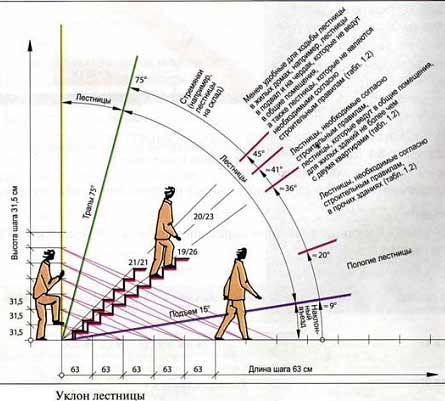
Before we start designing an attic staircase, consider some of the standard design characteristics:
- The width of the march for attic steps should not exceed 60-65 cm;
- The height of the entire structure (taking into account the slope) is allowed up to 300 cm. Anything that exceeds this length becomes less stable and less strong. The higher the ladder, the less load it can withstand;
- Based on the recommended length of the stairs, the number of steps is chosen - 13-15 pcs., With a distance between them up to 20 cm;
- The most convenient and safest angle of inclination of the stairs is 60-700 degrees;
- The steps are a direct receiver of the load when lifting, therefore they must have a dense structure and a thickness of 18 mm, and be located strictly parallel to the floor.
The choice of material for a flight of stairs should be determined by the frequency of operation of the structure. Wood wears out faster than metal. So, if you go up to the attic every day, it is better to design the stairs from metal. In other cases, wood, as a material, lightweight, environmentally friendly and easy to install, is very popular.
So, let's get started and create a modern attic staircase with a hatch with our own hands according to the drawings that our specialists have prepared for you.
Stages of design and installation of a staircase of three sections with a hatch
Any work must start with a project. Determine the height of your future staircase, taking into account the height of the ceiling and the slope of 60-70 degrees. It is also worthwhile to accurately measure the attic passage and draw an appropriate diagram. The drawing should contain the following information: the length of the stairs, the angle of inclination, the height of the ceiling of the room, the dimensions of the passage and the attic hatch, the width of the march, the number and dimensions of the sections, the number, distance and dimensions of the steps.
I. Drawing preparation
At this stage, the design is calculated. It is not difficult to calculate the length of the stairs. We use a simple mathematical formula: D = B /, where α is the selected angle of inclination, B is the height of the ceiling. So, with a ceiling height of 3 m and an angle of inclination of 60 degrees, the length of the stairs will be 3 / 0.867 = 3.46 m.Masters advise adding a few centimeters to the resulting figure, so that later you can more accurately measure and cut the desired length:


The dimensions of the hatch should be slightly smaller than the opening itself. For the calculation, 6-7 mm are left on each side of the door.
We calculate the length of the sections according to the following scheme: the first section - the length of the hatch minus 10%; second section - length of the first section minus 10%; third section - the sum of the lengths of the first two sections is subtracted from the total length of the staircase.
Now the calculations need to be transferred to paper and start preparing the necessary materials and tools.
II. Selection of materials and tools
To implement the project, you need to prepare carpentry tools: a tape measure, a chisel, a hacksaw, a screwdriver, a welding machine (or capital connections for a metal frame), a square, a hacksaw, clamps, wood glue, masking tape, electrodes, wood glue.
The main materials that we need: bars 50x50 mm for finishing the hatch (about 4-5 pcs.); two boards for a bowstring 100x25 mm in length equal to the selected length of the ladder; board for steps 100x20 or 100x25 mm; plywood or material with similar characteristics (one standard sheet is enough for the hatch door); plates and corners for opening and hinges; nuts, bolts, screws, washers, etc.
III. Manhole door manufacturing
Step I. Prepare the bars for the hatch. At the ends of the beams, make cuts-grooves to tightly connect the structure in a regular triangle using mounting glue and fasteners. Protect the corners of the frame with temporary plywood plates so that the rectangle does not lead.
Step II. Attach a sheet of plywood of the appropriate size to the base of the blocks. Now you need to try on the hatch to the aisle to the attic. It should be 6-7 mm less on all sides.
Step III. Provide a lock for the attic door. It can be an automatic mechanism, or the most ordinary bolt, which can be opened with a pole with a tip.
Step IV. We install hatch opening / closing mechanisms. If you do not want to buy ready-made mechanisms, you can make them yourself. There should be two mounts - left and right. For work, purchase a 4x20 mm steel plate and a corner. The photo shows a drawing of the left mounting part. The right one is performed in a mirror image. The sizes are given by convention. For more accurate calculations, consider your parameters. Before fastening, be sure to check the mechanisms in operation:

IV. Putting the ladder together
You can always order a ready-made sectional staircase from the masters, which can be fixed according to the ready-made scheme yourself. But if you decide to do the work with your own hands to the end, you can assemble a ladder from the prepared materials.
Step 1. We mark the place of installation of steps on the bowstrings. To do this, mark each detail with a pencil, according to the chosen angle of inclination of the stairs and the calculations made earlier. Now press the ends of the boards tightly together and secure them with masking tape. This is necessary to drill through holes at the joints of the sections. Drill a hole for the hinge with a diameter of about 25 mm at the junction of the first and second sections. Next, you need to remove the tape and turn the boards over, again fastening them. Now we drill a similar hole at the junction of the second and third sections:

Step 2. Cut the bowstrings along the marked lines. Next, grooves are made for steps on the inside of the bowstrings using a chisel. The depth of the grooves must be at least 5 mm (this should also be taken into account at the first design stage). The lower section of the bowstrings should be beveled according to the angle of inclination of the ladder.
Step 3. Cut the steps according to the markings and attach them to the left bowstring. We put the steps on glue and fix them with self-tapping screws. We attach the right bowstring and also fasten it with self-tapping screws.
Step 4. We attach the hinges for the sliding ladder mechanism. Hinges, like hinge mechanisms, can be bought at a store, or made yourself from a metal tape. We need eight strips of metal (you can use the leftovers from the door mechanisms). Weld small pieces of the same strip to four strips. We drill two holes in each part (for fastening and hinge). We connect the hinge with the hinges. Now we join the cut sections and apply the hinges so that each hinge falls into the groove (25 mm holes drilled before cutting the sections). We fasten the loops on the bowstrings:

V. Final assembly
Now the top of the finished ladder needs to be fixed to the hatch, after checking the operation of the hinge mechanisms. The ladder should also be checked after installation. After making sure that all the parts are in good condition and functional, open the steps with varnish:

And one more step-by-step installation guide:

You can insulate and seal the hatch with foam rubber or construction wool. The edges of the hatch should be sheathed with rubber sealant tape.
That's it, your ladder with a hatch is ready! This is exactly the option that is quite feasible "in one helmet". We wish you a quick and easy job.
The attic is a traditional space in almost every country house. Its functionality is unusually wide. For example, this room is used as a storage room or workshop, some homeowners even design the attic as a living room or bedroom. In fact, the functional purpose of such a room depends solely on your own imagination, as well as financial capabilities. However, despite the wide variety of design options for the attic space, it is worth knowing that the attic staircase with a hatch is an integral part of it. If you do not build this structure, then you simply cannot get into this room. Creating an attic staircase is a fairly simple matter, in connection with which you do not even have to contact the professionals in the construction industry.
 The attic staircase must be functional
Classification of structures
Actually, the most time-consuming process in organizing the attic space is the construction of the stair segment. Before creating a project for a specific staircase for your home, you must first determine the category of construction. There are such options:
- folding;
- stationary;
- portable.
 An approximate diagram of a folding ladder with a hatch
Features of various designs
Experts in the construction industry call the wide marching structure the most reliable in the corresponding segment. It should be noted that its durability, reliability and safety cannot be compared with constructive analogs on the market. Meanwhile, despite the large number of advantages of this option, the choice in its favor is sometimes impossible due to the banal lack of the necessary free space. Thus, if you do not have a large area for the stairs, then the stationary model will not suit you. However, do not despair, because you can always build a folding ladder. Its design has the best characteristics from stationary and portable counterparts. For example, it is not as reliable and safe as a stationary marching model, however, to organize such a structure, it is necessary to have a very small amount of free space. In addition, it is the folding models that are easiest to implement without the help of experienced professionals.
 Simple two-piece staircase
Temporary solution
Portable models will be allocated in a separate category, however, it is quite extensive. The variety of portable products is incredible. Meanwhile, do not forget that the daily use of such a product can never become safe or comfortable enough, and the ladder itself is not able to compete with stationary and folding models in terms of operational and technical characteristics.
 The ladder should be comfortable and functional
Selection of building materials
In the process of creating an attic staircase with your own hands, namely, its preliminary drawing, you should pay attention to what building materials are usually used in this case. Despite all the variety of products in the segment of building materials, any experienced builder will tell you that there are certain types of goods that show themselves in the best way during operation. As a rule, all the main parts of the structure are made mainly of wood, while fasteners and fixing elements are made of metals. Thanks to the competent selection of materials, the attic staircase with your own hands, the drawing of which was made by a non-professional, will be an order of magnitude stronger and more reliable.
 Folding hinged ladder
How to make your choice?
Due to the fact that building materials for folding stairs to the attic are presented in a variety of price segments, source materials and characteristics, it is quite easy to drown in the sea of information about them. To minimize the time spent on searching and choosing the best options, you should be guided by a number of rules:
- Specify the type of functional purpose of the structure, as well as its main parameters, including design features, sectioning, width, and so on.
- Choose building materials in strict accordance with how actively the product will be used and in what conditions.
- Determine the negative factors that can reduce the operational rock of the product.
 Another typical scheme of an attic staircase
The main thing is to define the function correctly
Any specialist with the required level of qualifications and experience in working with these types of objects will tell you that the final result of construction work on erecting stairs to the attic with your own hands largely depends on the competent determination of the functional purpose of the product. This parameter allows you to calculate the indicator of the permissible load for each step of the product. The standard value of this indicator for a metal product reads about 250 kgf, but wooden models are designed only for 150 kgf. In addition, it should be borne in mind that the above indicators are valid for products made by professionals, while homemade objects have slightly lower parameters. In general, the indicator of permissible pressure on a step does not mean that it will not bear more stress. However, if you overload the structure too often, then it will become unusable in a fairly short time.
 You don't have to make a lot of effort when opening the hatch.
So, the main criteria by which the choice of the optimal option is carried out are as follows:
- free space in the room;
- functional purpose of the object;
- the required angle of inclination of the product.
 Drawing creation must be carried out in accordance with the regulations
Stages of work and their features
Actually, experts say that there is nothing particularly difficult in creating a ladder with a hatch with your own hands. It is enough to adhere to certain rules, proven over the years. For example, when drawing up design drawings, it is worth being guided by the regulatory and technical documentation, in which, in addition to general conditions, specific parameters of standard products are also given. In addition, on the Internet, a lot of ready-made schemes for every taste are offered in the public domain. You can take a ready-made version and start bringing the project to life, or you can slightly modify it in accordance with the individual characteristics of the house.
 Toolkit recommended by experts
Figure 9.
What to consider when designing?
The most general requirements of regulatory and technical documentation can be reduced to a number of simple and understandable conditions:
- the ergonomic range of product width is from 60 to 100 centimeters;
- the best height is three and a half meters;
- the maximum number of steps - 15 pieces;
- the distance between adjacent steps should be about 20 centimeters;
- the step height comfortable for a person reaches about 20 centimeters, a deviation of 2 centimeters is allowed;
- if we are talking about a folding structure, then when creating a project, a permissible load of 15 kilograms is taken.
Tools
Having decided on the independent implementation of construction work, it is very important to stock up on a certain set of inventory, so that during the implementation of the product project you do not stop due to the banal absence of a screwdriver or tape measure. So, the standard set of tools consists of the following items:
- polyurethane foam;
- bars;
- self-tapping screws;
- electric screwdriver;
- hacksaw;
- yardstick;
- anchors;
- screwdrivers.
 Staircase construction is not difficult
Location features
All the nuances of the location of the object in the room will become visible during the construction process. This is especially true if you are engaged in the creation and subsequent implementation of the project yourself. Remember that the product in no way can reduce the comfort of the room. That is why ladders with a hatch are not located in bedrooms, living rooms and kitchens. However, if necessary, you can diversify your staircase project with an interesting design. Thanks to this, the product will be able to harmoniously fit into the overall interior of the room.
Project implementation technology
By following a certain technology, you can quickly and efficiently implement even a complex project. So, if you chose metal as the main material, then remember that the following stages are carried out:
- the drawing is applied to sheets of cardboard;
- the cardboard elements of the future product are cut out;
- hinge markings are applied on metal strips and special holes are prepared;
- prepared parts are fixed to each other;
- the required angle is measured and the structure is moved apart in accordance with the obtained parameters;
- on metal sheets, markings are applied to those places that will subsequently be covered by corners;
- elements are cut out using a special tool;
- an aesthetic appearance of the object is given;
- existing corners are rounded;
- the workpieces are fastened in pairs.
Install a temporary ladder before starting work
As you can see, the technology of work on the implementation of the staircase project with your own hand is quite simple. It applies not only to metal objects, but also to wooden products.
In order for the appearance of the attic staircase to be as attractive as possible, do not be too lazy to carry out preparatory work on the surface of the building material. This is, for example, the application of a special primer before coating the surface with a coloring agent.
Do not be afraid of difficulties, because the technology for the construction of a staircase only at first glance may seem problematic to you and requires experience in the construction industry. Applying the optimal amount of effort will help you achieve maximum results.
For country cottages, private houses and simple country houses equipped with an attic, the presence of a comfortable and reliable staircase leading to the said premises is a common vital necessity.
At the same time, the staircase does not have to be capital and cumbersome at all - you can assemble and install an excellent folding structure, which will in no way be inferior to stationary stairs.
Diy ladder to the attic
You can handle all the related tasks with your own hands, saving money and testing your own strengths.
Choosing the type of stairs
There are several types of stairs that can be installed to access the attic.
Stationary
Attic staircase
Stationary ladder
A staircase with wide flights and handrails is the most reliable, durable and easy-to-use design. However, the possibility of arranging such a staircase is far from everywhere - it is definitely not possible to equip it in small areas.
Portable
Portable option
They are mainly used as a temporary option, as well as for access to rarely used premises. The main disadvantages of such a ladder are low safety and ease of use. Therefore, whenever possible, the use of such a design should be discarded.
Foldable
Folding ladder
They are something between portable and stationary ladders. In terms of ease of use and safety, they are practically in no way inferior to full-fledged stationary structures and, at the same time, have a significant advantage - very little space is needed for their arrangement. Therefore, when making a ladder yourself, it is recommended to give preference to a folding structure.
Choice of materials
An equally important point is the choice of materials from which the stairs to the attic will be assembled. For the main elements of folding sectional stairs, wood is usually used, and fasteners are traditionally made of metal.
Attic stairs
Nowadays, there are many different materials, types of controls and fasteners, which makes it possible to easily assemble a folding ladder that will best suit your particular room.
When choosing materials for the manufacture of an attic staircase, a number of important factors must be taken into account. First of all, decide on the functional purpose of the structure, its type, width, as well as the optimal number of sections.
Attic stairs
The functional purpose of the attic staircase is very important in terms of determining the maximum permissible load on the steps. So, for example, factory-made wooden stairs are capable of withstanding an average load of 150 kgf, metal ones - 250 kgf. For homemade stairs, these figures are slightly reduced.
This does not mean that the steps will not be able to withstand a higher load, but it is definitely not worthwhile to load them so regularly, otherwise the structure will break down very quickly.
Attic stairs, drawing
The width of the stairs, however, should not be greater than the width of the attic opening.
When choosing the size of the attic staircase, be guided by proven and approved standards.
- march width - at the level of 650-1100 mm;
- height - no more than 350 cm. With more significant values, the ladder noticeably loses in terms of rigidity and safety in general;
- the number of steps - up to 15. In some situations, the number of steps can be increased with the obligatory additional reinforcement of the structure;
- the distance between the steps is 15-20 cm, they are usually placed at a distance of about 18-19 cm;
- the thickness of the steps is about 2 cm, it may deviate slightly in both directions;
- the angle of inclination is about 60-80 degrees. To install stairs at a small angle, you need a lot of free space, but a large angle reduces the safety of the structure.
- When designing a staircase, be sure to consider the expected level of stress on the structure.
Ladder dimensions
Remember: the steps must be installed strictly parallel to the floor surface. In addition, the rungs of the stairs must be non-slip. To do this, you can fill overlays of any non-slip material over the main material.
Interfloor opening size
Attic Stair Making Guide
There is nothing super complicated in making the stairs to the attic yourself. Of course, an inexperienced craftsman is unlikely to be able to assemble a structure with the same attractive appearance as factory-made models, but it is definitely worth a try.
Diy attic retractable ladder
Before starting work, create a drawing of the future staircase. In the absence of the necessary skills, order the creation of a drawing from a specialist, or select a suitable scheme from the options presented in open sources.
One of the drawings
Instruments
Prepare all the necessary tools at once so as not to be distracted by the search for missing tools in the future.
You will need:
- hacksaw;
- polyurethane foam;
- electric screwdriver;
- screwdrivers;
- anchor;
- self-tapping screws;
- bars;
- fastening loops;
- yardstick.
Almost complete set
Marking tools
Also, before starting work, you need to buy or assemble an ordinary ladder. For a self-made assembly of such a structure, you only need to fix the transverse steps between two long vertical posts and additionally strengthen the structure.
The finished staircase should be about 30 cm longer than the distance from the attic opening to the floor.
Luke
Simple hatch
With the manufacture of the hatch, you can also easily cope with your own hands. Of the materials, you only need plywood sheets and a 5x5 cm wooden bar.
First step. Choose a location for the hatch and determine its optimal dimensions. Add about 7-9 mm to the dimensions of the hatch on each side, so that in the future you can easily close the lid without squeaks and other noise. Make an opening according to the specified dimensions.
Hatch box
Second step. Cut the timber into four pieces to match the dimensions of the hatch.
A simple scheme for constructing an insulated hatch to the attic
Third step. Make grooves at the ends of the bars. Lubricate the prepared grooves and join the bars into a rectangular (square) structure. Additionally, strengthen the connections with self-tapping screws. Screw on the scarves so that the diagonal does not move.
Fourth step. Attach a plywood cover to the resulting base and try on the product through the hatch opening.
Fifth step. Cut a regular latch into the hatch cover. You will use the handle to open the latch. Attach it to the cover and finally fix the product in the pre-aligned opening. Usually, hinges are used for this.
The hatch should open easily
Simple folding ladder
Start making a folding ladder. It is assumed that you already have the aforementioned wooden ladder at your disposal.
First step. Attach a wide beam to the bottom of the ladder. Attach the same block to the top of the product. In this case, the lower bar must be fixed rigidly, and the upper one - on the hinges.
Second step. Saw the ladder into 2 pieces. The upper part should have a length of about 2/3 of the total length of the ladder.
Third step. Attach a pair of slats for extra diagonal stiffness.
Fourth step. Connect the parts of the structure with hinges.
Fifth step. Secure the top beam under the hatch with anchors.
Sixth step. Secure the bottom of the ladder with a hook so it won't open spontaneously. Place the loop on the stringer above the cutting line.
Seventh step. Press the finished structure to the wall surface and fix it.
The main disadvantage of such a self-made ladder is not a very attractive appearance - all the timber and fasteners remain visible. However, with the main tasks - ensuring a comfortable and safe ascent and return descent - such a ladder copes 100%.
Finished construction
Folding attic ladder with bowstrings
Improved and more attractive version of the previous design. There is nothing difficult in the manufacture of such a ladder, it is enough to step by step follow all the provisions of the manual.
Folding attic ladder with bowstrings
First step. Divide your regular wooden ladder into 3 pieces. Make the first part according to the size of the attic hatch, make the second a little smaller than the first, and the third such that the remaining space to the floor surface is completely covered.
Second step. Take a bevel and measure the angle of the attic hatch. Transfer the corner to the boards, thus marking the location of the steps.
Third step. Drill holes at the hinge locations between the individual ladder sections.
Fourth step. Sand the edges of the structures.
Fifth step. Saw the planks at the hinge points.
Sixth step. Cut and sand the steps.
Seventh step. Prepare the indentations for the steps in the bowstrings.
Eighth step. Insert the steps into the prepared slots. Use glue and additionally reinforce the connections with self-tapping screws.
Ninth step. Connect the sections of the ladder with special hinges. To do this, the sections must be placed on a stable, level surface.
Tenth step. Check the operation of all sections. If you find defects and deviations, try to fix them immediately.
Eleventh step. Sand and varnish all wood surfaces.
Twelfth step. After the varnish has completely dried, install the structure in the opening of the attic hatch. If necessary, make final adjustments to the structural elements.
Ladder
Thus, self-assembly of the ladder is extremely simple and affordable for almost every event. At the same time, the cost of a self-made ladder will be much lower compared to the price of a similar factory-made design. Follow the instructions and everything will definitely work out.
Happy work!
Also read on our website an article - DIY stairs to the basement.
Video - Diy ladder to the attic
 An attic hatch with a ladder is a guarantee of comfortable operation of the structure In many houses, the attic is not just a room filled with junk, but a room quite suitable for rest or work, which is often used. In this case, the question of a safe and comfortable climb to this very room arises. You can, of course, use ladders or other attached structures, but the ladder hidden in the attic hatch will be much easier and more comfortable to use. Moreover, doing such a thing with your own hands is not so difficult.
Folding attic stairs with a hatch: sizes and types
The stairs that lead to the attic are divided into three main types: stationary (they cannot be moved), portable and folding.
The first type is inconvenient because it takes up a lot of space. The second is a rather troublesome option, since the ladder has to be constantly moved from place to place. But clamshells are exactly what you need. They are compact, can be removed at any time and, as a rule, are generally invisible if hidden in a hatch.
The attic hatch, despite all the simplicity of its design, can be:
- Horizontal- the most common type, mounted in the ceiling;
- Vertical- its second name is manhole, the most convenient to use;
- Attic- also leads to the roof, has a complex device, so it is better to order it from specialists;
- Revision- designed more for checking the room (usually used if there is very little space, but you need to monitor the room).
The dimensions of the hatch must clearly correspond to the dimensions of the stairs. Otherwise, there will be difficulties with its operation.
 Folding attic stairs are of three types
- The height of the structure should not exceed 3 meters, otherwise its safety becomes threatened;
- The width of the ladder can be from 60 cm to 1 m;
- It is better to do staircases in the area of 60-65 cm;
- The number of steps should not be more than 15, and their height fluctuates within 20 cm;
- Also, the steps should not slide, and their location should be clearly parallel to the floor;
- The angle of inclination of the stairs is recommended to be made from 60 to 70 degrees.
The hatch cover can be made in one piece or from two identical halves. The latter option is very convenient for a wide opening. In this case, it is not necessary to lift the cover completely.
You can, of course, resort to a simpler option. Namely, buy a hatch with a ladder in the store. For example, in the Ob. You can get acquainted with the products directly in the Internet catalog and choose exactly what you need for your home or summer cottage.
Reliable attic staircase with a hatch with your own hands: drawings and tips
In addition to the size, it is important to decide on the material from which the hatch will be made. Wood or metal can be used to create it, as well as for stairs.
Before starting construction, it is necessary to create drawings of structures and choose a place where it is most convenient to place the hatch.
- The hatch should in no case fall on the floor beam;
- It is advisable not to touch the roof rafters either;
- The direction of the hatch and its location largely depends on the direction of the rafters (you need to focus on them first of all).
 An attic staircase with a hatch can be made with your own hands, but before that you need to create construction drawings
The dimensions of the hatch must match the dimensions of the ceiling opening. Otherwise, the hatch can become crooked, which will complicate its operation, and over time it can lead to cracks in the ceiling itself.
The place where the hatch will be placed will require additional reinforcement in all directions. Moreover, if the attic is not heated, then it is necessary to think about the thermal insulation of the lid.
After creating the drawings and determining the place where the hatch will be located, you can start making it.
Sealed hatch to the attic with a ladder with your own hands
There is nothing difficult in making a hatch with your own hands along with the stairs leading to the attic. You just need to follow a certain sequence of actions and work according to the instructions.
The hatch itself can be a ready-made structure with existing seals on both sides and with external strips around the entire perimeter. With this in mind, the process of securing the hatch can be simplified.
 It is not so difficult to create a sealed hatch to the attic, the main thing is to adhere to the instructions and the sequence
So, the work of attaching the hatch to the attic consists of the following steps:
- Preparing the opening in the ceiling - all measurements can be made while inside the room in the attic. It will be more convenient this way. You can use an electric drill to drill holes around the perimeter of the future hatch. And cut the hole itself with a jigsaw.
- Fitting the hatch - having removed all the overlays on it and leaving only the frame, you need to lean the hatch against the opening and check the tightness. The hatch should fit into the hole like a "glove". At the same stage, you can attach a latch to the hatch.
- Installation and fixing - it is better to do this work together. You need to start from the side of the attic. The upper outer strip is attached directly to the hatch and is fixed in the hole. Then, from the side of the room, the lower bar is attached and fixed to the ceiling. The cover is fastened.
- Checking the structure - do not immediately give the maximum load on the ladder. Better to do it gradually.
If you wish, you can make a beautiful decoration of the entrance to the attic. If you want the hatch to be invisible, it is better to use the same materials that were taken for the ceiling or, on the contrary, highlight it with a bright spot. If the hatch is made of metal, it can be painted.
How to make an attic insulated hatch with a ladder
In order to prevent heat from leaving the room, the hatch can be made with additional thermal insulation. This is not difficult.
The process of creating an insulated hatch with your own hands looks like this:
- From strips of 25 or 30 mm, a rectangular frame is knocked down by 40 - 50 mm less than the opening on all sides;
- The hatch frame itself is sheathed with fiberboard, wooden crate or plywood;
- In order to make the hatch warm, a vapor barrier film is placed on its base, and on top of it is mineral wool, expanded polystyrene or some other insulation material;
- Next, the insulation is fixed with boards and glued, and the other side is processed with fiberboard or plywood;
- Then hinges are attached to the already insulated hatch and to the ceiling, and the opening is sheathed with platbands.
Additionally, the insulated hatch can be protected with a special sealing rubber band so that it “fits” tightly.
 Attic hatch with ladder can be additionally insulated
Installation of the hatch into the hole is carried out in this way:
- Two boards are installed on which the structure will be attached;
- Installation and alignment of the frame is done with special spacers;
- Next, the screws are screwed into the front and back of the frame, and possible gaps are filled with thermal insulation;
- Then the mounting boards are removed and the ladder is checked by laying it out and inspecting for distortions and irregularities.
You can also save yourself time and opt for stairs that already have a hatch with an insulated cover and are produced by well-known companies.
For example, the Fakro company produces ladders that are famous for their practicality, reliability and come complete with an already insulated manhole cover. They are sold pre-assembled, so installation is quick and easy.
In addition to Fakro, it is worth noting the Velux company. Thanks to the constant quality of its products, it has been holding a leading position in the market of its industry for many years. The inhabitants of Russia, Ukraine and Belarus were able to appreciate her products.
All VELUX stairs can be divided into three groups:
- "Economy"- folding structure, consisting of three sections without insulation. Can do a good job in the garage or in the country.
- "Basic"- also has three sections and an additionally insulated manhole cover.
- "Compact"- consists of four shortened sections, has a special insulation. Great for small rooms where it is problematic to put a regular staircase.
As you can see, there is a choice - to make a hatch with a ladder on your own and thereby reduce your costs or buy a ready-made structure.
Standard loft hatch without stairs
The hatch does not have to be with a ladder, it can be without it. It is simpler in design, but also less convenient. After all, the ladder will still have to be attached or somehow fixed.
The hatch itself is quite simple to make. As a rule, for these purposes, wooden blocks are used, which are assembled into a rectangle and screwed in at the corners with self-tapping screws.
 A standard hatch without a ladder can be made by yourself, and without much effort
Installation of an attic hatch in the opening looks like this:
- Fixing the hatch in the opening - this can be done by putting it on the boards laid across the opening to the ceiling;
- Fastening the hatch - this must be done so that the distance on all sides between it and the opening is the same;
- Next, wooden inserts are inserted into the slots and at least 3 self-tapping screws are screwed in on each side;
- The empty space between the opening and the hatch is blown out with foam, and after it dries, you can deal with cladding and finishing.
Actually, that's all the work. This is easy even for a beginner to do. The main thing is not to be afraid and boldly get down to business.
How to mount an attic hatch with your own hands (video)
Creating an attic hatch with or without stairs is troublesome, but not difficult. You can buy a ready-made structure and simply assemble it, or you can do it yourself by purchasing only materials. This is the choice of everyone. In any case, there are options on how to make the entrance to the attic beautiful, convenient and safe.
What can be an attic hatch with a ladder (photo examples)


This article provides step-by-step instructions on how to create a folding loft staircase. You will learn how to properly assemble the main hinge element, from which to make ladder sections and how to securely fix the structure in the installation position. The article contains diagrams and drawings.
Inventory factory stairs to the attic are a fairly common product that can be purchased at many hardware stores. However, budget options are not always reliable, and strong branded products cost accordingly. Making the necessary item or device with your own hands from scrap materials is very popular among home craftsmen. The attic staircase is no exception.
Material for work
To assemble an analogue of a factory product, you will need high-quality materials that may be available, especially during construction:
- Bar 50x50 (pine) 1st grade - 20 lm. m. The frame of the cover and opening will be made of it.
- Plywood 8-10 mm - 2 sq. m. Needed for lid trim.
- Board 100x25-30 mm - 15 linear m. Will go on steps and bowstrings.
- Steel strip 3-4x20 mm - for flexible knee fasteners.
- Corner and plate 3-4 mm - for the main mechanical element.
- Bolts, nuts, washers, grovers M12-M14.
- Self-tapping screws.
Tool:
- Plotnitsky - saw, screwdriver, goniometer.
- Locksmith - welding machine, electrodes 3-4, grinder.
- Workbench and clamps.
Operating procedure
First of all, you need to choose a place for the stairs and make an opening. If necessary, trim and install intermediate beams in the floor - 6-7 mm larger than the size of the intended cover. Further, according to the size of the hatch, you need to assemble the cover itself - from a bar and plywood. The design can be arbitrary, but it must be reliable (it is better to glue the connections). The bar on one of the short sides should be rounded so as not to interfere with the opening of the lid.

Assembling the hinge mechanism
This is the most critical structural element. To make it you will need: a steel corner, a plate and strips with a thickness of at least 3 mm. The shape of the parts is clear from the diagram, but the dimensions of the drilling site should be determined individually, based on the situation in place. The manufactured parts must be of high quality, they must be cleaned and the edges processed.
 1 - thrust plate; 2 - corner, top view; 3 - short curtain; 4 - long curtain
The key point is determining the opening angle. This angle is very important and figures in the manufacture of the plate. In order to set it correctly, project the future march on the ground - stretch the thread and experimentally (by choosing the best position) set the desired angle. Fasten it securely to the protractor - it will be needed when making steps.
The resulting angle must be transferred to the part, namely to the plate. To do this, set the mechanism to its original position, apply a protractor and move until the angles of the angle shelf and protractor coincide. Then mark the plate along the resulting trajectory and cut out the travel area of the part.
Pre-drilled holes in the plate for mounting to the beam. We assemble the mechanism on bolts through washers.

After a rough assembly, you need to try on the assembly in place, make money and exactly reproduce the procedure for opening and closing the hatch. If you find flaws in the move, fix them.
Then you need to make a response mechanism. He must completely repeat the first, but in a mirrored form. Use clamps and a workbench - clamping parts together, you will achieve complete identical dimensions.


Make adjustments and final assembly empirically. When open, the cover must follow the angle projected by the cord exactly.
Making sections
Calculation of the length of each section:
- 1st - opening length minus 10%
- 2nd - length of the first minus 10%
- 3rd - march length minus the sum of the first two
Let's assume that the march length is 2500 mm. Based on the length of the opening 1200 mm:
- 1st - 1080 mm
- 2nd - 972 mm
- 3rd - 448 mm
We mark out the whole boards according to the calculation and transfer the march angle to the bowstrings.
Attention! Bowstrings must be installed mirrored! Consider this when marking and drilling.
At the joints of the sections we drill Ø 25 holes - mirrored through one.

All parts must be properly processed with sanding tape, chamfers must be rounded in order to bring the quality as close as possible to the factory one.
Then we cut the grooves for the steps according to the marking. We select the wood with a chisel.

The structure of individual sections is assembled on self-tapping screws 65 mm with a press washer through D-3 wood glue.

Knee loops can be made from the same strip as the opening mechanism. To do this, we cut 4 strips of 160 mm and 4 strips of 120 mm, round off the ends. To four of them we weld on legs up to a length of 160 mm with a hole of 8 mm. You should get 8 parts of the same length, but 4 of them with a step.
Assemble the individual plates into hinges using bolts.

Assembly of sections and installation of stairs
Lay out on a flat surface and install the finished section hinges so that the mounting bolts fall into the holes in the tree. Install the hinges on the M8-10 bolts.
After assembling the first elbow, check the system for operation. Correct the misalignment if necessary.
Then attach the lower short elbow and test the system.

Now the ladder remains to be mounted in the design position - on the hatch cover. Use screws for installation (self-tapping screws are not reliable). If, after installation and testing, everything works without distortions, the structure can be dismantled for painting. Use varnishes and metal spray paint.
Subsequently, the design can be complicated and made more convenient by adding to it:
- Additional hinges to eliminate backlash.
- Spring to support the structure to make opening easier.
- Lock-retainer.
- Handrails.
- Use decorative trim and additional insulation.
Finished staircase view:

The issue of finishing and insulation is decided locally, based on the needs. You can trim the lid with any material that fits into the ceiling. Basically it is plastic - lightweight, inexpensive and with an additional layer of air. The difference in price between the "home" and "store" folding ladder is about 90% ($ 80-150). The work required only a few new boards, a covering for them and hardware.
Attic staircase drawings are not particularly complex. But a number of features for calculation and design should be taken into account. Then the resulting structure will meet the basic requirements for safety and ease of movement between levels.
Name of the elements of the folding ladder to the attic
Before choosing a ladder, you should pay attention to a number of important points:

All these points will help you quickly navigate in the choice of the type of construction. There are the following classifications of attic stairs:

More often, aluminum structures are found. Metal and wood can be combined.
Technical requirements. Calculation data and formulas
Attic stairs must meet the following specifications:
It is not difficult to make a staircase to the attic. You should start with the calculations of the parameters and the drawing. To draw up a diagram not "by eye", the following data will be required:

Folding ladder schemes
Such structures do not require more space for arrangement; they can be organically fit into the interior or hidden in the attic. The proposed options will help you to equip your home ergonomically.
Drawing No. 1
This type is a device of two folding sections.
This option is suitable for attic openings located near the wall.
When developing a drawing, the following points are taken into account:

This staircase is not particularly aesthetically pleasing, but when assembled, it practically does not take up space.
Drawing No. 2
This option, like the first, is attached to the wall, but through one string. The requirements for it are slightly different:

This staircase is a little more complicated than the previous one. But the following type of device has gained great popularity.
Drawing No. 3
This type of structure, when folding and closing the hatch, is retracted into. The most convenient option, as it does not take up space in the residential part of the house. If the width for the previous structure could be arbitrary, then for this type of staircase this parameter is related to the dimensions of the opening. The main subtleties in design and assembly:
The attic staircase with your own hands, the drawings of which are presented, are made simply. Some craftsmen also make the hinge mechanisms for the hatch themselves.
Many owners of private houses, in order to get to the attic space, use an attached or stationary staircase installed on the street. Of course, for the sake of safety, such a ladder is fully justified, and will never become superfluous. However, for use in the winter, and especially in cases where an utility or even a full-fledged living room is equipped in the attic, it will be much more convenient to provide for the possibility of entering directly from the house.
But it often happens that the stationary construction of an internal staircase requires a very large area, and therefore cannot be implemented in practice in a small house. And even if the area is sufficient, it hardly makes sense to "squander" it if the attic is not used constantly, but only from time to time. What should I do? And there is a way out - this is a "transformer" construction, which is removed as unnecessary in the attic floor. So, the topic of this publication: do-it-yourself folding stairs to the attic - the most optimal option for both large and small private houses.
General information about folding ladders to the attic
What do they say about the advantages and disadvantages of such designs?
Folding ladders, if their design is thought out, safe and easy to use, are very convenient. However, they also have their drawbacks, which you also need to know about in advance, starting to similar reconstruction of one of the rooms of the house.

So to the advantages of a folding ladder structure include the following points that will greatly facilitate the operation of the attic space:
- The ability to safely enter the attic at any time, regardless of the season or current weather conditions.
- The compactness and ease of operation of a high-quality structure allows all residents of the house to cope with the folding and unfolding of the stairs, since no great physical efforts are expected.
- The folded structure does not take up useful space both in the living room and in the attic. In the absence of the need, the staircase is most often removed into the opening of the attic floor, saving free space.
- A hatch in the ceiling, which is necessary to accommodate the staircase, with a high-quality finish from below does not at all spoil the appearance of the ceiling surface.
- When purchasing a ready-made design, it is quite possible to choose a model with an electric drive. This is, of course, extremely convenient, since if necessary, bring the ladder into working condition or remove it - you will not have to make any effort at all. However, in order to install this version of the ladder, you will have to invite a specialist. Yes, and there are such kits - quite a lot.
The disadvantages of installing this structure in the attic floor include the following:
- Be that as it may, folding ladders, in contrast, do not always meet the criteria for maximum convenience in terms of the steepness of the rise, the number and size of steps.
- Based on the first point, the second suggests itself - climbing and descending such staircases still requires care and special precautions. This will especially apply to children, older people or those with some physical disabilities.
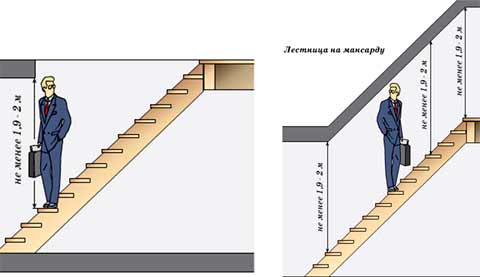
- No matter how tightly the hatch fits into the opening cut out under the stairs, it will still deprive the ceiling of its tightness. Therefore, in order to prevent cold air from above (or, conversely, hot air - during the summer heat) from entering the living rooms, the attic will have to be insulated. This certainly leads to additional costs. True, you can consider this problem from the other side. If it is planned to equip an utility or living room in the attic, then in it, one way or another, it is necessary to carry out thermal insulation work on the roof slopes and perform flooring with
Criteria to be met by a folding ladder
In order for the ladder to be used for a long time and to be safe for its owners, it must meet certain criteria, regardless of its design and material of manufacture.
Folding ladder prices
folding ladder
These qualities of the product include:
- The strength of the material of manufacture, all fasteners and connecting nodes.
- Ease of construction in terms of weight. This is important not only for the ease of use of the stairs, but also so that when folded, it does not give an excessive additional load on the attic floor.
- Ease of use - any adult member of the family should cope with the process of bringing the ladder to "combat readiness" and its folding.
- Hinges folding the ladder or other units and devices should function easily, without even the smallest difficulty.
- If the staircase will be used constantly, in view of the fact that it is supposed to locate a frequently used room in the attic, then it is better to make the product yourself or order it to a good master to be sure of its reliability, and therefore, of your personal safety.
Why is it better to make your own ladder?
Today, a considerable number of models from different manufacturers are presented on the construction market. They are usually quite convenient to use, but if they are not used very intensively. If the ladder unfolds and folds several times a day, then a more durable mechanism will be required, since the offered products may not withstand such intensive use due to the fact that each of them is designed for a certain "motor resource".
Finished stairs almost always have a small slope angle relative to the vertical. That is, the manufacturer makes them too steep, so it is inconvenient to climb and descend along them, especially holding a certain load in one hand, and insuring yourself with the other. The reasons, as you can see, are very significant, and therefore many home owners prefer not to buy ready-made kits, but to mount them on their own according to their own drawings, calculating them for their own weight and equipping them with durable mechanisms.
The main types of folding stairs to the attic
Before purchasing or manufacturing a folding ladder, you need to decide on its design, since there are several of them. So, the following types of ladders have been developed and manufactured on an industrial scale and independently: retractable, folding spring, telescopic, folding with a simplified design, simple folding compact ladders.
Retractable or extendable ladder
The retractable staircase structure can consist of two or three sections, depending on the height of the attic floor.
- First option
The upper section of the structure is fixed with a metal flange on a transverse board, which forms a box of the opening, which is arranged in the attic floor. Each of the sections, when the ladder is folded, slides into the part located above, like along a rail. The assembled sections of the staircase are transferred to a horizontal position and laid on the floors of the attic. The hatch in this design can be fixed to the upper and shortest section, in which case the entire staircase will be hidden when the hatch is closed. The hatch can also be closed separately, that is, first the stairs are sent to the attic, and then the hatch is closed.

1 - Beam of the attic floor.
2 - Screw flange.
3 - Retractable ladder sections.
4 - Swivel mechanism.
This illustration shows how the retractable ladder works. However, it is quite obvious that it can only be suitable if the attic is not used as a living space and is visited quite rarely, and not constantly.
- Second option
Another variant of a sliding ladder, consisting of two sections - a short one fixed on the hatch cover, and a long one, which after unfolding will rest against the floor surface of the room .. This option is also suitable for an attic used as a utility room. So, if you need to get to the attic, the hatch opens, and with it the stairs descend. Then, from the folded structure, its lower part is pulled out all the way to the floor.

When unfolding the stairs, the passage to the attic is freed up. In ready-made, factory versions of sliding or folding ladders, the hatch is equipped with its own thermal insulation. And a seal is installed along the contour of the opening so that warm air from the room does not leave through the gaps around the roof hatch. We must not forget about such methods of minimizing heat losses when making a ladder on your own.
Folding ladder
A folding ladder differs from a sliding ladder in that its sections do not slide into one another, but fold together. This is ensured by special hinge mechanisms installed in the spans connecting nodes. The construction is folded according to the accordion principle. Top section fixed on the hatch panel, onit folding handrails are also installed, which make it easier to climb to the upper floor or attic.

The advantage of this design is that it does not take up more space than the opening in the ceiling, as it is completely hidden in a special box, which frames the opening hatch. Therefore, having climbed to the attic, the stairs can be lifted so that it does not interfere on the lower floor, and in order not to accidentally step on the hatch, being at the top, you can provide an upper strong hatch or an opening fence.
Ladder prices
ladder

The diagram above shows a finished design, one of those offered in specialized stores. However, focusing on it, it is quite possible to make a staircase yourself. How to do this will be discussed in detail in the instruction table below.
The diagram shows a box framing the opening. It is equipped with an elastic rubber gasket, thanks to which the hatch will be tightly, without gaps, pressed against the inner walls of the box.
The hatch of the shown design is made of chipboard, but by making such a ladder on your own, it is quite possible to replace it with boards by assembling a shield from them. For this purpose, it is recommended to choose a lightweight porous wood such as linden or pine.
The wooden steps are equipped with an anti-slip coating. When making a ladder yourself, you can use a router to cut grooves on the steps, in the form of two or three grooves, passing along the entire length of their surface.
The treads are fixed in the side posts of the ladder sections with a dovetail joint, which is more reliable than straight tenons.
Scissor type metal ladders
Another option for a folding structure is the so-called scissor ladder, which is made of metal. As a rule, aluminum is used for this purpose, due to its low weight. The design has proven itself quite well, especially for those cases when the attic has to be visited quite often.
The advantages of this type of stairs include its versatility. This means that the modules forming the steps can be stretched "to the full" if the room has a high ceiling, or they can be compressed to a certain level, of course. The main thing is that the lower step rests on the floor. Thus, the staircase is designed for a certain, and quite considerable range of ceiling heights.
When folded, such a ladder is quite compact and does not go beyond the box intended for it, installed in the thickness of the attic floor.

The disadvantage of such a scissor design can be considered that certain efforts must be made to install and fold it. This can present a problem for some residents of the house who do not have the necessary physical data.
It is quite difficult to make such a ladder on your own, since the most accurate fitting of metal parts is required, and the design itself is replete with hinged joints. Yes, this is also unprofitable, since the material for self-production will probably cost no less than the cost of the finished product.
A folding ladder for summer cottages, country houses, and cottages with attic rooms is becoming a vital necessity. It should not take up a lot of space, because every square meter is important in a country house. In addition, a great advantage of the ladder will be its mobility. Foldable designs save space and are easy to install. To complete all the related tasks for the construction of such a staircase, you can do it yourself.
A folding ladder to the attic can be located both indoors and in the attic itself. The second option is more profitable in terms of saving living space. According to the construction of the manufacture of stairs, there are the following types:
- monolithic (marching or screw);
- folding (lever, telescopic, scissor or folding);
- portable (attached or stepladders).
Portable structures are used very rarely, mainly when performing construction work. The most convenient option is monolithic products, which have wide flights and are equipped with handrails. However, they are not suitable for access to the attic, since they are large.
It is better to use retractable structures that are safe to use and easy to install. In addition, when folded, they do not take up space in the room. Thanks to the variety of possible designs, you can choose the most suitable staircase for your home.

Transforming stairs
For the manufacture of folding attic stairs, wood and metal (most often aluminum) are used. This combination produces the best results. Wood is necessary to create flights of stairs (the weight of the structure is reduced), and metal parts are most often corners, fasteners and mechanisms that ensure the rigidity of the structure.
For stairs, choose solid wood (birch, ash, larch, beech, maple). The beam must be chosen at least 2 cm thick. If the ladder will be used quite often, you should think about the metal structure. The manhole cover should be filled with foam for greater thermal insulation. Dimensions of stairs to the attic:
- the optimal march width is 65 cm;
- the average number of steps is 15;
- the optimal step width is 19.3 cm;
- the thickness of the steps is not less than 18 mm;
- the optimal angle of inclination of the structure is 60-70 degrees.

To prevent the ladder from sliding on the floor, it is worth putting on special overlays on each bowstring.
Scissor
Such stairs are made entirely of metal. Their other name is accordion stairs. They are lightweight, compact, easy to attach to the hatch. However, scissor ladders have one drawback - over time, during their operation, a creak appears. They need to be lubricated periodically.
Telescopic
In this case, the folding ladder has several sections that fold into one another. They are usually made of aluminum. Domestic summer residents are wary of such stairs and prefer transformers to them.
Sectional articulated products are more in demand. They are more bulky and difficult to install, but they have high strength and durability. How a retractable ladder to the attic is made is described below.

Location of the stairs
There is one main requirement for the location of the stairs - it should not interfere with residents when moving around the house. That is why it is not installed in a bedroom or hallway. Sometimes it is possible to establish a staircase as a piece of furniture - if the size of the room allows. In this case, it is not necessary to hide it.
Making a two-section ladder
A folding ladder should have a simple and practical design, it is worth looking at the option with two sections. To make such a ladder, you will need a small amount of tools and materials:
- hacksaw;
- ladder;
- roulette;
- timber 2-3 cm thick.
- loops along the width of the stringer;
- hook, screws, anchors and hinges.
First you need to carry out the preparatory work, then make the ladder, and then install it correctly.

Preparatory work
First, dismantle the old structure, consisting of a staircase and a decorative frame, equipped inside the passage. Then you need to pick up the bars for the flights of stairs. Each bowstring must have a cross section of at least 30 * 50 mm. The optimal slope of the attic staircase in a small room is 60-70 degrees. It must be taken into account when calculating the length of the stairs and the angle of inclination of the steps relative to the stair racks.
It is worth arranging a two-section staircase when the attic passage is located in the immediate vicinity of one of the walls. The foldable structure will hang directly on the wall. The presence of only 2 sections does not allow it to be hidden in the attic directly above the aisle.
Making stairs
First, the bottom and top of the ladder are assembled. This will require 4 bowstrings and steps. The bottom should be 1/3 of the total length. Then it is necessary to strengthen the upper part with diagonal slats to give it more rigidity. Then the structure is connected together using loops. A bar is attached to the top of the stairs, which will later be screwed to the wall.
The ladder is attached to the wall using a pre-screwed bar. It should be installed directly under the hatch. The advantages of such a design are obvious - a minimum of parts and efforts in manufacturing, ease of installation, ease of construction. The disadvantage of a two-section staircase is that it remains visible.

To avoid such a situation, it is worth building a more complex structure. The best option is a ladder with 3 sections. It can be easily hidden in the attic and used only when needed.
Three-section
The most compact version of the staircase to the attic is a hatch with a folding structure of 3 sections attached to it. These items are sold in stores. They are made of steel, small in size and made of steel. You can also build them yourself. Wooden blocks are most often used as a material. To build a staircase to the attic with your own hands, you will need to perform a certain sequence of actions.
How to make a sunroof
Before making the hatch, it is worth calculating its dimensions. If the hatch to the attic is 125 * 70 cm in size, then the passage should be cut 7-8 mm larger on each side. This will make it easier to open and close the hatch. The level of thermal insulation from such a gap will not decrease.
As materials you will need:
- Bars 50 * 50 mm - 2 long and 2 short.
- Plywood 10 mm thick.
Now you need to build a hatch. To do this, 4 bars are attached to each other, and then a sheet of plywood is nailed to them. Check the diagonal before attaching the plywood. So that the construction of the bars does not "lead", you need to nail the kerchiefs to the corners. After the hatch is completed, it must be tried on in the opening.

So that there are no locks outside, and the hatch closes well, you should cut the door latch into the cover. It will hold the hatch perfectly and open comfortably.
Opening mechanisms
Now it's worth tackling the most difficult thing - creating opening mechanisms. In order not to complicate and delay the process, you can buy them at a hardware store. However, if there is a desire to do everything with your own hands, you should adhere to certain rules.
To begin with, they carry out drawings of the future design, taking into account the opening angle of the hatch. To make a hinge on which the hatch will open, you will need:
- pieces of sheet metal;
- one corner;
- two metal strips of different lengths.

Holes are made on the hinges according to the preliminary drawings. Then they connect everything together without tightening the bolts too much. You can determine the opening angle empirically. To do this, the hatch is opened to the desired angle and marks are made on the metal. Then the area that interferes with the movement of the corners is cut out with a jigsaw.
Now every corner is locked in position. To make the mechanisms identical, first one is completely made, and then all the details of the second are made according to the finished sample.

For greater strength, the hatch is connected to the opening with a supporting structure made of corners and metal strips. Pieces of metal are welded to the end of the upper strips, against which the lower strips will abut. The corner becomes a reference platform. The result is a hinge mechanism that is bent when the hatch is opened.

Ladder
The staircase itself is made of wooden planks. For bowstrings and steps, an inch board of 100 mm is suitable. The first section is made according to the size of the hatch. The length of the second can be equal to the first section, provided that it will not touch the ceiling during unfolding.
For the third section, the length is chosen that remains to the floor. The tilt angle is measured with the hatch open. Then it must be transferred to the board, marking the steps. Then the length of the sections is marked. All the markings that were made on the first board should be transferred to the second. All lines should be mirrored.
Where the hinge hinges will be located, it is worth drilling holes. The upper one is drilled directly at the junction of the bonded boards, the lower one is drilled on their outer sides. To make the holes look more aesthetically pleasing, it is worth additionally walking over them with a router.

Then the boards are sawn at the junction of the segments. After that, the steps are cut and all the elements are ground. Small recesses are made on the bowstrings, into which the steps will be inserted. As soon as all the structural elements are ready, you can start assembling.
Marching loops
The next stage in the manufacture of stairs is the execution of loops for connecting staircases. To do this, you need to find 8 metal strips 25 mm wide. On 4 of them, you need to weld a small piece of the same strips. 3 holes are drilled in each. One will serve as a point of connection with the hinge, the others - for screwing to the ladder.
To connect the ladder segments, they must be placed on a flat surface. The hinge must be screwed so that the bolt goes into a groove specially cut for it - in the center of the connection of the sections. After screwing on the loops, it is necessary to check the section for flexion-extension. Only after the check has been carried out can the 3 section be screwed on. After all the procedures have been completed, you can remove the hatch and screw the ladder to it.

Each staircase, regardless of type, should be comfortable. In addition, when performing an attic structure, it is worth adhering to the basic rules:
- folding mansard ladders should not be more than 3 meters;
- metal steps should be equipped with anti-slip pads;
- wooden models are not installed in too dry or damp rooms;
- mechanisms and fasteners must be strong and reliable;
- from time to time, rubbing parts of the product should be lubricated.
Such rules will be useful in the manufacture of attic stairs.
As you can see, making an attic staircase with your own hands is simple. In the process of its manufacture, certain recommendations should be followed, and a detailed drawing should be made before starting work. In the process of work, you should be careful, especially when working in the attic near the opening.