How to properly install the battery in the apartment. Replacing heating batteries
It is difficult to imagine a cozy home without a heater or a simple radiator. Most likely, no one will live in a freezing or terribly damp house. In such a house, people are constantly sick. A similar problem is relevant for Russia with its harsh climate, which is why the heating season in the country lasts about six months.
Radiators are already provided in all houses, but sometimes it happens that even if there are several batteries, the house does not warm up well enough. In this case, if the winter is especially cold, and the existing batteries cannot cope with the frost, or there are simply no heating devices in some room, the installation of heating radiators is needed. With them, there will be no terrible humidity in the house, leading to fungal infection of walls and furniture, there will be no terrible cold, from which teeth drive.
Why is a radiator, or in other words, a battery so good at heating rooms?
The heating radiator device is very simple. Hot water circulates through it, it transfers heat to the metal frame, and it heats the air. Hot air rises to the ceiling, and cold air descends. This movement of air is called convection. To make convection more efficient, the installation of the radiator is always the same.
In order for the house to heat up better, it is advisable to install a heating battery near the window and as low as possible. Then all the cold air that enters the house from the street will immediately heat up and will not be able to cause discomfort to the residents.
Important things to remember before starting the installation of heating radiators.
It is very important to choose the right type of radiator. After all, not all of them are the same: some radiators are expensive and not efficient enough in certain cases, while others are too massive for the room in which they want to be installed.
It's worth starting with steel radiators. The installation of steel batteries was very popular during the Soviet era. Such radiators have a very low inertia and a fairly large heat transfer. Their price and energy consumption please everyone, but still such batteries are not very durable.
After the water is drained from them, which is usually done at the end of the heating season, the radiators begin to rust from the inside. Well, also, they are bulky and therefore the installation of a steel radiator is not suitable for all walls and brackets.
Lighter and more comfortable radiators are made of aluminum. They have a very high heat transfer and heating rate. If the oxygen shell of aluminum dissolves, then the metal will become very active, which means that the corrosiveness will increase.
The installation of cast iron radiators is also popular in Russia. These radiators, unlike the previous two, can last up to half a century, and all because of the inactivity of the metal. Also, cast iron has a high heat capacity, so after the heating is turned off, the heat will remain for several more hours. However, the heat capacity also has a negative side - after connecting such a battery to the heat supply unit, you need to wait a long time for it to heat up.
For those who want to use the best properties of aluminum and steel radiators, bimetallic batteries have been created. Their core is made of steel and the shell is made of aluminum. However, before installing heating batteries made of two metals, you should make sure that there is enough money, because their prices are very high. But for the sake of a long service and high heat transfer, you can give any money.
There are more difficult to install radiators that are mounted directly into the floor. They almost do not take up space, evenly warm up the room, and at the same time they do not fog up the windows because of them. However, the installation length is very high and due to the fact that the radiator is located under the floor, the heat dissipation is low.
Why shouldn't a layman try to install a battery?
Installing a heating radiator is a very difficult task, it must be done with high precision. The slightest deviation from the standards can lead to a drop in heating efficiency.
In general, those who do not understand the installation of plumbing equipment can make many mistakes. Here are a few of the most common, after which the installation of a radiator will not bring the desired benefit:
- Installation in the wrong place;
- Wrong way to connect;
- Improper handling and care.
Even if the radiator is installed correctly, which is very unlikely for a layman to work, the radiator can be placed in a location that reduces heat dissipation. For example, if you place a battery in a decorative box, the heat output will drop by 15 or even 20 percent. And if the window sill is very large, then the radiator under it will lose about 10 percent of the heat.
Installing radiators and then connecting them incorrectly can be a waste of money. When the inlet and outlet are connected to the radiator from the same side, an increase in the number of sections will worsen the condition of the system. In this case, the first section will be heated to the required 80 degrees, and the rest will be much less.
Even if somehow the installation of the heating radiator was successful, it was connected correctly and everything is going well, improper battery care can ruin everything. For example, if you paint a radiator in several layers, the heat will be trapped by an air gap between the layers of paint, so the heating of the room will deteriorate. If we paint, then only in black, then the heat transfer will increase, but quite a bit. Also, do not paint the radiator white, this will slightly worsen the heat transfer.
Installing the battery correctly isn't too difficult
Self-installation of heating devices is a task for which you need to carefully prepare. The slightest violations of the simplest process in the opinion of an amateur often lead to negative emergency consequences. Therefore, it is advisable to entrust the replacement of batteries in city apartments to plumbers, on whose powerful shoulders the whole burden of responsibility will fall, and in a private house the installation of heating batteries with their own hands can be successfully performed by the owner. However, in order not to have to repair the floors and re-glue the wallpaper after a hot "flood", you should familiarize yourself with the information about the basic rules and nuances of installation.
Preparatory stage of work
The first step is to find out what type of wiring was used when organizing the heating system. The owners who arranged it on their own should know whether the heating network provides heat to their suburban estates.
Before you start installing a radiator, you should find out the one-pipe or two-pipe heating circuit in the house, the choice of parts and their number depends on the wiring diagram
Parts required for installation
Parts are selected depending on the design features. For a battery built into one-pipe heating, it will be necessary. This element will allow in the event of any malfunctions to turn off only the device equipped with a bypass without shutting off the entire heating system, which is highly undesirable in frosty weather.
The connection diagram and the type of radiator also determine the number of connecting and functional elements required for proper installation. Adapters, couplings, nipples, corners are selected according to the scheme and dimensions.

An inexperienced performer should not get carried away with details for mounting a radiator, which are unnecessarily difficult to install: 1) corners, 2) radiator shut-off valve, 3) "American", 4) a tap with an American
The future installer will also need shut-off valves. It is recommended to choose the radiator type of shut-off valves, without being carried away by too complicated ball valves with "American", which require professional skills from the contractor. It is problematic to ensure tightness without experience. To connect the battery to the pipeline, you will need squeegees with threads corresponding to the dimensions of the radiator and pipes. A sleeve will still be screwed onto the drives, which is then twisted and inserted into the battery.

With the help of squeegees, it is easier and easier to connect the radiator to the heating circuit - no need to weld the joints of the supply and pipeline
It is important to note that when purchasing for installation, you must first check whether the brackets included in the kit correspond to the type of material from which the walls are erected.
In order for the battery to be able to release air, it must be equipped with a Mayevsky crane. Usually it is available in the factory configuration, but if it is not available, you will need to buy it.

An important detail required for the correct installation of the heating radiator is the Mayevsky tap, which is required to bleed air from the device.
How do I calculate the location?
Those wishing to install the radiator on their own should know that the pipe sections leading to the devices must be placed with a slight slope directed towards the movement. In the case of a strictly horizontal laying, as in the case of a slight distortion in the installation of the radiator, air will "collect" in steel or cast-iron batteries. It will have to be constantly blown out by hand to avoid heat loss.
It is desirable that the central axis of the radiator coincides with the axis passing through the center of the window opening. Deviations of 2 cm are permissible, which are absolutely not detectable visually. This recommendation is not a strict requirement.
In the list of strict rules:
- The elements of the supply to heating devices should be located so that the slope is 0.005, it is recommended to increase it to 0.01. That is, one meter of the pipeline should be inclined towards the circulation by at least 0.5 cm. The angle of inclination should be calculated according to the length of the pipe sections to be installed.
- From the plane of the floor to the battery 6-10 cm or more.
- From the bottom line of the sill to the top line of the radiator 5-10 cm.
- From the wall surface to the radiator 3-5 cm.
When installing a radiator, a prerequisite is compliance with the horizontal and vertical directions.

Norms and rules for installing a heating device: distances from the floor, walls, windowsill
In order to increase the performance of the radiator, a specialized shield made of heat-reflecting material can be installed on the wall located behind it before installation. You can simply coat the wall surface with a compound with similar properties.

For aesthetic and technological reasons, the radiators in the same room are located on the same level
Battery layout with brackets
The sectional principle of selection of heating devices allows you to accurately determine the number of sections required to heat a room with specific technical conditions. You need to find and study information about the rules of calculations before buying. But according to the installation rules, 1 m² of the heating surface area of the battery is equipped with one bracket.

Brackets for mounting radiators: home-made from above, factory-made from below, if desired, a home craftsman can easily do it himself by analogy with factory-made battery mounts
So, here's what to do:
- Taking into account the above rules, we mark the installation points of the brackets.
- Before drilling the holes, check all the distances again.
- We insert dowels into the drilled holes, into which we then screw the fasteners.
If the markings were done correctly, the battery will firmly "lie" on all installed supports, firmly resting on each of them. Further installation of the radiator with your own hands consists in connecting the device to the communication system.
Tools and supplies
The contractor will need torque wrenches with dimensions that allow them to maintain the torque moment with high accuracy. Since the coolant moves through the system under pressure, insufficient tightness will lead to a jet from the junction. Over-tightening will cause the threads to break, with similar consequences. Therefore, you should carefully follow the instructions supplied with each device. They indicate the value of the torque moments.
You will need to stock up on a sealant, tow soaked in oil paint, or a special sealing tape.
Directly the installation process
Before starting work, it is necessary to completely shut off the heating circuit, drain the water from the system, the pump will help to remove the remains of it qualitatively. Let us carefully check with a level the battery hung on the supports vertically and horizontally.
- Unscrew all plugs from the device.
- Connect a valve-equipped bypass, required only for the one-pipe circuit. For connection to a two-pipe circuit, a bypass is not needed; for connection, only a squeegee with a valve connected to it is used.
With the help of threaded squeegees, we connect the battery to the system, to seal the joints using tow or another sealant (if you have experience in welding, the joints of the squeegees and the pipeline can be welded).

A bypass is required to connect to a single-pipe circuit - connection diagram: 1 - tee for metal-plastic pipes; 2 - direct control valve; 3 - direct shut-off valve; 4 - adapter for metal-plastic pipes; 5 - rotary valve for air release
It is important to note that until the end of the installation with, and the devices do not need to remove the packaging shell.
Installation is complete, but more will be required. To implement it, you will need to call a plumber. His experience will be useful, and the device, which does not make sense to buy for the sake of installing several batteries.
The specifics of installing a cast iron radiator
No matter how intensively the manufacturers of innovative batteries promoted their aesthetic ultralight aluminum and bimetallic products, there are still many adherents of cast iron. The material, which does not please with elegance, retains heat for an incredibly long time, gradually transferring it to the heated space. Those wishing to learn how to properly install a heating radiator made of heat-intensive cast iron should familiarize themselves with the specific design features of the device and its installation:
- Before installation, a cast iron battery will need to be unscrewed, adjusted nipples, and then reassembled. Disassembly is carried out on a workbench, wielding a pair of radiator keys inserted into the nipple holes. To increase the applied force and to fix the key in the eyelet for unscrewing the lower nipple, insert a crowbar. To avoid skewing, both top and bottom nipples are unscrewed at the same time. It is more convenient to do the work together. When unscrewing the cast iron radiator, pay attention to the direction of the threads. Cast iron radiator threads on opposite sides. Have you deployed? Take off the section.
- By analogy, you need to screw all the sections, and then, in a strict reverse order, group them into a single device with the number of sections required to heat a particular room. The assembled battery must be crimped, if a leak is detected, adjust the nipple in the problem area.
- Cast iron wall batteries can be fixed on brick and foam concrete walls. Walls made of wood will not support the weight, so the owner of a wooden house will need radiators with special floor supports. However, supporting fasteners must be installed on the walls as well.
- Since in private houses mainly single-pipe heating, a bypass is being installed. In the connection diagram, there must be a Mayevsky valve and the corresponding shut-off valves.
Connection to the pipeline is carried out using threaded squeegees. It is better not to use a welding machine in wooden buildings.
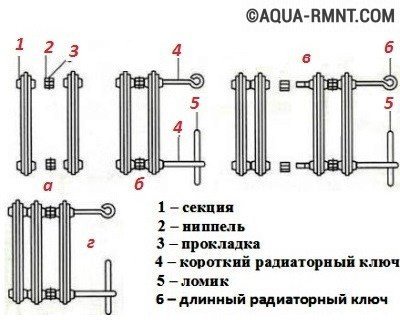
Technology for unscrewing and assembling cast iron batteries: a - nipples capture the thread of sections (2-3 threads); b - tighten the nipples, dock the sections; c - mount the third section; d - group two radiators

The difference in the schemes for attaching a cast-iron battery to walls made of different building materials:
a) wooden wall: 1) support bar, 2) stand
b) brick wall: 1) window sill, 2) niche, 3) brackets
Whether or not it is worth saving on installing batteries is a private matter of the owner. In fact, there is not a single particularly difficult moment in the installation technology. By clearly observing the sequence, knowing the rules, having studied the information on how to install a heating radiator, you can safely get down to business with your hands confidently holding the radiator, torque wrenches and other tools. True, confidence alone will not be enough to achieve success. Thorough observance of the installation rules and the formation of impeccable tightness, guaranteeing the complete absence of leaks, will certainly help.
One of the stages of installing a heating system in an apartment or a private house is the installation of heating batteries with connection to highways. It is better to perform this operation before laying pipes, it is easier to make neat radiator connections. We will reveal the rest of the nuances of installation work in detailed instructions on how to properly install a heating radiator with your own hands.
Selection of heating devices by type and power
If you have not yet purchased batteries, then before installing you need to select heating radiators from 4 varieties available for sale:
- Sectional aluminum. They are made of light alloy - silumin (aluminum + silicon) in the form of ribbed sections, painted with a heat-resistant polymer composition.
- Bimetallic heaters are made of two types - sectional and monolithic, although externally finished batteries look the same. Construction: inside each silumin section there is a frame made of steel pipes.
- Cast iron heating devices - design and Soviet-style - are only sectional.
- Steel radiators are welded from stamped metal (panel) or manufactured by casting (tubular).
Note. In addition to the heaters shown in the photo, there are copper and baseboard convectors. They are rarely used in water systems.
Choose the type of heating devices according to two criteria: price and appearance that matches the interior of the rooms. One caveat: any batteries are suitable for the autonomous heating system of a private house, and radiators that can withstand a pressure of 12 bar for an apartment with centralized heating. in a separate instruction.
The heat dissipation of batteries and registers is spelled out in the manufacturer's technical documentation. According to current standards, the power of the radiator sections is indicated at a temperature difference between the coolant and room air of 70 ° C.
For example, the room temperature is 20 degrees, the water in the pipes is 90 ° C, then the section will give off approximately 180 W of heat. Since the coolant rarely heats up to 80-90 ° C, the real heat transfer will be much lower. Hence the conclusion: take radiators with a margin of 80-100%. Simplified in our material and video:
Almost all types of batteries are offered in 2 versions - with side or bottom connection. Here the choice depends on the method of laying pipes and the device of the connections. So, before installing, you need to consider the issue ...
About the methods of connecting radiators
The connection scheme must be thought out in advance, the position of the heater on the wall depends on it. Example: installing batteries with a bottom connection means installing a headset with taps, which takes up to 10 cm of space under the heater. Imagine that 2 lines of a two-pipe system are laid above the skirting board, then with a low window sill, the radiator simply will not enter the niche.
Example two: you decided to make a replacement yourself - to remove an old cast-iron "accordion" in your apartment and install a modern appliance. The iron pipes of the wiring will not allow the implementation of the lower connection - only the lateral one. To put the radiator in the middle of the window, you will have to build up the liners made of polypropylene or metal-plastic.
 Diagonal connection options: on the left - a diagram with a ball valve, on the right - with a thermal head
 Battery Connection Methods:
- Side versatile (diagonal). The heat carrier is supplied through the upper hole, exits the lower one from the opposite side, evenly flowing through the internal channels. Maximum heat transfer, the radiator works efficiently.
- Side - both connections are connected from 1 side. Approximately 10% of thermal power is lost, since the far part of the battery warms up worse.
- The lower versatile scheme is used in horizontal single-pipe systems of the Leningradka type. The efficiency of the device decreases by 10-20% depending on the pressure generated by the circulation pump.
- The purely lower coolant supply is not inferior to the diagonal one due to the design feature - through the first vertical channel, the water rises to the upper zone of the radiator, and then diverges along the rest of the ducts and collects at the bottom.
Side-connected circuits are more often implemented in traditional systems - two-pipe or one-pipe (except for Leningrad), which are mounted openly. The lower connection is a more modern version, the pipes from the boiler are laid in the floor, leaving directly under the battery.
 Diagram of one-sided connection of a radiator to a two-pipe and one-pipe system of an apartment building. Instead of the upper valve, you can put a thermostat with a head, instead of the lower one - a balancing valve
 4 types of radiator fittings
When starting water heating, the system must be balanced, during operation, repair and flush the radiators. To solve these problems, the following shut-off and control valves are used:
- balancing valve;
- ball valve;
- thermostatic valve with thermal head;
- headset for bottom piping.
An important point. When installing radiators, always use taps with American women - straight and angled. The union nut connection allows the heater to be removed at any time without emptying the pipeline network.
 On the left is a diagram of a one-way connection of a battery with a balance valve, on the right is a lower versatile (used when installing one-pipe horizontal wiring)
 How to install radiator fittings correctly:
- When connecting the heater to the centralized heating, install 2 ball valves, no balancing valve is needed. Option two: a valve with a thermal head can be provided on the supply line to automatically regulate the air temperature in the room.
- Radiators in a private house are connected as follows: at the entrance there is a ball valve, at the exit there is a balancing valve. If you want to regulate the flow automatically, replace the inlet tap with a thermal head.
- For bottom connection, use a special headset with a built-in balance valve from Danfoss, Herz Armaturen, Oventrop. There are models for installing a thermostat.
When replacing the battery in an apartment, do not forget to provide a bypass for the direct flow of water through the riser. Equip the last radiator of the individual heating network of a country house with 2 shut-off taps, you will not have to balance it.
 With the bottom connection, the coolant flow is directed into the upper horizontal channel of the radiator
 Battery location and height
Radiators should be installed in places of greatest heat loss:
- traditional location - under the window, in the middle of the skylight (when viewed vertically);
- in the corridor near the front door;
- on staircases;
- near cold walls of living rooms without window openings.
 The drawing shows the minimum distances to the nearest structures. For efficient battery operation, it is better to increase them: the top and bottom indents - up to 10 cm, the back - up to 50 mm
 Explanation. When the battery is installed in the window sill, the upward convection stream mixes with the cooled air from the window. If stained-glass windows are made in the room instead of the outer wall, it is better to install water or electric convectors into the floor.
If heating radiators are installed under windows, observe the following minimum spacing:
- from the outer wall - 2.5 cm;
- from the windowsill - 50 mm;
- from the floor - 60 ... 200 mm, depending on the type of the heater and the method of its connection.
Unlike aluminum and bimetallic batteries, the depth of steel panel radiators varies in a wide range - from 6 cm (type 10) to 160 mm (type 33). The thicker the battery, the more air it can let through and heat. This means that it is necessary to provide air supply from below and removal of the warm flow from above the heater. Wiring diagrams of steel panels of different types are shown in the drawing.
 The mounting height of panel radiators depends on the specific type
 Recommendation. We do not advise to completely sew up the radiator after installation, making 2 convection openings with grilles. You will lose all infrared heat flux, which is at least 20% of the battery power. But the air under the casing will heat up to 30-40 ° C, due to the temperature difference between the street and the niche, heat losses will increase.
Installation instructions
To hang and connect the battery to the heating pipes, prepare the following components and materials:
- hooks with plastic dowels for attaching the radiator to the wall - at least 3 pcs .;
- 2 foot (side plugs) with right-hand pipe thread, marked with the Latin letter D;
- 2 feet with left-hand thread, marking - S;
- 1 (Mayevsky crane) with a key;
- 1 plug;
- sealing silicone thread or flax;
- tap, balancing valve, thermostatic valve, headset - according to the diagram;
- polypropylene, metal-plastic or polyethylene pipes with an inner diameter of 10-15 mm for liners.
The number of fixings depends on the size of the heater. An aluminum battery up to 10 sections must be fixed on 3 hooks or special brackets - 2 on top, 1 on the bottom. In other cases, 4 mounts are used.
Steel panels are sold assembled with hanging brackets included. Floor-mounted heavy cast iron radiators are equipped with feet.
 Types of wall and floor brackets used for mounting batteries
 From the tools you will need:
- an electric drill and a drill corresponding to the hardness of the wall;
- screwdriver or screwdriver;
- construction level;
- gas key;
- tape measure, pencil.
Pre-assembly
Radiator sections are pulled together by nipples - metal squeegees, on which left and right threads are cut (half the length). To connect, you need a long wrench with a nozzle for a nipple, in the household you will not find this. Hence the advice: ask to twist the sections right in the store.

Assemble the sectional battery in this order:
- Clean the areas around the side holes.
- Screw on the 4 feet from the ends, carefully tighten them with a gas wrench. Please note: plugs with a regular thread should be screwed into the right ends of the radiator, with a left thread - into the left (when looking at the front side of the product).
- Close the unused bottom outlet with the supplied plug.
- Using sealing material, pack and screw the Mayevsky cock into the upper channel.
- In the remaining 2 holes, install the mating part of the American women, disconnected from the taps.
An important point. The element of the American woman with a union nut does not need to be wrapped inside the case until it stops. Otherwise, the nut will not move away from the edge and will not allow the valve itself to be attached. To screw in, you need a special internal key, but if you wish, you can do with powerful pliers.
After installing the American women, screw on the valves and tighten (by hand for now). Panel heaters do not require assembly, unless you have to install an air vent. Do not remove the film from the case - it will protect the coating from accidental damage.
 Wiring diagram of the sectional radiator assembly
 How to mark the radiator mount
We start with preparation - we remove interfering objects, tear off the old wallpaper (in their place you can glue a reflective foil screen), dismantle the old battery in case of replacement. Be careful not to cut the threads on the steel pipes with a grinder. It is better to clean it with a metal brush and unpack the coupling joint by unscrewing the nut.
Reference. If, for various reasons, the thread has become unusable, you will have to look for a set of pipe cutters and cut the turns on a new one. In open heating systems operating under atmospheric pressure, the use of compression couplings type GEBO is allowed.
How to make the correct markup for the battery:
- Determine the middle of the window opening and mark it on the wall with a vertical line.
- Having stepped back 7-10 cm from the windowsill, draw a horizontal line using a level. This line marks the position of the upper end of the radiator.
- Measure the distance from the center of the assembled battery to the suspension points, lay it horizontally on both sides of the vertical line. The sectional heater can be attached to the wall and marks can be made in front of the two extreme joints.
- Find out the size from the top panel to the radiator mounting point, set this distance down from the previous marks. Get the top drill points.
- The points of the lower hangers are easily determined: step back down another 50 cm - this is the standard center-to-center distance of the heaters. There are other sizes - 300, 600 mm and so on.
 After the marking work, it is worth checking the distance from the attachment points to the floor, the best way is to attach the assembled battery to the wall
 Before marking, be sure to check the horizontalness of the window sill. If it stands unevenly, and you hang the battery on a level, then from the side it will seem that it is the radiator that is fixed crookedly. Then you need to be guided by the slope of the window sill.
The second moment: in order for the air to leave through the Mayevsky tap, the heater is installed with a slight slope. The side of the device, where the air vent is located, rises literally by 1–2 mm, visually such a skew will remain invisible.
When replacing a radiator with a connection to existing pipes, you will have to measure their position relative to the window sill, then tie in height. How this is done, the wizard will show in the video:
The final stage
The final installation of heating radiators is carried out according to simple rules:
- Drill holes, hammer in dowels and attach hangers. Hooks for sectional devices are screwed in, taking into account the smallest indentation of 25 mm.
- Hang the battery on the brackets and try on the liners. For convenience, draw lines on the wall.

- Remove the radiator and carry out preliminary work - punch furrows for hidden laying, connect the pipes to the highways, stick the reflective screen.
- Finally, install the heater, connect the pipes and tighten the American ones.
 In the photo on the left - the side connection unit with a bypass, on the right - the bottom connection with hidden connections
Leave shut-off taps and valves open for successful filling of the system with coolant. The manual air vent must remain closed and is used when pumping water or antifreeze.
When replacing a central heating radiator in high season, the entire riser must be shut off. At the end of the installation, close the taps at the battery inlet, then supply water to the riser. When the noise of the coolant dies down, slowly open the upper tap first, then the lower one. from the battery.
How to hang a battery on an insulated wall
Sometimes homeowners insulate the outside walls from the inside with a layer of foam or 50 mm extruded polystyrene foam. When installing the radiator battery, a problem arises - the standard hooks are too short, and the longer ones experience a cantilever load and bend. It is clear that it is unrealistic to attach to the foam, only to the wall.
A simple solution is offered by our expert Vitaly Dashko in his video. The battery mounting technology is as follows:
- We mark the attachment points according to the above instructions.
- We take a wooden bar 5 x 5 cm (or according to the thickness of the insulation) 600 mm long or according to the size of the bracket for a steel radiator.
- We cut out a vertical recess in the foam, insert a bar there and fasten it to the wall with any fasteners - dowels, anchors, dowels.
- We put the heater on standard suspensions attached to the bars.
We are watching a video on installing a radiator on an insulated wall:
Conclusion
To install heating radiators with your own hands, you do not need to undergo any special training or have a specialized education. It is enough to remember the nuances of editing, watch a few videos from experienced craftsmen and you can get to work. The only caveat is that batteries should be securely fastened, especially cast iron ones. Settlement or breakage of the bracket will lead to leakage of the coolant, sometimes quite hot 😊.
Own boiler room in the house provides year-round coziness and comfort: you can turn on the heat supply at any time in a cold summer, turn it off with the arrival of heat in the spring.
Independence from the whims of utilities and the heating schedule with CHP is an indisputable advantage of the autonomous system of a private house.
Requirements for the location of the radiator in a private house

Radiators need to be installed in places of greatest heat loss in the house (window openings and entrance doors).
As a rule, heating devices are installed under each window of the dwelling and in the hallway on the wall, next to the front door of the house, as a heat curtain and wet clothes dryer.
For maximum heat transfer from the heating device, the following optimum distances from the radiator are available:
- To the floor 8-12 cm;
- to the windowsill 9-11 cm;
- up to the wall 5-6 cm;
- protrusion of the radiator behind the window sill 3-5 cm(so that the heat from the radiator heats the window block).
Requirements for wall and floor construction:
- Wall on which the heater will be mounted, must be plastered.
- When attached to a plasterboard wall it preliminarily install a reinforcing frame made of timber.
- Floor mounts for radiator installed on the finished floor.
Installation Tool:
- Drill or hammer drill,
- Drill 10 mm,
- Hammer,
- Screwdriver for screwing in self-tapping screws when using corner brackets,
- Construction level with spirit level or laser,
- Pencil,
- Roulette,
- Radiator wrench made of plastic,
- Key for the American.
Connection diagrams
The radiator has holes at the ends for connecting pipes with the supply of coolant to the radiator and its removal (return). Exists the following connection diagrams:
Side

The pipe with the coolant supply is connected to the upper hole at the end of the radiator... The coolant passes through all sections from top to bottom and is discharged through the return line connected to the bottom hole at the same end.
In the upper hole on the other end is installed Mayevsky's tap for bleeding off excess air... A plug is placed in the remaining bottom hole.
- It is used in apartments with a one-pipe heating agent supply system.
- Radiator length no more than 1 m(heat loss increases with the number of sections).
Diagonal
The coolant supply is through the upper hole on one side, the return outlet is through the lower hole on the other side of the radiator. The coolant flows diagonally from top to bottom.
- Effective heat dissipation with any number of sections.
- Allows connect several radiators in series.
Lower and saddle
The supply pipe enters the bottom hole on one side, the return pipe exits through the bottom hole on the other side of the heating appliance.

Photo 1. Bottom diagram of the heating radiator connection: pipes pass between the floor and the radiator.
- It is used for hidden piping in the floor.
- Thermal efficiency 30% lower than diagonal(stagnation of the coolant in the upper part of the radiator).
Reference! Most often in private houses, heating pipes laid along the wall between the radiator and the floor. Next to the radiator, bends are made upward with a diagonal connection.
Accessories for mounting a battery for heating
To install the battery, you need a number of components.
Installation kit
Comprises two feet with a right-hand thread, two feet with a left-hand thread, plugs, Mayevsky crane, three brackets and three dowels.
Futorki ( adapters 1 - ½ inch) are screwed into the holes of the radiator, into which the direct outlet and return are supplied. On the right side of the radiator there is a right-hand thread (screwing the case clockwise), on the left side - a left-hand thread (counterclockwise). A Mayevsky faucet is placed in the upper right hole, and a plug is placed in the remaining hole.

Photo 2. A set of four fittings with right and left threads is required for mounting the radiator.
You will also be interested in:
Flax sanitary and paste-sealant
Flax is used for thread packages... It swells under the influence of water and seals gaps in threaded connections.
Unipack sealant paste seals flax in threads, protects it from decay, makes it easier to screw the bushings.
Shut-off valves
Ball valves are used to shut off pipes and are placed on the supply pipe. A control valve is placed on the return. The connecting part of the crane or valve is an American - a detachable connection with a union nut. Consists of two parts... Part of the American with 1/2 "male thread screws into the inner hole of the radiator case.
American makes it easy to connect the radiator to the tap and remove it.
Wall markings for brackets
Algorithm for marking for radiators up to 10 sections... Two brackets at the top along the edges, one at the bottom in the middle.
- Measure window opening length, mark on the wall midpoint(under the windowsill).
- Draw from marked point vertical line down to the floor.
- Mark point (A) on a vertical line at a distance of 10 cm from the windowsill.
- Conduct a horizontal line through the marked point (A).
- Measure the distance on the radiator between the attachment points of the upper brackets.

Photo 3. Choosing a place on the wall where the radiator will be located, determining the method of fixing the upper brackets.
- Set aside on both sides of point (A) on the horizontal line the line segments with the length, equal to half the distance on the radiator.
- Set aside on the center vertical line segment from point (A) downwards 50 cm long - place installing the bottom bracket.
- Drill holes for the brackets. Hold the drill strictly horizontally so that the drill does not go sideways in the wall.
- Hammer in the dowels, screw in the brackets the required distance from the wall.
Radiator assembly process

Important! Do not wrap linen on the thread itself! Linen serves as a gasket between the case and the end of the battery. Do not use silicone to lubricate flax. Silicone prevents flax from swelling in water and sealing the joint.
Correct battery installation
Installation of the heating radiator is carried out in several stages.
American sleeve packing

Mounting
- Install the American in the hole of the futorka, tighten by hand until it stops, avoiding skewing.
- Insert the American wrench and begin to tighten the sleeve gently. The sleeve should be tightened with a perceived force, but without binding.
- After fully tightening the sleeve to the full length of the thread clean the installation site from excess paste with a napkin.
How do I mount the instrument on the brackets?
- Visit radiator on the installed brackets.
- Adjust the position of the brackets, bending them vertically, achieving a tight fit of the radiator on the upper and lower brackets without backlash.
Strapping
- Attach its counterpart on the tap or valve strictly along the axis to the American bushing.
- Tighten the union nut by hand until it stops.
- Install piping piping and shut-off and control valves at the location of the radiator.
Important! Do not use flax under the union nut! The sealing of the American connection occurs due to a rubber ring at the end of the sleeve. Do not overtighten the union nut! It will be correct to make a power reserve so that there is a possibility of tightening the nut.
Are you planning to change the heating appliances in your own home? For this, knowledge about the types of battery wiring, how to connect and place them will come in handy. Agree, because its efficiency directly depends on the correctness of the selected scheme for connecting heating radiators in a particular house or room.
Correct connection of the batteries is a very important task, because it is able to provide a comfortable temperature in all rooms at any time of the year. It's good when the fuel consumption is minimal, and the house is warm on the coldest days.
We'll help you figure out what it takes to get the most out of your radiators. In the article you will find a lot of useful information about how to connect batteries and how to implement them without the involvement of specialists. There are diagrams and videos that will help you clearly understand the essence of the issue.
An efficient heating system can save money on fuel costs. Therefore, when designing it, you should make a balanced decision. Indeed, sometimes the advice of a neighbor in the country or a friend who recommends such a system as his is not at all suitable.
It happens that there is no time to deal with these issues yourself. In this case, it is better to contact professionals who have been working in this field for over 5 years and have grateful reviews.
Image gallery
The first option involves the use of physical laws without buying and installing additional devices. Suitable when water acts as a coolant. Any non-freeze will make it worse to circulate through the system.
The system consists of a boiler that heats water, an expansion tank, supply and return pipelines, batteries. As the water heats up, it expands and begins to move along the riser, visiting the installed radiators in turn. The cooled water from the system goes back to the boiler by gravity.
With this type of circulation, the horizontal pipeline is installed with a slight slope towards the direction of movement of the coolant. This system is self-regulating, because depending on the temperature of the water, its quantity also changes. The circulation head is increased, allowing the water to heat the room evenly.
With natural circulation, two-pipe and one-pipe schemes with an upper wiring are used, two-pipe with a lower one. Such methods of connecting radiators to the heating system are beneficial to use for small rooms.
It is important to equip the batteries with air drains to remove excess air or install automatic air vents on the risers. It is best to locate the boiler in a basement, so that it is lower than the heated room.
For houses with an area of 100 m 2 or more, the coolant circulation system will have to be changed. In this case, you will need a special device that stimulates the movement of water or antifreeze through the pipes. We are talking about . Its power depends on the area of the heated room. The use of a pump for forced circulation allows the use of antifreeze as a heat carrier. In this case, it is necessary to install a closed-type expansion tank so that the fumes do not harm the health of the inhabitants of the house.
The circulation pump is used in two- and one-pipe circuits with horizontal and vertical heating devices connection system.