The second floor is an attic type with your own hands. Do-it-yourself roof of a house construction: stages of making an attic
1.What roofs can be used for mansard buildings
2. Why attics are becoming popular
3. What are the mansard roofs
4. What you need to know when building an attic
5. Requirements for mansard roofs
6. Possibilities of using the attic floor
The final stage of any construction is the installation of a roof, and in the case of building a roof of a private house, it is important to determine not only the materials necessary for work, but also the structure and shape of the roof.
The most rational today are the projects of mansard roofs, due to which you can significantly save and equip an additional room.
In this case, it becomes possible not only to make the attic more attractive, but also to use it to increase living space. By what criteria can you understand that you have an attic floor in front of you?
Firstly, it is located on the top floor. Secondly, to create its facade, a broken or sloped roof is used, both partially and completely.
Taking into account the building requirements, the level of intersection of the roof with the facade should not exceed 1.5 meters from the attic floor.
If the project of the attic roof does not provide for such, then the room cannot be called an attic - it will remain well equipped, but still an attic.
The architects note that mansard roofs give any home a special presentability, and also contribute to an increase in its practical functions.
If, when planning the attic floor, it is difficult to place the interior rooms in a conditional triangle, then a more suitable angle of the attic roof is chosen, for example, with broken slopes, as shown in the photo.
The main advantage of attic buildings is the ability to use the existing foundation, that is, even with capital construction, the area of the land plot will remain unchanged.
In short, this roof is an economical option for arranging additional living space used in modern construction.
What roofs can be used for mansard buildings
Depending on the type of roof you choose, you will get an attic of one shape or another, as a rule, these are triangular, broken, asymmetric, located throughout the house or in a specific part of it.
Varieties of attic roofs:
- The simplest option is the arrangement of a pitched roof.
Such a roof looks like an inclined plane, fixed to load-bearing walls of different heights. Such options for attic roofs are very rare due to a significant decrease in the internal space.
- Gable or gable roofs, consisting of two slopes fixed in opposite directions, are very popular among developers. Such a roof is characterized by convenience and speed of installation, as well as high structural strength.
- In the attic of small houses or summer cottages (see: "Attic in the country, advantages and disadvantages"), broken roofs look good, which are a subspecies of a gable roof (read: "What are the types of roofs with an attic").
- A hip and semi-hip roof is considered to be more complex in design (refer to hipped roofs).
It is noted that such projects of houses with a mansard roof are aimed at maximizing the use of the usable area.
- On rounded and polygonal buildings, a domed, pyramidal or conical roof will look great.
In this case, a mansard-type roof is erected in several stages and assumes maximum accuracy in calculations.

Why attics are becoming popular
The increase in demand for the construction of attic spaces is due to a number of reasons, including:
- equipping additional living space without using an additional plot;
- external attractiveness of the building;
- the possibility of increasing the density of construction;
- expansion of an already operated house, while tenants do not need to move out anywhere;
- short construction time;
- for the installation of the premises, a minimum budget is sufficient.
What are mansard roofs
Among the large number of proposals, attention should be paid to the main options for the mansard roof used in construction:
- a gable or sloping roof is perfectly combined with a single-level attic;
- for a single-level structure, outboard consoles can be installed;
- the construction of a two-level attic can be carried out using mixed-type supports (read also: "Finished projects of baths with an attic").

When choosing the types of attic roofs, it is important to take into account the level of the expected load on the structure as a whole.
Even if the owner of the cottage or house will be engaged in the construction of the attic independently, then the creation of the project and calculations of the maximum permissible loads are assigned to specialists. As for the style of roofing, a lot of options are offered here, different in appearance and cost, however, initially the choice must be coordinated with the operational and design requirements (see: "Mansard roof: features and stages of construction").
What you need to know when building an attic
Not everyone is able to independently draw up a project for the attic roof of a private house and correctly perform the installation work, so it is better to immediately assign responsibility for the implementation of the planned activities to professional builders (see also: "Possible projects of attic houses").
Before starting to create a project, you should analyze the layout of the base of the building, the structure of its roof.
If the design of the attic roof is carried out as an additional floor to a long-operated house, then an assessment of the quality of its foundation and supporting base, as well as the level of possible load on them, is required.
One-story houses with an attic are becoming more and more popular.
Since the attic structure must be very light, the corresponding building materials are purchased.
Mansard sloping roof, in detail on the video:
Requirements for mansard roofs
All projects of mansard roofs of private houses are drawn up taking into account the requirements listed below:
- Roofing materials should have a minimum weight.
Metal tiles, metal sheets and so on are excellent for this.
- For interior and exterior facing work, as well as the construction of partitions, lightweight profiles or drywall are used.
- Due to the large surface area in contact with the external environment, the level of heat loss in the attic is much higher than in the lower floors, therefore, special attention should be paid to the thermal insulation of the roof. Builders generally recommend mineral wool or any modern lightweight insulation.
Additionally, vapor barrier and waterproofing are laid (see also: "Attic in a private house - stages of the superstructure").
Possibilities of using the attic floor
It should be noted that attic roof designs can be created for any living space including a bedroom, study, children's playroom, gym, or gym for the personal use of home owners. And when glazing a structure in the attic, you can create your own vegetable garden or a green corner (read the article: "Roofs of houses with an attic: forms and variety").
Today, the presence of an attic in the country is not only a normal activity, but also an indicator of the material well-being of the owner.
location additional floor it depends on personal preference - someone will take up all the free space, and one will be enough to make only part of it. But in addition to the hard part of the imagination, you need to know how to build an attic, taking into account all the nuances of a particular room. Accurate planning and correct choice of building materials - ensuring a satisfactory result and comfortable housing placement.
MANSARD DESIGN
When building an attic space in a wooden house, it is necessary to consider:
- The surface area depends on the angle of the roof.
The greater the slope, the greater the surface area.
- Roof shape. The best option is a slippery roof, which helps to rationalize the space.
- Characteristics of the design of future spaces and the structure of the entire building.
Particular attention should be paid to auxiliary elements.
- Load it on the roof. Where necessary, rafters are installed, which increase the strength of the structure.
- Arrangement of communication system elements in accordance with fire safety requirements.
- The need to install windows.
The distance from the ground to the center of the window is no more than 200 cm. Optimum illumination is achieved if the window size is one tenth of the floor area.
For the maximum correct calculation of the load-bearing elements, the attic structure should be carried out at the stage of preparing a new building. The building layout includes beams, stands, posts, rafters, and wall reinforcement. In this case, the maximum height of the superstructure must be 2.2 m and its width must be at least 3 m.
Also, you should carefully consider where the stairs and windows will be.
WOODEN MACHINE MANUFACTURING
The optimal choice of materials for the additional floor frame is wood. In addition to the aesthetic appearance, wooden walls have low conductivity, which helps to keep the room warm. Environmentally friendly frame "breathes", absorbs decomposition products of oxygen and other chemical compounds.
With strict adherence to the DIY wood loft step-by-step guide, it can be pretty quick. The main thing is to determine the consumption of building materials and clearly plan the desired design.
Renovation of the attic
Once the walls have been removed to the desired height and the floor has been created, you can proceed with upgrading the additional floor.
The attic wall is built first, if it was included in the layout. In this case, a material similar to that of which the wall walls are made is used. The wooden wall is covered with a binder, according to which another layer of the liner is used to protect it from the negative effects of the external environment.
The walls and a half allow for a table that is taller than a person's height, allowing free movement throughout the room. The choice depends on the purpose of the attic, the construction of the building itself and other details of the layout.
Securing the walls and installing Mauerlat
If the height of the attic wall is more than 0.7 m, in order to avoid the appearance of cracks, it is necessary to increase the strength of the structure.
For this purpose, the walls are reinforced or glued to which the Mauerlat is attached. Ties are rebars intercepted by special clips. It strengthens the entire volume of walls, the thickness of which determines the distance between the reinforcement.
Attention: no welding - connection is made only with clamps!
To make a blank under the beam, we use U-shaped blocks in which the skeleton will be laid.
In addition, hairs 1.2 cm apart are set at 1 m for the subsequent installation of Mauerlate. The frame is then sprayed with concrete after full hardening, which can be continued with the construction of gutters from the windows.
Mauerlat falls to the armada and is firmly tied to the wall.
If you want to do this, you will need 1.5cm bars. If you don't have the length you want, you can connect multiple short links using an anchor.
Before the installation of the Mauerlets, the humidity of the armadias was ensured well in advance. roofing felt... The rods are drilled holes that are positioned so that the anchors can easily penetrate the grooves.
Do-it-yourself attic - an additional area of your home
Then the screws must be tightened firmly, and the formed structure must be left for a few days, after which they must be screwed down.
MANSARD INSULATION
Regardless of the purpose of the lower part of the attic, the space must be insulated, which entails significant heat loss through the roof. In addition, the thermal insulation reduces the risk of rotting wood upgrades and molds.
Mineral wool or polystyrene is used as a heater.
The use of any material has its own advantages and disadvantages.
As practice shows, the optimal design of the material for internal thermal insulation of basalt wool.
Ceiling insulation from the inside
Before installing the thermal insulation on the ceiling, it is necessary to remove all small cracks, after which you can proceed with the waterproofing.
For this, a waterproofing film is attached to the rails to protect the surface from moisture penetration.
If you want, you can place the box as close as possible between it and the rafters. basalt slabs... Depending on the thickness of the insulating material, they are stacked in one or more layers.
To avoid moisture penetration, it is recommended to install a vapor barrier suitable for parchment or plastic foil. Attach the vapor barrier to the rafters with uprights or resin adhesives.
It insulates plasterboard ceilings, beams or plywood.
Heating of floors and floors
To insulate an attic floor, you must first apply a layer of steam fencing and then heat the space between the joists and trim with wood planks.
The walls of an attic room should only be insulated if they are not formed on roof slopes. Before insulating the wall, level the surface and remove all laces.
The procedure for laying the thermal insulation material is the same as for the ceiling, the obligation is to have only the container.
VENTILATION MANSARD
Suitable ventilation device- a prerequisite for reliable heating of the attic.
Air circulation is necessary to prevent wood scissors from burning and corrosion of the reinforced elements.
Poor ventilation also leads to wetting of insulation and deterioration of heat transfer. To avoid adverse effects on roofs, a ventilation slot must be installed.
And from the inside of the pie with a roof, you have to leave free air movement.
The holes for its exit are made in the area of the roof ridge, and in case of absence it is advisable to install a special special ventilation element on the ramps.
INTERIOR STRUCTURES OF THE ATTACHMENT
The completion of the attic depends on the personal wishes of the owner and the purpose of its location.
Elements of the attic decor are no different from the design of any other room.
Ceilings, wall cladding, bamboo fabric, or drywall are used here. You can create a very comfortable environment by going around or painting the walls with one or more tones. Important factors in choosing a design are the size and configuration of the loft, lighting, the location of windows and doors, and the availability of materials.
Characteristics of the construction of lofts
Step by step - production steps
How to build an attic with your own hands
The final phase of the mansard roof construction
The presence of an auxiliary roof can significantly increase the usable area of private ownership of apartments. To save money, many homeowners are considering building an attic with their own hands.
According to experts, this is quite possible if you study the relevant information.

Characteristics of the construction of lofts
One of the best options is to break the attic.
It is spacious and, with the proper refinement, becomes a complete living space. When such a roof is installed without accurate calculation, it cannot do this.
It should be noted that when designing an attic with a roof covering, the recommendations of SNiP should be taken into account.

There are several shades of this part to consider:
- If the building is built in a field where a mild climate prevails with frequent windy weather and very rare snow, the roof may be tilted at a slight angle.
- In the event that snowfalls and heavy rainfalls occur in the area of residence, the flat roof should be relaxed.
- It is absolutely imperative to equip high quality acoustic, hydro and thermal insulation, as the attic should be the same living room as other rooms in the house.
- The best roofing material for the construction of a mansard-type roof is considered to be slate or tiles.
Some owners improperly install metal covers, but with the onset of cold weather they have problems with a heat-saving attic room. Building materials should be chosen with fire and moisture resistant properties, since the roof always consists of wood elements. For their better preservation, such surfaces are treated with antifungal agents.
- If you build an external staircase with your own hands when building a roof, you can save usable floor space in your home.
An internal staircase will be more comfortable for residents, but it will take many square meters. There is another option - the location of the ceiling staircase, which practically does not cover the space. With regard to the design of the propeller, its comfort is questionable.
Step by step - production steps
When the attic is lifted by hand, the production steps will be:
- Wooden beams with a size of 10 × 10 cm are installed in the waterproofing.
How to make an attic
In this case, the best waterproofing material is roofing felt or only in rolls, which makes it convenient even in the absence of the appropriate skills. If the ceiling in the house is wooden, then there is no need to place additional beams under the main beams.
- Below is the installation of pedestals on bearings with the same cross-sectional size.
These shelves serve as a kind of enclosure for the attic walls. They should be installed at a distance of no more than two meters. To ensure quality work at this stage, hand-drawn drawings of the attic roof will be made.
If you do not have the required knowledge, you can contact the experts.
- Each of the stands must be completely accurate and use lugs and clamps to secure them. The accuracy of the installation should be checked according to the level and, if necessary, place these elements in a specific location. Once the rack is installed, they are aligned on both sides. From the inside, plain plywood sheets or dry walls are used, and the panels are made from the outside.
It is important to install the heater between the racks.
- In addition, an upper beam with the same cross-section is installed. He can strengthen it in some way. When building a mansard roof, the main thing is that the beams are firmly and firmly installed.
- At this stage, the Mauerlat installation, which is the support of the rear leg, is located at the bottom of the structure.
Thanks to this element, the roof ramp is fixed to the walls. For Mauerlat, you need a stick or plate that has a 40 × 40 centimeter portion. Place waterproofing underneath to prevent rotting.
- If Mauerlatt is well located, it will protect the roof of the house from the effects of wind, in winter from snow and other loads.
For a thorough fixation, use a 5 mm wire, preferably annealed, which is intended for bonding. If you want the power to stand, the wire is built directly into them.
- At the next stage, in accordance with the technology for installing the attic roofs of private houses, it is necessary to install rafting legs. First, the mark on the Mauerlat frame and raft is marked at the rafting points. Typically, the installation step is 100-120 centimeters.
The scissors are made from completely flat plates with a cross section of 4-5 inches and a width of 15 centimeters.
- Foot rafting should be supported by an obligatory element of the building - on the crest of the shaft. This is not necessary if the rafter length does not exceed 8 meters.
They are then treated with normal stretching.
- Fillet installation is carried out in the same way as with rafters. To keep things simple, it starts with two extreme elements.
Pull the cord between them and point at it when you install the next filler. Once installed, they are attached to the floor slab, which serves as an obstacle to wind and precipitation.
- Before creating a mansard roof, you must define the position of the windows when drawing drawings.
The window opening must be at least 12-13% of the surface of the side walls. Where you install windows, you need to reinforce the rafts. To do this, place stripes that will become the top and bottom of the window in which the frame is mounted and attached.
How to build an attic with your own hands
Then make sure that all previous work has been done correctly.
With the help of a level, you need to check all the sizes of tiles and beams from the cufflinks of the roofs, which make up your own hands. It is also necessary to ensure the rigidity and reliability of the fastening of the structural elements to ensure that the insulation is everywhere. Small flaws may need to be addressed.
You can contact an experienced builder to evaluate the quality of the attic work in the home, as the roof must be strong, reliable and durable.

If everything is how to set up the attic well, and the design is not in danger, you can proceed to the next stages of construction:
- When the skeleton of the roof is ready, the crate rails are additionally attached to the rafters.
The step of their installation depends on the roofing material chosen for the roof covering.
- After installing the rail, a hibernation is applied to it. The most commonly used conventional plastic films for this purpose. It is cheap and at the same time protects the quality of the attic from moisture penetration. Secure it with construction clamps. The film should cover from bottom to top.
- Thermal insulation material is installed on top of the film layer.
One of the best insulations is rock wool. This material is lightweight, safe for health, and retains heat well. In addition, minvat prevents rodents from spreading in the home.
- In the place where the roof is located, the installation is carried out in the same way as the installation made of polyethylene foil.
The roof material is laid in the same way that it loads the elements together. It must be ensured that in places where the roof is damaged, the tops of the roofs of the roof protrude above the bottom.
This point is very important because incorrect installation results in the fact that even with a little rain, the roof of the attic will start to leak and that the wooden structure will gradually become useless.
- Install the skates so that after the construction is completed, atmospheric precipitation cannot get under the roof.
The final phase of the mansard roof construction
When the main part of the attic is complete, proceed with the installation of the doors and windows that are part of the roof structure.
The roof cake in this case is multi-layered, so noise, heat and waterproofing are guaranteed inside the attic.
If the decision on the stairs is not made, it is better to choose the external option, which will be easier and cheaper. Over time, you can make a staircase in a room, losing part of the room in the house.

Pay attention to reverse work if there is a living room in the attic.
However, for those who have ever renovated houses in their homes, this work will not be difficult.
Even if you choose to invite a team of experienced builders, information on how to build a roof won't be overwhelming.
This will allow you to control the work on the construction of the attic on the roof.
Reading time ≈ 3 minutes
If you look into history, then the attic first began to be used in France. Poor people lived in it, but today everything has changed, and it has become fashionable and prestigious to have an additional room for living or comfortable rest. In this article we will look at step-by-step instructions in which we will tell you how to build an attic with your own hands. In addition, you can see photos and videos of the attic structure with your own hands.
Before starting any work, it is worthwhile to understand that the additional living space will be located in the place of the attic, which means that the roof structure will need to be completely changed.
Materials for the construction of the attic

So, for the construction of an attic with your own hands, you will need the following materials:
- Reiki.
- Wooden bars.
- Boards.
- Metal corners.
- Fasteners.
- Metal staples.
- Mineral wool.
- Waterproofing.
- Window constructions.
- Mineral wool.
- Ladder.
In addition to all these materials, it is necessary to prepare a set of construction tools such as a screwdriver, drill, hacksaw, stapler, chisel, level.
DIY step-by-step instructions for building an attic
1. Project of the future attic

The main element in this work is the roof, which is distinguished by its unconventional structure. Very often, window openings are installed in the roof. Their differences are that they are located at an angle. A do-it-yourself attic roof often includes profile changes, making it broken.
2. Roof shape

Imagine in advance what shape the future roof should be and the angles of inclination of the planes.
The roof of the attic can be:
- Broken gable.
- Standard gable.
- Single slope (rare).

Start drawing. It should be done in different projections. Be sure to indicate the dimensions and indicate the relative position of all elements.
3. Construction of the frame of the future attic

Experts believe that this stage of construction is considered the most time consuming. You cannot do this work on your own; it requires the involvement of a partner. A Mauerlat must be laid around the perimeter of the upper part of the house. Next, attach the two end posts with slings to the Mauerlat (horizontal bars connected to each other) using metal corners. After that, install the longitudinal jumper along the top of the uprights.
4. Arched structure

Stretch the cord. Place the inner frame elements between the resulting ones. Consider the fact that they must be sized to match the side arches. There must be the same step between all the Stoics. The elements of the arched structure should be fastened with metal brackets and corners. When placing sloped roof elements, observe the calculated slope angle and centering. After that, from the outside of the resulting roof, use a hammer and nails to hammer in a crate made of slats or boards. Do not forget to leave openings in it for future windows.
5. Hydro and thermal insulation

Hydro and thermal insulation is an important step in the construction of an attic with your own hands. The best option for protecting the attic from moisture is a membrane-type film.

It fits on top of the lathing. For insulation, mineral wool is an excellent material. Wool is attached to the inside of the rafter system. It is important that the installation is carried out without gaps.
You can use the attic space more rationally if you equip living rooms there, which are called the attic.
The attic floor can occupy the entire area of the house or only part of it (or garage). Sometimes the attic floor serves as a substitute for the second floor.
What is an attic floor?
To put it simply - living room (s) in the attic (i.e. attic-type room)
According to construction terminology, an attic (or attic floor) is a dwelling located on the last floor of a house with an attic roof (i.e., the attic facade is partially or completely limited by the roof surfaces).
The difference between the attic and the second floor - comparative characteristics
If you try to compare which is better, the attic or the second floor, you get something like the following picture.
| Parameter | Attic | Second floor |
|---|---|---|
| Price | Below. The amount of savings depends on the type of attic | Above |
| Duration of work | Lower compared to floor construction | High |
| Height of vertical walls | Up to 1.5 lm | Over 1.5 lm | Below | Above |
| Air volume | Lower due to beveled walls | Above |
| Square | The usable area is less due to the "blind" zones at the junction of the roof to the wall | Above |
| Room layout | The layout of the attic floor is carried out taking into account the presence of dead zones | Free |
| Land area | Does not change | Does not change |
| Illumination | Better, due to tilted windows, more light penetrates | Depends on the number and location of the windows. In addition, the deep slope of the window blocks 2/3 of the sunlight. |
| Glazing area | 25% less than vertical windows | Minimum 1: 8 to the surface area of the walls (depends on the location) |
| Window | Inclined mansard | Vertical |
| Temperature regime | With the correct execution of all stages of work, almost the same | |
| Heat loss | Above | Below |
| The need for thermal insulation material | Below | Above. The overlap above the floor needs to be insulated |
| Aesthetics of the structure | A house with an attic floor looks more elegant and unusual | Typical design |
However, it should be noted that there are cases when it is impossible to build an attic floor. For example:
- load-bearing walls and foundations may not withstand the additional load;
- the walls are constructed of porous materials that can collapse.
- small dimensions of the house. With a mandatory height of 2.3 m (according to sanitary standards, SNiP is limited to 1.5 m), it is difficult to equip a full-fledged living space with an insignificant surface area. If the width of the house is less than 5 m. it makes no sense to build an attic. The resulting area will be insignificant, and the costs for it are high.
Is an attic considered a second floor?
According to urban planning standards, the superstructure of the attic does not affect the number of storeys in the building. That is, a private house in which the second attic floor is arranged is considered (is) a one-story house.
Documentation regulating the calculation and construction of the second floor of the attic type.
The superstructure of the attic floor is governed by the provisions of the following regulatory documents:
- SNiP 2.08.01-89 "Residential buildings";
- SNiP II-3-79 "Construction heat engineering" (standardizes the arrangement of enclosing structures, including the roof);
- SNiP 23-05-95 "Natural and artificial lighting";
- SNiP 21-01-97 "Fire safety of buildings and structures";
- SNiP 2.01.07-85 "Loads and Impacts";
- sanitary and hygienic standards.
Types and types of attic floors - dimensions and dimensions of the attic
The height of the attic floor determines its type (view):
- full floor. Vertical wall above 1.5 m;
- attic. The height of the smaller wall is in the range from 0.8 to 1.5 m;
- semi-attic. The height of the wall is less than 0.8 m.
 Depending on the needs of the residents, it is possible to equip rooms on the attic floors for various functional purposes.
But, most often there are bedrooms and lounges.
If the requirement for a building height of 2.3 m is met, then according to the standards prescribed in SNiP, the area of the attic floor cannot be less than 16 square meters. In this case, the bedroom must be at least 7 sq.
If the height of the walls of the attic floor exceeds the value of 2.3 m, then the construction of a bedroom of a smaller area is allowed. The rationale for reducing the area is the large total cubic capacity (volume) of the room.
Armed with this theory, you can start building an attic floor with your own hands. Construction is not troublesome if there are detailed step-by-step instructions.
Construction of an attic floor (attic)
 Before starting construction, you need to create a project for the attic floor. You can do the project yourself or contact the professionals.
Note that building an attic with your own hands is quite within the power of everyone. But it is rather difficult to take into account all the determining factors and calculate the loads without special knowledge.
First, let's find out what affects the attic project.
It is quite difficult to choose the appearance of the attic roof, because this is influenced by a number of factors:
- visual effect. First of all, subjective feelings are taken into account. The final choice may fall on a different model, but the starting point is here;
- living space. The rafter system of the gable roof "steals" the area and creates "blind" zones, but the hip roof allows you to use almost the entire space of the attic superstructure;
- financial opportunities. A pitched roof is the cheapest option;
- roofing material. Some types of roofing material can be used if a certain roof slope angle is maintained. For example, for a tile, the angle should be at least 25 °, and for a corrugated board PK-100 (wave height 100 mm.) 3-4 ° is enough;
- general architecture of the building;
- wind and snow load. Snow should slide off the roof;
- condition of load-bearing walls and foundations. The condition of the bearing walls can be judged after a visual inspection. The presence of cracks indicates a problem. The use of porous material in the construction of a house reduces the wall's ability to withstand the load of the attic. It is difficult to judge the foundation. But knowing its appearance and what materials and technology were used in its construction, you can calculate what kind of load it can withstand;
- device of internal communications and ease of connection to them;
- selection of windows. Installation of special roof windows (inclined windows - sliding, pivoting, sliding) is carried out directly into the rafter part. They are more expensive but allow for better ventilation. To install vertical windows, you need to build walls or gables. The surface area of light-transmitting structures must be at least 12.5%;
- choice of material for construction. The cheapest and most popular option for performing work is the use of wood. Frame construction technology is quite simple. It is a mistake to think that it is unacceptable to build a wooden attic floor. According to SNiP 21-01-97, the use of wooden structures in the construction of the attic floor is allowed with proper wood processing and a building height of up to 75 m.
- the complexity of the calculations. During the construction of a pitched roof, the loads on the load-bearing walls are unevenly distributed. Ignoring this fact will lead to the subsidence of the walls and the destruction of the foundation.
The main shapes of roofs are shown in the figure.

Nuance. The smaller the angle at the junction of the roof to the wall, the more usable area you get.
Some projects of houses with an attic floor are shown in the photo.

Before starting work, you should have a drawing, sketch, diagram or drawing with all dimensions in your hands.
The drawings of houses with an attic below will give an idea of what needs to be applied to the diagrams.


Calculation of the area of the attic floor
The ability to use the attic for living space is calculated by the formula
AxB + 0.7xC
A- the total area of premises, the height of which exceeds 2.5 m;
V- the total area of premises, the height of which is in the range from 1.1 to 2.5 m;
WITH- the total area of premises, the height of which is in the range from 0.8 m to 1.1 m.
0,7 - correction factor. Says that theoretically this area can be used, but with significant restrictions.
You can reduce the number of unused square meters by raising the walls to a height of more than a meter. This is achieved through the construction of attic walls. The attic walls of the attic floor are a superstructure above the load-bearing walls.

Material prepared for the site www.site
The device of the attic floor (attic)
Next, we go directly to construction work or to reconstruction (alteration of the attic space into the attic floor). For those who want to remodel the attic into an attic, you need to dismantle the old coating.
Then the rafter system is installed, for which you will need:
- log (diameter not less than 180 mm) or timber (the best glued, dimensions 80x80 or 100x100);
- board (40x1500) for the lathing;
- hardware, baked wire, anchors or fittings. In order to perform reliable fastening of all elements;
- floor beams. A finishing floor will be laid on them;
- finished staircase to the attic floor. It can be located outside the attic or inside. Outdoor placement creates inconvenience when using it in the cold season and in the rain. The interior steals the usable area of the lower floor. A spiral staircase can serve as a compromise. Even in the smallest room, a compact folding or retractable ladder is installed.
- roofing material;
- protective films;
- thermal insulation material;
- material for wall and ceiling decoration.

Attic floor rafter system - device technology
The device of the rafter system begins with the installation of the Mauerlat, then the rafter legs are assembled and installed. It is easier to collect them on the ground. The installation starts with two opposite legs. Then a rope is pulled between them. It regulates the accuracy of the installation.

After installing the frame of the rafter system, the legs are fastened together. That is, the crate is stuffed. The step of the lathing depends on the type of roofing material.
Attic floor construction process - video
The frame is ready. A properly made roofing cake looks like the one shown in the figure.

Attic windows
Roof windows are installed between the rafters. To make the fastening more reliable, at the place where the window is installed (above and below on the rafter system), horizontal jumpers from the timber are installed.
Insulation of the attic floor
Energy saving needs to be taken care of. The absence of an air gap created by the attic increases heat loss through the attic roof.
An attic is a living space under the roof itself. It allows you to significantly increase the square of the building area without extensions. An attic does not have to be planned in a private house in advance; it can be built on an old building with a conventional roof with an already existing rafter system.
The budget for such work will be relatively small - after all, the supporting elements are already present, it is possible that revision will be required only for insulation and bringing the attic to a living state. A do-it-yourself attic is a very real project that can be implemented without attracting qualified labor, but with an assistant.
Reconstruction of the roof under the attic without replacing the raftersBefore starting construction
Do-it-yourself construction of an attic on a constructed building begins with a careful assessment of the situation. First of all, you need to make sure that the old structure will successfully carry the additional load.
The matter also applies to the material of wall structures. Usually, a sufficient margin of safety is laid both in the foundation and in the bearing walls, which will make it possible to do without additional reinforcement. However, if in doubt, it is better to distribute the increased load on additional columns, spacers, or to strengthen the floor beams between the lower floor and the attic.
The roof of a mansard roof has its own specific requirements. If the existing elements do not correspond to them, they will have to get rid of them and mount new ones, which will be designed for new loads.
 Popular attic with a sloping roof shape
 A mansard roof with your own hands can be built according to different projects. The shape of the roof space depends on how the roof will be formed, in particular, its load-bearing elements - rafters and beams. The most successful form of the roof requires the embodiment of a gable roof scheme with a broken roof line. That is, the angle of divergence of the slopes from the ridge point in the middle of the run is replaced by a steeper one, and the overhangs of the roof descend very steeply onto the Mauerlat of the second floor.
Although a pitched roof has the advantages of a simpler structure of the rafter system, this type of project has not found frequent use in attics due to a number of inconsistencies with the tasks of the room. With it, it will not be possible to provide a high ceiling, or the width of the room will be minimal. In addition, the weight of the snow cover in this case is significant and requires an increase in the cross-section of the bearing beams, which will lead to an increase in the cost of building a mansard roof.
For this reason, many people prefer to build a sloping gable roof, considering it the most acceptable option for houses with an attic. The advantage of this attic roof scheme is that the usable volume of space under the roof will be the largest, which brings a properly designed attic closer to a full-fledged room.
 House with a semi-attic roof
 A compromise can be considered the option of a semi-attic roof, when part of the walls of the attic floor is a continuation of the building box. At the same time, the gable shape of the semi-attic roof dictates the inclined side parts of the ceiling of the room.
Features of the roof truss system
The broken scheme of the attic roof is good in that it allows you to arrange the overhangs longer and place them at a steeper angle. This type of project gives a distinctive look to the whole house. At the same time, in addition to the aesthetic factor, low overhangs well protect the joint between the wall and the roof from precipitation. On the other hand, the windage of the roof increases in strong winds, therefore, when developing the attic structure, an average solution is found that satisfies all the parameters.
 Steep overhang of a sloping roof
 Determine the angles of inclination
When deciding how to make an attic, it is necessary to determine the magnitude of the slope angles. To do this, you need to deal with two basic factors: weather conditions with the prevailing wind directions in the region where the construction is carried out, as well as the materials that make up the floor joists, rafter beams and walls. If in winter there is a lot of snow, which lies for a long time and does not melt, then the roof is made steeper.
Thanks to this, the snow does not accumulate in a thick layer and does not increase the load on the rafters. Taking into account all climatic factors and the fact that a board of standard sections or timber is commonly used as rafters, the angle of the upper part of the roof is 30 degrees with respect to the horizon, and the lower part is 60 degrees. These parameters are shown in the following drawing.
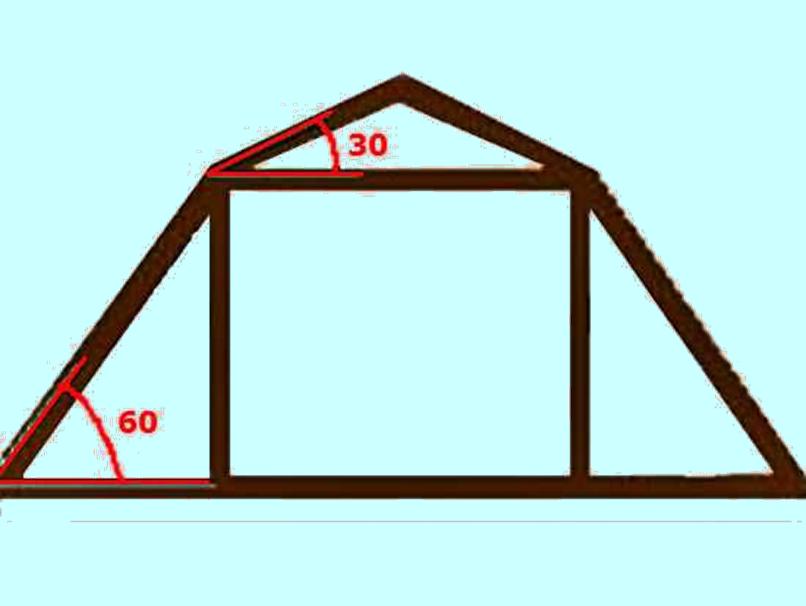
This solution provides a solid structure, which, with a minimum consumption of wood, provides the maximum ceiling height in the under-roof space. According to building codes, it should be at least 2 m. Anything below is considered an attic, not an attic, and is not suitable for comfortable living. On the contrary, if possible, the ceiling is raised to a level of 2.2 - 2.3 meters, since tall people will be uncomfortable in a low room.
It should also be remembered that the steeper the slopes, the higher the skate. This increases the windage of the roof, that is, the wind resistance.
If in the region the winds blow constantly, with high speed or strong gusts, the roof is at risk of falling off, which should not be allowed. For this reason, the choice of a mansard roof project with the indicated angles is the best option.
Choosing the type of rafter system
In the vast majority of cases, pine is used as a material for rafters in the construction of an attic floor with their own hands, due to its cheapness, acceptable weight and ease of processing. The thickness of the beams is usually chosen 40 - 50 mm, width - 200 - 250 mm. The more powerful the rafters, the more it is allowed to take a step between them, and vice versa. Determination of the exact parameters is carried out in accordance with SNiP 2.08.01-89 and TKP 45-5.05-146-2009.

For the device of the rafter system of the attic sloping roof, two schemes are used: layered and suspended. In the hanging system, the ridge beam does not rest on the racks in the center, and the rigidity of the structure is provided by puffs that form a triangle with the rafters. For long rafters, such a system will not work due to the long length of the beams. In the layered scheme, load-bearing beams are erected in the center of the floor, on which the ridge girder rests. Thanks to the intermediate support, the roof can withstand heavy loads, but inside the attic there will be supports, or a one-piece partition.
 Frame size option with hanging rafters
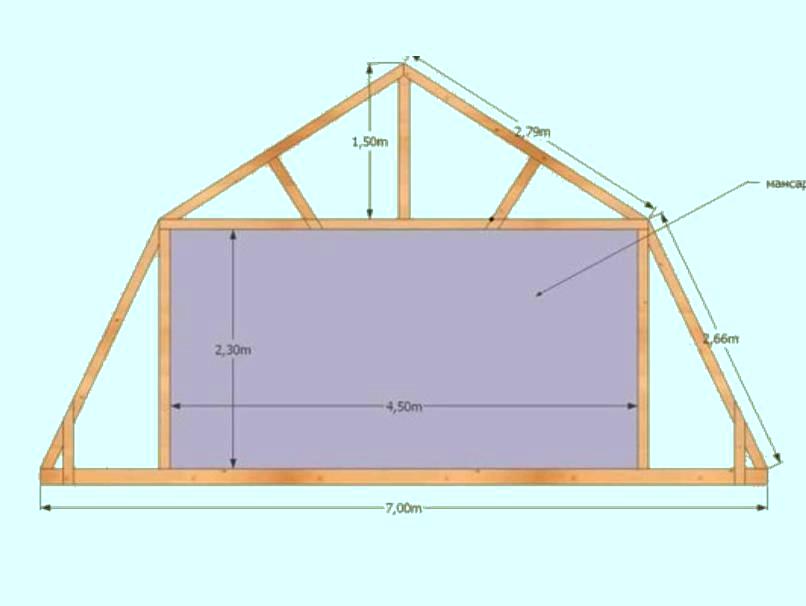
 A sloping gable roof is a little more complicated than a straight one. The fact is that in the first one there is no rigid triangular structure. For this reason, hanging rafters can only be made if the tightening width is not more than 4.5 m. This parameter corresponds to the width of the attic room. However, even in the case of a smaller parameter, it will be necessary to install vertical posts connecting the break point of the roof with the floor joists.
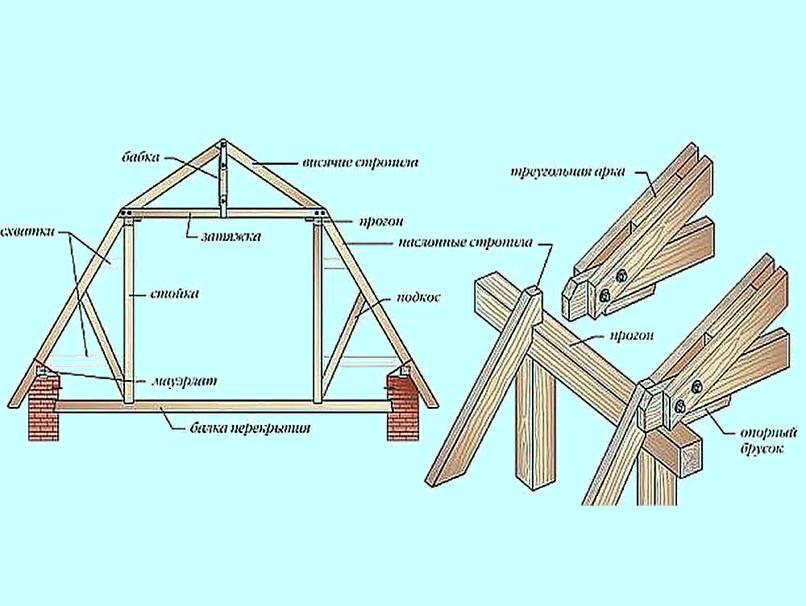 Rafter system with struts
 For additional strength, if the roofing is multilayer and heavy, contractions are made - horizontal braces between the lower inclined logs and vertical posts. Sometimes a headstock is included in the design of the rafter system - a stand between the ridge run and the tightening. Its installation makes sense only in the case of a heavy ridge and a wide roof; in all other cases, the rigidity of the upper triangle is sufficient.
 An example of a simple rafter system
 Basics of calculating a sloping roof of a house
For the roof of a house, the width of which does not exceed 6 m, an approximate, approximate calculation can be made in order to present the approximate amount of material for construction and the money that will need to be spent on it. In small houses where the load on the rafters is small, you can focus on the above experience of arranging the rafter system, taking into account the characteristics of the accompanying materials, for example, insulation and external roofing.
One of the main parameters is the step of installing the rafter beams. If it is planned to use mineral wool insulation as thermal insulation, then this size should be selected based on the format of the material. Mineral wool mats are 60 cm wide and do not require fastening at the time of installation, as long as they are inserted tightly and held by elastic force. Accordingly, the step of the rafters should be chosen from 57 to 58 cm.
The width of the rafter leg should allow the insulation to be laid freely with slight sagging. If we are talking about the Urals, Siberia, the northern regions, then the basalt insulation is laid in a checkerboard pattern in two layers of 100 mm each. This means that the beam must be at least 230 mm thick.
On the Internet, there are statements that the insulation should be "ventilated", so the width of the rafter leg should be chosen with a margin. In fact, the insulation itself may not be ventilated, since it is not afraid of moisture, but at the same time it somewhat loses its thermal insulation properties when moistened. Ventilation, which in reality is rather necessary for the wood of the frame, is provided by stuffing the crate and counter-lattice on the rafters, if the width of the beams is not enough for this.
The timber for posts and beams must be selected with a thickness of at least 80 mm on the smaller side. It is allowed to use a bar 80 * 80, 80 * 100, 100 * 100. The latter option is relevant for heavy roofs of a large area.
It is better to entrust the exact calculation of all elements of the rafter system to the design organization if you do not have experience in construction calculations.
At the same time, a mistake can make itself felt not only at the stage of purchasing materials and erecting a roof, but also later, when expensive repairs are required.
Diy mansard roof installation diagram
Before installing the truss system for the attic with their own hands, first of all, they construct a Mauerlat - a belt made of a bar that encircles the building around the perimeter. It is on it that the lower overhangs of the rafter legs are attached. Mauerlat is exactly the same for both a sloping and a straight gable roof. Depending on the material of the walls, it has features in the installation.
In houses built of timber or logs, a separate Mauerlat beam is not required - its role is successfully taken over by the upper crown. The eyes are cut in it with the desired pitch, and the ends of the rafter legs are attached to the corners or hairpins.
 Fastening the Mauerlat and rafter legs
 In houses made of aerated concrete, an armored belt is required before laying a wooden beam around the perimeter. Without it, the soft porous material of the walls can squeeze over time, and the mount will tear out of the crumbled aerated or foam concrete. It is made of concrete along the formwork, reinforced with two or four rods, best of all from fiberglass, so that the structure is lighter.
Brick and cinder block walls do not require an armored belt. In this case, holes are prepared at the end of the wall with a perforator, and the Mauerlat bar is attracted by anchors. The rafters are attached to it with the help of corners, as well as large screws - "wood grouses" with hex caps for a key or head. It is more convenient to tighten them with a wrench.
Assembling roof fragments on the ground
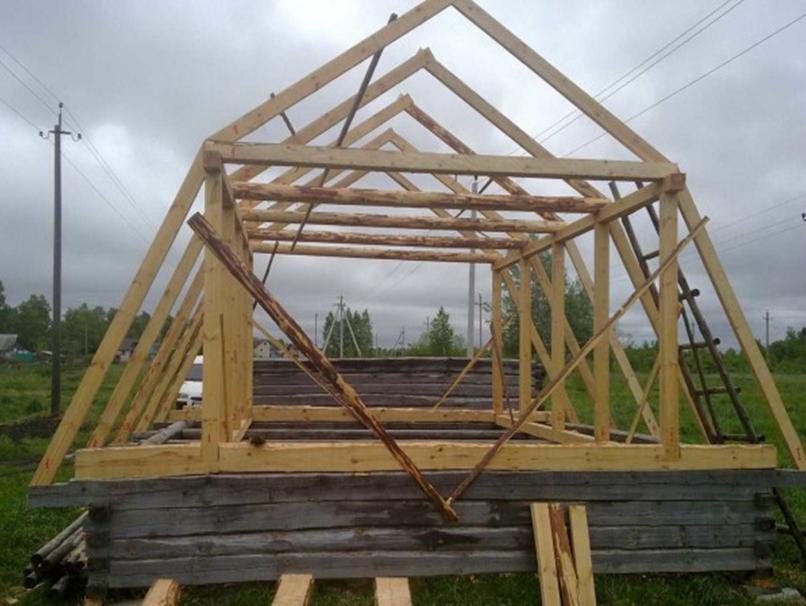
There are several ways to assemble a skylight roof frame. One of them is the assembly of all the elements on the ground, lifting them to the roof, strengthening with temporary struts, and then through "finishing" installation, which provides the structure with rigidity. Consider performing the work step by step:
- The first step is to assemble the gables. They represent the upper and lower parts of the rafters, which are fastened to the racks and ties at the fracture line. All the lower ends of the boards and beams rest on the base. In the middle of the gables, dormers are usually provided.
- The prepared subassemblies are lifted and secured from one side and the other of the building. The bases are fixed with anchors in the wall, plus temporary struts are added to hold the structure.
- The "ribs" of the rafters are sequentially assembled and placed in the cuts of the Mauerlat with the prescribed step.
- After all the elements are assembled, they are sewn together with longitudinal jumpers: with a ridge bar - the tops of the triangles, connecting beams - at the junction of the struts and puffs. So the structure acquires the required rigidity.
Serial assembly on site
In the second case, all parts of the rafter system are gradually assembled in their places on the roof. At the end, a finished structure comes out. This option is easier in the case when individual fragments weigh a lot and cannot be lifted without special equipment. In this case, the step-by-step assembly instructions are as follows:
- Begin by installing racks on the floor joists of the second floor. The step is the same as for the rafters. The upper ends are connected by tightening - a horizontal bar. At this stage, you should end up with a rectangular box of uprights and puffs.
- After that, the lower parts of the beams are mounted. They must form a triangle with the posts and the base - a rigid structure.
- Behind them, you can install the upper sections of the rafters. For the required rigidity, they are fixed by bevels to the puffs. Additional transoms can be provided for wide roofs. Also, if the span of the tightening is too long, put a beam that secures the ridge beam with a tightening - this will prevent it from sagging.

For a sloping roof, there is no problem with a shortage of the standard length of lumber - 6 m. Recall that the rafter consists of two parts. If, nevertheless, such an inconvenience arose, the beams can be built up by placing patches of the same thickness as the beam on both sides, and tightening the joints with bolts and nuts through the through holes.

Drawings of important components
The most critical places, the execution of which may require schematic visualization, are the connections of several planes, as well as places that have a large load. The photo shows drawings of such connections.

Different fasteners are used to fasten wooden beams and racks. In order of strength and preference, you can arrange them in descending order: bolts with nuts and washers - screws and "wood grouse" - nails. Nails are bad because after years, when the wood dries and deforms, they tend to crawl out of the holes. The structure will not fall apart completely, but unwanted backlash will appear. 
The rafters are attached to the Mauerlat by means of powerful steel corners. For convenience, a stop bar is stuffed on the lower part of the rafter leg, which prevents the end of the board from slipping and allows you to carefully tighten all the fasteners.
Attic floor window options
The attic, as a living space, should be well lit. SNiPs recommend a 10% glazing area of the floor area in the room.
The easiest way to let light in under the roof is to provide windows in the gables. If you have provided bearing racks, then it will not be difficult to install such a window. Neither special waterproofing nor reinforcement of the attic roof structure is required. If the window is only on one side, this side should be west or south, so more light gets into it during the day.

Sloped windows are another popular and attractive solution. They do not require any modification to the roof structure. They also have the advantage of the large amount of light they provide. However, when installing sloped windows, a good waterproofing of the frame is needed. In regions with snowy winters, it is recommended to install reinforced windows, since in the presence of a thick layer of snow, they will have to experience additional stress.
 Tilted windows from the inside
 The steeper the roof slope angle, the lower the window height can be. On the other hand, in shallow areas, the height should be higher. Usually, inclined windows are not made wider than the inter-rafter step, as this would necessitate a serious reinforcement of the adjacent rafter legs, onto which the weight of the roof would be redistributed. It is more expedient to make two narrow windows - the light will penetrate through them as much as necessary, and there will be no influence on the structural elements.
 Dormer and tilt windows
 Sometimes dormer windows are made in the attic, for which a special ledge is arranged. The plus is the vertical arrangement of the frame and the ability to stand in front of a full-length window. Minus - the need to change the configuration of the roof. On a solid surface, two valleys appear at once - the meeting points of two planes, where the greatest danger of leakage arises.
A window similar to a dormer, but only in reverse, that is, recessed inside the attic, is done if they want to provide an exit to the balcony. There are no other advantages to this solution, since less light enters the premises in this case than through standard tilted windows.
Installation of lathing and roofing
The next stage in the construction of the attic with your own hands will be the installation of the finishing roofing. First of all, a waterproofing membrane is stuffed onto the floor joists. It should not allow water to pass to the insulation, but steam should escape through it. On top of the waterproofing along the lag, slats are stuffed. Then a supporting crate is attached across the lag. It can be a board of any width and thickness of 15 - 20 mm. Due to the presence of these multidirectional layers, ventilation of the reverse side of the roofing is provided.

This scheme is suitable for rigid roofing materials: slate, metal tiles, standing seam roofing, corrugated board. Flexible roofing requires a solid, solid underlay. For this, osb plates or plywood sheets are used, a screen is made on top, and elements of a soft roof are fused on top.
Step-by-step instructions for insulating the attic
Most often, when arranging the attic roof of a private house, it is assumed to be insulated. In this case, it is more convenient to nail the waterproofing membrane outside the roof. However, if you have not done this, then you can always mount it from the inside. To do this, rolls of membrane are rolled along the roof and are aimed at the logs with a construction stapler. In this case, it is necessary to leave deflections for the insulation. The joints are glued with a special double-sided tape.

Diy mansard roof project. Drawings, according to which you will build an attic above your home, which will make it possible to increase your living space, while the whole thing will not be financially costly. The gable sloping roof is one of the popular construction options due to the low complexity of the technology.
The construction of an attic roof in your own house is a fairly frequent phenomenon, because this method of construction makes it possible to reduce the cost of space, while making a rather curious dwelling under the roof. In order to properly arrange the attic floor, it is very important to thoroughly study all the requirements for this floor, as well as choose the right type of roof itself, along with its slope.
 According to regulatory documents, the attic floor is the volume under the roof covering, which is used to accommodate utility or living quarters there. In this case, the height of the outer walls is needed no more than one and a half meters in general, otherwise this space is considered a whole living room.
Making an attic with your own hands is an extremely profitable activity both during construction and during the use of the house itself. In the case of construction, costs are reduced because the height of the vertical fencing structures is also reduced. This is all because the attic itself takes on the function of the enclosing structure, while it continues to serve its original purpose.
Mansard floor
Attic - a room under the roof, from which it will be possible to make a separate living room. During use, costs may decrease due to the following points:

Making an attic: preparation
It is necessary to start the construction of the attic roof with the preparation of a schematic project; this project should display the attic roof, or rather its drawing, its complete structure. Usually, the roof used for the attic floor is gable, which makes it possible to provide full-fledged windows in the gables, but it is possible to use a four-pitched hip roof.
If you are going to use the hips in order to illuminate the premises, then there is the possibility of installing window openings for the attic exclusively. This method is more difficult during the installation of the elements of the attic roof, as well as during the construction of interiors inside. However, costs are reduced during such roofing due to the lack of gables. In a brick building, the savings will be much more noticeable, because the cost of the construction work itself for the installation of wall fences, as well as the cost of materials in such a house, is quite high in itself.
Mansard roof device in the house occurs from the moment the roof is measured, its shapes and sizes... There has already been a mention of the selection of the type of rafter systems (hip hip or gable). After that, you need to make a choice of a slope, straight or broken. Among the disadvantages of a broken slope are such as an increase in cost, as well as the complexity of the process itself. However, the use of this method can be easily justified by the need to increase the height of the room itself due to the fact that the angle of inclination of the attic roof will change.
During the design phase, it is necessary to determine the optimal slope of the attic roof. This choice will depend on the restrictive roofing material used, as well as on ergonomic considerations.
Before starting the construction of the attic:
- It is very important to make calculations of all its supporting elements for strength and bending.
- In addition, you need to choose the composition from which the roofing cake will be made.
- It is necessary to make calculations for heating technology and select materials.
Design
List of structural components of the main load-bearing elements:

The construction of a mansard roof of a house with your own hands should take place with the selection of sections for all structures of the roof frame. The material must be selected, taking into account the following conditions:
- The tree must be coniferous, i.e. larch, pine or spruce will do.
- There should be a first or second grade of materials.
- More than fifteen percent humidity is not allowed.
- It is necessary to process all the boards, as well as the bars, with antiseptics before starting the construction process.
Heat engineering calculation process
In order for the warmth in the house to be preserved, it is necessary to select the insulation and its thickness. Mineral wool is often used for rooms with an attic. You can also use polyurethane foam, ecowool, polystyrene foam or expanded polystyrene foam. As soon as you decide on the material for thermal insulation, you need to choose its thickness.
 When choosing a thickness, it is necessary to take into account the rafter height. This rafter height must be greater (or equal) to the thickness of the thermal insulation layer. In the case of mineral wool, it will be necessary to provide a ventilation gap of fifty millimeters between the roof covering and the thermal insulation surface. In the event that the rafter sections are small, in order to fulfill this requirement, it is necessary to mount the counter-lattice.
Before the process of building an attic with your own hands, there is the possibility of manual calculation of heating equipment, with the help of a joint venture thermal protection of buildings. However, it is best to use special programs.
You should be very careful with the design of the attic of the house, because flaws in the calculations, together with the incorrect parameters of the structures of the rafter system, will lead to damage to the roof itself and, along with it, the walls of the house during its operation.
It is advisable to provide the design of the attic at home to professionals. In addition, you can use specialized programs on a computer, with their help to perform calculations of rafter systems, the optimal angle of inclination of the attic, as well as many other parameters. All these calculations are made according to the SNiP of loads and impact.
In the process of choosing an attic project, it is very important to pay attention to the dependence of the angle of the attic slope and the parameters of the room itself. The premises of a residential building should not be higher than two point two tenths of meters. If the mansard roof has straight ramps, the angle of inclination of these roofs will have a serious impact on the overall width of the room itself.
Skylights, their heights and roofing pie
 A broken attic allows a strong expansion of the room, while setting the desired height at the ceilings. In this case, the rafter bottom is at a sixty-degree angle, and the angle of the rafter top can be selected at will.
Taking on the attic roof with your own hand, it is very important to foresee what materials will go to the installation of the roof pie, this must be done at the design stage. These materials will include:
- Steam isolation
- Waterproofing
- Roofing material
- Insulation
Insulation. His choice will affect such an important parameter as the rafter step. To save the material of thermal insulation, it is recommended to lay the rafter systems so that the mat or slab fits very tightly between these systems. The type of your lathing will depend on what kind of roof coverings you choose for yourself - it will be sparse or solid, as well as the step of the lathing, if it is sparse. What is important is the device of the attic roof on the floor, which involves the addition of high-quality good insulation, as well as a properly functioning ventilation system in the attic roof.
Required tools and materials
Materials and tools
In order for the construction of the roof and rafter systems to be safe, it must be carried out using clean, environmentally friendly and fire-safe materials. Processing of wooden materials is carried out using fire protection and biosecurity. For in order to build a rafter system in your house with your own hands, you will need:
- timber made of wood, section 50x100mm;
- wooden board 150x50mm;
- unedged wooden board;
- 80 nails, as well as screws and other fasteners;
- annealed wire with a diameter of three or four millimeters;
- level;
- plumb line;
- roulette;
- hacksaws;
- axes;
- hammers;
- carpentry knives.
If you use quality tools during construction, it will significantly speed up and make the installation of wooden structures much easier. You can also find various video instructions on how to conduct such work step by step.
Stages of erecting an attic with your own hands
The hand-made construction of a mansard roof has some differences from an ordinary pitched roof only by the presence of heat-insulating elements. Protective layers for insulation also go into the pie. Here is the procedure:

In order not to make mistakes during construction, you need to consider in detail the instructions for each item, you can also find video instructions.