DIY sliding doors. DIY sliding doors: increasing the usable area of the premises DIY sliding door frame
There is an opinion that it is not realistic to make sliding doors with your own hands at home, but this is not so. A sliding door is not such a difficult thing, and then we will talk about what sliding doors are, walk through the pros and cons of compartment doors, and most importantly, we will give step-by-step instructions on how to make a sliding door with your own hands, and in 2 versions.
Sliding structures in houses are not only beautiful, but also convenient.
The question of how to make sliding doors just right is when you know what you want, so first, let's figure out what they are like:

The accordion looks original, but it is not very convenient to use.
An accordion sliding interior door consists of a certain number of sections connected by hinges, which are folded according to the accordion principle. There is no point in assembling this structure by hand, firstly, there is a lot of small and precise work, and secondly, the system is inconvenient in operation, plus a package that has been completely shifted takes part of the doorway.

Cascade sliding structures.
A cascade sliding structure refers to several door leaves that slide in and hide behind each other. The whole trick is that the canvases, no matter how many there are, move apart synchronously, and you cannot make such a sliding door mechanism with your own hands, and the installation there is far from the easiest.

Retractable radius design.
The retractable radius design is aerobatics in this niche. You should not even try to make such sliding doors with your own hands, because almost all the details of radius doors will have to be ordered individually. Agree, it will be a shame to pay money for the order, and then break the doors, trying to install them yourself.

It is quite possible to make interior doors of a compartment with your own hands.
Sliding compartment doors are the best option for a home craftsman. Such a door can be single-leaf and double-leaf. The mechanism for sliding doors of a compartment is simple, but reliable, in short, guides are installed on the wall along which the doors travel.
- Hidden doors that hide in the wall;
- A door that slides along the wall.
But this, in principle, is not true, because the drawings, diagrams and the device of the structure itself are identical in both cases, the door slides in the same way, the roller mechanism is the same. The only difference is that a plasterboard box is mounted next to the door leaf, in which the leaf is hidden.

General scheme of hidden sliding doors.
Interior doors differ from similar designs in wardrobes only in a more powerful mechanism, because the canvas is much heavier here. Therefore, it is not so important whether you will mount the sliding door with your own hands on a cabinet or on a doorway, the technology is almost the same.
We figured out the main differences and the choice of design, now let's talk specifically about how to make compartment doors with our own hands.
Two options for self-arrangement of sliding doors
Do-it-yourself sliding interior doors can be made in different ways, more precisely, for different rooms. Plus, the size of the budget plays a significant role, it's one thing to assemble doors for a small summer cottage with seasonal living, and quite another to make sliding interior doors for a city apartment.
Option number 1. Solid door for an apartment
In this case, we will learn how to properly install sliding doors on rollers with our own hands.
You need to forget about self-made mechanisms right away, we are only talking about the installation of ready-made systems. Of course, such designs are sold with a description, but there are nuances that are not in the description.
To install sliding interior doors with your own hands, you need a tool:
- Hammer drill or electric drill with impact function;
- Hydro level;
- Bubble level;
- Screwdriver;
- Roulette;
- Open-end wrench set (from No. 5 and higher);
- Manual frezer;
- Hacksaw for wood;
- Hacksaw for metal;
- Pencil;
- Hammer.

We assume that the door is made from ready-made units, that is, we have a door leaf, guides, rollers, stops and other door fittings. The only thing that you will need to buy additionally is a wooden block 50x50 or 50x70 mm.
Even before assembling the sliding door and even before going to the store for accessories, you need to make sure of the fundamental things:
- Check how smooth your opening is, if there is a skew, take a wide canvas (with a margin);
- Make sure the wall can support the load. It is better for an amateur to work with a brick or concrete wall, leave foam concrete and plasterboard false walls to professionals;
- Absolutely all finishing must be completed. Doors are assembled at the very end.
How to make a coupe door with your own hands:
There are many roller models, we are interested in mechanisms on a supporting platform with the ability to adjust the gap between the web and the guide profile.
Wide platforms are mounted on the edge of the door leaf, but if the door leaf is more than 80 cm, then you can step back from the corner by 1/6 of the door width.
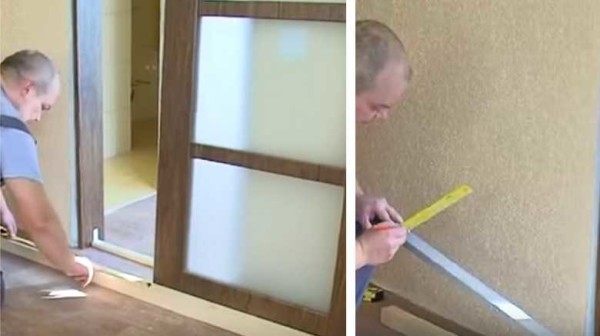
Using a tape measure, we calculate the center and, attaching a roller platform to the end of the canvas, mark the entry points of the screws.

It is not worth driving the self-tapping screws right away according to the markings, you do not know what quality the plate is, when screwing the self-tapping screw "live" it can crack. Therefore, first drill the holes, the drill diameter is about 2 mm. Then you apply the bar and screw in the self-tapping screws.

Now insert the carrier plate itself, equipped with a rod under the roller, into the grooves of the roller strip. In this case, the plate is fixed on the bar by screwing in the stem a couple of turns (here open-end wrenches will come in handy for you).

As you can see in the photo, the rod is equipped with a thread; we need to screw rollers onto this thread. There is, of course, the possibility of adjustment, but the thread must enter the roller at least 3 - 4 turns. It is better to count the revolutions so that they are approximately equal on all rollers.

In order not to work then overhang, it is better to cut in handles and locks right away, especially when it comes to secret handles, as in the photo. All such grooves in the canvas are cut with a hand mill.

With the rollers and fittings finished, now we turn to the installation of the guide bar. The guide bar itself is metal, we will attach it to a wooden block. It is important here how to calculate the cross-section and length of the bar.
Do not be alarmed, for the calculation we only need a tape measure and a pencil. If your doorway is simply plastered, without platbands, then you can take a block of 50x50 mm. Platbands will be taken at least 10 - 15 mm, so you need to take a block of 50x70 mm for them.
As for the length of the bar, it is calculated as 2 widths of the door leaf, plus another 50 mm for stoppers.
Now we put the guide on the bar and fasten it with self-tapping screws in increments of about 200 mm. The holes in the guide are drilled into the underfloor, that is, so that the screw cap does not protrude from above, otherwise the roller will begin to cling to it when moving.

Then we suspend the structure. It is enough for a professional to make a measurement once, after which the craftsmen attach the timber separately, and then hook the doors onto it. It is better for an amateur to try on the assembled doors, for this we put the rollers into the guide.

To make the measurement more accurate, you need to insert a wedge between the door and the guide bar, preferably more than one.

Above the bar, you need to put a mark on the wall and already from this mark you should step up at least 7 mm, plus the thickness of the carpets, if any
The holes in the block must be drilled immediately. The step depends on what exactly you will hang the structure on. For anchor bolts with a cross section of 6 - 8 mm, a step of 50 - 70 cm is sufficient, and for long self-tapping screws with plastic dowels, holes are drilled at a distance of no more than 25 cm.
We make the markings on the wall through the block. The photo below shows how the craftsmen are drilling the wall without removing the door, we do not advise you to do this. We have the markup, now you can remove the door, attach the block to the wall, level it and mark the future holes with a drill. Then you remove the block and drill it out.

To prevent the rollers from jumping out, you need to install stoppers along the edges of the guide, but they are installed after the doors are hung. The stopper is inserted into the groove and the clamping screw is tightened. The mounting point is determined empirically by the position of the rollers.

Our doors hang on the rail, but so that they do not dangle, they need to be somehow fixed from below. To do this, a groove is cut from the bottom end along the entire length by a router, if the door is factory, then the groove should already be there.
The blade will be controlled by a flag pinch roller, which is attached to the floor directly next to the door jamb.

In order for the door to rub less against the roller, it must be set strictly along a plumb line. The checkbox technology is shown in the photo below.

Control flag setting technology.
In principle, the sliding door has been installed with your own hands, it will work, but you still need to bring beauty. To do this, buy a platband to match the door leaf and nail or screw it to a supporting wooden bar. Such a bar will hide both the bar itself and the suspension mechanism.

Option number 2. Homemade for a summer residence
Sliding doors are a good thing and they have a lot of advantages, but all these advantages fade into the background when a person finds out the price of such accessories. Do not get upset with a creative approach, you can solve this problem too. The design is not the most beautiful, but it is quite suitable for a summer residence.
So, let's take a step-by-step look at how to make sliding doors for a summer residence yourself and at the same time not spend much money.
The door leaf will cost the most. Although there are options here, for example, you can restore an old door and hang it.

Old doors can be used in new ways.
Then we go to the store with furniture fittings and buy the simplest furniture wheels there. Do not take pivoting mechanisms on a hinge, it will only get worse with them. Such wheels are attached to the doors with a pair of self-tapping screws. There are 2 anchor points for each canvas.

We fasten steel rings from the upper end of the canvas over the wheels. The thickness of the metal in such rings should be at least 3-4 mm, otherwise they will quickly fray.

As a guide, we will use a three-quarter inch steel pipe, although this is not essential, you can take any pipe, as long as the rings fit into it normally. We calculate the length in the same way as in the case of a wooden block.
We install, as shown in the photo below, the knee and the fastening "penny" can be found on any construction market, however, like the pipe itself.

Fastening the pipe to the wall.

Output
As you can see, it is not so difficult to install sliding doors with your own hands, and for those readers who thought this information was not enough, there is also a video on this topic.

An option for a home-made construction on the upper suspension.
Strength of character lies not in the ability to punch through walls, but in the ability to find doors. Better yet, not only be able to find them, but also be able to create these doors. This article will focus on how to realize your strength in everyday life and how to make a door with your own hands.

How to prepare
It would seem that the modern market is so wide that you can find a door of any shape, size and quality on it. But this is not always the case. Especially when it comes to an exclusive, a special kind of wood, a spectacular stained glass window, an outstanding form. Buying a standard factory design is boring and mediocre. And making a door with your own hands is a completely simple task, especially if you have a suitable canvas, a couple of skillful hands and a little time.

However, in order to make a beautiful and high-quality door yourself, you need to first study the subtleties and nuances of the material, evaluate the complexity of technology and calculations, and identify pitfalls during its installation.
First you need to prepare all the materials and tools that you will need for work. Indeed, the final result is influenced not only by the quality of the raw materials themselves, but also by the quality and reliability of the auxiliary tools and materials that were used in the assembly and installation of the door. And this will require:
- manual milling machine. With its help, the processing of a wooden product is carried out, it is shaped, the groove elements are grinded;
- hand-held circular saw;
- Bulgarian. In this case, it will serve for sanding wood;
- screwdriver for door mounting;
- building level and tape measure;
- hammer;
- pencil or marker.

Regardless of what type of product needs to be made, whether it is interior, entrance or doors for a summer cottage, a single technology is used for all. Therefore, after studying this article, you can easily make homemade doors for any needs. In addition to the tools, you will also need the material itself. As a rule, they choose an array of different types of wood: oak, ash, birch, larch, pine.
Some people prefer exotic species: mahogany, wenge, beech. The choice depends on personal preference, the type of room and the overall concept of the interior.

When making a structure with your own hands, you need to take into account the fact that a wooden canvas will require preliminary processing, especially for hard wood. When choosing a wooden canvas, you need to focus on ensuring that the wood is even, smooth. There should be no cracks or knot holes. The selected board is first dried in a well-ventilated room at a temperature of about 25 ° C.
You can dry it outside, but only in dry weather, preferably in the summer of central Russia. Depending on the type of wood and its initial state, it can take up to ten days to dry the web.

Popular models
Before proceeding to the manufacture of doors, you need to think about what type they will be (hinged or sliding), decide on the shape and design. The most important characteristics of all doors are functionality and appearance, because they will become an integral part of the interior.

Let's characterize the main models:
- Very popular today sliding doors. The door of the "compartment" type can be either single-leaf or with two leaves. Sliding doors on rollers are an alternative to conventional options with hinged leaves, especially if there is an acute issue of saving space. There are two types of sliding doors: bottom rails and top rails. So, using a mechanical system with lower guides, the door "walks" along the built-in rollers, reducing the load on the walls.
It is advantageous to use such a sliding door fastening system for thin partitions in apartments.

- Among compartment doors designs with a hinged mechanism are especially popular. Hinged sliding doors are usually made of glass, due to its lower weight compared to solid wooden counterparts. In addition to the fact that this type of door also takes up little space in the apartment, plus it also lies in the fact that its glass surface perfectly transmits light into the room. This option is very appropriate if you plan to overhaul the "Khrushchev" in order to free the already small area of the apartment from unnecessary structures.

- Book-door, like a compartment door, helps to maintain useful space in the apartment. Its folding structure consists of two separate canvases, interconnected in such a way that when opened, one part lies on top of the other, without cluttering the interior. They are often used in dressing rooms and bathrooms in bedrooms.

- Folding door- another option for small apartments. Compared to swing doors, such doors can save up to two meters of space. This type of product can be used in any interior. The design of the accordion doors is varied. There are even interesting options with intricate stained glass windows.

- Well-known paneled doors remain popular to this day because of their aesthetic characteristics. A paneled door differs in design from a conventional one in that additional thinner canvases are inserted inside the door frame. Thus, even the most boring door can be made very original using inserts with textured patterns or carvings. The area of use of these doors is not only office premises, but also residential buildings and apartments.

Manufacturing
A standard hinged door consists of several parts:
- door frame;
- door leafs;
- fasteners;
- castle;
- frames in the form of platbands.


If the fabric of the product is not a monolithic board from an array, but has several components, it is necessary to clarify what they will be made of and what is their functional purpose. The frame of the structure is the frame. It sets the main dimensions of the product, gives it rigidity and shape. The outer visible part of the canvas is represented by sheathing. In this capacity, not only wood panels can serve, but also plastic profiles or glass stained-glass windows.


If the task is to make the front door, then you need to take care of the insulation, which is placed inside, under the cladding.
This article will provide information on how to independently make a door of the simplest design with a hinged fastening mechanism, without insulation and complex cladding options such as glass decorative elements and carved panels.

Measurements
Seven times measure cut once. This proverb will be more appropriate than ever when making your own door. Indeed, the final result will depend on how correctly the measurements are made. And you don't have to figure out which parts to measure. All the main parameters have long been known, it is enough just to write them down on a sheet of paper and measure them using a regular construction tape.

It is imperative to measure:
- door width (distance from the left to the right edge of the leaf);
- door height (distance from the floor to the top point);
- the width of the doorway;
- the thickness of the doorway;
- the slope of the opening (if there are distortions);
- evenness (determine the elements, the size of which differs from the main one).

When determining the width of the product, it is recommended to measure the distance between the side parts of the opening in the floor area, in the center of the opening and at the upper border of the opening and find the average value. If necessary, if these values differ, the opening can be trimmed.
For an interior door, the width is usually 80-90 cm, for an entrance door - 90-120 cm. The height of the door is determined by the height of the opening and is approximately 200-210 cm. Measurements are taken with the same tape measure from the floor to the top point of the doorway.
It should be borne in mind that if there is no floor covering in the apartment yet, then the measured height will not be entirely accurate, therefore for a start it is recommended to finish work with the floor so that all parameters of the future door are taken into account correctly. When determining the height of the door, measurements are also carried out at three points (extreme left, center and extreme right).

The thickness of the doorway is measured similar to the width of the door. You just need to take into account that the width of the box will be slightly larger, since it is necessary to leave a distance between the door and the box for free movement of the door. And yet, when forming the box, it should be remembered that its width should be several centimeters less than the measured width of the opening, since it is necessary to leave technological voids during installation.

The thickness of the doorway is measured at six points (thickness at the bottom, middle, top for the left edge and the same positions for the right edge). This parameter will depend on the thickness of the wall into which the door will be mounted. For the entrance, it is usually more than for the interior, but there are exceptions. Here you should also pay attention to the presence of non-standard dimensions of the thickness of the opening. In this case, it is necessary to provide supplements that will compensate for this moment.

In order to simplify the installation of the structure, it is necessary to first determine the evenness of the opening... Using the building level, check the vertical of the opening (at three points) and the diagonal. Using a tape measure, measure the distance inside the opening diagonally, from the top corner to the bottom, for each side. Both values should be approximately equal. In the event of strong deviations, not only the appearance of the structure will deteriorate, but also the reliability of the fastening system is called into question.

After the basic parameters have been measured, proceed to the correction of irregularities and distortions. To do this, they carry out plastering of these places or cut off the excess with the help of a grinder. The ideal option would be to level the opening with drywall sheets.

Eliminating the shortcomings identified in the process of measuring the dimensions of the product will certainly have a positive effect on further work and will eliminate many unpleasant moments during installation.
Materials (edit)
The modern market is oversaturated with various door options from a variety of materials. However, the tree remains traditional. Due to its high quality indicators, as well as the property of being perfectly combined with wooden furniture and parquet boards, wooden doors have become more in demand, especially in the interiors of apartments and country houses.
In addition to their aesthetic characteristics, wooden products have a number of other advantages: the strength of the material, ease of processing of the material, the ability to retain heat, good sound insulation, as well as environmental friendliness.
It is worth paying attention to the fact that if the choice fell on a wooden door, then all other parts must also be made of wood (box, platbands, extensions).

Among the shortcomings of wood, one can note the flammability, the ability to absorb moisture and expand, and, of course, the high cost.
The most popular, but not the easiest to manufacture, are paneled doors. It is better to use ready-made cutters as internal inserts, since cutting them yourself is laborious work. On the construction market, you can purchase a set of cutters for a future door. To save on material, the door leaf can be made from boards, instead of a wide monolithic leaf.

If you need to make a door to a summer cottage or a bathhouse, you can use even cheaper materials. A good alternative to solid wood would be a plywood door. This is a fairly strong material; during its manufacture, the peeled veneer sheets are glued to each other so that the fibers of one sheet are perpendicular to the fibers of the other. The outer layers of plywood are pasted over with aspen, pine or larch veneer (these types of veneer have good strength and aesthetic appearance).

Lining products are also an inexpensive option. The advantage of this material is that in order to make a door, it is not necessary to use the factory lining, you can make separate profiles from scrap materials.

In addition to natural materials, synthetic polycarbonates are widely used. The choice of this material for the manufacture of the door is advantageous when it is assumed that the structure will be influenced by unfavorable weather conditions (humidity, temperature). But if earlier polycarbonate was used for the manufacture of greenhouses, now it is easily used for entrance doors, the main thing is to provide a reliable base and insulation.

If desired, you can build a structure from other polymers. An aluminum frame with plexiglass inserts is often made. Looks pretty stylish, but these materials are quite expensive.
How to make a door frame?
Before you start assembling the door frame, you need to study its structure. So, the door frame consists of four main parts: two pillars (the longest parts), a threshold and an upper crossbar (short parts). To begin with, measure the length of the racks. In the case of using a threshold, it is equal to the length of the door plus 2-3 centimeters for the gap on each side. If there is no threshold, then instead of a gap from the bottom, add 15-20 centimeters. This will allow the door to move freely from the floor.

The measured values are traced on the canvas and each rack is cut out with a special knife.
The crossbar and the threshold are the same component. Their length consists of the width of the door, the same two gaps and the thickness of the frame. The measured dimensions are transferred to a wooden canvas and one or two elements are cut out, depending on the need for a threshold. In the upper crosspiece of the box, grooves are cut out, marking the lines where the racks intersect with the upper crossbar, and carefully cut these sections with a jigsaw on each side.

After all the grooves have been cut, the uprights and crossbar are aligned on the floor to make sure they match. After that, the cut out parts are carefully sanded with sandpaper, eliminating all irregularities and rough roughness. When all the elements of the box are ready, you can start assembling.
In order to assemble the structure, you will need a drill or screwdriver. A 2-3 mm drill is inserted into the screwdriver and holes are drilled in the aligned corners of the future box. These holes will keep the material intact when screwing in the screws. Screw the screws into each hole with a Phillips drill. The door frame is almost complete.
To make sure that the box is made correctly, you need to place it on the floor and put the selected door leaf inside, assessing the presence of gaps between them. It is worth noting that if the task is to independently make a sliding structure, then you need to take into account its distinctive mechanism. When such a door is opened, it will move to the side like a pencil case (enter the wall or lie on it), therefore, when forming the box, a groove for the door should be provided in one of the racks.

How to make the door itself: step by step instructions
Now let's look at how to make the door itself. For outbuildings, the door will be a simple shield made of separate boards, fastened together with wooden straps. Interior wooden doors should have a more aesthetic appearance; simple fittings are not applicable here.

The work should be carried out on a joinery stand or on a table that will allow the product to be fully positioned on it.
To form the door leaf, grooved boards with grooves are used (you can also cut the grooves yourself). The thickness of the boards should be from 2.5 to 4 centimeters, depending on whether it is an interior or an entrance door. Prepared boards are folded into a shield. If grooved boards are taken, then the grooves are removed on the outer boards using a circular saw.
The boards are glued together with carpentry glue, while the pattern of the annual rings must be observed (they must lie in the same direction so that an imbalance does not stand out on the finished product). The blank of the door is placed in a vice in order to combine the elements more tightly, and the glue is allowed to dry. After that, the entire surface of the web is passed with a milling machine, special attention is paid to joints and uneven fragments.

If the thickness of the boards is not sufficient to use the door as an entrance, then you can glue the boards in two layers. Such a door will be quite massive and heavy.
Next, proceed to the design of the finished shield. Using a stencil, transfer the drawing onto a wooden canvas, first with a pencil. Using a router with a manual mechanism, they carefully cut out the pattern, changing the cutters. The finished drawing and the canvas itself should be treated with sandpaper, then blotted with a special antiseptic solution. If the door is entrance, then it must be treated with moisture-resistant agents and fire retardants. So it will last much longer.

How to insert?
On the door frame, mark the places where the hinges will be located. Marks are also made on the door leaf in the appropriate places. To do this, put it in a vertical position, the top will be on the side where the hinges are attached. On the reverse side, mark the location of the castle. Previously, the door is placed in a box, the marking is checked, the location of the lock tongue on the box is marked, then the hinges are inserted, then they are applied to the door and to the box, drilled with a drill. The tongue is carefully cut with a jigsaw.

In order to correctly install the door lock, it is first applied to the installation site on the product, circled, and all the necessary technological holes are marked with dots. After the depth of installation of the lock has been determined, it is placed in the marked place and screwed on. Now that all the parts are ready, you need to install them correctly.


First, we insert the door frame into the opening. We align and secure it with wedges. You can adjust the box already mounted in the wall by hitting the wedges with a hammer. Then dowels and self-tapping screws are inserted into the holes drilled in the wall and box. And the last and most important thing is the assembly of the door and the frame.
It is better to perform this operation together to avoid injury, since the door leaf is a heavy structure. Holding the door in weight, we fix the hinges with self-tapping screws.

After the assembly of the main parts is completed, you can do the platbands. It is easier to buy ready-made in the store or make it yourself using wooden blanks 1-1.5 cm thick and a simple jigsaw. Each edge of the casing is cut at a 45 degree angle and adjusted to length. Finished products are fixed at the level of the box using wood glue or small nails.

In general, the work on installing the door, with a competent approach and high-quality materials, will take no more than two days. And the above recommendations can be used to make doors from other materials, changing only some of the tools.
Finishing
Finishing will help to give the finished product a finished look. You can also do it yourself, it is more pleasant and less complicated work than installing and assembling the door itself. Door finishing can be done as follows:
- door painting;
- varnishing;
- pasting with wallpaper or decorative film;
- decoupage;
- insert of mirrors and colored glasses;
- lining with fabric;
- the use of methods of aging a wooden canvas.


Sections of the article:
The huge popularity of these designs stems from the ability to save such valuable living space. The market offers many different models of these doors. However, having certain skills and using familiar elements, you can make sliding doors with your own hands.
Pros and cons of a sliding door
Before using such an interior solution, you should familiarize yourself with the strengths and weaknesses of sliding structures. Unfortunately, these products do not always guarantee the solution of all interior tasks. But making a sliding door with your own hands allows you to solve many problems.
Advantages of sliding doors:
- Saving space;
- The sliding door will never close against drafts;
- The doors open with the slightest effort;
- Automation capability;
- Lack of thresholds.
With a large number of advantages, there are also significant disadvantages. If you make sliding interior doors with your own hands, and then install them and use them, this will immediately affect the heat and sound insulation.
In addition, such structures are not suitable as entrance doors. It is also not suitable for balconies or loggias. But if there is a wall of suitable length, then glass structures can be used. How to make such a sliding door with your own hands, you can watch the video. 
Another disadvantage is the cost of accessories. The prices for fittings are much higher than the cost of the same products for conventional doors. Cloths are also more expensive. In a finished version from a factory or a well-known brand, such a design can cost a lot of money. Therefore, it is very important to make a sliding interior door with your own hands.
Types of sliding systems
With all the variety of doors, the mechanism is the same in them, and the doors themselves may differ only in appearance.
There are several popular designs:
- Compartment doors;
- Cascade models;
- Harmonic;
- Multi-leaf systems;
- Radius systems.
Fittings
The unusual design presupposes such unusual fittings. If you are going to make sliding doors with your own hands, you need special locks, handles and other details. Handles and locks for these structures look unusual - the handles are sunk into the canvas. This is done so that when the canvas is closed, nothing interferes. 
By purchasing or making a sliding door with your own hands, the canvas can be equipped with all the necessary fittings, or everything will have to be purchased separately. In the second case, it becomes necessary to perform independent installation. When choosing, you need to carefully examine the accessories.
How the mechanism works
These doors are called so due to a different, not typical for city apartments, way of opening and closing. The systems work by means of rollers that move along special guide profiles. If you are going to make a sliding door with your own hands, you need to take time to choose a mechanism that will fit the canvas. Also, the choice depends on the number of leaves, door type.
The fact is that the systems differ significantly in weight. Therefore, different weights mean different loads on the entire system.
 Telescopic (cascading) sliding doors.
 When installing some types of doors, it is necessary to take into account the number of rollers in order to then choose the right guides for them. For example, if you plan to make cascading sliding doors with your own hands, then you will need to prepare two mechanisms for each canvas. The guide profile must have 2 grooves. It is also very important that for cascading structures, one groove in the guide profile is required for each blade.
Here's how to make DIY sliding doors. In the video you can see what mechanisms and fittings are used.
Mounting options
Unique characteristics, high functionality, excellent ergonomic characteristics make it possible to embody the most interesting design ideas. This is very important in a very limited space. And also the manufacture and installation of sliding doors with your own hands can be the best solution even in large areas.
A popular solution is the installation of a sliding system in one room, but between two zones.
For example, a double-leaf door helps not only divide a room into different zones, but at the same time leave the room intact. See how sliding doors change the room. They are all handmade. These photos show how the space is zoned.

Another way of using structures is a partition that separates the living part of the room and the balcony or terrace. But this is only true for country cottages. But here the right solution would be to create sliding doors with your own hands. Through the transparent glass, sunlight will enter the room, and in summer it will also be warm. If you open the doors, the room expands indefinitely.
These structures are often used in technical rooms. Utility rooms or storerooms will be closed and valuable space will be saved. This technique is often used in cramped city apartments.
The most difficult DIY sliding door to create is the radius model. Here the difficulty is not only in the production of guides, but also in the creation of the canvas.
Manufacturing process
For starters, here's how do-it-yourself sliding doors are made. Watch the video - this video shows the whole process from start to finish.
The first step is to go to the store for accessories and everything you need. But first you need to make measurements. It is very important to know exactly the width, as well as the height of the doorway and door leaf. Knowing these parameters, you can, not only without difficulty and confusion, acquire everything you need to create sliding doors with your own hands.
 Sliding structure mechanism.
 In a hardware store, the first step is to acquire a mechanism. The consultants will be able to choose the right option according to the size of the door receptions and the canvas. It is worth considering that the length of the guides should be 2 times longer than the canvas. If the system is a little longer, it doesn't matter. You can always cut off the excess.
It is also worth thinking about a new door frame.
It may be necessary to purchase an additional rail for it. Also, before making sliding doors with your own hands, they usually also acquire decorative strips, as well as thrust strips. If the task is to make a beautiful door, then you should choose a suitable one tightly.
Preparing the canvas
For preparatory work, a milling cutter or a grinder, a drill, a hammer and a chisel is required. Which tool to choose is a matter of taste, but with a power tool, preparatory work can be done more accurately and much faster.
On the lower end part of the blade, a groove is cut in the center. Its width should be 3 mm. It is needed for the installation and operation of the guide. A more precise groove is made with a router. In general, creating beautiful sliding doors with your own hands using only a hand tool is impossible.
Next, it's time to unpack the mechanism and find rollers and staples in the package. First, the rollers are connected with brackets. On the latter, special holes are provided for this.  The resulting nodes are attached to the upper end part of the canopy and outline the contours of the parts. Further, on the same end part, grooves are selected equal to the thickness of the fastening part of the bracket. Then, the part is screwed to the body of the canvas. In the simplest version, without a lock, you can consider a do-it-yourself sliding interior door ready.
At the next stage of work, a lock is installed. For work, the same manual router is used. The installation site is marked. 900 mm are measured from the bottom of the canvas. There will be a handle here. The lock is cut into the center of the canvas. The length of the lock is halved. The length of the lock is set aside from where the handle will be. This is done in two directions from the center. Further - at this point they make a niche for the castle. Then the lock is inserted and secured with self-tapping screws.
Professionals recommend carefully marking the canvas before making a sliding door with your own hands. If the markings are incorrect, the door can be irreversibly damaged. If door handles are needed, then grooves or a through hole are also cut out for them. The hole is much easier and cheaper to make.
Installation of the mechanism, installation of the door
Installation of the sliding system is simple. If you do not know how to make a sliding door with your own hands, then even in this case, installation will not be difficult. All that is needed is to set the guide profile strictly horizontally.
The edge of the guide profile must protrude 50 mm from the edge of the opening. On the other hand, the profile must go to the width of the door leaf. The installation height of the mechanism must be calculated. This dimension is the sum of the height of the curtain and rollers, as well as the gap under the door.
The distance of the profile from the wall depends on the wall itself. If the wall is flat, then everything is very simple. If it is not too flat, then perhaps the process of making and installing a sliding interior door with your own hands may be slightly complicated.
The canvas is installed on the guides from the side. After the door sits down, an emphasis is attached from below. Now all that remains is to equip the opening. Now you know how to make your own sliding doors. It is not difficult, original and ergonomic.
Such doors are a new trend. Many designers use these solutions to create unique interiors. Such designs are also popular in Japan. You can decorate your home and expand your space. In addition, how to make a sliding door with your own hands is a very exciting experience.
In an effort to make the house more comfortable and cozy, the idea often comes to replace ordinary swing doors with sliding doors (they are also called sliding, sliding, suspended). The good news is that you can easily install sliding doors yourself. The bad thing is that a normal mechanism costs about the same as a high-quality canvas. What is captivating in them is the moment that in the open state they hardly "eat up" the space. They either hide in a wall (the best, but more difficult option to implement), or move along it.
All this is true, but there is a significant disadvantage - a very low degree of sound insulation, especially in the version of the compartment door. When the canvas just covers the opening. When installed in a pencil case (in a wall), the situation is slightly better, but the degree of sound insulation of the swing door cannot be achieved even with this installation method. If all this does not scare you, you can start studying systems, choosing, and then installing.
Sliding door systems
There are two types of mechanisms: suspended and rail. Both are not perfect. Briefly about their advantages and disadvantages - below.
Suspension system on the top rail
The suspension mechanism is a supporting beam, to which a guide in the form of the letter "P" with "legs" bent inward is attached. The rollers move along this guide, to which the door leaf is attached. In technical terms, this is a hanging door on the top rail.

When installing such a door, the floor under the door remains smooth, only the lower roller is installed on the right and / or left in the doorway. It slides along a groove made in the lower end of the blade. It is necessary so that during movement it does not deviate vertically. This design is the easiest to install. Installation is very simple and consists of several steps:

That's all. Roller doors installed. But this system, as in the photo, has very low noise insulation characteristics. They are practically zero: the passage is simply blocked.
Sliding rail doors
This type of door has two rails: an upper and a lower one. The rollers are also installed at the top and bottom. Thanks to this design, the system has a high degree of rigidity: it can be wobbled, and this will not cause much damage.

The disadvantage of the rails in the floor is known: the difficulty of cleaning. Debris and dust constantly get into the grooves, you have to monitor their cleanliness. This type of door is most often used in wardrobes,. They are installed as interior doors if mobile children grow up in the family. Then safety is more important than the difficulty of cleaning.
Mounting options
Regardless of the sliding door system, installation methods can be:

The easiest installation option is sliding doors. They can be installed independently, not only at the stage of repair, but also after it. It is only important that the opening is even, and the wall has a normal bearing capacity. The disadvantage of such a system is that you cannot put anything close to the wall in the place where the door rolls back. There is one more: very low sound insulation. The explanation is simple: if you look from the end, there is a gap of a few millimeters on the sides. It is necessary so that the canvas does not "shuffle" along the wall. And through it all sounds perfectly penetrate, becoming only a little quieter.
Cassette doors are good because, when open, the leaf is in the wall niche and does not interfere. The second plus is that seals can be installed along the perimeter of the opening, which give much higher sound insulation performance. The disadvantage of installing a sliding door in a niche is that it can only be done at the stage of repair. The second drawback: to make a pencil case for sliding doors, they usually put a false wall, and this is stolen centimeters of the area.
Cascading - one of the varieties of compartment doors. It just has more guides: according to the number of movable door leaves. Installation is perhaps the most difficult: there are a lot of details and a high accuracy of installation is required. The systems belong to the category of elite, and they rarely save on installation: repairs will cost more.
Features and installation procedure
You can even put up sliding doors with your own hands without much experience. It is quite possible to do without installers. It will take a little time, and also installation instructions. We will try to give a detailed description of the process with photo and video materials.
Self-installation of sliding interior sliding doors
The systems may differ slightly, but the general rules remain the same. There are several requirements that must be met prior to installation:
- The opening must be even, otherwise you will have to take the canvas, which overlaps all deviations with a margin.
- The bearing capacity of the sides of the doorway should be high, as well as the wall above it.
- The opening must already be finished: plastered and painted, covered with wallpaper or decorated with decorative panels.
Next, we start assembling. You can attach the rollers first. Different manufacturers have their own recommendations. Some recommend retreating 1/6 of the width of the door leaf from the edge, in other systems they are attached immediately from the edge, and the indentation is provided by mounting plates. We install just such a system: in it, roller platforms are installed immediately from the corner.

Marking the place of installation of rollers
We center them, measuring so that the distances are the same. Having set the plate, with a pencil or a marker, we outline the places for the fasteners. Drill holes in the marked places. The drill diameter is 1 mm less than the screw diameter.

We expose the plates, screw in the screws. The length of the fastener depends on the weight of the blade, but not less than 70 mm. We twist them exactly perpendicularly, otherwise unnecessary stresses will arise.

Installing the rollers
Supports for the rollers are inserted into the installed plates. They are fixed with a cover on the side surface. Next, roller platforms are screwed onto the threaded pins.

It is also convenient to install handles and locks before hanging. They need special, mortise. If you bought a ready-made kit, the required holes are available. If you have adapted an ordinary canvas, you will have to trace the contour with a pencil, and remove the excess with a chisel. After the handle or lock enters the recess, the attachment points are marked, holes are drilled under them and the fittings are installed.

The most convenient way is to hang the sliding doors on a dry wooden beam. Its cross-section is less than 50 * 70 mm, its length is double the width of the door leaf + 5 cm. Cut the guide to the same length.

Having set the guide along the bar, it is attached to the bar with self-tapping screws at least 8 cm long. The number of fasteners - at least three - stepping back 10 cm from the edges and in the middle (more often, less often - not).

Now you can measure at what height the timber is to be fastened. On the door with installed rollers "roll" a guide with a bar. So you can accurately mark what height the doors turned out to be. Drill at least four holes in the side edge of the timber for fastening to the wall.

A guide with a bar is "rolled" onto the rollers on the door
7-10 mm is added to the resulting mark - the doors should hang, and not scuffle on the floor. 7 mm is the minimum gap, which is sufficient if there is no floor covering in the opening. If they are supposed to (lay laminate, carpet, linoleum, etc. later), then the thickness of these coatings must also be taken into account.

So that during installation the canvas does not "walk", it is jammed with small wooden wedges. At least two stops are required - near both rollers.

Having attached the timber to the wall and correcting its position using a level, we mark its position with a pencil. If the wall allows, you can fix it to the wall through and through, but for this you take self-tapping screws with a length of at least 120 mm, and it is better to put it on anchor bolts.
If the wall is, for example, concrete, the installation of dowels is required. To do this, you need to transfer the marks for the fasteners to the wall. This can be done with a thin and long drill, the diameter of which is smaller than the drilled hole.

An even simpler option: a long, thin nail. It is inserted into the hole and a mark is made on the wall with a couple of blows. Further, the procedure is known: we drill holes for the plugs of the dowels, insert the plugs, if necessary, hammering them. Then we mount the doors.

We fix the sliding doors on the wall
Stoppers must be secured along the edges of the guide. They are brought in from the sides, empirically set the required location (so that the canvas covers the opening completely in the closed state, and rolls back enough when opened. Fix them with clamping screws.

Having opened the doors, we set a flag roller on the floor. It fits into a groove cut out at the bottom of the blade. It is necessary so that the doors do not deviate vertically.

First, we insert it into the groove, mark the holes for the fasteners, drill, then fix it with short self-tapping screws (length about 15-20 mm).

On this we can assume that the sliding doors have been installed. They are already fully functional. Finishing work remained. The mounting bar with a guide is covered with a decorative strip, matched to the tone of the door leaf. It can be nailed directly to the timber with finishing nails.

Only when you expose it, make sure that the wheels are closed. So much more beautiful)) Now - that's it, you installed the sliding doors with your own hands.
A video tutorial on the installation of such a door is shown below. There are several installation options.
We mount sliding doors of cassette type (in a pencil case)
The very process of mounting the guide, hanging the door leaf almost one-to-one repeats those described above. There is no need only for finishing, and all other steps are necessary. Instead of installing a decorative strip, a false wall is mounted at a distance of at least 10 cm from the wall. Usually it is made from plasterboard profiles, which are sheathed with plasterboard wall. But this is not important - you can use gypsum fiber board or plywood, any other suitable material.
Where does the 10 cm distance come from? The thickness of the door leaf and the gaps on both sides is 5 cm. At least another 5 cm is added to them for the installation of the profile. So it turns out 10 cm.
Since the main load will fall on the wall, the frame from the profiles need not be reinforced. If such a wall does not seem very reliable to you, you can insert wooden blocks inside, which you can fasten with self-tapping screws. This will make the structure very rigid.
The basic principles of calculating a pencil case for a sliding door, as well as marking features, principles of preparing a doorway for installation, see the video.
Homemade sliding doors
Any door leaf can be installed on rollers and will work as a sliding door. The guide and all other components - rollers (bearing and flag), stoppers, stops - can be bought. Hang on them at least a piece of plywood or a door assembled from several boards. That will be the simplest and cheapest option. But making the mechanism yourself is a more difficult task. One of the options for a sliding door mechanism made from scrap materials (from round pipes of different diameters) in the video. The system was supposed to be installed in a closet, but judging by designs, easy even an oak solid wood door can withstand.
Sliding doors are very popular now. A variety of them are doors that hide when opened inside the wall. If necessary, they silently disappear and leave free space without occupying it, as, for example, swing doors.
The door-pencil case saves space, does not slam from drafts, closes and opens silently.
A pencil case door is an excellent solution to save space and simply to add sophistication and elegance to the interior. Such doors, together with a ready-made cassette (pencil case), can be bought in a store or made by yourself. However, it should be borne in mind that it is not easy to install a pencil case door with your own hands. This issue must be approached very seriously, having studied the information and finding out all the subtleties of its installation.
Advantages and disadvantages of the pencil case door
The pencil case door has a number of advantages over other types of doors:

Pencil case diagram with dimensions for an interior door.
- when opening, the door slides into a specially equipped niche or cassette, thereby significantly saving usable floor space, which is very important in small apartments and offices;
- does not slam due to air flow;
- due to the presence of a floor controller, the door leaf moves smoothly and silently;
- no threshold setting required.
The disadvantages of this type of door include:
- low sound insulation;
- the complexity of installation, since it requires certain experience and skills to install it.
The main types of pencil cases for the door

Types of doors - pencil cases.
Sliding a special niche into which an open door will move. These niches can be manufactured in different ways.
If the wall towards which the door is supposed to move is not load-bearing, then it can be dismantled and in its place a new wall partition with a niche for the door leaf, the so-called false wall, can be erected. That is, the case for the door will be a partition. In this case, you can save the area of the room without increasing the thickness of the wall.
If the wall is load-bearing or, for some reason, its dismantling is impossible, then a wooden or metal frame is completed to it, which is then sheathed with plasterboard.
What might be required for the job?

Diagram of a sliding door mechanism.
Ready-to-install sliding door cases can be purchased at the store. However, they are very massive and quite expensive. Making a pencil case will cost almost half the price. It is possible to install a pencil case on your own, but this requires some experience and knowledge. Installation should begin at the stage of finishing floor leveling. The pencil case should be erected when the level of the finished floor is known, up to the thickness of the floor covering and substrate.
To work you will need:
- door leaf, handles, locking mechanism;
- platbands, extensions;
- galvanized steel profiles;
- puncher, screwdriver;
- fasteners;
- set of sliding mechanism with a guide;
- pencil, level, tape measure.

Correspondence table for the sizes of door blocks and openings.
- Make the necessary measurements. Measure the door leaf and measure the required length of the guide. It should be equal to two lengths of the door leaf.
- Mark and cut profiles. When constructing a false wall, it is necessary to make two rows of profiles. In the case of an overlay from the frame to an existing wall, one row of profiles should be assembled. Profiles are fixed in both cases on the ceiling, floor and wall. The niche should be, on average, 20 mm wider than the door leaf, and at least half its width deeper. As a rule, a margin of about 4-8 cm is left. So that during the operation of the door the characteristic hum and vibration does not appear, during installation it is necessary to place wooden blocks inside the racks. You can make the movement of the door leaf noiseless as follows. Fastening the frame to the ceiling and floor, you need to lay a rubber layer or a layer of technical cork between them.
- Install the sliding mechanism and hang the door leaf. The door must be installed so that the gap between it and the floor is no more than 5-6 mm. In this case, the soundproofing ability of the door will improve. Adjust the door travel, excluding the possibility of friction of its surface against the frame. This must be done before sheathing it, since after all work with drywall is completed, it will no longer be possible to adjust the door leaf.
- Sheathe the frame with plasterboard, plaster it, finish the walls and install the platbands.
Some features of mounting a pencil case door

Sliding door box scheme.
The pencil case door is equipped with a roller suspension mechanism. Such a device does not require special attention and frequent maintenance; it can serve for a rather long period. The lightness and smoothness of the door leaf movement is ensured due to the fact that the rollers of this mechanism have not only a large diameter, but are also equipped with polymer tires and steel rolling bearings. Different models of this mechanism have different lifting capacities. Therefore, when choosing it, it is necessary to know the mass of the door leaf in order to ensure high-quality and long-term operation of the suspension.
The roller mechanism has adjusting screws that allow you to change the vertical position of the door leaf up to 2 cm. Sometimes a pencil case door is installed before the finish of the floor finish and the door may turn out to be too low due to its increased height. Then you can adjust the blade using the screws of the roller mechanism. If this does not help, then the door leaf must be cut slightly from above and below, but no more than 1.5 cm, thereby reducing its height. Otherwise, after installing the flooring, a significant gap may form between the door and the floor. If it cannot be adjusted with screws, then a bar can be fixed to the bottom of the canvas and tinted in the color of the door. The situation with the glass door is much more complicated. If its dimensions do not fit the opening and niche, then the pencil case will have to be completely redone.
If inexpensive thin profiles with a thickness of up to 0.5 mm are used in the manufacture of the frame, then they must be strengthened with bars. Otherwise, the movement of the door leaf can vibrate the partition, and also lead to sagging of the guide.
To prevent distortions and violation of the vertical position of the jambs during the installation process, a temporary fixation of the doorway with a brace is required. It can be made independently from a steel profile or a bar.
When installing the door, you should very accurately determine the width of the pencil case. If too narrow a niche is installed, the door will cling to the frame, and disproportionately wide gaps will worsen the insulating properties of the structure and spoil the view.
The door in the open state should not completely enter the niche, otherwise it will be problematic to close it and the use of additional devices will be required. Therefore, it is necessary to determine the extreme position.
The pencil case is installed on a completely finished, perfectly flat floor. It is worth considering all the nuances during the installation of the structure before its sheathing. Since, after the work is completed, it will be possible to fix something only by disassembling the wall of the frame again.
A pencil case door is an excellent solution for rooms with a small area.
However, its installation requires some experience and a serious approach. By setting up a pencil case door with your own hands, you can save a lot, make it stylish, in accordance with your preferences, and fit into any interior.