How to make a pencil holder out of a bottle. How to make a glass for pens with your own hands
Color a regular bottle with permanent markers for something quick and easy. If you don't want to use paper towels, you can simply draw something on the bottle with permanent markers. The pencil will turn out to be translucent, and the plastic will look like colored glass.
- If you make a mistake, erase the line with a cotton swab dipped in rubbing alcohol. Wipe dry the area you washed it off and continue painting.
Paint the bottle with acrylics or paint cans (available at art stores) to keep the pencil bright. To help the paint adhere better to the bottle, try sanding it with fine-grained emery paper. First paint the entire bottle with one color, wait for the paint to dry and paint something like flowers.
Decorate the clear or painted bottle with stickers for something easy. If you don't have a lot of creative materials on hand, you can always glue the bottle with stickers. For example, you can paint a bottle dark blue or black, wait for the paint to dry, and tape it with silver or gold star stickers.
Wrap the bottle with regular tape, colored tape, or decorative tape to create a continuous pattern. Peel off the end of the tape, approximately 1 inch (2.5 cm) long, and press it against the bottle as close to the bottom as possible. Hold the tape close to the bottle and wrap it gently around it to create a closed loop of tape. When you get back to where you started, glue about 1.5 centimeters of duct tape over the beginning of the strip and cut it off. Start the next circle right above the previous one, or make it overlap the previous one a bit.
- If the tape has gone beyond the cut line of the bottle, bend it so that it is inside the bottle and glue it.
Make your pencil holder even more beautiful by gluing buttons or large glitter to it with a glue gun. You can glue them over the whole bottle or just small parts of it. However, it is better to glue the buttons and sequins at the bottom of the pencil holder. If there are many such decorations closer to the cut line of the bottle, the stand will turn out to be unstable.
- To make the pencil stand brighter, color it in or paper towels over it using papier-mâché before gluing on the buttons or glitter.
Wrap the yarn or twine around the bottle. Run a bead of glue around the cutting line and press the thread against it. Start wrapping the string around the bottle, adding a bead of glue every few centimeters. When you reach the bottom of the bottle, run another bead of glue and press the end of the string against it.
Punch holes near the cut line of the bottle and thread the colored yarn through them. Use a hole punch to punch holes around the cut line about 1.5 centimeters apart. Thread some yarn into a suitable needle and use the needle to pull the yarn through the holes. This will make the top of your stand look more beautiful.
If your bottle is made of PET or PETE plastic, use an iron to line up the cut line. This should be done after you cut the bottle, but before you start decorating it. To find out what plastic your bottle is made of, turn it over and look at the bottom and around the bottom. If there is a recycling sign with a number inside, then the bottle is made of PET / PETE plastic. Sometimes this sign is hard to see, so watch carefully.
- Turn on the iron and check that the steam is off. Wrap a cloth or aluminum foil over the heating surface of your iron to keep it clean.
- Press the cut side down of the bottle to the bottom of the iron.
- Raise the bottle every few seconds to check the condition of the cut line. When the plastic heats up, it will start to melt, making the cut line straight.
- Turn off the iron and let the bottle cool before you start decorating it.
Writing materials scattered around the table distract attention and interfere with important tasks. To fix the mess on the table, make a pencil holder from a plastic bottle with your own hands. Such an item will not only help maintain order in the work area, but also make the interior more comfortable.
Required tools and materials
Even a child can make a pencil holder with his own hands, because special skills are not needed for this skillTo create a pencil holder that can function as a pencil case, you will need:
- 2 plastic bottles with a volume of 0.5 liters;
- glue;
- scissors or clerical knife;
- bright colored plastic zipper;
- tailor's centimeter;
- items for decorating crafts - depending on the invented version of the decor, these can be threads, colored cardboard, buttons, paints, felt-tip pens or something else.
When working on the creation of a stand for pencils and pens, you should follow safety precautions, handle plastic and cutting objects carefully to avoid injury.
Step-by-step manufacturing instructions
 Pencil holders will help to clean up the table, thanks to which you can separate pencils, pens and felt-tip pens
 Creating a pencil case with your own hands will take no more than half an hour. And the algorithm for making a pencil holder is as follows:
- Plastic bottles with a volume of half a liter (containers for lemonade or mineral water are suitable) are rinsed and dried.
- The neck and a couple of centimeters of the plastic adjacent to it are cut off from the first bottle, and the bottom of the second.
- With the help of a centimeter, the circumference of the resulting holes is measured, and the resulting result is transferred to the zipper, measuring its part from the fastener.
- The cut off part of the zipper is unfastened and the fabric base is smeared with glue on each half of it.
- Glue the zipper to the prepared parts of the bottle so that it can be zipped.
- Wait until the glue dries and start using a practical and convenient pencil holder.
Such a simple option for making a stand for writing utensils is good because it allows you to keep pens, felt-tip pens, pencils, brushes in order and will not let them crumble, even if the craft falls off the table.
Decor ideas
So that the pencil holder plays not only its main functional role, but also looks beautiful, fits into the interior, cheers up, it can be decorated. There are many decor options - you can glue pasta of a suitable shape on plastic, cover them with paint and, after waiting for it to dry, apply a layer of transparent varnish.
 Creating amazing crafts allows you to keep your child busy with useful and interesting things.
 A very simple and original decor for a plastic stand can be made from ordinary colored paper or cardboard.
 Fun pencil stands will cheer up any child
 You can also create a unique finish for your creation using ice cream sticks.
 Ice cream sticks will help you create an interesting and new little thing
 And if you have leftover yarn at hand, you can coat the pencil holder with PVA glue and wrap it tightly with threads.
You can make a stand for pens with your own hands from anything. These are glass, tin, plastic cans, and a piece of wood, and cardboard, and seemingly material that is completely unsuitable for this: disks, floppy disks, ice cream sticks, an old grater and much more. Consider how to make several of these coasters from different materials.
Wooden coasters
They can be made from a saw cut, a block, a log, plywood, ice cream sticks, twigs, etc. The material for decoration is also varied. For example, paint or decoupage stickers and more unusual options like woolen socks. Wooden coasters are beautiful, stable and durable. They look beautiful not only on a child's desk, but even decorate an adult's desk.
For a stand from a saw cut, you need to drill several holes in it. The saw cut should be about 10 cm high. It will look unusual if you use it at an angle. It is imperative to thoroughly clean out any irregularities and burrs. If desired, paint, cover with a layer of varnish. The same principle can be used to make a stand out of balsa discs. They must first be glued and drilled holes for the handles.


A stand from a bar can be made using the same technology as the previous one, or you can cut it into several pieces and fold the box. There are also many design options. From paint or burning to decoupage technique. This material can make a very unusual stand. For example, cut a sharpener or a horse out of it.


For a stand from a log, you need to remove the core with a chisel. Choose the height at will and ease of use. Deburr well. Decoration is not required here, but you can use ribbons, natural material, decorative elements.

You can come up with a very unusual stand out of plywood. You will need a drawing for the assembly of the structure. Details are glued together. Decorate with the technique of carving and wood burning. It is easy to make both a funny elephant and real openwork masterpieces from this material.


For a stand made of ice cream sticks and twigs, it is advisable to use some kind of jar or cardboard blank as a base. But you can do without it by folding a well out of sticks, for example. These materials also include wooden pencils and clothespins.


Paper models
Origami technique is used for paper coasters. A stand of any desired shape is folded from a sheet of paper according to the scheme. The technique of modular origami is also used. In this case, many blanks (modules) of one or several colors are assembled in advance, and a stand is assembled from them, as from a constructor. Such stands are assembled according to the scheme.


Another popular material is cardboard. You can even use junk material from it - rolls of paper towels or toilet paper. Various cardboard boxes are also suitable. These coasters can be decorated with corrugated paper, felt, cloth, cord, ribbons, etc.
If a sheet of cardboard is used, then a box of the desired shape and size is pre-glued from it.


As real braids, stands are obtained from newspaper tubes. For them, cut the newspaper page into 4 strips. Twist a tube from each with a knitting needle. You can use several strips for one tube, lubricating with glue, or glue a long tube from short ones. The product is woven according to the pattern, and then painted over with paint and opened with varnish. Decor elements are optional.


An interesting idea is a stand from old magazines. For a stand, they need to be divided into several parts. Glue together in the form of a flower. Decorate with paint, decorative items.

We use plastic
Here, the material can be milk bottles, sour cream, detergents, ordinary plastic bottles and cups. Options for such stands in the photo:


Master class of a stand from a plastic bottle in the video:
Cut off the lid of milk and detergent bottles or cut any other convenient shape. The material is light, so a stand made of it can not only be placed on a table, but also hung on a wall or table using a hook or Velcro. As a decoration, you can stick a funny face on the stand.

Whole compositions can be created from bottles. Where in each compartment will be stored separately pens, pencils separately, separately the rest of the accessories. Options for such stands in the photo:


Unusual solution
To make a stand for pens from discs, take 7 discs, a tool with which you can make cuts on them (hacksaw, jigsaw, grinder or hot nail), sandpaper. Make cuts on the discs according to the following scheme:

Carefully clean the edges of the cuts from all kinds of irregularities. If you plan to paint them, you can do it at this stage. Assemble the structure.

The stand of floppy disks looks interesting. The easiest option is to make a box of 5 floppy disks, fastened with plastic fasteners. But there are also more complex options:


A completely unusual solution is a stand made of an old grater. Here the handles are inserted into the large holes. And actually there is nothing to do - insert the handles into the grater and that's it.

Related videos
There are many interesting solutions, there is a suitable idea for everyone. Look at the video for several master classes:
All parents are familiar with the situation when, after drawing, pencils are scattered around the children's table. Pencil boxes are made of cardboard and are usually short-lived. Therefore, in order for the child to have order on the table, you can make an original pencil holder from a plastic bottle.
- Plastic bottle;
- saucer;
- felt-tip pen;
- awl;
- narrow green ribbon;
- needle;
- sticker;
- scissors.
1. Cut off the top of the bottle with scissors or a sharp knife. The pencil is approximately 16 cm long, so the rest of the bottle should be at least 25 cm high.

2. Put a saucer on top of the cut part of the bottle so that its edge coincides with the edge of the bottle.

3. With a felt-tip pen draw around the edge of half of the saucer.


4. Cut the edges of the bottle with scissors along the drawn line.

5. Put the saucer on again, but now draw around its bottom edge with a felt-tip pen.

6. Cut off only one side of the bottle along the line.

7. Bend the valve from above so that the cut edges match. It turned out a box for pencils with a lid.

8. Now let's start decorating the pencil holder. First, we glue the cut edges with tape to protect ourselves from cuts on sharp edges. With a heated awl we make punctures along the edge of the lid.

9. In the same way we make holes at the bottom of the bottle.

10. We thread the green tape into a large needle and "stitch" over the edge along the holes on the lid. If desired, you can use a tape of any color.

11. In the same way we sew the bottom of the pencil holder.
Color a regular bottle with permanent markers for something quick and easy. If you don't want to use paper towels, you can simply draw something on the bottle with permanent markers. The pencil will turn out to be translucent, and the plastic will look like colored glass.
- If you make a mistake, erase the line with a cotton swab dipped in rubbing alcohol. Wipe dry the area you washed it off and continue painting.
Paint the bottle with acrylics or paint cans (available at art stores) to keep the pencil bright. To help the paint adhere better to the bottle, try sanding it with fine-grained emery paper. First paint the entire bottle with one color, wait for the paint to dry and paint something like flowers.
Decorate the clear or painted bottle with stickers for something easy. If you don't have a lot of creative materials on hand, you can always glue the bottle with stickers. For example, you can paint a bottle dark blue or black, wait for the paint to dry, and tape it with silver or gold star stickers.
Wrap the bottle with regular tape, colored tape, or decorative tape to create a continuous pattern. Peel off the end of the tape, approximately 1 inch (2.5 cm) long, and press it against the bottle as close to the bottom as possible. Hold the tape close to the bottle and wrap it gently around it to create a closed loop of tape. When you get back to where you started, glue about 1.5 centimeters of duct tape over the beginning of the strip and cut it off. Start the next circle right above the previous one, or make it overlap the previous one a bit.
- If the tape has gone beyond the cut line of the bottle, bend it so that it is inside the bottle and glue it.
Make your pencil holder even more beautiful by gluing buttons or large glitter to it with a glue gun. You can glue them over the whole bottle or just small parts of it. However, it is better to glue the buttons and sequins at the bottom of the pencil holder. If there are many such decorations closer to the cut line of the bottle, the stand will turn out to be unstable.
- To make the pencil stand brighter, color it in or paper towels over it using papier-mâché before gluing on the buttons or glitter.
Wrap the yarn or twine around the bottle. Run a bead of glue around the cutting line and press the thread against it. Start wrapping the string around the bottle, adding a bead of glue every few centimeters. When you reach the bottom of the bottle, run another bead of glue and press the end of the string against it.
Punch holes near the cut line of the bottle and thread the colored yarn through them. Use a hole punch to punch holes around the cut line about 1.5 centimeters apart. Thread some yarn into a suitable needle and use the needle to pull the yarn through the holes. This will make the top of your stand look more beautiful.
If your bottle is made of PET or PETE plastic, use an iron to line up the cut line. This should be done after you cut the bottle, but before you start decorating it. To find out what plastic your bottle is made of, turn it over and look at the bottom and around the bottom. If there is a recycling sign with a number inside, then the bottle is made of PET / PETE plastic. Sometimes this sign is hard to see, so watch carefully.
- Turn on the iron and check that the steam is off. Wrap a cloth or aluminum foil over the heating surface of your iron to keep it clean.
- Press the cut side down of the bottle to the bottom of the iron.
- Raise the bottle every few seconds to check the condition of the cut line. When the plastic heats up, it will start to melt, making the cut line straight.
- Turn off the iron and let the bottle cool before you start decorating it.
Not far off on September 1, the time when all children will go to school, and students to technical schools and higher educational institutions, the time will come to gain knowledge. Students spend most of their time in educational institutions, but they also spend no less time at home preparing and completing homework.
In order for the obtained material to gain a foothold in an educational institution, you need a comfortable and beautiful workplace at home. Of course, a desk and a comfortable chair are important, and it is also very important that everything you need is always at hand. A desktop stationery set - the keeper of pens, pencils, erasers, paper clips and other such important trifles - should cope with this task.
 In this article, the news portal "site" has prepared especially for you the best selection of the most original stands for pens and pencils, which you can easily make yourself from scrap materials. You can use a homemade stand for pencils and pens on your own, or you can present it as a gift to your girlfriends or friends, brothers or sisters.
DIY pencil and pens stand

Necessary materials:

- threads;
- scissors;
- plastic jar;
- wooden sticks from popsicle ice cream;
- brush and glue.
Manufacturing:
Cut the top of the plastic jar so that the bottom remains and a few more centimeters up. Using glue, glue wooden sticks to a plastic jar (see photo).
 Now we intertwine wooden sticks with multi-colored threads, filling the voids with threads.
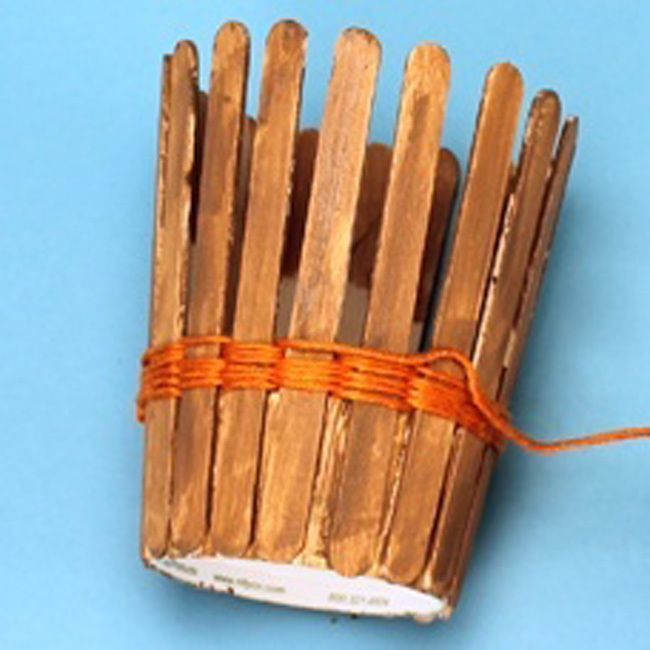 Use threads of different colors, then the pencil holder will turn out to be especially bright and unusual.
 You can decorate the finished pencil holder with rhinestones, interesting stripes or buttons.
DIY tin pencil holder
DIY paper holder for pencils and pens

Necessary materials:
- newspapers or magazines;
- toilet paper roll;
- glue;
- cardboard;
- double sided tape;
- threads;
- acrylic paints.
Manufacturing:
Roll the tubes from the newspaper or magazines, grease the ends with glue so that they do not bloom.
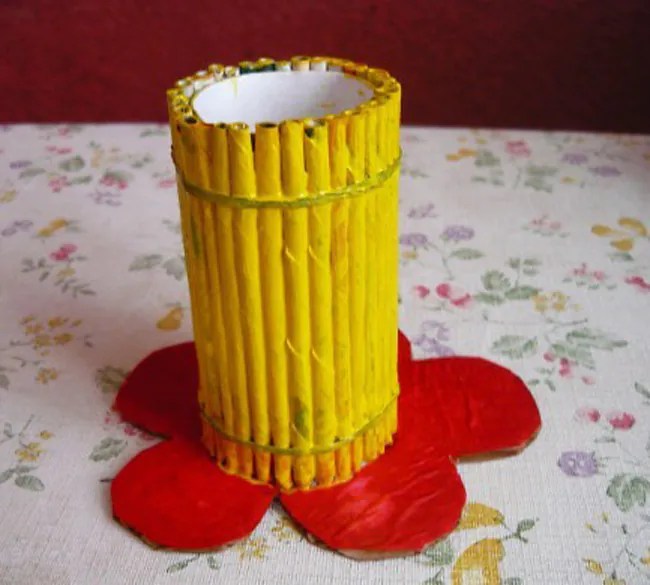
 Use glue to glue the newspaper tubes vertically onto a cardboard roller. For more reliability, tie them with threads.
 Make the bottom for the pencil holder curly from a sheet of thick cardboard (it can be a flower, leaf) and glue the bottom onto double-sided tape.
 Now you can decorate the pencil holder and the bottom.
 You can decorate a ready-made stand for pencils and pens using different elements - grass cut out of paper, leaves, flowers, etc.

Stand for pencils and pens from the phone book

Necessary materials:
- thick book (telephone directory);
- glue;
- acrylic paints;
- toilet paper rolls;
- cardboard;
- scissors or a utility knife.
Manufacturing:
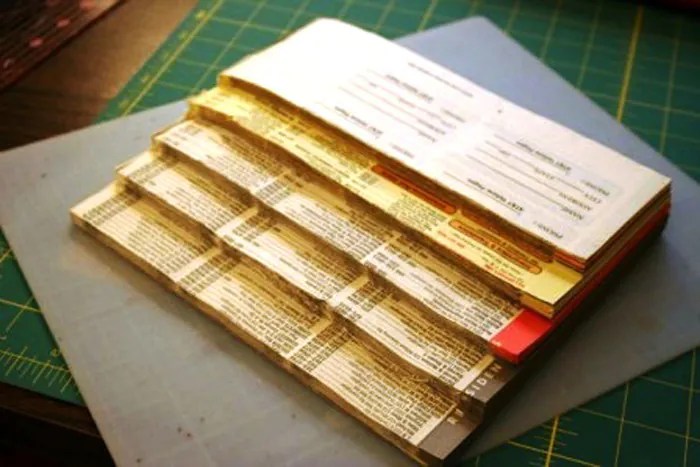
We cut the phone book and wrap the pages of cardboard rollers, fix everything with glue. Cut out a curly bottom from a sheet of thick cardboard and glue it to the finished structure. Now you can paint everything with acrylic paints.
 If you cut a telephone directory into pages of different heights (see photo), you can end up with an original and unusual pencil case, different in height.

DIY gold pencil holder
Tin can holder for pencils and pens

Necessary materials:
- tin can;
- the cloth,
- glue;
- decorative braid and ribbons.
Manufacturing:
We measure a tin can and sew a cover for it from a piece of fabric we like. Sheathes the fabric with beautiful ribbons and braid. We put on a cover on the jar.
We fill the edges of the cover inward and glue them with glue.
Mosaic pencil and pen holder

Necessary materials:
- can;
- a piece of styrofoam;
- primer;
- stationery knife;
- acrylic paints;
- glue
- cement mortar, sealant, or putty.
Manufacturing:
First of all, a layer of primer must be applied to a previously cleaned tin can from contamination.
 Using a sharp knife, cut out the squares from the Styrofoam sheet to be painted with colored acrylic paints.
 We glue the colored foam pieces to the tin can with glue, remembering to leave gaps between them.
 Now fill in the gaps with primer using a regular sponge. All unnecessary wipe the pencil holder is ready.

DIY pencil holder
Thread stand for pencils and pens

Necessary materials:

- can;
- threads;
- glue;
- buttons, braid, ribbons and bows for decoration
Manufacturing:
The tin can must be carefully wrapped with multi-colored threads, periodically smearing them with glue so that they do not unwind later.
Now you can start decorating. Decorate the pencil holder with buttons, beads, decorative tape and rhinestones.
Neither children nor adults usually stay in order for a long time on the desktop. The correct organization of the space and workplace will help to organize the work process for adults more efficiently and teach children to be collected and orderly. A glass for pens and pencils will help you organize your writing materials.
How to store writing utensils
In order for the desk to be in order, it is necessary to purchase or make a glass holder for pens, pencils, scissors and other office supplies. Such a stand allows you to keep the necessary office supplies nearby, and not to search in drawers or on shelves. A self-made glass for pens and pencils will appeal to children and motivate them to keep the work area in order. There are many different ideas on how to make such a stand yourself. Parents can only decide on the material and model and bring it to life with the child. By the way, not everyone knows what the glass for pencils and pens is called. Many people call it that - just a "glass", but the name "pencil holder" or "desktop organizer for the office" would be more appropriate.

How to do it yourself
Making a glass for pens and pencils with your own hands is not difficult. For manufacturing, you can use a wide variety of unexpected ideas for decor and materials. Most of these crafts will not take much time and are not financially expensive, because it is interesting to decorate a glass with materials that are almost always available in many homes. A pencil can be made from plastic tubes (plumbing), cans, toilet paper sleeves, wood, glass jars, flower pots. Of course, the look of a tin can or paper sleeve is not very pretty, the starting materials are just blanks and need to be decorated.
What is needed
To create an organizer glass you will need:
- raw materials (cans, bushings, material chosen for decoration);
- transparent glue;
- scissors;
- glue gun;
- threads, needles;
- ruler.
Some materials may require additional tools as well.

Wooden pencil holder
You can make a glass for pens and pencils yourself from natural wood. To do this, you will need a small wooden frame, in which you should remove the internal wood (with a chisel), giving the appearance of a glass. The workpiece turns out to be interesting and original. It does not need unnecessary decor, since wood itself is an interesting natural finishing material. You can also use the bark of a tree by pasting it over a tin or glass jar. Such a pencil holder will also look very unusual and natural.

Tin can decoration
You can make a glass for pens and pencils yourself using cans from coffee drinks and canning. Such material is tough, durable, and the decor fits on it easily and adheres well.
- Knitted cover - a cover can be made from threads with the simplest knitting pattern, which will perfectly decorate a brutal tin can. For ease of use, so that the bundle does not fidget, it can be glued to the jar.
- Rope (twine) is another interesting way to decorate a glass for writing utensils. To do this, we wind the rope or twine on a can, pre-lubricated with transparent glue (you can use a glue gun). In this case, the threads should be tightly joined so that they adjoin each other without gaps. For a complete look, you can decorate the product with a bow.

- Cloth - a rectangle should be cut out of thick fabric that wraps around the jar in diameter. Then sew the inside and put on the jar. If desired, the decor can be diversified by gluing beads, pebbles, bows. Such vintage-style pencil holders, covered with fabric in combination with lace and a satin ribbon, look very impressive.
- Burlap - a rough material combined with a strip of linen or gingham fabric and lace will make a tin can a lovely decoration for your table and room. In this case, it is better to glue the burlap to the jar. And then decorate.
- Wallpaper, self-adhesive, scrap paper - you can use any piece of wallpaper, self-adhesive film and scrapbooking paper to give a tin can look. If the surface of the jar is corrugated, the pattern may crumple up a little, so it is better to choose smooth cans to make a glass for pencils and pens with your own hands.
Other unusual options
Also interesting ideas are:
- Grommets - Don't rush to throw paper towels and toilet paper tunnels away. They are perfect for storing pencils and pens on your desk. Decorating options can be different: they can be painted, painted or pasted over with corrugated paper.
- PVC pipes - a whole organizer can be made from plumbing pipes by gluing several pre-cut sleeves to the board. Before that, they can be decorated with fabric, beautiful pebbles or spray painted.
- Pencils - An interesting idea is to decorate the jar or sleeve with colored pencils. They should all be equal to the height of the jar. Each pencil should be glued vertically to the jar, pressing firmly against the previous one. You can tie a ribbon around.
As you can see, everyone can make a glass for pens and pencils if they wish, and ideas can be very diverse. A DIY stationery glass will save you money and be a cute little thing to help you keep order.
The pencil holder is one of the useful attributes on the desktop that helps us keep our workspace tidy and quickly find writing utensils. Quartblog has prepared for you some simple ideas on how to make pencil holders with your own hands from what is usually available in the house. In addition, these crafts can be made with your child. Let the original pencil holders become an additional decorative element in your interior!
From jars
This is the most popular way to make pencil holders. Jars can be any: glass, plastic, tin. They can be pasted over with colored paper, fabric, braid, ribbon, lace, painted with acrylics - it all depends on your imagination!


Made of cardboard and paper
Another easy way to make a pencil holder is with cardboard or colored paper. You can use toilet paper rolls, shoe wrappers, old magazines or newspapers.


From plastic bottles
Use plastic bottles of shampoo, cream, and other cosmetics. For example, funny monsters can be cut out of colorful bottles.


From natural materials
More precisely, from logs and twigs. Here you will need a man's help to cut out a suitable stump and drill holes in it for pencils. You can also take several twigs of the same height and tie them with string around the base.


From clay
Clay is a fertile material for creating pencil holders. You can either take self-hardeningpolymer clay and stick it around some base, or come up with an original design and mold it from sculptural clay or plasticine, and then paint it with paints.


From pencils
Papier-mâché
The papier-mâché technique allows you to create three-dimensional shapes from shredded paper mixed with glue: use newsprint, and then paint a pencil holder with paints.

Crochet or knit
If you know how to knit, and even try to introduce the child to knitting, then you can easily knit a warm multi-colored cover on the base jar.


Sew from fleece or fabric
Soft and cozy pencil holders can also be made from fleece and fabric. Attach eyes, a nose and ears to such coasters - you get funny pencil animals for a children's room.


Decorate with twine, threads


Decorate with beads, buttons
If you like small and painstaking work, you can glue the pencil holder with small beads, pebbles, buttons.
The order on the desktop is an excellent indicator of the organization and orderliness of the thoughts of the person who works behind it. Now on the Internet you can find many options for organizers for desktops. But it is much more pleasant to surround yourself with unique, suitable things for you. Everyone can make a pencil cup quickly and easily with their own hands and decorate their table with it.
It only takes a little patience and a drop of imagination. Material for creativity can be very diverse, sometimes you can find it just at hand.
We collect a simple glass for pencils with our own hands
For example, make a paper pencil cup. But for such a craft, the following are also suitable:
- flower pots;
- glass or tin cans;
- plastic bottles;
- knitting yarn;
- cardboard tubes;
- pencils or markers;
- modular origami.
Modular origami - the creation of volumetric items from paper elements - modules. Using this technique, you can assemble a toy for a child, a decoration for a desktop, or a glass for pencils. Beginners should not immediately take on complex work and buy special paper. For training, newspaper sheets or magazine pages are fine.
Craft materials:- sheets of paper of two colors (here red and yellow);
- ruler;
- scissors;
- cardboard;
- glue;
- slate pencil.
Using the example of a cup, you will learn the basics of creating paper modules for volumetric origami, connect them into a cylinder, and experiment with paper shades.
The work is painstaking, you need to be patient, but the result is worth it.
First you need to prepare the paper from which we will make the modules.
We turn plain paper into a module.Cut out 176 pieces of paper rectangles. We fold them as shown in the figure.

When all the modules are assembled, you can begin to collect the first circle. To do this, we insert two modules with sharp ends into the third. The first 8 rows will be assembled from modules of the same, main color.
Create a circle of 24 modules. For beginners, making and connecting the first circle is not an easy task. Details can be glued together. Then they will not disintegrate.

In the 9th row, we begin to introduce modules of the second color, according to the scheme: 1 yellow module, 5 red ones, and so on in a circle.
Gradually reduce the number of red modules between yellow ones. We design all sides of the stand in the same way.

To decorate the bottom of the cup, you need to carefully turn its bottom and seal it with another row of modules.

Optionally, you can cut out a circle of cardboard, suitable in diameter, and glue the glass to it.
Making a paper pencil cup: step by step instructions
Modular origami is a very beautiful and painstaking art. But there are times when the resource of time or paper is limited, but there is a desire to decorate the desktop with a cute and original stand for stationery. A master class on creating a paper pencil cup will come to the rescue.
To create a cup, you only need one sheet of paper, but you have to be extremely neat, the paper wrinkles very easily. So that your craft does not lose its appearance during work, you need to collect the glass with light movements.
We make a square from a standard A4 sheet. To do this, you need to take it by the corner of the short edge and bend it diagonally. Cut off the remains.
We bend the sheet diagonally and horizontally. In further assembly, we will focus on the resulting lines. Fold the paper along the horizontal fold line so that we get a triangle.

The upper corner of the triangle must be bent by about two centimeters, drawn along the fold line with a fingernail and straightened back to its original position.
Bend the lower right corner of the triangle to the left to the line outlined above.
Fold the lower left corner of the craft to the right to the same mark. Next, fold the left fold diagonally back to the left. We hide the bottom corner down, between the layers of the product.
We carry out similar manipulations on the other side of the craft. We will gently smooth out the finished craft. Turn over and open the glass from the bottom. Smooth the bottom of the glass with your fingers from the inside.
Our stand is ready.
Related videos
All the details and even more options for creating a glass for pencils are possible by watching the video master classes on how to work with your own hands.