Thanks to grandfather for the victory: applications for Victory Day. Volumetric applique for Victory Day Applique on the theme of Victory Day through the eyes of children
The greatest and most solemn holiday of our country is approaching - Victory Day. On this day, it is customary to congratulate those who defended our Motherland during the Great Patriotic War and remember all those who did not return from the war.
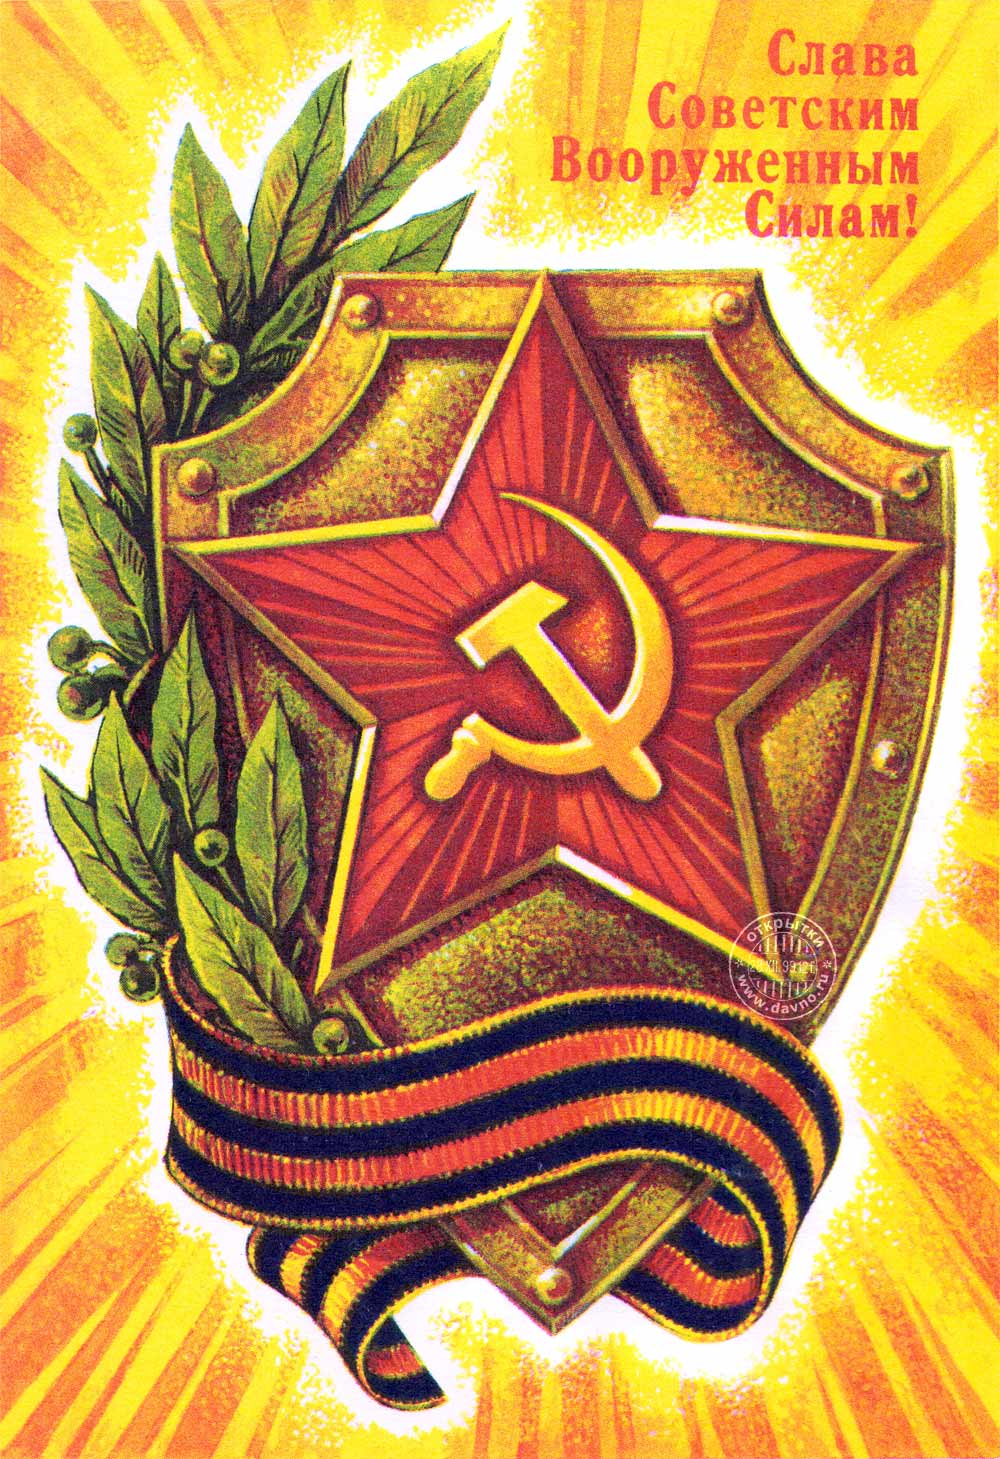
The symbols of Victory Day are traditionally considered to be the Red Star, St. George's Ribbon, Victory Salute, and the Eternal Flame.
The guys can make something with their own hands as a gift for veterans, and even if such a gift is not perfect in some ways, it will be made from the heart and with love. I suggest that together with your parents at home or with teachers at school, you can make a bright three-dimensional craft - an applique for Victory Day. This work does not require any special materials; its highlight is that in the process of work we will use different types of paper: corrugated paper, cardboard, white office paper, colored paper, multi-colored stripes for quilling and even wallpaper. Carefully following our step-by-step instructions, we begin work...
To work you will need:
1. Box of chocolates;
2. Quilling strips;
3. Quilling tool or toothpick;
4. Ruler;
5. Regular scissors and curly scissors;
6. Colored cardboard;
7. A piece of wallpaper;
8. Corrugated paper;
9. PVA glue and glue stick;
10. Simple pencil;
11. Stapler.

The basis for the future composition for Victory Day will be an ordinary candy box. Inside the box we paste a piece of wallpaper, 
equal to the size of the box. The wallpaper background will give our craft volume and interesting texture. 
On the right side of the craft we will place the St. George ribbon - a symbol of Victory. You can use a fabric ribbon, or you can make it yourself from black and orange quilling strips. I would like to immediately draw your attention to the fact that at the edges of the “classic” St. George’s ribbon the orange stripes are slightly narrower than in the middle. Therefore, on the right side along the entire background we paste an orange strip 0.3 mm wide,

then to the left we paste a black strip 0.5 mm wide, 
glue an orange strip in front of it, etc., glue the final orange strip with glue, also 0.3 mm wide. 
The next element of our composition will be a festive envelope. Making an envelope is very simple. On a white sheet of paper, draw a rectangle 18 cm wide, 12 cm high, measure out 6 cm segments at the bottom left and top right, and draw lines from them to the opposite corners of the rectangle. Cut along the lines as shown in the photo.

As a result, we get a rhombus like this. 
We bend the opposite corners of the rhombus towards the middle, 
and bend the bottom corner up. 
We glued the parts of the envelope together, and we got an almost real miniature envelope for our three-dimensional applique. 
Now let's start making the star. There is nothing complicated here: we draw a star of the required size on a white sheet of paper, cut it out, put it on the back side on red cardboard,

We trace along the contours and draw additional details along which we will bend the cardboard and stick the star on the craft. 
Cut out the star, bend additional elements 
and glue a star in the upper left corner of our work. 
Another bright detail of our holiday crafts are carnations. In order to make a carnation flower, draw a circle with a diameter of 5-6 cm. Fold a small piece of corrugated paper several times, and trace this circle along the contour.

To make the clove with pointed ends, cut out a circle using curly scissors. We fasten the layers of corrugated paper in the middle with a stapler.

We crumple each layer one by one and you get this fluffy flower. 
We make three identical flowers. 
For the stems of the carnations we will use green quilling strips. We glue the strips - the stems so that they seem to “come out” of the envelope, and glue our flowers onto the tops of the stems.


We will also make flower petals using the quilling technique. Wrap half of the green quilling strip loosely around the quilling tool 
or on a regular toothpick, place it in a circle on a ruler with a diameter of 18 mm, let it unravel a little, and glue the end. 
Next, we squeeze the round roll with our fingers on both sides and get a shape resembling a drop. 
You need to make 5-6 such droplets - these will be the leaves for the carnations. 
Glue the leaves onto the flower stems. 
Well, at the end it remains to write on the envelope “Happy Holidays!”, and in the upper right corner “MAY 9”. 
That's all! A bright and original craft for the holiday of May 9 is ready! 
It can be given as a gift to war veterans or used to decorate a school classroom or kindergarten. Happy upcoming Victory Day!
Paper crafts for May 9
With the approach of the great holiday of Victory Day in the Great Patriotic War, a number of preschool and school educational institutions, as well as many young mothers, for educational and educational purposes, begin making themed children's crafts for May 9th.
Children's crafts for May 9 are not only a way to instill in the younger generation respect and love for veterans, patriotism and deep gratitude for the exploits of our grandfathers and great-grandfathers, who gave each of us the opportunity to live under a peaceful sky above our heads. But these are also amazing, touching little masterpieces of decorative and applied art that can be an excellent gift for war veterans.
In this article, the News Portal “site” has prepared especially for you several simple master classes on making themed crafts for May 9th from paper, cardboard and other available materials.
So let's get creative...
DIY carnations made of paper
 The traditional flowers that are customary to give to our dear veterans are, of course, bright red carnations. Try making paper bouquets of carnations with your children that will delight veterans for more than one day or even a week; such flowers can last for years.
 To make paper carnations you will need corrugated paper in two colors (green and red), wire, glue and scissors.
 To drape the stem of the carnation, you can use green duct tape.
 If your child is too young to make such flowers, then you can try making a simpler paper bouquet.
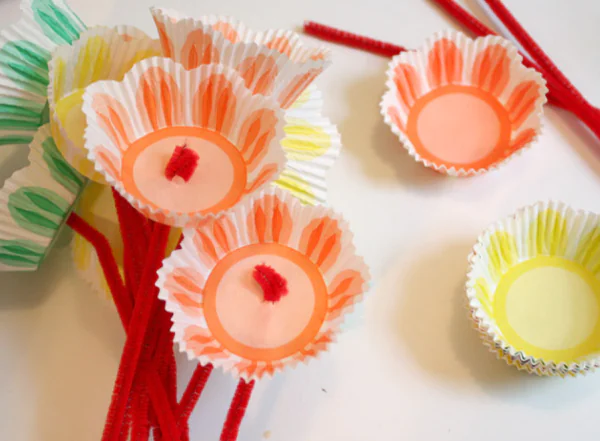
 To make it you will need paper baskets for cupcakes, you can buy them at any supermarket and decorative wire.
 In the middle of the cupcake basket paper, make a small hole through which you thread decorative wire.
 Tie one knot inside the future flower, and the other outside.

Do-it-yourself eternal flame made of paper
 Such a paper craft for May 9 can become the decoration of a concert hall, exhibition or school class for Victory Day.


 From a thick sheet of colored paper (you can use colored cardboard), fold a three-dimensional star.

 Make a small hole in the center of the star and place a piece of red paper in it.
DIY airplane
DIY paper tank
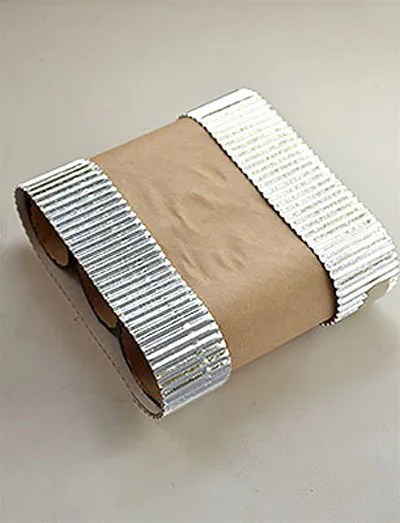
 To make a paper tanka, you will need cardboard toilet paper rolls, any paper (you can use colored paper), silver decorative paper (if you don't have that, you can make a tanka caterpillar out of foil), and a cocktail straw.


DIY tank made from dishwashing sponges
 Young children will definitely like this craft, because it is easy to do and looks very colorful. To make a washcloth tank you will need washcloths, glue, scissors and a baby juice straw.


 Depending on which washcloths you choose as a material, the color and size you will get tanks.
 Be sure to decorate the finished tank with a red star.
Vytynanka
 Another amazingly beautiful and interesting craft for May 9, for Victory Day, can be considered paintings made using the embossing technique.
 Choose any card or picture you like on the holiday theme, transfer it using tracing paper onto a white sheet of paper and cut out some details with a sharp knife or nail scissors. Place the finished white composition on a sheet of colored paper, then the drawing will be visible more clearly.
DIY Orders of Military Glory
 This craft is made using the applique technique. You can make a wide variety of medals, of any shape and shade.
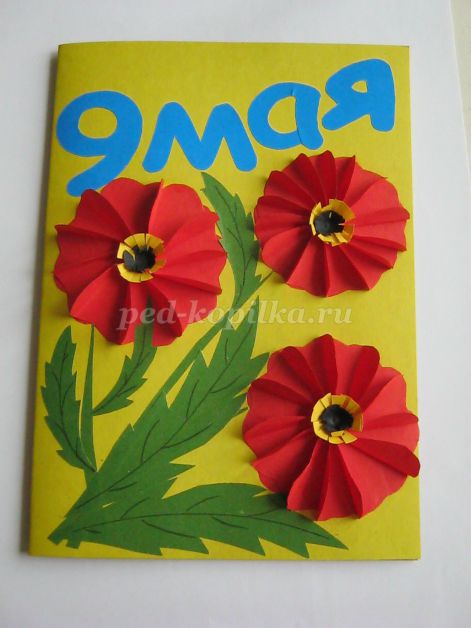
The postcard is designed to express your attention and cheer up the person to whom it is intended. Postcards for Victory Day have acquired particular significance, because with their help we express our gratitude, respect and eternal memory to those who defended our Motherland! We invite you to make festive cards for May 9th with your own hands using various handicraft techniques.
Postcards for May 9 with paper flowers
The easiest way to decorate a postcard, which even small children can handle, is to make an applique from colored paper.
Cards with rainbow carnations
And even a child can do this
Carnations can be easily and simply made from colored paper or napkins.


...and napkins
How to make a carnation incredibly similar to the real one, see the master class ABC TV:

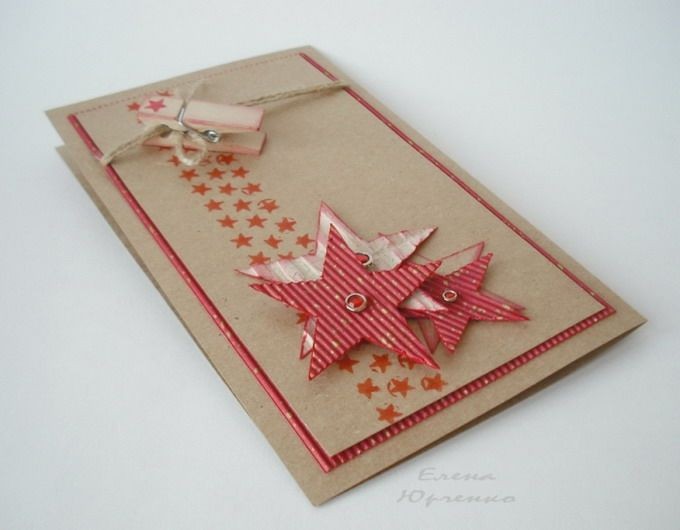
Postcards for May 9 using Quilling technique
Quilling is the art of making paper compositions, voluminous or flat. It involves twisting long pieces of paper into spirals. The resulting spirals or “rolls” can be used to decorate postcards.
It’s worth starting small, studying the basic elements from which the entire composition is formed:


Photo of the main elements of Quilling from the site vscrape.ru.
Having mastered the twisting of the basic elements, you can assemble simple but original postcards from them:

Beautiful inscription made of small elements

And here is a version with an apple tree branch
Before starting work, you need to decide what decoration elements you have available. Perhaps you have old, unused May 9 greeting cards lying around, or you have the opportunity to print out elements to decorate the card.

Strict postcard...

…Darling…

...and retro
A red star can be cut out of cardboard or felt, or a three-dimensional star can be glued together from paper and combined with other elements:

Star with leaves...

...roses...

...Ribbon of St. George...

...and other decor
Even a small wooden airplane clothespin can be used to decorate a card. Everything is very simple and original!
St. George's ribbon made of any materials (fabric, paper) in combination with clippings, floral elements, aged paper will always add brightness and symbolism to the author's postcard:


You can also use a ribbon with the colors of the Russian flag:

You can “scrape” using glue or sew elements of your story onto a postcard (using a sewing machine or by hand):


Battle maps, military documents such as the “Act of Unconditional Surrender” and others will all draw children's attention to our history when creating a holiday card:

He clearly shows how and from what materials to make such a postcard in his master class. MASTER FOREVER:
You can watch how to artificially age military documents or maps in the master class DIY Creative Ideas HANDMADE CRAFTS:
Decorative elements can be anything that reminds us of the Great Patriotic War and Victory Day: camouflage fabric, stars for shoulder straps, small cartridge cases, patriotic poems, old military letters or artificially aged notes.
In his master class, Podarki.ru shows how to make a scrap card with a gift using camouflage fabric:


Or photos of war heroes, perhaps your close relatives, grandparents...

Don’t forget that May 9 is a holiday, so your postcard can be decorated with joyful moments of Victory Day

Drawn postcards for May 9
If you are good with a brush and paints, as well as colored pencils, you can draw a bright card yourself. For this you can use colored pencils, watercolors or gouache, etc.

First you need to make a sketch using a soft pencil. Next, draw out the main details of the drawing more clearly and begin coloring.

Children's drawing...

...no worse...

...the creations of the masters
Postcards that can be sent by email
Nowadays, you won’t surprise anyone with electronic congratulations. If you want to congratulate someone by email or via social networks, then these cards will do the job perfectly:


Happy Victory Day!


Ekaterina Besprozvannykh
Target: make a greeting card for Victory Day and give it to WWII veterans.
Tasks:-continue to arouse children’s interest in working with the application;
Strengthen the ability to cut a strip from a sheet of paper in a straight line;
Strengthen the ability to crumple a napkin to create a flower;
Develop the ability to compose a composition;
To cultivate accuracy in work, perseverance, and a sense of patriotism.
Equipment: colored cardboard, colored paper, dove template, napkins, glue, oilcloth, scissors, rags, step-by-step sample application on the topic of the lesson, leaves prepared in advance.
Progress of the lesson:
Dear Guys! On May 9, our country will celebrate the most solemn, wonderful and bright holiday - Victory Day! Every year we remember this great day!
We celebrate many holidays. We all dance, play, sing.
And we meet the beautiful Autumn, and we wait for a beautiful Christmas tree.
But there is one holiday - the most important!
And spring brings it to us.
Victory Day is solemn and glorious.
The whole country celebrates it.
Look, our group also prepared for this holiday. Various illustrations, posters, layout.
Guys, Victory Day is not just a holiday. On this day, the war, which lasted for 4 years, ended.
There are a lot of poems dedicated to this day, maybe you guys want to tell us some poems? (Children's answers).
Guys, how is Victory Day celebrated in our country?
(Veterans put on orders and medals, meet at the monuments to the dead, tell how they fought. The whole people congratulates their liberators, wishing them long life).
And guys, WWII veterans will also come to us and tell us how they fought, we will congratulate them and give them cards, which we will make today.
Please go to your workplaces.
So today, as I said, we will be making greeting cards for veterans.
For this we will need: colored cardboard - this will be our background for the postcard; colored paper green, orange, black; glue; scissors; napkins of different colors; rags for wiping off excess glue and a dove template.
Guys, check if you have everything? (Children's answers).
Then let's get to work.
Please look at the board. I have a finished postcard on my board with what is depicted on it. (Children's answers).
Guys, what do you think the white dove means? (Children's answers are a symbol of peace).
What about the St. George Ribbon? (Symbol of military valor and glory).
I have on the board showing the steps of how we will make a postcard. So the first thing we will do is flowers.
Who can tell me what parts a flower consists of? (Petals, stem and leaves).
Look at the first stage. Where do we start working? (from the stems, for this we will need scissors and green paper.
Guys, can anyone tell me the rules for working with scissors? (Children's answers).
Take green paper and scissors, cut off three long narrow strips. These will be our stems.
Now carefully apply glue to the stem and glue it to your card. We do the same with the remaining stems.
Wipe off excess glue with a cloth.
Guys, you're probably tired, let's play a little. Come out here everyone.
Physical education minute:
Stand up straight, guys.
We walked like soldiers.
Lean left, right,
Stretch on your toes.
Raz-jerk,
Two-jerk
Have you rested, my friend?
Wave your hands together
We all need to work.
You've rested, now take your seats. Let's continue working.
Let's see what we will do at the second stage? (we will glue flowers to the stems). How we will make them, everyone has napkins on the table, unfold the napkin and crumple it in your hand. We do the same with the rest of the napkins.
We have the flowers ready, now all we have to do is glue them on.
Take a glue stick and apply glue to the area on the card where the top of the stem is. We take our flower and glue it.
In the third stage, we will glue leaves to our stems. We take the previously prepared leaves, coat one edge of the leaf with glue and glue it to the stem. Here are our flowers ready.
Take the dove template and glue. Apply glue and glue the dove to the upper right part of the card.
Next stage. What's new on this sheet? (St. George Ribbon).
What do we need to make the St. George Ribbon? (Children's answers). Well done.
So, first we take a strip of black paper and apply glue to it. Glue it to the bottom of our bouquet.
And at the last stage, what should we do? (Glue the orange stripes onto the black one).
What do we need for this? (Orange paper and scissors).
Cut off two orange thin strips. Apply glue to them and glue them onto the black stripe. Our postcard is ready.
Lesson summary:
Guys, what did we do today (children’s answers).
Who will you give your cards to (children's answers).
You did a good job today, well done. Now let's clean up our jobs.
Maria Stupnikova
Summary of GCD for application in the middle group “May 9 - Victory Day”
GCD theme: « Victory Day» .
Educational area: artistic and aesthetic development
Target: Education of patriotic feelings
Tasks: To create in children a mood of empathy for the past events of the Great Patriotic War. Expand children's ideas and knowledge about the Great Patriotic War, the holiday Victory; encourage respectful attitude towards the feat of our compatriots. Strengthen the skills of speech, musical and productive activities on patriotic material; actively participate in dialogue with the teacher. Continue to develop the ability to create a collective composition, cultivating co-creation skills (coordinate your actions with the actions of other children). Strengthen children's ability to fold circles in half, aligning the sides, ironing the fold line. To foster respect for the memory of warriors - winners, love to motherland; traditions of continuity of generations. Foster a creative approach to doing work and accuracy.
Activities: gaming, motor, cognitive and research.
Forms of organization: group, individual.
Forms of implementation of children's activities activities: game exercises, solving a problem situation.
Equipment: For appliqués: for each tray, scissors in cases, glue stick, pre-cut circles of different diameters from colored paper. Blank for postcard composition "Holiday bouquet". Phonograms of war songs. Presentation with illustrations.
Preliminary work: Introduction to the events of the Great Patriotic War. Reading books, looking at illustrations. Memorizing poems, proverbs, songs about war.
GCD move:
I. Introductory part
Problem situation
Guys, I want to offer you one game. D/U “What are the words?”
Guys, do you think there are many or few words around us? We are surrounded by a huge variety of words.
I suggest you search among many words"sweet words".
Now remember and name "funny words".
There are sad words. Which "sad words" can you name?
And there is a terrible word - this word "war".
Why is the word "war" so scary?
Many years ago it was the same as now warm sunny day. And suddenly people learned that our land was attacked by enemies, and a war began. Planes flew in, tanks arrived, soldiers came with weapons, and immediately everything changed.
II. Main part
Conversation "War is scary"
Houses burned and collapsed, people died. Men went to fight, to defend their land, to drive away enemies. Women and even children worked day and night so that the soldiers have clothes, food, weapons. (Showing pictures and illustrations).
But our defenders did not immediately manage to drive away the enemies. After all, the fascist enemies prepared for war for a long time, they had a lot of weapons, bombs, planes, tanks. But our defenders turned out to be much stronger. What holiday do we celebrate in our country on May 9?
That's right, on May 9 we congratulate the veterans of that great war. Every year there are fewer and fewer of them. Guys, how many of you have grandfathers or great-grandfathers who fought or were in Nazi captivity? What do you think our soldiers gave their lives for?
Guys, how do people in our city remember the people who gave their most precious thing for their Motherland - their lives?
There were also short moments of rest during the war. Between battles, at rest, the soldiers sang songs. Became famous throughout the world "Katyusha", wrote letters to their family and friends.
But it was not only men who showed heroism during the war. Many women and girls also went to the front. They flew combat aircraft and provided assistance to wounded soldiers. Victory came to our people at a high price. Eternal memory to the heroes who defended our Motherland. It is customary to honor the memory of the victims with a minute of silence. In that day wreaths and flowers are laid, rallies, a parade of military units, and festive fireworks are held. What, besides flowers and congratulations, can you please veterans on this day?
And I propose to give our veterans holiday cards with flowers. I suggest using the diagram to look at the sequence of folding a flower from a circle. Then glue it onto a holiday card. But before we start working, let's move a little.
Physical education minute.
Aircraft.
The planes hummed (rotating in front of the chest with arms bent at the elbows,
The planes flew (arms to the sides, alternate tilts to the left and right,
They sat quietly in the clearing (sit down, hands to knees)
And they flew again.
Now take your seats and let's get to work.
III. Final part
Well done guys, you worked really hard, you made very beautiful cards.
Let's remember what we talked about today? What do you remember? What did we make from colored paper? What did you like most?
May there never be war
Let the peaceful cities sleep.
Let the sirens howl piercingly
Doesn't sound over your head.
Don’t let one shell explode,
Not one is making a machine gun.
Let our forests announce
And may the years pass peacefully.
Let there never be war!