Mk swan from a 5 liter plastic bottle. Do-it-yourself swan from plastic bottles: create a composition
The swan has always symbolized beauty and graceful grace. There is no such person who does not admire the regal curve of his long, thin neck. This bird is an adornment of any reservoir, wherever it lives. You dare not even dream of such a bird settling in your garden. But this is quite real. You will need patience, perseverance and free time. Detailed instructions will be provided from our side. The main material for the craft will be a plastic bottle. Are you intrigued? Then we start our master class.
Create a composition
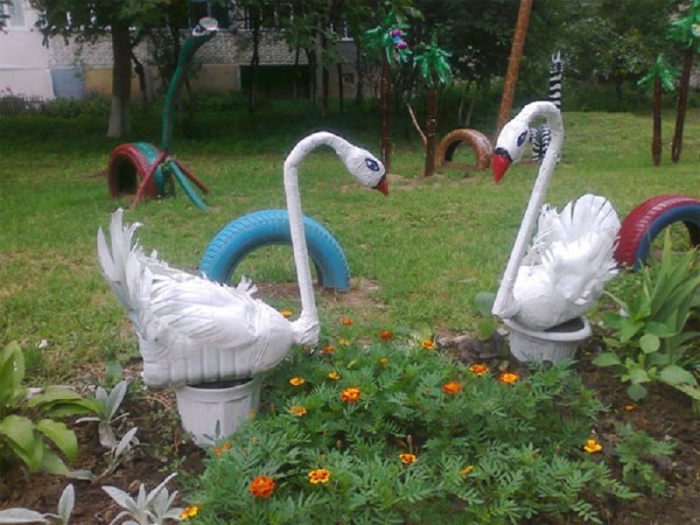
First, determine where your swan will be in the garden. This will not be just a garden decoration, the swan will have a completely functional purpose. This is a swan flowerpot made from a plastic bottle, into which flowers can be planted. Just imagine how great it will look.
Swan from plastic bottles: master class
Prepare the following materials:
- large plastic bottles for 5-6 liters
- wire with a diameter of 0.6 mm
- metal mesh for wings
- putty
- putty knife
- sand
- brush
Cut the bottle lengthwise into two, keeping in mind that there should be as much space for planting flowers as possible. Bend the wire with the number “two” and insert it into the hole made in the plug. Fix with ceramic tile glue and sprinkle with stones or broken bricks from the inside for greater reliability.
Fill the resulting hole with sand, which was previously moistened.

Under the weight of the sand, the container should round out and take the shape of the body of a future swan.

Cover the place of work on the future swan with a film. Now knead the putty. The solution should be thick enough, because we will have to sculpt from it. The first layer is applied directly to the film - this will be the bottom of the flowerpot.

We put the bottle on the solution and trim the solution with a spatula, moving from bottom to top. The spatula should be constantly wet, so it will be more convenient to work with it.


We trim everything with a wet brush.

Thus, we cover the entire surface of the bottle with a putty with a layer of about two centimeters.

We already have a 15x30cm mesh for the wings. We will bend it, giving the shape of a swan wing, attach it to the side part and press it down. On top, immediately apply a little putty to fix it. Now you can rest a little until the putty sets.

After the putty has dried, we begin to coat the wing with the moistened hands with the solution. One hand works from the outside of the wing and the other supports the inside. Don't worry if you feel like you're not doing very well. We will fix all the flaws later.

Now let the wings rest, and we will move on to making the neck. With a solution of putty, gradually coat the neck.

We help ourselves with a damp brush all the time.

In the process, wrap a wet bandage around your neck and lightly press down with your hands. At this stage of work, you can already form the beak, slightly flattening it. When you're done, you can go back to the wings and correct any errors.

Form the tail. Bend a piece of mesh at an angle of 40-45 degrees and fix it with mortar. You can prop it up with something while it dries.
Also, now it will be necessary to fix the head and leave the swan alone for about half an hour.


We do the top of the tail detail in several steps, periodically returning to making the neck with the head.


Cover the upper open cut of the planter in the shoulder area with a layer of putty and smooth it.


This is what the ponytail looks like from above.

And so on the side.

This is our semi-finished product. Inspect it carefully and fix all the shortcomings with a putty solution. Now he will need to completely dry out in the sun. It will take about two days. At the end of this time, we will clean it first with sandpaper for plaster, and then with simple zeroing. Let's prime the workpiece before painting. And then we already apply two layers of ordinary white enamel. Only the beak and eyes are drawn in the corresponding colors. After painting, it is necessary to varnish the surface, also in two layers.

So our craft Swan from plastic bottles is ready, the master class on which was so detailed that you can easily repeat it.

You can make him a friend, because what a swan is without a pair, they are an example of loyalty.

Final chord
We have presented you one of the techniques for making a swan pots. But if you want to know about other options, watch the video on how to make a swan from plastic bottles video below - you will be given different options for such master classes, among which you will choose what you like.
Video lessons
Be sure to check them out!
Good afternoon, dear friends, today you will learn how you can make a flowerpot for the garden in the form of swans with your own hands. Any site, garden or playground can be beautifully decorated, for this you need to apply only a little imagination. After all, you can not only decorate our site with flowers, but also crafts and garden sculptures. Due to the lack of space, it is not possible to put sculptures and plant flowers on every site, so for such purposes it is best to use a planter with your own hands. After all, you will have a craft and planted flowers. Planters are made different in shape and size, but most often they are created in the form of a swan. The swan is a very beautiful, graceful bird that leaves no one indifferent. This is probably why most often on the site you can meet this charming bird. A swan is made from different materials: tires, plastic bottles, cement, plaster, foam, etc. If you are interested in how to create, then on the site you can find crafts from these materials. Now let's get back to the topic and consider a detailed master class on making pots in the form of a swan, which will decorate your yard. The author of this master class is Alla Korobko... Alla showed and told in detail how you can create a swan with your own hands.
To make a swan you will need:
* Plastic 5 l. square bottle.
* Iron rod 0.6mm.
* Bandage.
* Starting putty.
* Small spatula.
* Brush.
* Capacity for mixing the solution.
* Water.
* Sand.
* Tile adhesive.
* Polyethylene film.
* Iron mesh.
* Sandpaper.
* Primer.
* Paint.
* Varnish.
How to make a swan with your own hands:
To make a swan, we need such a starting putty, Alla used this one.

Cut off the top of the plastic bottle as in the photo and add sand there. But first, we take an iron rod and bend it in the form of a two. In the cork we make a hole for the wire and insert the curved iron pond into the hole. From the inside, you need to fix it somehow, for example, you can use broken brick or stones and seal it with tile glue.

Now we pour sand there. Alla moistened the sand so that it was wet and then put it into the bottle. Slightly expanding the sides of the bottle with sand to give a more natural shape to our planter.

We will prepare a workplace, take a plastic wrap and cover it. Next, knead the putty solution very cool. We take a spatula and use it to apply a layer of putty on the film, this will be the bottom for our planter.

When the layer is missed, we put a frame from a bottle on it. We continue to smear the putty, but from the bottom along the edges. Distribute the excess putty evenly and spread it along the edges from bottom to top. During work, the spatula must be moistened in water, this is done so that the putty does not stick and it is easy to work.

When everyone has missed everything around, go to the neck. We wet our hands and take a putty solution from it, form a small ball and coat the base of the rod with the cork.

We wet the brush in water and use it to level the surface.


We start making wings. We take an iron mesh 15 cm by 30 cm and bend it slightly, give it a wing shape and slightly press it into the workpiece as if obliquely.

When the mesh is set, immediately fix it with a small amount of putty. When smeared, we leave it like this for 15 minutes, you need to wait for the putty to set for about 10-15 minutes. You can go while rest and drink tea. Under the rear part of the wing, you will need to make some kind of support.

When the wings have grabbed, proceed to the manufacture further. We moisten our hands in water and take a little putty solution in them. We smear the putty with the hands on the outside of the wing, and with the other hand you need to hold it on the inside. We do the same with the second wing. If the putty does not stick very well, try to make the second wing for now, do not worry, you will definitely succeed. And we will fix all the shortcomings, flaws with you when the putty dries up a little.

When the wings are coated and it takes time for the putty to set, we will take care of the neck at this time. With wet hands, we form a small roller and fix it on the rod.

When the neck is smeared, we moisten the brush in water and use a wet brush to level the surface.

When we have leveled more or less the surface, we take a bandage, tear off small pieces and moisten them in water. Then we wrap it with a wet bandage around the neck, squeeze it a little with our hands. So we make the wire to the end, at the end we flatten it in the form of a beak and also wrap everything with a bandage. The neck is all for now, we go back to the wings, they dried up during this time and we can balance all the shortcomings.

Also unforgettable about the tail. Take a small piece of mesh and bend it with a cutout, about 40-45 degrees. With the help of putty and support, we fix the tail.


The head and neck also need to be fixed and given time for everything to grab, you can go for a walk for about 30 minutes.


We coat the very top of the tail in several approaches, alternating it with the manufacture of the second layer of the neck and head.

While the ponytail is drying, apply a second layer of putty to the neck using wet hands.


So we get to the head, do the same. We only try to make the beak stand out and look like it.


Then use a wet brush to level the edges.

This is what the ponytail looks like from above.

And so from the side.

That's it, the swan flowerpot is almost ready. Let's examine it from all sides and if there are any flaws, we will smooth them out with a putty. Then find a place for him so that our planter dries well and he is not afraid of rain. After a few days, our pots should dry well and then, using sandpaper, we equal the swan. Next, we need to prime the craft with a primer, and only then apply the paint. If you do not apply a primer, the paint will roll off in lumps. When dry we paint with ordinary paint with enamel in two layers. Next, paint the beak, eyes. When the paint dries, apply the varnish in two layers too.

That's all, look what a beautiful swan it turned out. With the help of a drill we will make some holes for water drainage and then paint them to protect the planter from destruction.

It remains to plant flowers in it, I think that dwarf marigolds will look very beautiful in them, but what would you advise for planting?

Author's advice: Put putty in small portions and very thick. You can always get it wet.
DO WITH ME, DO LIKE ME, DO BETTER ME! And remember "Do not forbid yourself to create, even if it sometimes comes out crookedly, no one can repeat your ridiculous motives!" as M. Tsvetaeva said. Good luck everyone! With pleasure I will look at the swans-pots in your performance!

Swan planter for the garden

It did not take long for Alla's pots in the form of swans to gain popularity on the Internet and many creative people also began to create swans for this mk. So Lydia Tkachenko also decided to create these wonderful swans for her garden. This wonderful planter will also decorate your garden and put you in a mood. From the usual 5 liters. plastic bottle Lydia made a beautiful flowerpot in the form of a swan for her garden with her own hands. Let's take a look at it too.
To make a swan, we need:
* Plastic bottle 5 l.
* Bandage.
* Putty knife.
* Brush.
* Sand.
* Iron wire.
Method of making pots:
We take a plastic bottle and cut a hole along the entire length on one side. Then we take the wire and insert one end into the neck and fasten it. Give the shape to the neck. It is better to pour sand into the bottle so it will be more convenient to work. We put a film on the workplace and put a putty solution on it and immediately install our planter on this putty layer. We start from the bottom to coat our planter with putty, having coated it a little, we go to the neck.

We also need to make wings, take a mesh or wire and fix them to the base.

Then we gradually make the neck, wrap it with a bandage to keep it better. When the planter is ready, paint it and varnish it.


You can plant flowers in a ready-made planter or simply decorate your garden.


Copyright © Attention !. Copying of text and photos can be used only with the permission of the site administration and indicating an active link to the site. 2019 All rights reserved.
The graceful bird has always fascinated with its grace. It became possible to place a symbol of fidelity in your garden, having at hand all the materials available to everyone. The information on how to make a swan from plastic bottles, offered in three options, will allow you to choose the most appropriate method for everyone.
Swan flowerpot from bottles
Crafts based on plastic bottles differ in different categories of complexity. A step-by-step guide will help even a novice master to cope with the task of decorating a swan. The main thing is to be patient. One 5 liter bottle and a lot of 1 liter white plastic containers are the main material for this spectacular craft. You will also need:
- metal rod for the swan's neck;
- fishing line, scotch tape and thin wire for connecting individual parts;
- metal mesh serving as the base of the wings.
Preparation of individual parts
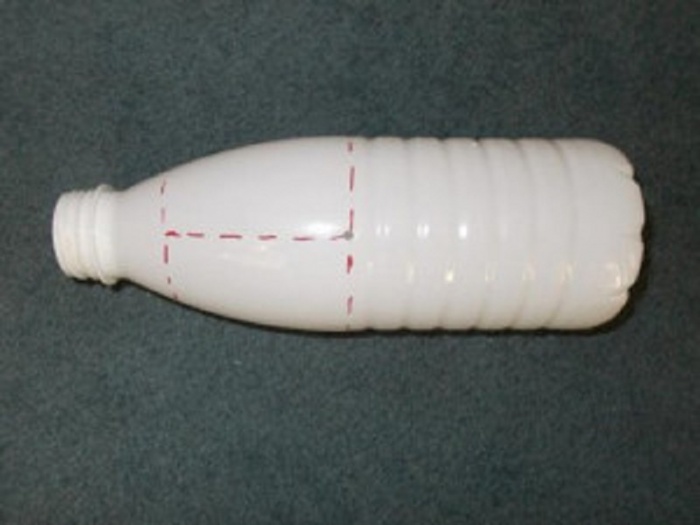
Making a swan precedes the preparatory stage. The work begins with cleaning plastic bottles from the remnants of labels and glue. On a clean container, markings are made according to the photo. The upper line is 2 cm below the neck, the lower line is 1 cm above the corrugated part of the plastic bottle. There is a perpendicular line between them. The cut is carried out as smoothly as possible.
For the neck, parts from plastic bottles with a neck are cut into 6 parts, cylindrical elements are divided into 8 fragments.
Attention! All corners on the workpieces are rounded off, 3 paired holes are formed at the base of the petals.
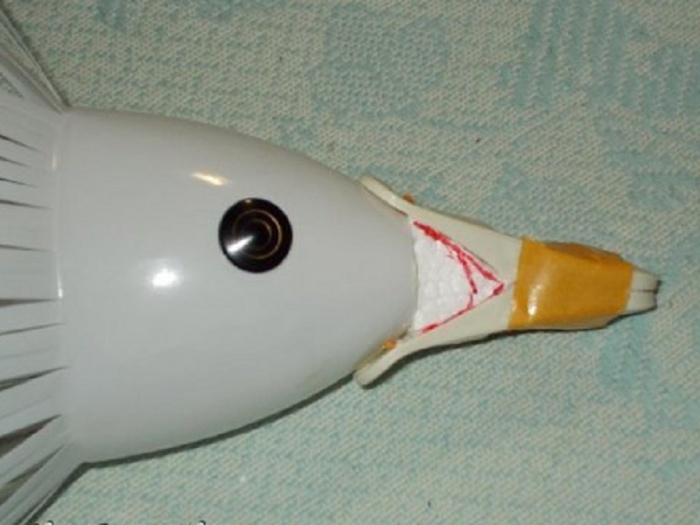
A neat swan head is obtained from a 0.5 liter plastic bottle as follows:
- the neck with a stopper is removed;
- an incision is made on the cone-shaped section along the seam;
- all other notch lines are at intervals of 0.5 cm;
- the ends of the clothespin, which will play the role of the swan's beak, are melted over the fire;
- holes are pierced on them with an awl, holes are formed in a plastic bottle at a similar distance.
The base of the swan's body is a 5-liter container, on the bottom and lid of which holes are made to fix the neck. The opening on the side should allow the hand to freely penetrate into the container.
Build process
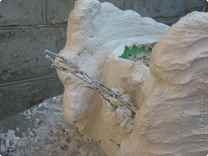
When the individual elements of the swan are decorated, you can proceed to the assembly of parts:

The result of a painstaking process will be a spectacular swan made of plastic bottles, similar to the photo below:


Combined version with bus
There is another interesting and affordable option for making a bird with a majestic bend in the neck.
Housing
According to the proposed master class, a swan made of plastic bottles will turn out to be no less fascinating. The main difference is that the function of the trunk is performed by a tire with a diameter of 50-55 cm.
Hull formation:
- The tire is cut in half. Work carefully so as not to get injured by the cord.
- One part is shortened by 10 cm.
- Both parts are connected in the shape of an egg about 45 cm wide and securely fixed.
The result will be the blank shown in the photo:

Head
Making a swan head:
- The basis of the part is foam plastic 20x12x10 cm.
- The head with the beak, after cutting, is thoroughly sanded with sandpaper.
- On the back of the head, a 5 cm depression is prepared for fixing the neck.
- The swan's head is evenly treated with putty.
- After the solution has dried, the surface is sanded with fine-grain paper.
- The blank is coated with white, black and blue paint. An example is the following photo:

Neck
The process of creating a bird neck based on plastic bottles:
- A rod about 2 m long is given the desired shape.
Advice! It is better to refuse the steel part, it is too difficult to bend and is capable of bursting.
- The corrugations will need about 80 cm. When using old material, it is thoroughly cleaned of dirt.
- One edge of the corrugation is made with cuts for mounting the swan's head.
- The swan's neck is fixed to the body and head with self-tapping screws.

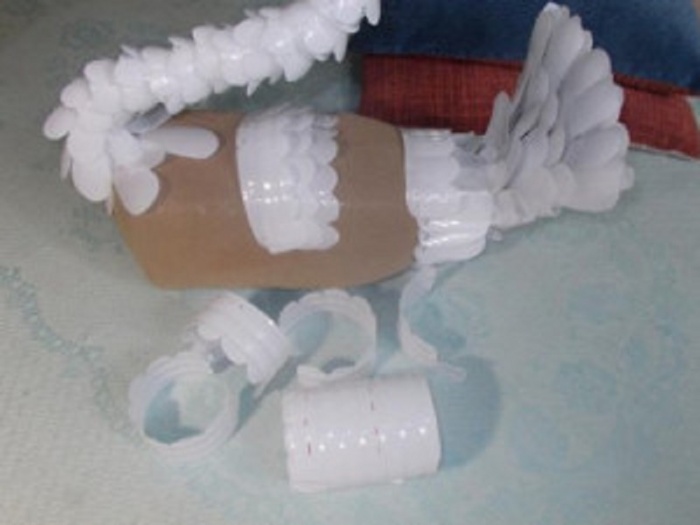
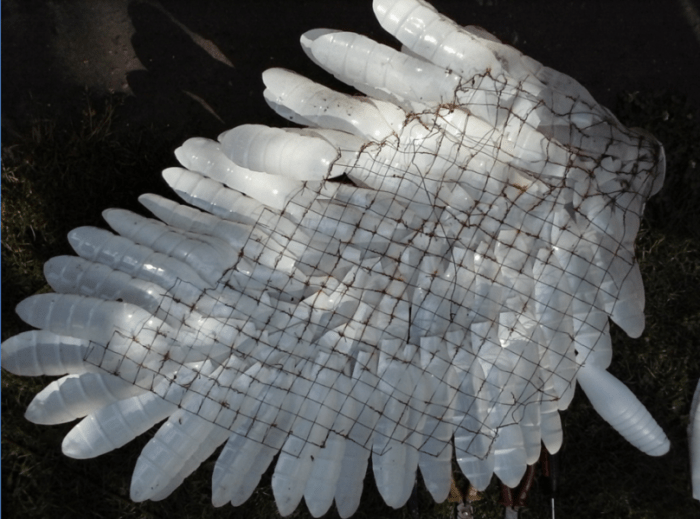
Plumage
The plumage of a swan will require:
- plastic white bottles - about 40 pieces;
- construction mesh;
- pliers and knife;
- wire, wire cutters.
To avoid corrosive processes, painting the mesh with white paint for outdoor use will help. One plastic bottle serves as a base for 5-6 swan feathers. On each workpiece from a plastic bottle, 4 holes are prepared for the wire. It is best to use copper material that bends easily. The feathers are overlapped with wire to hide the connection areas. The process of formation of the wings and tail of a swan is identical, the difference lies only in the outline of the grid.

Assembly and installation
When all the parts from the tire and plastic bottles are ready, they start assembling the swan. The plot on which it is planned to place a decorative figure is decorated with bricks, a board or a car tire. This will be a kind of podium.
The connection of the neck to the body is carried out with self-tapping screws. The end of the rod is bent in such a way that it is possible to fix it in the ground. The wings are fastened to each other with a wire, from the back they are clamped with a rod. Then the swan's tail is fixed. The head, made from a plastic bottle, is screwed to the corrugation with screws. Do-it-yourself graceful bird from plastic bottles will become a worthy decoration of the site.

Grace in the garden
Another craft option based on a large plastic bottle is also practical, due to the possibility of placing flowers inside.

The swan has always been a symbol of beauty, grace and grace. Making a swan from plastic bottles with your own hands is not difficult. Although you need to show perseverance, patience and spend a little time, then a beautiful swan made from simple used plastic bottles will be a great decoration for a garden or summer cottage.
In this article, a master class on crafts will be presented, two techniques for making a swan are described with detailed instructions, which are supported by photos and videos.
Here are some photos of how the swan should look like:

Composition creation stage
First, it is important to choose a place in the garden or in the country in which the swan will stand. This original bird is used as a tub for flowers or other plants. The name of this craft is a swan flower pot. A stunningly effective and functional thing.
First technique
For crafts, you will need materials such as:
- 5 liter large plastic bottles;
- 0.6 millimeters of iron wire;
- Metal mesh to make bird wings;
- Putty;
- Putty roller;
- White bandage;
- Brush.
It is necessary to cut the bottle in half, bend the wire and make it look like a number two, make a hole in the bottle cork and insert the wire. Strengthen the structure with a special glue for ceramics, and to make the product stronger inside, cover it with stones or broken bricks. Fill the hole with wet sand.

How it works? Under the pressure of the sand, the bottle should become more rounded and take the shape of the bird's body.

The workplace for working on the craft should be covered with cellophane. At the next stage of work, it is necessary to make a putty solution. To make the swan easier to sculpt, you need to make the solution thicker. In order to make the bottom of the product, the first layer of putty must be spread directly onto the cellophane.

Place the bottle on top of the solution and gently smooth out the layers with a spatula.
Related article: Mexican painting

The next step is to blind the bird's neck. To do this, you need to start coating the wire with putty. Start from the bottom and do it with wet hands.

In a similar way, coat the entire bottle with a spatula, with a thick layer of two centimeters.

To make the wings of a bird, you need to bend the net into the shape of a wing, attach the bottle to the side of the bottle and press down, fix it with putty. Wait for the solution to set.

When the putty has grabbed, smear the bird's wing with the solution with your hands.

While the wings are drying, you need to smear the bird's neck.

During the working process, wrap with a wet white bandage.

It is required to form the tail of the bird. To do this, bend a part of the mesh at an angle of 40 degrees and hold it with a solution. Then hold your head and leave the product to dry for 30 minutes.


From the bottom of the tail, make a roundness at the bottom of the tail.

Make the top of the tail in several steps.

Top view of the tail.

Side view of the ponytail.

When the blank for the swan is ready to dry, you need to plaster it, paint it with white paint and varnish it.

The beautiful swan is ready!

Second way

For crafts, you will need the following materials:
- White liter plastic bottles, exactly 25 pieces and one bottle of 500 milliliters;
- 5 liter transparent bottle;
- One flexible plastic bottle, volume five liters;
- Three meters of thick wire;
- Women's elastic tights;
- Sintepon and bottle caps;
- Fishing line and wire;
- Small stones;
- Red fabric for the beak;
- Scotch;
- Buttons for the eyes.
First you need to prepare the bottles. Remove the neck, plugs, rings, peel off the labels. Next, you need to cut the bottles, but before cutting, draw clear lines along which to cut.

Cut a half-liter bottle, remove the neck and cork. Make cuts to the cone of the bottle. Make the first cut along the molded seam. Next, make a beak, melt the ends of the clothespin and pin two holes with an awl. Tape together two halves of the clothespin. Make the body of a swan with a 5 liter bottle.


