Do-it-yourself bird feeder in the country. DIY bird feeder: a selection of ideas
Birds experience great difficulties in finding food in winter. The ground is covered with snow, and the tree branches are frozen, so the birds are sorely lacking food. Because of this, most of the birds die. Everyone can help our smaller brothers and make a feeder that will be their salvation during the cold weather. It has been customary to feed birds in winter for a very long time and caring people do this every year.
We make our own feeder
Before you make a bird feeder with your own hands, you need to consider that you will have to fill it regularly as the food runs out, as the birds will hope to be fed. You can use such a bird dining room not only in winter, especially if it is located on a garden plot. The food will attract birds, which, in turn, will partially rid the area around the house of midges and other harmful insects. In this article, various ways to make a bird feeder are selected.

Choice of location and material
Usually, when talking about bird feeders, many people think of a wooden house with a hole. This is the most successful form, as it will reliably protect the birds inside from bad weather, and will not become unusable during precipitation and strong winds, as it is very reliable and strong. But still, it is not necessary to make a wooden feeder, as now there are a huge number of options that can be implemented. It can be made from any material and any shape, the main thing is that the finished product met the following requirements:
- It was strong and durable enough to support the weight of several birds.
- It was weather resistant. You can often see small feeders made from juice bags or shoe boxes, but such a product will not last long, as rain or snow will soon render it unusable. If, nevertheless, there is no other material other than cardboard, you need to glue the structure made with adhesive tape, so it will be a little stronger and withstand adverse weather conditions.
- It was safe for the birds. After cutting the openings, especially for feeders made from a bottle, very sharp edges remain, which must be treated with electrical tape, polymer clay or other materials before hanging the feeder so that the birds cannot get hurt.

In order for the birds to see the dining room for them and constantly fly to it, you need to place it in a place convenient for them. This is usually a well-visible area. Don't place it where there are a lot of branches or where cats can get to.
Feeder Options
Now a do-it-yourself bird feeder can be made as fantasy requires, but if it’s difficult to come up with a convenient design on your own, you can use the following step-by-step instructions for making.
Plywood feeder
If at home there are several pieces of plywood stale after repair, then why not make an excellent feeder out of them. They come in various types with a flat or gable roof. But in order to feed only small birds that cannot get their own food, you need to make holes for them of such a size that larger birds do not eat all the food. It is imperative that for such a feeder it will be necessary to make a drawing in advance so that the finished design is as originally intended, and not to be mistaken with the dimensions.

After the drawing is ready, you need to prepare the tools necessary for work:
- jigsaw
- Sandpaper
- Nails of the right size
- Water based adhesive
- Plywood
- Small bars measuring 4.5 * 2 cm
The simplest plywood feeder is performed according to the following algorithm:
Details of the future product are marked on plywood and cut out with an electric jigsaw. The roof should be slightly larger than the bottom so that moisture from it does not flow onto the feed.
To prevent the occurrence of burrs and sharp edges, the cut points must be processed with sandpaper.
Racks about 30 cm high are cut out of a 4.5 * 2 timber. If it is planned to make a feeder with a flat roof under a slope, then 2 bars are made a few centimeters lower.
Assembling the structure:
- We glue the racks to the bottom, and the sides to them.
- We drive nails into the joints or screw screws.
- We attach the roof from above.
The feeder is ready, now you can pour food inside and hang it in a convenient place. It is in no way inferior in quality to a wood product.
Another simple plywood construction is shown in the video:
Wooden feeder
Products for birds made of wood are the most common and convenient, so consider the process of making such feeders. To make a wooden feeder, you will need knowledge of the basics of carpentry, as well as material - boards no thicker than 2 cm.
To create the lightest model, you need to stock up on a bar for racks measuring 4.5 * 2 cm, plywood 25 * 25 for the bottom and two sheets of 35 * 22 for a gable roof, self-tapping screws, nails and wood glue.

Manufacturing technology is as follows:
- We connect the bars 4.5 * 2 cm together to make a rectangle, and fasten it to the bottom with glue and self-tapping screws.
Tip! Two sides can be made a little longer. This will allow you to place perches on them.
- We fix racks in the corners.
- We lay the rafters at right angles to the racks.
- We fix the finished rafters with self-tapping screws to the racks.
- We attach two pieces of wood in the form of a triangle to the rafters - this will be the roof slope.
- You can make a skate if you attach a window corner.
- If at the stage of manufacturing the sides, two of them were lengthened, then a perch was attached between them.
Advice ! To avoid splitting the wooden parts in the feeder, the tip of the nail must be made blunt, and holes must be specially drilled for self-tapping screws.
It is installed permanently on a wooden rail or suspended from a branch with a wire. Its design is such that up to 5 birds can feed at once, the food will not scatter from the wind, as it is protected by the sides, and will not get wet, since the feeder has a roof.

If the adjoining area has a gazebo, then inside it you can place a feeder without a roof. If desired, a wooden feeder can be coated with paint or varnish, but only water-based, to prevent bird poisoning.
A simple bottle feeder
A bird feeder from a plastic bottle is made very quickly and you do not need to have special tools for its manufacture. It is enough to take a five-liter bottle and cut holes in the form of a rectangle or arch on parallel walls. If you cut out only three sides of the hole, and lift the cut out part up and fix it, you get a beautiful visor.

All edges must be covered with adhesive tape or electrical tape so that the birds do not injure their paws when eating grains. You can make holes in the bottom of the bottle and thread a round stick through them, so the perch will come out.
You can attach such a feeder with a thick rope to a tree branch.
Feeders from a bottle with a supply of feed
The first option would be a bunker-type product. Its design is interesting in that the food will spill out on its own as it is eaten by birds.

To make such a feeder, you need to take two bottles of the same volume. We mark one bottle before cutting with a marker. It needs to cut holes near the bottom so that the birds can peck at food. We mentally divide the bottle into three parts and cut off one upper part completely, and just below we make holes for the rope parallel to each other.
The second bottle in the narrowest part at the neck is equipped with several holes so that food can then spill out of them.
Important ! Do not make holes too large for pouring feed.
The final part of creating this feeder is to pour the feed into the #2 bottle, screw on its cap and insert this bottle into the first one with the neck cut off. The manufacturing technology is clearly shown in the video
A bottle feeder with spoons is also a great option for those who can't feed regularly and who have a few wooden spoons in the kitchen. You need to make a hole in the lid and thread a rope through it for hanging. After you need to make 2 symmetrical holes corresponding to the size of the spoon. Where there will be a wide part of the spoon, the hole should be wider so that the birds can take food. The spoon is inserted into the holes and the food is poured. You can make a dining room for birds with one spoon, or you can use several so that two birds can eat at once.

A bird feeder can be not only a vital help for our feathered friends in the winter, but also an excellent decoration of the site. Everyone can create it, as you can see below. Below we will consider the process of making the most curious in our opinion feeders from various improvised materials and, of course, wood.
Wooden feeder - detailed analysis with drawings
A gable wooden feeder is the most common and at the same time the most complex design of all, which we will talk about in this article. You will need a set of tools:
- hacksaw;
- screwdriver;
- tape measure and pencil;
- electric drill;
- sandpaper.
We start with design, but before you make a drawing, be sure to decide on the design and type of birds you want to feed - the dimensions of the feeder depend on this. As a basis, take the finished project, which is presented to your attention below with dimensions and an assembly drawing. The proposed feeder includes a pallet and a gable roof on four racks. If desired, you can correct the proposed dimensions or even change the design, for example, fix the roof on two pillars or on solid plywood sidewalls.
If you decide to create your own, unique project, it is not at all necessary to draw the structure to scale with high accuracy. Pay attention only to the most important thing - try to depict in detail all the details, even by hand, and indicate their dimensions in millimeters. This will avoid errors in the manufacturing process of the structure.

After preparing the project, you need to make all the details of the feeder. We start from the base, i.e. bottom of the pallet - cut a rectangle out of plywood or chop it from boards. The dimensions of the base determine the area of \u200b\u200bthe future feeder. Immediately make the sides for the pallet - cut two bars along the length of the base and two along its width. It is advisable to use rectangular bars for these purposes, for example, 20x40 mm.
For the manufacture of racks in the proposed project, bars of square section 15x15 mm are used. Of these, you need to make four segments of the same length. If you want to make a feeder for small birds, then the racks should be low, and vice versa - to make large birds feel comfortable in the feeder, make the racks more authentic. Now you need to create two identical triangles from the bars of the same section as the racks. They will serve as roof trusses. The base of the triangles should be a few centimeters wider than the pallet so that precipitation does not penetrate inside. You can take any angle of the slopes.
Then, from the same bar, make a ridge run (in the proposed drawing, this part is shown at number 8). Its length should slightly exceed the length of the pallet. When the frame details are ready, the roof sheathing can be done, i.e. slopes. The easiest way is to cut them out of plywood in the form of rectangles, but boards can also be used for this purpose. You need to arrange them on the roof in a herringbone pattern so that water does not seep through the cracks. Such a roof will look even more beautiful than just sheathed with plywood.
Do not treat wooden parts with chemical antiseptics, as the smell of chemicals can scare away birds. To make the feeder durable, use moisture-resistant wood (larch, pine) for its manufacture. Additionally, the tree can be treated with linseed oil.
Now it remains only to assemble the feeder from finished parts. Start with the pallet - around the perimeter of the base, fix the bars that will serve as the sides. To connect all the parts, it is better to use screws, not nails, if you want the product to last longer. To prevent the wood from cracking when screwing in, pre-drill holes for them. At the corners of the resulting pallet, racks are installed on the inside. Attach them to the base and sides strictly perpendicular to the pallet. True, sometimes the racks are specially placed at a slight angle so that the design resembles a tower in shape.
Attach trusses to each pair of end posts. They can be overlapped or butted, the main thing is that the triangles are on the same horizontal line, otherwise the roof will turn out to be skewed. Connect the trusses with a ridge run, which will give the structure rigidity. Fasten the roof sheathing on the roof trusses - planks or plywood rectangles. To ensure the tightness of the junction of the slopes, attach a wooden corner, a piece of linoleum, or other material that does not allow moisture to pass through the ridge.
Lightly sand the finished feeder with sandpaper so that the surface is smooth, without any notches. Then screw a pair of ring screws into the ridge, for which the structure will be suspended. This work is not finished yet. If you want the product to be a decoration of the garden, it must be decorated. You can do this in several ways:
- paint with paints. It is better to use water-dispersion paints that have no smell;
- decorate with carvings. In this case, it is better to process the parts before assembling the structure;
- apply patterns with a burner;
- to fix all kinds of decorative elements, for example, on the roof you can make a beautiful flooring from branches.
The feeder, made almost entirely of branches, looks interesting. It is made in the same way as the design described above. The only thing is that all the bars are replaced with branches a finger and a half thick. I must say that there are an infinite number of design options for the feeder. Embody your own ideas, and then the product will surely become the subject of your pride.
Five-liter bottles - the easiest way
You can make beautiful feeders as quickly and effortlessly as possible from plastic five-liter bowls. In fact, such bottles are almost ready-made feeders. All you have to do is cut holes and decorate the structure. To make the holes even, mark the cutouts on four sides of the eggplant with a marker. It is best to use a template, in which case the cutouts are guaranteed to be the same. Then, along the markings, cut through the plastic with a sharp knife. From above, the windows can not be cut to the end, which will allow you to get U-shaped cutouts.

From the resulting "tongues" make visors for the windows - cut them in half and bend. Then sharpen the cutouts with a file or even a nail file, glue them around the perimeter with tape or tape. As a result, the product will look neater, moreover, the birds are not injured, clinging to the opening with their feathers. In the lid, make a couple of holes for attaching a rope or wire on which you will hang the feeder. In order for the structure to hang evenly, the holes must be centered. Also, when hanging the feeder, fill the bottom with sand or put some pebbles there so that it does not sway much in the wind.
Now the resulting product needs to be decorated, because in its original form it does not “pull” on the decor element of the site. For decoration, use decorative stickers or even paint. Another interesting option is decorating with a rope that is wound around the top of the bottle and glued to the surface. In the same way, you can make a feeder from a mayonnaise bucket. True, due to the small dimensions of the bucket, only small birds can eat in it.
Pumpkin Birdhouse - No Halloween
There are a lot of options for making a feeder, but if your site is decorated in a rustic style, we recommend decorating it with a pumpkin product. For the manufacture will need the following materials:
- pumpkin;
- several sticks as thick as a little finger;
- a pair of wire staples;
- twine.
Cut the pumpkin crosswise into three parts and remove the stones. We need only the lower and upper parts of it. You can use the middle one for its intended purpose. Make a hole in the center of the bottom of the pumpkin so that you can pass a rope folded in half through it. Don't make the hole too big, otherwise the food will spill through it. Then also make a hole in the center of the "lid" of the pumpkin. Insert 4-5 racks made of wooden sticks, pencils or even metal tubes into the walls of the lower part and put a “lid” on them.
Now measure the required length of the string and tie the two ends to the staples. After that, fasten the staples to the back of the "bottom" of the pumpkin, and thread the rope through the lower and upper holes. Now the product is completely ready for operation. I must say that you can make pumpkin bird feeders even easier and faster. To do this, as in the previous case, cut it into three parts and clean the seeds. Then the "walls" of the lower part must be pierced through with two sticks located perpendicular to each other and parallel to the bottom. The edges of the sticks should protrude outward, i.e. behind the walls, a few centimeters. Tie ropes to the protruding edges of the sticks to hang the feeder.

If the first feeder can be conditionally called "winter", since it has a roof, then the second is an exclusively summer option. True, if you hang it under a canopy or a visor, then the birds will be able to eat in it in the winter. You can also make a feeder from a whole, i.e. uncut pumpkin. In this case, holes are cut in its machines, i.e. windows. Through them, all the seeds are simply scraped out - and the feeder is ready. Since pumpkin products are beautiful and original in themselves, they do not need additional decoration.
What can be done with wooden spoons?
You can make an original feeder from an ordinary plastic bottle with a volume of one or two liters and a couple of spoons. The length of the handles of the spoons should be 2-3 cm longer than the diameter of the bottle. Instead of spoons, of course, you can also use ordinary wooden sticks or bars, but spoons will provide the product with a more interesting and original look. Start by making holes in the sides of the plastic bottle so that the handles of the spoons can poke through. For one feeder, two or three spoons are enough, which should be perpendicular at different levels. Please note that the hole on the side of the scoop of the spoon must be made slightly larger than the diameter of the handle so that grain can spill through it.

Then insert the spoons into the holes made and immediately pour the food through the neck. Make a couple of holes in the center of the bottle cap and tie a rope to it, then screw the cap onto the neck. The principle of operation of such a feeder is extremely simple - food, poured under the very neck, fixes the spoons. Waking up through the hole, he falls into the ladle. The latter serves not only as a recipient for food, but also as a perch for birds. You can decorate such feeders according to the same principle as products from five-liter eggplants - use stickers, paints.
Boxes and Tetra Packs - why not material?
To make cute feeders, you can even use cardboard boxes left over from buying electrical appliances. In addition to boxes, you need to prepare:
- scotch;
- kapron thread;
- stationery knife.
Work begins with cutting windows. As in the cases described above, in order for the product to learn neat, mark up using a template. You can cut through the windows according to the markup using scissors or a stationery sharp knife. Immediately you need to decorate the product. For example, the box can be pasted over with colored cardboard or painted. Since the cardboard does not withstand exposure to water, the box must be carefully taped with tape. Glue the strips with an overlap of five millimeters.
To make a gable roof, take a sheet of cardboard from another box and fold it in half. If the box is small, you can take two sheets of cardboard and glue them on both sides with tape. Attach the roof with wire or nylon thread. To do this, holes must be made in the areas where the roof adjoins the box. Like a box, glue the roof with tape. At the end of the work, make two holes for the rope in the center of the roof.
I must say that instead of a box, you can use Tetra Paki, for example, from kefir / milk. In this case, the manufacturing process looks a little different - in one Tetra Pak, a wide wall is completely cut out. The result is a feed tray.

Cute are made from juice cartons
To make a gable roof, you will need a second Tetra Pak. It must be cut lengthwise from the top to the bottom, we do not cut the bottom itself. The incision should be in the center of the narrow walls. Then we turn the Pak over and push the walls apart, the result should be the letter "L", i.e. finished gable roof. We put the roof on the pallet and "sew" to it with wire or nylon threads. Since Tetra Packs are resistant to moisture, they can not be pasted over with adhesive tape.
Mesh tube and saucer feeder - simple design
It will not be difficult for any home craftsman to independently make a feeder from a metal or other suitable mesh rolled into a tube. Not a lot of materials will be needed for it:
- the grid itself with a suitable cell size. You can also use a ready-made mesh tube, for example, from a filter. It is advisable to pick up a beautiful tube with an unusual cell shape or simply paint it, as the appearance of the product will depend on this;
- two plastic saucers from under flower pots. You can use one saucer and a plastic lid. The main thing is that the latter should be larger in diameter than the tube;
- a metal threaded stud and a pair of nuts with washers.
The work is extremely simple - roll the mesh sheet into a tube and fix it in this position with wire or nylon threads, tying both ends of the sheet with them. If your saucers don't have center holes or are small, drill them out. The diameter must match the diameter of the stud. In one of the saucers, additionally drill a couple of small holes for hanging the product.
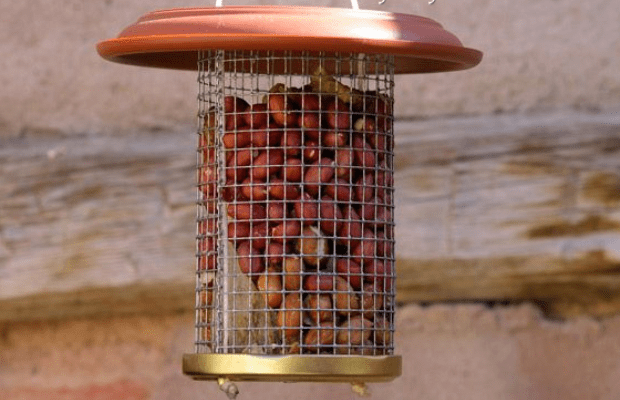
It is not difficult to make a feeder from a mesh tube and saucers
Place the tube on a saucer and insert a hairpin so that it enters the hole. Then pour food into the tube and close it with a second saucer or lid. Carefully tighten both saucers with nuts and washers. Do not overtighten the nuts, as the mesh walls may be deformed.
Log, drill and chisel - a universal set
Finally, consider another version of the wooden feeder, which is made from logs. We recommend that you take up its manufacture only for those who at least a little bit know how to work with a tool for wood. The fact is that, on the one hand, this do-it-yourself bird feeder is easier to make than a gable one, as it is done "by eye" from start to finish, on the other hand, the process of its manufacture is more laborious and complex.

Making from a log is a rather laborious and complex process.
It is desirable that the blank (log) be of soft wood. Even better, if you find a log with a rotten core, in which case the work will be greatly simplified. Of the tools you will need:
- an electric drill and a long drill, preferably a large diameter;
- chisel;
- hacksaw.
First you need to cut off two round logs a few centimeters thick from a log and set aside. Subsequently, they will serve as the side walls of our feeder. Then we outline the wall thickness of the future dugout. To do this, draw circles on the ends of a smaller diameter than the log. The difference in diameters should be 2–3 cm - this is the wall thickness. Next, you need to perform the most difficult work - to hollow out the middle of the log. To do this, drill many holes next to each other using a long drill bit. Remove the entire perforated interior with a chisel and hammer. The result should be a hollow log.
Saw a thin strip from the wall of the log to provide the birds with access to the treat. The easiest way to do this is with a jigsaw. The wider the strip, the larger the birds will be able to visit the feeder. Now you can install the sidewalls by fixing them on the ends of the workpiece with self-tapping screws. To make it more convenient to hang the product, screw two self-tapping screws with rings on top. This is the end of the job.
I must say that log feeders are not only very unusual, but also universal. They can decorate absolutely any garden, regardless of the style of landscape design. Birch products look especially beautiful, but it is very difficult to hollow out the core from birch logs due to the hardness of this breed. Finally, we note that it is not at all necessary to strictly adhere to the instructions above. Taking them as a basis, realize your unusual ideas!
Birds are our smaller friends who delight us with their chirping and singing. And any garden in the presence of birds seems to come to life, filled with new life. Besides birds help to protect the summer cottage from attacks of various insects in the summer. And in winter, when they have almost no food, the task of a person is to help the birds survive the frost by feeding them. A good attitude towards birds will pay off handsomely. for birds with their own hands is done quickly, without unnecessary manipulation, it will not only become a source of food for birds, but it will also be able to decorate any area.
Feeders for winged birds were made by many while studying at school, and someone, together with their parents, managed to make more than one feeder while still attending kindergarten. At that time, tasks for making feeders were given at school in order to instill in the child a desire to work and take care of our smaller brothers.

Now, in most cases, feeders in the adjoining areas are located in order to lure birds to permanent residence in the garden or to take care of them in the winter. There are a great many variations of feeders, but do not forget that if a person pursues a good goal, he must make sure that the feeder is not just beautiful, but comfortable and attractive to birds.

So what should it be like so that birds from all over the area flock to peck at delicious delicacies?
- The feeder should not be bright. Do not forget that birds are inhabitants of the wild, in which bright colors often indicate the danger of an insect or animal. So it is unlikely that birds will fly to nuclear flower feeders. The best option is the color of the wood.
- The place for feeding should be equipped with small sides so that the food does not fall out of it during the wind and at the moment when the bird lands on the feeder and shakes it.

- It is important to make sure that the sides and other elements of the feeder are not sharp and do not pose a danger to birds.
- The best thing, so that the feeder has a small roof- then the food lying in it will not get wet in the rain, and it will not be covered with snow.
- It is recommended to place the feeder where cats and other predators cannot reach it.. Then the birds will happily fly to it. If the place carries danger, then it is unlikely that it will be possible to lure the birds.

- All openings in the walls of the feeder must be spacious so as not to create the effect of an enclosed space. Otherwise, the birds will be uncomfortable.
- It is best to make a feeding place that will withstand various weather conditions and will not collapse after the first season.
- Feed in the feeder should be clearly visible- Birds use their eyesight more than their other senses when looking for food.

Advice! In order to make the structure heavier and protect it from swinging in the wind, you can place pebbles in it, but so that they do not end up in food.

Which is better: homemade or from the store?
You can make a place for birds to eat on your own, but the stores now sell ready-made designs and products that you can simply purchase and hang in your garden or outside the window. Of course, then a lot of time is saved, but it’s better to make the feeder yourself or order from the masters. Only in this case, you can be sure that the feeder is made of materials that are safe for flying inhabitants of nature and will perform its function correctly.

On a note! Undoubtedly, you need to pay attention to the design of the feeder, but if this is not just a decorative decoration of the garden, then, first of all, you should pay attention to its functionality.

It is also important to understand that a good feeder, but made in production or by craftsmen, will cost a lot of money. So it’s worth considering what to do - save money and do everything yourself, or still spend money and buy a ready-made version.

Provided that a feeding place can actually be made quickly and easily enough, the DIY option remains the best. The main thing is to decide and decide what and how to make a feeder, how and where it will hang, and also take into account the availability of skills in the manufacture of various products. You should not take on a complex project without proper experience, it is easier to choose the simplest option. Fortunately, there are many types of feeders.
Table. Types of feeders.
| View | Description |
|---|---|
| This category includes all types of feeders that are fixed in the right place by hanging. Such a design, most likely, will require weighting with something so that it does not sway in the wind and during the landing of birds. This category also includes simple feeders with bacon or grains stuck together in one lump. They are hung from the trees on the braid. |
| The most familiar, familiar from childhood and common option. The roof of such a product is made in the form of a house, it protects the food from getting wet. It is best if the roof is installed on thin blocks so that there is as much free space for birds as possible. |
| Such a feeder is a board with sides, fixed on something or suspended. It does not have a roof, and therefore the food will constantly get wet or covered with snow. But this is the easiest option. |
| Such a feeder is a small container-bunker, inside of which there is food. The birds, pecking at the food spilled out on the pallet, make room for the new one, which gradually spills out of the bunker. Also, in some cases, birds can peck at the grain directly from the hopper. The main advantage is good protection of the feed from water and wind. |
| Feeder designed for stubblers. Often sold in stores. It must be periodically cleaned of debris, as the birds will leave it behind themselves and food in large quantities. |


On a note! The design can be made simply from feed, combining the grains into a single lump with the help of various nutrients and hanging such a “gingerbread” in a conspicuous place. Suitable for small birds that will peck out grain from the feeder, catching on it with their claws.

What can you make a feeder out of?
You can make a feeder yourself from a variety of objects and materials, ranging from an ordinary board to a plastic bottle or even a tetrapack box. Each material has its advantages and disadvantages, and it is necessary to choose what the food base will be made of, based on the presence of certain skills in working with various tools, the availability of free time, funds, and the goals of creating a place for eating.

Wooden feeders
The best option for creating a bird feeding area was and remains a natural, untreated tree. Such a design will be closest to nature, and its neutral color and smell will not scare birds away from food. It is ideal if the natural bark is preserved on the boards. So when choosing a material, you can stop at saw cuts of birch, pine, etc. You can even make a feeder from branches!

Wooden feeder - the best option
But in order to make a wooden, even the simplest feeder, you will need certain skills and tools for working with wood.
Advice! You should not decorate a wooden feeder with various bright objects, but you can decorate it with natural material, for example, by masking the roof with twigs, cones, leaves.

How to make a tree feeder?
Consider how you can make the simplest feeder from wooden materials. To do this, you need to buy wooden blocks, a small piece of fiberboard, a furniture stapler, a saw, drawing supplies and a tape measure.
Step 1. From a sheet of fiberboard you need to cut a square or rectangle. You should apply a drawing of a square or rectangle of the appropriate size on a sheet of fiberboard, and then cut off the excess with a saw.


Step 2 Now you need to make the sides for the pallet. It is necessary to cut out two pieces of the same length from the bar, equal to the side of the square or the long side of the rectangle, as well as two shorter pieces, which will be equal to the width of the square or the narrow side of the rectangle, minus the thickness of the bar.

Step 3 The sides need to be attached to the bottom of the feeder, which was previously made from fiberboard. The easiest way to do this is with a stapler.

Step 4 Now you need to make 4 supports for the roof of the feeder, all from the same bar. They must be the same height.


Step 6 The upper parts of the supports standing on one side must be connected with crossbars cut from the same bar. You should also make saw cuts on them at an angle of 45 degrees.

Step 7 Next is made. It is required to connect two sheets of fiberboard at an angle of 90 degrees. The connection is made using a small "ridge" bar with a length equal to the length of the slope. It is worth remembering that the roof should hang a little over the tray of the feeder, which means that the slopes should be made taking this factor into account.

Step 8 Next, the roof must be fixed on the racks for it using the same stapler or nails. The junction of two slopes can be glued using any material that does not allow water to pass through. The feeder is ready. If desired, it can be stolen with cones and branches.
Advice! While fixing the sides on the bottom of the feeder, they can be additionally smeared with PVA glue to ensure the connection not only due to the stapler staples, but also due to glue.

Feeders with sides are most loved by shelling birds, and for the rest, you can make a feeder without sides. The main thing is that the side is not too high.
Similar designs can be made from plywood, refusing to use fiberboard. In this case, the feeder will be more reliable and durable.
Video - Wood feeder
Simple hanging feeders
These are very simple feeders, they can be easily and simply made in just a few minutes. They are a delicacy placed on a braid or in a case and hung on a tree. Often, according to this principle, pieces of fat for tits are fixed on the trees. You can also make balls from seeds. To hold the grains together, you can use peanut butter or interior fat. And such feeders just need to be fixed on a braid somewhere in a place noticeable to birds. To attract attention, you can try to tie a sprig of mountain ash to such a feeder. You need to form balls on the street so that they immediately freeze in the cold.

Advice! It is best to make pendants in the shape of a ball, and not in some beautiful and exotic shape. It is the ball that is the most convenient option for birds.
Making a fat feeder
Let's see how you can make a simple structure for placing fat, for the manufacture of which you will need twine, wire and a regular hoop - an accessory for embroiderers.
Step 1. In the store you need to buy ordinary plastic hoops. They need to be separated into two halves, but in the area of \u200b\u200bthe castle, the hoop should remain connected.


Step 2 In the area of \u200b\u200bthe castle, you need to wrap the hoop with wire on both sides.


Step 3 On the other hand, where the hoop is separated, you need to make a wire jumper and wrap it with a “tail” from the wire to about the middle.

Step 4 The rest of the wire must be twisted and formed into a hook at an angle of 90 degrees, which is directed inside the hoop. Fat will be planted on it.


Step 6 After that, the hoop and wire must be wrapped with ordinary twine. The feeder is ready. It remains to place it in the right place in the garden and put a delicacy for the birds on the pin.


Making a feeder from a plastic bottle
Of course, you can simply cut a hole in the wall of a plastic bottle and hang it on a tree, filling it with grain. But you can contrive and make the feeder a little more complicated. To do this, you will need pallets for flowers of different diameters and a plastic bottle of about 1.5 liters. A strong rope will also come in handy.
Step 1. In one of the pallets (which is smaller), you need to make a hole of the same diameter as the neck of the bottle. You can cut it both with a knife and with a special crown put on a drill.


Step 2 Next, you need to remove the cap from the plastic bottle and screw the bottle itself into the tray with the neck, and screw the cork onto the neck from below. But for now, the structure can be temporarily disassembled. A small hole should be cut in the side of the bottle so that the food can spill out of it and be available to birds.


Step 3 Cut off the bottom of the bottle with a sharp knife.

Step 4 Now on the pallet - both on the first and on the second - you need to mark and drill holes for the rope. First you need to make holes on the smaller one, and then, applying it to the larger one, mark it and also drill holes.


Step 5 The final assembly is underway. The bottle must be screwed to the bottom tray.

Step 6 It is required to cut six pieces of rope of the same length. The rope is better to take dense and thick enough. You can also use a synthetic version.

Step 7 Now on each rope you need to tie a knot at the same distance from the edge.

Step 8 It is required to thread the ropes into the holes on the small pallet so that the short tails of the ropes are at the bottom.

Step 9 The second pallet will become a makeshift roof for the feeder. Now you need to thread the ropes into the holes of the second pallet.

Step 10 The ropes must be well tensioned. You should get the same design as in the picture.

Step 11 Now it is required from below and above from the remains of the rope to form "tails". On the top side, do not forget to make a loop for hanging.

Step 12 It remains only to fill the feeder with seeds and fix it on tree branches using a hanging loop.

Video - Large plastic bottle feeder
Video - Glass bottle hopper feeder
You can make bird feeders from any material. In haste, a feeding place can be built even from cardboard, but such a feeder will not last long. If you want to decorate the garden with beautiful and durable feeding places for birds, then it is better to spend your time and make a tree feeder.
Birds living in the wild need protection and care. It is especially difficult for them during the winter: when it is cold outside, it is so hard to find shelter and food.
That is why caring people try to feed our younger "brothers" as much as possible. One of the ways that will not only help the birds, but also decorate your garden, is a feeder made from improvised materials.

In this article, we have collected some of the most affordable options - focusing on descriptions and photographs, using already unnecessary items (plastic bottles or old dishes), you can easily equip a place where flocks of birds will gather.
Material selection
After evaluating the resources you have to create a feeder, you can choose an idea to your liking. However, it is worth remembering that not only its appearance depends on the configuration, but also practical characteristics such as stability.

That is why a good feeder must meet the following requirements:

Wear resistance and durability. Preference should be given to wood or plastic that can withstand weather conditions without getting wet from rain and snow, without collapsing under gusts of wind.

In addition, the birds themselves are often the cause of damage to the feeder - in search of crumbs, their beaks and claws scratch and tear fragile materials.

Proper size. Remember that if you cut a small feeder, for example, from a tetrapak, then large birds will not be able to eat from it, and small ones will start fights for a place and shake out food on the ground.

No sharp edges, "pulling out" carnations, etc. Birds are very delicate creatures, their feather protection and skin on their legs cannot prevent cuts from sharp objects, so make sure that your feeder is not dangerous for them, especially if it is made of glass, plastic or knocked together from planks!

Location and installation
Choosing the right place is extremely important!

Having chosen the most suitable position in terms of landscape design, evaluate:

Accessibility for birds. Perhaps the feeder will be closed from them by thick branches, or, conversely, too open, and then, with a strong wind, the birds simply will not be able to get close to it.

Difficulty for cats. These animals are excellent hunters, especially those who live in villages and holiday villages. They are stronger, faster and more agile than their domestic counterparts, and therefore, sneaking up to the feeder, they can cause great damage to the bird community.

Ideas for creating a do-it-yourself feeder
There are a huge number of different types of feeders - it all depends on your imagination and the materials available.

We will try to consider both the simplest and the most original ideas.

House made of wood or plywood
Despite the apparent complexity, such a design can well be assembled with unnecessary boards, pieces of wood, glazing bead, plywood and, of course, special glue or nails.
Note!

The basis should be a heavy flat plank. For the manufacture of walls and roofs, you may need a drawing, however, it is quite possible to get by with an eye.

A wooden feeder, depending on how much attention you pay to it, can become not only a place for feeding birds, but also an elegant decoration of your garden.

Plastic bottle feeder
This type of feeder is very easy to make and is great if you decide to involve children in the process of creating. You need to cut one or two holes in the bottle in such a way that it is possible not only to pour the food, but also access to it is not difficult.

Of course, you should try to make the cut edges come out neat and not too sharp (in addition, it is advisable to glue them with tape).
If you are using a small bottle (1.5-2 liters), then you can do it in two ways: cut a square or rectangular hole in the bottle, or prefer a U-shape so that you can bend a piece of plastic and make a visor.

In the event that you decide to use a large bottle (5-6 liters, in which drinking water is usually sold), you can make a large side cutout. So it will be possible not only to fill up more food, but also give the birds room to maneuver.
Note!


In order to prevent the wind from ruffling a light bottle, it is worth putting a stone or a brick fragment on the bottom. This also applies to the next type of feeder.

Tetrapack bird feeder
In order to make a bird feeder, you can also use juice or wine boxes.

To do this, follow the same technology as in the previous case: mark the place of the cut, cut it out in shape, glue tape (or adhesive tape) on the underside of the opening, then make holes for a strong rope in the upper part of the tetra pak. It remains to hang the feeder in the place of your choice.
Shoe box feeder
The cardboard from which the shoe box is made cannot be considered a durable material, but it is sufficiently resistant to moisture, and if it is cold outside, such a feeder can hang until spring.

The manufacturing technology of the feeder, as in previous cases, is also very simple: make four to six holes for the rope, cut on the sides and put a weight on the bottom - for stability.

Note!

Other options
The above options are extremely popular - such feeders can be found in any country house. If you want to make a unique feeder with your own hands, you should take unusual materials, for example, old tableware: a cup and a saucer.
In the autumn, you can cut a product from a pumpkin or zucchini; in winter, halves of an orange peeled from the pulp are suitable for this. Such feeders will surprise your neighbors and will undoubtedly decorate the garden!

DIY bird feeder photo


A do-it-yourself bunker bird feeder made of wood or thick plywood can be made for different purposes. It is very convenient to fill up a large amount of dry food once every few days and not constantly monitor its presence. The design of the feeder allows you to use different types of feed. It can be used to feed birds and squirrels, but it is also suitable for poultry.
When working with wood, you will not need too many materials. The most important thing is to choose high-quality wood, because even such a small structure needs to be made strong and neat. For making do-it-yourself wooden feeders, thick plywood (1.5-2 cm) or dry boards of the same thickness are very well suited.
Woodworking requires the following tools:
- jigsaw or hacksaw;
- drill with nozzles (drills, screwdriver);
- fastening material (you should prefer wood screws);
- small furniture hinges.
The bunker can be made not only from wood, but also from an ordinary glass jar or plastic bottle. In the case of such a technical design solution, an appropriate container of arbitrary size will be required.
The connection of the parts of the feeder is best done with self-tapping screws. A driven nail can split the board and does not hold as well.
How to draw a feeder drawing?

Tray and hopper can be cut separately from each other. You will need to make a drawing of a trapezoidal part for the sidewall of the hopper. The width of the narrower lower part should be calculated so that the bird can peck at the food without touching the walls of the hopper. This is especially important for hens with developed combs and roosters, who are reluctant to eat food from uncomfortable feeders.
The sides of the tray are made in the form of a pentagon, resembling a children's drawing of a house in shape. The length of the lower side (the future bottom of the tray) should be 10-20 cm longer than the narrow part of the trapezoid (bunker sidewall). When assembled, this difference will be divided by 2 to give the width of the feeder on each side of the grain bin. This value, as well as the height of the vertical side, is chosen arbitrarily and depends on the type of bird. The inclined parts of the part are used to install the grate (so that the bird does not scatter grain) and strengthen the bunker.
After the sides of the upper and lower parts are drawn in full size, it remains to make rectangles for the front parts of the tray and hopper, as well as for the bottom and cover of these parts. When calculating, you need to be guided by the fact that to feed 1 adult chicken or duck, you need a tray length of about 7 cm. The number of birds must be multiplied by this value and divided by 2, since the chicken feeder will have 2 sides. If you need to make a feeder for tits and squirrels, then the length is chosen arbitrarily. Please note that the length of the hopper must be such that it can be inserted tightly between the sides of the tray.

From a board or plywood 2 cm thick, cut out 2 sidewall parts for the upper and lower parts of the structure. Cut out 2 parts of the sides of the tray and the front walls of the hopper. Make rectangles for the bottom of the feeder and the lid of the feed container.
The product is assembled in the following order:
- Set aside a distance equal to ½ of the board thickness from the edge of the rectangular parts, make holes along the sides of the walls and sides. Align the edge of the side with the cut of the sidewall, screw the screws into the holes. The other edge is also connected to the 2nd part of the sidewall. In the same way, attach 2 sides.
- Make holes for fasteners around the perimeter of the bottom of the tray. Attach the board to the lower cuts of the sides and sides.
- The walls of the grain container are attached according to the same principle. They will be tilted forward in accordance with the location of the sides of the trapezoidal sidewall. Attach the lid to the upper wide part of the hopper using 2 furniture hinges and self-tapping screws. At the bottom there will be a hole into which the food will pour out.
It remains to connect the container and the feeder. By sliding the grain container between the sides of the tray, you need to adjust its height so that the feed spills out when the birds eat it from the bottom of the feeder. Mark the location of the parts of the feeder, remove the hopper.
Make holes for fasteners in the upper part of the sides of the tray. Insert the hopper again and fix it at the desired height by screwing the screws into the prepared holes.
If you wish, you can make an adjustable chicken feeder with your own hands. This will require 2 clamping screws. Under them, holes of the appropriate diameter are drilled in the upper part of the sidewall of the tray. To keep the hopper securely, you need to make small recesses for these screws in its side walls. After that, the fasteners must be tightly tightened so that the ends of the screws hold the container at the desired height.
If the feeder is intended for quails, hens or chickens, then a grate with holes corresponding to the size of the bird's head must be fixed above the tray. This will prevent them from raking food with their paws or scattering it with their beak. Squirrels, wild birds, ducks do not need a grill.
Other types of feeders
To make a one-sided hanging feeder with a hopper, you need to draw a rectangle of the desired size for the side part. On 1 side of it from the bottom, set aside the height of the side (3-6 cm) and put point A.
From point A, draw an oblique line inside the rectangle. Its length is chosen arbitrarily, according to the size of the bird's head. Put point B in the right place. Distance AB will be approximately equal to the width of the feeder tray.
Connect point B to the upper corner on the same side. This line will correspond to the location of the front wall of the bunker.
Draw the details of the side, the front and rear walls of the hopper, the cover and the bottom of the feeder, focusing on the dimensions of the corresponding parts of the sidewall and the desired length of the product. Cut out the appropriate rectangles and secure as instructed for the previous model. Make loops on the back wall for hanging.
Decorative feeder for the garden
You can make a feeder for squirrels or birds according to the principles of chicken bunkers. But it is better to dream up and make a beautiful craft. If you manage to find a piece of a thick branch with beautiful bark and wood, make a simple decorative feeder:
- For the base, you will need to saw off a circle 5 cm thick for the base. Its edges can be uneven, only the diameter of the cut is decisive - at least 20 cm.
- The upper part can be made from the same even saw cut, but the feeder will look much more interesting if the log is cut like a gable roof of a house.
- To make a container for grain, you will need a jar with a twist-off lid with a volume of 0.5-1 l. It must be prepared by cutting a hole in the lid so that only the side and 5 mm of the upper part in a circle remain.
- At the base of the future feeder, mark the place of installation of the previously prepared container lid from the can - in the center. Along the perimeter of the circle, make several recesses into which the food will pour out. These can be round recesses, which are convenient to make with a drill attachment (a cutter with a diameter of 5 cm), you can work with a chisel and make rectangular holes. Trays should be positioned so that they go halfway inside the circle in the center, which indicates the place where the lid of the can-container is attached.
- In the rim left from the cover, make 5-6 small holes for fasteners. Install the cover in a pre-marked place and screw it to the base. At this stage, you can check how the grain will spill out of the can. If necessary, deepen or widen the recesses of the trays.
- According to the size of the base, make a paper template (circle). Mark on it 4 cross-shaped points for making holes in the bottom and roof of the feeder. Transfer marks from template to wood.
- Make 4 through holes in the top and bottom parts. Pass 2 pieces of strong cord through them. Connect the upper ends together, balancing the structure.
When connecting the upper ends of the cord, leave space so that the roof can be lifted by unscrewing the can. Attach a hanging hook. Pour grain mixture for small birds into a jar, screw the container to the fixed lid. Turn the feeder over and lower the upper part of the structure onto the bottom of the can. The grain will fall into the recesses as the birds eat it.
Crescent feeder
This model is suitable for small wild birds. They are often driven away by large brothers and squirrels. But the light, elegant design, made in the form of a crescent, will not allow large birds to sit on it.
For manufacturing, you will need a board or plywood 1.5 cm thick and thin plywood (0.5 cm). The master can make a pattern in the form of a crescent sickle on his own. The sizes are arbitrary. From plywood or boards 1.5 cm thick, you need to cut 2 identical parts.
Cut thin plywood into 2 rectangles. Their width is the same and is chosen at will. The lengths are equal to the outer and inner arcs of the crescent.
Make a small hole at the bottom of the inner rectangle. It will serve to peck food for birds, and when the feeder is empty, you can also fill in new grain through it. Below the hole, it is desirable to attach an even bar (glazing bead, stick) so that the bird can sit comfortably. Attach a hanging hook to the top of the crescent moon.
Make holes for fasteners along the edges of the rectangles. Screw them with self-tapping screws to the outer and inner arcs of the side parts. The finished feeder can be hung on a tree branch in the garden.
In order for wooden products to last longer, they must be protected from moisture. To do this, use impregnation with drying oil or mineral oils, cover the feeders with waterproof varnish or paint.