How to properly apply decorative plaster to the walls. Decorative plastering
The general concept of "decorative plaster" unites materials of a wide variety in their composition - this is flock, and liquid wallpaper, and "Venetian", and textured, and imitation of various materials - wood, stone, leather, fabric and many others. Decorative plaster forms the original style of the room and often becomes its basis. Decorating walls with this material combines art and painting work.
We offer you some tips on how to properly apply decorative plaster yourself.
Preparing the walls
Before applying decorative plaster, the wall must be thoroughly cleaned of old wallpaper or loose pieces of old plaster. Then the surface of the walls is rubbed with an emery cloth, the bulges and irregularities of the walls are removed. All dust that has settled on the walls during work is gently swept away with a brush.
It is imperative to apply a primer under the decorative plaster. The usual primer is applied with a trowel, and the primer-impregnation is applied with a roller. After the walls are completely dry, you can start working with decorative plaster.
Stages of work

Preparation of decorative plaster is carried out in accordance with the instructions on the packaging, which is a plastic bucket of various capacities. Usually it all comes down to thoroughly mixing the composition with a special nozzle inserted into a drill. If you do not have a drill, then manually stir the contents of the bucket with a narrow board or piece of reinforcement.
A subtle point in the simple work of applying plaster is the addition of dye. You have several options:
- add the dye immediately to the bucket with the composition in a ratio of 1:10;
- add colorant to the finishing composition
- at the end of the work, dilute the dye in equal parts with the composition of the plaster and apply uneven, chaotic strokes to the wall with an ordinary sponge or roller.
The third option, of course, is the most laborious, but the plaster, made in this way, looks very impressive.
After you have decided on the colorant, you can start applying the plaster. A layer of the composition is applied with a spatula or trowel to the primed wall surface. Layer thickness 2-5 mm.
Now, of course, you will already notice and understand why it was necessary to apply a primer:
- the composition lies on the surface of the walls very easily;
- is not absorbed by the pores of the wall;
- the surface of the walls is quite smooth and has good adhesion.
The composition is applied to the wall with a tool in one direction - either from bottom to top and vice versa, or in a circular motion.


Right now is the right moment to show your artistic imagination. The applied plaster layer can be brushed into a striped structure.

You can make a relief. For this, toothed trowels or curly rollers are used. It is very convenient to work with a wide tool that immediately covers a large area.

A very interesting relief, reminiscent of the lunar surface, is obtained if you take a plastic bag crumpled in a lump and lightly press it on the wall.

In addition to the listed tools, various applicators and stamps are used to create relief patterns, with their help repeating reliefs are obtained.
Decorative plaster dries from 8 to 48 hours, depending on the thickness of the layer. On a dry wall, be sure to lightly walk with a medium-sized emery cloth in order to remove sharp embossed edges. All dust is sure to be swept away again.
In conclusion, the plastered surface is covered with a finishing solution, which must be selected for compatibility with the composition of the plaster. Instead of a topcoat, builders often use a special wax to make the wall highly waterproof. It can also be coated with a dye composition.

Content:
Currently, the number of finishing materials available on the domestic market is quite large. And decorative plasters among all this variety are one of the most versatile and easy to use. After all, decorative plastering of walls with your own hands is quite easy. Moreover, its cost is quite low. And this, especially when applying decorative plaster of the walls with your own hands, gives you the opportunity to significantly save on finishing work, while obtaining a high-quality and quite attractive-looking coating.
DIY decorative plaster of walls - Photo
Why do they love decorative plaster for walls?
Among the advantages that decorative plasters have, the most noteworthy are:
- the uniqueness of the interior created with their help. Using the same plaster, you can create completely unique patterns and effects;
- high resistance to various influences, as well as to pollution;
- excellent soundproofing properties;
- environmental friendliness of the material, the use of which does not release any harmful substances.
Plaster classification
Typically, decorative plaster for walls is classified into the following types:
- Facade, more resistant to the influence of external factors and due to this, it is more often used for outdoor decoration;
- Interior , usually used for interior work and sometimes silicate, silicone, acrylic and mineral.
In addition, decorative plasters are also subdivided according to the type of surface obtained as a result of its application - for example, it can be "bark beetle", "roller", "fur coat" and even "marble plaster".
Decorative plaster wall marbled beautifully - Photo
Each of these plasters must be applied using a different technique that is usually well known to the professional repairman. However, nothing prevents you from doing these work yourself - decorative plaster of the walls with your own hands is not at all so difficult to apply.
So, for example, for the "bark beetle" finishing method, no tools are required at all, except for an ordinary spatula. Although the same "Venetian" plaster, without having any experience in its use, it is better not to apply it yourself. However, whichever method you choose, you will not be able to do without preparatory work.
Walls finished with decorative plaster in a pink shade - Photo
Preparing walls for applying decorative plaster
Before applying materials such as decorative plaster with your own hands, you should thoroughly clean the surface from previous layers of coatings (wallpaper, paint or other plaster).
The application of the "bark beetle" technique will only require filling the cracks and removing the exfoliated areas. But for Venetian plasters, you need a surface quality close to perfectly flat.
If different sections of the wall will be plastered according to their own methods, they should be separated from each other, for example, with masking tape. In some cases, it may also be necessary to adhere to the application site of the mesh or fiberglass material.
What tools are needed for applying decorative plaster
Do-it-yourself decorative plastering of walls, in addition to knowing the application techniques and preparatory work, also requires a certain set of tools:
- several spatulas of different sizes;
- wooden or plastic grater;
- trowel (usually metal);
- containers for water and plaster solution;
- roller (only for textured types of material).
How to apply decorative plaster
The dry mixture, in the form of which the plaster is sold, is diluted with water and mixed for several minutes using a mixer. The proportion in which water is added is usually indicated on the packaging of the material. It is advisable to prepare enough solution to use this amount completely, since it will no longer be possible to reapply it.
Decorating walls with decorative plaster - Photo
Decorative plaster is applied to the walls with spatulas, and after it has partially solidified, it is carried over the surface with a trowel, creating the appropriate patterns. You can also use special rollers and even hands. The main thing is to do everything as quickly as possible, because the plaster dries quickly enough.
The technology of applying decorative plaster using ordinary objects - Photo
About a quarter of an hour after application, the wall relief must be slightly smoothed with a wet rag. When the material dries almost completely (usually this happens in a day), it is treated with fine-grained sandpaper, removing small defects, and then, if necessary, painted. Also, instead of paint, varnishes, glazes and even beeswax can be used, which are applied with sponges, rollers, brushes and even napkins.
Finishing the walls is a very troublesome and responsible event. Especially if the corners and walls are uneven. Pasting such surfaces with wallpaper or decorative tiles is a difficult task and it is rarely possible to solve it efficiently.
In such situations, decorative plaster comes to the rescue.
Currently dominated by dry mixes, it is the same free-flowing composition as the usual mass for interior wall decoration. Decor properties are given to it by various additives specially introduced into the recipe. These can be small pebbles, and even wood fibers, which give the lined surface a completely original pattern and texture.
Even an experienced plasterer, starting wall decoration, will not be able to imagine at the beginning of work what will turn out in the end. Therefore, before starting work, craftsmen prefer to make a test application on a small flat surface, for example, on a piece of drywall. The test allows you to immediately determine the methods and techniques of coating to identify the most advantageous characteristics of the decorative coating.
Decorative plaster costs
The presented material has many varieties. Depending on the composition, the price of the material in the form of a dry mixture ranges from 200 to 600 rubles per square meter. The consumption rate of the finished composition is provided by the manufacturer and is indicated on the package. And the price of work per m2 by invited specialists is from 250 rubles.
It should be borne in mind that the use of this method of wall decoration eliminates the need to perform a number of preparatory operations on their surfaces, which reduces the cost of the final cost of the coating. In addition, having minimal skills in finishing work, you can do them yourself, eliminating a significant part of the costs.
Types of decorative plaster
There are several types of classification of such material for wall decoration:
- By the type of binder.
- Depending on the type of filler that determines the surface texture.

On the first question, you can get advice from the manager of a building materials store. The choice depends, first of all, on the texture of the surface to be finished and the operating conditions of the coating after application.
Depending on the filler, the classification can be as follows:
- Textured surfaces. As the name suggests, the surface of the finish is uneven. The material successfully hides almost any defects on the wall and allows the performer to independently apply it, even with zero skills of such work. Actually, this is what determines the high popularity of this particular type of coating. And the price of the material is at a minimum for this type of coating.
Plasters of this type, in turn, are divided into several varieties:
- "Lamb". This design gives the impression of a soft woolen surface when viewed from the side. Works well with substrates of mineral origin.
- "Fur coat". The surface is similar to the previous one, but it looks like a fleecy.
- "Bark beetle". When applied on a plane, grooves are formed, surprisingly resembling traces of a bark beetle, with the correct selection of tone, the texture corresponds to aged wood.
- Structural. This type of coating is characterized by an almost absolute unpredictability of the nature of the surface that will be obtained during application. The previous version still allows you to somehow predict the result. In this case, at the beginning of work, you can be sure of only one thing - some structure on the surface will still appear.
- Venetian. In terms of its decorative capabilities, this plaster is superior to other types. One of the features of such a coating is the need to create an almost perfectly flat surface, which is not always available even to experienced craftsmen. The application process takes a lot of time. A distinctive characteristic is also the translucency of the material. With the correct setting of lighting, the effect of an internal glow of the surface is created. This property allows you to make design decisions in which the image on the wall looks like a haze or fog.

In addition to the types of decorative plaster mentioned here, others are also produced. All of them differ in the nature of fillers that imitate one or another surface, which is not affordable. Such characteristics can be imitation of wood or silk fabric.
These materials also include colored plaster, produced in a wide range of colors.
DIY plastering of walls
With the exception of individual cases (Venetian coating), plastering work is done quite simply and any developer, if given the time and desire, seeks to carry out these works on their own. The desire is quite reasonable and understandable, but you need to take into account a number of circumstances, which are set out below:
- You need to carefully consider the selection of material. Here, the consultation of an experienced specialist is not only desirable, but also required. And it would be better if it was not a store manager in charge of sales, but an uninterested outsider. Ideally, it is better to see a sample of the performance of this or that interior. The calculation of the amount of material based on the manufacturer's recommendations is not always correct. In an effort to assure the buyer of economic efficiency, he shows the minimum expense, which in terms of real execution is not always achievable. Therefore, it is better to purchase the amount of material with a small margin.
- If there are no gross defects on the surface to be coated, the finishing can be neglected. Only rough chips and cracks should be repaired. The rest will be effectively removed with a layer of plaster, for which it was originally intended. But the application of a primer is necessary - it significantly improves the adhesion of the plaster to the wall surface. It is generally accepted that the finer the structure of additional inclusions, the higher the surface quality should be.

- After the primer has completely dried, and she needs at least half a day for this, you can start plastering work. In the absence of experience, no instructions, including videos, will help. But it won't take much time to master the profession. You just need to start work from the least critical place, for example, where the furniture will subsequently stand. It is also useful to practice on foreign material from building materials waste.
- At the end of the application of the plaster, you can give it additional charm, complementing it with additional relief, for which you will need additional tools. The non-tinted surface can be painted additionally by choosing the paint to your liking. This method is used to ensure uniformity of tone throughout the room, which is often impossible with the inevitable frequent mixing of the plaster composition.
Plaster is usually a waterproof coating. Therefore, it can be washed safely. In this case, you must refrain from using aggressive detergents. A mild detergent is used with elastic sponges, hard brushes and products containing abrasives are not applicable for the care of such a coating - the surface quickly loses its appearance, becomes dull due to a large number of scratches. As an additional protection, the surface is covered with a thin layer of wax, which protects it from moisture, but not from mechanical damage.

If you want to change the interior, the walls can be repainted, and if it is planned to use wallpaper, the walls can be additionally plastered.
Plastering tool
The tools and accessories for professionals are quite varied. He must ensure not only the productivity of work, but also their quality.
The range of tools used largely depends on the choice of the nature of the coating. In the simplest version, you can get by with a minimum set of spatulas of different sizes. You will also need a trowel, and for more complex options, it is desirable to use textured rollers. If the surface is to be painted, you need to stock up on a painting tool.
Applying plaster to the wall
How to make decorative plaster with your own hands? For independent execution by a person without experience, a covering of the bark beetle type can be recommended. She is not demanding of meticulous preparations. Due to its texture, it is not necessary to carefully level it during the application process. To work with such material, several spatulas of different widths and a little plastering skill are enough. It is almost impossible to spoil the bark beetle. The technology involves manufacturing in various versions, which directly depends on the size of the grains, the inclusion. Larger ones will require a thicker coating layer.

The device of the "Venetian" without a firm mastery of skills is impossible. When performing it, you need to apply on a perfectly prepared surface several ideally even layers of plaster, each with its own properties.
Silicone materials also require special skills. It is painstaking and delicate work that requires incredible patience and artistic tendencies. But the result also corresponds to the work invested.
Wall decor can be applied in the following order:
- In accordance with the instructions on the package of the mixture, a solution of the desired consistency is prepared. Its quantity should provide for the possibility of production at a time. Additional stirring with the addition of water is not possible - the thickened residue will have to be thrown away.
- A spatula and a grater become a universal tool. The applied layer of plaster is evenly distributed over the surface. As soon as the mass shows the first signs of hardening, it must be rubbed with a grater, while creating a pattern.
- For beginners in this business, there are several simple techniques that allow you to get a beautiful decorative design with simple operations. This can be wavy grouting, beveled or straight lines that simulate rain, various closed curves or intersecting stripes. Movement when performing work should be confident, soft, not allowing for correction.

- An interesting surface texture can be obtained using the most unexpected objects, from crumpled paper to brushes or washcloths. The easiest way is to use textured rollers with different patterns. Given the limited hardening period of the plaster, the drawings also need to be done as quickly as possible, there will be no opportunities for correction.
- In 15 - 20 minutes after applying the pattern, the coating begins to lose its shine, which indicates that the crystallization of the solution has begun. It is necessary not to miss this moment, and walk along the surface with a wet trowel, smoothing out irregularities and removing too sharp relief changes. The tool should be cleaned frequently and moistened abundantly.
- To separate areas of coverage with different textures, it is advisable to use construction tape. It must be removed before the applied solution hardens to ensure a clean, tear-free dividing line.
- Complete drying of the solution occurs within a day. After this time, you need to treat the surface with a fine emery cloth. In this way, unnecessarily protruding parts and irregularities in the coating are removed.
- A protective coating in the form of varnish or wax is applied to the surface approximately three days after the decorative layer is applied. Before applying it, you need to thoroughly clean the surface from dust using a vacuum cleaner.

- When decorating external walls, a concrete surface using river pebbles is popular. After applying the composition to the wall, when it shows the first signs of hardening, you need to wash off a small part of the outer layer of the solution with a wet paint brush. The pebbles exposed at the same time are a wonderful decorative design of the wall.
Decor in alternative ways
To give decorative properties to a putty coating, you can use the following techniques:
- Purchase a dry putty mixture and dilute it with water, taking into account the recommendations on the package. The most convenient are materials based on gypsum or cement. Possessing high strength properties, they make it possible to successfully level out irregularities on the base.
- For the base layer, a thickness of 2 mm is sufficient, there is no need to carefully level the surfaces, since the decor will visually hide almost any irregularities.
- In the process of creating a textured surface, you can use various tools and techniques. A common method is using a spatula or trowel
- Various stamps and embossed rollers with ready-made patterns are widely used
As a finishing operation, the surface is most often painted. It is done with a paint roller in two passes, the first time with a long pile, the second with a short one. Such a coating best emphasizes the texture of the finish.
The elements of the texture are applied to the front layer from the same putty. Its thickness should not exceed 3 mm. Otherwise, cracking may occur during operation.
Drying of the putty layer must be done with closed doors and windows. Drafts are not allowed. Accelerating the process by turning on the heaters can lead to cracking and collapse of the finish layer. The essence of the process consists in the crystallization of the mass of the finishing material, in which air moisture also takes part. Therefore, its premature removal will lead to disruption of the process.
As you can see from the above data, the decorative plaster finishing process can be very simple, even easier than creating a smooth base surface. But certain materials and methods require special attention and skill, as well as artistic taste. Realistically assess your strengths and capabilities. I wish you success!
Repairing and decorating the walls of an apartment or house is often an unpredictable thing. Sometimes, during do-it-yourself repairs, a lot of new ideas are introduced into the original idea that can change the design style of the home furnishings. This happens when, after applying decorative plaster with your own hands, new ideas for wall decoration appear on most of the walls.
The wide possibilities of decorative plaster are good and bad
Especially if you are lucky to see interesting and fresh photos or videos about what is best to use and how to properly apply decorative plaster to the wall plane.
Before entering the temptation, changing the initial idea in the design of the walls with your own hands and applying a new drawing, it is worthwhile to soberly evaluate several main points:
- The cost of repairs, even if the basic work on decorating the walls with your own hands and strict adherence to the original idea and estimate, always grows by 10-15% minimum;
- It is not difficult to apply a new design in one room, but such a move may require reworking most of the plastering. Apply it with your own hands in other rooms, to preserve the style of wall decoration;
- The cost of repairs can double and lead to significant losses in time and effort.
Thanks to new materials and techniques for applying decorative plaster, even with your own hands, you can achieve impressive results.
Advice ! With all the desire to make the most of the expressive possibilities of decorative plaster, it is worth dwelling on one initial idea of \ u200b \ u200b decorating the walls and complete the repair with minimal costs.
All interesting thoughts about decorating walls with your own hands can be collected and postponed until next time. Perhaps new money, new premises and new ideas will appear.
When and how to properly apply decorative plaster
Modern wall design options allow you to create the most realistic imitations of various decorative surfaces, from a fracture in a stone to bas-relief images. But the main advantage of decorative plaster is incredible flexibility in choosing the texture of the plane with your own hands. In fact, the use of plaster decor made it possible to apply real artistic images and whole paintings to the walls. Even 15 years ago, individual painting of walls with their own hands was within the power of artists-designers, and such a pleasure cost a lot of money.

We use the possibilities of decorative plaster
New decorative materials for wall decoration with plaster can be called more a way of decoration than a means of leveling and protecting the masonry of the walls. Polymeric binders, water-soluble paints and various fillers are used as components and bases of plastering materials, which, in fact, determine the appearance of the decorative component of the walls.
Among the many approaches to the process of applying decorative plaster, several main directions can be distinguished:
- If you have a steady hand and good skills in decorative sculpting or drawing, perhaps after a little practice you will be able to apply ornament or abstract drawings to the surface in a theme that matches the style and purpose of the room. It is expensive in practical implementation, and even more expensive then to remake what has been done into something new;
- With good taste and sufficient financial resources, you can use a combination of specific shades and colors with a monotonous relief applied to the plane. This is simpler than the previous version of decorative finishing, but it will require serious design skills in order to harmonize and combine all the premises of the apartment into a single concept;
- Simpler and more practical formulations make it possible to apply plaster decors of simple structure with a restrained relief or even a simple imitation of natural stone, brick or classic decor options.
Advice ! If the time and finances do not allow you to apply decorative plaster in all rooms, you can, as an experiment, select the most curved and nondescript plane in an apartment or house and try to apply various types of plaster. This will allow you to personally understand and see the advantages of different techniques over general repairs.
Works with decorative plaster
The first two directions of working with decorative plaster will require you to accurately understand all the nuances of the colors and texture of the walls, therefore, before applying a complex decorative pattern with embossed images, it makes sense to pre-make sketches or select photos of the corresponding design solutions.

The more intricate the design, the more difficult it is to apply it to the walls. For example, without practice, not everyone can do decorative plaster with a moire effect, as in the video
A decorative composition in the style of a panel will require a good knowledge of the properties of plaster and a lot of patience in working with it, but the effect obtained is worth it. The beauty and accuracy of the work can be assessed by video
In such cases, it is better to apply the decor with the hands of specialists; it is very difficult to achieve this quality on your own.
Important ! In addition to artistic taste and knowledge of the technological intricacies of working with decorative plaster, it should be understood that it is physically difficult to apply the material to the surface, and the process will require considerable effort and endurance.

In the first experience of using decorative plaster, it is still better to choose the simplest version of the picture and try to apply it yourself.
The easiest way to apply decorative plaster
One of the most popular options for decorative plaster has become lime-based composite compounds that imitate natural materials. Most often they use plasters that have been proven by practice and many years of use:
- "Venetian composition", which gives the texture of the wall in the form of an unthinkable number of intertwined relief elements;
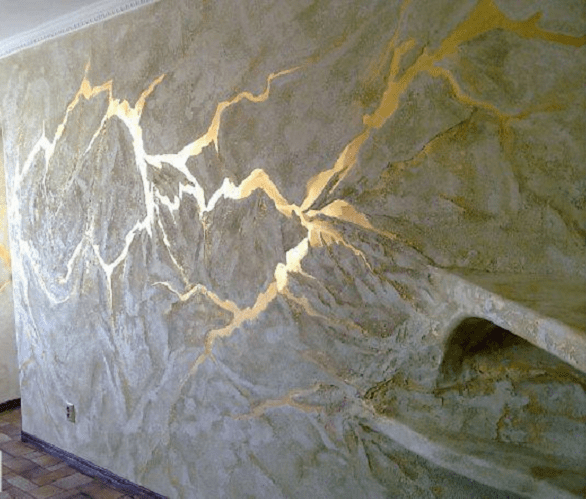
- "Marmorino" and "Marseilles", similar to the surface of marble calcite, with a network of inclusions and cracks and polished surface transitions;
- Imitation of the surface of natural limestone with an uneven, deliberately rough and scratched surface known as "Travertino".
Important ! All the above decorative compositions of plasters are very easy to apply on the wall with your own hands, obtaining almost 100% surface quality.
Venetian decorative plaster drawing
The secret of the recipe is to use ordinary ready-made plaster mixtures - starting and finishing mixtures to obtain decorative plaster. Thanks to this, the cost of expenses is reduced by about half. The original plaster mass is prepared by mixing both mixtures in a 50/50 ratio in the amount required to apply the composition to 1-1.5 m 2 of the surface.
Before applying the composition, the walls are primed with an acrylic primer, and the composition is carefully applied with a spatula and trowel to a slightly dried surface. The thickness of the layer of decorative plaster is on average from 3 to 6 mm. As the decorative base is applied with a trowel on a damp material, it is necessary to apply a relief pattern. The specifics of such work are well understood from the video.
Important ! Sometimes the problem arises of the correct connection of two sections of the wall, on which a solution of decorative plaster is applied with a gap in time.
Most often this happens due to the need to prepare a new portion of the plaster mass. Therefore, the boundaries of the plots have to be “traversed” by the tool several times.

After a little drying, the embossed pattern is rolled with a special tool that makes the pattern flatter and more expressive. As a finishing operation, which is the "highlight" of Venetian plaster, a tint paint is applied to the wall surface with a roller, which gives the plaster the color of "old silver". To do this, 250 gr. primers add about 50 grams of dye.
After the drawing has dried, it is necessary to apply acrylic varnish with a small addition of glitter. Decorative plaster dries for a rather long time - up to two days, after final drying it acquires a slightly lighter shade.
Travertino, what could be easier
This is a plaster based on lime and calibrated quartz sand. If it is important for you to combine a beautiful surface texture with the advantages of lime plaster, then the choice is obvious. Among the advantages of the Italian recipe is the ability to apply plaster even on a cement soil of concrete or brickwork, provided that the surface is previously cleaned of dirt and deposits and a special primer mixture based on sandy quartz dust is applied.

Such a primer will allow you to level and hide the "flaws" of the walls and improve adhesion to the decorative layer. On a prepared surface, such as drywall sheets or plastered walls, decorative plaster can be applied in one layer, but with a preliminary treatment with an acrylic primer.
The decorative composition is applied with a spatula and a wide trowel, achieving a uniform layer, 3-4 mm thick. The plaster drawing must be applied with a roller with a porous surface, the surface formation process itself is well understood from the video
If you like brick wall ornaments, Travertino can be used to create a brick pattern. To do this, strips of construction tape are glued onto the previously prepared surface of the wall, imitating the seams between brick blocks. Next, you need to apply plaster and separate the strips from the main layer, due to which a texture is formed that imitates silicate or ceramic bricks.
Conclusion
Simple compositions of decorative plasters do not mean that they are primitive in beauty or design. Most often, such options are used to apply a base for hand painting, painting or applying bas-reliefs from a putty mass.
Decorative plastering solutions, or decorative textured coatings, do not require further processing or surface finishing. They can be applied to walls and partitions made of any material - be it brick, concrete, drywall, wood or ordinary plaster. But the plaster hardens very quickly, so it is quite difficult to carry out finishing work with it on a large surface.
In addition, the use of decorative plaster for wall decoration requires a thorough preparation of the surface (treatment with a primer, putty, grouting materials).
Usually decorative plaster is available in the form of a dry or ready-to-use thick mixture. The basis of such materials includes a polymer binder, a filler (marble or granite chips, sand, lime), on which the texture of the future coating depends, as well as a liquid base - water.
Dry plaster in packages
The composition of decorative plaster often includes other additives that provide additional properties (different surface structure, protective shockproof properties).
There are also special, separately sold additives for giving decorative plaster of one color or another.

Plaster with colored additives
If the coating is made in the form of a dry mix, it must be diluted with water in the correct proportion. The plaster is applied quickly enough: first with a brush, and then with a spatula or with another tool, or with a special tool right away (which one should be indicated in the instructions for using decorative plaster). Such a tool can be a roller, brush, trowel, trowel.

Stretch plaster is always applied with a trowel, from bottom to top. Such plaster is characterized by a denser grain structure. Outwardly, it is very different from ordinary plasters.
The use of decorative plaster offers many possibilities. For example, with the help of various molding tools, you can additionally create different types of texture.
Plaster consumption is measured in kilograms per square meter of surface and usually ranges from 1.5 to 3 kg.
Decorative synthetic plaster is also used for finishing both interior walls and facades. Depending on the grain size and the direction of grouting such plaster, you can create an individual structure of the walls of the interior. This type of plaster is usually used as a topcoat, but can be additionally covered with paint.

Decorative plaster in the room
Trowelable mineral plaster is characterized by a high content of natural grains, does not contain artificial resin. Differs in high ability to pass water vapor. Used for outdoor and indoor use.
Before covering the walls with decorative plaster, apply a preparatory layer of ordinary plaster on the lighthouses, consisting of a spray and a primer. The surface of the preparatory layer is scratched, roughening it for better adhesion to the decorative layer. On a well-aged preparatory layer, a cover is applied from a decorative solution. Moreover, it can consist of two, three or more layers.

First, a spray from a decorative solution is applied to the preparatory layer, then a layer or layers of soil and, if required, a cover from the same solution.
Creating decorative plaster from ordinary
Decorative plaster "Wave"
A variety of textures for the future color can be "depicted" on ordinary plaster. For example, “waves” look great on lime-sand plaster.
To reproduce them on the surface, on fresh or previously rubbed plaster, incised and moistened with water, apply a second layer of mortar in straight or curved stripes and smooth it with a spatula. Thus, a wavy surface is obtained.

Plaster "Wave"
Plaster "Traverin"
To create travertine (lime tuff) on the wall, a thin layer of colored mortar is applied to the prepared surface of the plaster by throws. After that, it is smoothed with a spatula or steel trowel. The result is embossed islands on a smooth worn background - the so-called decorative "stones".

Plaster "Traverin"
For the process of applying this type of joke, see the video:
Stone plaster
To create the texture "under the boulders", a plastic colored solution is applied to the ground, quickly smoothed with a scraper and then the surface is plowed with a hard hair or bristle brush. When trimming, the brush should be kept strictly perpendicular to the surface. A hard brush is needed because only it gives clear, sharply defined "boulders".

Stone plaster
Dune plaster
Under the dunes, the colored solution is also first leveled with a scraper, and then a grater is attached with slight pressure and immediately torn off. The solution adheres to the grater and, together with it, is pulled away from the surface, which is why roughness forms on the surface. Outwardly, these roughnesses are very similar to sand dunes. If you want the dunes to be wavy, the grater can be torn off not straight, but by slightly sliding it to the side. To obtain the texture of small dunes, the solution is first allowed to grasp a little. After that, it is lightly rubbed, put a grater to the surface and tear it off.

Dune plaster
Watch how to apply Dune to your wall in a short video:
Furrow plaster
The furrow-like texture is obtained using a bevel with semicircular teeth, which is made of steel strip or wood. It is up to 30 mm wide with grooves between the teeth 10-15 mm. The teeth of the chamfer are sharpened in one direction. An inactive solution is applied to the prepared soil, quickly leveled with a trowel, then take the rule in the left hand and apply it to the solution that has not yet set. Now you need to put the bevel on the rule with your right hand and guide it with the sharpened side of the teeth forward at an angle of 45 ° to the surface. In this way, even furrows are obtained. Their size and shape, naturally, depend on the shape of the teeth of the beetle.

Furrow plaster
Plaster "under a fur coat"
By spraying, throwing the solution through a mesh, shaking off the solution from a broom or brush.

Ways of applying plaster "under a fur coat"
Spraying through the mesh and from a broom is performed with any solution (even with a large aggregate). Only fine aggregate mortar is suitable for brushing. To get a dense spray without a gap, repeat it several times until there are no places uncovered with a solution on the surface. You can also use a spray attachment (it looks like a fan).
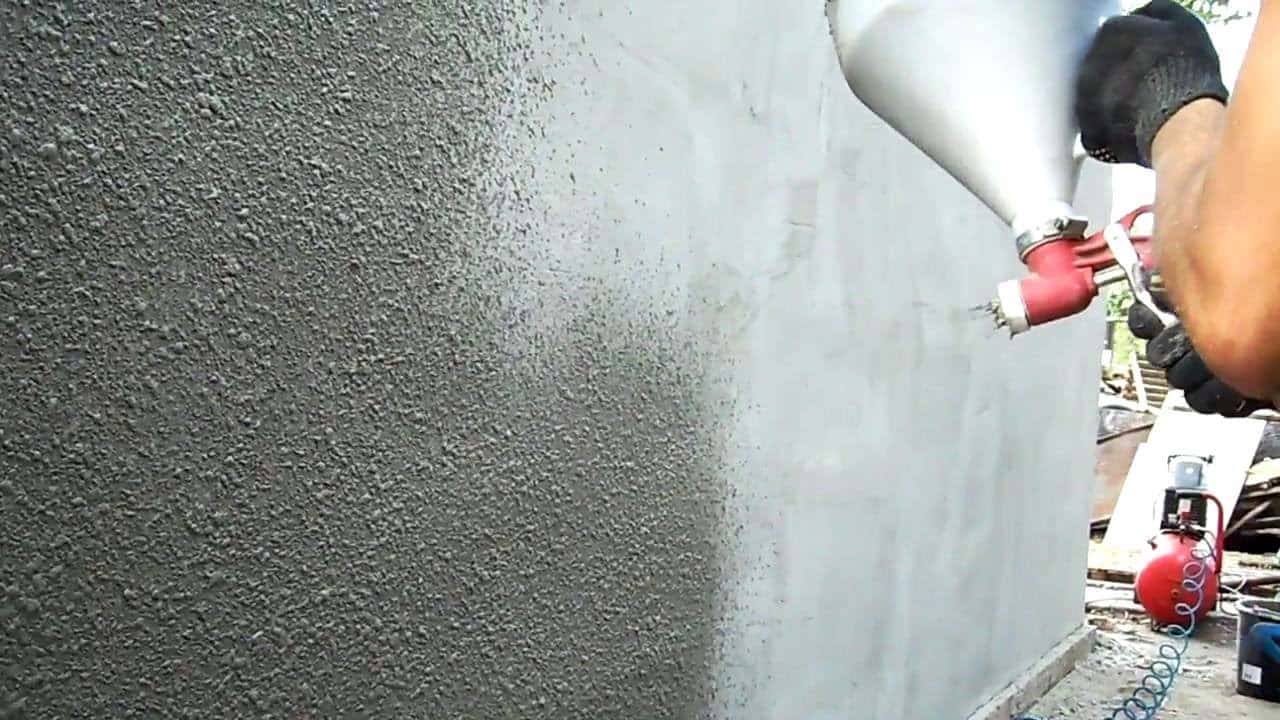
Spray application of plaster under a fur coat
Spray on the mesh is performed as follows. Stretch a mesh with cells from 2.5 to 10 mm on a wooden frame measuring 100 x 100 or 100 x 50 cm (the specific size depends on the size of the texture). Pull the wire diagonally from the back of the frame. It is necessary so that the mesh does not bulge and vibrate during operation. Attach a net to the wire, tie it. In order for the frame to be always at the same distance from the wall, nail strips 10-25 cm thick to it.

Spraying plaster "under a fur coat" through the mesh
The frame is placed on the surface of the soil and the mortar is thrown through the grid with a spatula from the falcon. Passing through the mesh, the solution remains on the surface in the form of tubercles. To get the same texture, try to apply the solution with the same strength.
When sprinkling from a birch broom, hold it with your right hand, and with your left hand take a round stick with a diameter of 4-5 cm and a length of 50-60 cm. Put the solution on the broom and hit it on the stick, shaking it off to the wall surface. The size of the resulting texture will depend on the thickness of the broom rods, the thickness of the solution and the strength of shaking off. Stir the solution from time to time during operation so that it does not delaminate.

Spraying the plaster "under a fur coat" with a broom
For finer textures, spray with a brush. Better to use a stiff hair or (best option) bristle brush. The brush is held with the left hand and, dipping it into the solution half the height of the hair, is brought to the surface with the bristles up. Then it is carried out on the bristles with a stick or a plank (it is held in the right hand), and the solution from the brush flies off onto the surface to be plastered. A thick texture will remain on the wall, similar to the pile of a fur coat.

Brush for applying plaster "under a fur coat"
To get a texture similar to snow flakes, spray is performed with flakes of a creamy plastic solution. The wall will turn out to be especially effective if flakes of white mortar are applied to colored plaster. In this case, first, a colored solution is applied, leveled and rubbed, and then a spray is performed on it. You need to do this without waiting for the plaster to dry.
To create a texture with a sponge, a creamy solution is applied to the ground, quickly leveled and immediately applied with butt-end blows with a sponge. After that, a relief remains on the surface of the plaster, the appearance of which depends on the shape of the pores of the sponge. To prevent the solution from sticking to the sponge, it must be moistened in soapy water and squeezed slightly.

Instead of a sponge, you can use a relief roller
To obtain relief patterns on an uncured plastered surface, you can use special stamps or any convex objects: shells, dense leaves, branches, and the like. Pieces of stone, brick, multi-colored shards of glass, shells can simply be pressed into the still soft plaster. It will harden and hold the mosaic together.

A wide variety of objects can be used to emboss plaster.
Sgraffito plaster
Another way to decorate walls using plaster is called "sgraffito" (scratched out). This technique consists in scraping off thin layers of specially applied colored plaster. If there are several such color layers, the resulting drawing will be three-dimensional and multi-colored, reminiscent of a fresco.

Wall decoration using the "sgraffito" method
Now let's move on to considering the techniques for decaring walls using terrazite plaster. This type of plaster consists of a large amount of fluffy lime mixed with white cement, white sand, marble chips, glass, mica and other materials. The peculiarity of terrazite plaster is given by the addition of mica and anthracite fines (up to 10% of the volume of cement).

A kind of terrazzite plaster
Plaster shading
A shaded texture (straight or offset strokes) with irregularities of 2 to 5 mm is obtained from fine-grained mixtures using a freshly applied solution. The mortar (in the range from 1 to 6 hours after application) must be processed with a notch with nail combs or toothed cycles. The applied cement mixture can be treated with a Trojan or a scalpel. On the hardened solution, work begins no earlier than 6 days after its application.
Plaster "Rock"
The "rock-like" texture resembles a chipped stone, but it is made from a hardened solution with a large filler, forged with a chisel or tongue. The tongue is driven into the mortar, thereby knocking out pieces and leaving indentations that form a uniformly grainy surface. If the processing is carried out with a chisel or a scalpel, cutting off pieces of mortar, the surface will look like a torn or chipped natural stone.
Technology of application and texture of stone plaster
The surface of the stone plaster is divided into separate "stones" before the treatment begins. To do this, with the help of a delimited cord, the lines of rows of "stones" or rustic "seams" are punched, as well as straps and other rectilinear details. After that, they start finishing the plaster for one or another texture.
Texture "under a fur coat" perform with different tools. If you cut with bush hammers with large teeth, the result will be a coarse-grained texture, with fine teeth - a fine-grained one, and when forging with a tongue-and-groove, an especially coarse-grained texture will come out. Keep in mind: with large and long spikes of the bush hammer teeth, the texture is deeper and larger.

Under shading with grooves, the work is done with a bush hammer, only instead of teeth it should have blades. The depth of the grooves will be determined by the size of the teeth. The first forging is carried out along the line broken off by the cord, and the subsequent ones - parallel to it. To get the texture with the division of the entire surface into stripes, you need to use a Trojan or a gear.

Bouchard and the Trojan
Dune-like texture on stone plaster, perform with a chisel. Previously, the surface of the wall must be cleaned with steel brushes or scrubbed with bars. And then from a well-compacted and rubbed surface of the plaster, you need to cut off a thin layer so that small depressions are formed.

Chisel types
Under torn stone or roughly chipped sandstone texture make with dowels, chisels, scarpels. First, a solution is applied to the surface with a layer of 4-6 cm, it is compacted and the surface is divided into "stones". When the solution grasps, cut through or perform rustications, and then process the surface as needed to obtain texture. A chisel or tongue is driven into the applied hardened plaster and pieces of mortar are broken off in different places to form large irregularities. If you want to get a texture like hewn sandstone, chisel small pieces of plaster with a chisel.

Fur coat and ragged stone finish
Coarse-grained and fine-grained texture receive in two steps. First, the cement mortar is applied - in small or large casts, - then a mortar for stone plaster is prepared and applied in a layer up to 10 mm thick over the seized layer of soil. The top texture can be fine or coarse depending on the filler.
Venetian plaster application
For best results, the surface covered with Venetian plaster should be as smooth as possible, monochromatic (white) and non-absorbent. Do not apply plaster to wood and metal - over time, the coating will crack.

Venetian plaster
Venetian plaster tools
To prepare and cover the walls with Venetian plaster, you will need the following tools:
- two brushes - maklovitsa and flutes,
- roulette,
- long ruler,
- level,
- pencil,
- syringe dispenser,
- measuring cups,
- containers for mixing materials,
- mixer,
- ladder,
- bucket with water,
- abrasive paper (no. 120 and 220),
- grinding float,
- two stainless steel trowels, 250 and 200 mm wide,
- wide and narrow forged polished stainless steel spatulas.
It is advisable to round off the working edges of the tools and polish with a fine-grained abrasive paper, completely removing scratches, burrs and other defects.
Make sure the substrate is thoroughly prepared before applying Venetian plaster. With insufficient quality preparation of the base, cracks may appear on the surface that cannot be repaired.

Stages of Venetian plaster application
The depth and transparency of the coating is achieved by a special application technique.
The master applies several thin layers of coating to the wall, consisting of randomly located spots of material. The combination of many such spots and their layers creates the illusion of the depth of the pattern of natural material. The number of layers varies from 2 to 10, but the total thickness hardly exceeds 1 mm. Each layer should be smoothed (pressed in) by hand with a spatula, trowel, or a trowel until a perfectly even, smooth and glossy surface is obtained. It takes almost an hour even for an experienced specialist to work with 1 m² of one layer.
The first layer is usually made of a material that contains finely ground marble chips. It is applied to the surface with a steel trowel or spatula in the same way as a putty. After 4-6 hours, covering, glazing layers can be applied to this layer, which will create the texture of the coating pattern.

Application of the first layer of plaster
If you want to get a matte finish, then the second and subsequent layers are made of the same material as the first. A glossy surface is obtained using a finely dispersed material mixed with a selected colorant.
Before starting work, place a small amount of material on the working surface of the long trowel with a spatula. Now start from any top corner. Proceed in the same way as for the finishing putty, applying the mixture in an even layer. Cover areas near the floor with a bottom-up movement. Press the trowel firmly against the wall, holding it at an angle of 10-15 ° to the surface. Make sure there are no gaps.
When the first layer is dry, proceed to applying the next one.
Stir the coating material first: add the dye to it (if you bought a “semi-finished product”) and mix everything thoroughly again.
Next, apply a small amount of material along the edge of the short trowel with a narrow spatula and spread it with random strokes using short arcuate strokes. Each movement should be approximately equal to the length of the trowel. If an overflow forms on the wall at the end of the movement, accelerate it in a straight motion at an angle to the overflow line. Alternate between the smearing and accelerating movements and freely change their length and direction. On the floor, apply in an arcuate motion, starting from the bottom. Finish when the second coat is about 0.7m x 0.7m.

Stage of applying Venetian plaster
Now smooth out the covering in this area with long strokes in any direction. Every 2-3 strokes, clean the trowel and dry it with a damp cloth. Increase the pressure force and inclination of the float plane to 20-25 °. The result should be an even thin layer.
After 10 minutes, start smoothing the coating with the edge of a wide (200 mm) trowel. The movements of the spatula from top to bottom should be slightly crisscross. As gloss appears (this occurs from heating and polymerization of the material), loosen the pressure on the spatula. Failure to do so can damage the resulting crust.
To completely gloss the surface, you need to smooth it with a clean trowel. At the same time, it is strongly pressed with both hands and held at an angle of 5-12 ° to the plane of the wall. When polishing the area near the floor, guide the trowel up and down and cross slightly.

The next stage in the application of Venetian plaster
When finished, proceed to applying the second layer to the next area, repeating all the steps of the operation in sequence.
The pressure on the trowel at the beginning and end of the movement is weakened (as when scraping). This allows you to change the thickness of the material layer. When smoothing and polishing, the trowel movements should cross the boundaries of adjacent areas. To obtain the desired texture, change the size of the trowel, the length of the strokes, the intervals between them, as well as the pressure on the tool.
Working in corners, openings, ledges and other difficult places, direct the smearing movements from the boundary line into the area. If necessary, use a spatula instead of a trowel.
Until the second coat is dry, proceed with the next coat in randomly spaced spots. In this case, the entire cycle of finishing is repeated in sections. Apply as many layers (different colors) as needed to achieve the desired result.
If you accidentally damage the surface, apply the first coat with a narrow trowel to and around the area. When it is dry, repeat the entire operation to apply the next layer.
You can use the premises after the end of all the work in a day, but it is better not to rush. The walls will dry completely in a week.

Venetian plaster
After all layers have dried, you can cover the walls with natural beeswax. It will enhance the shine of the coating and give the impression of an optical illusion. Waxing also adds moisture resistance to the coating. It is not necessary to apply wax to some of the plasters produced today: all the necessary components are already contained in the material.
Decorating walls with decorative plaster: 10 types of do-it-yourself textures