Do-it-yourself metal rocking chair. How to make a rocking chair made of plywood with your own hands - drawings and assembly instructions are attached; DIY rocking chair made of wood
You can make a rocking chair with your own hands. To do this, you will need a drawing of a plywood rocking chair. Plywood is best suited for such a product due to its ductility. With the help of an electric jigsaw, you can make a structure that will combine two important elements of the product at once - the sides and runners. You can increase the strength of a plywood product by choosing a structure without joints.
- Electric jigsaw.
- Screwdriver.
- Plywood sheet with a thickness of more than 15 mm.
- Slats made of oak or pine with a section of 1 by 5 cm (20-30 pieces).
- Self-tapping screws, which are equal in size to the length of the rails.
After that, you need to prepare a piece and transfer the image to plywood, which is cut with an electric jigsaw.
Do-it-yourself rocking chair plywood drawings give free rein to imagination. Novice carpenters need to pay close attention to such a complex material as plywood. The parts of the chairs are glued in three layers, and with the help of an electric jigsaw, precise and strong connections can be made.
You need to remember that plywood sheets for the middle layer should be taken twice as thick as for the extreme. Thus, if the total thickness is 2 cm, then you need to glue 0.5-1-0.5 cm. In this case, the parts are assembled exclusively using waterproof glue. If in the process of creating a chair from plywood you use PVA glue, you need to additionally fix it with nails. The joints are glued and screwed on both sides. In this case, the supporting surfaces must be protected by interlayers of a thin strip or rubber.
A rocking chair made of plywood should be made for the reason that it is a malleable material with which you can implement any technical solutions, even the most daring ones. For example, it becomes possible to manufacture a shell chair.

Hemisphere rocking chair
The convenience of such a product cannot be denied - it is high and stable. You can make a hanging hammock or swing out of it. Please note that the thickness of the sanding boards should be more than 1.2 cm, and the connecting half washers - more than 2.4 cm. Do not forget to saturate the finished wooden chair with a water-polymer emulsion or liquid acrylic varnish. This is necessary in order to give strength to the product, as well as to remove residual stress on bent parts and joints.
The chair creation process
The process of creating a rocking chair from plywood with your own hands is as follows:
Step 1
We develop a scheme and prepare patterns. To do this, you need to redraw the drawing on thick cardboard and cut out the silhouette of the fragments of the chair. Armed with a pencil, we mark out patterns on plywood sheets.
Step 2
We take an electric jigsaw and carefully cut out the elements of the future rocking chair made of solid wood. Sidewalls, two posts, support arrays and planks are sawn from the densest piece. Now we need to create a cross member and a plank, the dimensions of which are 50 by 40 cm.To create seventeen planks and fifteen transverse elements, we need a sheet 1 cm thick.
Step 3
We find a thin sheet and cut the elements in the shape of squares for the seat and back. Do not forget to sand the elements with sandpaper. The finished cross members are glued onto the thin section of the seat and backrest. All parts are carefully varnished, and if desired, they can be treated with a dye composition.
Step 4
After all the wooden elements are dry, they are assembled into a single whole. Do not forget to pre-drill holes for fasteners, the caps of which will hide under special plugs.
Step 5
To create legroom, you can use an unnecessary rake or shovel holder. In total, the length of the structure will be 53 cm.
How to make chair covers
Now that you know how to make a rocking chair with your own hands, let's get down to the overlays. We turn the product over with runners up and warm up the pre-prepared bar with a construction hairdryer. We put the finished swinging bar on the runner and securely fasten it along the entire length with a cotton cloth. Be careful not to burn yourself on the hot chipboard. After the wood rocking chair has cooled down, remove the fabric and glue the overlays with PVA glue. At the same time, we fix the ends with small nails. We recommend placing small beams, pieces of plywood or washers under the nail heads. We remove this temporary fastener after the chair from the bar is completely dry from the glue. We drill blind holes for fasteners and fix the ends. Please note that the pads for the rocking chair are attached with metal hardware only at the ends. This will avoid scratching the floor when rubbing off the pads. Do-it-yourself rocking chairs are ready.
Another option for assembling the chair

Photo of the structure - rockers made of wood
For those who did not like the first option, the following scheme is suitable. Note that videos will help you understand how to make a chair out of bent plywood yourself.
First, prepare the diagrams - you can create them yourself, or you can find them on the Internet. Schemes are necessary in order to avoid mistakes in the process. Drawings are processed on graph paper. Do not forget that the scale should be 1 to 1. In the process, rely on the photo of the chair that you want to get in the end. The drawing is transferred pointwise, and the details of the made chair are laid out in such a way that the plywood board is used to the maximum.
All elements are cut with a jigsaw.

Cutting out rocking elements
Now you can assemble a wooden chair with your own hands. The finished elements are twisted with self-tapping screws, which should not stick out.

Build process
Elements can also be fastened with finger joints. At the same time, the caps of the self-tapping screws are hidden under the plugs. As you can see, a rocking chair can be made from wood with your own hands. At the same time, a minimum of funds and efforts will be required from you.
Diagrams and drawings of rocking chairs:
Drawing 1 Drawing 2 Drawing 3
Drawing 4 Drawing 5 Drawing 6
Drawing 7 Drawing 8
Drawing 10 Drawing 11 Drawing 12
Drawing 13 Drawing 14 Drawing 15
Drawing 16 Drawing 17 Drawing 18
Drawing 19 Drawing 20 Drawing 21
Drawing 22 Drawing 23 Drawing 24
Drawing 26 Drawing 27
We will send the material to you by e-mail
You used to look at a rocking chair in a store and think: it’s expensive and it takes up a lot of space. And you sit in it and understand that it is simply impossible to refuse such a purchase. Unusual comfort and tranquility - I would have sat and sat in it on the veranda of a country house, admiring the garden. Do not rush to spend money, because you can make this product with your own hands .. We have collected for you drawings and useful recommendations from craftsmen, as well as information on the cost of finished products.
Few matches the comfort of a rocking chair
Rocking chairs can vary in design and material, but they all share common advantages:
- beneficial effect on the muscular and nervous system of a person;
- creating conditions for a comfortable stay;
- the ability to use in closed and open spaces;
- use for different age categories;
- reliability and safety.
By the way, the opinion that a rocking chair takes up more space than an ordinary one is wrong. Modern rocking chairs are compact in terms of the volume of occupied space and are in no way superior to ordinary furniture. Rocking chairs are universal, but if you are thinking about a garden chair, it is better to select it taking into account the specifics of the installation. Soft seats should be removable so that they can be removed when it rains. The chair cover should be selected from a material that is resistant to sunlight and atmospheric precipitation.
For your information! Whatever the design of the rocker runners, they will get stuck in soft ground. Therefore, this furniture should be placed on a solid platform.
Types of rocking chairs
| View | Main characteristics | Peculiarities |
|---|---|---|
 On runners | Paired base; Lack of unnecessary details; Weight limit up to 100 kg; Inertial type of control. | The classic version, not intended for use on soft carpets and soil. Differs in extreme simplicity of design and sensitivity to irregularities. They can squeak if there are problems in joining parts. |
 Pendulum Pendulum | Fixed base; The presence of hinges; They can be equipped with a swing mechanism. | The base of the glider is motionless; a pendulum mechanism is used for swinging. Installed on any floor, they provide a uniform rocking mode, are silent, indifferent to floor irregularities. They can be equipped with touch and electronic controls. |
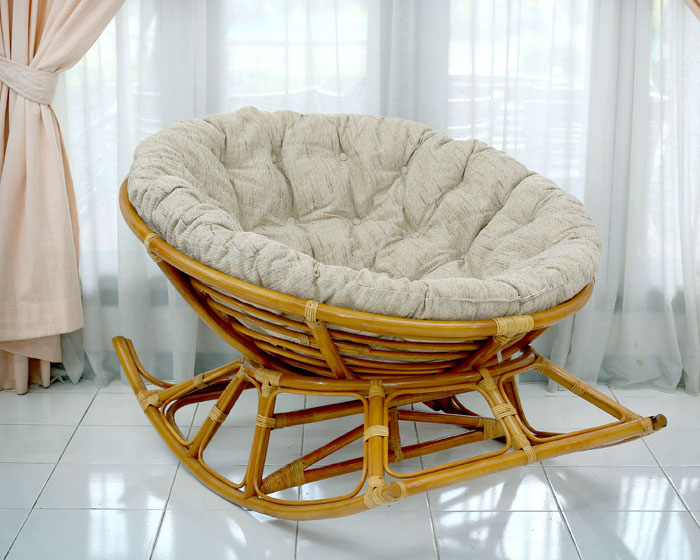
 Spring loaded Spring loaded | Fixed base; Large spring mount; | They differ in inertial swing mode, have round and reclining seats, usually made of rattan. |
Wood, plywood, metal or rattan are used as the basis for the frame. Exquisite models with curved elements are obtained from wood. Such products need protection of wood from moisture and insects. Budget options for rockers are made of thick plywood. It is better not to leave such chairs on the street, as plywood is afraid of moisture. The best base for garden tools is metal. Craftsmen can even offer you wrought-iron chairs, but they are very heavy.

The seats and backs of such chairs are made soft or hard. Convenient if the soft mattress can be easily removed. They can be washed or removed for bad weather. The filling of pillows can be made of foam rubber, padding polyester, latex, coconut fiber or horsehair. The upholstery of the armchairs is selected from practical materials. You can find decoration from tapestry or jacquard, cloth, flock.
Natural leather is more practical in this regard. If the material is well finished, it is soft and not afraid of moisture. But genuine leather is an expensive pleasure. An alternative can be eco-leather - durable and moisture-resistant. Its only drawback is that it will not be very comfortable to use such a chair on a hot day. The pictures below show the most comfortable rocking chairs that we have found for you as an example.


Diy rocking chair: possible options
On the Internet, you will find many options for how to make a rocking chair at home. Craftsmen sometimes use the most unexpected ideas and achieve tremendous success in this matter.

High-quality wood will provide the product with durability and strength. A minimal knowledge of the carpentry craft will allow you to build a completely attractive structure. If there are no carpentry skills at all, it is better to take plywood. It is easy to cut and handle, and you can find reliable furniture fasteners on sale. The most difficult thing is to make something out of vines or rattan. It is difficult to make a wicker rocking chair with your own hands; here you cannot do without special knowledge. To work with metal, you need a welding machine. If you know how to use it, there is nothing difficult. Some craftsmen suggest using plastic for structures, but such chairs will only withstand a child. For an adult, they are not suitable because of their fragility.

Let's take a look at a few popular ideas on how to make a rocking chair.
Related article:
: for a garden, a nursery, a kitchen, a bathhouse, a garden, a gazebo; how to restore pieces of furniture, useful tips and advice from specialists - read our publication.
How to make your own rocking chair from an old chair
The easiest way to make your own rocking chair is to use an old chair or chair as a base. You will surely find such a piece of furniture in your home that asks for alteration. You can make a homemade rocking chair out of it in just a couple of hours. The only question is what to make the runners from. And they can be made from a pair of wide boards, or a bent pipe.
Rocking chair runners: drawings and dimensions
The most important thing about runners is their curvature. The range of motion depends on it. For this reason, you should not make too rounded parts. The easiest way is to use a thick and wide board - it is easier to fix it, and it is not difficult to make the element you need in size and curvature. A simple drawing with dimensions for a standard chair looks like this.

How to make chair runners
Option 1: made of plywood. For work, you need a thick sheet of plywood (at least 1.5 cm). Two curly strips are cut out of the sheet according to a pattern 100 cm long. For cutting, it is better to use a jigsaw. Holes are made in the side of the legs of the old chair for fastening the thorn-groove. You can, of course, go even easier and use ordinary self-tapping screws. It will not be very aesthetically pleasing, but fast.

Option 2: curved beam. If you are not looking for easy ways, try making runners from a bent bar. To do this, a piece of wood with a cross section of 45 × 45 mm must be soaked in hot water until elasticity is achieved. Then the bar is bent on a pre-prepared form and fixed until completely dry. Next, the skis are attached to the chair in the thorn-groove method.
Option 3: board. A semicircle is cut out of a wide board. In this case, the thickness of the wood must be at least 3 cm. The ends of the runners must be carefully sanded. You can fasten the runners with self-tapping screws or in the thorn-groove method.
Features of fastening in a thorn-groove method
For this method of fastening, the legs of the chair must be drilled from the sides. After that, a groove is selected in the legs corresponding to the width of the runners. They are inserted into the grooves, a mark is made for the location of the hole in the leg, and they are drilled in the same place.

All parts are carefully processed with wood glue for a firm hold. After connecting, you need to tightly fix the place of contact and leave to dry completely. This mounting method guarantees a neat appearance and high reliability. The only caveat is that it is not suitable for chair models with thin legs.
Important! To balance a rocking chair from an old chair, use a counterweight system and crossbars.
Related article:
: photo of the best ideas. What can be made of pallets for an apartment, office and summer cottage; rules for the selection and handling of pallets; master classes on making a table, sofa, bench, armchair and rack - read our publication.
Do-it-yourself rocking chair made of wood: drawings and a master class
Wooden furniture has a number of advantages. It is environmentally friendly, durable and reliable.

These rocking chairs look great in the country and in the apartment, they can be used by children and adults. For a wooden rocking chair, it is better to use coniferous wood: spruce, pine, larch. Such a tree is relatively light and has a low density, which means it can be easily processed at home. In addition, coniferous wood is inexpensive, which means that you can not be afraid to spoil some of the material if something goes wrong. Expensive woods such as ash, oak or beech are also suitable for making furniture, but it would be good to have at least some skills in carpentry to work with them.
Important! Furniture wood must be thoroughly dried, otherwise the finished product may deform over time.
Examples of drawings of wooden structures.


And now a master class on making rocking chairs with your own hands. Suitable for any drawings.
| Illustration | Description of action |
|---|---|
 | All details of the future design must be carefully sanded before assembly. |
 | Mark all connections. Use a vernier caliper or straight ruler to mark accurately. |
 | Use a router or drill to make the grooves. |
 | Carefully peel off the mounting spikes. They must be free from irregularities and burrs. |
 | Check all connections before final assembly. The pins must be forced into the grooves. Use a rubber mallet. |
 | In the pre-assembly process, the chair is made first and the runners last. The straight legs of the chair must be rounded under the surface of the skis. |
 | To give the ends of the legs the desired shape, you must use a grinding wheel. |
 | Fix the batting or foam rubber on the seat blank with glue, cut it to shape. |
 | Cover the seat with upholstery. Use a construction stapler to secure fabric or leather. |
 | The final assembly is done with wood glue. All joints are carefully coated with glue. You need to give the product some time to dry out and gain a foothold. |
 | Finally, fix the runners with the countersunk fasteners. |
How to make a simple rocking chair from a profile pipe with your own hands
For a metal structure, a round profile with a cross section of 20-25 mm is required. To make a seat, you need to buy a piece of sturdy awning fabric.
Drawing of a rocking chair made of metal for making with your own hands and a master class
The design of this chair is very primitive. You just need to weld the frame of the appropriate size and pull the fabric strip of the seat over it. The drawing looks like this.

Working with metal will require the use of a welder and a primitive pipe bending device. If you have difficulties with bending, take the blanks to the master in advance. The photo shows a simple algorithm for making a rocking chair made of metal with your own hands, we will consider all the steps in turn.
| Illustration | Description of action |
|---|---|
 | Bend the runner tubes slightly. If there is no pipe bender, it can be done manually with a simple device. |
 | For a snug fit of the pipes at the joints, you need to slightly sharpen the ends. |
 | Weld the sides of the seat as shown in the photo. |
 | Secure the runners. Pay attention to the reliability of the fastening. All welding points must be subsequently sanded. |
 | Assemble the structure into one piece by welding the transverse strips. |
 | Cut open the seating fabric. It is best to do this directly on the welded structure to adjust the depth and comfort of the fit. |
 | Paint the frame with corrosion resistant paint. |
 | Secure the seat by sewing the seams directly onto the frame. Make double or even triple stitches for security. |
 | A simple and comfortable chair will delight you every day. |
We have given you the simplest example of a metal structure. If you are ready for more serious work, watch the video on making a pendulum rocking chair with your own hands, it is very interesting.
DIY plywood rocking chair: drawings and recommendations
Plywood is a lightweight and pleasant material to work with. Making a rocking chair out of it is not at all difficult. It is easy to "fit" such a product to any interior by painting and decoration. For a chair, it is better to look for oak plywood, it is characterized by increased strength and resistance to a humid atmosphere. The optimal thickness of the plywood sheet is 1.5 cm. If you could not find such a material, you can buy thinner sheets and glue them together with wood glue.

What is important to consider when working with plywood:
- plywood sheets are very large - prepare a convenient place for cutting, where you can turn the material without any problems;
- all parts must be coated with a protective compound before assembly: paint or varnish, stain;
- all end parts must be carefully sanded. Ideally, hide them with a plastic or metal edging;
- remember that plywood is not cut across the grain;
- nails cannot be driven into plywood parts, all fastenings are made only into drilled holes;
- if there is a need to make a part with a bend, the plywood is soaked in hot water and, after soaking, is fixed in the desired position until it dries;
- for a strong gluing, the plywood surface must be sanded with sandpaper and only then the adhesive should be applied parallel to the wood fibers. The parts to be glued are pressed with a press.
We suggest looking at an example of assembling a plywood product of the most primitive design in the step-by-step instructions.
| Illustration | Description of action |
|---|---|
 | Mark the runners using the templates. |
 | Sand the cut out parts at the ends with sandpaper. |
 | Cut the seating slats to the same size. |
 | Attach rectangular pieces of plywood to the inside of the runners as shown in the photo. Use screws and wood glue for fasteners. |
 | Attach the crossbars to the runners. |
 | Cover the structure with wood stain and varnish. |
 | Stretch fabric or leather over the back of the chair. You don't need to do this, but it looks more aesthetically pleasing. |
 | Place a foam cushion covered in fabric or leather on the chair. The chair is ready. |
Result in half an hour: video instructions for making a rocking chair from a car seat
Car seats are extremely comfortable, as they are designed by the engineers of the automotive industry, taking into account the anatomical features of the person. It's a pity to throw out such a chair, but what if you decide to update the car interior? Use the driver's seat to create a cozy rocking chair.
If there is no time, but there is a desire: prices for ready-made models of rocking chairs
Any amateur performance requires time and effort. You need to look for suitable material, fasteners, assemble and design. Does not work? You can always follow the path of least resistance and just buy or order such a chair. There are a lot of ready-made products for every taste and budget. You can buy a rocking chair inexpensively in large stores like Ikea at a price of 5,000 rubles. Products made from natural wood with luxurious decoration have already cost tens of thousands.

A good invention for those who appreciate the opportunity to relax and unwind without leaving home - a rocking chair. And if you put it in the garden, you can enjoy it twice.
The traditional material for such chairs is willow vine and its analogue, rattan. Products made from this material are lightweight, are distinguished by their graceful lines and a solid price.
Modern materials can also be used in the manufacture of wicker chairs - there are options from synthetic vines. They are not worse than natural ones, they are not afraid of moisture at all and have a very long service life.
Armchairs made of metal, despite the reliability and ductility of the material, are too heavy. A wrought-iron chair will look great in the garden, but you will have to make a platform for it. In addition, certain skills are required to work with metal; it is difficult for a beginner to make a metal chair.
Rocking chair made of pipe scraps
 Metal profile rocking chair
 Affordability and attractive appearance of plastic chairs. These advantages can be added resistance to damp weather, durability, bright, non-fading color. In addition, they do not have to be repainted and processed.
For self-production, wood is best suited - an inexpensive, easy-to-process material. At the end of the work, the wooden chair can be given any color or texture. For those who first thought about making their own furniture, wood is best suited.
There are many models for DIYers, the simplest are presented below.
When developing a homemade rocking chair, the main thing is that it does not tip over when the seated person leans back. It is also important that the very process of rocking, for which the chair was made, does not force the person to strain too much.
Types of rocking chairs
 The simplest type is the armchairs built according to the radial principle. These are the most affordable products for self-manufacturing, they are distinguished by the simplicity of manufacturing technology and design. The model below has a somewhat heavy and awkward look, such a chair is suitable for a garden.
Chairs of this type are made with a fairly low seating position, this ensures smooth rocking and the safety of the seated person. If the seat is set to a normal height, then the seat runners are equipped with bumpers - limiters of the swing amplitude. To get out of such a chair, you need to make a physical effort. And the buildup itself requires some tension. 
Chairs on runners of variable curvature are much more stable, they do not tip over.
Nirvana chairs are very comfortable, it is worth leaning forward a little, it will gently "put" a person on his feet. Rockers on elliptical runners, despite their comfort, can tip over, therefore they are equipped with bumpers, the front one usually serves as a footboard.
Tipping over when rocking near sun loungers with awnings, on elliptical runners is excluded.
Where to begin
Below is a garden rocking chair that, with some effort, even a beginner can make. On  You can try your hand at such a model before moving on to a complex home option.
In any case, the drawing should be as simple as possible so that it can be reproduced, even without much experience.

 Such a compact armchair will look great in the garden and can be placed at home without taking up much space. This simple model will be used to describe the process.
You should start working with a drawing.
The drawing is carried out on a scale grid, on which each cell corresponds to 10 cm. All markings on the sawn out parts should be made in accordance with the drawing, taking into account the scale.
What can you make a chair out of?
Eurofaner 3 cm thick is suitable for work.
- You need to cut the sidewalls exactly according to the pattern, three parts for each side;
- The rest of the parts are made of timber 50 mm wide and 25 mm thick. For the seat and backrest, 35 pieces of timber are needed, the length of each is 120 mm;
- In order to correctly calculate how much timber you need, you first need to visit the store and see which bars are presented and what their length is. Knowing the initial size of the material, it will be possible to minimize waste by varying the width of the chair;
- For example, if bars of the required thickness and length of 2.3 meters are on sale, then you can make the chair a little narrower - cut the bars for the back and seat at 115 mm each. If the beams are slightly wider, then the chair can be made a little wider, so that there are not many scraps left;
- You will also need three crossbars from a bar, in their manufacture you should proceed from the width of the chair - that is, the length of the bars for the back and seat.
Small fluctuations in width will not affect the stability of the chair, so you can do this without worrying about the result.
When the parts are ready
After the parts are cut out, they will need to be processed. There should be no roughness on them.
In addition, carefully finished surfaces will give the product a finished look and facilitate finishing.
Surfaces are processed using a grinding machine, each part must be sanded on both sides with sandpaper with different grains. If you have the skill, you can use a router bit to soften and round the sides of each piece. If this is not possible, you can simply process the sections with a grinder or sand them by hand.
Hot linseed oil treatment should be carried out in at least two layers. This is one of the most outdated methods, but after that the product can be painted with oil paint and used even on the street, without losing its qualities and appearance.
Small parts can be dipped whole in boiling linseed oil, but you cannot hold them with your hands. Better to make improvised tongs from wooden slats. The larger parts should be liberally smeared with a brush, spreading them out on cardboard, alternately on each side, and the rest of the parts should also be dried. Working with hot linseed oil requires great care; this should be borne in mind during the impregnation process. You must not bend over a container with a boiling substance; you must have tight work gloves on your hands.
Alternatively, the parts can be treated with antiseptics, stain, other impregnations, of which there are a great many in stores. They should be selected based on the intended purpose of the item: where it will be used.
At the end of the work, it will be possible to walk with a fine sandpaper again by hand, bringing it to full smoothness
Assembly
- It is imperative to apply the points of attachment of the transverse beams - these places are marked on the drawing, their location on the finished parts should be calculated, based on the step of the scale grid.
- Having assembled the sidewalls, you can start attaching the seat and back parts. The back will be attached to the rack, the seat to the side bars.
We must once again draw attention to that. that the tsars should be fixed strictly symmetrically, and the assembled side parts, if put on top of each other, should completely match, without the slightest deviation.
- Now the side parts are fastened together with crossbars, they should be attached at the legs, in the middle and at the top of the chair. For attachment, it is better to use confirmations (type of connecting fasteners);
- To attach the back and seat parts, four holes must be drilled in each block, two on each side. In order for the caps of the screws to be not visible, each hole must be slightly expanded from above with a drill of a larger diameter (it must be selected in accordance with the diameter of the caps). When screwing on, the caps will be in the recesses, which can then be masked with furniture putty.
Such a careful execution of the first part of the work will ensure the fulfillment of the following indispensable condition - all parts of the seat and backrest, all 35 bars must be located strictly horizontally.
Final processing
After assembly, the product needs to be processed again to give it a finished look. In addition, it will significantly extend its service life and maintain its aesthetic appearance.
If the parts were treated with linseed oil, then at the end of the assembly, the chair should be covered with oil paint, in thin layers in two or three layers.
If you want the product to have a natural wood texture, it should be treated with a stain of the desired shade and varnished.
Choose a varnish that is waterproof, as well as a stain. There are varnishes that create a particularly durable coating that is resistant to abrasion and cracking. If the chair will stand on the street, it is better to take a yacht varnish or another with increased strength. In any case, it is better to keep the product under a canopy, this will extend the life of its functionality, or at least bring it into the house in case of precipitation.
- For the chair, you need to use strong types of wood. These are oak, larch, conifers;
- Europlywood, a 3 cm thick glued wood material, also has sufficient strength to make the chair reliable;
- Plywood sheets must be carefully inspected before purchasing so that they do not have surface damage and cracks. This will save you from the difficulties in cutting the product and its subsequent processing;
- The more time is spent on processing the product and impregnating it with drying oil or compounds, the longer its service life will be;
- The chair does not need to be upholstered with foam rubber and dense fabrics, this will contribute to the accumulation of moisture under the upholstery, which will quickly render it unusable. For the seat and backrest, it is better to get removable pillows;
- If the finished product falls back too much or, conversely, is oriented forward, at the end of the work it will be necessary to balance it. For this, an additional cross member is installed at the rear ends of the sidewalls. Previously, recesses are cut out in it, where the weights are attached according to the slope. Also, if necessary, the front of the chair is loaded. By adding and subtracting them, trying to sit and swing in a chair, you can achieve the perfect balance of the product.
Making a rocking chair is a complicated process, but quite doable. If you perform all the actions correctly and accurately, following the drawing and the tips set out in the article, the result will be a beautiful and functional product that will last a long time.
For inspiration, watch the video at the link below. The video contains incredibly simple models available for self-production from available materials.
The chair is primarily ergonomic and functional: it is a piece of furniture for relaxation or creating comfortable conditions for long sedentary work. But at the same time, an armchair in the living room or bedroom is prestigious and can be a luxury item, therefore it is very aesthetically significant. If curtains complete the aesthetics of the interior, the chair provides the key to understanding it. And if the curtains are unpretentious, then it is the chair that brings all the furniture into a single ensemble. Of course, in the case when the interior design is carefully and competently thought out. Finally, a garden or country chair should fit into the landscape and withstand bad weather, wintering in a cold closet, and careless handling.

Making a chair with your own hands is quite within the power of a home craftsman. Amateur carpenters make their own armchairs, sometimes of a very high level, see fig. However, we will leave the works of high furniture art for later, and we will consider this publication as an initial one and restrict ourselves to samples that require at most space in the garage, an ordinary wood tool and an average degree of skill in using it for making. For some, the matter will generally cost only sewing. Nevertheless, in the country of armchairs, the border between purely utilitarian and elite specimens is very conditional and some of the things described will find a place in the living room. And the experience gained in the course of work will allow, over time, to approach the exclusive.
About padding and covers
 Any soft chair, on a rigid base or frameless (see below), is filled with soft and sufficiently elastic material. Horsehair is now available to a few, whalebone is not available to anyone at all, so amateur armchairs are most often stuffed with foam rubber or polystyrene foam (expanded polystyrene) in granules. They have a common property: they are easily electrified and hold static electricity in themselves for a long time, which is by no means good for health. Therefore, the upholstery of pillows, mats and other soft furniture knots must be made of 2-layer: external decorative and internal antistatic. This also makes it easier to maintain the decorative trim and replace it if necessary.
The antistatic cover of upholstered furniture is sewn from cotton fabrics according to the same patterns as the decorative one. There are almost no alternatives to cotton as an arrester: the leakage resistance of a chair on wooden legs, standing on a laminate floor, with an outer sheathing of very well electrified silk, with an inner cotton cover, lies in the range of 1.8 - 5.6 MΩ , which provides an almost instantaneous drain of the charge from the electric machine. The synthetic winterizer is somewhat worse: it does not rot, but the outer skin must also be antistatic, made of natural furniture fabrics.
An antistatic filler for upholstered furniture, remarkable in its mechanical properties, is polyurethane foam (PPU). But not a building self-foaming sealant / heat insulator, mechanically it is not suitable for furniture, but the so-called. neoprene foamed under special manufacturing conditions. Neoprene is available in granules and sheets; from the latter, by the way, make wetsuits. This material is expensive, especially sheet, but the need for invention is cunning. Car seat liners are made of neoprene. Therefore, if you come across a clunker intended for a landfill, try to get its seats and backs. As metal, they will still not be counted, and you, having shredded the inserts, will get excellent padding for a couple of chairs.
Where do we start?
From the rocking chairs. A homemade rocking chair will give the most tangible savings in money compared to purchased ones - times. Manufacturing it is technologically simple; from stationary equipment, it is enough to have a workbench (perhaps also homemade) in some nook and cranny - two. And at the dacha it will always come in handy, even if the design with the decoration from an inexperienced master was played around - three. But you need to make a rocking chair with your own hands only and only according to proven samples, and you can design yourself only if you have considerable experience as a furniture maker and / or solid knowledge in this matter.

There is an analogy with the design of sailing ships in the design of rocking chairs. There the center of windage (CP), the location of which depends on the configuration of the surface part (most of all - the sailing equipment), the direction and strength of the wind, should always be slightly behind the center of rotation (CV) of the vessel. The location of the CV is determined by the interaction of the underwater part of the vessel with the oncoming water flow.
If the CPU is ahead of the CV, the vessel on the move will be prone to overshoot and poorly keep on course, and with the tiller / steering wheel thrown, it will fall into the wind and lag (board) to the wave, which is fraught with disaster. If the CPU is far beyond the CV, the ship without a rudder will be led to the wind and take the wave on the bow, which is safer, but it will respond sluggishly and slowly to the rudder turns, which also threatens to wreck. Therefore, sailboats are designed so that during any ship evolutions (maneuvers + changes in windage in any possible sailing conditions) the CPU behaved like a sly fox with a dog: "teased" the CV, keeping closer to it from behind, but immediately ran off a little, as soon as the CV comes close. In this case, the vessel will be nimble enough, and the uncontrollable will still be brought to the wind.
In a rocking chair, the role of the CP is played by the general center of gravity (CG) of the chair and the person sitting in it, and the role of the CV is the line of contact (LC) passing through the points of contact of the supporting shoes (arcs) of the floor or ground. If the CG is far ahead of the LC, it will be difficult to swing, and when you leave the chair, you can get a pendel from it, excuse me. If the CG is behind the LC, then an "overkill turn" is possible, which is not at all funny: doctors are well aware of cases when people broke their necks, tumbling over their heads from homemade rocking chairs. That is, in order for the rocking chair to be safe, convenient and comfortable, its CG with a rider of any corpulence should always be slightly ahead of the LK.
Note: for reference, the CG of a normal human body is located at the border of the lumbar and sacrum on the inner side of the spinal column. With movements and in different poses, its position changes little - over millions of years of evolution, a kinematic system has been developed that allows us not to fall to one side, stretching out our hand.
Rocking chair designs
Due to the above, the first rocking chairs appeared relatively late, not earlier than the middle of the 18th century. By that time, science had given technology methods for calculating complex mechanical systems in dynamics, and the first steam engines were puffing. As for the rockers, their classic construction scheme is arcs elongated posteriorly with a radius of curvature gradually decreasing from front to back, pos. 1 in fig. In such a system, the further back the seated person is pumped out, the further the LK will move back from the CG and it will be more and more difficult to pump out until the stopper - the rear ends of the arcs turn into straight lines. This is the so-called. backward progressive support. It is often referred to simply as progressive because it is really progressive will dump the rider back from the slightest push and therefore does not apply. For reasons of ergonomics, progressive arcs are not always convenient (if someone steps on the heel of the arc, the rider will pull), so at the same time they came up with the idea of putting the footboard forward, which shifts the general CG there, pos. 2, but these chairs are only suitable for people for whose physique they are designed.

The best way to create a rocking chair that is comfortable for anyone is to put the arches on the springs, pos. 3. At first, the springs were made of wood, teak or dogwood (there is no replacement). Now the rocking chair springs are made of carbon fiber (carbon, Kevlar) or special steels. The rocking chairs on springs, in addition, swing long and smoothly from a small push, lulling the rider in the most gentle way.
The most simple constructively and absolutely safe rocker-ladders, pos. 4. In them, the stringers serve simultaneously as arcs, and the large length of their generators guarantees against overturning. But single rocking-ladders are individual chairs. If someone else sits in such, with a CG, even slightly shifted from the calculated one, it will either be difficult for him to swing, or he will turn out to be lying on his knees in the sky. Therefore, according to the ladder scheme, as a rule, a paired garden chair or rocking bench is performed. In this case, the overall CG of riders is less likely to leave the computational domain, and the large support area of the arcs provides swinging when the rocking chair is installed directly on the ground. The device and dimensions of a paired garden rocking chair are shown in Fig. Seat upholstery - slats 30x50; valleys - board 100x30.


Product samples
On the trail. rice. - drawings of a classic rocking chair, relatively simple and not particularly material-intensive, but suitable for both the dacha and the living room. The seat and back cushions in the latter case are made with a thickness of 5-7 cm according to the technology described below.
The next option is a garden rocking chair made of boards, see fig. Widened arches are designed for ground installation. When creating the structure, the fact was taken into account that on a lawn or gravel from one push you still won’t sway for a long time. This made it possible to carry the CG more forward from the LK due to the removal of the seat, and use simple radius arcs. In addition, the obtained stability margin made it possible to make the backrest adjustable in tilt.

The rocking chair in Fig. above it is structurally already close to a rocking chair-chaise longue, in which the fixation of the rider's CG relative to the LC is provided by his very posture; simply - a rather deep failure of the dearest parts and, accordingly, a low-lying general CG. Drawings of a pair of rocking chairs-chaise lounges are shown on the trail. rice. On the left, it looks more elegant, but material-intensive: for each of the shaped sidewalls, you will need a whole sheet of plywood 20 mm thick. On the right - simpler and more economical. Arcs 60 mm wide are 4-ply: 2 medium arcs are cut in one piece with the corresponding 15-mm plywood sidewall pieces, and to them are added strips cut separately. All this together makes the structure very strong, and the additional displacement of its own CG downward due to heavy arcs and sufficiently resistant to overturning.

Back to the cottage and not only
The rocking chair is not to everyone's liking; most vacationers prefer to sunbathe in ordinary sun loungers, if only because they can be folded down to be carried on the roof rack. For such a case - in Fig. drawings of a sun lounger for a summer residence, a picnic or a beach. The difference from standard samples is that the backrest tilt adjustment system does not require shaped metal, which, however, requires the execution of part 1, as well as round crossbars, made of sufficiently hard wood.

On the trail. rice. - the design is curious. This wooden chair in its original version will go to the country house, but it is not difficult to modify it into a quite prestigious apartment:

Note: the seat and back cushions with a thickness of about 10 cm are sewn as for the frameless chair described below.
And if without carpentry?
Although shavings and sawdust are not dirt at all, woodworking is pretty garbage business. At the same time, modern materials and cutting methods make it possible to create printed garments that hold their shape under load without a frame. This is perhaps the main reason that frameless upholstered furniture is gaining more and more popularity among craftsmen and amateur craftswomen. Sewn armchairs are the most widespread. the whole essence of a home chair is in soft elasticity and a functional frame, in general, does not need it.

The device of the sewn chair is shown in Fig. The purpose of the double cover, the choice of fabric and filler is mentioned above; here we only note that there is absolutely no need to put a zipper (zipper) on the inner case. Both covers are sewn upside down and the last seam of the inner after filling the filler is sewn up with a scar outward. It's easier, cheaper and more reliable, but the scar is still not visible. The cover is turned inside out before sewing the last seam or installing the fastener.
The last (detachable) seam of the outer cover should be 0.8-1 m long, because through it, you will have to put the outer cover on the inner one that has taken shape. If the filler is one-piece (foam rubber, neoprene block), 2 half-length zippers are placed on the split seam, fastening towards each other, otherwise the inner bag will get stuck in an asymmetrical cut.

In the case of replacing the zipper with lacing, the allowances at the edges of the detachable seam are folded, ironed, a dense strong braid is inserted into the lapel before the cover is turned out, and the wings of the lapel are quilted. Then the holes for the cord are punched with a hole punch with a pitch of 4-6 cm and framed with eyelets. In extreme cases, the holes are cut with petals, a ring of wire or durable plastic is applied, the petals are bent through it and PVA is glued; then the grommet is tightly overcast with a coarse thread (see the figure on the left) and glued again. Several types of chairs fit into this general scheme of the device and sewing.
Note: machining allowances are everywhere within the range of 15-30 mm.
Cushions
Who, as a child, lay on a pillow that was erect? The simplest embroidered armchair is the big pillow. But it is only suitable for fun, but it is poorly suited for relaxation: either there is no backrest, or something sticks out between the legs. And it also easily crumples and falls to one side. Therefore, a pillow chair is sewn only in appearance similar to a pillow under the head, but in fact it is quite ergonomic and stable.

The easiest way is to pattern a pillow-chair according to pos. and on the left in Fig. It has only 2 parts with a bend, and even then with a simple radius. Filler - foam rubber. But such a "pillow" looks angular and does not really look like a real one. To get the chair more elegant and more like a real crumpled pillow, pos. b, you need to reduce the bottom, narrow the back, and cut the remaining parts obliquely by 5 cm, as shown in Fig. In this case, the filler is foam or neoprene.
Ottoman
Structurally and in terms of material consumption, the chair-cushion is similar to the chair-pouf, on the trail. rice. It is more difficult to tailor it, but the chair-poufs have an important advantage: they are suitable as a play and rest child's chair “from zero to school”. But not a work chair, a feeding chair and other functional children's furniture! Accustomed to falling apart on the soft, the child is at great risk of ruining the posture!

Chair-puffs are sewn most often according to a pattern of 3 parts: shell (ring sidewall), seat, bottom. But in operation, it turns out that a single vertical seam (or zipper) soon diverges or breaks. Therefore, it is most correct to sew a chair-pouf from 5 parts with an insert in front, as shown in fig. The liner works in a similar way to stitching the socks of work or military shoes. It doesn't look good on weekend shoes, but the chair insert can be made decorative, and there will be no extra seams on the sidewall.
Sack and pear
It is not far from the chair-pouf to the chair-bag with a higher back. The simplest bean bag chair can be sewn from 3 parts, as on the left in fig. The front vertical seam, due to the rider's support on the back, is less loaded and quite reliable.

A simple beanbag chair has drawbacks: the filling, especially the foam one, tends to creep away, and the back does not give full support. From the heart in such a chair you will not fall apart, the back will go to a break. Free from these ailments, a pear chair, on the right in Fig. The option for cutting the bottom (bottom) No. 2 allows you to save about 0.5 m of fabric with a width of 1.44 m, because details according to option No. 2, when marking the cut, can be squeezed between the wedges. The zipper is in any case located along the diameter of the bottom.
Ball
A great option for a sports child or adult is a ball chair, see fig. Cutting the fabric for him is not so difficult if you use not the dimensions from the net, most often incorrect and not tied to anything, but the radius of the generating circle and the central angle of the polygon. In fig. they are given for a ball chair with a diameter of 80 cm; for a diameter of 60 cm, it will be respectively 165 and 128 mm at the same angles.

The sewing of the ball chair has some peculiarities:
- Because the detachable seam is short, the cover will have to be sewn single from an antistatic fabric.
- So that during sewing an error does not accumulate, which will negate all the work, the templates of the polygons are carefully checked, applying the sides to each other. All sides of both templates must be the same length with an accuracy of 0.5 mm; for an 80 cm ball - 100 mm. Unusual for cutting work, right? But when sewing, the error accumulates. For 20 6-gons + 12 5-gons, the discrepancy can reach 0.5x32 = 16 mm, and then no tightening of the corners can be achieved.
- The filler is poured into the cover through a rolled cardboard tube with a diameter of 60 mm. You can use a piece of plastic.
- If the ball will be laced up, a detachable seam is made with a flap, as in old leather soccer balls, so that the filler does not spill out.
Note: the volume of the filler for the described cushion chairs and the 80 cm ball is about 250 liters, and for the bag and pear about 350 liters. The internal volume is completely filled up, then it will rinse out.
Like the real
Here in fig. - a frameless chair with foam filling, imitating a body chair. Armrests, if necessary, are sewn like a backrest. The entire product can serve as a module, from which a sofa, chair-bed, etc. are assembled. The basis is foam rubber slabs (density) 40-45 10 cm thick, PVA glued in pairs up to a thickness of 20 cm, pos. 1. The seat and foot zippers are located at the back and the back / armrests at the bottom. They are necessarily paired, pos. 2, because it is very difficult to push the foam rubber in any case into a deep cavity through an asymmetrical split seam.

Note: in the same way, but of a smaller thickness of foam, the seat and back cushions of some of the chairs described above and below are made.
The tongues for stitching elements of the chair with a width of about 10 cm (pos. 3) do not give a full guarantee against lateral displacement with a bias, therefore, pairs of buttons are sewn in the corners with an indent from the edges of about 7 cm, pos. 4. The back / armrests are sewn full before the seat is filled and the padded seat is sewn after.
To prevent the lower (folded) decorative sheathing from getting dirty and rubbing on the floor, it is advisable to lay the chair on a plywood or board pallet with low (approx. 5 cm) legs. It unfolds through the bottom, pos. 5. In this case, it turns out a good temporary, say, in the country, a crib for a child. And if you save a little on foam rubber and lengthen the legs due to the gained height, you will get a good sun lounger on the veranda, pos. 6. So that, again, the lower (unfolded) edge of the footboard does not wear out, it is sheathed, taking the corner, with technical fabric. When folded, the lining will be in the back between the pillows and will hardly be visible.
More children ...
Children really love to feel like adults. If this feeling is given to them for a period of sufficiently long painstaking studies (handicraft, preparation of lessons), then perseverance will develop. To do this, in Fig. - child seat, economical, durable and comfortable enough. For the reasons indicated above (the child's skeleton is not yet completely ossified), only the armrests are soft in it; in this case, they are made of sheathed foam rubber with a thickness of up to 30 mm. It is not necessary to thicker, as well as expanding the seat with a backrest or performing them curved, scoliosis may develop. And the body is numb - let it lie on a pouf, a pear or a ball for half an hour. The key to correct posture is mobility and periodic change of posture.

The history of children's rocking horses is curious. According to the excavations, they appeared as soon as some primitive innovator first saddled a horse. Initially, their function was purely utilitarian: the initial training of the future equestrian warrior. However, it is useful for a child to feel like a rider even nowadays, the vestibular apparatus and balance motor skills are developing well. What does the chair have to do with it? But look how easy it is and without tangible costs to make a baby rocking chair-horse, see the video:
Video: do-it-yourself baby rocking chair-horse
In addition to developing the vestibularity and a sense of balance, the little equestrian will enjoy swaying in a position that excludes deformations of the musculoskeletal system.
... and to the dacha
A rocking chair, a chaise longue and, in general, a country chair are good on a veranda or a paved area. On the ground in the rocking chair you really won't swing, and the legs are slowly sinking in a well-groomed lawn, at the same time spoiling it. So if there is a suitable tree, it makes perfect sense to hang a garden lounge chair. This will deprive him of mobility, but it will give complete peace, comfort and unity with nature. Technically, there are 3 solutions: a swing chair, a bassinet chair and a hammock chair.
Swing
How a wooden hanging swing chair works is shown in fig. The specified width (130 cm) is the limit, for a double chair, for a single chair it can be reduced. For reliability and simplification of the suspension, it is better to cut the initial (root) ends of the suspension cable with thimble loops, throw them on the bosses of the armrests (pos. 1), and pass the running ends through the rear suspension rings (pos. 2), throw them through the supporting beam of the suspension (branch wood, e.g.), insert into the front rings and then fix with locking knots, as shown in fig. The seat and backrest can be fitted with soft cushions sewn as described above.

Cradle
A swing chair requires a horizontal or nearly horizontal load-bearing beam. suspended at 2 points. If this is not the case, you can hang a bassinet chair on almost any tree, see fig. Its basis is a hoop with a diameter of 1.1-1.5 m made of steel or a propylene water pipe. The latter is bent into such a diameter without heating; then the joint must be secured with a round hardwood insert, fixed with self-tapping screws. As shown in the figure, as well as the location of the suspension cables. The top suspension unit is the same as hammock chairs, see below. It is better to make the seat not textile, but wicker, but this is already a topic about weaving hammocks.

Hammock chair
A hammock chair is a hybrid of parts of a hammock, an upper suspension of a cradle, an additional beam and a pair of semi-rigid pillows, sewn with a book in the manner described above, see fig. on right. Elements leading from the hammock are woven / knitted in similar ways. The features inherent in this particular chair are in the seat with a backrest:

From scraps
The country chair shown in Fig. Is remarkable not only for its rather original appearance. It is made of scraps of furniture array 28 mm thick, loose on square beams. Well, it's a pity to let expensive high-quality material on firewood or some kind of plugs-patches. The seat and back boards are plywood; soft pillows (see above) 7-10 cm thick are placed on them.

Adirondacks
The Adirondack is a sparsely picturesque mountainous-wooded area on the border of the United States and Canada. Its inhabitants have a reputation for being wayward stubborn and have long come up with their own chair for admiring their native land. The general public's interest in the Adirondack and his armchairs was awakened after Rockwell Kent painted the painting "The Autumn of the Adirondack" in 1951, see fig; the artist worked a lot in those parts. Upon the death of R. Kent in 1971, one of the heirs either sold or donated the "Adirondack Autumn" to the USSR Hood Fund. It was not placed in the central repositories: they did not forget that R. Kent once fought in the Vietnam War, they handed it over to the Odessa Museum of Western and Eastern Art, where the author of these lines happened to see her in the early 80s.

Rockwell Kent, "The Adirondack Fall"
Unfortunately, in reproductions, Kent's paintings fade irreparably: no print is able to convey the subtle riot of colors that the artist was able to create on canvas. Nowadays Rockwell Kent is known to the masses more for b / w illustrations for "Moby Dick"; "Adirondack Autumn" on the net is found except in the form of crappy scans with moire. But the Adirondack chairs were more fortunate, they are popular to the point that their name has become a household name, right up to the Adirondack chairs or simply Adirondacks.
Structurally, adirondacks chairs, I must say, are very successful: simple, cheap, technological. The backrest support cross member gives them excellent strength and rigidity, while the large support surface of the rear legs, which carry the bulk of the workload, provides low ground pressure. In aesthetics, the Adirondaki chairs fit perfectly into the wild, and their wide armrests can serve as tables. The inhabitants of the Adirondack, by the way, also enjoy the fame of unsurpassed masters of moonshine. Clifford Simak admitted that he wrote off his Allé-Op in the Goblin Sanctuary from the Adironaki. For the reasons listed, Adirondack-type chairs are made in a variety of modifications, see fig.

Garden chairs "Adirondack"

Drawings of the Adirondack chair made of plywood
There are enough drawings of Adirondack chairs in the world network. Here we present a relatively little known version of 20 mm plywood. Its distinctive feature is only 2 curved parts (armrests) with simple radius curves. The seat and backrest can be fitted with 5-10 cm thick foam cushions.
What is undesirable
Quite simple home-made chairs, as you can see, there are many. But there are constructions that it is better not to tackle with all the desire and skill. First of all, this is an office chair. The requirements for its ergonomics are fundamentally different from those for home use for relaxation: it should create comfort, not relaxing, but supporting performance for a long time. Technologically, this is achieved by using complex-shaped parts made of high-quality materials. And their manufacture, in turn, requires industrial conditions with press and stamping equipment, for plastic molding, TIG / MIG welding, etc. In addition, a gas lift when buying a piece at retail can cost more than a ready-made chair; gas lifts are already made by machine-building enterprises with equipment for precision metalworking.
Note: a computer chair differs from an office chair in essence only in name, and everything that has been said above applies to it in full measure.
Secondly, the chairs are made of cardboard. Corrugated packaging cardboard is an excellent material in many ways and is widely used. But not for armchairs. In principle, it is not so difficult to build a chair out of cardboard, see the picture, and its overall strength will be very high. But - alas! - even cardboard, reinforced in any way, is easily wrinkled from the end and the seat of the chair will sag very soon. A push with anything hard, even a vacuum cleaner, will leave an irreparable dent.

Finally, about the unusual
Nevertheless, cardboard is very useful in making chairs. For example, for modeling unique chairs, pos. 1 in fig. Sheets of cardboard are glued to the thickness of the selected plywood or board, cut into blanks and assembled from them a model, which, of course, cannot be sat on. After fitting, the model is disassembled and a set of templates for cutting the base material is obtained. True, although it is not difficult to fill the gaps of the skeleton with polystyrene or foam, but in order to cover such a chair with a soft one and sheathe it with decorative fabric, you need to be a cutter and an ace seamstress.

Chairs made of felt or overcoat cloth, pos. 2, covered with foam rubber cubes (the seat is supported by a hidden plywood insert), pos. 3, or water pipes, pos. 4 already require more ingenuity than high skill. Felt and tubular, of course, will cost a pretty penny. But a chair made of cubes is within the power of even far from adult craftsmen and craftswomen. And a hand-made chair for mom's birthday - it's really cooler than that.
In general, the armchairs, even without reaching the sophisticated representative ones, give scope for creative self-expression as few other pieces of furniture and, in general, homemade products. So, since the chairs have gone - create, invent, try!
A private garden is a great place to work and relax. For a full-fledged summer vacation, people have come up with a variety of devices from a swing to a hammock. Armchairs are considered a classic piece of comfortable furniture. But someone ingenious managed to add an addition to its design that made it even more convenient: a rocking chair was born. This model allows you to perfectly relax all the muscles, and the unhurried and rhythmic swaying disposes to pleasant reflections, calms, lulls. The rocking chair has become so popular that many variations and modifications have appeared since its invention. Moreover, it turned out that a do-it-yourself rocking chair made of different materials is not a myth.
To create a classic rocking chair, you need a willow vine. The delicate and lightweight design looks great against the backdrop of country greenery and is successfully combined with the interior of a garden house or gazebo. This lightweight and durable product has one drawback - the fear of excess moisture.
Making a light and seemingly unpretentious armchair from a willow vine is not so easy. You need to be able to prepare the material, and the weaving technique requires special skills
Rattan is a flexible vine native to Southeast Asia. They also make wonderful and very beautiful chairs from rattan. They are not inferior in beauty to willows, which cannot be said about strength. No screws or nails are used to create rattan furniture. All connections are adhered only thanks to glue and skillful knitting.

Rattan is not sold as raw material in our stores. Such a rocking chair for the owner of a summer cottage is a good purchase, and not a product in the manufacture of which he can show his creative abilities.
If we talk about the strength and durability of the product, then this model, created from forged metal, can be an example of reliable furniture. An elegant lace structure will decorate any garden.

The main advantage of this model is its durability. The main one, but not the only one. Agree that this thing looks like an exquisite silver jewelry
Rocking chairs are used not only as country furniture. A distinctive feature of an office rocking chair is its respectability and solidity.

Office workers also value quality rocking chairs as accessories that help them to get a complete break from the hustle and bustle of business. Of course, office models are different from the suburban version.
There are also designer models of high-tech rocking chairs.

A very interesting and, most importantly, quite functional model. Combines a comfortable rocking chair and directional light
Some of the state-of-the-art rocking chair designs are truly unique. Like simpler models, they guarantee their owner comfort, but, in addition, independence from energy sources. Such a product, equipped with solar panels, allows you to spend time with comfort and benefit.

Thick plywood can be used for the base of such a structure, and polycarbonate for its upper part. Finding solar panels on the network today is also not a problem.
Master class: rocking chair for two
A two-seater rocking chair looks more like a sofa. If you put several pillows or throw a blanket on this comfortable structure, you simply cannot find anything better for a summer cottage. We will tell you how to make such a rocking chair with your own hands.

Who said that you can only enjoy the comfort of a rocking chair by yourself? This model is good for two too.
Stage # 1 - preparation of tools
Making a quality rocking chair isn't as difficult as it sounds. Having all the necessary tools and stocking up on quality materials, you can slowly do everything yourself. What kind of tools do we need for this job?
- Electric jigsaw complete with wood saws.
- Disc grinder. It will need nozzles with different grain sizes. In fact, a manual router may also be needed, but if you have a large amount of coarse sandpaper and if the grinder has enough power, you can do without it.
- Screwdriver with a set of wood drills and bits.
- A right angle with a long ruler.
- Roulette.
- Hammer.
- Putty knife.
- Brushes and pencil.
The correct organization of work assumes that all the listed tools will be literally at hand.
Stage # 2 - draw the drawing
Any important work begins with the manufacture of a drawing. It is necessary in order to correctly calculate the need for materials. However, the drawing is already there. On the metric grid, the step of which is 100 mm, the template for the side of the chair is placed. It is best to transfer the drawing to paper and cut out a mold, with which it will be easier to draw the outline on the plywood.

A drawing of an excellent rocking chair, which you can make with your own skillful hands, is made on a metric grid, the step of which is 100 mm
Small inaccuracies are permissible, it is important not to be mistaken in the main thing: the sidewalls must be identical, on the rolling, lower side of them there must be no protruding corners.
Stage # 3 - cutting blanks from plywood and timber
For the manufacture of screeds, sidewalls and sidewalls, you will need eurofaner, the thickness of which is 30 mm. The sides, as already mentioned, are cut with a jigsaw strictly according to the pattern. The dimensions of each of the three drawers are 800x120 mm.
Now you need to cut the blanks of the bars, which will later form the surface of the seat and back of the rocking chair. To do this, we need a beam of 50x25 mm in size, from which we will cut 35 blanks of 1200 mm each. Before purchasing the necessary material for this, find out what the standard length of one such bar in your stores is.

Based on the proposed drawing, you need to make a pattern, with which you should apply the contour of the side of the chair to the plywood
You can easily calculate the general moldings that you need on your own. Observe the multiplicity so that when cutting blanks there is no large amount of residues. Better to let your rocking chair turn out to be a little narrower than originally planned. For example, with a standard length of 2.4 meters, the length of one workpiece will be 1195 mm (the thickness of the cut and subsequent processing are subtracted).
With fasteners, everything is simple. Looking for:
- confirmations (euro screws) 12 pieces, size 5x120mm;
- self-tapping screws 140 pieces, size 4x45.
In fact, the initial part of the work is over, but you still have to work hard to get the desired result. In the process of this work, you will need drying oil, varnish for wood, putty, antiseptic, which you also need to buy in advance.
Stage # 4 - pre-processing of parts
We proceed to sanding all parts and removing small chamfers. If your sander is powerful enough and you know how to handle it, this procedure shouldn't take you long. Taking into account that the rocking chair will be on the street, special attention must be paid to the ends of all elements in order to protect them as much as possible from the dampness to which they will undoubtedly be exposed.

Pre-treatment of parts is not only about sanding and chamfering. It is necessary to take all measures in order to protect the end parts of the elements from decay.
The ends of the parts must be impregnated with hot drying oil, and the wood fibers on them must be slightly flattened with a hammer. This will reduce moisture absorption. For the ends, the processing-varnishing-processing procedure should be carried out twice before the general assembly of the structure.
Stage # 5 - assembly of the structure
There are no specific standards in the manufacture of this piece of garden furniture. The holes for the tsars are marked as the logic requires: the headboard, the middle part of the outer arc of the sidewall and the footboard. The drawers will be pulled to the sidewalls with the help of confirmations. To do this, a preliminary marking is made on the sidewalls, after which the two sidewalls are aligned, and a through hole is drilled in their planes with an 8 mm drill. For the hole in the end of the drawers, a 5 mm drill is used. Now you can tighten the chair frame with the euro screws.

The holes for the drawers must first be marked, after which both sidewalls are folded together and neat through holes are drilled
Now let's talk about how to drill the bars that form the seat and back of the chair. We have exactly 35 of them. Drill 4 holes in each block (two on each side). And these are 140 symmetrical holes.
To simplify the task, we use a "conductor" - a device for marking a large number of homogeneous parts. We make it very simply: we take a piece of the same bar, not shorter than 250 mm, drill holes in it for a template, the diameter of which should be the same as that of a marking pencil. From the end and one of the side parts of the "conductor" we nail the plywood trimmings, which will serve as a limiter, preventing overshooting during the marking process. The "conductor" is ready.

Assembly is the longest and most time consuming part of creating a rocking chair. However, the "jig" will help you to facilitate the procedure for drilling symmetrical holes.

This is what the chair looks like at the final stage of work. Of course, in this form it cannot yet be exploited. It is necessary to take measures to protect it from bad weather.
The "jig" will be used to mark holes, you cannot drill through it, because the drill can break pattern holes and the parts will have to be countersunk separately. If you take a 3.5x30 drill with a countersink, it will be possible to make a hole as needed using the finished markings.
According to the drawing, there should be a gap of 15 mm between the bars. In order to avoid distortions, it is necessary to mark on the side of the chair a distance that will correspond to six bars together with intermediate intervals, and check the coincidence of the template inserts in thickness. If they match, you can continue to fasten. Otherwise, adjustments should be made. The four-millimeter self-tapping screw for wood holds perfectly in the Euro-veneer. But given that the frequency of attachment is high, it is better to use a 3mm drill.
Stage # 6 - finishing the finished product
The holes above the self-tapping screws must be carefully filled. The next in line will be antiseptic treatment and three-time coating of the product with a waterproof varnish. You have to work very diligently. Remember how much of your labor has already been invested in this chair. After all, you want it to last as long as possible? Then do your best!

If you have small children, you can involve them in the work of filling the holes above the self-tapping screws, but you will have to carefully examine the model to look for damage to fix them yourself.
Sliding chair without rails
You probably noticed that all the models presented above have a common principle of operation. The trick is that these rockers use curved runners as a base. How to make a rocking chair without runners? It turns out that there is such a possibility too. Watch this video and you will get an idea of exactly how this is done.