How to make an arched door with your own hands. Interior arches: interior design ideas
Arches have been used in architecture since the second millennium BC. At the dawn of history, they were given a special sacred meaning: to go through the arch meant to be born again.
Today, arches are gaining popularity in interior design.
The interior arch performs the same functions as several thousand years ago: it gives originality and visually divides the space, simultaneously combining two rooms together.
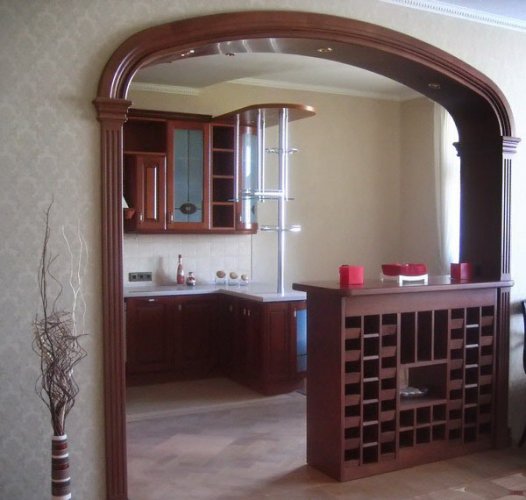
Arches are most actively used in a wooden private house or in an apartment, they are usually mounted in the corridor or connect the kitchen and living room.
Varieties
Arches represent a symbiosis of elegance and versatility, fit into any interior, ennoble the doorway.
The variety of forms of arched structures classified as follows:
In addition, arches can be made according to individual sketches and have a fancy shape, depending on the imagination of the customer.
Interior arches made from the following materials:
- Wooden- a practical material that creates an atmosphere of comfort and warmth. Arches made of wood fit into any type of opening.
- Drywall- differs in plasticity, ease of installation.
- Plastic(pvc) - easy to care for, moisture resistant, durable.
- Mdf-aesthetic, large selection of colors and textures, affordable cost.
Do you know how to attach drywall to a wall without a frame? Read this article.
Decorative finishes

Interior arches made of mdf, plastic or wood are usually left in its original form.
In turn, plasterboard structures require additional decor.
Finishing performs the following functions:
- camouflage - allows you to hide installation defects;
- technical - adjustment of dimensions using decorative elements;
- decorative - gives the arch a final look in the theme of the chosen style.
A huge amount of modern finishing materials allows for individuality and combinations with the rest of the interior.
Consider the most common options decorative finishes:
- Plaster- a simple method, while the choice of textures and colors will satisfy the most demanding taste. Previously, the surface is putty and primed, wait until it dries completely and apply decorative plaster. If a relief is provided, then a drawing is made on a fresh leveled layer.
- Cork wallpaper- presented in the form of rolls or veneer tiles or cork chips. They are lightweight, elastic, durable, mounted on a leveled surface with glue. It is quite easy to decorate the arch with cork wallpaper yourself and does not take much time.
- Painting... The pre-leveled plasterboard structure is covered with acrylic or water-based paint, the wooden one - with varnish.
- Decorative rock- durable, resistant to external influences, but not cheap material. Installation is laborious and requires certain skills. The stone must be glued to the cement base after preliminary filling and priming of the vaults and walls.
- Mosaic... It is made of pieces of ceramics, glass, stone, pvc panels with a wide range of shades. Based on the material used, the elements can be square, round, oval, rectangular, triangular, or arbitrary. It is quite easy to decorate the arch with mosaic patterns, you just need to turn on your imagination. Mosaic designs are original and unique.
As you know, modern design ideas are constantly presenting us with new solutions. The decoration with mirrors or textiles looks original. The status of the interior will be given by frescoes- hand-painted with paints on wet plaster.
Design Experts experimenting with shapes, creating arches with through niches or bar counters. In recent years, stucco molding, columns and gilded details have returned to fashion.
Arch in the hallway with your own hands
Making an arch at home is not a difficult job, requiring minimal experience in the field of home renovation. Consider the technique of erecting a simple semicircular drywall arch in the hallway. Note that the process may differ slightly depending on the thickness and material of the walls.
We buy material and prepare tools
Measure the opening and sketch with the start height and radius.

The best option is moisture-resistant, fire-resistant plasterboard... It is advisable to choose a wall 12 mm thick, arched - 6.5 mm. For straight frame elements, a rack metal profile is required, and for a contour, a guide profile is required.
You will need short self-tapping screws for metal, special for drywall, as well as wood screws.
We prepare from the tools:
- roulette;
- puncher;
- level;
- jigsaw;
- putty;
- pencil;
- scissors for metal.
Preparatory work
Clear the opening of paint, wallpaper, widen the opening or raise it in height, if necessary. Level the side walls using a putty, mark with a pencil.
Cut two rectangles out of the drywall. Apply arc shape to drywall using a nail or pencil tied to a thread.
Do not make an excessively steep arc, especially for a narrow opening.
Then cut the arch with an electric jigsaw, or with a hacksaw for metal, repeat the procedure with the second rectangle. (see photo) 
Installing the frame
Cut four vertical elements that match the length of the workpiece and two horizontal ones that are equal to the width. Next, you need to install the profiles and attach them with self-tapping screws. 40-50 cm long to the walls of the opening, leaving about 1.5 cm deep on both sides.

Consider the thickness of the drywall to the structure coincided with the plane of the wall... Start with a horizontal guide.
Perhaps you will be interested in information on how to putty drywall for painting. Read this.
Assembly
Secure the drywall sheets to both sides of the frame using a screwdriver. Leave the screw caps flush with the surface... Then measure the length of the arc and cut off the section of the profile using metal scissors.

To bend the profile it is necessary to make several cuts along the edges, the more often - the stronger the bend will be. Fix the resulting arc at the bottom of the metal frame with self-tapping screws. Connect the guide and drywall with self-tapping screws in 10-15 cm increments.

Lightly wet the drywall before bending. Now attach the resulting element to the arches (the cuts should be inside the structure), attach with self-tapping screws. Achieve maximum adhesion of the frame to the structure.
Finishing
At this stage, it is necessary to sheathe the edges of the drywall and joints with fiberglass mesh or paper tape, wait until dry. Apply a layer of putty and after drying sand the surface... Repeat the process twice for perfect smoothness.

Choose the decor to your taste. As an example, we give the simplest and most economical way- pasting the arch with wallpaper with further finishing of the edges with a plastic corner.
Wallpaper should be chosen that are easy to care for (vinyl, bamboo, non-woven), monochromatic or with a small complex pattern are recommended. It is necessary to glue the walls on both sides of the opening, leaving a margin of 2-2.5 cm., cut off the excess, fold the edge into the inside of the arch.
Cut a strip to a suitable width and glue inside the opening.
The joint will look more aesthetically pleasing if you use a plastic corner.
Before installing it is desirable degrease the inner surface corner, then apply a thin layer of sealant, liquid nails or special glue, press firmly to the installation site. Fix, wait for the glue to set.
The work is completed, you can enjoy the result.
Do-it-yourself drywall arch: video instruction.
Arches in openings have been used for a long time, since it was believed that this architectural opening is very aesthetic. Today, the arrangement of arches in doorways has become popular due to the fact that they are easy to mount from drywall. With the advent of drywall arches, it became possible to separate rooms without much effort. Such arched vaults will help to give individuality to each room.
Thanks to the arch, you can visually expand the small space of the corridor, kitchen or room.
As for the forms of the arch, there are a lot of them. By making drywall arches, you can recreate almost any historical copy. The main convenience is that drywall is a very flexible material. We make an arch in the doorway according to the following scheme:
- All necessary measurements are carried out and the required amount of material is calculated.
- Next, all the necessary tools that will be required for work are prepared.
- The front parts of the arches are cut out, the frame is made of a profile or wood.
- Next, the front elements of the arches are attached.
- The lower parts of the arches are cut out and also attached.
- Arched corners are attached and all surfaces are putty.
What materials will you need?
For work, you will need the following materials and tools:

Types of forms of arches.
- drywall 9.5 mm thick;
- guide profiles - 27x28 mm;
- rack profiles - 60x27 mm;
- self-tapping screws for fixing gypsum plasterboard (gypsum plasterboard) - 3.5x25 mm;
- dowels with screws - 6x60 mm for fastening the profile frame (needed if the walls are made of brick or concrete).
- self-tapping screws with a press washer - 4.2x12 mm;
- wood screws (if the walls are made of wood);
- gypsum plasterboard putty;
- needle roller for bending drywall sheets;
- perforated arched corner;
- putty knife;
- screwdriver;
- protective gloves;
- roulette;
- square;
- pencil;
- scissors for metal;
- stationery knife for cutting plasterboard.
Related article: Feng Shui children's room
What kind of arch can there be?
The opening of a door or window can be decorated by creating an arch. There are a large number of arches that can be done in your home. When choosing, you need to be guided not only by taste preferences, but also by the following parameters: first of all, the height of the ceiling and the width of the doorway. So, some designs look good with high ceilings, while others, on the contrary, with low ceilings. Views:

Diagram of the arch device.
- Portal - this arch is made as a standard in the form of the letter P. The device of the arch can be different: polygonal or wavy. It all depends on the materials available and the imagination of the owner of the house.
- Classic arch - in another way called "classic". This type of arch is only suitable for ceilings that are more than 3 m high. On average, with an opening width of 90 cm, about 45 cm of height will be occupied by the bend of the arch, so a height of 2.5 m may not be enough.
- Romance. This option is perfect for wide openings, relatively small in height. A straight insert is made between the rounded corners, either at an angle or horizontally.
- Modern. This type is perfect for making a doorway inside a typical apartment. In this case, the corners can be both rounded and sharp.
- Semi-arch. This option is able to perfectly perform the zoning of the room.
- A straight arch is a great option for high-tech and modern rooms.
In addition, the arches are also distinguished by their design:
- Radial (asymmetric) - the simplest and at the same time the cheapest technology that will suit absolutely any interior.
- Multilevel. This design is used mainly in cases where the interior is made in one specific style.
- Openwork is suitable for all cases, except for those when the walls are made in a non-standard form.
- Domed and symmetrical ones are suitable for classic arches, the opening of which is at least 1 m.
Doorway: making the necessary measurements

Ways to bend drywall sheet: dry and wet.
Before making an arch in the doorway, you need to make all the necessary measurements. Naturally, you need to start by measuring the opening. You need to find out the height and width of the opening.
Related article: Choosing a bunk bed
As for the width of the arch, it should be equal to the distance between the opposite walls of the doorway. It is necessary to measure this distance and halve it. This size is needed in order to make an exact semicircle.
In addition, you need to determine in advance the shape of the future arch. If you choose a classic arch, then you need to align all the walls. They should be completely vertical so that the arch does not look awkward. It is necessary to level the walls with the help of beacons with putty or plaster.
Preparing the gypsum board for the arch
- First of all, you need a regular pencil and a tight rope. The pencil is tied to a string and makes a great large-scale compass.
- Further, the middle is marked on the GCR - that is, the radius of the future arch. To do this, you need to remember the size of the opening width.
- Where the top of the arch will be, a mark of 60-65 cm is marked. This figure was taken at the rate of 50 cm radius and 10-15 cm - the height above the arch.
- Next, a plasterboard sheet is cut exactly along the width of the doorway.
- Then a point is marked, which will be the center of the radius.
- A rope with a pencil is taken, its length should be equal to the radius. A semicircle is drawn along a point marked in advance. When making the correct measurements, you should get a perfect circle, which will be the arch of the opening.
- After that, a clerical knife or jigsaw is taken, with which you need to cut a semicircle along the drawn line. In our case, its width should be 100 cm, and its height should be 60-65 cm.
DIY arch frame installation
Both aesthetics and structural strength will depend on a well-made frame.
The stages of manufacturing and installing the frame are as follows:
- First of all, at the top of the opening, a guide from a metal profile is attached using dowels. Further, the guides are attached to the wall in 2 places.
- After that, an arched profile is made, also made of metal. To make it, using metal scissors, identical cuts are made in the profile, each of which must then be bent to form a right angle. As a template, you can use already made parts from gypsum plasterboard. The profile is fastened with dowels, and the drywall is already with self-tapping screws. For the arch, you will need 2 arcuate profiles.
- To strengthen the frame between 2 arcs, you need to attach profile segments.
- Further, the arcuate parts are attached to the frame using self-tapping screws.