How to make a plastic children's watering can with your own hands. Homemade garden irrigation nozzle
Many owners of suburban areas and summer cottages are faced with the fact that by the end of the season they accumulate a lot of unnecessary cans and plastic bottles.
Such things do not throw out: from them you can create a wide variety of crafts for the garden, cottage or garage, which can perform both practical and decorative functions.
Most of these items can be built with minimal effort in 10-20 minutes, and they can make the territory more interesting and original.
 Depending on the characteristics, such containers classified according to the following parameters:
- Volume - from 1-2 to 50-80 liters.
- The form. Canisters can be flat and rounded, oval, rectangular or square in cross-section, have a handle with a lid.
- Colour. Plastic products are most often white or translucent, there are also cans of green, blue, red and other shades.
For creating decorative items and practical accessories suitable containers for food, water, fuels and lubricants, fertilizers, other liquid products.
Before you start making a craft, it is advisable to inspect the canister for damage, thoroughly clean and degrease it.
How to make a washbasin?
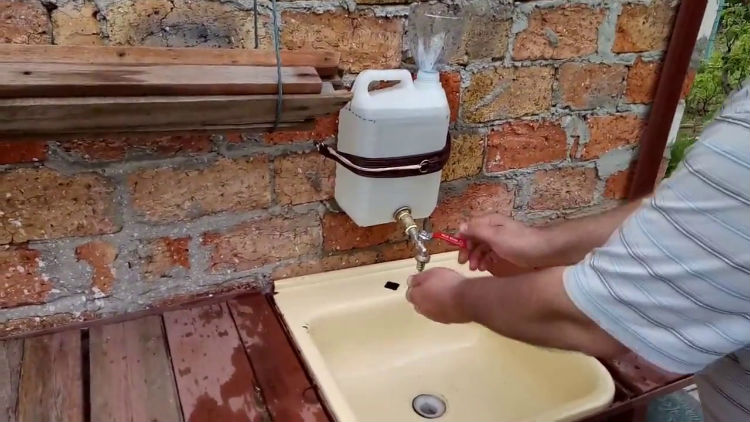
The 5 liter plastic container is ideal for making country or camping device for washing.
The filling hole of the canister will be used for filling with water, and in the bottom it is required to make a hole and insert a tap or valve.
To do this, you need to use a pair of seals in the form of rubber gaskets and a fastening nut so that water does not flow out and the tap is firmly fixed.
Ready-made washbasin or washstand can be hung on a crossbar, hook, attach to a vertical surface with a belt or even tape. A funnel can be inserted into the filler hole for convenience: this way, when filling the canister, water will not spill onto the ground.
If you put a simple tap, you can adjust the pressure by turning the handle.
Master class on creating a swan
Sculptures of birds for decorating a suburban area are often made of plastic. We present to your attention a small master class on making a swan from an old canister.
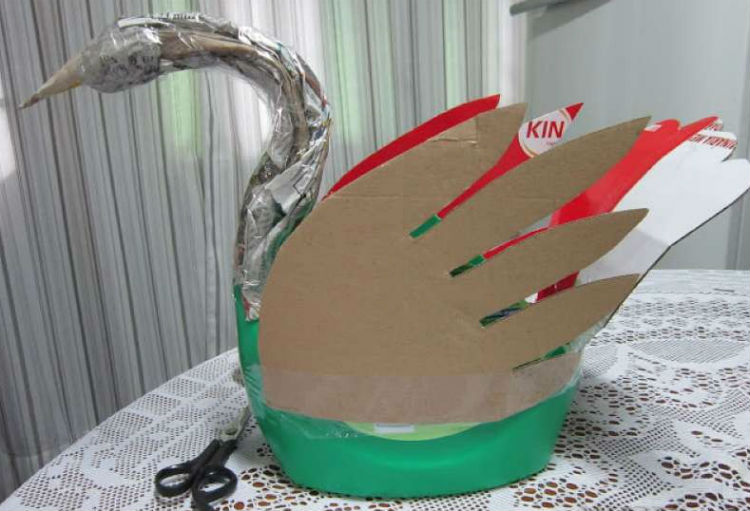
For this purpose containers of 5 liters will be required... It is necessary to cut the product so that the trunk, tail and long neck are cut out at once.

Then you need to prepare the wings from thick cardboard.
Neck worth glue with newspapers and tape, then do the same for the entire workpiece.
After you need apply a layer of plain napkins and coat the future sculpture with plaster mortar.
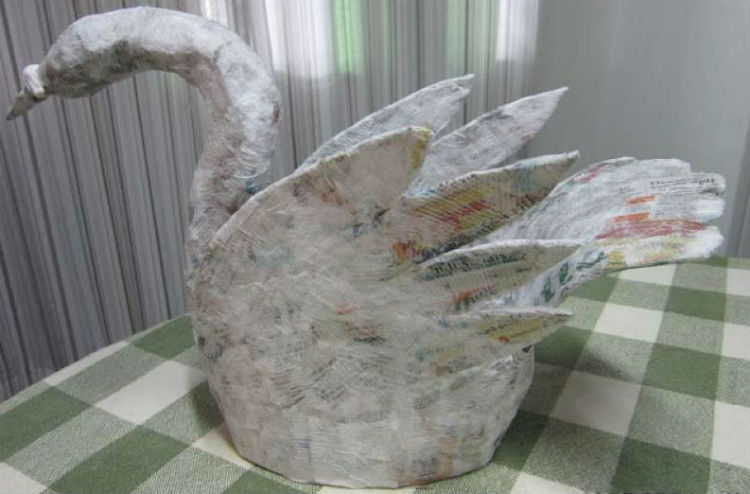
As they dry, the surfaces are sanded, painted and decorate with additional elements(for example, a bird's eyes can be made from colored stones or glass).

Flower bed
Many owners equip flower beds in the garden or front garden, and plastic cans can be adapted for two purposes:
- Flower planting container... You will need to cut the product, turning it into two halves, and dig it into the ground, then pour the prepared soil with fertilizers inside and sow flowers. The canisters themselves can, if desired, be decorated with colored paper, paint, or in other ways. In addition, the mini-flower beds themselves can be lifted off the ground, as shown in the photo below: this is especially true if the soil is not initially suitable for specific varieties or it is too wet.
- Fencing for the finished flower bed. The option is great for large flower plantings: cans are dug in around the perimeter, blocking the plants. This design wears rather decorative, for her it is better to use colored containers of the same shade or alternate 2-3, then the fence will look aesthetically pleasing.

Plastic scoop
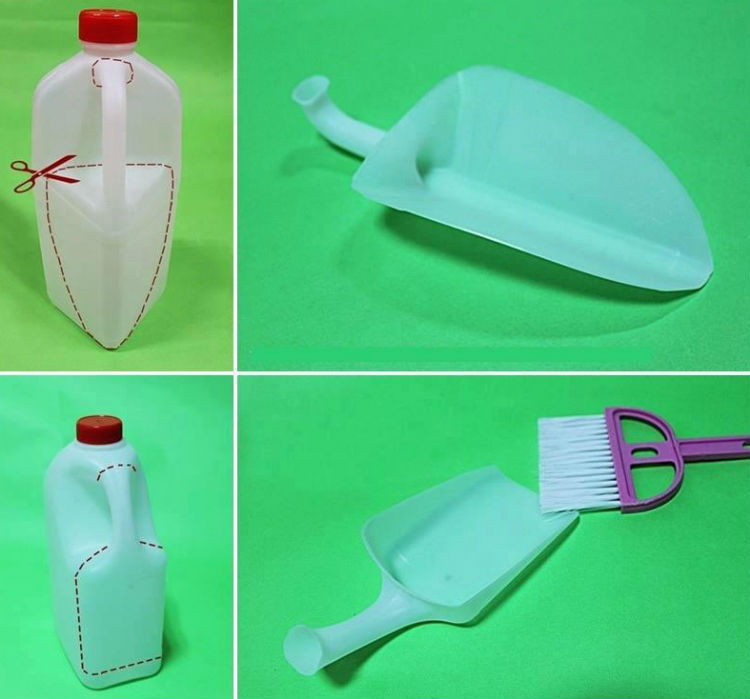
If the canister is small (1.5-2 liters), a scoop can be made from it. for cleaning or garden work.
You will need to mark the future product on the surface and cut it out; the handle is aligned with the handle of the container. The nose can be made either triangular or square.
In the first case, the scoop is convenient to use for digging out plants with a small root system from soft soil, and in the second - for collecting garbage.
Sprayer
The large container (10-30 liters) can be adapted to spray plants with pest-protecting chemicals.
Canister equipped with a manual or electric pump for ease of spraying. For carrying, you can adjust the handle or straps to carry it on your back.
A hose, spray nozzles, and a boom are available from any hardware or plumbing store.
A rubber nipple can be used to install the valve.
Such a sprayer is suitable for processing small vegetable gardens and front gardens; for larger areas, an extension cord may be required.
Most often the device is from a plastic canister used for spraying chemicals against pest beetles, cabbage, as well as mold and mildew. You can also use remedies prepared according to folk recipes, from soap solution to urea.

Tool box in the garage
To create such a device, you can use canisters of different sizes, the choice depends on how many things are planned to be placed inside.
The most commonly used containers for 10-20 liters from under water, food, chemical, combustible products. The shape should be rectangular with a handle in the middle at the top.
Manufacturing instruction:
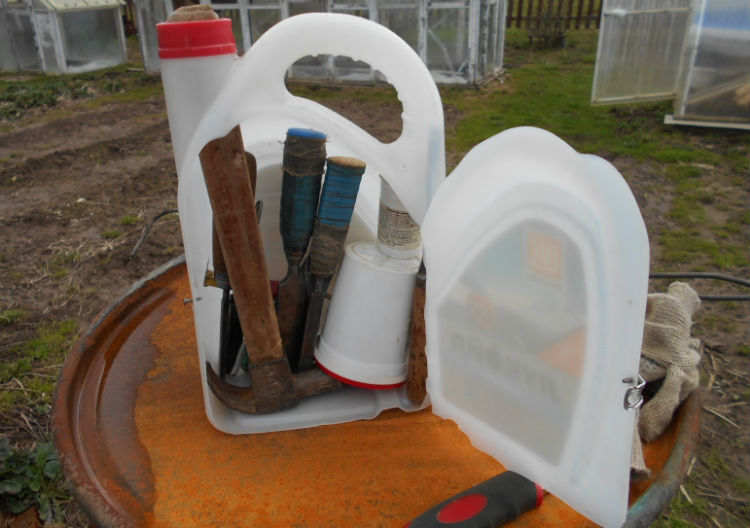
- make a vertical cut on the side of the neck and handle, leaving the wall intact from the narrow part of the canister;
- bend the resulting "door", opening the container. Inside, you can place sections of plastic cups or boxes, any other fasteners. In such a box, you can store small things (nails, screws, paper clips, electrical tape, etc.) or directly tools (hammer, pliers, pliers, etc.).
To make the toolbox more durable and airtight, the sides can be reinforced with metal plates, for this, the walls will need to be drilled and fixed with bolts and nuts.
Watering can
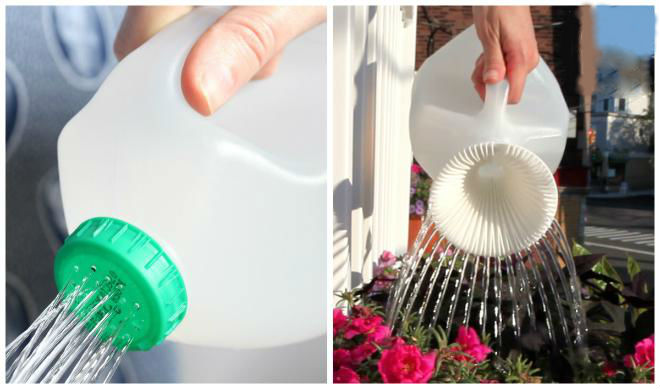
For such a product, it is optimal to take a canister from a detergent or other product that has slightly flattened shape and comfortable handle.
It is necessary to thoroughly wash the inner parts of the remaining liquid, then drill fine holes in the lid. The optimal size is 1-1.5 mm. Just above the handle, you need to make a larger hole for the air supply: if this is not done, it will be more difficult to water the beds due to the pressure drop.
If necessary, you can equip the watering can with a plastic tube, which is purchased in household goods or plumbing stores: this will increase the spray range.
Water filling is carried out through the plug, for this convenient to use funnel or hose so that liquid does not spill.
You can also cut out a wider lid, then the use of a funnel when filling with a regular bucket is not necessary. However, in this case, care should be taken to ensure that water from the watering can does not flow to the ground through the lid when the plants are watered.
We create a pots
Hanging or stationary flower pots can also be made from plastic containers.
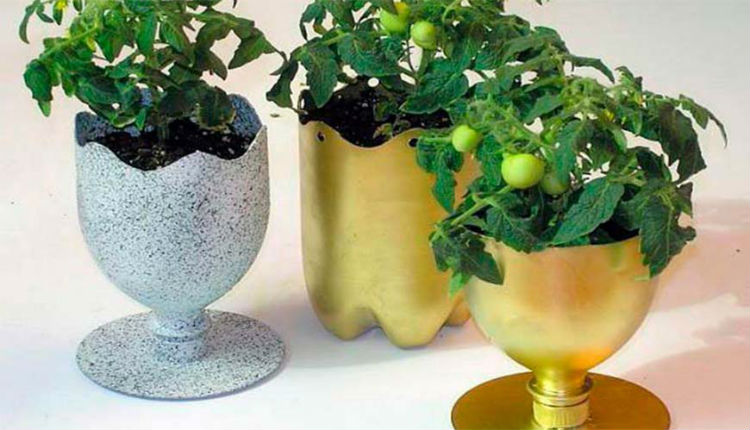
Canister can cut in half horizontally, then process the edge of the medium so that it is not sharp: sanding is required. After that, holes are made 0.5-1 cm from the edge, into which a cord or rope of small thickness is inserted, they are fastened, making an allowance of 20-40 cm (the size depends on which plant the pots will be used for).
Then a single suspension is formed, it can be made in the form of a loop. The planter can be hung on hooks, wire, nails.
If the products are to be placed on a stand, making holes for fasteners optional.
In any case, small cuts are needed in the bottom: they allow you to create a competent soil microclimate and remove excess moisture.
The surface of the finished pots can be braided into knitted covers, decorated with applique or painted - a sample of such a craft is shown in the photo below.
Fishing box
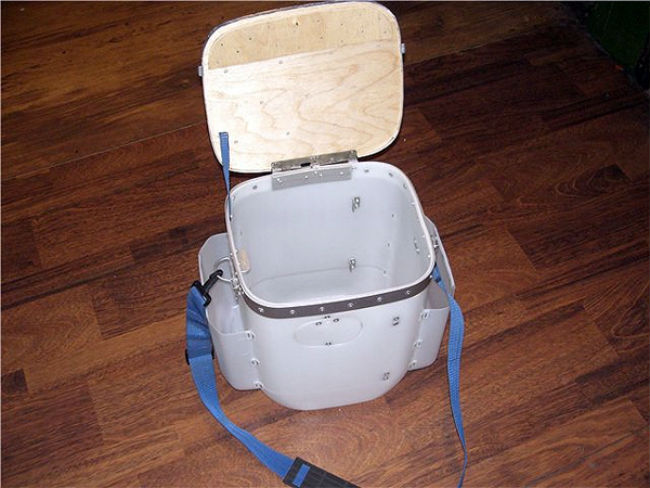
For this purpose, oil cans of 20 liters can be used; side pockets, if necessary, are made from less capacious containers.
The canister is cut, leaving the height at which the fisherman will sit comfortably for a long time, reinforce the cut with an aluminum strip fastened with rivets.
Inside, you need to place a partition made of thick plastic: it not only divides the object into compartments, but also serves as an auxiliary stiffener and prevents the lid from deforming.
The cover is cut from a thick plywood sheet and hinged. The upper part is usually pasted over with soft material for comfort.
A strap is attached to the sides of the canister so that you can carry the fishing box on your shoulder. The internal tool compartment can be divided into smaller segments (for rigs, rods, donuts, circles, etc.).
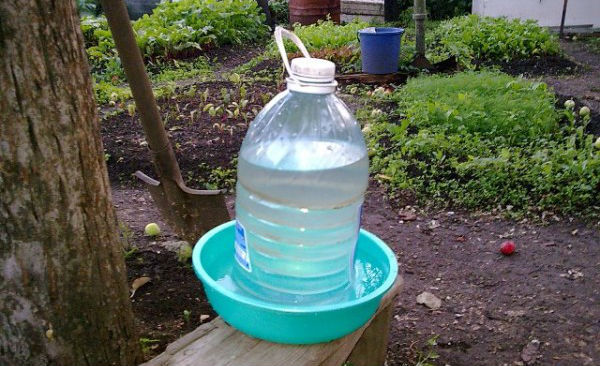
Drinking bowl for chickens
A device for providing poultry with fresh water can also be made from a 20-30 liter canister.
Would need prepare a wide pallet that does not allow moisture to pass through. Make slots in the bottom, then put the canister in the pallet, leaving a gap between it and the bottom of 1-2 cm (for this, you can make stands along the edge under the container).
The structure should be secured so that the container under the water does not tip over from an accidental shock.
After filling the liquid will flow evenly into the pallet from where the chickens can drink.
Such a drinking bowl for chickens is good not only for its simplicity, but also for the absence of the need to manually adjust the water flow.
Flowerpots
It is very simple to make such products: just cut off the upper part and make holes in the bottom to drain excess moisture. The canisters are placed on stands soil is poured inside and seeds or flower seedlings are planted.
Such flowerpots can be decorated or processed with moisture-resistant paint, decorated with applique.
Most often they are placed on terraces and in gazebos, turning the resting place into a piece of paradise filled with living greenery.

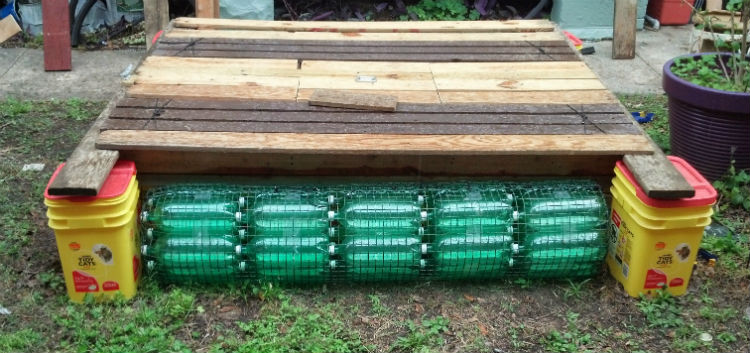
Empty container raft
This design is suitable for crossing the river, fishing, mobile footbridge on the pond.
The raft frame is made from a 3mm plank, knocking it down with nails or screws.
A raft is made from empty canisters with a volume of 40-50 liters, they are attached to the frame with packing tape or a special darkened film.
The second option is interesting in that it protects plastic surfaces from burning out under the rays of the sun. The frame must first be covered with antifungal agents and varnish in order to protect it from rotting when in contact with water.
Finished construction can be equipped with the following equipment:
- mooring ladder;
- feeders for luring fish;
- seats, sun loungers;
- shelter from the sun;
- anchor.
Shower for giving
The procedure for creating such a structure includes the following steps:
- Creating a handle... To do this, you can use a simple rope by passing it through the handle of the container and tying it around a tree or other structure where the shower will be attached.
- Installing the nozzle... A lot of small holes should be made in the lid, blown through them, then insert it into the container tap. The joint should be sealed so that moisture does not leak.
- Building a shut-off valve regulating the water pressure. Such a product can be found in the plumbing department. For installation, rubber seals are required.
- Cover arrangement where the water will be poured. It is better to make it closable so that dirt, foliage and insects do not get into the canister.
- The side parts are pasted over with black electrical tape so that the water inside warms up faster: black walls absorb ultraviolet light better.

Useful video
Another idea for using a plastic canister is a toilet paper holder plus a shelf in this video:
Conclusion
If you still have unnecessary plastic canisters and you cannot find a use for them, you should not throw them in the trash.
Recycling and reusing plastics in industry is the best option for use resources rationally without harming the environment.
In addition, the containers themselves can be used for both decorative and practical purposes - the choice depends only on the owner's imagination.
From the article, you learned what can be made from 10-50 liter cans for a garden or garage, you got acquainted with how to make a washbasin, a swan, a watering can, a raft, garage boxes and other useful devices.
In contact with
Very often, when constructing summer shower structures, the question of acquiring a watering can with the necessary parameters arises, since standard options have approximately the same configuration and may not always fit certain structures. At the same time, it is important to carry out the work efficiently so that the homemade shower head is in no way inferior to the ready-made factory versions and serves as long as possible, which is what we will consider in this article.
What may be required to carry out the work
To begin with, we will consider what products will be needed to assemble a structure in certain conditions, the list may change depending on the configuration of the system, we will touch on the most demanded nodes:
| Spray | For these purposes, an old structure is also suitable, which was replaced during repairs and was lying around in the closet or basement. If it is not available, then the simplest solution would be to purchase a plastic sprayer, its main advantages are the low price and excellent performance properties, because polymer materials are not subject to corrosion, which is very important when used outdoors |
| Tap | Again, you can choose a wide variety of available designs: from old ball systems to any other options. The most important thing is that the system is working, so whatever you can find will do. If there is nothing, then buy a faucet in a plumbing store, the cost of this type of product is low, so you will not incur high costs in any case |
| Pipe | Most often, either pieces are used, or ready-made drives are purchased (a drive is a pipe of a certain length, on both sides of which a thread is cut). It is worth noting that it is far from always possible to find a run-off of the finished length, but below we will consider how to get out of this situation. |
| Flexible hose | You can use either a ready-made version, which can be purchased separately in a specialized store, or you can adapt any suitable hose for these purposes, its service life is much shorter, but as a temporary option it is quite suitable and will last at least one season. Do not forget that you need special hose clamps to secure the hose. |
| Sealing elements | In order for all connections to be reliable, they should be sealed using special rubber gaskets of a certain diameter, they can be bought, or they can be made of rubber. In addition, you can use additional sealing materials - fum tape, Unipack composition and other similar materials. |

Important! It is not recommended to purchase a ready-made version intended for use in bathrooms, since the coating on such products is poorly resistant to adverse outdoor conditions. Most often, the decorative coating begins to peel off after a few months of use.
Design options
We will analyze two variants of systems - rigid and with a flexible hose, they differ in the method of assembly, therefore, a separate chapter will be devoted to each of the solutions. You just need to choose the one that best suits your operating conditions.

Fixed watering can
The order of work is as follows:
- First of all, you need to calculate what the total length of the system should be from the point of attachment to the barrel to the edge of the watering can, while it is very important not to forget to take into account the fact that when fastening, part of the pipe enters the container. Too large a size will cause the rain to be low, and tall people will wash, bending over and constantly banging their heads, which of course is undesirable, since comfort is significantly reduced.
Advice! If the height is not enough for the location of the watering can or the outlet in the container is located on the side, then you can use one trick: weld a small protrusion on the surface and position the system at an angle, this saves height and allows you to direct the flow to the middle of the shower area.

- Next, you need to make a pipe or buy a ready-made squeegee... The manufacturing option is relevant when the length of the element must be large and it is unlikely that it will be possible to acquire a ready-made structure. The work is carried out as follows: first, a pipe of the required diameter is selected, after which a piece of the required length is cut off and a thread is cut on both sides of it, the pitch of which must correspond to all other elements.

- Assembly is carried out in the following order: first, the spray gun is screwed through the connecting nut or directly into the tap, do not forget to wrap the thread with sealing material. Next, a squeegee of the required length is attached to the crane, it can be either small or very long, it all depends on the design features.

Flexible hose system
Now we will consider how to make a shower head with our own hands, if it is necessary to ensure its mobility and mobility, the work is carried out as follows:
- First of all, you need to prepare a flexible element, the length of which should be calculated in such a way that it is convenient for you to use the system. For these purposes, both a ready-made version and other improvised elements made of PVC or other polymeric materials are suitable.
- For fastening, you will need special threaded adapters, but for reliability, the hose must be additionally secured with clamps made of stainless or galvanized steel.
- Next, you need to make a tie-in into the container, it can be either in a design with a hose, or rigidly fixed to the barrel. It is important that the water intake is 20-30 millimeters above the bottom level to prevent sediment from getting into the watering can, as this is not very hygienic and causes clogging of the holes.

- Further, all the elements are connected to each other, pay special attention to the threaded connections, they must be well sealed to exclude any leaks.
- Do not forget to check the system for leaks after assembly to ensure that all assemblies are securely attached. As you can see, the instructions are quite simple, and almost any person can do the work.
Naturally, if any problems arise, then you will not have a question how to disassemble the shower head for cleaning or troubleshooting. In general, if all work is carried out carefully and from high-quality materials, then the durability of the system is very high - the structure serves for many years without any maintenance.
Output
Of course, if you do not want to do this kind of work, then you can purchase a ready-made solution. But when it comes to non-standard designs, then there is simply no other option other than do-it-yourself assembly.
The video in this article will help you understand the topic even better, especially if you still have any questions.
Current page: 3 (total of the book has 10 pages) [available passage for reading: 3 pages]
Font:
100% +
Earth drill
Such a technical device makes it possible to easily extract from the soil the powerful roots of various weeds deep in it.
HydrodrillThe device is designed to apply fertilizer directly to the root zone, significantly reduce moisture loss for evaporation, reduce the degree of injury to plant roots, wash away pests from trunks and branches.

Hydrodrill. 1 - tube, 2 - tip, 3 - hose, 4 - tee, 5 - handle, 6 - tap, 7 - dispenser tank, 8 - flexible partition, 9 - hose, 10 - valve, 11 - hose.
A tapered tip is put on a durable rubber hose. The diameter of its outlet should be 6 - 8 mm. With a pressure of 1 atm in the water supply system, the water flowing out of the hydraulic drill in a matter of seconds washes out a hole up to 70 cm deep (up to 6 cm in diameter) in the soil.
In order to apply top dressing with the help of a hydraulic drill, a hydraulic compressor with a flexible partition is connected to it. After connecting it, the supply of the nutrient solution is regulated using a special valve.
Drill from an old panA drill made from an old pan is fixed on a riser, after having previously installed a drill fragment (25 mm in diameter) from below. (Instead, you can use a strip of steel twisted in a spiral.) Attached to the body on 2 sides is a knife. In front of each of them, small slots are made (30 - 40 mm wide). When the drill is deepened through these same slots, the soil is fed into the pan. Then it is removed.

A drill from an old saucepan. 1 - tip, 2 - slot, 3 - knife, 4 - knife attachment, 5 - body, 6 - riser.
Markers and seeders
At the summer cottage, wherever you turn, manual labor is completely required. Even the primitive mechanization of work will greatly facilitate the matter and increase labor productivity. A marker is a device that allows one movement to make not one, but several grooves (or nests) for seeds at once.
Cross marker
Cross marker. 1 - base, 2 - rail, 3 - handle, 4 - stand-support, 5 - tap.
If it is planned that the crops on the bed will be located across, the grooves are made using a cross marker that covers the entire width of the bed.
The base of the marker is a board. From below, slats are nailed to it, but not flat, but having a triangular section. A handle with a stand-support and a tap is attached from above. The marker is placed across the ridge and rests with your foot on the board. In this case, one of the edges of the lath is pressed into the soil and leaves even grooves. The tap spike is a kind of border for the next marker installation. Row by row, setting a marker, mark out the entire garden.
Longitudinal markerWhen the plants are placed along the ridge, a rake-shaped longitudinal marker is used. But this is only in shape: instead of teeth, 3-sided parallel wooden blocks are attached to the base.

The device makes it possible to make 12 furrows at once in one pass.
Simple markerA simpler marker will help to make planting of vegetables more orderly.

Its design and dimensions are shown in the figure (1 - for radish seeds, 2 - for pea seeds).
Rake markerAn ordinary rake can also be adapted for a marker. But improvement is indispensable here.

2 metal points are attached to the rake on bolts, the length of which exceeds their teeth. Having drilled several holes in the rake bar, rearranging the points, you can change the distance between them, and, consequently, the interval between the grooves.
Simplified markerIt will help out when you need to make a lot of seed holes. Similar to the tool used by plasterers. Made from a board or a piece of chipboard. Wooden spikes are fixed on the working surface of the marker, and a handle is attached on top.
Uncomplicated markerMade from old ("toothless") rakes. To the base, from the opposite side, "antennae" of 3 thin metal plates are riveted.

A triangular notch is provided in the middle of the base. Thanks to it, the marker can be moved along the taut line, which guarantees the accuracy of the marking.
Marker (I. Mikhailov)It is intended for sowing radishes and carrots, as well as for marking a plot for tomatoes and cucumbers. The craftsman based the invention on wooden slats 50 - 60 mm wide (15 - 30 mm thick and 130 and 200 cm long). He planed them with a plane, giving the shape of a wedge, and then connected them with 2 short (proportional to the size of the row spacing) transverse bars. Before starting agricultural work, the gardener puts the structure on the garden bed, slightly presses on it with his foot - and furrows 20-30 mm deep appear in the soil. The rationalizer determines the location of the future plant as follows: he places a pre-marked pipe with a diameter of 76.2 mm on the site. Its length corresponds to the size of the site.
Marker (N. Semenov)The inventor passed a steel rod (12 mm in diameter) through a metal pipe (30 in length and 6 cm in outer diameter). On the ends of the homegrown axle, he planted on the bearing.
To the same axis, the gardener attached 2 curved plates that form "horns". A second pipe is inserted between their ends, but already 120 cm long (through the lugs of the plates and the lower end of the second pipe, for greater strength of the connection, 2 rows of holes with a diameter of 8 mm are drilled. M8 fixing bolts are inserted into them). Depending on the desired row spacing, 3 to 7 discs are put on a horizontal rotating shaft (with an outer diameter of 100 and an inner diameter of 60 mm). The thickness of the discs is 10 mm, their outer edge is sharpened to a cone). In order to facilitate the movement of the marker from above, a handlebar from a children's bicycle is inserted into the vertical tube.
Multi-row markerMade from a piece of thick plywood (or chipboard). At the base of the device, holes are drilled at the necessary intervals (in several rows). Wooden round pegs are driven into them, protruding from one side of the base to the required size. The lower end of the pegs is sharpened. Handles are attached to 2 sides of the base.
Seeder-shoeSuch an original device is used for sowing seeds of fairly large garden crops, placed in a row at a step distance (or multiple steps). With its help, you can even sow the seeds of some trees (for example, spruce), as well as corn and melons.
A device, shaped like a bird's beak, is attached to the heel of a boot with straps. Taking a step, the gardener presses the "beak" of the seeder into the ground. A hole is formed in it. In this case, the lever touches the spring plate and rotates. The "beak" opens and the seeds fall into the ground.

The seed container is attached to the belt. It is connected to the "beak" with a flexible tube. But just throwing a seed into the ground is not enough: it needs to be watered and fed. For this purpose, another tube is brought to the "beak" through which water or liquid fertilizer enters the hole.
Seeder caneEliminates constant inclinations during seeding. An old bicycle is suitable for manufacturing. A movable seed container is inserted into the vertical part of the handle. In the lower part of the device, a trapezoidal ploughshare with a seeding depth regulator and a soil compaction heel are riveted. Before work, seeds are poured into the container and buried in the ploughshare to the required depth (after setting the limiter). Then the "cane" is turned around its axis by 90 - 130 °, as a result of which a funnel-shaped nest is obtained. After that, the container is lifted and the seeds rush into the chamber. Through the slot, push the required amount of seeds into the tube with your finger.

Seeder cane. 1 - container for seeds, 2 - container fasteners, 3 - slot, 4 - chamber, 5 - container, 6 - tube, 7 - ploughshare, 8 - soil compactor, 9 - depth adjuster.
Three-wheel seeder (M. Krasilnikov)
The craftsman fitted 3 wheels to the seeder: the rear wheels are from a children's bicycle (300 mm in diameter), the front wheels (on one axle) are from a baby carriage. A box made of plywood with a plexiglass cover is placed on a frame bent in the shape of a letter "P" made of strip iron (size 40 × 350 mm) (length 525 and width 115 mm) and attracted with 2 bolts. This is a seed hopper. Inside the box on 2 sliding bearings, in a horizontal plane, the main part of the apparatus is mounted - a shaft carved from birch and varnished, shaped like a thread spool. One of 3 replaceable tapes made of a leather belt is inserted into its cavity, in which hemispherical indentations are burned out (their number depends on the area of crops, and the diameter is 10 - 8 mm). When the seeder moves over the plowed area, the bicycle chain stretched between the rear wheel sprocket to the seed meter spool rotates the latter. The cells of the tape in the hopper capture the seeds and send them into the funnel (the diameter of the funnel itself is 56 mm, the outlet tube is 28 mm).

The seeder is three-wheeled. a - seeder diagram (side and top view), b - seeding wheel diagram (top and side view); 1 - drive wheel, 2 - sowing device, 3 - frame, 4 - marking wheel, 5 - funnel, 6 - opener, 7 - seed tube, 8 - reel, 9 - handle, 10 - sprocket, 11 - chain.
From there, the seeds fall by gravity first into the opener and then into the furrow.
The simplest seederAny (fortunately, now they come in different volumes) pharmacy bottle can be adapted for it. Seeds are poured into it, the neck is plugged with a cork, into which the hollow, thickened end of a goose feather is passed. Before sowing the seeds, the bottle is tilted and gently shaken. The seeds are laid down in a pre-prepared furrow with an even line.
Simple crutchDesigned for planting potatoes and other crops. It is made from a shank of any length. A block 170 - 180 mm long is nailed across the handle, at a distance of 250 mm from the sharpened end.
One person makes holes in certain places, and the other lowers nodules in them.
The crossbar on the handle does not allow the crutch to go deeper into the soil than required, which ensures the same planting hole depth.
Its transverse part has a length of 130-200 mm and a width of about 100 mm, is made in the form of a shuttle and is mounted on the handle. The device is convenient to make grooves for sowing seeds.
Cabbage crutchUsed for planting cabbage seedlings and other vegetable crops. The crutch consists of a 1.25 m long handle, pointed on one side, and a handle, which is also made of wood. The landing process, as with a simple crutch, requires a companion. The first, walking along the ridge, makes holes in the soil, and the second plants seedlings in them.
Watering tools and devices
If irrigation of the ridges can be dealt with either with the help of a conventional watering can, or with an improved one, then in the garden this operation turns out to be quite laborious. And there is no escape: trees and shrubs are also thirsty. Therefore, we will focus on irrigation installations. All home-made irrigation installations have a significant drawback: too much water consumption. In light of this, drip irrigation is of interest to gardeners. A similar device is more often used when there are few fruit trees on the site.
Watering cans
For decades, the design of a fairly simple representative of gardening tools has remained practically unchanged. Nevertheless, skilled gardeners are constantly modernizing what, it would seem, does not lend itself to modernization.
Leica telescopeIn a garden watering can, the mesh irrigation nozzle is usually located just above the handle. The standard "nose" is lengthened with a piece of metal (or rubber) pipe. It is much more convenient to work with the improved watering can: the "telescope" delivers life-giving moisture to the edge of even the widest garden beds.

Usually, during storage and transportation, the spout of the watering can requires additional space. And he interferes with scooping water from the barrel. The watering can will become more convenient during work and storage when the spout and body are connected with a corrugated rubber tube. A cable is tied to the mesh attachment and fixed to the latch. To prevent the watering can from rusting from the remaining moisture, make a hole in its body (closer to the top cover). It is better to store the improved watering can upside down.

An arc-shaped handle is soldered to the watering can. The irrigation quality will be greatly improved by the transverse tubular nozzle.

The standard grid is changed to it. It is much more convenient to work with such a watering can, and besides, after modernization, its working grip will increase.
Watering can with splitterThe water divider, as a rule, is put on the nozzle of the watering can. In this case, the fitting of the nozzle and the splitter with respect to the nozzle of the watering can is done internally.

Watering can with a divider. 1 - watering can body, 2 - branch pipe with a baffle collar, 3 - divider.
The seating surface of the branch pipe divider can have both conical and cylindrical. The divider is inserted into the pipe until it stops. Thanks to such an improvement, water seeping into the gap between the branch pipe and the splitter is directed through the drain collar to the irrigation zone. The watering attachment reduces water consumption and increases the convenience of using the watering can. When applying liquid fertilizer, the divider is removed, while the solution flows through the branch pipe. The collar does not allow fertilizer to flow out of the feeding zone through the pipe and watering can.
Rational watering canA standard garden watering can, with 2 handles (top and back) on a cylindrical body, is extremely inconvenient. First, you have to carry a full watering can with your hand on the fly, which is quite tiring. Secondly, watering with such a watering can is also inconvenient: the center of gravity shifts as it decreases, and it is impossible to intercept the hands, since their position is fixed.
A watering can with an oval body and a curved handle is much more rational. The design will allow you to occupy only one hand, and as the center of gravity changes, it can be intercepted. Such a watering can is more comfortable to wear than a cylindrical one, and an arc-shaped handle runs along the body.

The most important advantage of this design is as follows: the gardener can water the beds with 2 watering cans at once, which significantly reduces the time for caring for the plants. The capacity of the oval watering can is different. They make a watering can from galvanized sheet iron. A hoop is attached to the oval body for strength. Its edge should be slightly below the bottom of the watering can. It is good if the spout is 1.5 times higher than the body. This will make it possible to water plantings located at a great distance.
The original nozzle for the watering canOr you can make an original nozzle for the watering can. For this, a piece of steel or roofing sheet is cut and bent. With its help, such a nozzle is convenient to water the ridges with liquid fertilizer. At the same time, the watering can grid is not clogged, and the jet from the nozzle is fan-shaped.

As a rule, gardeners are not content with 1 - 2 types of crops grown on the site. And different plants require different care. The same applies to such a simple, at first glance, operation like watering. There can be only one watering can on the farm, but in order to increase its versatility, you must at least have a similar set of nozzles.

A set of accessories for a watering can. 1 - general view, 2 - nozzle with a strainer facing upwards, for watering tall plants, 3 - nozzle with a strainer facing forward, for watering plants of medium height, 4 - nozzle for irrigation with a fertilizer solution, 5 - nozzle for irrigation into holes, 6 - attachment to a watering can for small-drop irrigation.
Homemade sprayer
Simple and reliable fixture. Air is supplied to it using a hand pump. The device is mounted at the end of a pole 1.5-2 m long and used to process the crowns of fruit trees.
They take the most ordinary canister (with a capacity of 10 - 12 liters). A fitting from the bicycle camera is pressed into the handle, to which a 1.5 m long hose is connected. A hose with a spray is brought to the bottom of the container. Its end is attached to a pole. When using such a device, follow the safety rules strictly. It is strictly forbidden to spray trees with pesticides without using personal protective equipment.

Homemade sprayer. 1 - rail-holder, 2 - tap, 3 - canister, 4 - pump.
Universal sprayer
Water in the garden for spraying plants is taken from the mains. To do this, a branch is made from it to the garden plot and a shut-off valve and a check valve are placed on it. Several taps are cut in from pipes with a diameter of 15 - 20 mm for analyzing water and connecting hoses with a sawing tip. The higher the water pressure in the network, the easier the work of the gardener.

Spraying scheme (a) and plant feeding device (b). 1 - main water supply, 2 - outlet, 3 - shut-off valve, 4 - tap for water parsing, 5 - pipeline, 6 - hose, 7 - tip, 8 - check valve.
For spraying, use a proportional dispenser. Its principle of operation is quite simple. Reducing the diameter of the pipe (for example, at a tap) causes a drop in water pressure. Having inserted a container with chemicals into this place, by turning the valve of the tap, the concentration of the solution used for spraying is changed.
Plants on the site are sprayed with clean water by connecting a hose to the nearest tap. To feed the plantings or protect them from pests, various dispensers are used. They are installed either on the pipeline or near the tip.
The tank with the solution is also attached directly to the tip (Fig. B). As a rule, all devices are made from scrap materials. In this case, the dispenser is made of an old barrel and a plastic bag, the dimensions of which are slightly larger than the dimensions of the barrel. Scheme of work: the barrel is disconnected from the water supply using a 3-way tap. The solution is poured into the bag through a funnel. He, through the drain valve, displaces water from the barrel.
After filling the bag, the tap is opened, and now the water displaces the solution.
Drinking ringIt is not difficult to make such a device: you just need to have a rubber hose (about 10 m long) and a tee. Small holes are made in the hose, at an equal distance from each other. After that, the hose is rolled up into a ring (1 m in diameter) around the trunk of the fruit tree, and the ends are put on a tee connected through a tap to the water supply. The pressure is given such that the streams of water are immediately absorbed into the ground without forming puddles.

An almost ideal method of irrigation: using it, you do not need to dig an irrigation groove, which can harm the roots, or to loosen the soil: a crust on it does not form during ring irrigation.
And most importantly, water is evenly distributed under the crown, while not flooding the neck of the tree.
Mechanized water intake from the sourceAll "landowners" know that mechanized water intake for irrigation is associated with high energy costs, and therefore financial. Therefore, the ability to reduce energy costs naturally attracts many gardeners.
It is not at all difficult to manufacture a wind-powered water intake system. To use the wind energy, a wooden riser is placed right above the well. A rod with an impeller is attached to it from above. It turns out the drive shaft. In the well itself, below the water level, a driven shaft is installed. The drive is carried out by means of a porous rubber belt.
The impeller, under the influence of the wind, rotates and drives the belt. He raises water from the well. The water is squeezed out of the belt using a special device (it looks like an old washing machine), and it enters the sump. The upper shaft with the impeller is mounted on an annular float so that it can turn towards the wind. A belt is made from almost any material, but it should absorb water quickly.

Wind-assisted water supply. 1 - driven shaft, 2 - foam rubber belt, 3 - water collectors, 4 - annular float, 5 - drive shaft, 6 - shaft, 7 - impeller.
Automatic watering
A platform is built on a free patch and a container is installed on it. Its size depends on the size of the garden (it can be from 1 to 10 m 3). A water outlet valve is provided at the bottom of the tank.
In the neighborhood with a large container, they put a smaller one - a kind of water clock. It contains a 40 mm thick foam float (or rubber ball). The water clock is equipped with an outlet, into which special gaskets are inserted. Such inserts (up to 10 pieces) are made of aluminum. The holes in the inserts differ in diameter: from 0.1 mm to 1.4 mm. Each hole corresponds to a specific watering interval. If it is permissible to pour any water into a large container, then only clean water can be poured into a small one, otherwise the water clock will clog up. Water from them, through a calibrated hole, seeps out gradually. Simultaneously with the water level, the float is also lowered.

Automatic irrigation device... 1 - bar, 2 - stand, 3 - microswitch, 4 - switch.
When it is in a certain position, a simple device (a lever with a weight and a cable) will pull the large-capacity valve up. The drain hole will open and the water will flow through the pipes to the plants.
Holes are made in them, at certain distances. Water seeps out through them, moistening the soil.
When the water is poured out, the boom is lowered and, using a microswitch, turns on the electric motor. The container fills, the bar rises and closes the switch on the stand.
Attention! This is an introductory excerpt from the book.
If you liked the beginning of the book, then the full version can be purchased from our partner - distributor of legal content LLC "Liters".
Hello to all homemade lovers.
Today I want to present a very simple option for making a homemade watering can from a plastic bottle, which is especially convenient to use for watering seedlings of various vegetable crops.
I was forced to make such a watering can by the need to ensure the convenience and simplicity of watering a large number of vegetable seedlings growing in our house on the windowsills.
The fact is that when watering from an ordinary watering can, the watering can itself has to be held higher and slightly to the side of the watered plant, so that its lower edge is almost at the level of the container in which the plant is grown.
This method is well suited for watering flowers growing in pots and standing in one row on a windowsill.
However, if you have to water the seedlings, especially those that are quite grown up, and containers with which are in several rows, then using a regular watering can is not very convenient. Since with this method of watering, the watering can has to be raised high enough above the seedlings. But at the same time, the stream of water falls from a great height, which can lead to splashing and erosion of plant roots, and if you lower the watering can below, you can simply crush the seedlings.
That is why, especially for watering seedlings, I decided to make a special watering can from a plastic bottle with a long nose from a plastic hose.
Thanks to this design, when watering, you can hold the water bottle itself to the side of the seedlings, and a long nose can be pushed through the stems of the seedlings and thus reached the farthest containers with plants. At the same time, the water from the bottle is poured out not under the influence of gravity, as in a conventional watering can, but as a result of pressing with your hands on the body of the plastic bottle.
To make such a watering can, we need the following accessories:
Materials:
The plastic bottle itself has a capacity of 2-2.5 liters.
Cork from a plastic bottle.
Transparent plastic hose with a diameter of 10 mm.
Instruments:
Vernier caliper or ruler.
Scissors.
Drill bit for metal with a diameter of 9.5 mm.
Electric drill.
First you need to drill a hole in the plug. Moreover, the diameter of this hole must be 0.4-0.8 mm, less than the outer diameter of the plastic hose. This is necessary in order for the hose to enter the hole of the plug with some interference, to ensure the strength and tightness of its connection with the plug.
Therefore, first, be sure to measure with a caliper or ruler, the outer diameter of the plastic hose. I have a hose diameter of 10 mm, so I took a drill with a diameter of 9.5 mm.

After that, we insert the end of the hose into the drilled hole in the plug.

As I said, the hose should enter the hole of the plug with a good interference fit, and its end should protrude from the bottom of the plug by 4-5 mm.

Then, with scissors, cut off a piece of hose of the required length with scissors, which will serve as the spout of our watering can. I have made the length of the spout equal to about 20 cm.


You can choose any length of the nozzle hose, depending on what and how you will need to water.
And now our homemade seedling watering can is ready!


By the way, I must say that for greater reliability and tightness, at first I wanted to glue the plug with the hose with hot melt glue. However, it turned out that the hose in the plug is already holding firmly enough, and the tightness is well ensured. Therefore, I have not glued it yet, especially since if something happens, it will be possible to easily pull the hose out of the cork and replace it with a piece of the same hose of a different length.
Now let's try to water the seedlings from our watering can.


As I expected, watering seedlings from such a watering can is quite convenient, since you can "crawl" everywhere with a long spout, and at the same time, the plastic bottle itself is on the side and does not interfere with the watering site, and also does not crumple the seedlings.
It is also very convenient that the long spout of our watering can is flexible, and thanks to this, you can water even the most inaccessible places by simply bending the hose.
In addition, one more advantage of this watering can was found out.
It turned out that if you do not press the plastic bottle while watering, but just hold it obliquely, then the water from the hose spout will not pour out in a stream, but drip drop by drop, or pour out in a very thin stream.
And this is very convenient when watering still very small seedlings, which have just sprouted from seeds and cannot be watered with a strong stream of water.
That is, in this case, a very careful, gentle watering is obtained.

Another convenience of such a watering can is that if the capacity of one plastic bottle is not enough for irrigation, and you have to use two or three bottles, then there is no need to make such nozzles from a hose for each bottle.
Just one nozzle is enough, because you can simply, by watering from one bottle, remove the nozzle from it and screw it onto another bottle, and then after emptying it, rearrange it to the next, and so on.
Naturally, if necessary, several such nozzles can be made at once from plugs with hoses of different lengths inserted into them, and possibly of different diameters, for different irrigation options.
But for me, nevertheless, one nozzle is enough for now.
Well, that's all, perhaps! Goodbye to everyone!
Anyone who grows seedlings knows firsthand how difficult it becomes to water the seedlings when they grow up. In order to somehow facilitate their work, summer residents invent different watering cans. We suggest you familiarize yourself with some of them.
1. Insert a slightly curved tube into a clean plastic bottle (1.5-2 L). It should be longer than the height of the bottle so that you can water the seedlings without hindrance, even in the most inconvenient place.
So that when the tube is bent, it does not decrease in diameter (flatten) one edge of the tube, close up with plasticine or clay, pour water and put it in the frost (you can in the freezer), so that water does not pour out of it. Bend the tube when the water turns to ice. In this case, the tube itself will take the desired shape, and the ice will not allow the walls of the tube to shrink.
Many gardeners grow seedlings in foil containers and a watering can made in this way will be an excellent assistant in caring for seedlings.
2. Sometimes seedlings do not need root watering, but with the capture of leaves. In order not to accidentally douse the seedlings with water, make a shower-can with your own hands.
Wash a half-liter plastic bottle thoroughly, remove the stickers from the outside and use a marker to put dots, instead of which you will make holes. Place the dots with a 5x5 square.
Clamp the head of the nail in pliers and burn the end of the nail on fire (candle) for 20-30 seconds. Now pierce the dots with a heated nail. When the nail cools down, heat it up again. Cut a water filling hole on the back of the bottle with a knife so that it is 2-4 cm above the watering holes. Fill the bottle with water and carefully place it horizontally above the plants.
For convenience, you can build a handle on a watering bottle from scotch tape.
3. There are never too many leeks either at the dacha or at home for seedlings and plants. Many plants cannot be watered with a hose, especially often this rule sounds in greenhouse gardening, so it is best and easiest to have a watering can at every step. In order not to spend money on a purchase, we suggest making it with your own hands. To do this, take any plastic canister (from water, car oil), a polypropylene pipe 50 cm long and turn it 60 °.
At the bottom, on a flat place, attach a "turn" and mark the diameter of the future hole with a marker. Cut out and measure how easily the tube fits into the canister (there should not be a large gap). Thoroughly grease the joint with hot glue, insert the nipple and leave to dry. Next, you just have to put a piece of pipe on the branch pipe and, if necessary, shorten it by cutting off the excess. The optimum spout length is the height that does not exceed the canister lid.
Tie the tube (spout) to the handle of the canister so that it does not break under water pressure. A cut-off plug can be inserted into the spout to fan out in a limited flow. If you have to scoop up water in the well with a watering can, then for the convenience of filling with water, make a hole on the opposite side of the spout so that the air can quickly come out.
4. A small plastic container (shampoo bottle) can also make an excellent watering can. To do this, it is enough to make holes at the bottom with an awl or a nail. Collect water in a container, close the neck, turn upside down and water.
5. You can make the most primitive watering can. Make holes in the lid of the plastic canister and on the opposite side for air to escape.
6. If it is not possible to regularly water the seedlings or seedlings, then it makes sense to do automatic watering. To do this, make holes at the bottom of the plastic bottle with a hot nail, fill the container with water and close the lid. Dig bottles into the ground next to each plant in the garden, or one for several seedlings.
As you can see, there are many options for making a watering can with your own hands, choose your own, make and share your suggestions.
