Street lighting connection. How to make a competent installation of street lighting
A private technician will carry out the installation of a street lamp at low prices. Service "Leader of Services" guarantees a professional approach, decent quality of performance, strict adherence to deadlines. There will be mistakes - we will fix it for free.
The site presents its clients with qualified performers - reliable, competent, responsible. We carry out a mandatory check of documents, certificates, availability of permits, practical skills.
An advantageous offer is the installation of street lighting of any complexity. Installation of LED spotlights, lanterns, garden lamps. The specialist will arrive at the appointed time, determine the required time, and name the cost of the work.
Replacing street lights
It is required to replace street lamps with LED ones - call an electrician through our portal. The master will dismantle old structures, install new lighting, connect to the network. It will tell you what kind of light is more rational to install.
Lider uslug will automatically list the artists who live near you. There is a rating system that takes into account compliance with the basic requirements - professionalism, punctuality, prices, the number of repeated calls.
Replacement of street lighting lamps is a demanded service in Moscow region. Our clients include owners of country houses, garden plots, auto repair shops, roadside cafes.
Installation of street lamps - Prices, guarantees
The low cost of installing lamps on the street, in the country, is the main reason to call a private specialist. If you want to get a cheap service, please contact our project. The money saved can be spent on purchasing new lamps.
If you don’t want to overpay for office rent, employees' salaries, transport maintenance, then you are a client of our service. We are responsible for the actions of the performers, we pay for the repeated call from our own insurance fund.
We guarantee the installation of street lamps at an affordable cost in Moscow. The call of the master with a favorable price for the work is available to all residents of the region, including pensioners, citizens with a low income level.
Reviews of the masters
m. Electrozavodskaya
I called Alexey from your site, I recommend him as a reliable electrician. He carried out additional lighting on the porch in the store, I am happy with how it turned out - neatly, he hid the cable in the corrugation, attached it so that the plaster is intact everywhere, and the corrugation itself is invisible to prying eyes. Brought to a new switch, so you can turn it on only when you need it. The money is fine, it did not come out of the estimate.
Ordering services:
district Dmitrovsky
I was looking for someone who could put street lamps on my house and in the yard, I wanted it not expensive and right, otherwise there are a lot of craftsmen everywhere. Thank you, my acquaintances suggested about your service, issued a call through the manager. The electrician arrived the next day, installed the lamps, it turned out very cool. There was a lot of work, it was also necessary to pull the wires. They decided to make a switch to turn it on / off from the house. I am satisfied, I recommend it.
Ordering services: Electrician services. Cabling. Installation of street lamps. Installation of switches.
Lukhovitsky district
Thank you very much to the service leader and Alexander specifically for the good work. I started looking for a specialist for a long time to supply street lighting fixtures, but something stopped me. Either expensive, or the performers did not inspire confidence. As a result, I went to your site and decided not to search anymore. Alexander is a wonderful pro, he made it so that there is nothing to find fault with with all the desire. Thank you from the bottom of my heart ..
Proper lighting in the yard of your house is not only the beauty of the territory, but also the safety of movement along it. If all the paths are clearly visible, then you need to try to stumble over something.
Today we will talk with you about the installation of street lighting, we will analyze all the working stages and project development. The topic will be interesting, so we pour some seagulls and read carefully.
So, the installation of outdoor lighting can be divided into three main working stages:
- Territory marking digging trenches and laying cable is one;
- Installation of embedded luminaires and, in fact, their installation is two;
- And the assembly of the entire circuit and its connection to the automation Is three.

Interesting to know! The circuit can be controlled either manually or using various sensors, for example, lighting, motion or sound. But the best solution would be to combine these methods in one panel room.
Materials (edit)
What materials do we need for all this?

- VVG-ng Ls cable, three-core, cross-section 1.5 mm2. Of course, the cross section, first of all, will depend on the current consumed by the circuit and the length of the section, but since today mainly LED lamps are used, and rarely which object consumes more than 16 A, such a cable is enough.
- This cable is not the most expensive, but it needs to be additionally placed in pipes, and if you really do not fit into the budget at all, you can purchase an armored cable, for which additional protection is not needed, and thereby save money. However, it should be noted that such a cable will be quite difficult to cut when connecting the lamps and in the control room.

- HDPE pipes - in principle, we have already mentioned the purpose of this element - a protective sheath for the wire. Different pipes are used - corrugated, double-walled and smooth. The photo above shows a not entirely correct example - the blue stripe means that the pipe will go for drinking water. We need an option without stripes at all.

- Modular contactor with normally open contacts.

- We will also include a light sensor in the circuit, or we will replace it with a photo relay in combination with a twilight relay. This will be an automatic part of our circuit.

- Street lights that you want to install on your site. These can be any devices you like. What distinguishes them from indoor ones is, first of all, the degree of their protection from moisture and mechanical damage.

- Modular machines.

- Three position switch.
Now let's see how the circuit is put together from all this.
All stages of street lighting installation.
Let's not bore you with a sea of text. Let's talk only about the most important things and accompany each assembly action with photographs. So, the instructions will be more visual and understandable.
Laying of underground communications

Before you start digging trenches, you need to draw up a plan of your site, preferably on a clear scale, and mark the locations of the lamps and the optimal position of the routes to them.
- On the plan, be sure to mark all objects that may interfere with the work. This will save you unnecessary steps and help you accurately calculate the required amount of material.

- Further from the location of the switchboard PC-0.4 kV, we dig a trench 70 centimeters deep along all points of the future lamps, as you marked it earlier on the plan.
![]()
- A layer of sand is poured onto the bottom of the trench. The height of the pillow should be 10-15 centimeters. If sand is not available, then loose earth can be used instead, but this option is not the best, since subsequently significant soil shrinkage will be possible.
![]()
- A HDPE pipe is laid on top of the pillow. It should have an exit at the point of each lamp, that is, we bring it to the right place, bend it up and cut it off above the ground level.
- We immediately lower the cut off part down and continue to the next point. The result is a classic scheme with parallel connection of light sources.

- Depending on the connection diagram and the way of placing the lanterns, it may be necessary to bring both three and four pipes to the surface.

- By the way, it will not be superfluous to install garden sockets, for which you also need to provide conclusions. This device will be very useful, for example, if you are using an electric lawn mower.

- HDPE pipes have a cable inside, or in another way - a probe. With its help, the cable is pulled inside.
- Do this and leave 30 centimeters of margin on the terminals for the convenience of further work.
- The cable is cut in the same way as the pipe and pulled to the next lamp.
Advice! If the line on your site is branched, then it is recommended to mark each cable somehow for orientation during connection.

- After the wire is completed, the cable must be covered with a layer of sand. Its thickness is also 10-15 centimeters. As a result, the pipe is inside the pillow.
- Then we pour about another 20 centimeters of earth on top of the sand and tamp it.

- We still have about 30 centimeters left to ground level. It is recommended to lay a signal tape at this depth, which may one day save someone's life. The price of such a tape is mere pennies, but it is difficult to overestimate its value.
Installation of street lamps
Naturally, there can be no question of fixing lamps directly to the ground, except, perhaps, the most compact options that you can simply stick into the ground. Even small items require a solid and reliable base.

- A concrete foundation will be an excellent basis for ground lamps, and even more so for lighting poles.
- We install formwork from planks at the outlets of HDPE pipes.

- It is hammered together in the form of a rectangular box. Its size will depend on the size of the mounted lamp post.
- In order for the lantern to stand securely, the base must be buried at least 30 centimeters into the ground.
- It is recommended to lay a reinforcing mesh inside, which must be raised by 5 centimeters.

- Next, the formwork is filled with concrete. For these purposes, a solution of the M150 or M200 brands will be sufficient.
- The concrete must be allowed to stand for several days to harden. After that, the formwork is dismantled, and the trenches can be completely covered with earth and tamped.
By the way, there are lamps equipped with a special lower pedestal, which is immersed in the ground. There is no need to make mortgages for such options.
Their installation is as follows:

- We make a bedding of the base from ASG, gravel, look for crushed stone, in order to provide good drainage for rainwater.

- Further, with the help of cement mortar, the lower part of the base is well fixed. It must be installed strictly in level, so use a suitable tool.
- The solution is poured only outside the cabinet. It is not needed inside - there will only be wires and their connections.

- Next, the top disk is mounted and the wires are connected. Be sure to do this through the terminals, for reliable protection and isolation of the contacts.
- Then the lamps and glass of the lamp are installed - that's it, it's ready to use.
There is another way to create a solid base for lampposts, and we must mention it.

- A flange is taken, the diameter of which corresponds to the diameter of the lamp post;
- A reinforcing cage is welded to it, as shown in the photo above;
- A hole of sufficient depth is made in the ground with the help of a garden drill;
- Then everything is poured with concrete, of course, after all the wires are brought out.

Such a base will be much stronger than the first one we considered in this chapter, and at the same time the fastening pins will be brought out, which is very convenient. But back to our first foundation, to figure out what needs to be done with it next.

- We take the lower mounting part of the lamppost, pass the wires into it, put it on the base, and use a pencil to mark all the attachment points.
- According to the marking, we make holes of the required diameter and depth with a puncher for the prepared anchors.

- We immerse the dowels in the holes - they can be plastic, and we attach the thrust bearing. Everything is simple and understandable without further ado.
- Then all the wires are connected. This is done inside the junction box with which most of the poles are equipped.
- The connection is made in any convenient way, but it is better, as we have already said, to take the terminals. It is both safer and much faster than twisting.

- It is very important to make high-quality insulation of the connections. In some cases, the junction boxes are filled with compound as shown in the picture above.
- Before doing this, be sure to check the performance of all connections, otherwise it will be very difficult to pick out the terminals later.
- The sealed box is mounted at the base of the post, after which it is fully installed, according to the attached instructions.
- Not all poles are equipped with a junction box. There are more modern and convenient solutions when special contact pads are included in the design - it is very convenient, but you will have to overpay a little.
All lamps and sockets on your site are installed in a similar way, after which you can proceed to the most interesting thing - connecting them.
The last stage is connection

So, in order to connect street lighting with your own hands, you need to understand and remember the diagram shown in the figure above. As we said, it includes a photo relay and a starter.
- Our task is to provide two modes of lighting control - manual and automatic. To do this, we need a three-position switch in the circuit.
- In the first position, the lighting can be turned on through a simple switch. You may rarely use this mode, but it will definitely be useful when the automation fails, which happens quite often.
- In the second mode, the automatics will be started, reacting to the external light sensor through the twilight relay.
- The third position "0" completely turns off all lighting.

- We install all the prepared equipment on a DIN rail located inside the switchboard, in the following sequence, from left to right: a three-position switch, a twilight relay, a modular starter and automatic devices.

- From a separate differential machine in the dashboard, we bring the power phase to the three-position switch. We connect the wire to pin 1.
- From this contact we connect the lower contact L of the twilight relay.
- The following lengths of wires connect pins 2 and 4 of the modular starter to the phase.
Attention! The picture shows the jumper connection of the automation. This is allowed only if the current in the circuit does not exceed 16A. Otherwise, the starter can only be connected directly from the machine.

- Outputs 1 and 3 of the starter are connected to the upper contacts of the machines. The cables that we laid in the ground will be connected to them from below.

- Next, you need to connect the zeros. One is connected to contact N of the twilight relay, and the second to the starter coil A2.
- Place an ordinary one-button switch nearby. It will be needed for convenience, so as not to constantly climb into the control room.
- We bring to it a two-core VVG-ng cable of the same section that we laid in the ground.

- One of the cores of this cable is supplied to the winding of the A1 contactor, and the second to terminal No. 2 of the three-position switch.
- As a result, if you set the three-position switch to the first position, then by pressing the switch button, you directly apply voltage to the starter, bypassing the twilight relay.
- The starter will be drawn in and the power will go through the machines to the lamps.
The next task is to install our photo relay:
- Please note that the sensor is not in the shade of any objects or trees, but it should not be in direct sunlight either.
- If these rules are disregarded, then the sensor may function incorrectly, allowing false alarms.
- The same wire is laid to the sensor as to the switch.

Outdoor lighting - automation connection
- The wire connects at the other end to the twilight relay, pins 2 and 4.
- When an external relay is activated, the twilight relay closes its upper contacts - 1 and 3.
- Accordingly, a phase must be connected to them, which will go from a three-position valve. For this we use its 4th terminal, the jumper from which will fit to terminal 1 of the twilight relay.
- Terminal # 3 from the relay is also connected to coil A1. We remember that when power is applied to it, the light starts to burn.
The work of this part of the circuit can be fully described as follows:
- The three position switch is set to position 2;
- When it gets dark outside, the photo relay is triggered;
- Closing its contacts triggers the twilight relay, which closes contacts 1 and 3.
- The active phase has already been connected to contact 1, which means that when triggered, it goes to the contactor, which already has a zero connected.
- Next, the starter is drawn in, and the voltage is applied to the lighting machines, the light starts to burn.
As soon as light enters the photo relay, its contacts open and the twilight relay breaks its contact. It's that simple!
So, we have disassembled with you a standard connection diagram. Knowing the whole chain, you can even independently carry out the repair of street lighting, if one or another equipment fails.
The video in this article will help you understand the topic even better.
17-11-2015, 12:56
The lighting provided by LED street lights and lamps is recognized as one of the most efficient, economical and safe. You can appreciate the convenience and advantages of LED lights both during installation and during subsequent operation. They are durable, provide clean, even light that is close to natural daylight and is completely harmless to human eyes.
Choose and buy LED lights today means to ensure good visibility not only of the crowded streets of cities and megalopolises, but also of the private sector, which often suffers from insufficient illumination. The arrangement of a plot of a private house with poles equipped with LED lamps is today practiced among many owners of suburban real estate. The question is different - how to properly connect LED lights to ensure energy savings and long lamp life?
Connection features and diagram
 Installation of LED street lighting fixtures, depending on the type, has its own subtleties. For this, lanterns are used, installed on low plastic or metal supports up to one meter high, mounted on reinforced concrete pillars from 2 to 7 meters high and attached directly to the facade of the building. As a rule, installation and connection of lamps on the facade or on the roof of the house does not cause serious difficulties. Another thing is to install spotlights by connecting to a photo relay.
Photo relay- this is a special compact device, in another way, it is also called "twilight switch" or light sensor. It ensures that the flashlight turns on at dusk and automatically turns off at dawn. In the assortment of the modern market there are many types of photo relay, which can be additionally equipped with a motion sensor. In this case, the light turns on and off according to a set timer, for example, at midnight, but flashes again when driving (a car, a person, a pet).
 Choosing and purchasing a street lamp on a pole through the online store means getting a complete set and purchasing an additional photo relay. Commercially available photo relays are easy not only to use, but also to install - the connection diagram on the back of the device greatly simplifies the process. Before installing several lamps, lay a supply wire (cable) with a cross section of 1.5 mm ^ 2 with a phased connection of LED lights. Together with the wiring diagram, the permissible load must also be displayed. An important rule is not to allow the installation of a large number of luminaires that put a heavy load on the network.
You can also buy an LED spotlight in the store wesem-light.ru. All goods are of excellent quality with delivery in Russia.
Lighting devices today are used not only inside the house, but also outside. This allows you to illuminate driveways, create optimal conditions for the movement of people at night, etc.
Today, LED street lighting is increasingly being used for such purposes. This allows you to get very high quality lighting, which at the same time consumes slightly less electricity.
Mounting methods
Street lights are types of lighting fixtures that are designed to work in an external environment. There are many types of such products on the market today.
All of them differ in the way of installation, among which 2 main options can be distinguished:
- Installation with additional supports. This option can be found both on the city's driveway and in a small park.
- Fixing to a wall or other rigid frame. It is very often used to highlight exits, etc.
It should be understood that the installation method often depends on the purpose of the luminaire and its design.

Connecting luminaires
The installation process of such systems can be divided into several sequential stages:
- First of all, wiring is carried out from the source of electricity to the future location of the lamp. At the same time, this can be done by air or by running a cable underground.
- At this stage, the luminaire is connected to the current source. This is done quite simply, since often only two conductors come out of the case of this design.
Accordingly, they should be connected to electricity. For such purposes, special junction boxes are used, in which several clamps are located. The cables are fixed according to the diagram of your luminaire. In this case, they should be properly fixed so that the wire pops out of the clamp. - The final stage is fixing the luminaire to the frame. This is done differently depending on the shape of the product.
Please note that the lamp can be connected either directly to the source or through a switch or special photoresistors that will turn it on during the dark period of the day.
This scheme is quite simple, since it involves an intermediate link that is mounted between the power supply cables and the luminaire. If you are not sure that you will do this correctly, then it is advisable to entrust it to an experienced electrician or watch this video carefully:
For a normal and comfortable life in the dark, street lighting is turned on. Its purpose can only be technical, such as in front of the entrance to the gate or in front of the garage. In this case, the focus is on getting good visibility within the illuminated area. The decorative purpose of outdoor lighting fixtures is mainly associated with landscape design. At the same time, light is not always used to be able to comfortably and efficiently perform certain actions.
It can either simply serve as a guide when driving in the dark on a personal plot, or perform a purely decorative function using colored backlighting. Façade lighting fixtures often combine technical and decorative functions. Luminaires are only part of the lighting network. Therefore, it is necessary to create it based on the purpose of the lighting, either using aerial laying of wires and cables, or by burying them in the ground.
Technical lighting involves a sufficiently bright light source located higher than a person's height, that is, not lower than two meters from the earth's surface. With this arrangement, it will not dazzle the eyes, and the illuminated space will turn out to be large enough when using non-directional light sources. In order to obtain more light at the same power consumption, reflectors (reflectors) must be used. They are the most widespread among street luminaires for technical lighting.
Street lighting
These lamps are located on poles or on the walls of buildings at a sufficient height above the ground. Their connection is done from an electric meter installed after. Since, according to existing standards, electricity metering devices are installed outside private houses, it is advisable to provide a separate electrical panel for outdoor lighting. Moreover, for the lighting network of a large area, it is better to install several electrical panels. This is more convenient for managing this network.
Each of them will be required to lay wires and cables to the lighting equipment. Therefore, it is necessary to mark the location of the lamps on the site plan and determine the method of connecting them to the lighting power network. In order not to affect the landscape design of the site from the side of the power input, it is recommended to lay the cable underground. By placing the electric meter in a metal lockable cabinet of the input device (VU), it is possible to reduce the number of additional electrical panels for the connections of the lighting network.

With such a connection, it is advisable to install facade lighting fixtures on the wall of the house. They will simultaneously perform both decorative and technical functions. The light tones of the walls of the house are especially successfully combined with facade lighting. For façade lighting, the light of which falls on the walls, it is recommended to select the shade of white for the best decorative effect. Therefore, as light sources, energy saving and LED lamps are best suited for this purpose.

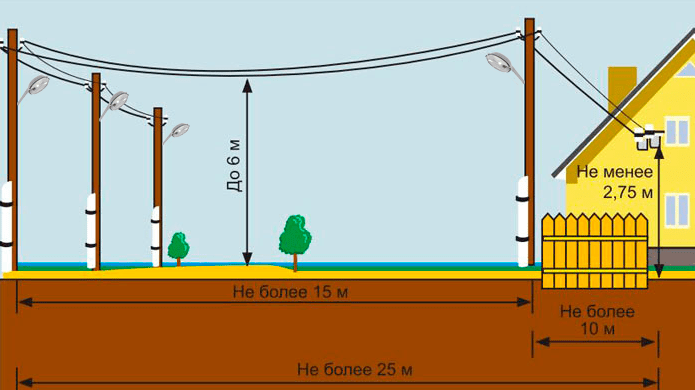
For street lighting with the location of the lamps on the poles, it is advisable to lay the wire through the air. In this case, you do not need to dig trenches, which is much more expensive than attaching wires to poles. But when installing poles and wires on them, you should adhere to the distances shown in the image below.
Lanterns and lanterns on the backyard
On the territory of the site, such an installation on the poles of lamps and wires will not carry any decorative effect. For lighting with technical and decorative functions, a cable is laid in the ground and hollow supports are installed inside. They are made from either metal or plastic. Poles with lanterns are both modern and stylized. During installation
 |
 |
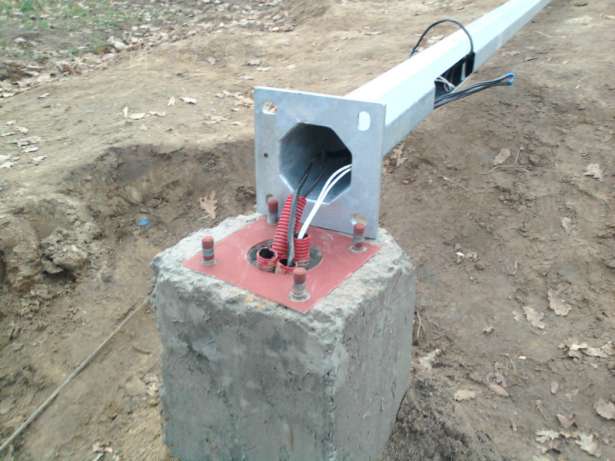
The foundation and studs are made in advance.
- For the foundation, either a hole is dug manually with a shovel, or a cylindrical well is made in the ground with a drill or a brace to a depth of 0.5 - 0.7 meters.
- There should be sand at the bottom. If at the bottom the soil needs to be poured and compacted with a layer of sand to a thickness of 10 - 15 cm.
- The diameter of the well is chosen in such a way that the rectangular wooden formwork placed in it is slightly larger than the dimensions of the base of the post.
- A steel or plastic pipe is vertically installed in the center of the well, the diameter of which allows you to effortlessly thread the wires through it.
- The lower end of the pipe is buried in the sand, and a cellophane bag is put on the upper end so that nothing gets inside the pipe when filling the formwork with concrete.
- After the concrete of the foundation has hardened through the tube, a cable laid in a trench is passed through it.
When installing luminaires and laying a cable for their connection, it is recommended to comply with the following recommendations and requirements:
- A cable trench is dug to a depth of 70 cm, which is assumed to be optimal. Moreover, the minimum distance to the nearest building is taken at 60 cm, to a cable or pipe - 50 cm.
- If a cable or wire is pulled through the air, the clearance from the carriageway is taken at least 6 meters, and from the paths of the personal plot - at least 3 meters.
- The location of the luminaires should not create streams of light into the windows of both your own home and the windows of neighbors and onto the territory of their plots.
- The illuminated space created by the luminaire minimally intersects with the space illuminated by the adjacent luminaire.
- Switches for the lighting power supply with a voltage of 220 V must be installed in a place that is reliably protected from moisture.
- Copper conductors and cables are recommended for burial, as they are more resistant to deformation and do not break from them in the same way as aluminum conductors can.
- All elements of the 220 V lighting network must be grounded.
- Luminaires for landscaping should not be flooded by water from melted snow or rain.
The paths on the backyard, along which there are garden lights, are beautiful, convenient, but expensive for the price, as well as for installation and assembly. Especially with a considerable length of tracks. To avoid costly work on laying cables in excavated trenches, as well as installing lantern foundations for paths and for landscape design, self-powered flashlights are used. The batteries in these flashlights can be either batteries that are periodically removed and recharged, or automatically recharged from solar cells.

If the light from such lanterns does not illuminate the tracks well enough, additional lighting can be made, arranged in the same way as at railway marshalling yards. A bright LED floodlight is installed on a separate high mast located in the optimal place for the light source. In combination with flashlights, it will create good visibility on the garden plot at night.