Super roof finishing. Options for arranging the eaves of the roof: sheathing and materials Sheathing overhangs of the roof of a wooden house
No wonder people from ancient times said that the main thing is a reliable roof over your head. Professional roofing masters also confirm that only a reliable, durable roof provides a comfortable living in the house. Moreover, the reliability and durability of this complex structure sometimes depends on seemingly quite insignificant elements.
For example, the eaves of the roof, despite the small size and percentage of the surface area of the slopes, this element performs important functions that affect the service life, insulating capacity and strength of the roof. In this article, we will talk about the device of the roof eaves at home, the methods of its formation and the optimal dimensions.
Roof cornice is an important element of roofing structures, this term denotes the lower parts of the roof slopes, which are their continuation. Installation of cornices is carried out during the arrangement of the rafter system by increasing the length of the rafters or by installing fillies. From above, the cornice, like the entire area of the slope, is covered with roofing material, and from the bottom it is sewn up with lumber, spotlights, siding. In the construction of the roof of the house, it performs the following functions:
- Protects the walls of the house from moisture. The eaves overhang protects the upper part of the outer walls from moisture and dirt, maintaining their attractive appearance and integrity.
- Prevents melt and rainwater from flowing into the foundation area. The structure of the eaves of the roof is such that it carries out streams of water and blocks of snow, sliding off the slope, further from the foundation of the house, preventing the erosion and destruction of the blind area.
- Gives the roof a finished, neat look. Roof overhangs, being a continuation of the slope, give the structure a more proportional look, harmoniously completing the architectural concept of the house.
Note! Installation of cornices is an obligatory stage of roofing work, which is required by the technology of roof erection, regardless of its type, shape and type of waterproofing coating. Even flat roofs have a small overhang that protrudes beyond the outer walls of the structure.
Views
Many homeowners are interested in whether it is possible to arrange a cornice for the roof with their own hands, since its visual design seems extremely simple. Experienced craftsmen believe that this is a job even for a layman. The main thing is to understand the purpose and types of cornices. In the design of pitched roofs, the following 2 types of overhangs are distinguished:
- Pediment. The gable overhang is the part of the roof slope that protrudes beyond the outer walls of the house from the side of the gable. As a rule, this type of cornice is short and is formed due to the lathing and the frontal strip, which gives it a shape.
- Cornice. An eaves overhang or eaves is called the lower part of the slope, starting from the intersection of the roof plane with the outer load-bearing walls. These curtain rods are usually much larger than pediment ones, as they prevent splashing water from the slope from entering the wall decoration.
Important! In fact, the cornice is an extension of the rafter legs. Since the overhang is at the bottom of the slope, the minimum snow load falls on it. However, the installation of gutters or snow guards changes the distribution of loads, so significant pressure can be exerted on it.

Formation methods
Before you make a cornice for the roof, you need to understand the device of this element of the roofing structure, as well as the methods of its formation. The eaves installation method depends on the design and type of roof, on the length of the slopes. The most common technologies that can be used to form a roof cornice are:
- Elongation of the rafter legs. The easiest way to form a roof overhang is to use rafter legs that are longer than the ramp. The more you want to get the overhang, the longer should be the bars from which the rafters are made. The disadvantage of this method is an increase in the weight of the frame, and, consequently, the load on the foundation.
- Raising the rafters with fillies. To form the eaves of the roof, you can build up the ends of the rafter legs with the help of filly - lighter and cheaper elements made of edged boards of lesser thickness. Thanks to the filly, the frame has less weight, despite the large cornice.

Professional craftsmen consider it advisable to use filly to form an overhang if the length of the slope exceeds the standard size of lumber. Usually the length of the boards from which the roof frame is made is 6 meters. If the roof slope is 6 meters or more, the installation of the cornice is carried out using filly.
Optimal size
It is often difficult for non-professional craftsmen to determine what size the cornice should be made. This is indeed a very important constructive decision, because if it is too small, then melt or rainwater from the slope will fall on the facing of the outer walls, on the foundation area, leading to destruction, as well as damage to the appearance of the structure. When choosing the length of the cornice, the following factors are taken into account:
- Climatic conditions. The optimal size of the roof eaves depends on the amount of precipitation in winter and summer. In more snowy regions, roofs with a wide cornice are traditionally used, which protect the walls, the foundation from the ingress of snow. For example, alpine chalets located in the mountains usually have cornice overhangs at least 1 meter wide.
- Roof slope. The greater the angle of inclination of the roof slopes, the smaller the cornice can be made. This is due to the fact that with a flat roof, the trajectory of falling snow and water goes far from the outer walls of the house. If the slopes are steep enough, then it is better to make the cornices wider to protect the structure from water splashes that can reach the walls during intense snowmelt or rainstorms.
- The proportions of the house. A wide cornice with a sloping roof makes the building visually lower, squat, distorting the optimal proportions. A narrow overhang with a high, steep roof, on the other hand, stretches the silhouette of the house.
Important! The minimum permissible width of the cornices is 45-50 cm, but this is clearly not enough for regions with a high snow load. If necessary, the size of this structural element is increased to 1 m.


Filing material
Installation of overhangs is carried out at the final stage of the assembly of the rafter frame. As the crate is ready, the rafter legs are leveled, and then the frontal (wind) bar is fixed at their ends. To protect the lower surface from moisture penetration or the infestation of birds of the overhang, the cornice is sutured. This task can be accomplished using various materials:

Remember that the ventilation of the roof space is an important factor affecting the lifespan of the roof frame. Therefore, experienced craftsmen recommend using spotlights for filing overhangs. It is better to use models with central perforation, providing an average level of ventilation.
Binding methods
In order for the eaves overhang not only to perform its functions with high quality, but also aesthetically, it looks neat, it is necessary to hem it correctly. For this, it is not enough to choose high-quality material, you still need to decide on the filing method, which depends on the slope and length of the slope. There are two methods:
- Diagonal hem. This method consists in hemming the cornices with soffits so that they are parallel to the slopes. In this way, roofs with a large slope, but a small slope length, are hemmed. The diagonal method is considered more time consuming.
- Direct filing. This option differs in that the cornice of the roof is sewn up with soffits using a box located at right angles to the outer wall of the structure. Direct filing is less time consuming, but more costly in terms of building materials.


Video instruction
1.
2.
3.
After the work on the erection of the roofing structure and the laying of the covering are completed, the filing of the eaves of the roof is carried out (detailed instructions with photos and videos on installation can be easily found on the Internet). Next, we will talk about how to hem the eaves, for which roof structures this procedure is intended, as well as the materials necessary for filing the eaves.
Hemming the eaves, or, more simply, the boxes, is a rather important undertaking, the end result of which can greatly affect the appearance of the house.
The harmony of the external appearance of the building depends, of course, on what type of structure the roof belongs to, whether it is a hipped hipped roof or a standard gable roof, on which the soffit of the eaves of the roof is used, as well as on what materials were used for the filing of the eaves. Moreover, it is also necessary to hem the cornices because the roof structure often includes those elements that are designed to ventilate the space under the roof; here is also the fastening of the gutters.
The process of filing eaves overhangs
Do-it-yourself filing of the eaves of the roof with your own hands is quite real, it is only important to know what to hem, that is, what materials are used in its creation, and also to strictly follow the entire technology of its implementation, not forgetting about some features.
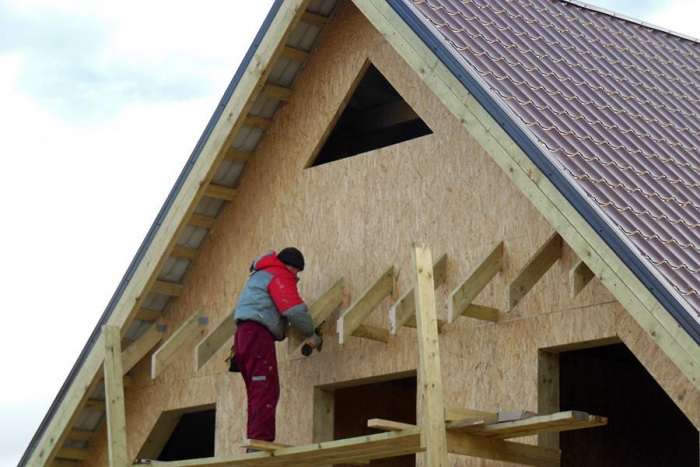
It must be remembered that it is possible to start the process of sheathing the cornice only after the installation of the rafter system has been finally completed, but before work has begun on the installation of the roof sheathing.

It is necessary to saw off the ends of the rafter legs clearly along one line, which should be parallel to the wall of the structure. Planking is also often performed parallel to the walls, so it is important to take into account the width of the cornice box, since if it does not match from different sides of the wall, the appearance of the entire structure will be very spoiled. After sawing off the rafters along the indicated line, either the first sheet or the sheathing board is laid.
It is recommended to insulate the walls of the building from the outside before filing the roof gables (read also: ""). This is especially true for those boxes that are sewn horizontally, and not along the rafter legs. It is better to do this because if you insulate the walls immediately after hemming, you will either have to put insulation under the first board, tearing it off the wall, or the entire upper part of the wall will not be insulated. One way or another, the thermal insulation will not be of high quality, which will inevitably entail the departure of heat from the house.

Materials for filing roof eaves
For filing roof eaves, several material options are suitable at once, among which the most common are the following:

The device for filing the overhangs of the cornice
Before talking about how to create a roof cornice, you need to understand how the box itself works. Of course, each roof is characterized by a special design and construction, and the option of filing the eaves overhangs depends on the parameters of a particular roof. But, however, there are aspects common to all options that apply to most mounted roofs.

There are two most popular options for filing eaves:
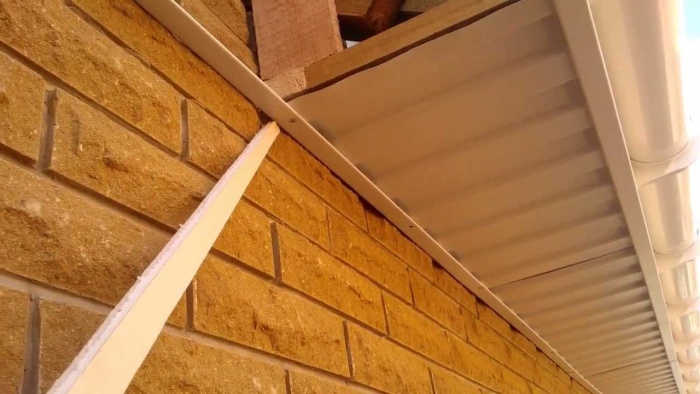
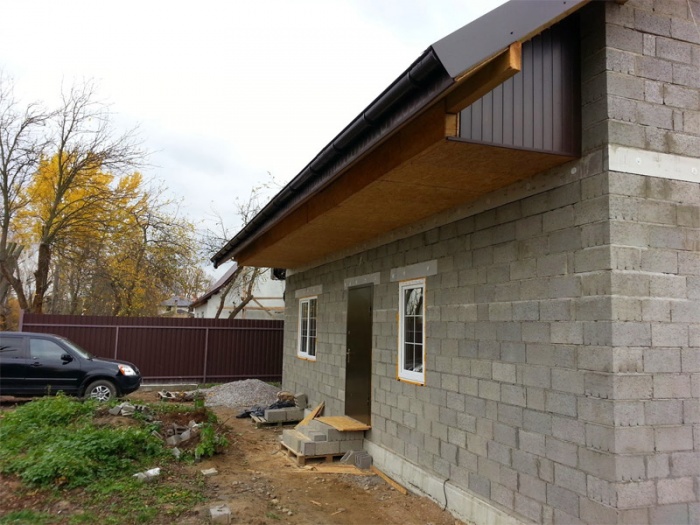
- Eaves filing on rafters. In this case, the inclined angle of the filing should be equal to the angle of the inclined inclination. This option is perfect for those roofs that do not have a large angle of inclination. In this case, it is necessary to lay the edged board or lining directly on the rafters, and this must be done, observing the parallelism to the wall. This requires that the surface of the bottom of the rafters be as flat as possible (read also: ""). Provided that this plane is not flat enough, then it must be leveled with your own hands. To do this, on both sides of the rafters, edged boards with a thickness of at least 4 centimeters and a width of at least 10 centimeters are fixed with screws. First you need to fix the extreme boards, between which you need to stretch a thread along which the remaining boards will be attached. To that rafter leg, which is located at the point of convergence of two roofing slopes, boards need to be fastened from both sides.
- The second method is more typical for a hip roof. So, from the end of the rafters to the wall of the structure, a box is mounted horizontally, and a rather thick board is used to produce a frame for filing the material used, for example, lining. It is fixed with one side from the bottom of the rafters, and the other at the junction of the rafters and the wall.
In order to secure the entire structure as well as possible, screws can be used, but it will be possible to achieve maximum reliability with the help of metal plates and corners.
At the end of the installation of the frame, you can begin the process of sheathing with clapboard or board.
Since a structure of this type will regularly be influenced by various natural factors (wind, rain, snow, etc.), the process of its fastening should also be taken as carefully as possible. It is recommended that each of the attachment points be equipped with at least two (in the case of a thick board, three) screws. This will prevent the boards from twisting.
How to hem the roof cornice, in detail on the video:
The whole process ends with a cut-in of ventilation grilles into the box, which, however, may not be required for the edged board, if there is a gap.
The filing of the eaves is performed when all roofing work has come to an end.
This is the finishing touch that gives your roof a complete look and protects all rafters from external influences.
Roof overhang is the lower part of the roof that protrudes beyond the level of the walls.
They perform not only a decorative function, but also protect walls and foundations from the destructive force of rain.
Their width can be from 40 cm to 1 m.
It is not at all necessary to do the filing of the roof overhangs, but the hemmed overhangs still look more aesthetically pleasing, and they bring considerable benefits.
This should be done after all roofing work is completed, and the walls of the house are insulated and finished.
Before filing the overhang of the roof with your own hands, all the ends of the rafters are cut along one line, parallel to the wall of the house, to which the overhang adjoins.
The ends of the rafters should be sawn off vertically. After sawing off the rafters, they fill the sheathing board with their own hands, along which the entire filing is then oriented.
Types of overhangs
Eaves are located under the pitched roof, and the pediment is on the side of the slope.

The eaves is located under the bottom of the roof slope. It is through it that the ventilation of the attic is carried out.
If your house does not have an attic, but an attic roof, then ventilation inside occurs through the roofing pie.
If the overhang is completely hammered with boards, then in this case, ventilation of the attic will not occur.
But if they are not knocked out, then birds and rodents will crawl under the roof of the house, and the rafters will deteriorate over time due to the moist air.
Do-it-yourself ventilation of the attic can be done in several ways.
The easiest way is to make a gap between the wall of the house and the filing of the roof overhangs. If you are hemming with corrugated board, then the gap should be from 0.6 to 1.2 cm, and for filing with siding or clapboard 1 - 1.5 cm.

For lining, metal sheets and plates, special ventilation grilles are usually used.
If the overhang is sheathed with boards, then a gap of 1 - 1.5 cm is made between them.
The pediment is located under the side of the ramp, which is inclined.
Ventilation is not needed in the place of gable overhangs, but it is important to take care of protection from moisture, wind and other bad weather.
If the overhang is not closed, the gusty wind during the rain can wet the boards and the edges of the insulation, after which heat will not be well retained in these places.
Edge finishing
Both pediment and cornice overhangs have open cuts from the ends - rafters or lathing. They need to be carefully decorated so that they are protected from the elements.
A drain should be installed along the eaves. Edging is carried out with the same material as for the roof.
Before filing eaves overhangs with your own hands, all protruding elements should be cut under one line, strictly at the same distance from the wall.
The video below shows how to sew overhangs with a soffit.
After that, the ends of the rafters are combined with one strapping board, and the frontal board is already nailed onto it.
The frontal board often comes complete with ceramic, metal or bituminous tiles, it is made of wood or metal, and then covered with a special protective compound.
On the pediment cuts, the edges of the sheathing boards are cut off, which protrude beyond the plane of the wall. An end board is nailed to the cuts of the boards and to the end of the ridge beam.
The end part of the board is trimmed with roofing material.
The main methods of sewing cornice cuts
Do-it-yourself filing of cornice cuts is usually carried out in any convenient way. But all possible cladding options can be combined into two techniques.
Sewing roof eaves straight along the rafters is the easiest method. The main condition is that the open ends of the rafters lie in the same plane.

This method will be most appropriate for roofs with a slope of no more than 30º and an overhang of no more than 40 - 50 cm.
A crate of wooden parts is nailed to the rafters and already to it, the hem strips are attached along or across the base.
The horizontal filing of the roof overhang is used if the roof has a steep slope. This kind of editing takes place quite quickly, and very little material is needed.

You need to knock down a box of beams and attach it to the base of the roof and to the wall. The beam that is nailed to the boards should be approximately 1 cm below the wall beam.
This will allow water to drain freely from the overhang. Planks are nailed in the corners from the roof to the house, the longitudinal beams are reinforced with transverse beams.
Materials for filing overhangs
Today, a variety of materials are used for filing eaves.
When choosing a material, one should pay attention to its protective properties - it must insulate, protect it from precipitation, and also provide ventilation of the roof.
In addition, it is good if the material will delight you with its appearance for many years.
Before metal and vinyl siding appeared on the building materials market, overhangs were mainly processed with board and clapboard made of wood.
Unlike processing overhangs with siding, processing with wooden building materials has many disadvantages.
Wood quickly loses its beauty, is prone to decay, and therefore requires constant care.

If you decide to process the overhangs with siding, then you do not have to constantly tint them and generally monitor them.
If you decide to use siding, then you should know that vinyl siding trim on the overhangs does not look very nice.
Condensation will also collect underneath the vinyl siding as this material has no ventilation holes.
If you want to process the overhangs with metal siding, then the condensation will corrode the screws over time, and all the material will be covered with unsightly red spots.
What materials can be used for filing overhangs with your own hands?
Decking is very often used for such purposes. This is a galvanized steel material covered with a polymer coating on top.

This coating not only additionally protects galvanized steel from external influences, but also allows you to make corrugated board of any color.
Galvanized steel, in turn, provides strength and rigidity of the material, resistance to mechanical and thermal stress.
To ventilate the roof, the corrugated board is laid with a gap. Corrugated panels are often made of the required width, so laying the material is quite economical.
Often, wood lining is used for filing overhangs. You should choose the lining very carefully, buying only the highest quality.
The lining should not be very thin. Make sure the wood is completely dry. It is best to choose a material that is stored for at least a month in the air.
The treated board is also suitable for stitching.
The video below shows how you can do the filing of the roof overhangs with your own hands.
A board with a thickness of 1.5 - 2 cm should be nailed with a gap of 1 - 1.5 cm. The advantage of this material is uniform ventilation of the attic.
PVC lining is considered a very cheap material for such purposes. For work, choose a moisture-resistant lining, and do not forget to purchase plastic corners for ease of installation.
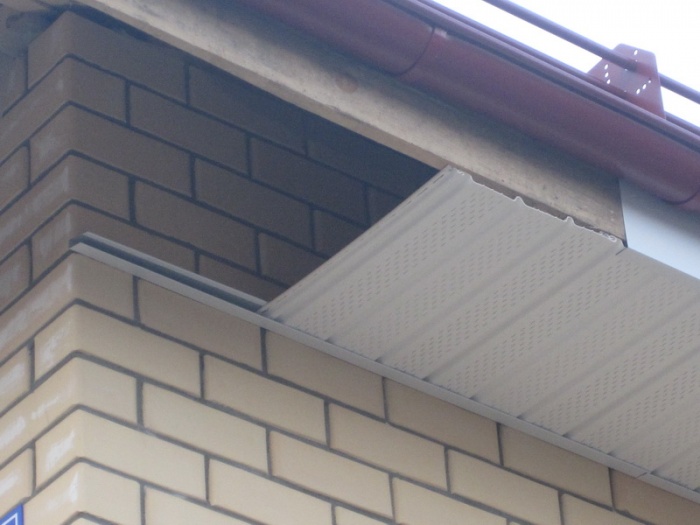
Most often, overhangs are now hemmed with a soffit - a plastic panel made specifically for this purpose.
This is one of the most common materials for this type of work.
It has a lot to do with siding. However, soffit, in comparison with siding, has a denser plastic and a special perforation that provides ventilation.
The material from which the soffit is made is very resistant to sunlight, therefore it does not fade. The soffit is cut and fixed perpendicular to the wall.
The arrangement of a pitched roof is always accompanied by such a process as finishing the eaves of the roof. These works may not seem so significant, but the further operation of the roof depends on how correctly they are performed.
Usually, corrugated board, lining or panels specially designed for this are used as materials for sheathing cornices.
What are roof overhangs and what are they for
A roof overhang is the surface at the bottom of the roof, which is distinguished by a protrusion beyond the walls themselves. It is needed in order to protect the walls and foundation of the house from moisture getting on them during heavy rainfall. As a rule, the width of this part fluctuates within one meter. Construction rules allow not to do the filing of this part of the roof.
But still, it is best if the overhangs are processed, since strong winds blowing through the holes in them can easily rip the roof off the building. In addition to the practical function, the overhang sheathing also performs decorative, since it is always better to remove the seamy side of the roof and aesthetically process its edge.
Before making the eaves under the roof, you need to complete the work on the erection of the roof, the finishing of the house and the installation of the finishing material on the eaves last.
Types of overhangs
If you look at the roof, you can see the overhangs from all sides. two of them are cornice, two are pediment.
Eaves overhang
This is the bottom surface through which air enters the roof structure and ventilation occurs. On roofs with an attic, air flows directly there, and on attic roofs into the very structure of the roof, where the air cavity is located. After the air has passed all over the roof, it exits through the ridge.
If the overhang is hammered with boards, then ventilation will not be carried out, but birds, mice and insects can get into the roof structure. Thus, the overhangs are formed. But not close, but with a small gap for air passage.

Usually, the issue of leaving a gap is solved by similar actions:
- Leaving a gap between the filing and the wall of the house. For filing from corrugated board, the gap is left small, from half to one centimeter. When using lining, you need to leave from a centimeter to one and a half.
- If the overhangs are made with metal, then you need to install ready-made metal grilles that are mounted on the finish.
- If the sheathing is carried out using boards, then you need to leave gaps of up to 1 cm between them.
- If a decision is made to use soffits, then perforated material is used, which is created for ventilation purposes.
Important! The area of the ventilation hole should be greater or the same as one five hundredth of the area of the roof structure. For roofs covered with bitumen, such holes are made even larger.
Frontal overhang
This is the side of the roof slope that adjoins the walls of the house. Ventilation in the case of him is not important, the main thing here is protection from environmental influences. If there is a strong wind and rain outside, then it is necessary that the gable-type overhang does not let moisture through with the wind, since there is a risk of moisture in the roof insulation, which will cease to perform its main function. That is why tightness is in the foreground when designing this part.
Plating methods
Roof overhangs can be designed in various ways, for example, in a perpendicular and parallel direction from the overhang. Various solid materials or their elements can also be used. Consider the methods of fastening the material:
Hems on rafters
If the roof has a slope of no more than 30 degrees and a small part of the overhang, about 50 cm or less, then this cladding method can be used. To begin with, a crate is formed, which is attached to the rafters, the material is already mounted on it in parallel, perpendicular or along the end of the rafters.

Horizontal binder
This design method is very good with a strong roof slope. To carry out the sheathing work, you need to build a kind of box that is attached to the rafters and the wall. For a quick drainage of water caught on the overhang, it is necessary to mount the timber on the rafters slightly lower than the one that is attached to the wall.

Important! With an overhang of more than 45 centimeters, another additional one is laid between the bars.
All beams are reinforced with boards that are nailed perpendicular to the wall.
Eaves cladding materials
When choosing a material for a roof cornice, you need to pay attention not only to its functional side, but also to the decorative one, since the cladding that is not suitable in style will look extremely unattractive.
Decorating with boards
Boards must be taken only of conifers and certain dimensions. The width should be at least 5 cm and no more than 25 cm, and the thickness should be about 2 cm. It is also necessary to carry out processing with an antiseptic and decorative coating with varnish or paint as needed.

With the perpendicular arrangement of the boards, their attachment points are located on each side, in the case of a long overhang - additionally in the middle. If the board is mounted parallel to the wall, then the fasteners are installed every meter. It is imperative that a gap of about a centimeter is left between the boards so that natural ventilation of the roof is carried out.
Clapboard decoration
Unlike ordinary boards, lining is a completely ready-to-install and processed material. Before installation, the lining must also be left under a canopy for one month. Installation is carried out in the same way as in the first case. The only exception is that there is no need to leave gaps between the elements. Special metal grilles for ventilation are then attached to the lining.
Important! Sheathing of the overhang is made only with moisture-resistant clapboard.

PVC siding trim
For finishing the eaves of the roof with siding, only those panels are used that have a special moisture-resistant coating. Additionally, you will need to purchase all additional decorative elements - special finishing strips for finishing the edges, corners for masking the joints, grilles for ventilation. The panels are fixed perpendicular to the wall with three to four fasteners. It is better not to fasten the panels along the overhang, as they can break due to the fact that they do not differ in high rigidity, for example, like wooden boards.

Profiled sheet finishing
This material can be laid so that a large area is hidden at once. Be sure to leave small gaps of about a centimeter between the sheets of corrugated board so that the panels do not bend when the temperature drops. Ventilation is carried out by installing ventilation grilles over the entire surface of the finish.

Sheet metal trim
For the purposes of sheathing the eaves of the house, copper, aluminum or galvanized or polymer-type steel can be used. The length of the sheets used can be up to 6 meters, and the thickness is from 0.6 to 0.8 cm. Ventilation can be carried out by installing additional grilles or by installing perforated sheets. Steel sheets must be treated with special agents on the cutting line to prevent metal corrosion.
Plywood finish
Such material for overhangs can be used, but only if it is water-repellent. Plywood has rigid sheets, so it is easy to fasten it, as a result, a reliable coating is obtained, but it must necessarily be painted, since it does not look particularly attractive without processing. Ventilation is carried out using special grilles.
Soffit finishing
Soffits are planks made of various materials that are made for processing roof eaves. Due to the large assortment of colors and materials, you can choose those soffit panels for execution, which in appearance will fit into the overall design of the exterior.
In addition, the kits contain a variety of additional parts that speed up and simplify the do-it-yourself cornice sheathing. There is no particular difficulty in installation, you just need to cut the strips to size and fix them according to the existing grooves.

Additional finishing of the edge of the cornice
Any type of overhang has uncovered parts of the structure. For the eaves overhang, such elements are the ends of the rafters, and for the pediment, the ends of the sheathing. They, as well as the overhang made, need to be formalized, while protecting from atmospheric influences.
Important! Eaves overhangs need to be decorated with gutters.
These elements can also be decorated with different materials, depending on what kind of material was used. Usually, along with a set for processing the overhang itself, a material for edging is also offered.
Before making the eaves overhang, all rafters must be cut vertically at the same level. Then the ends are joined using a strapping board, to which the frontal is attached. A gutter will subsequently be installed on the latter.

The gable-type overhang is processed by first cutting off the ends of the sheathing that extend beyond the walls so that they are parallel to the wall. An end board is nailed to these ends. It is covered with roofing material.
Roof overhangs are sutured for several reasons. One of the main ones is an aesthetic appearance, since the absence of spotlights gives the overall picture some incompleteness, and therefore the design is not neat enough.
Manufacturers of modern building materials have taken care of making the process of arranging this section of the roof as easy as possible. If earlier various materials at hand were used to close the lower space of the overhangs, such as moisture resistant plywood, board trimmings, siding or lining, today on sale you can find special profiled sheets of certain sizes, as well as the necessary fittings for them. Due to the ease of installation of such parts, they can be installed even by a not very experienced craftsman who knows how to work with the simplest construction tools. All you need is a screwdriver, an electric jigsaw or metal scissors, depending on the material for making the soffits.
Naturally, when performing this type of work, it is necessary to observe the appropriate precautions, since the main process will take place at a height.
Find out how to do it for work at height from a new article on our portal.
Varieties of spotlights and their design
The word "soffit" is translated from the Italian language (" sofitto") As a" ceiling ". These parts are panels made of metal, wood or plastic and are intended for filing eaves and gable overhangs, as well as other horizontal surfaces. In terms of their functions, they can be compared with such popular materials today as siding or wall paneling. However, these panels have a number of differences that take into account their area of application. And one of them is their width, which can even go up to 800 mm.
Soffits are classified into types according to various criteria:
- by design features;
- by material of manufacture;
- by area of application.
Design features of soffit panels
According to their constructive structure, soffits are of three types - these are perforated, partially perforated and completely closed.

- Perforated the variant consists of panels that are evenly covered with small through holes over their entire surface. This type of material is intended for filing horizontal surfaces of overhangs that are not directly affected by atmospheric precipitation. Perforation is able to provide effective ventilation not only of the overhangs themselves, but also of the entire under-roof space of the roof structure. And constant air exchange should be provided here. This is necessary to prevent the accumulation of condensation, dampness, and as a result, the onset of putrefactive processes on the wood and the appearance of mold or mildew.
Perforated panels perfectly protect the space under the eaves from the penetration of birds and insects (for example, wasps) into these cavities under the roof, since the holes have a very small diameter.

- Partially perforated panels have ventilation holes not over the entire surface, but only on one or two sections of the profiled sheet. Thanks to such hemming materials, it becomes possible to regulate the air exchange in a way. Partially perforated soffit panels are used for filing external horizontal surfaces of a house, as well as ceilings of terraces, gazebos, veranda or porch. Therefore, this type of material can be called universal.

- Unperforated the version of the panels does not have holes on its surface, and is intended for sheathing areas that are likely to be directly exposed to atmospheric precipitation. Such areas can include overhangs on the gable part of the roof, as well as vertical walls along the eaves. In addition, soffits without perforation can be used for facing the vertical part of the pediment.

Everything, except for the wooden homemade soffit panels , howplastic and metal, have special locks, with which they are fixed on the overhang and are connected to each other. After the spotlights are docked and fixed oncrate overhang, locks it is seen will not.
Soffit panel prices
soffit panels

The standard sizes of vinyl and metal soffit profiled panels can vary in width from 300 to 800 mm, and their length usually 3050 mm.
If the filing work will be done independently, then it is necessary to take into account that the wider the panel is selected, the faster the installation can be carried out spotlights in place.
Varieties of spotlights by material of manufacture
According to the material of manufacture, as mentioned above, ready-made soffits can be divided into plastic and metal (steel, aluminum and copper) options. Sometimes natural wood is also used. To determine the choice of soffit panels according to the material of manufacture, it is worth considering their characteristics in more detail.
Plastic (vinyl) panels
Plastic soffits are made of the same material composition as for finishing the walls of the facades.

The manufacturer's declared lifespan of such plastic in outdoor conditions is 30 years or more, which, you see, is a lot. It is easy to care for it - it is enough to periodically clean it from dust. The material does not require coloring, since it has a constant color - the dye is introduced into the vinyl structure at the stage of the production of the plastic itself. In specialized stores, a wide range of panel colors is presented, which allows you to choose the one that will be in harmony with the shades of the facade color and with the color of the roof. The panels come on sale in packs of 16 ÷ 22 pcs.
The advantages of plastic spotlights include the following characteristics:
The group of metal soffits includes panels made of aluminum, steel and copper. However, the most demanded metal panels are steel as the most affordable. The second place is occupied by aluminum, followed by copper, but not because of poor quality, but because of the high cost.
Each of the metal options has its own drawbacks.
It has already been said that the most affordable metal panels are steel soffits with an enamel protective and decorative coating. After cutting the parts for filing, the trimmed edges require processing, otherwise, with the inevitable effect of moisture, they will become hotbeds of the appearance and further development of corrosion.
Aluminum can also be damaged by oxygen corrosion, and to prevent this from happening, its cut must also be treated with a special compound.
Copper, although it has the highest cost, is also susceptible to oxidation. Therefore, the material for these products is often subjected to an oxidation process. However, the oxidation of copper does not lead to structural damage. Therefore, such products are often viewed as not having a limited shelf life.
Prices for plastic panel panels
plastic panels

Copper panels are becoming more expensive due to the fact that they are usually purchased with a drainage system made of the same material.
The positive characteristics of metal soffits include the following qualities:
- A wide range of color solutions for steel and aluminum spotlights.
- A very presentable appearance of the copper version of the sheathing of the eaves, especially if it is combined with a copper roof.
- With appropriate processing of cuts, the material becomes resistant to atmospheric aggressive influences.
- Complete inertness to fungus, mold, moss, biodegradation.
- The strength of the material and high enough resistance to mechanical damage.
- Inertness to ultraviolet radiation and temperature extremes.
- The operating temperature range is very wide - from - 60 to +100 degrees.
- The material is environmentally friendly and does not emit toxic fumes.
- The relatively low weight of the materials facilitates installation work. In addition, due to this quality of the material, it can be used on old buildings. Such decorative cladding does not significantly increase the load on the supporting structure.
- Easy maintenance of the created structure.
- Long service life, which must be at least 30 years for steel and aluminum. We have already said about copper - there are no special restrictions on the duration of operation.
Wooden spotlights
Quite often, on wooden and stone buildings, you can see overhangs, hemmed with boards or wooden planks. Home craftsmen most often make such spotlights on their own. Another option is to order them at carpentry workshops.

However, when choosing this material for filing overhangs, do not forget about the need for ventilation. To ensure it, gaps are often left between the wooden planks, and so that insects cannot settle in the under-roof space, a metal mosquito net is fixed to the overhangs before fixing the narrow boards.
The planks of wooden soffits can be fixed along the eaves or perpendicular to it. Their location depends on the choice of the home owner, the overall design of the facade and the width of the roof overhang.
Additional structural elements for filing eaves
When installing soffit panels, additional profile elements will be required, which play not only a functional, but also a decorative role. For soffits, fittings are used from the kit used for cladding walls and other surfaces with siding or plastic clapboard.
- For framing and fixing the edges of the panels, a J-profile is fixed to the plumbing crate, which can have different dimensions in width, depending on the model of the kit.
Siding prices

- A finishing strip is used to decorate the top edges of panels fixed to the wind board. She is the final element of the design. This element is fixed along the upper edge of the wind board and the edge of the panel is hidden in it.

- The H-profile is necessary for joining individual panels in those places where it is impossible to use the locks located at the edges of the soffits. For example, you cannot do without it when decorating the corner zones of eaves overhangs.

The use of the H-profile simplifies the diagonal installation of panels and masks their uneven cut edges. In addition, the H-profile must be installed between the panels in cases where the eaves overhang has a length of more than 8000 mm. The connecting element will stiffen the structure and make it more reliable.
- To install soffit panels on the wall of the building, not only the J-profile, but also the F-profile is used. It is convenient in that it fixes the panel not only from below, but also from its upper part. In this profile, fixed along the line of the wall, the panels are pushed in and firmly held in one position.

- A profile, called an outer or outer corner, is usually mounted at the junction of the lower edge of the wind board and the overhang sheathing, into it is established facing panels of a wind board and soffits of an overhang.

In addition, the outer corner can be used in other cladding areas where two panels need to be joined at a corner line.
- Internal corner - this profile will be necessary if the house has an L-shaped or U-shaped arrangement in the plan, as well as if the porch, veranda or terrace of the house protrudes beyond the main structure.

The inner corner is also suitable for joining soffit panels and siding boards or lining used for wall cladding along the wall.
 J-chamfer - excellent for facing the frontal board, at the same time creating conditions for attaching soffit panels
 - A J-bevel is a wide profile with an S-shaped bottom edge. It is designed to fit the front edge of the soffit panel into it. This profile element can be used when installing spotlights in the event that there is a wind (frontal) board in the overhang structure. When choosing the size of this profile, you must focus on the width of the wind board.
An example of using such a J-chamfer is well shown in one of the illustrations above.
Additional fittings for the installation of spotlights are selected depending on the design that the eaves overhang facing will have. Sometimes different profiles can be used interchangeably. For example, instead of an inner corner, two J-profiles are installed, turned in different directions. However, it is best to use the profile element that is directly intended for a particular area of joining or framing panels.
In order not to miss any of the elements for the installation of the structure when buying material, it is recommended to draw up a diagram in advance and measure the length and width of the surfaces of the overhangs and the wind board. In the hardware store, according to the drawn up scheme, the sales assistant will help determine the choice of the size and shape of the profiles, as well as their length and number.
Installation options for soffit panels
How the soffit will be installed depends on the width of the overhang, that is, on the distance that has formed from the wall to the end of the rafter (or filly), and also, often, on the height of the latter.
- If the width of the overhang is less than 400 mm, then the soffit panel can be installed in profiles fixed horizontally on the wall of the house and at the ends. In this case, additional crate is not even required.

- If the width of the overhang is more than 400 mm, but less than 500 mm, then a bypass rail or bar is fixed to the ends of the rafters around the entire perimeter of the overhang, to which the J-profile is fixed, into which the edges of the soffit panels will be installed. Such a strapping will strengthen the overhang and become a place for additional fastening for soffits. That is, the step of fixing them will be less, which means that they will hold more securely.
- If the overhang has a width exceeding 500 mm, then it is necessary to mount a crate under the soffit panels. To do this, bars are fixed on the wall, as well as on the edges of the rafters, and then between them, along the entire length of the overhang, as a result of which a reliable base for the panels is formed. Guide profiles are fixed on the beams fixed along the edge of the rafters and on the wall - which one to choose is determined in advance. Soffit panels will be installed and fixed into these profiles. It turns out that each of the panels will be fixed at six points.

- If the wind board has a small width, then one long but narrow one can be used for sheathing, which is installed along the eaves of the roof. If the frontal board has a width of more than 150 mm, then it is recommended to fix the panels vertically. Regardless of how the panels will be installed, before installing them, it is necessary to fix the corresponding profiles under the roofing material, as well as along the edge of the rafters.
- Here it is worth considering the design of the corner plumb lines. They can be trimmed at an oblique or right angle, as shown in the figure.

Soffit joints on roof corners:
a) oblique angle;
b) right angle;
1 - external receiving cornice profile - J-profile or J-chamfer
2 - soffit panel;
3 - two J-profiles installed back to back, or one H-profile;
4 - wall profile: it can be an F-profile or J - a profile;
5 - J-profile, as an additional supporting element, mounted when forming a filing at a right angle.
Do-it-yourself sewing of eaves overhangs with soffits
Installation tools
To carry out installation work on the filing of eaves overhangs, the following tools must be prepared:
- Building level.
- Tape measure, ruler, construction square.
- Miter box.
- Hammer and
- "Bulgarian" and (or) scissors for metal for metal panels. It is still recommended to use scissors, since when cutting sheet metal with an abrasive disc, the edges of the panel, due to overheating, lose their protective coating, and the appearance of foci of corrosion is not excluded in these areas.
- Fine-toothed wood saw for plastic and wooden spotlights.
- Sharp construction knife.
Having these tools at hand, and knowing how to use them during the installation process, you can easily cope with the task of filing spotlights.
Installation procedure
By themselves, the installation of soffit panels is not particularly difficult. The problem may, however, be the fact that the main operations will have to be carried out at a height.

Therefore, professional builders, before proceeding with the installation of the drain and sheathing of the roof overhangs, install scaffolding along the entire length of the slope. it difficult enough construction, but allowing you to move around calmly and do all the work alone.
If it is not possible to use the scaffolding, and you have to work from the stairs, then you will need two of them, and you will also have to invite an assistant.
So, work on the arrangement of spotlights begins after the flooring is completed. The first step is to take measurements from the overhang area: you need to find out its width, length and width of the wind board on both sides of the roof. If it is planned to cover the gable overhangs or even the entire gable, then the dimensions are taken from it.
| Illustration | Brief description of the operations performed |
|---|---|
 | According to the measurements taken, a scheme is drawn up for filing the overhangs, indicating the sizes and locations of specific profile elements. In addition, it is immediately necessary to decide on the elements of the crate. Above, it was told about the standard schemes of a wooden base for the installation of spotlights. However, some craftsmen, for the purpose of higher reliability, prefer to strengthen the crate with additional bars. These elements are also included in the scheme, and then in the estimate. The overhang filing scheme may look as shown in the figure, but in addition it will be useful to put down the length and width of the sheathed area on it. Having a work flow chart, it will be easy to plan the procurement of materials and accurately calculate costs. |
 | Having purchased everything you need, you can go directly to the work. And the first step in this process is securing the lathing. The most common way of arranging the lathing, even if the overhang is 400 mm wide, is to form a frame of three longitudinal bars. One of them is fixed to the wall with dowels or other fasteners at the level of the lower edges of the rafters, and the second is fixed to the lower ends of the rafter legs with self-tapping screws. |
 | The middle rail of the lathing in different versions can be attached in different ways. For example, if the length of the slope is small, then the beam, fixed in the middle of the structure, can be fixed only along the edges of the eaves overhang. If the length of the ramp is more than two meters, then the middle bar must be fixed not only along the edges of the ramp, but also in addition to the rafter legs, by installing pieces of the bar between them. |
 | At the corners of the roof, it is necessary to make a reinforced crate. At the same time, of course, it is taken into account how the soffit panels will be joined - with a direct or oblique connection. If the second option is chosen, then it will be necessary to fix the timber from the corner of the house to the outer corner of the overhang. An H-profile will be attached to this frame element. |
 | It is much easier to equip the crate for soffits, which will be fixed parallel to the rafters. In this case, two or three beams, depending on the width of the overhang, are fixed directly to the rafter legs (or to their continuation - filly). |
 | The J-profile (starting profile) is fixed to the batten timber, fixed along the wall, with self-tapping screws. Fastening is done with a self-tapping pitch of 150 mm. Here it is necessary to take into account that if the walls are sheathed with clapboard or siding, then instead of the J-profile, an internal corner bar is installed. Instead of the J-profile, an F-profile can also be installed, which will more reliably fix the panel in the desired position. |
 | A J-profile can also be installed on the front side of the frame. However, to make the task easier, a J-bevel can be installed instead, which will cover the windboard and become a support for the front side of the soffit panels. If this element is selected for installation, then first a finishing profile is installed along the top line of the wind board, which will hold the J-chamfer panel. The illustration shows the installation of these parts on battens and a windboard. On it you can consider: 1. Finishing profile. 2. J-chamfer. 3. Wind board (berth). 4. Wooden frame element. Installation of all these parts is carried out using self-tapping screws, which are screwed approximately in the middle of the longitudinal holes and are not tightened to the stop. It is recommended to choose stainless fasteners that will last longer and will not leave rust stains on fittings and soffit panels. |
 | The next step is to cut the panels according to the dimensions of the overhang width taken in advance. Metal spotlights are cut with metal scissors. The illustration shows cutting with a grinder, but we have already mentioned the undesirability of such an approach when using steel soffits. Vinyl panels can be easily cut with a fine-toothed hacksaw. When cutting panels, it is necessary to take into account that the panels must be 6 ÷ 7 mm less than the total width of the overhang, that is, the so-called technological gap must be observed. This value is necessary if the panels will not slide into the profiles from their end side, but are inserted first into one fixed along the wall, and then into the J-chamfer. In addition, this gap will allow the material to expand as the ambient temperature changes. It should be noted that each of the materials has its own temperature gap, which is indicated by the manufacturer in the installation instructions for soffits. The edges of the cut metal soffits must be immediately treated with anti-corrosion compounds, otherwise corrosion over time will begin to destroy the panels, and they themselves will take an unsightly appearance from rust streaks. |
 | Next, you can proceed to installing spotlights in the profiles prepared for them. If a J-chamfer is selected for installation, the soffit panels slide into the gaps of the profiles. |
 | Each of the retracted panels is screwed to the wooden lathing through special longitudinal holes. The next panel to be installed is inserted into the lock part of the previous one, that is, it overlaps the edge with holes through which the first one is fixed to the crate. So the installation continues up to the corner of the overhang. |
 | If it is more convenient to install and fix the soffits on the crate in the profiles, inserting them first into the guide fixed on the wall, and then into the front one, then this process must be carried out very carefully, since the edges of the profiles can be easily damaged. This installation method is more suitable for vinyl panels, as they are more flexible and easily return to their original shape after a slight bend. After installing the first panel, it is immediately screwed to the crate in two or three places, depending on its width. The next panel, engages with the first folded edge of the locking part and closes the chamfer with fasteners. |
 | If the overhang does not have a turn to the other side of the house, then for its side part, parts are cut out of a solid (without perforation) soffit or siding panel, which are fixed on the end part of the lathing. These parts can be mounted vertically or horizontally, but so that rainwater does not penetrate under them at the joints. The illustration shows only the crate for the installation of such a "plug". |
 | If the method of direct fastening of the panels is chosen for the design of the corner area of the overhang, then the overhang of one of the sides of the roof is hemmed in the usual way, and on the other side the panels are fixed with a profile pattern perpendicular to the panels of the other side of the overhang. If, as shown in the illustration, the overhang has a complex shape, then the soffits are fixed on it, according to the established crate, over the design of which you will have to think additionally, based on specific conditions. |
 | If you want to form a cladding on the so-called "oblique corner" or "herringbone", it is necessary to provide a bar in the frame lathing, which is installed in the corner part from the wall to the outer edge of the overhang. In the future, an H-profile will be fixed on this element, into which panels cut at an angle of 45 degrees will be installed, forming a right angle of the overhang. |
 | The gable overhang is much easier to handle, since it is usually small in width, and two types of profile can be used to frame its edges - these are the J-profile and the F-profile. An inner corner profile is often used for joining panels under the ridge. If the gable side of the roof is sheathed with clapboard, then one profile can be used for it and the soffits - this is the inner corner, fixed along the line of intersection of the slopes and the gable wall. A soffit panel is inserted into one side of this profile, and lining or siding into the other. |
Common errors when filing roof overhangs with soffits
In order for the overhang to look neat, it is necessary to follow the sequence of the installation process. Even a slight deviation or simplification can backfire.
Wall paneling prices
- Do not neglect additional elements in the frame crate, as well as save on fasteners. A strong wind that has risen can easily ruin the whole work, tearing and breaking the soffit panels if they are not fixed securely enough. As a result, money and time will be wasted, and you will have to do the same work again, impoverishing the family budget for additional expenses.
- Soffit filing is carried out after the walls are faced with clapboard or siding, and gutters are installed.
- It is recommended to fasten all parts of the soffit structure only with stainless fasteners. Otherwise, after a very short time, the initially neat appearance of the finish will be radically damaged by rust spots.
- Soffit panels made of any material during installation require adherence to the technological gap, since with an increase in temperature and expansion of the material, it can deform. In such cases, the cladding begins to warp, and it has to be dismantled in order to redo it again later.
Adhering to all the rules and recommendations for performing installation work, as well as strictly observing the necessary safety measures, it is quite possible to perform filing of eaves overhangs with soffits on your own, without resorting to the services of masters and saving a very decent amount at the same time.
You can familiarize yourself with some additional nuances of filing overhangs with soffits by watching the video recommended for attention:
Video: the process of installing spotlights on the eaves of the roof