Tin can burner. Beer can burner
An alcohol burner can be useful on a hike, in the country, or at home, if the gas and electricity are suddenly cut off.
For manufacturing we need:
1. Aluminum can for beer or other drinks.
2. A coin or a round plate made of metal, diameter - 25-35 mm, thickness - 1-3 mm.
3. A saucer (plate, lid, tin can with a low side) made of ceramic, glass or metal.
4. Alcohol - 80%.
Tools:
1. A knife with a sharp end on the blade (I used a Swiss knife, the handle added a height of 1.2 cm, can be replaced with an office knife blade by increasing the thickness of the lining)
2. Shiloh
3. Wood lining, thickness - 2 cm
4. Rubber lining, thickness - 0.8 cm
Manufacturing:
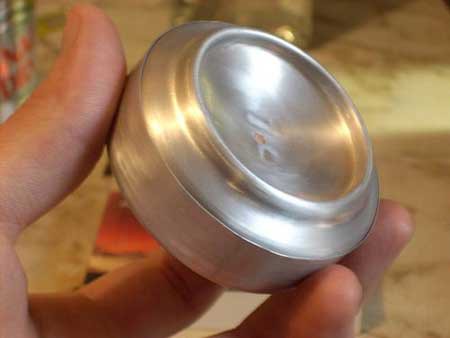
1. The bottom of the burner is made from the bottom of the can.
Place the jar and linings on one flat plane and make an incision with a knife edge on the bottom of the jar, height - 4 cm. After piercing the wall of the jar in the place of the cut, squeeze most of the jar with your fingers. The upper part of the edge of the resulting workpiece, 0.8 - 1 cm high, press inward with even bends around the circumference.

2. The upper part of the burner is made from a part with a cover.
Turn the jar upside down and make an incision 3.2 cm high, press the rest of the jar with your fingers.
3. Connect the upper and lower parts so that their planes are parallel. Along the outer circumference of the lid, at a distance of 5-6 mm from the edge, evenly pierce small holes with an awl with a diameter of 2-3 mm. The distance between the holes is 7-8 mm.

Burner use:
Put the burner in a saucer, pour 50 ml of alcohol into the burner and a little in a saucer. Cover the hole with a coin. Pour some alcohol on the lid and set it on fire, also set fire to alcohol in a saucer to warm up the alcohol vapor. When the burner starts to work (this will be seen by the outgoing flames from the punctured holes), put a container with water.
A video about the creation and use of an alcohol burner.
From just two aluminum cans, you can make a simple and reliable burner that will help out both the tourist and the hunter. Unlike commercial burners, it is small in size and light in weight. In addition, it can be made from improvised means.
In order to make a burner from a beer can, we need:
- Two half-liter aluminum beer cans;
- Stationery knife or scissors;
- Awl;
- Sandpaper;
First you need to sand the bottom of the paint cans with sandpaper. If the paint is not cleaned off, then in the future it will smoke and melt.
It should look something like this:
Now you need to cut off the bottom of the cans, about 3 centimeters high. You can do this with a clerical knife (after fixing it in a vice - so that the level of the cut is at the same height) or scissors. Sand the edges to get rid of the burrs.
We got two identical aluminum cups. Now we will need to insert these cups into each other.
There may be a slight difficulty here. The fact is that they are of the same diameter, and although aluminum is a soft material and can deform, you need to try. The easiest way to do this is to put one cut-off bottom over an entire beer can, causing it to expand slightly, and then insert the second part.
In the center of our burner from beer cans, we will need to make several holes through which we will pour alcohol (you can get by with one large one - about 3 mm). It will also act as an overpressure valve and will not damage the burner. Along the perimeter, at an equal distance, we make about 20 holes, through which the lighted vapors of alcohol will come out.
The beer can burner is ready:
Burner start
Pour in about 30 ml of alcohol and close the central holes with a coin. If excessive pressure forms inside, it will toss a coin and the burner will not explode.
After holding the burner a little over a lighted match (this is necessary so that the alcohol begins to evaporate) - we set fire to and rejoice at the result.
Here's a short video:
Important:
- Alcohol is a flammable liquid, be careful and observe safety regulations.
- The burner body heats up.
- Do not put any flammable substance other than alcohol into the burner.
- Do not completely fill the burner with alcohol - it may explode.
With this burner, you can easily boil half a liter of water for 7-10 minutes. 30 ml of alcohol burns for about 20 minutes. Ideal for a tourist or hunter to make tea or pour boiling water over the noodles.
The camping life of an avid tourist is not complete without all kinds of gadgets and gadgets. After all, the more prepared you are in nature, the easier it will be to cope with everyday difficulties, such as heating water or food. It seems to be a simple task, but with firewood, and even in a damp forest, it is sometimes not so easy to solve.
This is where a camping alcohol burner will help out, which can easily replace a stove, stove stove or any other heater. And today we will tell you how to make it from aluminum cans. The raw materials are the most affordable, and do not have any peculiarities. Ordinary aluminum cans from cola and beer will do. So let's get started!
Materials, tool
- Several aluminum cans of the same diameter (one of them with a screw cap);
- Copper tube, diameter - 4-6 mm;
- Nut М6-М8;
- A bolt to the size of a nut with a rubber O-ring;
- Two-component epoxy adhesive;
- Twine (rope) according to the size of the inner diameter of the copper tube;
- Alcohol.
Step-by-step instructions for making a reactive alcohol burner
For the case, we need a few small pieces of aluminum cans. Only the lower part with a bottom is needed, which we cut off at a distance of 4-5 cm from the edge of the embossed bottom of the cans.
The bottom of one of the cans will be the working part of the burner, so it must be cleaned with emery cloth from varnish and paint. Otherwise, they will burn when heated, and leave unpleasant traces behind.
Next, you need to bend the copper tube, making two small staples out of it, suitable for the diameter of the bottom of the can. To do this neatly and without kinks, pour fine sand into the inside of the tube, and bend it using a larger diameter pipe for the template.

We cut off the neck of one of the cans, and also clean it with sandpaper. We check that the neck fits in size to the bottom of our burner.

Then we mark the edges of the brackets from the copper tube at the bottom of the can. They need to be positioned perpendicular to each other so that they, overlapping, form a cross.
We drill holes for the tube exits with drills, starting from the smallest. The final drill will be a drill corresponding to the diameter of the copper pipes. This will make these holes as neat as possible.

We insert a piece of twine as a wick inside the copper brackets, and set the crosspiece from the tubes in the bottom of our burner.


Each aluminum can has an inclined edge that separates the straight walls and the concave bottom relief. We make a hole in it for the screw filling of our burner. We will make it from a euro nut with a wide collar at the base, and a bolt with a rubber gasket that protects against fuel evaporation.


It was the turn to fix all the elements with a specialized high-temperature two-component epoxy adhesive. This glue can be rightfully considered unique, since it can withstand heating up to 316 degrees Celsius without loss of strength and glues almost any material!
We glue the base of the staples, the neck and the euro nut with diluted epoxy glue.

We coat their mates with the bottom so that they are completely sealed.


Use a thin drill to drill holes in the bottom of the can between the shackles of the staples.

Now you can assemble the burner body from two pieces of aluminum cans. Our homemade product is completely ready to go!


It can be refueled using an ordinary syringe, and the cap screwed on the neck will prevent fuel from spilling out of the burner.
The idea of an alcohol burner from a tin or aluminum can is not new. Such a device has long been used by hunters and fishermen in nature in order to warm up a mug of tea or cook food without making a fire, and in domestic conditions, an alcohol lamp for the same purposes often helps out in the event of a power outage. It is very simple to make an alcohol burner from a can, and if you experiment with its modification, you can adjust the height of the flame tongues, the duration of combustion, as well as the amount of heat released during the combustion of fuel. You can learn more about how to make a burner with your own hands.
To make the simplest alcohol lamp, you will need two aluminum cans of beer or any carbonated water. To prevent a beer can burner from smoking and melting when burning, it is necessary to sand its surface with sandpaper to get rid of the paint. Then you need to cut a part of each of the cans, about 3 cm from the bottom, with a clerical knife. The cutting line should be straight, so you can use a marker attached to a 3 cm board to draw this line, or fix a clerical knife in a vise, while twisting the can, cutting off the desired part. The sharp edges of the cut off part must be sanded.
The resulting two identical parts of the cans must be connected by inserting one into the other. Since they are of the same diameter, it can be difficult to connect. insert one into the other so that there is no gap between them. Since aluminum is easily deformable, before cutting the second workpiece, you can stretch the cut off, finished part of the future spirit lamp on the bottom of a whole can, thus expanding its edges to the desired diameter.
After both parts are connected, holes need to be made around the perimeter of the upper part of the spirit lamp with an awl or drill 1-2 mm. They can turn out to be 18-20 pieces with the same distance between them. In order for the flames to rise up, the edges of the holes need to be slightly bent upward. At the top of the burner, you need to make several holes 3 mm in diameter for pouring alcohol and adjusting the internal pressure of the container.
You can simply pour alcohol inside the burner, or you can put a cotton pad there so that it is saturated with it.
A do-it-yourself beer can burner works very simply: 30 ml of alcohol is poured inside, the inlets in the center of the top are closed with a coin. The bottom of the spirit lamp is heated with a match, alcohol vapors ignite, forming tongues of flame emerging from the holes made around the perimeter.

To make it convenient to heat water or food on the burner, you need to make a dish support. To do this, you need to use a slightly larger jar, for example, from under canned food. On it, you need to mark two lines: one at the height of the burner, the second at a height, twice the length of the burner. The top of the can is cut off and its walls are divided into 12 vertical cuts. Of this number, you need to leave six pieces, cutting off the extra ones after one. In the center of the bottom, you need to make a hole for heating, and bend the remaining strips inward to the bottom. The stand is ready, all that remains is to place an alcohol burner inside it.

Tin can burner
Besides the fact that beer cans can be used, an alcohol lamp can be made from a regular tin can. An excellent burner is also made from a can of coffee or brewed tea with a tight-fitting lid.
The principle of making a burner from a can is similar to that described above:
- Several holes are made in the lid for pouring alcohol.
- Next, you need to make holes along the diameter of the upper edge of the can at a distance of 1-1.5 cm. They should have a diameter of about 1 mm and the edges bent upward at an angle. This is necessary so that the alcohol vapors are directed upward.
- The ignition of the can is carried out in the same way as for beer, with pre-closed holes on the top using a coin.
In principle, an open alcohol burner can be made without the need for a lid. To do this, insert a sheet of tin into it, rolled up in a circle with a diameter smaller than the walls of a tin can. Inside the resulting circle in the center, alcohol is poured and set on fire.
As with any flammable substance, handling alcohol requires caution. You cannot fill the jar with it to the top, otherwise it may explode. It is not recommended to use fuels other than alcohol. The burner must not be installed on a table at home, as it can catch fire, and in general, when using an alcohol lamp in everyday life, it is necessary to use a stand for both the burner itself and the dishes. To extinguish an alcohol lamp, it is necessary to stop the access of oxygen to the burning vapors of alcohol; for this, you can cover it with a tin lid on top. Do not use the burner to heat small synthetic tents.
A few aluminum cans can be used to make an excellent alcohol burner in just a few minutes, which will help you out on a camping trip or if the gas is suddenly cut off.
There are quite a few options. In our case, we need 3 aluminum cans with our favorite drink, and one should not be open.
Step 1. We open two cans and mercilessly drink the contents.
Step 2. We cut off the bottom part of the cans: for the first can, it is 20 mm high, for the second - 30 mm. To make the cut even, you can use the design shown in the figure.

Step 3. To connect both bottoms, one of them will have to be slightly widened. This will require a third unopened jar. It is necessary to insert the can into the smaller bottom part and, by pressing, put it on the bottom of the can.
Step 4. A hole> 3 mm in diameter must be drilled in the center of the 30 mm part of the burner. Fuel will be poured into it, and it will also serve to release excess pressure, which can damage the burner. This hole can be replaced with several of a smaller diameter by piercing the jar in this place with an awl.

Step 5. Now you can align both halves of the burner by putting the previously expanded lower part on the upper half.
Step 6. In a practically finished burner, it is necessary to make holes along the circumference with an awl for the outlet of flammable gases. Now the burner is ready.

Burner start
Pour about 30 ml of alcohol into the burner through the hole in the center and cover the hole with a coin. If high pressure builds up inside, it will just flip a coin and your burner will not explode.
In order for the burner to work, it must be preheated. The best way is to place the burner on a pallet (for example, a can lid), drip a few drops of alcohol onto the pallet and set it on fire. After heating, the alcohol inside the burner will begin to evaporate intensively and, coming out of the nozzles, will create an even flame.