The cheapest and most durable fence. How to make a fence with your own hands
Any owner of his own land plot, be it a small cozy dacha or a suburban area for living, wants to fence off his plot with an inexpensive but attractive fence. Often, owners erect fences with their own hands that look beautiful and individual, and their performance is at their best.
To erect a fence for a summer residence with your own hands, it is possible to use any materials, both specially purchased for this, and those that are "at hand".

The main thing is to decide for what specific purposes the fence is needed (only decorative functions, for zoning or for hiding from prying eyes and protection), which budget is allocated for construction and in what style the fence will be made.

The cost of the fence is influenced by the type of material and the dimensions of the finished structure. If metal supports, concrete mixes, stone or tiled elements are used in construction, the facades are deaf, and the structure itself is high, then the price of this structure will not be small.


If the structure is based on a tape-type foundation, and the panels are translucent, then the work budget will be reduced.
Building materials
Wood. A large number of photos of a fence for a summer residence demonstrate that the most common material is wood. This material is environmentally friendly and safe, easy to process, and the appearance of wood fences harmoniously fits into the surroundings of the summer cottage.
The variety of forms of timber structures allows you to create hedges of any design. For construction, elements are used in the form of logs, planks, beams, planks, etc.

However, it should be understood that wooden fences need to be periodically treated with special compounds and paints that prevent the formation of fungus, mold and decay.

Mesh materials. Fences with mesh canvases are inexpensive, while doing a good job of protecting against intruders. A chain-link mesh can be used, which is attached to a metal frame by welding. A cheaper option is to pull the net over the posts.
Corrugated mesh is more durable, however, its decorative qualities want to be better. Welded mesh sheets are practical and have an acceptable appearance.

The best fences are considered to be stone structures, which are very durable, reliable and outwardly respectable. However, the cost of such a fence is quite high, and besides, one cannot do without outside help during construction.


Fences made of profiled sheet canvases are of high quality. Looks good in combination with stone elements, metal, wood. The color palette is diverse, the weight is low, and the design is durable.

The picket fence has been used for the construction of fences not so long ago, but this material has already become popular with many. The view of the fence is translucent, installation is very simple. Thanks to the large selection of shades, it is possible to choose the option that suits the floor and specific needs.

Plastic fences are a worthy alternative to traditional materials. In terms of service life, PVC structures exceed metal and wood products. It is very easy to work with such panels.

Unconventional hedge materials
If the primary task is to build a fence, which will be low in cost, then you should think about how to make a fence in the country from the available materials at hand. Among the most common options are the following:

Plastic bottles - fences built from this type of raw material can be considered eternal, since neither weather conditions, nor microorganisms, nor natural disasters affect the service life. Plastic elements can be fixed to concrete mix or they can be wired.

And from the lower bottle parts, you can create a whole plastic sheet by attaching the elements to each other with a stapler. Between the supports, the canvases are connected according to the principle of working with a chain-link mesh.

And if you collect pvc elements from your neighbors and friends, then the cost of purchasing raw materials will be minimal, as a result, you will be able to build a cheap fence, the appearance of which will decorate the site.


Glass bottle elements are also suitable for building a homemade fence. The elements are fixed in cement mortar. You can choose any masonry technique: checkerboard, bottoms inward or outward, it is possible to lay out inscriptions or patterns from bottles, etc.

It is very profitable to use plants as a fence, because it is absolutely environmentally friendly, very beautiful, but also free. In addition, to maintain such a fence, it is necessary to acquire only a pruner, with the help of which it is necessary to level and shape the crowns of the fence.

For hedges, it is better to choose well-climbing seedlings, and plants with thorns will cope with the protection function. Rosehip bushes, bindweed roses, blackberries or sea buckthorn, etc. are suitable for this.


The sculptural elements in combination with the climbing branches of grapes or other plants give the whole area a medieval touch. Large ancient Greek amphoras are used as supporting elements in such hedges, between which seedlings grow in a continuous canvas.

You can buy such amphorae in specialized stores, order manufacturing in a workshop, or cast from a concrete composition yourself.

In addition to the external design of the future fence, you should also decide on the type of gate and their location relative to the entire protective structure.

Photo of a fence for a summer residence


The fencing of the site plays not only a protective, but also a decorative role. Due to the variety of materials on the modern market, you can build a fence not only from wood or netting, but also from brick or corrugated board.
Instructions, ideas and drawings for building a fence with your own hands can be found in this article. It provides useful information for those who want to make a strong and beautiful fence for the site.
DIY fence
Permanent barriers are subject to both general and legal requirements. Among the common ones are called:
- Reliability of supports, their resistance to wind loads, as well as to rain and melt water;
- Lack of shading of residential buildings and green spaces;
- Neat appearance;
- The erection of solid fences is allowed only from the side of the street.
Guided by these requirements, you can independently create a project and build a fence on the site, choosing the most suitable material for this.
How to make a wooden fence
Recently, wooden fences are becoming less common, because wood is being replaced by more modern building materials of high quality. However, a picket fence is often erected in suburban areas, since it combines ease of construction with an attractive appearance and low cost.
Installation materials
To build a wooden picket fence, you will need the following materials:
- Wooden poles for supports;
- Cut or planed boards, the length of which depends on the expected height of the future structure;
- Beam, 2 - 2.5 m long and 40x40 section;
- Cord and stakes for marking;
- Construction nails (screws);
- Crushed stone (concrete) for the installation of poles;
- Roofing material (roofing felt) for waterproofing supports.
In addition, you will need an antiseptic or bitumen mastic to treat the posts. Without this, the supports can quickly fail, and the integrity of the structure will be violated.
Construction of a wooden fence
With the budgetary cost of a wooden fence, it can serve its owner from 10 to 15 years. In addition, its construction does not require special construction skills, so it is quite possible to do all the work yourself, without spending money on the services of professional builders.

Stages of construction of a wooden fence
Consider the sequence of work during the construction of a wooden fence from a picket fence:
- Implementation of markings with the determination of the location of the pillars (2-3 meters from each other);
- Preparation of wooden poles for installation in the soil: treatment with an antiseptic and bitumen mastic. Alternatively, you can wrap the ends of the supports with tar paper or roofing felt;
- Digging out recesses for the supports in accordance with the markings. In this case, the depth of the submerged support should be at least a quarter of the total height of the structure;
- Arrangement of sand and crushed stone cushions at the bottom of the recesses. Its thickness should be from 10 to 25 cm. It is imperative that the interlayer be spilled with water and carefully compacted;
- Installation of supports and their concreting;
- Fastening a wooden beam to the installed supports after the concrete has hardened;
- Fastening pickets to transverse beams. In this case, the minimum distance from each fence to the ground surface should be at least 5 cm.
At the final stage, the wooden structure is treated with colorless mastic, impregnation or oil paint.
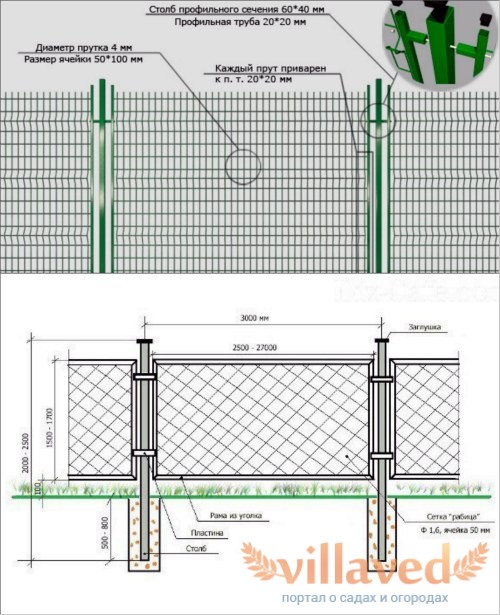
How to make a chain-link fence with your own hands
In the conditions of small summer cottages, due to the risk of shading, it is impossible to build fences from corrugated board, slate or brick. In this case, the chain-link mesh becomes indispensable, the fence from which does not prevent the sun from entering the site and allows air to pass through well.
In addition, the chain-link is inexpensive and lasts a long time. Let us consider in more detail the features of the construction of a structure from this material.
Erection of a fence from a chain-link mesh
The easiest way to build a fence from a chain-link mesh is to fix it between posts made of various materials (metal, wood, concrete). In this case, the optimal distance between the supports is 2.5 meters, and their height is calculated in a special way.
The height of the clearance from the fence to the ground (5 - 10 cm) is added to the width of the mesh, and an additional one and a half meter is added. The resulting number will indicate the average height of the pillar. At the same time, the length of the corner posts exceeds the others by 20 cm, since these supports carry a large load, and therefore they must be buried deeper.
If you are using wooden posts, be sure to treat them with an antiseptic before installing. It is also recommended that the foundations of all installed supports be concreted for greater stability.
Further, hooks are attached to the supports using screws, nails, wire, welding for mounting the mesh. They begin to install the net from the corner post, straightening it from post to post and hanging it on hooks with a rod. Then, reinforcement, located horizontally, at a distance of 5 cm from the edges, is threaded into the mesh from above and below, and the rods are welded (attached) to the posts. Construction work is completed by bending the hooks and painting the supports.
Stages of work in the sectional construction of the fence
Another option for erecting a fence from a chain-link mesh is to attach it to the sections. As in the case of the tensioning model, work begins with marking and installing pillars. Then they start making the frame. It needs a 40/5 mm corner.
Chain-link fence construction plan
Next, you need to calculate the required frame dimensions. To determine the length of the section, it is necessary to subtract 10-15 cm from the distance between the posts, and to calculate the width, the same number is subtracted from the height of the support above the soil level. In accordance with the calculations, the corners are welded in a rectangular structure and the mesh is fixed, forming sections. Then, between the pillars, it is necessary to fix metal strips, 15-25 cm long, 5 cm wide and 5 mm wide. Finished sections are welded to these strips. The work is completed by painting the metal elements.
How to build a fence from corrugated board
Corrugated fences are very popular due to a number of advantages. Profiled sheets are reliable and durable, and their colors and various sizes can satisfy even the most demanding consumer. Such a fence protects well from dust, wind and noise, it is easy to install, and its service life is quite long.
This material is great for building a stepped fence in an area that gives a slope. With some building skills, it is quite possible to build such a structure from corrugated board on your site. Let's see how this is done.
Installation of the fence
The construction of a profiled sheet fence begins with accurate marking and installation of pillars. You should know that in this case, the supports are installed at a distance of no more than 3 meters from each other. For these purposes, you can use pipes with a square or round cross section. In the first case, their size should be 50/50 mm, in the second - at least 76 mm. The upper holes of such supports must be welded to prevent moisture from entering them.

Stages of erecting a fence made of corrugated board
To install the pillars, you will need pits with a depth of 1 to 1.5 meters and a width of 15 cm, which depends on the height of the fence and the diameter of the supports themselves. The bottom of the pits must be covered with medium-grade gravel, then the pillars must be installed strictly vertically and concreted. In the case of soil, where groundwater rises too close, you will have to build a strip foundation to install the pillars. It consists of a box, 20 cm high, the boards of which are fastened with bars or wire. The walls of the box are covered with a layer of waterproofing material and poured with concrete. After the solution has completely solidified, they proceed to the installation of the lag - transverse strips, to which the profiled sheets will be attached. As a lag, you can use a profiled pipe with a section of 40/25 mm. In this case, the number of lags depends on the height of the future fence: at a height of up to 1.7 m, you will need to install two lags, at a higher height - three.
The upper and lower logs are attached at a distance of 4 cm from the top of the sheet and the edge of the ground. Metal structures assembled in this way must be treated with a special primer to protect against rust. Sheets of corrugated board are attached to the logs using self-tapping screws for metal. In this case, the sheets are joined with an overlap.
What is needed for construction
For self-installation, you will need the following materials and tools:
- Sheets of corrugated board;
- Pipes for support pillars;
- Lag pipes;
- Cement, crushed stone, sand for the preparation of concrete mortar;
- Rope, level;
- Primer;
- Welding machine;
- Solution container;
- Drill and drill;
- Riveter with rivets or self-tapping screws
- Antiseptic and bituminous primer for wooden posts.
How to make a brick fence: video
Brick fences remain popular due to their strength, durability and decorative effect. However, this type of fencing is expensive and requires special construction skills. Therefore, most often the canvas is made in combination using various materials.
Construction stages include:
- Selection of material and calculation of its quantity
- Drawing up a drawing
- Marking on the ground
- Laying the foundation
- Bricklaying
- Plastering
Since the construction of a brick fence requires certain skills, we recommend that you watch the video, which shows the main stages of this process.
A foundation is needed to build a fence. Moreover, its appearance depends on several factors: the type of soil, the type of supporting structures, the material of the canvas. It should be borne in mind that the foundation must withstand the loads applied to it from the environment, soil and the fence itself. Therefore, it is so important to choose the right type of foundation. For example, the tape type is required for brick and concrete fences. Under the fence made of corrugated board, it will be enough to lay a point foundation in the places where the supports are installed. Let's take a closer look at the construction technology of different types of foundations.
The laying of the strip foundation is preceded by marking along the perimeter of the site using pegs and twine. This is followed by digging a trench along the markings. Moreover, its depth reaches half a meter, and the width should not be less than the thickness of the future fence. The bottom of the ditch is covered with a mixture of sand and gravel, and then rammed.

The main components of the foundation
This is followed by the execution of the formwork from the boards, the height of which above the ground level is about 15 cm. In this case, you should know that its inner surface must remain smooth, therefore, all fastenings of the boards are made from the outside. Reinforcement is laid inside the box: cut pipes, metal, reinforcing mesh. In the places where the supports are installed, the reinforcement should form a three-dimensional structure.
The next step is filling the formwork with concrete, leveling it and removing air bubbles. At the end of the concrete hardening (after 1-2 weeks), the formwork is removed, however, construction work is not continued, since the foundation will still gain strength for about a month and cannot be disturbed. Only after the final support can you proceed with the installation of the fence itself.
For light types of fences, a pile foundation is used, erecting it in the following sequence:
- Site marking;
- Drilling wells for supports, 0.8 m deep for fence and a diameter of about 20 cm;
- Laying a crushed-stone cushion in the wells, with a height of 10 to 15 cm;
- Installation of supports with their preliminary processing (if necessary), their fastening with props;
- Concreting of pillars from the outside;
- Concreting of wells from the inside to ground level;
- Further construction of the fence after complete solidification of the concrete solution.
Fence posts
Support pillars play an important role in the process of arranging any fence, because they not only increase the strength of any structure, but also complement it in style. Therefore, it is so important to choose the most optimal type of supports when building a fence.
Types of pillars
Most often, wooden, brick and metal pillars are used as supports. The choice of material depends not only on financial capabilities, but is also determined by the expected load, which is created by the sections, as well as mechanical and wind loads.
So, metal poles are universal, since they can be mounted on both sections from a chain-link netting, as well as a wooden picket fence and corrugated board. In addition, metal poles have a long service life (up to 50 years). Wooden supports, on the contrary, can last no more than 20 years even with proper processing due to their tendency to decay. Therefore, wood pillars are recommended for the construction of temporary barriers, front gardens, or low hedges. Brick (concrete) pillars are erected during the construction of heavy fences, however, in some cases they are used for decorative purposes.
Installation methods
The installation of poles can be carried out in several ways, the choice of which depends on the design features of the fence and the nature of the soil. So, metal, reinforced concrete and wooden structures on soils with a low level of groundwater occurrence are mounted in a universal way. This means that a hole of the appropriate size is drilled (dug out) under each support, a pillar is installed, and the remaining space is filled with concrete mortar.
The simplest and cheapest way is to drive the posts using the so-called "headstock". In this case, the supports are installed on a strip or columnar foundation. Another option is the use of piles, which are easy to install by hand and serve as a reliable support for heavy fence structures.
Materials for building a fence
As mentioned above, you can build a fence from almost any material. For small areas, a chain-link mesh is most often used, but if the design is to be more reliable, wood products should be given preference.
Brick fences are considered the most reliable, but their installation requires special construction skills or the involvement of specialists. One of the simplest and most modern is considered to be a corrugated fence, which is easy to assemble, but has a long service life.
Calculation
Calculating the foundation for a fence is a rather complicated process and requires special knowledge. In addition, you should know the characteristics of the soil on which the fence will be located, the prevailing direction and strength of the wind. Therefore, if you are building a fence yourself, it would be best to resort to a combined tape-point foundation, which is considered the most reliable. With this design, any kind of load will be distributed over the entire length of the fence.
Here is a simple calculation of a fence made of corrugated board. With a span length of 2.5 meters and a height of 160 cm, the area of the corrugated sheet will be 4 square meters. Taking into account the value of the aerodynamic coefficient for flat vertical surfaces (1.4) and the value of the high-speed wind pressure (about 40 kg), the wind load will be 224 kg for each support. Distributing the load evenly over the entire surface of the fence, and taking into account the resistance coefficient (225), we get the foundation depth equal to 80 cm.
However, it should be noted that this calculation was made without taking into account the characteristics of the soil. Therefore, in practice, the foundation is buried to the depth of soil freezing for each specific area. Most often it is 120 cm and guarantees a solid installation of the posts.
Which boards to choose for cladding
Inexpensive unedged boards are most often chosen as fencing cladding. They can be positioned vertically or horizontally. The first option is considered the simplest. In this case, horizontal beams are attached between the supports, and pickets made of boards are attached to them.
It is worth considering that a wooden fence can be through or deaf. In the first case, a certain distance is left between the boards, and in the second they are nailed tightly on both sides of a horizontal bar.
Before installation, the boards must be carefully inspected and cleaned. A width of 20 cm is considered optimal, since in this case the material will not dry out or crack.
Fence sheathing calculation
The main structural elements of any fence are the foundation, supports and materials with which the spans will be sewn up. But, if for the calculation of wooden boards the calculation is carried out simply (the width of the span and the board is measured, and the distance between the pickets is determined), then for products from corrugated board, the required number of sheets must be calculated more carefully.

An example of calculating materials for the construction of a fence
First of all, you should decide how the sheets will be attached, and what brand of corrugated board you will use. The last point is especially important, since sheets of different brands have different widths.
Consider several common calculation options:
- Horizontal placement without gaps for supports: in this case, the sheet grade does not matter. The only thing to consider is the overlap on the posts (subtracted from the length of the sheet). This indicator should be half the width of the support plus 10-15 mm.
- Horizontal fastening with gaps for supports: with this arrangement, the calculation is carried out similarly to the first example, with the only difference that no overlap margin is left. In other words, you need to measure the width of the span, and buy sheets 10-20 mm less than the resulting figure. This will allow you to build an even and symmetrical fence, even if there are irregularities on the support posts.
- Vertical fastening without post spacing requires careful calculation. First of all, it is necessary to determine the working width of the sheet, since the width of one span will depend on this indicator. Further, depending on this indicator, sheets of suitable width are selected and multiplied by the number of spans. For example, if 3 sheets are required for one span, then for a fence of 5 spans - 15 sheets.
However, with the vertical method of fastening, there is a risk of uneven material consumption and the formation of a large amount of waste, therefore, when buying a profiled sheet, you should make a small margin.
Construction tool
To build a fence, you will need a standard set of tools. First of all - a tape measure for taking the necessary measurements, as well as a drill for digging holes for supports.
In addition, you need to prepare a drill, screwdriver and fasteners (screws) to fix the structural elements to each other. It is better not to use a grinder for cutting profiled sheets, as it leads to heating of the metal and a violation of the integrity of the protective coating. For this purpose, it is better to use electric metal scissors.
How to make a budget fence
There are situations when the site must be fenced off, but there is no extra financial means for the construction of a fence made of brick or corrugated board. In this case, it is better to give preference to wooden products or mesh-netting fences.
It should be borne in mind that a wooden fence needs to be painted regularly, and a mesh fence serves as a decorative rather than a protective function, and can only serve as a temporary structure or delimiter for several areas.
The fence is an important part of the arrangement of the suburban area. The main purpose of this structure is to delimit land plots and ensure the protection of the yard from the intrusion of strangers and even from their views (if the fence is solid).
A well-designed fence performs not only these functions: it completes the landscape decor and testifies to the respectability of the owners of the suburban area. Fencing made of corrugated board
What kind of fencing is the most suitable for a suburban area? First of all, that, the costs of which are compensated by quality. A self-made budget fence on a suburban area is easiest to design and make with your own hands from corrugated board.
A fence for a summer residence made of corrugated board is the best solution - both in terms of cost and quality.
Such a fence has a number of advantages:
- acceptable budgetary cost;
- long service life;
- a large selection of color options for professional sheets;
- ease of installation;
- undemanding care (the fence does not even have to be washed, there is enough rainwater).

Fence made of corrugated board: photo in the country
A corrugated fence is erected in several steps:
- Holes for supports are being prepared at a distance of 2 to 2.5 m, their depth is in the range of 0.8-1.2 m.
- The bottom of the holes is covered with a layer of gravel (the layer thickness is about 20 cm).
- A supporting structure made of metal is installed (the even placement of the supports is achieved using a level).
- The depressions are filled with a mixture of concrete and sand (the mortar is prepared in proportions of 1: 8).
- After the concrete-sand mixture has hardened, two diameters from the profile pipe are attached to the supports by welding.
- Profile sheets are connected to the lags by means of self-tapping screws.
A self-made budget fence made of corrugated board for a summer cottage is easy to design, it does not take much time and does not require large expenses.
Metal fence
A metal structure is also suitable as a fence for a summer cottage. How to make a metal fence in the country? It's simple - we draw a fence scheme, purchase materials and erect a fence using welding.
The design technique of a metal fence is similar to the construction of a corrugated fence, the only difference is in the cladding. To create spans, a mesh, metal rods are used. In the process of manufacturing the frame, the structural elements are connected by welding.
The specificity of a metal fence is that it can do without a foundation.
Forged structures, mesh fences, sectional fences or corrugated sheet fences help to achieve harmony with the landscape decor and the suburban structure.

Fences and barriers for summer cottages, photo
A wrought-iron fence is not a budget option; moreover, in order to build it in a summer cottage, you need to work hard.
On a note! Fences constructed from iron rods belong to the fences of the economy category, but such structures are not deaf: the courtyard will be open to the eyes of passers-by.Plastic enclosure
An innovation in the improvement of suburban private territories is considered to be plastic fences. Plastic fences are easy to install, which is especially valuable for those who have the skills to assemble PVC and plastic profile fences.
For the construction of such a fence, high-strength plastic is used, which has increased resistance to damage.
The advantages of a plastic fence are abound:
- affordable cost;
- ease of care;
- easy installation;
- presentable view of the assembled structure;
- resistance to moisture, fire and deformation;
- resistance to fading under the influence of sunlight.

Fence for a summer cottage, photo
Plastic is a material that allows you to create various variations of fences - deaf, like a picket fence or imitating a wattle fence.
Important! The plastic fence does not dry out, it is resistant to cracking.Brick fence
The construction of a brick fence is a responsible task, for the implementation of which a number of rules must be observed. Having worked hard on the construction, the owner will receive a durable fence, characterized by increased strength and aesthetic appearance.
Brick makes it possible to design beautiful solid fences that organically fit into any landscape design.
A properly constructed brick fence can withstand even heavy wind gusts.
How to put a brick fence in the country with your own hands? The construction of a brick fence is carried out according to the following scheme:
- We measure the length of the future fence and form an estimate.
- We mark the site and dig holes for the construction of a tape-type foundation.
- After installing the supports, the base is immediately poured.
- To avoid joints and strengthen the strength of the fence, the foundation should be erected in one go.
- After the foundation has hardened, brickwork is made. Bricks can be arranged in one row or made in a combined version. If the fence is high, the laying is done in two rows.

Cottage fence do it yourself, photo
If you don't have the skills to work with bricks, use the help of professionals. The brickwork must be flat. If there is not enough experience, the structure may turn out to be unstable and unpresentable.
Fencing made of mesh-netting
The first fences, for the construction of which were used construction mesh-chain-link, showed how well this material is suitable for the design of fences that allow light to pass through, to highlight the boundaries of areas. Having installed a fence from a grid on the site, you can not worry about the indignation of neighbors, summer residents, that the fence shades their planting.
There are several types of chain-link construction mesh:
- with galvanized coating;
- ordinary;
- coated with plastic.
Plastic coated mesh is more suitable for warm climates and seaside areas.
Plastic provides a mesh fence with reliable protection from moisture, but does not tolerate temperature extremes. The most acceptable solution would be a galvanized-coated mesh netting: it is considered the most durable.

DIY fence inexpensive, photo
- The location of the supports is being marked. We place intermediate supports in a three-meter range, tension elements - at a distance of 9 m. As load-bearing sections, we use a metal profile with a diameter of 60 mm, the size of the corners is about 50 mm or a little more.
- For intermediate supports, we drill the soil to get approximately 40 cm depressions. For tension supports, holes 60 cm deep are needed. If the soil in the area is clayey or there are impurities, there is no need to concreting the holes. Such soil has the property of heaving, this can lead to cracks in the concrete in the winter season. Sandy or loamy soil when installing poles should be concreted.
- After installing the tension supports, connect them to other pillars using bolts and metal corners, using a welding machine.
- When installing exclusively intermediate supports used as supporting structures, the mesh will be taut. But the fence will not be very reliable - for the reason that the sheathed lower part can be easily lifted, which makes it possible for illegal entry into the territory, and both nimble children and thieves. To make the fence more reliable, pass a 3 mm wire through the mesh cells in three horizontal directions. To stretch, make three holes in each support with a drill - they must be through.
- We fix the mesh on the supports. We place the net roll in a vertical position at the support and check that the bent ends are at the top. We attach the upper term of the net to the top of the support and move to the next one, slowly unwinding the net. The wire should be passed through the mesh between the supports and lead its ends into the existing holes. The wire rod is tensioned and secured with bolts.
Wooden fence
What can be used to make an inexpensive fence? The classic and simplest option for a summer residence is a wooden fence. Among wood structures, there are such popular variations:
- wattle;
- fence;
- slab fence.
There is also a modern type of wooden fencing - "American Ranch".
Wattle
To erect a wattle fence on the site, you should prepare branches, supports and pipes. Provided that the supporting structure is approximately 8 cm in diameter, willow, birch, poplar branches, willow or flexible vines are preferred as spans.
For the construction of a simple wicker fence, branches of trees growing in the garden are suitable. But it is important that they are cut at an angle of 60 degrees.

Cheap fence for a summer residence with your own hands, photo
Stages of the construction of the wattle fence:
- Use logs from deciduous trees as bases. The number of bases depends on the size of the proposed fence. The approximate distance of the posts is 50 cm. If the rods are thick enough, the spacing can be increased. Place the last three supports at a distance of 20 cm from each other.
- Treat wooden elements with protective impregnations, flame and resin. Especially carefully it is necessary to process the bottom of the supports, which will be located in the soil: this will prevent the destruction of the wood.
- Weave branches between the supports. Stick the first rod into the soil 15 cm and set it vertically. The rest, regardless of how they are located, braid with wire rod around the frame and secure the thicker end first, and place a thin branch along the support through the attached vine. Tap the canvas with a hammer in every fourth row. Arrange thin twigs in several pieces and remove the edges inside the wattle fence so that they are not visible.
- Cover the finished hedge with varnish and plant along the fence plants that can trail along it, for example, ivy. A simple fence is ready.
 Landscaping the area around the house? We suggest using for this purpose, you can create useful and beautiful things that will originally decorate the local area.
Read the reviews of the owners of container houses: evaluate for yourself the advantages and disadvantages of building housing from shipping containers.
Picket fence
The picket fence is a blown-through fence, consisting of wooden strips. The erection of the picket fence begins with the installation of metal supports (pipes with a diameter of 60 mm are needed).
After concreting the holes, design the logs. Weld the cross-sections to the bar elements overlapping and remove excess welding.
The next step is the installation of the wicket and the installation of fittings. Close the end part of the pipes with plastic plugs in order to protect the supporting elements from moisture penetration into them and to prevent the appearance of rust. Use self-tapping screws to fix the wooden planks on the cross sections, at a distance of 3 cm.
Cover the fence with a ridge bar to make it more presentable. Air flows freely pass through the picket fence, which has a positive effect on the growth of horticultural crops.

Original wooden fences, photo
Slab-sheathed fencing
Slab is lumber with one sawn side, and the second can remain intact or have a partial sawn. When working on a sawmill, logs usually remain, which can be used when filling the spans, thereby saving on materials.
Croaker perfectly imitates wood; this material makes it possible to obtain an inexpensive but aesthetic fence.
Plating a fence with a croaker is quite simple to perform:
- Remove the bark with an ax or a sharp shovel to prevent insects from ruining the fence. Buff the sanded material and treat it with an antiseptic.
- Supports can be installed in both metal and wood. If you chose the second option, larch, pine or oak wood with a diameter of 200 mm and a length of 2 m is suitable. Treat the bottom of the supports with heated resin. If the fence will have girders, leave a distance of 2.5 m between the posts.
- If the soil is loamy, there is no need to strengthen the supports. In the places where the posts are placed, make holes with a drill and hammer in the posts with a sledgehammer. If the soil is sandy or black earth, first make holes twice the diameter of the supports. Cover the bottom with gravel (with a layer of about 10 cm) and tamp. Place each support in the center of the recess and cover with gravel, checking the levelness of the installation.
- Sheathing is done in any direction. First you need to leave small cracks, and then close them with a croaker and them, with a bulge outward.
- Varnish or paint the fence.
- Install metal or plastic cones to protect the end of the supports.
If the material is located horizontally, fasten the beam to the supports using nails or self-tapping screws, overlapping it, on one side and on the other. To sheathe the fence vertically, cut the material crosswise and fix it to the purlins with the convex part.

Fence in the country, photo
American wooden fence
To build an inexpensive American ranch-style fence, treat the wood with antiseptic compounds, especially the bottom of the supports - the part that will be in the ground. After that, mark the territory and place the supporting elements in the corners of the marked area of the territory, concrete them and mask them with earth.
To make the installation of the posts even, pull a rope between them - this way you can optimally fill the space between the sections - and put intermediate supports at a distance of 2 m.

DIY fence in the country, photo
The cross members are fastened to the posts with nails; self-tapping screws are also used for this purpose.
The fence is varnished or painted.
Foundation
The choice of foundation depends on what material the fence will be made of.
Important! Brick and wood fencing needs a solid foundation. If you fill it in correctly and correctly install the supporting elements, the fence will last for many years.For the design of fences, two main types of foundations are used:
- tape;
- columnar.
Belt-type bases are designed in the following situations:
- when erecting bulky fences;
- if the work is done on heaving soils;
- when you need to design a massive blank fence, which serves as an obstacle even for animals.
In order to build a strip foundation, you first need to dig a trench: its depth is 30-80 cm and even more if the soil is unreliable. After that, a sand and gravel cushion is prepared, the foundation is filled with water and tied with reinforcement.
The next step is to erect the formwork and fill it with concrete.

The pillar base is great for lightweight fences. A correctly designed pillar foundation can last no less than a strip foundation.
Stages of pouring a pillar base:
- With a drill we drill holes 1-1.5 m deep and 15-30 cm in diameter more than those of the supports.
- We make a sand pillow (you can add rubble), with a layer of 20 cm and fill it with water.
- We install the supports exactly and fill the grooves with cement.
- We mount the spans.
Ways to decorate the fence
The fence in the country should be not only reliable, but also externally presentable, even if the economy class option is chosen. After all, the owners of summer cottages spend a lot of time in the garden, and any owner would like the fence to please the eye.
Looking through many photos, you will probably pick up a photo or a picture with a cheap decorative fence that suits you, or you will use our ideas for decorating a homemade fence.
The best way to decorate a fence is by planting climbing plants next to it, such as grapes or nice-smelling hops. You can also plant one-year-old climbing plants.

Nothing is more pleasing to the eye than flower beds dotted along the fences. Moreover, not only flowers, but also shrubs are planted next to the hedges for decoration.
Another original way to decorate a fence at a summer cottage is to paint it and make a gazebo or a fountain next to it.
Planters with bright flowers are also perfect for decorating a fence, which will delight not only with their attractive appearance, but also with a pleasant aroma.
There are enough options for creating a fence in the country with your own hands. It is not so difficult to cope with this work: if you wish, it is quite possible to make both a beautiful and reliable fence.
Video
Other original ideas for building a fence for a summer cottage with your own hands - see beautiful and unusual options and choose which fence to make in your country cottage:
Private property owners are always trying to improve the area around buildings. To create a special design style of the fence, internal picket fences, in harmony not only with the facade, but also with the surrounding landscape. The beautifully crafted external fence, which forms a single composition with the house, stands out for its exclusivity among the monotonous buildings. In a single architectural ensemble with pronounced exteriors of neighbors, it brings its own flavor to the overall architectural style.
There are plenty of fence designs made of various materials. The main thing is to choose the best option that elegantly fits into the surrounding landscape environment.
By erecting a decorative fence with his own hands from improvised means, the owner of the site will not only save his personal budget, but also enjoy the quality of the work done. Admiration for craftsmanship, design skills from loved ones, friends, acquaintances, just passers-by. It is not difficult to build a picturesque fence on your own, a decorative fence for internal zoning. The main thing is to start and in the process of work you will acquire skills, knowledge, the ability to work with the selected material.
Functions, features and application of a decorative fence
Elegantly arranged, made in an individual style, moderately colorful and elegant fence can perform several functions:
Self-construction of artificial fences has some peculiarities.
Without knowledge, experience with the material, you will first have to study the topic, acquire practical skills.
Before creating them, first determine the functions that the fence will perform. Structures installed as a barrier to access must be a reliable security system against external encroachments. With this appointment, it is necessary to take care of strong supports, the foundation of the future structure. The construction of wooden barriers will require special processing of the fence elements. Impregnation, painting will increase the service life of the fence. Working with any workpiece requires the skill of safe handling. We must not forget that glass elements are fragile, require increased care during work, protection from cuts.
Fences, as decorations, are not intended for long-term use. Over time, the owners may want to change the design for a more attractive one. Or there will be new ideas, fantasies of decorating the inner backyard space. Therefore, for the construction of palisades, fences, it is convenient to use even short-lived materials. The most common residues are:
- plastic;
- wood;
- bricks;
- glass;
- stone;
- rubber;
- concrete;
- metal.
Some craftsmen create combined structures that have their own flavor and appeal. And besides physical labor, they do not require financial costs. Following practicality, it is better to choose workpieces that will be familiar and convenient to work with. The most common for creating picturesque fences is a tree. By appropriately preparing the structural elements, you can operate the structure for up to 10 years. The tree is easily processed, takes the desired shape. Glass, plastic bottles are the most affordable, convenient for making quick fencing.
Types of decorative fences from scrap materials
The creation of artificial barriers from improvised means, of which there are plenty in the household, does not require much effort. The main types of decorative fences:
- flower beds;
- front garden;
- water bodies;
- garden;
- sectional;
- ceremonial;
- zoning;
- security.
The front gardens are fenced with wooden mini-picket fences. On flower ridges, stone curbs, miniature fences, and plastic tape are used. Pre-painted plastic bottles installed around the perimeter of the garden look beautiful. Zoning fences can be made in one style for all zones. Individually selected for each site separately. Garden paths and reservoirs located on the backyard are decorated with small metal fences. The front entrance of the house is ennobled with graceful fences, which look spectacular against the general background of the facade.
Decorative fences made of wood
Making a board fence is simple. Thin boards are required, the dimensions of which are determined by the purpose of the fence. Low hedges are used to separate flowers from lawns and paths. When restricting the access of children and pets, the height is selected from 0.4 m. The configuration of the boards is created from simple triangles crowning the top of a decorative wooden fence to carved complex figures. On two crossbeams, workpieces are stuffed closely or at a certain distance from each other. The finished sections are dug into the prepared trench. You can install posts on which to fix the board fence flush with the ground.
A wooden lattice fence is assembled from slats. First, the contour is prepared, and then, placing the slats, connect them to the base. The structural elements are fastened to each other with nails, screws. The sections are installed, fixed on the previously dug supports. It is even easier to make a wattle from tree branches. The best option is willow vine. Prepared branches are laid between the hammered wooden poles.
A rock
The erection of imposing stone structures will require a solid foundation. Low stone barriers do not need support. Structural elements are stacked end-to-end and provide shape to flower beds, flower beds, beds. Placed in several rows, they block the access of pets and babies. For reliability, they are laid on a concrete solution. The most convenient plank stone, conveniently stacks on top of each other. The location of the buta in one layer, end-to-end, is used to fencing the beds, decorating garden paths.
You can make zoning with granite of various sizes, dividing ridges. If there is a small reservoir, a spring on the site, then the stone is the most suitable decorative element. High granite barriers are a reliable external protection of the territory. The construction of a serious system will require the skills of preparing concrete mortar, laying stone, equipping the foundation for the structure. If you set yourself the goal of creating such a fence at home with your own hands, then having studied the construction business it will not be difficult to build a structure that will stand for more than a decade.
Glass
Glass bottles are the most common raw material that almost every home owner has. An artificial fence near the flower bed, the fence of the garden paths looks very original on the site. Glass bottles are unpretentious raw materials, they withstand all weather disasters. Collecting the right amount will not be difficult. To increase the strength, sand is poured inside. Transparent bottles pre-filled with colored fine gravel look beautiful. A glass garden fence made of bottles will last for more than one year. The placement technology is simple: they are driven in with the neck down, half the height.
Some home designers like a different layout. They place bottles with the neck up with the same stoppers. Laying is done in a trench at an angle. This option gives the flowerbed, garden bed a special look.
Brick
The simplest available means of zoning flower beds is a brick. The presence of residues can be used as an artificial fence. To create a florist, you will have to master simple masonry skills. Improvement of the territory is carried out by laying of the type:
- "Zigzag";
- "Chess";
- "Vertical".
When laying in a zigzag, the material is placed on top of each other with a slope of 45 °. In order for the elements to stand securely, they first dig out a groove. Bricks are laid in it in a checkerboard pattern, on top of each other with small gaps, which are filled with cement mortar. When laying vertically, one row is placed vertically at a certain distance from each other so that you can put the second row flat on top. Fantasy will help to create original figures from bricks. Very often, they are lined with flower beds, forming rhombuses, ovals, square, rectangular shapes.
Plastic
Most often, plastic bottles are used, installing flower bed fences from them. You can paint the workpieces with multi-colored paints. Such a fence will frame the beds in an original way. The forms are varied, as far as imagination suffices. First, a groove is dug around the perimeter at half the height of the bottles. Then they are placed close to each other, covered with earth, tamped. Neck up or down, depends on the preferences of the owner of the site. If old vinyl records are lying around, you can attach them too, placing them around the perimeter of the beds.
The formation of flower beds is also performed from plastic sheets. This is useful when you need to stop rooted vegetation. The height of the plastic sheet is selected taking into account the depth at which it must be placed.
Rubber
Old car tires are good for arranging small flower beds, a flower garden. Earth is poured in the middle, seedlings are planted. Some gardeners are engaged in the cultivation of strawberries in these makeshift beds. Previously, at certain distances, the tires cut holes for planting seedlings. Then the chambers are stacked vertically on top of each other. Each tier is filled with earth. The system is stable, so you can place up to 6-8 rubber chambers. After that, an impromptu garden bed is planted with strawberries. The method is convenient when the personal plot is small. The cameras can be preliminarily whitewashed with lime, painted.
For high-quality irrigation, a plastic pipe with drilled holes is installed in the center of the column. If necessary, water is poured into it, which evenly flows to the roots of the plants.
Metal
Metal systems are convenient for creating decorative fences. Usually these are small fences installed for the purpose of zoning, decorating the territory. Working with metal will require certain skills and tools. The most commonly used is electric welding. First, the individual structural elements are prepared, then they are welded together. Such fences are strong and can be installed by driving support elements into the ground. The remains of metal profiles are convenient to use in the zoning of flower beds.
Many gardeners who grow raspberries, blackberries use them as a restraint of the spread of plant roots. A trench is dug around the perimeter of the berry to a depth of 20-30 cm, a metal profile is installed. Then they cover it with earth, tamp it. In the future, the roots of raspberries and other vegetation will not be able to spread throughout the garden.
Concrete
Artificial concrete fences are easy to make with your own hands. First of all, it will be necessary to master the technique of preparing the solution, the proportions of its constituent substances. For massive outdoor fences, first equip the foundation. A trench is dug, a wooden formwork is installed around the perimeter. The created box is poured with the prepared solution. Small concrete fences for flower beds do not require a foundation.
The prepared forms are filled with a solution, kept until the required strength is achieved. After that, the formwork is disassembled. The resulting volume is filled with earth, plants and flowers are planted. Small flower beds are made of concrete, which are installed at the front entrances to the house, cottage. Common shapes: rhombuses, squares, circles, rectangles, ovals.
Hedge
Decorative fences made of living plants are very popular with many owners of houses and summer cottages. The main thing is to find the appropriate seedlings of the desired type, quantity. These can be trees with a falling crown, densely growing shrubs. Villagers often set up live blackberry fences. The plant is unpretentious, growing rapidly. It is spread by the root system, so you will have to equip an underground barrier.
Natural blackberry hedge is the cheapest option for arranging a natural hedge. The main thing is not to start uncontrolled growth. You can create a natural hedge from the following plants:
- Maiden's grape;
- Honeysuckle;
- Climbing rose;
- Schisandra;
- Ivy.
When choosing a live fence, you need to pay attention to how the plants tolerate pruning. Some, like juniper, are intolerant of such procedures. Therefore, if these plants are planted, then it is necessary to give them the opportunity to grow freely.
Gabions
In the arrangement of the local area, gabions are also used. To create it yourself, you need a metal mesh with a certain mesh size. First, a rigid cage is assembled, which is covered with an available mesh. Gabions are made with an anti-corrosion coating. The cage in the net is made depending on the size of the filler.
The system is created by welding individual wires together. Small cylindrical gabions are used as a separate decor on the site. You can plant plants or assemble a composition from individual elements. The main thing is to have the skills of welding metals. Filler for gabions: quarry, gravel, pebbles, granite. The flower beds arranged in them look good. You can diversify the landscape of the site in small forms, by purchasing a ready-made mesh, independently giving the desired geometry, reinforcing it with rigid ribs.
DIY decorative fence made of branches
An interesting fence, as a decoration, protection of the backyard is a tyn or wicker fence. This type of arrangement has ancient roots. Was a common type of fence of the past centuries. It is made from improvised branches, sticks, vines. Today's landscape design has made twig decor quite popular. The building is environmentally friendly and natural. Such an element of Slavic culture has become fashionable today. It can be installed in the garden or protected from the access of animals, children, other areas of the courtyard. The technology is simple: the branches cut from the bushes are woven into the installed supports, stakes.
Preparatory work
Two groups of elements of a wicker fence are procured as raw materials: supports, rods. For the former, thick branches with a diameter of 6-8 centimeters are suitable. You can use metal pipes, wooden poles. The basic principle is that the higher the supports, the thicker the rods can be used in the weave. The material is harvested from fruit trees, willow, birch. Maple and poplar twigs are also suitable. Harvesting is carried out in the spring, before the appearance of sap flow in the trees. In dry, hot weather, cutting twigs in summer is allowed. Branching is done at angles in the range of 40-60º. Tyn is weaved from freshly cut blanks. Preparation for future use is allowed, but before use, the rods are soaked in hot water. Wooden poles are treated with impregnation, fired, washed out. The most optimal pillars are made of larch, which does not rot.
Main works
After the procurement of materials, they begin the main work. First of all, the pillars are buried. For a wattle fence with a height of one meter, the supports are hammered into a depth of at least 0.3 meters. A one and a half meter fence will require deepening the supports by 0.5 m. When constructing a low tyna, the pillars are driven in at 0.2 m. The distance between the supports is 0.4-0.5 m. The greater thickness of the rods makes possible a sparse installation of the posts.
On the edges of both sides of the fence, three pillars are driven in, the distance is 0.20-0.25 m from each other. This is done with the aim of rigidly fixing the vine in the initial, final areas. Then the rods are woven, placing the blanks in turn between the supports. The lower rows of the vine must be fixed with wire, buried in the ground by 10-15 cm. Subsequent layers of branches are attached with wire around the frame. Weaving begins from the thicker side of the twigs, overlapping the thin ends of the branches.
After passing three, four rows, it is necessary to compact the vines. This is done by tapping them with a hammer. The ends of the panicles on the vines are pre-cut. If reed mace is used, reeds - laying between the posts is done with armfuls of material. After the end of the work, the wattle fence is decorated with national ornaments and old utensils. To increase the service life, the structure is coated with varnish.
Conclusion
There are many options for creating elegant, practical barriers for various purposes. It is necessary to acquire a tool, start learning carpentry, construction and practice skills. The choice of improvised means for quickly decorating a flower garden will take a couple of minutes. Flower beds can be arranged in concrete containers filled with earth. Such flower beds decorate the front entrances, placing them along the perimeter of the porch. They look beautiful, and in the heat, weaving plant species create coolness. It is easy to create green walls from them, which, during the flowering period, smell and amaze with their beauty. On a private plot, you can always create exclusive decors, easily dismantled parts of fences. Fences protecting plants from encroachments by poultry, animals, children's pranks.
Even the most modest suburban area needs a reliable fence. To save the family budget and at the same time not to lose in quality, many craftsmen choose to build a fence with their own hands. Inexpensive materials are used that can serve the owner for several decades.
Today on the site for successful ones you will find a wide variety of fences for summer cottages, photos and short descriptions will help you make the right choice faster. Thanks to practical advice, you will be able to independently install the selected structure model on your site.

Wooden fence - a classic of the genre
Wood is a favorite material of summer residents for building a fence. It is especially attracted by its environmental friendliness and durability. In addition, the wooden fence does not violate the harmony of the natural landscape, does not create the feeling of a closed space and allows summer residents to fully enjoy the privacy with nature.
 Wood is an excellent material for a summer cottage
 It is very easy to work with a tree, so even an amateur can easily cope with building a fence in the country. The material is also interesting in that it does not require complex processing or the use of intricate design ideas. Even the simplest models of wooden hedges look aesthetically pleasing, harmonious at the summer cottage, pleasing the eyes of owners and passers-by.
 In the photo, a wooden blank fence, created by hand
 The simplest wooden fence Painted white, green or any other color, it looks quite attractive surrounded by greenery. You can evaluate the success of such a combination by looking at the photo provided here or looking for other illustrations on the Internet.
 Wooden picket fence
 You can use any raw material you have stale: logs, boards (even untreated ones), planks. Other materials available in your shed or garage will help to complement the design. Purchase the missing parts from the store.
 DIY wooden fence
 A picket fence is perfect for a small country house. It is better to protect the building from a log house with the help of logs... For the solidity of such a fence, natural stones are taken as an additional element.
 Pictured is a fence made of logs
 Fences are also popular from boards... This is one of the more recent options. The boards can be positioned in a variety of ways. The most common are: "chess", "herringbone", "braid". You can familiarize yourself with them using the photos provided on the Internet. Video materials shot by folk craftsmen will help you to get the necessary information in order to create your own chosen model of a wooden fence for a summer residence.
 In the photo, a fence made of boards
 If you intend to create a living fence for a summer cottage, choose a low model of a wooden fence that will let in a lot of light. The sunshine that seeps through should be enough so that the climbing plants planted along the fence can fully develop, braiding the hedge.
 Making a fence yourself is a great way to save money.
 Metal and plastic fences at an affordable price with a photo
Dacha fences made of the "Chain-link" mesh can be called cheap. They do a good job with their responsibility to protect the site from intruders. If there is a goal to protect yourself from prying eyes, use camouflage types of mesh that perfectly transmit the sun's rays and do not impede the penetration of air. The masking net is not used by itself, but is applied over the metal one.
 Chain-link fence
 Many summer residents have chosen for themselves another option for creating a cheap fence for a summer cottage with their own hands - the use of corrugated board. The structure can be made of any height. The material goes well with stone, wood and metal details.
 Fencing made of corrugated board in the country
 Profiled sheets as fence material have many advantages: they are not heavy, durable and easy to handle. It does not take too much time and effort to create a good fence with your own hands. However, there is a significant drawback of this option - the fence turns out to be deaf. This leads not only to a visual decrease in space, but also to a violation of air circulation and the creation of deep shadows in the fence areas.
Having stopped your choice on a fence made of corrugated board, you have a certain opportunity to choose a design. For example, you can install a metal frame and fix a solid sheet of a profile sheet on it. The second option is to install separate framed sections. Often, sections of the fence made of profile sheets are placed between brick pillars. They also practice the use of carved and forged inserts in such fencing products. The main thing is that all this is successfully combined with the country house and other buildings on the site, as well as harmoniously fit into the exterior.
 Cheap fence made of corrugated board
 In recent years, fences for summer cottages from a metal picket fence have gained popularity. This is an economical and practical way to enclose your property. Overhead fencing made of euro shtaketnik is a modern approach to creating a fence on suburban estates. The material is characterized by high aesthetics and ease of use. Even an inexperienced master can assemble such a fence with his own hands.
 A fence for a summer residence from a metal picket fence
 Many summer cottage owners are inclined to create plastic fences. It is a very durable material that does not require complex installation or maintenance. A wide assortment allows you to choose options for any design and in any color scheme. Plastic fences are a good option not only for installation along the perimeter of land holdings, but also for zoning the territory and fencing flower beds.
 Plastic fence in the country
 Ready-made fences for summer cottages at affordable prices, with photos
For those who do not have the ability or desire to build a fence around the perimeter of the summer cottage with their own hands, there is an easier way - to purchase blocks ready for installation. If necessary, you can order the installation of the fence.
A particularly wide selection of fences from different price categories can be found in online stores. On their pages you can see photos of ready-made options and prices for each of them.

Even when buying a ready-made fence, you can get by with a fairly modest amount by choosing cheap material. For a little more, you can get an exclusive fencing that's perfect for you and highlight your personality. It is very important to find a company that is ready to provide quality services and guarantee a long service life of the product.
 Fencing made of euroshtaketnik
 For those who have not yet come across the purchase of a fence and poorly delved into this topic, the table below will help navigate the prices. It indicates the approximate cost of a two-meter fence made of different materials. The height of 1.5 is also considered standard; 1.7 and 1.8 m. The difference in cost when ordering a fence of different heights depends on the material and design. For more details, check out the manufacturers' websites.
Material | The minimum price for 1 p.m. at a height of 2 m, rub. | |
| Standard picket fence | ||
Deaf picket fence | 1215 | |
Picket fence "chess" | ||
Profiled sheet | With 2 horizontal rails | |
With 3 horizontal rails | 1055 | |
| With 2 horizontal rails and colored cover | ||
With 3 horizontal rails and colored cover | 1117 | |
| Euroshtaketnik | With 2 horizontal guides and color application | |
With 3 horizontal guides and color application | 1375 | |
| Rabitz" | Solid fencing | |
| Sectional fencing |
Photos and descriptions of fences made from improvised means
If you want to really save money when building a building envelope with your own hands, do not limit yourself to using the cheapest materials. The use of free raw materials lying in the garage or shed will significantly save your wallet. There will probably be a lot of details that might come in handy. Connect your imagination and skill, and you will get an original fence for a penny. We provide you with photos of ready-made options to give you an idea.
Fence from plastic bottles
One of the most affordable materials for building a fence in the country is plastic bottles. You can use both the containers themselves, fixing them with a solution, and multi-colored lids, stringing them on a wire. Such a picturesque hedge will become the highlight of your summer residence, without requiring any waste. Before connecting with a solution, plastic bottles must be filled with sand to the very neck.

You can also create a practical garden bed fence using plastic bottles. The bottles are connected with a thick wire in two places: near the neck and near the bottom. This homemade fence is positioned necks down between the pins installed in the corners. Thus, a high bed in the garden is obtained.
 In the photo, a fence for a garden from plastic bottles
 A small fence for a garden or flower bed can also be made in another way. Dig a trench around the perimeter and bury the bottles in a row with their necks down. The container must be filled to the brim with sand in advance. If you use bottles of different colors or just repaint them, you get a fun fence that improves the mood of owners and passers-by.

A fence made of plastic lids turns out to be very beautiful with neat and premeditated work. However, it takes a lot of time and effort to build it. First, several thousand caps must be collected. Secondly, in each of them you need to make several holes. Thirdly, all the covers should be neatly connected together with a wire, adhering to a certain pattern. Everything needs to be done very carefully, and then the fence for giving from plastic covers will turn out to be as attractive as in the photo below.
 The photo shows a fence for giving from plastic covers
 Plastic bottles are an affordable material for building a summer cottage fence with your own hands. It is easy to work with them, they are not afraid of moisture, they are resistant to the development of fungus. Plastic does not ignite, but only melts under the influence of very high temperatures.
The disadvantage of the material is its reaction to temperature changes. In hot weather, plastic bottles deform and shrink. In severe frosts, the bottle may crack. Fences made of plastic are not recognized by admirers of the organic method of cultivating the land. Poor quality plastics give off toxic substances, especially when exposed to high temperatures.

Glass bottle fence
Glass container fencing is highly aesthetically pleasing and will serve its owners for many years. Let's consider several ways to create such a fence.
Method 1
Place the bottles across the wall of the fence with the necks in the yard and connect with mortar. This will give you a thick and sturdy fence. This option looks pretty nice. Pay attention to the photo example.

Method 2
Place the bottles across the wall, as in the previous version, only alternating the bottom and neck from the outside. Thus, you can get a certain pattern on the fence. To do this, you need to think about the location of the glass container in advance.

Method 3
By stringing glass bottles onto a metal rod, you can get a highly decorative fencing for a summer cottage. To do this, drill a hole in the bottom of each bottle. Having picked up containers of different color and shape, you can create a cheerful fence for a summer residence with your own hands. The photo shows how unusual this option looks.

Tire fencing
Not a new, but quite popular idea - using old tires to create a country hedge. They can be spread out along the perimeter of the cottage in a checkerboard pattern or placed vertically and bury the lower half. In the first option, brightly flowering flower beds are often arranged inside each tire. A fence created using the second method will become more attractive if you change its color to a brighter one with the help of paint.
 In the photo, the original fence for giving from tires
 Fence from pallets
This option involves the use of imagination. The first thing to do is to install and concrete the posts around the perimeter. Next, you need to attach pallets to them in the required order. Another option is to disassemble the pallets into separate boards and make a picket fence or another version of the fence.
 Fence from pallets in the country
 A fence made of branches and vines
It takes a lot of time to create a wicker fence for a summer residence. But many people are ready to sacrifice it for the sake of obtaining an original and cheap hedge. You will need dry branches or stems of vines. An interesting fence design will be a great addition to a country-style summer cottage. The support for such a fence can be made from bars or reinforcement rods.

A high-quality fence for a summer residence does not always require large financial costs. As you can see from the photos, if you buy inexpensive materials and do the installation yourself, you can get a decent fencing at no extra cost. With the use of scrap materials, the fence is practically free. Do not forget about the aesthetic edge of the issue, because the fences in the country (photographs demonstrate this) will stand for more than one year, and it is good if it will please the eye all the time.
Video: CHEAP PROFESSIONAL FENCE
What are weaving plants for dacha and garden decor