Plaster bas-reliefs on the wall with your own hands ideas. Do-it-yourself bas-relief on the wall: step-by-step actions for beginners
There is a very fashionable trend in modern design - a bas-relief made of decorative plaster. The ancient technique of decorating walls with three-dimensional images was undeservedly forgotten for a long time and was used only to create monumental sculpture and decorate public places.
Few can still afford to create decor from stucco molding in a dwelling: the artistic level of such work enables the master to evaluate his work quite high. But the techniques for making a bas-relief are not particularly difficult. The main obstacle on the path of an amateur designer is the conviction that it is very difficult to make a beautiful bas-relief on the wall with your own hands.
There are 2 ways to mount a decorative panel on the walls of premises: buying ready-made plates with fragments of stucco molding and creating an image directly on the wall. In the first case, the laying of panel details resembles the performance of facing work with tiles. To fasten the elements, liquid nails or tile glue are used.
The other way is more difficult, but much more interesting, as it requires the manifestation of creativity. To complete the decoration, you need to have minimal skills in working with plastic materials (at the level of school modeling lessons), spatial imagination and the ability to draw. If you wish, you can use ready-made drawings or ornaments by transferring them to the wall using a projector or enlarging them in cells.
The creation of the relief itself will require patience and accuracy. The material used in the work is of great importance. For good results, it is best to use gypsum-based finishing plasters or decorative mixtures with a very fine filler fraction. They lend themselves well to grinding, are flexible and have a homogeneous structure, which makes it possible to perform even small details.
How to prepare your workplace?
Gypsum mixtures tend to harden within 15-20 minutes. This makes it possible to easily and reliably fix relief details on the wall, sculpt the necessary fragments directly on the plaster. But this same feature of gypsum can get in the way of a novice decorator who has to work very slowly. The only way out of this situation is to make a large amount of mortar for sculpting large parts, when you can throw it on the wall like ordinary plaster and knead a little gypsum if painstaking work is required to create small parts.
In order not to come off in the process of work in search of the right tool, everything should be prepared in advance. For an amateur sculptor you will need:
- finishing plaster mixes or decorative plaster;
- roller;
- trowel;
- spatulas of different sizes or palette knives;
- capacity;
- damp cloth;
- chisels with different stings or a set of chisels for wood or plaster.
For different techniques of making a convex pattern, you may need stripes of gauze or rags, dry ears and grasses, or other decor. To create a repeating ornament, you need to prepare stencils in advance. Acrylic paints, a sponge and a dry cloth will also come in handy. If you plan to create a relief with details that protrude very far above the level of the wall, you should also stock up on wire.
How to make a bas-relief?
The wall on which the plaster bas-relief will be created must be prepared for finishing: it must be leveled and primed with a composition of deep penetration into 2 layers. If a decorative finish with textured plaster is required on the surface, then it should not be covered with wax or varnish. The bas-relief will only adhere well to an untreated wall.
Your own relief can be applied as a background under the panel. It needs to be done on a limited section of the wall, where it is planned to carry out a volumetric finish. Focusing on the general external contours of the sculptural image, make a mark to which the background texture should extend. This technique allows you to more organically fit the sculptural image into the surface of the wall. The simplest texture can be done with a long-pile roller and plaster putty: apply a thin layer of the mixture to the wall within the outlined boundaries and roll the fresh plaster with a roller. After the layer has hardened (24 hours), you can proceed to applying the relief.
Transfer the drawing to the prepared surface, noting the location of its parts inside the contour. Where the plaster layer will be especially thick, holes can be made and dowels can be driven in. On self-tapping screws, the bas-relief on the wall will be able to hold like on fittings. Some parts can be molded or molded separately and then glued to the wall.
- According to the sketch, apply a prepared solution of water with plaster inside the circuit (prepare according to the manufacturer's instructions for the mixture). There are many options at this stage: you can make the relief right away if the drawing is simple enough, or first raise the outline above the surface in order to sculpt the details later. Some elements of the picture can be pressed into the plaster, applied specially for this in a thick layer. The main rule when forming a composition is that the closest or central fragment should protrude above the wall the most. Minor and deleted parts have a lower height.
- Attach the separately molded parts to a layer of raw gypsum and mask the seams by covering them with plaster. If you need to make a fragment strongly protruding forward (horn, nose, stem or leaf), then you need to use wire as reinforcement, fixing it on the wall in a layer of plaster and drying the mold for 1-2 hours. Apply plaster on this base, forming the desired part of the picture.
- Work out small details using palette knives or cutters, a knife and any tools convenient for this. Parts on a set but still wet plaster can be easily scratched, cut or built up with your own fingers.
- Leave the completed bas-relief for several hours until it hardens. Sand the surfaces with an emery cloth, removing excess and eliminating defects. If a part of the drawing does not suit the master, it can be corrected by applying a little mortar and sculpting the missing one.
After drying the finished sculpture for 3-5 days, depending on the thickness of the layer, paint it with colored acrylic paints or make a shading treatment for the volume. To do this, you need to prepare the paint, tint it in dark shades of beige, gray, sand color. Apply the acrylic emulsion with a sponge, trying to paint over the depressions of the relief well. Wipe the damp surface with a dry cloth, removing excess paint from raised areas. Apply fragmentarily in the right places white paint or gilding, silvering, glitters.

Only after the bas-relief is completely ready, you can proceed to the application of waxes and varnishes on it and the rest of the wall.
Other techniques for creating panels
If the bas-relief on the wall should consist of a certain number of repeating elements, then it is very easy to make them on a stencil. Depending on the desired height of the pattern, a durable, moisture-resistant material should be selected. This can be thick plastic, heavy cardboard, or a ready-made stencil purchased from a store.
In this case, the application of a bas-relief begins with the selection of a pattern and transferring it to the prepared material. Then you need to cut through the contours of individual fragments and attach the cardboard to the wall. With a spatula, spread plaster mortar over the cut portions, grabbing the stencil areas around them. In this case, a pattern with a flat surface is formed, protruding from the background by 2-3 mm. After it gets a little stronger, the cardboard must be carefully removed, add small details, if necessary, and move on to the next image, attaching the stencil next to or in any desired place on the wall.
Convex contours of objects, branches, architectural ensembles of any complexity can be made from pieces of bandage or cloth twisted into bundles. After moistening them in plaster of plaster, glue them in the marked place of the drawing, wipe the seam. In this way, you can also fill in the contours if the bas-relief should contain images with uneven surface texture. By adding hand-sculpted details, you can create very complex compositions.
You can do the same with dried flowers, branches, ears, shells, etc. Carefully cover them with a layer of gypsum in a suitable container and glue the fragments onto the damp plaster. After completing the attachment of the finished panel parts, you can supplement them with stucco elements. The final finishing can be done by toning, darkening the depression of the pattern with paint and highlighting the bulges with a light shade.
In the nursery, a painted color panel with the image of your favorite characters from fairy tales will be appropriate. In the kitchen, you can harmoniously fit into the interior a still life or a stucco border with fruits and berries. Landscape paintings are suitable for living rooms, bedrooms and hallways. They can be highlighted with color or well-chosen lighting of a single-color bas-relief.
I want to make my home beautiful and original. The safest way is to use unique homemade jewelry. One of the very interesting ways is a bas-relief on the wall. This is a volumetric image sculpted from plaster or any other similar material. Gypsum in its pure form is used very rarely - it hardens too quickly, without giving time for processing. Most often, gypsum plaster mixes are used. They come with additives that make it easier to work with. With them, you can make a voluminous wall panel with your own hands, even without experience.
General technology for creating a bas-relief
To make a bas-relief on a wall, you first need to prepare it: clean it, level it. Already on a level and completely dry surface, you can start working. When you are going to make large bas-reliefs, it is advisable to prime the wall - for better adhesion of the composition to the wall.
The bas-relief on the wall can be of varying degrees of difficulty. This one is difficult. For beginners, it is clearly overwhelming. But you know what can be done in the future
For the first experience, it is better to start with small items - such as medallions (round or square) with simple relief images. It is best to take moisture resistant as a basis for such products. A frame can be made for it (from a profile, for example). In this form, the volumetric composition can be outweighed from place to place. It's easier to master the basics of technology.

This is the whole technology in general terms. There are nuances worth dwelling on separately. The first concerns the application of a starting layer of putty on the walls and the transfer of the picture. In more complex compositions, the bas-relief on the wall begins with the transfer of the contours of the drawing. This is done with a pencil or crayon (if you know how to draw) or with the help of an image printed in the required size and a carbon copy attached to it. Then we cover the places where the putty will be applied (for better adhesion), and then with the help of mastechins (small spatulas of different shapes) we apply the first layer of material. Further, the sequence of actions is similar to that described.
Materials for creating a bas-relief
The most common question among beginners: what kind of putty is better to take for making a bas-relief? In principle, any finishing gypsum plaster is suitable. Each master has his own favorite brands and compositions. Here are a few to recommend:
- Knauf Uniflot. Very durable and flexible. You can form a deep relief from it - it will not fall off even without reinforcement. Disadvantage: dear.
- Fugen. Slightly less durable, cut slightly worse. Much cheaper than Knauf Uniflot (almost three times). You can also make a relief without any problems.
- PUFAS. It is a gypsum plaster with cellulose fiber. The processing time is about 60 minutes, it is applied with a layer of any thickness, it is well cut, it is easy to grind.
- Rotband for the lower layers and Shitrok for the upper ones.
- "Acryl Putz" (Poland). Finished acrylic putty. The good thing is that it slowly "grasps", it takes an hour or more to work out the details (depending on the humidity in the room).
In addition, impregnations are required. They are selected based on the starting characteristics of the material. There are compounds that strengthen crumbling materials by penetrating deeply and binding the particles of materials to each other. This is necessary, since gypsum panels weigh decently and create additional stress. Without preliminary preparation, they can fall off from fragile bases. You can use PUFAS moisture-proof soil concentrate. It is suitable for all mineral substrates including wood and wood-based panels. Moisture protection Aquastop is suitable for loose substrates.

In addition, the following compositions are used:
- before starting work - to improve adhesion to the wall material (or base);
- for layer-by-layer processing - when creating a deep relief, when one layer of putty is applied to the already dried, applied earlier;
- for finishing impregnation before painting - to level the absorbency and so that the paint lays down evenly, emphasizing the relief, and not hiding it.
For layer-by-layer processing, primers are needed, which create a sticky, rough surface on the surface. In this case, you can put a new layer of putty even on the already dried surface. Ceresit deep penetration primer and PUFAS impregnating primer are suitable for these purposes. They can also be used for finishing before painting.
Instruments
Tools for creating a bas-relief are needed for two types of work - for applying putty and for removing / cutting off excess mortar. Therefore, the set of tools and devices is quite extensive. For applying putty or decorative paints use:

These are all the tools you might need. Necessary: trowels, spatula, chisels. Palette knives are very convenient, it is difficult without scalpels and a pastry syringe. Stacks, on the other hand, are a tool for the perfectionist to fine-tune the relief.
Making a bas-relief from gypsum plaster: photo report
For the relief painting on the wall, a sea theme was chosen - with fish, octopus, algae. A great option for getting your first experience! A light pattern that can be formed gradually.

Preparatory work
Drawing with a pencil is transferred to a pre-leveled and primed surface. For the production of the bas-relief, SHITROK / SHEETROCK gypsum plaster (with a finer grind) is used. When diluting the solution, a smaller amount of water is added: take 0.5 liters of water per kilogram of the mixture (instead of 0.6 as recommended). With such a batch, the composition turns out to be harsh, but it is this one that is better for making a relief image on the wall.

Mix a small amount of mortar right away: gypsum plaster quickly loses its elasticity (15-17 minutes) and you need to have time to not only lay the entire volume on the wall, but also align and give the desired shape. For the first time, knead 300-400 grams, lay out, give some shape. If in the process you feel that you can handle the larger volume, knead more.

Little by little, spread the solution with a palette knife, filling the contour of the algae, cut off the excess, smooth it out as much as possible
With this tactic - small portions of the solution - most of the time is spent precisely on mixing the putty. It is better to knead in a bowl with high sides - a bucket or a saucepan. However, it is difficult to remove the frozen solution from them. If there is an old ball in the house, you can cut off the top and knead the putty in it. Even small particles are easily removed from such a container.
Pour the powder into the container, add clean cold water, mix quickly with a spatula, then bring the composition to homogeneity, leave for 5 minutes, then mix again. There should be a homogeneous thick paste without lumps or irregularities. The time of holding and "setting" is indicated on the packaging with putty, if you use a different composition, follow the manufacturer's recommendations.
Formation of small parts
It's easier to start with shallow terrain. When forming small parts, we take a small amount of mortar on a trowel, apply it to the right place, trying to smear it well so that the adhesion of the mortar to the wall is good. If the wall is covered with a primer that improves adhesion (the surface is slightly rough and sticky to the touch), there will be no problem. If the details are very small - like the tentacles of a jellyfish - it is more convenient to put the solution with a palette knife.

A bas-relief of a jellyfish made of plaster or acrylic putty is not much more difficult to make ...
Having laid out the mixed portion of the solution on the wall, we immediately proceed to leveling and forming the relief. We work with the edge of a trowel, palette knives, knives, chisels, scalpels - everything that is at hand and that can give the surface of the desired shape. If the part has already dried out in the process, but has not yet been finalized, you can moisten it with a spray bottle and try to modify it after a few minutes. When you have achieved the desired degree of perfection, empty the mixing container of the remaining solution and mix a new batch. Note: the container must be absolutely clean... The smallest particles will leave scratches.
We form the main reliefs
When making a bas-relief that will protrude beyond the wall by no more than 2 cm, no reinforcing structures are required. With a greater thickness, in those places where a layer thicker than 2 cm is planned, self-tapping screws are screwed in. It will be possible to navigate by them when applying the plaster, they will also support the solution, preventing it from slipping.

The fish and the shell have a larger volume - in some places more than 2 cm.Here we screw in self-tapping screws for reinforcement
In this bas-relief, the most prominent parts are fish and a shell with a pearl. In those places where a thick layer will be laid and screw in the self-tapping screws. We roll the pearl separately, making a ball and putting it on a self-tapping screw.

The thickest place is the head
In places where the relief is supposed to be deep, you can apply the solution not at one time, but in several layers. In this case, it is not at all necessary to smooth the layers. The more uneven the surface is, the easier it will be to apply the next layer. When the required volume is reached in a certain area (for example, the head of a fish), we begin to work on small details - eyes, whiskers, gills, etc.
When working on small details, knead no more than 100-200 grams of solution - while cutting, leveling, the solution sets, so large portions are simply not needed.

After the drawing from the putty on the wall is ready, it is left for a couple of days until it dries completely. Then you can start sanding - we take sandpaper with a medium grain, process it, achieving the desired smoothness. When the relief is ready, we polish it with fine-grained sandpaper.

Two days or more, elements with a deep relief can dry. Smaller ones - algae, waves, jellyfish - dry out faster. You can start with them. While you are bringing them to mind, thicker parts will also dry out. After sanding is completely finished, remove dust with a thick brush. Vacuum if desired. Next, we cover the decorative plaster panel with a deep penetration primer.
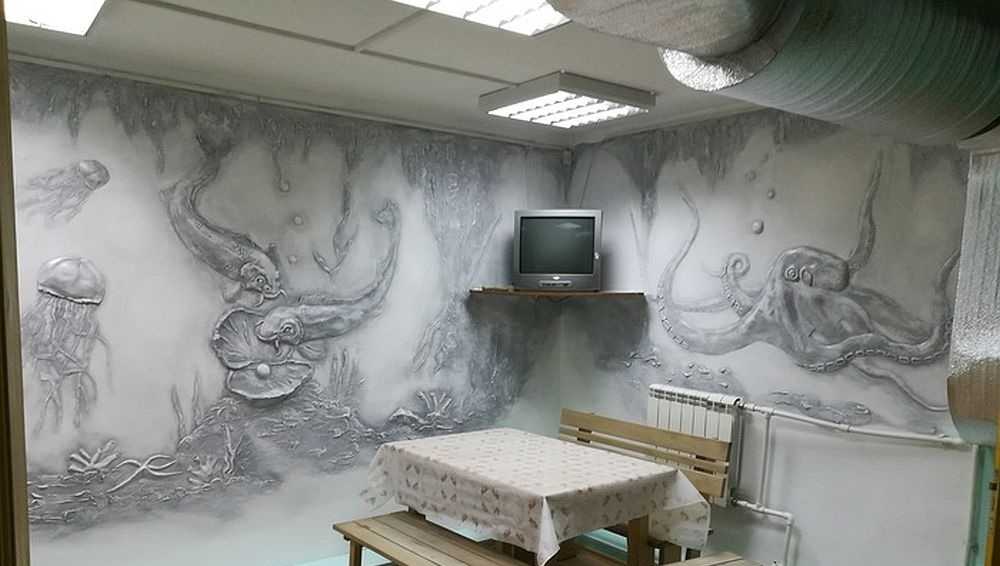
The last step in making a bas-relief on the wall is painting. Everyone chooses the method of painting himself. In this case, the usual water-based emulsion was used (the primer was under water-based paints). On this we can assume that you made a bas-relief on the wall with your own hands. In this case, the result is a large composition on two free adjoining walls.
One tip: the bas-relief on the wall looks better with specially designed lighting. So pull the ends out before leveling the wall. After leveling and priming the surface, install those lamps with those lamps with which you will further highlight the relief picture. In this light, it will be necessary to grind the volumetric panel you made from the plaster mixture. Only in this case everything will look good. Because if the work is carried out under a different lighting, when installing standard lamps, you may find "nightmare and horror".
Bas-relief on the wall: photo ideas
Without experience, it is very difficult to understand what and how can be done using ordinary gypsum plaster. In fact, three-dimensional plaster paintings can be of very different subjects, but the most common are flowers, trees and landscapes (urban, suburban). In this section, we have collected a number of the most diverse bas-reliefs on the wall. With their help, you can imagine yourself a theme for art sculpting on the walls. In fact, the process is similar to working with plasticine. 


Since ancient times, people have been trying to decorate the walls of their apartments. One of the types of such decor is - volumetric works of art "drowning" in a flat surface, parts of which protrude no more than half of their size. Many will agree that such a decoration looks much more interesting than ordinary painted or wallpaper surfaces. And the do-it-yourself bas-relief on the wall will certainly become an object of admiration not only for the owner of the apartment, but also for the guests.
What can be decorated with a bas-relief
Many people, when they think of a bas-relief, immediately pop up in their minds of photographs of works by famous masters decorating the facades of buildings or the pedestals of statues. However, even in the most ordinary apartment, you can find many places and surfaces on which a bas-relief will look good.
- A small bas-relief will be an excellent decoration for the surface of various objects like photo frames, mirrors, decorative panels and boxes. Also, such a finish can be placed on cabinet doors, chest of drawers, desk.
- Larger bas-reliefs can decorate doorways and the doors themselves, fireplaces, the ends of large furniture.
- The wall is a suitable place even for a medium to large sized bas-relief. Chamomiles, galloping horses, a snow-covered tree or a pouring waterfall - incredibly beautiful compositions can look harmoniously on the wall in any room, be it a dining room or a bedroom.
In addition to the decorative role, the bas-relief can also perform a practical function, for example, it can successfully mask the unevenness of the wall, utilities, create a smooth transition from one functional zone to another, or simply distort the space advantageously.
What you need to create a do-it-yourself bas-relief
Creating a bas-relief is a rather laborious and sometimes time-consuming process. Therefore, the masters of this business ask for a lot of money for their work. If the service of a professional is too expensive, and you really want to decorate the wall, you can try to create a plaster bas-relief yourself. This will require minimal sculpting skills, accuracy and perseverance. The list of required materials varies depending on which image and in which area you are going to reproduce. It usually includes the following attachments:
- Various types of brushes and spatulas, pencil, cutter.
- Masking tape, thick transparent film - used to protect the surrounding surfaces or transfer a sketch.
- Rubber gloves - so as not to get your hands dirty.
- Putty, gypsum, plaster, alabaster - your choice.
- Auxiliary materials - plasticine, polystyrene, cardboard, pieces of decorative cords. All this can come in handy in the process of creating a bas-relief.
If this is your first time starting work on creating a bas-relief, it is better not to take on a complex project of a large size. It will be even easier to create the decoration on a separate sheet of drywall, and then fix it to the surface of the wall.
Of course, before trying to create a bas-relief with your own hands, it will be useful for novice craftsmen to watch master classes on video. On the Internet, you can find detailed descriptions of the stages of work on creating wall compositions for every taste with a photo.
How to make a bas-relief on the wall with your own hands
The step-by-step instruction, which will allow you to understand how to make a bas-relief on the wall with your own hands, includes several mandatory points.
- The work on creating a bas-relief on the surface of the wall should begin with the preparation of a sketch. Print or paint the desired life-size image and see how it looks in the interior. If everything suits you, you can proceed with further actions.
- Clean the surface on which the selected decor element will be located. Best of all, adhesion to gypsum occurs if you first level, plaster and prime the wall surface at least twice.
- Place a transparent thick film on the previously prepared drawing and trace the contours with a marker or pencil.
- Place the film stencil on the treated wall and secure with masking tape. Trace the contours with a hard pencil so that the outlines of the future bas-relief remain on the filled surface of the wall.
- The most difficult and time-consuming stage is the application of plaster or gypsum to the surface and the creation of a volumetric image. Small details can be worked out with brushes and even your fingers. Please be patient!
- When the work on creating the bas-relief is finished, you need to let the plaster dry. Then sandpaper your masterpiece to give it its finished shape. Finally, the surface of the product is coated with a primer or painted with water-based paint.
As additional materials, you can use foam, cardboard and even twine. Small elements can be cut out of polystyrene and cardboard, covered with plaster and simply glued to the composition on the wall, as well as a pre-plastered piece of twine rolled into a fancy curl.
If large elements fall off and do not stick to the wall surface, you can try to strengthen them with a regular plaster bandage. You can buy it at any pharmacy.
In the photo, you can often see bas-reliefs with an abundance of flowers on the walls. It is not necessary to sculpt each flower separately - they can be made from fabric or paper and simply covered with a mixture of plaster and PVA. After drying, the elements are attached to the main composition with thick alabaster.
If, in the midst of work, you realized that creating a bas-relief on the wall surface with your own hands is too difficult for you, you can try to seek help from an experienced specialist. You can find such a person in your city using social networks and message boards. It is better to assess your strengths in time and transfer the work to someone else's direction than just scrape off the wall and throw away a mountain of expensive plaster.
When decorating the interior of an apartment or house, you can make a bas-relief on the wall with your own hands.
Decorations of this type are rightfully called exclusive, because the bas-relief makes the design of an apartment or house simply unique, because even the author does not always succeed in repeating the work already done.
For a person who has never encountered this trend in the visual arts, very often there is not enough determination to create such a picture.
However, it is well known that the gods do not burn pots. After reading this material, you will learn how you can make a bas-relief on the wall yourself.
And the bas-reliefs in their apartments are sculpted not only by professional sculptors and artists.
The novice master is increasingly doing the design of his home with his own hands. Including the bas-reliefs on the walls.
Basic concepts
At all times, people have devoted a lot of effort and financial resources to decorating their homes, and especially the walls. We chose the most popular and scarce paintings from the classic and avant-garde paintings.
Bas-relief, as a technique for obtaining volumetric images on the wall, has recently begun to gain popularity. It can be applied to a separate tablet and fixed in place.


Larger compositions are sculpted directly on the entire wall. The bas-relief most often depicts flowers, trees, birds, animals and plot paintings.
In order to create a bas-relief with your own hands, you can go through a master class and use special techniques and techniques.
Preparatory stage
Even the simplest plaster stucco molding gives the room an elegant and solemn look.
When developing the design of any apartment or house, from the kitchen to the bedroom, you can use relief images.
The bas-reliefs harmoniously fit into the interiors of any style, from modern to fusion.
To create such pictures, you only need desire, accuracy and perseverance.
Before starting any serious business, you need to properly prepare, watch a master class or consult with neighbors.
Practice shows that first a wall or walls are selected on which the bas-relief will be applied.
It is very important to evaluate how the picture will be illuminated, with natural light or with the help of electric lamps.
The next step - among the abundance of paintings, you need to choose the one that will be molded in a specific place on the wall. Such decisions take time to think and choose a specific option.
Taking on a genre painting with images of wild animals and brave hunters is not recommended for a person who for the first time intends to mold a bas-relief with his own hands.
The most suitable in this case will be images of flowers, leaves and fruits.
It will be useful to watch the simplest master class from a specialist who is professionally engaged in sculpting bas-reliefs for walls.
It is advisable to choose an image that is not complex, but also not primitive. In its original state, it should be pleasing to the eye.

To do this, you need to collect the minimum set of tools that apply in this case:
- trowel;
- the brush is flat;
- palette knife;
- maklovitsa;
- masking tape;
- rubber gloves;
- the film is transparent, dense.
You will also need a finishing material that is used when leveling the walls. The creation of a bas-relief is carried out in several stages.
Each step requires special primers and plastics.
Sequencing
In order to mold a bas-relief on the wall with your own hands, you can use a variety of materials. The most common are alabaster, clay, gypsum, gypsum-based plaster.
Looking through the master class on creating a bas-relief, you need to choose the most suitable texture for yourself.
It makes sense to create the bas-relief on a separate tablet. For this, drywall or fiberboard is suitable. An already finished painting must be fixed in the place where it will serve as an ornament.
Step # 1 - preparing the image
From the number of pre-selected paintings, you need to take the most clearly traced one.
The outline of a leaf or flower must be transferred to paper. Then a transparent film is applied on top.
And already from above the image is transferred to it.

The contour can be traced with a pencil or helium pen so that it does not wear out.
Step # 2 - preparing the foundation
The base for the bas-relief is prepared from acrylic filler or "Marseilles wax".
A layer of putty is applied to the plasterboard with a spatula and leveled.
After 15-20 minutes, after the material has hardened a little, you need to transfer the image to the base.
To do this, a stencil from a film is placed on the base and the outline of the drawing is outlined with a hard pencil.
A relief image of a leaf or flower remains on the putty surface.
Step number 3 - forming a picture
This stage can be called the longest and most responsible.
A master who is engaged in modeling from plasticine or clay will quickly cope with this matter. A person who does not have such experience will have to work hard.

The essence of the process is to add volume to the painted leaves or flowers.
The volumetric composition is not created in several steps. The putty is applied to certain areas of the drawing not immediately, but gradually, layer by layer.
The material from which the volumetric figure is molded should be plastic and do not harden immediately.
Prepare a putty of this consistency in advance.
Step 4 - painting and fixing the bas-relief
When the bas-relief on the wall is completely sculpted with your own hands, it must be dried.
After that, all sharp edges and protruding corners are smoothed with fine sandpaper.
At this stage, the main thing is not to overdo it and not scrape off excess.


At the end, in order for the bas-relief on the wall to take on a complete look, its surface is primed and painted.
Most often, a three-dimensional picture is painted with water-based paint.
Plaster bas-reliefs
Gypsum is a material that both professionals and novice artists like to work with.
It is enough to look at the master class with general recommendations for handling it and you can easily achieve the result. Gypsum is mixed with PVA glue.
This mixture is similar to plasticine for sculpting individual elements of the picture. In order to get a three-dimensional image of a leaf or flower, you can simply buy the corresponding shape in the store.
You need to pour a mixture of gypsum and glue into it and wait until it hardens. When the mixture has hardened, carefully remove the resulting element from the mold and fix it on the wall in the desired place in the composition.
Wall bas-reliefs made using artificial flowers harmoniously fit into the interior design. Cloth, paper or plastic are the materials used to make flowers.
In a trough-type container, alabaster or a mixture of plaster and PVA glue is diluted. The consistency of the solution should be like sour cream or yogurt.
A flower made of fabric or plastic must be dipped in the solution several times. It is important to ensure that there are no drips that harden quickly.
After each dipping, a pause is maintained during which the solution hardens slightly. When the texture of the flower acquires a uniform saturation, the procedure can be completed.
After the flowers have finally hardened, they need to be fixed on the panel with thick alabaster. From separate fragments, a composition is made up to the entire wall.


Finishing the master class on making a bas-relief on the wall with your own hands, it should be noted that there is nothing complicated in this technology.
In this context, it should be emphasized that the bas-reliefs on the wall are one of the types of decoration.
Saturated compositions claiming aesthetic value should preferably be done under the supervision of an artist or a decoration specialist.
Simple wall art works equally well with craftsmen and diligent and determined beginners.
After reading the material, you learned how to make a bas-relief, and now you can surprise relatives and friends with an amazing technique.
And again about the floral bas-relief. 3 MKBas-relief, as a technique for obtaining volumetric images on the wall, has recently begun to gain popularity; to perform this technique when decorating their home, both professional artists are hired, and lyre-makers make interesting relief panels with their own hands. After all, even the simplest gypsum stucco molding gives the room an elegant and solemn look. If the image protrudes more than half, then it is called a high relief, and if less, then it is a bas-relief.
I don’t know how to your taste, but in my opinion the more natural, the less smoothed and asymmetrical the wall bas-relief is, the more aesthetically pleasing and elegant it will integrate into your interior. And unpainted bas-reliefs look much more impressive due to the play of shadows than painted ones, even if they were covered with gilding! 
The inspirational factor in making the bas-relief by hand is that your design will turn out to be unique, even if a stencil is used, because you are not yet a professional craftsman and do not have a recognizable style!
You can make a bas-relief yourself in different ways: sculpt along the outline of the sketch:

or vice versa "plaster" by template.

Painted reliefs somehow look unnatural....

In monochrome it is more elegant:


How to make a bas-relief using a stencil
To make a bas-relief using a stencil, without having any skills and experience in such work, it is necessary to study all the subtleties and features of its use.
To get started, you can practice on a small drywall board, and then start decorating the walls.
|
|
 |


A stencil can be purchased at any hardware store by choosing the drawing you like. You can also make it to order in a workshop or make it yourself, but first you need to decide on the pattern - the image should be moderately complex, but not primitive.

A stencil is used to apply an additional layer on a flat wall surface, which will serve as a protruding pattern. You can draw a stencil pattern yourself or find a suitable pattern on the Internet and print it. If the selected pattern is too large, you can glue it piece by piece with tape.


The most durable material should be chosen for making the stencil. Plastic is best. In order to transfer the selected pattern to plastic, you need to use copy paper. If the plastic is transparent, then the drawing can be placed under it, and then cut around the contour. To prevent the drawing from moving during the transfer, it should be attached with tape. The stencil is cut out so that no burrs and cuts remain on it, as the pattern may be damaged. Cut lines must be clear and straight.

Preparatory work with the wall
Before starting work on the wall, markings should be made. This is necessary so that the pattern can be evenly applied to the surface. A stencil for bas-reliefs is used only once, so you should immediately prepare several templates with a pattern.
To secure the template to the wall, you can use a variety of adhesives that must be attached to the back of the stencil. It can be masking tape or glue, which is very convenient to use in such work. After the glue is applied to the template, it is applied to the wall and held until it is firmly attached.
Priming the surface is not a necessary process, but it will not be superfluous either. When working with putty, it is always recommended to use a primer, therefore, it should be covered with a solution that part of the wall to which the bas-relief will be attached. After covering with a primer, the wall should dry well.

Bas-relief application
It is recommended to use a fine-grained putty for applying a three-dimensional pattern. It looks like a viscous paste and goes through a fraction of this work perfectly. The putty can be bought ready-made or you can dilute the dry mixture yourself with water to the desired consistency. The putty is applied to the stencil, covering it completely. Each layer of such a solution must be well compacted.

Remove the template from the bas-relief only follows when the plaster is completely dry and hardened. To remove the stencil from the wall, you need to smoothly pull it towards yourself and gradually separate it slowly.

If the pattern is not even enough, then after complete drying, its edges can be sanded with sandpaper. This process is more clearly shown in the video MK (but in my opinion, the contours of the plant in Julia Bykovskaya look very symmetrical and unnatural)
;
RELIEF MODEL ON THE CONTOUR:
The essence of the process is to add volume to the painted leaves or flowers. A volumetric composition on the wall is created in several steps. The putty is applied to certain areas of the drawing not immediately, but gradually, layer by layer.


The technique of sculpting plaster bas-reliefs was described in detail in the post HERE:

Below is a small tutorial with tips.

|
From the number of pre-selected images, you need to take the most clearly drawn version. The outline of a leaf or flower must be transferred to paper. Then a transparent film is applied on top. And already from above the image is transferred to it.

The contour can be traced with a pencil or helium pen so that it does not wear out.
Master class from Alexei Tishchenko's FrescorelieF studio on how to make a bas-relief on the wall with your own hands. Photo and text of the Author. 
Any idea finds the beginning of its embodiment in a pencil sketch. Our Flower is no exception.

Based on this scheme, we drew a sketch to scale, where all proportions were preserved.
Tracing paper with a sketch for masking tape was fixed to the wall prepared for this. And the preparation consists in the fact that it must be leveled and plastered. 
The drawing is translated by tracing it using carbon paper.

For further work, we needed: about 2.5 kg of well-mixed sculptural clay (it should be soft, but not stick to fingers), stacks, a knife, a column brush, a brush-bristle, a rolling pin, two containers - one for water, the other - for slip. You also need to prepare a slip on which we will glue the fragments of the relief. Slip is nothing more than the same clay, brought to the consistency of liquid sour cream. We use ordinary water as a thinner. You can add PVA glue there (by about a third, however, this is not strict). The clay itself must be wrapped in a damp cloth and placed in a plastic bag so that it does not dry out. 
In our case, we started sculpting from the top left. Although, in fact, it was necessary to start from the central part, where the most massive and multi-layered fragments will be. All this in order to optimize the drying process. After all, it is more desirable to apply the next layer to the dried one. But we had time to stretch out the pleasure. 
It should be separated from the whole piece of clay exactly as much as is required to form a fragment. Try to hide excess pieces in a bag right away. Do not make the elements too bulky, so that when you transfer them to the wall, they will not fall apart. 
All stucco elements can be divided into 3 main types: flagella or sausages, layers and balls. Everything else is derived from them. Therefore, before sculpting a fragment, determine for yourself what kind of view it will be. The layers are rolled out with a rolling pin, and everything else - by hand. Smear the area on which you intend to glue the fragment with a slip, use a bristle brush. Only when the fragment has adhered well enough, smooth it around the entire perimeter without leaving any gaps. 
Use your fingers, stacks or even a rolling pin to give the mass the desired shape, work out the details. If necessary, smooth the relief with a core brush dipped in water.
Match the next fragment with the previous one so that the joints are not visible. Do not leave a non-ironed area for a long time, the clay dries up and then the unprocessed part will have to, perhaps, be cut and sanded. 


Step by step - and the relief is molded.
Leave it to dry naturally for one week. At high humidity and low temperatures, the process slows down. Accordingly, you can speed it up by increasing the temperature and lowering the humidity.
When the work is dry, sand it with fine sandpaper. Before painting, prime it with a solution of PVA glue with water (50%). Wait until it is completely dry. Then you can tint in any color. In our case, we used a spray gun, because the brush leaves marks. If desired, again after complete drying, go over all surfaces with acrylic varnish (glossy or matte).

|
|

For more information about 4 methods of plaster molding, see the post
And finally, an elementary method of making a flower wall using decor plaster: