What to make a woodchip stove from? Turbo oven thermos splinter! Do-it-yourself camping stove.
There is a huge amount of information on the Internet about tourist mini-stoves, so I somehow stumbled upon the design of such a stove and I really wanted it for myself for fishing, and even so - on short outings on weekends. Who cares - just google the names "Bond stove", "turbocharged wood chip", "turbocharged mini-stove" - and you will see a lot of information on such devices. They are made by both serious firms and individual master-nuggets. The latter use a set of stainless steel mugs for construction. A hole is cut out in the bottom of the largest one, where it is placed a little smaller, having previously amputated the handle. The upper part is made from the third circle, from the fourth, the smallest - a turbine for pressurization.
For me, buying this on the Internet is not at all high, because the playful hands itch. So I took my legs in my hands and went to my favorite store of constant sales "Galamart", where these mugs were ... like shoe polish in a shoe polish factory. And he discovered that shoe polish had run out of stock of the aforementioned mugs. And not only in the store closest to me, but also in a couple of other stores of the Galamart chain.
An ambush, however ...
And my hands itch more and more. Well, in this case, if there is no way to buy the necessary components, there is a simple way out - to adapt something unnecessary for this purpose, the option of buying something unnecessary first :) is not considered, the unnecessary from a real master should always be in abundance :) ...
Having cast an eagle's gaze on the stocks of unnecessary things in my household, I stopped him (gaze, of course :)) on an old Chinese thermos with a metal flask and a wide neck with a capacity of either 0.3 or 0.35 liters. The device kept warm from the very purchase, the neck lid closed disgustingly, all the time it flew off the thread. And I realized that I had found what I was looking for. In fact, what we have is a double-walled stainless steel vessel. He needs something - to dismantle the bottom, open the sealed partition, remove it completely, cut the grate holes in the bottom of the flask, cut holes for organizing traction in the upper part, there is a very well located ridge in which to organize them - a nice thing, well, cut a hole for side turbocharging - and the base of the stove is ready.
The second question is what to make a turbocharger from? And then my eyes fell on an old Chinese flashlight, which has a number of advantages from this point of view.
Firstly, it has a battery compartment for three AAA batteries, assembled into a single cartridge, for a total of 4.5 Volts - what is needed for a CD motor designed for this purpose. Secondly, this very motor does not fit a little in diameter into the part where the LED unit was located. A small revision - and it will stand like a native. Thirdly, there is no need to fool around with the controls, because the native on / off button is present, and it is very convenient - at the end opposite to the intended location of the engine. Fourth, lightweight aluminum body.
And to accommodate the fan itself in my kulak economy, it’s already 30 years that a casing has been lying around like a miniature aluminum casing from some kind of fan for cooling Soviet microcircuits (which, as you know, were the largest in the world :) and therefore needed intensive cooling).
Trying on showed that it fits almost perfectly, only the diameter of the crimp ring is slightly larger than the diameter of the flashlight. But it doesn't matter, more - not less, we will insert a spacer made of the same aluminum.
Then there was only work within the framework of the activities described above. In addition, I will only add that in the process I wanted to have two blowing speeds, as it is on the same Bond stoves and the turbine for boosting got an additional blue turbo button. The wiring diagram is simple - made power through a resistance, and when the switch is turned on, the current bypasses the resistance directly through the line of least resistance. As a result, we have power supply either through additional load and low power, or directly and turbo mode.
The spacer was bent out of an aluminum strip, and the seat for the engine was manually modified with a scraper.
From the stainless steel mug available in the same kulak economy, I made the upper part and a toy mini-frying pan for my grandson.
All work on cutting metal and cutting holes was performed by an engraver using tooth mills and burs, with which he managed to stock up a couple of years ago.
I cut out the fan impeller from a piece of tin from a gas cylinder, put it on a fluoroplastic gear on the motor shaft, having previously modified it with a cutter at its own speed to the required diameter.
And the last thing. Assuming that the inner and outer flasks of the thermos are possibly connected to each other by soldering, which will lead to self-disassembly of the stove at the first use, I made four holes with a diameter of 4 mm along the rim, and then at work they were neatly welded to me with argon. There are four additional electric rivets. I finished the reinforcement of the seam with the same engraver flush, now if you don't know, you won't see them right away.
So, what happened in the end.
Here is the entire set assembled, in the transport, so to speak, position:
Opening the lid:

We extract and lay out the components:

We collect:

And with the turbine installed: 
There is also an untested version with the upper part made of a cross, it is supposed for wide bottoms such as a frying pan or a large pot.
Here are the cross bars:

And here is the device assembled with them.


Here and above the thermos bowl is set purely symbolically to understand what is being put where. Unfortunately, it itself only has a transport purpose, and as a container for spilling, but not for cooking because of the plastic interior. Although it can also be disassembled to the top and bottom and, theoretically, the top made of thin stainless steel can be used for cooking. I have not tried it yet - the stainless steel is very thin, almost foil, it will definitely warp it.


Now element by element.
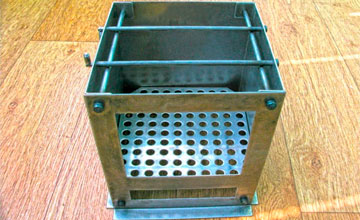
The furnace body itself:

View from the bottom:

Top view (bottom removed):

The bottom, as you can see, is removable, which is a pole in my opinion. It is a little tough to remove, although I removed the metal in this place, over time I will finalize it to a tight fit with easy removal. Or maybe over time, after several cycles of heating and cooling, the landing itself will weaken. It is very convenient to place a kindling on the bottom and pile wood on top to raise the stove and light it (kindling) through the holes in the bottom. However, even through the throat, ignition is carried out without problems.
Now I am using the second version of this part.
The first one, made from a mug, I rejected, because it was high (40 mm above the edge of the neck) and with 4 large cut-outs for traction. On the first test, the thrust was excellent, the temperature was high, even aluminum rivets flowed and melted, with which the ribs and hooks were riveted to the crown, but the mug of tea was heated for a long time. I decided that due to the fact that the heating object is located far from the combustion source, and the healthy holes that I copied from one of the prototypes, it seemed to me that the flame was deflected to the side. Here it is, the first option:


Now the design is like this. Here is the crown itself:

And here are the brackets: which provide a 10 mm gap for traction between the bottom of the dishes and the oven, and also increase the area of \ u200b \ u200bthe support for the dishes:

The details are small, so as not to lose them, I fastened them with a 1mm cable.
Here is the complete crown assembly:

Well, and a turbine for pressurization.
It should be noted that the stove works well without it, especially if it is oriented with a blowing hole towards the wind. But with the impeller .... you have to experience it yourself - raw firewood, everything that can burn theoretically burns for a sweet soul. Especially with the included turbo. This is no longer an oven, but a burner.
So, here it is from all sides (in the first photo - with the battery cartridge removed):


One minor drawback is that the center of gravity is too far away, and if the stove is empty, without firewood, which means it is light, then the impeller can overturn it. But such a situation is meaningless, since a stove without firewood does not need an impeller, so its use is quite convenient and does not cause problems yet. Although, when I see small stainless steel mugs on sale, it is quite possible that I will think about creating another impeller, more compact.
Well, and another minor nuisance - it was not possible to manually make a balanced impeller - in turbo mode it cracks a little from vibration, apparently I will try it in the near future either to rebalance it, or to replace it with a new one, initially balanced.
In short, everything on the device, in the near future I will publish the second part with the results of testing the stove on the last Day of the Man on the barbecue.
Tourists and cycling enthusiasts are probably familiar and interesting with the topic of camping stoves. A lot of wood chips and factory and handicraft production of various designs are on sale. I want to tell you about my wood chip stove, which I have been using for more than one year. Usually water for tea is boiled on it or canned food is heated. At one time, I became interested in this topic and came across a similar design on the Internet, which, after various experiments, changed somewhat and turned into today's version.
The design of a homemade stove is quite simple and can be done, literally, on your knee in a couple of hours.

The stove body consists of two parts - the side wall and the bottom. All this was cut with metal scissors from the most common galvanized sheet with a thickness of 0.3 mm. and riveted with aluminum rivets. I used a tapered drill to drill the holes. But it would be faster if you use a punch of a suitable diameter.

It is better to drill holes for rivets first on only one part, the workpiece. When you bend it around the pot and shape it, it will be easier to mark and drill counterparts along the prepared holes. The pot should be freely inserted into the stove up to the lid itself without any extra effort.

I bent the upper edge of the stove by 5 mm so that it is not sharp and to give it a little more rigidity. The cutouts for the side attachments of the pot handle were simply bent in the form of tubes. For them, you can theoretically hang a wood chip on a metal cable if there is nowhere to put it. But in practice, this has never been useful to me. A pattern for the bottom of the stove can be done simply by tracing the bottom of the pot on paper with a pencil with a small margin of about three millimeters or a little more. Transfer the contours of the bottom to the metal, cut out the workpiece and drill large holes. Then insert the bottom inside the stove and mark the matching rivet holes. Drill them and rivet the bottom into place.

Shredder legs are made of 3 mm. electrode. You need to knock off the coating from it and sand it with sandpaper. Then bend in the form of a staple. The ends that will be inserted into the stove body are shaped like the letter "Z". You need to make sure that both legs are the same. Otherwise, you will have to look closely each time which one is right and which is left. It is also highly desirable that the legs are large enough to fit inside the pot. They are inserted into the stove from the bottom side and slightly go out through the side wall. I drilled holes for them in the same place.

Coasters for the bowler hat were made of double-sided Chinese cloth for metal. I made small cuts in the sides of the stove and in the stands themselves. I would not say that such a design is the most convenient, but the bowler is stable. And the gap allows you to put sticks in the stove from above without removing the pot.

Making another wood chip stove, I probably would have made changes to the design. And you can not copy my pattern, but draw your own. I'll tell you a little about the basic principles that are important for the normal operation of the stove. The most important thing for fire is oxygen. Since this design does not have forced air blowing and there is no pipe for creating thrust, sufficient combustion air can only be provided through the holes in the housing. It is imperative to drill the entire bottom and bottom of the stove from the sides. A row of holes on top is also needed. In addition, you cannot completely cover the upper part of the woodchip with a pot - the fire will immediately begin to burn several times less intensely. That's why I made the bowler stands so high. The flame heats the bottom of the pot and rises freely along its walls, also heating the contents.

The legs also serve for free air flow from below. In addition, they are bent at such an angle that the support area is wider than the bowler hat. Otherwise, you can easily turn the structure over by placing firewood.
To ignite the wood chips, I first put crumpled paper on the bottom (it doesn't matter, any kindling is possible). Then I pour in thin twigs and then fill the stove to the top with thicker sticks. I put the stands in place, on them a pot of water. I light the paper through the hole in the end. A full bookmark is enough to boil about half a liter of water in about five minutes. If the pot is full, you will need to add additional firewood. If at this moment there are thicker sticks inside the stove that give good coals, throw small dry chips on them. So the fire will quickly gain strength. If the chips to be placed are larger or slightly damp, then they emit a little steam, they will initially flare up poorly and extinguish the already burning coals, due to which the boiling time of the water will increase.
The main enemy of this and, perhaps, any other splinter is the wind. Since the pot is not covered with anything from the sides, the wind easily blows the flame away and does not allow the water to boil. Any fire has a burning area and the flame itself is much larger, although the wind also noticeably affects it.


The pros of this stove, in my opinion, are obvious.
Firstly, it is very light weight - 200 grams including legs and supports for the kettle!
Secondly, the dimensions. We can say they do not exist at all, since the stove in the stowed position takes literally millimeters around the pot. And if a pot without a stove fit into a backpack, then it will definitely fit with a stove.
Thirdly, she does not need a lot of firewood. To boil water for tea, just a handful of chips are enough. In pine plantations, I don't even go anywhere to fetch firewood - there is enough of what can be taken at arm's length.
Fourthly, after such a splinter there is no scorched trace left on the ground and it is much less fire hazardous than, say, a bonfire.


Fifth, ease of manufacture. I tried to do it from aluminum and from millimeter stainless steel and came to the conclusion that all these are unnecessary movements. Galvanized thin sheet is easy to handle and bend. Its rigidity is enough with a margin. Zinc coating (it seems to be harmful to humans) quickly burns.
And one more point, possibly controversial. I used a stove under an awning set in the form of a wigwam. A small flame did not damage the awning in any way. It got quite warm inside, although a little smoky. I wouldn't start a fire there.

The stove itself, no matter how skeptics assured, for three years of frequent use has not yet burned out. Those stoves burn out in which a fire burns for a long time for heating or serious cooking. I don’t use a woodchip for more than half an hour. Its main purpose is to boil water for tea and heat canned food. Although a simple soup can be cooked if desired, you only have to constantly throw up firewood, because of the small volume of the firebox, they quickly burn out.
The shape of the pot is not the most suitable for cooking. It is made to be comfortable for a soldier to carry (although this convenience is also quite controversial). It is known that flatter molds with a larger bottom area heat up better and faster. Using the principles described above, you can make a similar stove under a small round saucepan.
One autumn day, my friend and I went on a hike. It was already chilly and by the end of the day it started to snow a little. At the halt, we got lunch, and Sanya began to heat up the food on a gas burner. As luck would have it, the gas ran out, and we only warmed up the food a little. We started talking about the burners and my friend told me about the wood chip oven. It became interesting to me to look at such a miracle of technology. When I got home, I opened the Internet and asked the know-it-all Google. The more I looked, the more I was surprised. Everything is done very simply, roughly speaking, this is an ordinary container, into which oxygen is blown from below, thereby enriching our fire. Everything is very simple, as I didn’t have such an idea before, I probably just didn’t set a goal. I look through the pages and see that people are doing pretty good options themselves. There are also purchased options, one of them is the “Airwood Light BM” turbo-draft stove.

Don't get me wrong, this is not an advertisement. For me, this is just a sample for another homemade product. The disadvantages for me were: the high price tag and the location of the fan and motor close to the fire, although the blades are iron. Having thoroughly examined the design of both purchased and various homemade ones, one nuance was not clear to me. Why does the useful air from the turbine crash into the inner solid wall? I found the answer from the seller like this:
"The peculiarity of the" Airwood Euro BM "model also lies in the fact that the space between the two walls of the stove (between the combustion chamber and the outer casing) is virtually hermetically sealed, that is, all the air from the injection (blower) unit is guaranteed to be supplied to the combustion chamber."
Maybe it is so, according to YouTube videos, it heats water quite well and is only inferior to gas for a couple of minutes.
The wall that confused me.

In my opinion, this is not good, I would try to make sure that the air blows as much as possible from below. Still cold air will "bump" into the hot wall and deform the thin steel.
Okay, it's time to get down to business and check everything yourself.
Material:
Old unnecessary thermos
Steel and aluminum rivets 3.2
Thin wall pipe
Galvanized
Steel bar
Motor and wire
Bolts and nuts 3
Instruments:
Riveter
Bulgarian
Boron machine
Metal scissors
Screwdriver / drill
I found an old non-working liter thermos in the kitchen. Immediately a thought, why not make a stove from him.

I decided to cut the thermos exactly in the middle. I think if it doesn’t work out with one part, so with the second part it’s for sure :)


At this point, my opinion was divided. If done from the top, then it will be inconvenient to throw fuel into the narrow neck. And if you use the lower part, then you need to come up with a mount for the internal combustion chamber. Eh, it was not, I do it from the top !!!
At the top of the thermos, the inner flask is already fixed, and all that remains is to make the bottom. For this I use a marker, a regular sheet of paper and metal scissors.

Paper is needed in order to accurately mark the borders.

Insert the paper, connect the leaves, and mark with a marker. In this way, you are guaranteed to mark the circle exactly.
I cut with scissors.


I cut a little more along the edges and bend the bottom.

It turned out interestingly, for fans of auto-tuning, you can attach it to the exhaust pipe :)
In the role of the bottom, I use thicker stainless steel.

I won't say the thickness, about 1.5 mm.
I cut it off with a grinder! Be CAUTION with this tool, glasses are required and change the circle only with the machine turned off.

I finish the circle on emery.

I drill holes in stainless steel and attach the bottom with steel rivets.


I go to the top of the chipboard and think over the design. It is required to make a windscreen and a rack for dishes. To translate the idea into reality, I do just such a thing. I cut off a strip of galvanized

And flex it

I drill holes in a thermos and in a strip. Using steel rivets, I attach the strip to the thermos.

The shank was joined end-to-end and riveted at both ends.

As a windscreen and a stand, I use galvanized steel more and more.

If someone is going to do it, then select the size "for yourself"
Here is such a windscreen and a stand I got.

There will also be holes, you will see below in the photo.
Since I wanted to make everything compact and convenient, I had to steam up with the search for a suitable pipe diameter for blowing. I was planning to hide the pipe inside the woodchip.

Well, here's something more or less suitable. I took this thin-walled pipe from a broken floor fan.
There was also such a thing.

I bent it under the body of the splinter.
I decided to attach the pipe to the stove body using this connector :)

The pipe is fixed firmly and does not fall out.
Mark along the inner circle with a marker and cut out the circle.

The photo shows that I sawed off a little of my pipe fastener to the stove.
I cut out a circle with my burr machine and a small circle. Uhhhh, the stainless steel "ate" as many as two mini circles. I drill the holes and attach the "air adapter" to the steel rivets.


I still made it so that the bottom of the inner chamber could be seen at least a little. The version of airtight ingress of air into the combustion chamber confused me a little.
Looks like a hookah :)

The motor and its mount.
Although the pipe is far from the fire, I still decided to make the blades from galvanized.

I connected it to 3V and checked the air flow. For such a kid it blows pretty well.
I made the motor mount from two galvanized tires. To do this, you need to cut out two shanks of the desired size.

I solder the wires and fix the motor in the shanks. I use regular aluminum rivets.


For fastening in the pipe, the shank must be bent. We cut off the unnecessary shank.


We drill holes in the pipe and attach the motor. I drilled with drill 3 and fastened with a bolt and nut.

Just in case, I decided to make a universal stove. And suddenly you forget the batteries or the wire breaks, anything can happen. Therefore, I make one more adaptation (I don't even know what to call it) for natural blowing from below.
As always, galvanized.

To keep the chip stable, I use a steel chrome bar

I fold it over on one side.
I cut out the shank for fastening the rods.

I cut the bar into the desired pieces and rivet the bar.

I flex and test my idea.

I insert the galvanized coating as far as it will go, and an air gap is obtained. It is desirable to put it on the leeward side. The splinter stands confidently and does not stagger. The holes about which I spoke above are also visible.
If the dishes are wide, then you can insert upwards.

The lid from under the thermos can be used as a last resort as a cup for heating water. And the plastic insert is like a mini plate.


Words in words, but it would be necessary to test the splinter in real conditions. To do this, I went on a small solo hike in the local forest. My goal was to walk about 15 km and test my homemade wood chip stove. It was February 25 and in the morning it snowed and froze a little.
Maybe someone will like a couple of pictures of the morning forest.
A wood chip oven is a small device on which you can boil water or cook food.
It is used for hiking, fishing, in the country.
Suitable for one or several people depending on the size. Such an oven economical on fuel.
Chip oven diagrams, drawings
Due to its compact size, the oven does not take up much space and weighs little. This compares favorably with a gas burner, for which gas cylinders will be mandatory. The total weight of the burner with cylinders reaches several kilograms... And the splinter weighs depending on the design about a kilogram.

Photo 1. Drawing of a square chip stove. Contains four parts, the dimensions of each element are indicated.
Design it is easy to do it yourself from the materials at hand. For one person, it is made from a large tin can. The larger version is collected from the drum of a used washing machine.

Photo 2. Drawing of a cone-shaped wood chip oven. Such a device can be folded like an accordion.
If the size is needed more than that of the can, but there is no unnecessary typewriter, it will be suitable as a material sheet metal. There are several types of designs. They differ in shape and scope.
Important! All devices assume air intake openings in the lower part. This ensures good traction and combustion of fuel.
First: a stove for a pot
This option is intended for hiking use, mostly in singles. Most tourists have a standard size army bowler hat. The oven is made for it. Woodchip shape similar to a cooking container... This design option is the lightest.
Reference. The dimensions of the stove are selected in such a way that the pot fits without a gap. Then it heats up faster, since the heat does not escape to the outside through the cracks. To fit, a drawing of the bottom is done, circling the lid of the flanged pot.
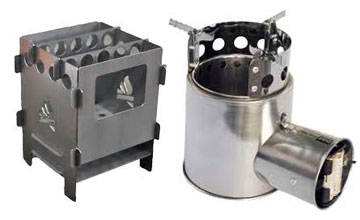
Second, square shape
Most cooking utensils are round, so the previous option won't work. Both on a hike and in the country it will come in handy splinter square in cross-section.
If you make it collapsible, then the device will be more convenient to transport and store. Dimensions, if necessary, increase commensurately.
The holes in the side walls can be of any shape.
Third trapezoidal

This wood chip oven is also foldable, but it is assembled like an "accordion", and not divided into separate parts. Differs from the previous one trapezoidal.
Such a furnace is more stable, the heat in the device is concentrated in the central plane.
If the top of the structure is made too narrow, some of the heat will be lost through the holes in the upper side of the walls. The device weighs approximately about a kilogram.
Making a stove with your own hands
One of the advantages of a wood chip stove is that it is easy to make it yourself. First, choose a suitable project. Prepare materials and tools. Then build a stove.
The choice of the scheme depends on several parameters:
- from the place of use - on a hike or in the country;
- on the number of people for whom you need to cook;
- on what materials are available.
Selection of materials and preparation of tools
For scheme 1 galvanized or "Can" tin. For option 2 better take steel with a thickness of 1-2 mm. The stove will be heavier (about a kilogram), but stronger. Thicker metal is not needed as the dimensions of the device are small.
It will take steel wire 3-4 mm thick. It can be replaced with knitting needles. In general, used materials (but with good quality) are often used for such projects.
Prepare bolts, nuts and engraving washers for fasteners. To create a furnace according to the third scheme, you will need piano loops.

Of the tools you will need:
- Bulgarian;
- drill;
- file;
- pliers;
- hammer;
- kerner.
You may also be interested in:
Furnace construction according to scheme 1
The stages of construction are as follows:
- Mark up the template on paper or cardboard. You can print the diagram.
- The bottom is cut by the size of the pot lid.
- Mark sheet metal according to this template and cut out.
- Make holes in the side walls and at the bottom. The holes in the walls serve both for traction and for fastening the wire on which the kettle will be placed.
- Bend the sheet, which will serve as walls, into the desired shape.
- Fold the "petals" in two places indicated in the diagram.
- Place the bottom on them.
- Bend the petals again.
- Tightly fasten the structure.
- Remaining "petals" will serve as legs.
- Insert the pieces of wire or trimmed knitting needles into the appropriate holes.
Attention! Holes in the bottom should be small so that the pieces of coal do not fall out.
How to make a woodchip according to scheme 2
Cut the walls according to the template. Their dimensions depend on the dimensions of the dishes that are planned to be used with the stove.

In such a design, nothing is required to bend. But for sustainability make incisions into which the walls will be inserted. Then no additional fastening is required.
Drill holes in the walls and insert the support spokes... Check how the oven is going.
Assembling the wood chip oven according to scheme 3
To create a pyramidal furnace, follow these steps:
- Cut out blanks according to the template.
- Drill holes.
- Execute larger hole for the door and smaller for chimneys.
- Bend the edge of one of the walls to hold the grate.
- Cut the piano loops to the size of the walls, fasten the walls with them.
- Attach the door to them and ears of corn to (also through the loops).
- From a loop attached to the extreme wall, extend the knitting needle and bend its tip... This spoke will hold the device assembled.
A shredder is a heating device that works on wood chips, twigs and other similar materials.
Those models that are available in retail and online stores, do not always correspond this or that situation.
That is why they are often made independently.
In this article, we'll show you how:
- choose shape and size;
- choose ;
- draw up a drawing;
- make the oven parts yourself.
When choosing a shape and size there are several parameters to consider, the main of which are:
- the size of the firebox;
- fuel combustion method;
- weight limit;
- size limit.
Firebox size
 This parameter affects the amount of fuel that the stove can accommodate, and hence the amount of thermal energy that it produces as a result of combustion.
Firebox parameters directly affects the efficiency of the heater in various conditions - the smaller it is, the slower a certain volume of water will heat up.
In other words, a device with a small firebox is suitable for serving one person. On it you can boil a mug of tea or heat a can of stew.
Trying to lay in the oven more fuel than the volume of the firebox allows, will lead to rapid overheating and damage to individual parts.
To service a company consisting of a couple of three people, the most effective volume of the firebox will be 1 dm 3, that is, a cube with a side size of 10 cm. For a company of 3-5 people, a cube with a side of 15 cm will be optimal.
These values are only guidelines, so it is not necessary to strictly follow them. In addition, even a small stove with a firebox size of 1 dm 3, if used correctly, can provide food for 3-4 people without deformation of parts, however, you will have to use instant products and spend more time on heating water.
Pyrolysis and conventional fuel combustion
Exists 2 main ways fuel combustion:
- normal;
- pyrolysis.
For conventional incineration fuel, it is enough to make the most primitive metal box, which will direct the bulk of the pyrolysis gases and flame upward.
Efficiency this way of burning wood not high, and due to the high content of unburned cellulose particles, which have turned into soot, the surface of the water container becomes soot and blackens. Therefore, the only advantage of the conventional combustion method is only in the simplicity of the design of the heating device.
With the pyrolysis method of combustion, thermal decomposition() with a partial lack of air and a small amount of fire.

Then, in the so-called pyrolysis unit, the smoke is mixed with secondary air, which enters through the holes in the stove body, and afterburning occurs. That is, part of the carbon monoxide (carbon monoxide), which is formed during the thermal decomposition of wood, turns into carbon dioxide with the release of thermal energy.
With this method of combustion, the cellulose, which the wood consists of, burns out more completely, generating more heat therefore, less fuel is required to heat the same amount of water.
In addition, the pyrolysis method is better suited for raw wood, but the main type of fuel for such stoves is that which can be lifted underfoot, that is, branches, bark and cones, which in most cases are characterized by rather high humidity.
Weight and size limit
Those who have gone on long-distance hikes for many days know how many things and groceries to take with them, and understand the importance of every extra gram. For such tourists, the weight of the wood chip stove is a determining factor.
Weight depends Not only from construction and the dimensions of the heating device, but and on the thickness of the metal, from which the stove was made. Therefore, you have to choose between the thickness of the metal and the weight limit.
 The thicker the metal, the easier the stove can withstand accidental overheating (this is true only for steel, so parts for titanium camping heaters are made very thin, that is, 0.4–0.6 mm).
On long hikes It is very important to use the most compact things, because the volume of the backpack is limited, and you need to take a lot with you.
In such conditions collapsible devices are preferable, because when folded, their size does not exceed the dimensions of a not too large book or tablet.
However, this type of heating device is noticeably more difficult to manufacture and slightly less efficient. If hard restrictions by size No, it is better to choose non-separable or partially collapsible design.
The main types of designs for homemade stoves
Here main types of structures:
- non-separable;
- partially collapsible;
- completely collapsible.
The advantages of a one-piece design in maximum rigidity and strength, the main disadvantage is the large size. A partially collapsible furnace consists of several blocks, therefore, its strength and rigidity directly depend on the same parameter of each block.
Fully collapsible in transport condition takes up little space, but its rigidity and strength not only noticeably below the same parameter of the two previous designs, but also directly depends on the quality of workmanship.
By type of fuel combustion device data divided by 3 main constructions:
- traditional;
- with bottom secondary air supply;
- with upper secondary air supply.
The first consists of walls and a bottom, so its design is the most primitive and easy to manufacture. The second one is much more complicated, because it is formed from the outer and inner cases, installed on a common bottom. Secondary air flows freely between the outer and inner casing, which did not enter through the openings of the grate.
Choice of case type
 All stoves can be roughly divided into:
- rectangular;
- round.
Rectangular make collapsible structures, because parts for such a shape are easy to manufacture.
Round more difficult to manufacture, so they are made from ready-made cylinders or glasses made of suitable metal.
Even if a round heating device is made collapsible, in the transport state it will always be noticeably larger than a rectangular one.
Material selection
For the manufacture of wood chips stove use acid-resistant and heat-resistant steel grades, because they not only tolerate high temperatures well, but are also resistant to condensation that forms during ignition.
This metal is used for the inner lining of furnaces and boilers, as well as for the manufacture of drums and inner casings of washing machines.
Often, air ducts of ventilation systems are made from such steel, but you need to be careful not to confuse it with galvanized steel, which has much worse characteristics, and when heated, releases zinc, which can lead to poisoning.
Also it is necessary to choose the correct metal thickness... After all, the thinner the part, the less rigid and durable it will turn out (even if it weighs less), but at the same time it is noticeably easier to process. And the thicker, the stronger the structure will be, but the greater its weight, and the processing is noticeably harder.
That's why often for homemade stoves used with a thickness of 1-1.5 mm although either less or thicker metal can be used.
 As a basis for the manufacture of round heating devices can be used of various diameters spoon dryers made of food grade stainless steel.
Such dryers can be bought on Aliexpress and other sites for a small price. To create pyrolysis ovens metal thermoses work well because they are also made of stainless steel.
However, they are rather difficult to drill due to their round shape and the inability to use a drilling machine, and for full pyrolysis, the air flow in the combustion zone should be minimal, and in the afterburner zone located above the combustion zone, maximum.
Often for making wood chips use different steel containers, such as:
- saucepans;
- mugs;
- bowlers;
- banks.
The main selection conditions are:
- heat resistance;
- acid resistance;
- compliance with the size and shape of the water tank, which will be installed on top.
Manufacturing
Manufacturing technique different types of wood chip ovens is different, however, often the same operations are used in the manufacture of structures of different types. Therefore, we will talk about each operation, and also we will give a sequence of actions for different types these devices.
This will allow you not only to manufacture devices for which there are descriptions and dimensional drawings, but also to develop your own models.
After all, often through experiments, it is possible to create something much more effective than what is described on the forums or found on the Internet.
But start off making necessary from reading forums, where they discuss homemade wood chips and everything related to them. In addition, it will not be superfluous to read the discussions regarding the experience of using purchased stoves, because from there you can get a lot of interesting ideas or unusual solutions.
 Here list of the most popular and authoritative forums where these issues are discussed:
Manufacturing of parts for rectangular devices
At first it is necessary to make a full-size layout of all parts made of thick solid cardboard. This will help you more accurately determine the shape of each part, as well as the size and shape of the mounting slots and protrusions.
When making parts from cardboard, do not make holes in them, because they will weaken the material, and you will not be able to assemble the structure properly. Having decided on the shape of each part and checking them using the assembly, the cardboard sample is laid on a sheet of metal and the contours are marked.
For cutting stainless steel or tool steel at home use:
- grinder (it is necessary to constantly water the place of contact between the disc and the metal with water);
- special guillotine shears (not to be confused with conventional metal shears);
- jigsaw (put a special blade and set the speed as low as possible).
You can cut the plate along the contour in any way, and the slots for assembling the parts will have to be made with a jigsaw, because the guillotine shears are not intended for such work, and the grinder makes too wide a cut.

If the finished parts have burrs then their removed with:
- sharpening machine;
- flat file;
- flat file.
When all the details are ready, they drill holes, using carbide drills for hardened metal... Moreover, you need to drill at low drill speeds so as not to overheat the plate or drill. If you set the average speed, then the place of contact between the plate and the drill will need to be watered with water to reduce the temperature and protect against overheating.
Production of round furnaces
Most often, various stainless steel containers are used to make round (cylindrical) chips. First, a drawing is drawn up or a full-size model is made, on which the location, shape and size of the holes are determined. Then the places for the holes are transferred to the container and drilled.
In most cases you have to drill containers with a hand drill, because due to their large size and round shape, they cannot be properly fixed on the drill bed.
Therefore, the holes for the holes are pre-punched with a sharp core and drilled in 2-3 steps, gradually increasing the diameter of the drill.
For maximum pyrolysis effect openings in the lower part of the active combustion zone are minimized, then gradually increase, doing maximum(the size depends on many factors, you need to select individually) in the upper active combustion zone.
 In the afterburning zone, the diameter of the holes is reduced to a minimum (1–2 mm) as we move towards the upper part of the stove.
Desirable cut a rectangular hole for fuel filling, and the cut out piece of metal can be used as a door.
Rings made of rigid steel wire with a diameter of 0.5–2 mm can be used as awnings.
If a container is used for the manufacture of a stove, into which a container with water will be inserted, then chimney holes must be cut in the upper part. For structures where there is 1–2 cm of free space between the edge of the stove and the water tank, such holes are not required.
If the basis is used stainless steel thermos, then besides the fuel door you need to cut out the blower door(ash pan), the width of which is slightly greater than the distance between the outer and inner bodies, and the length is equal to ¼ of the circumference of the body.
The door needs to be secured to a pair of paper clip or steel wire hinges and some sort of retainer installed. However, the door can be dispensed with by leaving the ash removal hole open.
Then in the bottom of the inner case you need drill 3-5 holes with a diameter of 10 mm through which the ash will be poured. In the upper part of the thermos, you need to cut out chimney holes, the size of which depends on the height of the side.
If its height is 2 cm or more, then the total area of the holes should be half the area of the side. With a side height of 1.5 cm, the total area of the holes should be 2/3 of the side area, and at a height of 1 cm, the total area of the chimney openings should be ¾ of the side area.
It is desirable that the holes are up to the very top, but you can leave a side with a height of 1-3 mm. If you make it larger, then the stove will effectively heat only containers whose diameter is at least twice the diameter of the side.
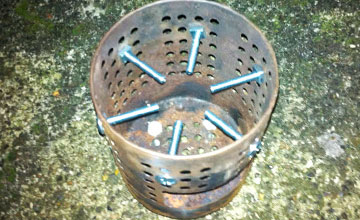 If as a basis use a dryer for cutlery or thin-walled pipe trim, then grate can be made from screws, the length of which is 40–45% of the inner diameter of the pipe.
The holes for the bolts are drilled at a height of 2–3 cm from the bottom of the pipe, the optimal number of them is 6–8 pcs.
When the holes are ready bolts are inserted from the outside, and from the inside are fixed with nuts and locknuts.
In the pipe below the grate, 2–4 holes with a diameter of 5–10 mm can be drilled, thanks to which the combustion process will continue in an economical mode even with the door fully closed. If the stove has an afterburner, then the number and diameter of the holes can be reduced by 2 times.
How to make it on a hike?
If the standard oven is out of order, and there is no access to the locksmith and welding tool, then you can make a splinter from any tin can. It will not last long, but it will last for 1-2 weeks.
For this cover banks you need first cut pocket or hunting knife along, then cut in a circle so that you get 2 petals connected to the jar by legs 3-4 cm wide.
Then these petals are unbent and the contents of the jar are removed, after which a platform for heated containers is formed from the petals. When the site is ready, it is necessary make holes in the sides of the can for air flow... This operation can be done with a bottle opener or knife.
The size and diameter of the holes are selected individually, but do not be afraid, even if there are too many of them, or they are too large, the stove will still successfully cope with its tasks.
The only disadvantage of this design is that only a small amount of water can be heated on it due to the impossibility of adding fuel.
If one bookmark is not enough, then instead of holes for the air flow, a door is cut out with a knife for filling the fuel, which is then bent downwards so that it serves as an additional support.
Turbo stoves
In stores, turbo-ovens are often found, that is, ordinary wood chips with forced air supply. Their main advantage is that they work well even on crude fuel.

For their manufacture will be required:
- a tin can of a small diameter (you can use a metal mug or a thin-walled pipe);
- an electric motor from a DVD drive;
- steel wire with a diameter of 1–2 mm;
- copper flexible insulated wire;
- a box for AA or AAA batteries (you can buy it in a store or remove it from any device);
- AA or AAA batteries (the larger, the longer they last).
The bottom of the can is cut off, then from it make a multi-blade propeller... The number of blades does not matter, the angle of their deflection is 10-15 degrees. The size this propeller should be slightly smaller than the inner diameter of the turbine housing, that is, a tin can, pipe, or mug.
The main problem in the manufacture of this device is that the tin propeller is difficult to fix on the tin shaft. After all, there is a source of high temperature nearby, and the limit of size and mass does not allow making the pipe too long.
When fan unit ready, his dock with the body stoves, placing under the grates. If the distance from the grate to the ground is less than the turbocharger diameter, then a new body or adapter is made to increase this distance and connect both blocks.
If the turbocharging is connected to the stove from a thermos, then the grates are raised to the level of the motor shaft, and the bottom of the fan pipe is set at the level of the bottom of the inner case.
Useful video
This video tells and shows how to make a comfortable and functional turbocharged wood chip stove with your own hands:
Output
A wood chip oven is a very economical heating device that can be used to boil a small amount of water. After reading the article, you learned:
- what materials can be used to make this device;
- what types and forms of homemade devices are;
- where to look for information about such homemade products;
- what operations need to be carried out in order to independently make a wood chip stove.
In contact with