How to make a stretch ceiling of fabric with your own hands. Fabric stretch ceiling with their own hands and without punctures how to pull the fabric on the ceiling and walls
The ceilings decorated with cloth look stylish and rich. The choice of textures and coloring of the canvas suitable for the ceiling decor is huge, so the tissue finish is increasingly used in modern repairs. The methods of finishing the ceiling with a cloth several, we will tell about them in this article.
Fabric ceilings - what are they?
Among them are most popular:
- stretch ceilings of fabric;
- draped fabric canvas;
- ceiling pastry silk.

Tension ceilings from fabric
They are performed from a special canvase based on synthetic tissue with polyurethane impregnation. Fasten on special baguettes with clip mounted on the walls around the perimeter of the room.

The advantages of stretch fabric ceilings:
- do not require the preparation of the draft ceiling;
- have a smooth surface;
- durable and durable;
- fireproof;
- allow to create a smooth and smooth ceiling.
Disadvantages:
- the color palette of the canvas is not too large and includes only basic colors and shades;
- drawing pattern on the stretch ceiling is possible only after its attachment;
- the work requires the skill of the installation of tension systems;
- after dismantling, the web can be replaced, the re-installation is not possible.
Stretch fabric ceilings are an excellent choice for finishing the premises in the classic style. They gently and unobtrusively emphasize the decor of walls and interior items, without distracting attention. They are used in the living room, office, as well as in other rooms, where strict lines and muffled colors are appropriate.

It is not recommended to use stretch ceilings from fabric in rooms with high humidity: the material will collect condensate and dust, quickly contaminated. Also undesirable to install them in the kitchen - the porous structure of the canvas absorbs odors, soot and fat, so the ceiling will quickly lose freshness.
Prices for fabric stretch ceiling
fabric stretch ceiling
Note! Stretch ceilings can be made of natural fabrics. At the same time, it is important to choose a web such a width to avoid unnecessary seams. As a rule, curtain fabrics use for this purpose.

Draped fabric ceilings
This type of finish allows us to use any tissues, from smooth silk to a translucent chiffon and organza. Due to the use of different textures, you can create various effects, give the ceiling any forms and bends.
Two-layer structures are also popular when over the smooth stretched canvas from dense tissue laid skillful drapery from a translucent flickering material. Drapery can be decorate the entire surface of the ceiling or individual fragments.

Fastening the draped ceilings can be performed:
- brackets or small carnations to wooden guides;
- on sticky tape;
- on a wooden frame, which is later attached to the ceiling.
Advantages of draped ceilings from the fabric:
- they do not require expensive preparation of the draft ceiling;
- easy mounted with their own hands;
- the canvas can be easily removed for cleaning or replacement;
- drapery is resistant to mechanical damage;
- a huge selection of colors, including the pattern, and the texture allows you to create a unique finish;
- finally, it is an inexpensive, but very spectacular way of finishing.

Disadvantages:
- drapets strongly lower the ceiling level, they should not be used in apartments with its base height of less than 2.7 meters;
- fabric is a fire-hazardous material, so special attention should be paid to the choice of lamps and electrical wiring device;
- the material absorbs odors, it is not recommended to mount it in the kitchen or indoors with sharp odors.

The draper can be pulled in the rooms where the comfort and homely atmosphere is appropriate: in the bedroom or children's, living room or dining room, as well as on an open veranda or terrace - there can be mounted on the summer period, and to remove it.
Draped ceilings fit perfectly into the oriental style of design or "ampir", and a smooth stretched fabric will decorate the room in the style of "Country" or "Provence". In the nursery using fabric you can create a fabulous atmosphere, pick up textiles with magic motifs.
Prices for satin stretch ceiling
satine stretch ceiling
Note! For drapets, almost any fabrics are suitable, the main requirement is the sustainability for sunlight and the ability to continue to keep the form without sagging.

For this method, finishing is used mainly silk fabrics or satin. The canvas are glued to the prepared surface with strips of jack, like wallpaper. It is important to use special glue, not leaving divorces and non-changing fabric structure.
Silk for pasting ceiling can be both monophonic and sting with a bright pattern. Light tones visually increase the ceilings and expand the premises, give it a soft glow, especially in combination with directional or point light. Bright colored fabrics allow you to achieve originality and attract attention.

Advantages of ceiling pastries with cloth:
- this finish looks stylish and rich;
- environmentally friendly material, does not highlight harmful substances and does not violate the air exchange;
- does not fade over time;
- does not lower the ceiling level;
- easy to attach yourself.
Disadvantages:
- it is necessary to align the draft ceiling;
- the fabric can not be removed for washing and cleaning;
- we need a thorough choice of material.
Casting cloth can be used in almost any room, from the office to the bedroom, it is important only to choose the right to choose the shade and pattern. Reception of finishing with silk Designers are often used in ceiling niches in combination with wooden beams. It is often combined with wall decoration, columns or decorative inserts.

Note! When choosing color silk, it is important to take into account the size and the overall style of the room. A large and bright drawing visually expands the room, and the petty feed gives it comfort. At low ceilings it is better to use light pastel tones.
Fabric ceiling technology
First you need to draw a sketch and decide on the method of fastening the tissue canvas, as preparatory work depend on it, and the finishing technology itself. After selecting the design of the ceiling, you can proceed to the calculation of the material and the choice of fabric, as well as to the purchase of the canvas and the concomitant materials.
Technology fastening tensionable fabric ceilings
The textile ceiling can be ordered in a specialized company, and in the presence of tools and skills to install yourself. This work is not so difficult, it is only important to observe the technology of stretch and exercise accuracy.
Ceiling profile prices
ceiling profile

Required materials and tools:
- polyester cloth or other suitable fabric;
- guide baguettes with clip;
- perforator or drill depending on the material of the walls;
- measuring tools, scissors and knife;
- laser or bubble level;
- special blade to refuel the cloth into the baguette;
- a greasy tool for removing the old trim and preparation of the ceiling.
Stages of work and installation technology are described in the table.
Table 1. Installation of fabric stretch ceiling.
| Steps, illustration | Description of action |
|---|---|
| Under the tissue ceilings there is no need to level the surface, it is enough to remove the old peeling coating or finish. Blooming or paint is removed with a spatula or special washing. Wallpapers are removed and wash off the remnants of glue. Close up of cracks, seams and cavities with alabastern or cement putty. Suspended structures are completely dismantled, the holes from the fastening of the frame are sealed with putty. If this is not done, the sound insulation of the ceiling will worsen. |
| For the ceiling to be smooth and strictly horizontal, careful markup is needed. It is more convenient to use the laser level, but you can do and bubble. Marking starts from the lowest angle. Return from the ceiling at least 5 cm and spend horizontal lines with a pencil or marker using a level on both adjacent walls. Conduct to corners, put a mark in them. They carry out lines in the same way to the last corner, ideally, they must come together at one point. |
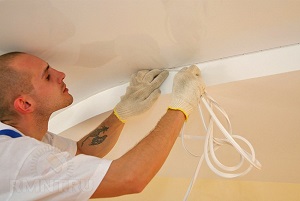
| As guides, it is convenient to use special baguettes for stretch ceilings from plastic or aluminum. They are equipped with special clamps - clips, under which the canvas are filled with a spatula or blades. Guides are attached by pre-applied markup with dowels and self-tapping screws. The holes in the wall make a drill or a perforator after 30-40 cm. |
| Mounting platforms or special fittings are installed for lamps. |
| The fabric for the stretch ceiling must be carved by the size of the room with an allowance of at least 20 cm on each side. The fabric, unlike the PVC-canvas, does not have good elasticity, it will not stretch it. Therefore, it is important to correctly calculate the desired width and make the tissue. The canvas from the specialized material are usually selected by the width of the room, and the length is rolled along the place directly from the roll. |
| The canvas is straightened and aligned so that the same tissue allowed remains from all sides. Rates from an angle at least half a meter, the web is temporarily fixed in a baguette in a step of 0.5-0.7 m without a strong stretch around the perimeter of the room. The fastening of the tissue ceilings begin with the middle of the short walls, then the long, the corners are filled with the latter bugs. In baguette, the fabric is filled with a rounded spatula. |
| Gradually tightening the canvas, it is aligned and stretched to an elastic state. Surplus are cut by the mounting knife or scissors. Under the knife when trimming it is convenient to substitute a wide metal spatula - it will protect the cloth and baguette from damage. The remnants of the canvas after trimming the spatula refuel into the baguette. |
| The slot between the baguette and the wall after the end of the ceiling and wall finishes are closed with decorative plinth. |
| Fixtures are installed, for which the holes of the desired size are cut in the canvas. The glue is applied to the mounting ring, it is glued to the canvas at the place of the lamp so that the centers of the ring and the lamp coincide. After the ring grabbed the cloth, the material inside the ring is neatly cut. The height of the lamp is regulated so that it is at the level of the ceiling panel, after which the lamp is screwed. It is desirable to use conventional lamps with no more than 60 W or halogen lamps up to 35 W to avoid strong local heating and deformation of the panel in the lamp region. |


Video - installation of stretch ceilings
Fabric stretch ceilings can also be mounted on wooden bars installed around the perimeter of the room. In this case, the fabric is fixed on the guides by the construction stapler, and later the attachment site is closed by a plinth or a decorative baguette of polyurethane.
Draped Ceilings Installation Technology
Unlike smooth ceilings, draped webs are not necessarily tightening, they can form waves, folds, and if collecting a fabric in the center of the room - a cozy tent. You can also pre-mount on the ceiling frame and give the ceiling the relief and bends in the right places.
The photo presents various forms of drapes.

To work, you will need:
- wooden bar 20x40 or 40x40 mm depending on the density and weight of the fabric, as well as the size of the room;
- drill and hardware for mounting bar to walls;
- electrolovik;
- measuring tools and levels
- fabric of one or more species;
- elastic or ribbon for the porter, allowing to make smooth folds;
- construction stapler;
- polyurethane decorative baguette and small nails for attachment.
Calculation of the size of the tissue for drapery is a fairly difficult task that depends on the shape of the drapery. In order not to make a mistake, it is better to draw the sketch of the ceiling on the scale, then carve out the intended canvases from soft paper on the same scale, folded them with harmonica and decompose the ceiling drawing. The larger the folds, the more denser there will be drapery. You also need to leave the tissue allowance for fastening to the guides.

Preparation of the ceiling before installing the draped fabric is carried out similarly to stretch ceilings. If the cloth is selected translucent, and the ceiling has an inhomogeneous dark color, then it is better to pre-paint or sharpen with a light composition. The marking of the walls under the guides of the bars is also performed according to the above technology.
Mount the draped ceiling according to the instructions below.
Table 2. Mounting technology draped ceilings
| Steps, illustration | Description of action |
|---|---|
| Cut bars of the desired size with a hacksaw or jigsaw. The small holes and a step of 40-50 cm are drilled in them, through them the wall is placed, attaching a barn with a lower edge to a predetermined line. |
| On the markup, drilled in the wall of the hole, score a dowel in them, after which the bars to the wall are attached by self-draws. If you need to create a challenge ceiling, a frame of the desired design is made of the bar. |
| Perform cutting selected fabric. To make a simple longitudinal drapery, on the two opposite sides of the canvas are sewed with a lumber or a curtain ribbon. With it, you can collect fabric in smooth folds. For the ceiling device in the form of the tent, there are several material strips of the same width. You can use the canvas of different shades, it will give the tent an additional charm. One side of the band is collected, and the second is uniformly distributed in the width of the sector. |
| Close the corners of the fabric to the bar with a stapler and evenly distribute the folds. Fix the canvas around the perimeter. For dense fabric, it is possible to use a stapler, the thin is better to press the wooden plank to the bar and nail cloves. |
| Baguette from polyurethane is attached to a bar with carnations or self-tapping. It is impossible to mount it on glue by ordinary technology - it will not hold on to the folds of the fabric. Plinth or baguette you can give any desired shade, covering it with paint. Paint and dried baguette before installing in place so as not to stain fabric. After installing the nail cap neatly tinted. |


In the case of a multilayer ceiling device, the first layer of dense tissue is tensioning without draperies, the second, made of transparent material, drape and fasten right over the first. Such a ceiling acquires depth and soft flicker, especially when the backlight is arranged from the LED tape.
Prices for ceiling lamps
ceiling lamp
Fabric ceiling technology
Fabric pasting is not much different from the ceiling finishing with wallpaper. The preparation of the surface at the same time should be more thorough, otherwise the fabric will not hold onto the ceiling. The fabric for pasting ceiling must be strong enough and not deform when tensioning, otherwise the strip will fail and sticking them to the jack will not work. For this reason, natural or artificial silk are often chosen.

Required materials and tools:
- silk or satin durable fabric;
- glue or mastic suitable for fabric stickers;
- malyal tool for putting and equalizing the ceiling;
- roller of foam rubber for applying glue and hard roller for alignment;
- scissors and measuring tools.
Table 3. Ceiling pastry with cloth.
| Steps, illustration | Description of action |
|---|---|
| The fabric glued to the ceiling will identify all irregularities and defects, so it takes careful preparation. First you need to carefully remove the old coating, after which it is frozen all the gaps and seams. The ceiling after that is aligned with a putty. Dry and apply the appropriate composition. |
| The selected cloth must be checked for shrinkage. To do this, a small piece of fabric is measured, wrapped and dried in room conditions. We again measure and calculate the shrinkage. If it is more than 5%, the fabric for finishing will have to first wet and dry or try with the ferry. Otherwise, it can give shrinkage when sticker and disappear. |
| Cutting the tissue on the strips is carried out only after checking the shrinkage, leaving the allowance of 10 cm. If a large drawing is applied to the fabric, you need to adjust it in advance and taking into account this cloth. Fabric bands are better rolled into rolls, the latter are put on the rod and the sticker gradually roll. It is more convenient to do it together. |
| To glue the fabric, you can use casein glue, special mastic or furniture thermoclay, frozen with thermal effects. In this case, the fabric will have to warm up the construction hairdryer. Prepare glue according to the instructions. Apply it to the ceiling with a roller, apply a tissue band and align it with a roller. The next band is glued and diligently rolled the seam with a roller. Cut the remnants of the fabric by the walls. Dry glue or mastic according to the instructions. The shelves of the ceiling and walls are separated by a decorative plinth or baguette, fixing it on special glue. |


The cloth can be separated not the entire ceiling, but only individual sections. This technique can be used in the zoning of the premises.
Note! When heating and bright lighting, the fabric can fade and change the shade. When choosing lamps, it is better to give preference to LEDs or chandeliers in which incandescent bulbs will be located at a sufficient distance from the tissue finish.
The ceiling, decorated with cloth for any of the above technologies, looks quite effectively. He will decorate any room of your home and will create a unique comfort in it.
Modern fabrics allow you to perform unusual forms of ceilings and change to unrecognizable any room. Consider what is the drapery of the ceiling by the fabric, the features of the mounting of the canvas and popular decoration styles.
The content of the article:
Tissue ceiling is a ceiling surface decorated with matter, which is considered an alternative way to design overlap. The main task of drapeting the ceiling cloth is to add harmony to the interior and create a coziness indoors. To obtain the desired result, adhere to certain rules for the selection of tissue and the design of the design with which we will now meet.
Advantages and disadvantages of fabric ceilings

Ceiling decoration with cloth has become popular thanks to the numerous advantages of this method. Benefits of overlap drapets:
- It does not require pre-processing of the base base, because the web is attached usually along the edges and does not concern the surface of the overlap.
- This is one of the few ways to decorate the ceiling that does not require construction skills.
- The fabric covers the unsightly type of overlap.
- To the base ceiling, you can fix the wiring, cables and communications, which then closes the web.
- Tissue ceiling has good thermal insulating properties.
- Falsepotor is not easy to damage, small defects are invisible.
- The ceiling decorated with cloth is turning into an exclusive artwork.
Designer Features of fabric ceilings

The canvas allows you to create interesting design effects on the ceiling, which must match the overall interior of the rooms. To select the optimal option, examine popular ceiling drape methods.
The ceiling in the form of a tent looks good if the walls are decorated in the appropriate style. Such a type of drapery looks good in self-execution. The tental coating significantly reduces the height of the ceiling near the walls and cannot be used in any rooms. For better perception, it is desirable to make a photo of a tissue ceiling, made in the shape of a tent.
The wave-like ceilings are manufactured using additional suspensions. Matter for similar designs is suitable any, but it is better to use translucent and not very severe species.
The method of installing a tissue ceiling "From the walls to the center" has many variations. For example, a cloth made of soft material can be switched to sagging or pulling stronger before the formation of a large number of flat folds. Usually in the center of the composition have a chandelier to obtain a semantic center.
Selection of fabric for drapery ceiling
The tissue ceiling device is very simple: the canvas for creating a false-brake and frame for its mounting. Very often, the canvas are finalized to install lamps, and rails, tubes or other elements for creating a embossed surface are added to the base ceiling or frame. Information about drapery tissues and profiles is shown below.
Requirements for matter for the upholstery of the ceiling
There are practically no restrictions on the choice of fabric to drapery, but there is a practical side of the task. Matter for the ceiling must have the following properties:
- Do not change strength quality and appearance under the action of sunlight.
- Do not lose the form and color after numerous washes.
- Matter should not blame too much.
- Choose elastic tissue.
- Do not use materials that possess the "Collect Dirt" property.
- The choice of type of fabric also affects the user's desire to use material with certain properties.
- Fabric from natural components (flax, cotton, wool) is perfectly combined with wooden elements of the room. In addition to decorative functions, it has good heat and soundproof characteristics.
- Fabrics for drapery should be treated with antistatic and anti-allergenic agents and substances that repulse dust. After impregnation, the material is not afraid of sunlight, has a high degree of wear resistance. All types of fabrics are subjected to such impregnation - natural and synthetic.
Types of fabric for drapeting ceiling

Among the customers are popular with such cloth ceiling options:
- Linen. The coating is obtained beautiful and good. Canvas does not savor over time, it does not stretch when installing. During cleaning from the surface, dust is quickly removed.
- Jacquard. Returns comfort and respectability.
- Thin silk. Always creates a feeling of sophistication and celebration.
- Cotton. Associated with calmness.
- Chiffon. Use in bedrooms and children's rooms. It gives the ceiling lightness and airiness. Matter does not stretch after mounting, dust is not going on her surface
- Exotic jute. Helps create original styles.
- Beautiful Rogozhka.. Combined with a country style.
- Brocade. For the ceiling, the material of bright shades is used. Noble heavy tissue is used to decorate the living room or hall.
- Fabric in the Christmas tree. Suitable for any design.
- Canvas. Carries the feeling of unshakable well-being.
- Velvet. Admires luxury.
Some types of materials have sound absorption properties, water resistance, such as leather, tapestries.
Color range Ceiling Cleaning

Various colors and drawings of the fabric create effects visually changing the forms of the room, and are also able to influence people's emotions. To decorate the ceiling, fabrics are used with any structure - brilliant and matte, transparent and dense, monophonic and with drawings.
Colors choose depending on the purpose of the room:
- If the color of the ceiling is darker of walls, it will put pressure and how to hang over you.
- Fabric with transverse stripes stretch in narrow rooms. This design visually increases the space of the room, but reduces the height of the ceiling.
- The ceiling with a longitudinally located pattern or stripes increases the height of the ceiling.
- Small drawing on the ceiling makes a room cozy.
- The canvas with large drawings is not recommended to be installed in small rooms.
- Light ceilings form the illusion of increasing the indoor space, dense and dark colors create the opposite effect.
- The red color of the canvas raises the mood, but some people may cause irritation. The fabric of this shade is never used in rest rooms.
- Yellow is useful for the eyes, stimulates the nervous system.
- In rooms with green ceilings you can relax, relax. Green worldwide is considered relaxant. He calms down, reduces pressure and has a positive effect on the heart rhythm.
- With blue ceilings work well, lethargic and apathy goes.
- Purple color sets up on reflections, but the eyes are quickly tired.
Preparatory work before the upholstery of the ceiling with cloth

Features of preparation for the installation of the fabric ceiling:
- Fabric before draping should be prepared. Cut a small piece from the main canvase and measure it. Water the matter, dry it and measure it again. If the size has not changed, you can start the drapery of the ceiling. When measuring the size, all the fabric should be tracked - wet, dry and stroke.
- It is advisable to use one piece of canvas to get a seamless ceiling. If you failed to get a wide web, the matter is stitched, and then stroked, especially carefully handled in places of connection.
- Before work, wrap the cloth on a long pole, it will make it easier to assemble the design.
- Mount the ceiling is best together: one holds the roll, the second creparates the canvas to the frame or ceiling.
Tissue Ceiling Mounting Technology

You can fix the material to the ceiling as you like, but all options will be modifications of the most popular attachment methods.
The frame method involves the installation of the structure on the floor, followed by mounting to the ceiling. The frame is collected from wooden or plastic rails. Usually this method is used to obtain flat designs or products with a slightly saving web. The frame ceiling can be found for overlapping using special devices. In this case, you can adjust the height of the ceiling. One of the varieties of fabric ceilings made by a skeleton method is called the bucket. They are sold in the form of ready-made fabric or leather panels that are manufactured to order. The user remains only to secure the product to the ceiling.
Fastening tissue with rails involves the use of wooden or plastic bars with a size of 30x40 mm, which are first attached to the ceiling without matter. Wooden designs are used in rooms, plastic - in the kitchen, in the bathroom or toilet. For drapets, a canvas with 20% are applied. In this way, the tissues of pastel shades with gilded or silver threads are fixed.
Fastening fabric on the rails is performed in the following sequence:
- Lock the rails around the perimeter of the room near the walls with the help of dowels and self-tapping screws.
- Tensioning the cloth from one wall to another, across the entire width of the room, check the absence of waves on the canvas.
- Secure the cloth to the brackets with brackets, starting with the middle of the wall and moving towards the corners, gradually unwinding the cloth from the roll. For fixation, use brackets No. 8, 10. Staples, do often, so use the electric stapler.
- After fixing the canvas on one side of the room, go to another. At the end of the work, the fabric should not be saved.
- Measure the gaps between the rails and walls and cut the decorative panel from MDF.
- Close the slit prepared panel. Traces from the bracket can also be masked by a tape, and instead of the MDF plate, use the ceiling plinth.

Velcro is considered the easiest attachment method. The canvas holds on textile velcro fasteners, which are sewn on the fabric and glued in the appropriate places on the ceiling or frame. This method allows you to quickly remove the cloth and decide the question forever how to make a tissue ceiling folding. The option is not designed for massive structures, heavy velcro fabric may not withstand.
The glue method of the thoroughly is fixed to the ceiling silk fabric. The process resembles the gluing wallpaper, but the glue is applied only on the ceiling. The upholstery of the ceiling with cloth is performed in such a sequence:
- Align the irregularities of the surface with putty.
- If the ceiling is painted, go through the surface of sandpaper until the roughness is obtained.
- Clean the ceiling from dust and rinse with soda solution. When dark spots are detected, they will shine them so that they are not manifested later.
- Sprouter surface.
- Apply a layer of special glue on the ceiling and give him some time on the drying.
- Next, the canvas strongly press the ceiling and scroll the rubber roller. The following strip is pasted with the observance of the pattern of the web.
- The fabric begin to glue from the center of the room to the walls. If the matter is with a pattern, control so that it does not get down.
To obtain a ceiling in the form of waves or sails to the ceiling or walls, thin tubes or cords are fixed, and the canvas are thrown through them. Also beautiful waves are obtained in the case of mounting the canvas to the ceiling with the help of lipochk.
Watch the video about the drapery of the ceiling with cloth:
You can experiment with the drape of the ceiling with a cloth to infinity, the main thing is the material used and the design style must correspond to the interior of the room. All ways to decorate overlaps are quite simple and allow you to make a fabric ceiling with your own hands.
The arrangement of the ceiling zone is a fairly extensive topic in the concept of repair. Today, the development of technologies pleases millions of people with the availability of original ideas, allowing to solve individual design tasks on their own. And at the same time, by the way, save funds, and at the same time, and get moral satisfaction from the creative process.
Few who will have to challenge the fact that it has long been time from Painting-painting (at least, if we are not talking about chulans, entrances of houses or economic buildings). It means that new ways should be coming to change "grandmother" methods. And they are. These are stretch ceiling structures.
Approximately at the same time, stretch ceilings made of PVC and ceilings made of tissue impregnated with polyurethane composition came to the market. What are their fundamental differences, pros and cons, advantages and disadvantages? Let's compare.
The elasticity of the PVC film is definitely plus. Some users have already come across a legendary water bubble, which is formed in the case of flooding of the room from above (the call brigade comes and produces accumulated water, after which the ceiling takes the former shape). There are no such dignity of tissue ceilings.

But they, in contrast to PVC, tissue stretch ceilings can be repeatedly repainted with water-level paint. The polyester thread has such a weaving that the painting layer on the layer is carried out without any visible drawbacks: the ceiling fabric looks like new.
There is another important advantage of tissue ceilings. For their installation, it is not necessary to heat the room with thermal guns to a temperature of + 60 ... + 70 ° C. So, your finish (decor and wallpapers), furniture, other household items will not suffer. Agree, an important "detail", especially if you consider that in some apartments and offices, quite a lot of money is spent on furnishing and finishing materials.

The fabric ceiling design can easily be placed in rooms where weak heating or it is not at all. Polyvinyl chloride on such conditions clearly disagree - it gives the temperature from + 18 ... + 20 ° C, not lower! In the cool atmosphere, he simply deforms and spoils irreversibly. As for the tissue ceilings, they calmly carry the temperature range -40 ... + 80 ° C without prejudice to its operational characteristics.
Fabric ceilings have durability, they are practical, possess high firepressure safety, functional. In addition, manufacturers offer a fairly wide selection of designer design (color, drawing). In stores Ceiling fabric sold with rolls of 5 m wide. It is easy to calculate the desired metrah and buy as much as you need without waste.
And finally, the most important dignity: the tension ceiling of the fabric is easy to install independently, without resorting to the services of a professional brigade. On this, if working together or threesomes, will take a maximum of 2-3 hours.
Video - installation of fabric ceiling
Procedure for performing work
There is a simple order of steps that need to be performed successively by each other, without running forward and without mixing one with another. Want to quickly get a quality result - follow the recommendations.
Prepare baguette, screws, decorative plug
Baguette is a fastening profile for mounting the frame around the perimeter of the room. Ceiling fabric will be held on the frame. Material: Wooden Planck, Metal Corner or Plastic Rake. It is suitable as a purchased version and a product of our own manufacture (many men are fond of carpentry work, so there is often everything you need at your disposal). Optimal dimensions 40x50 or 50x50 cm.

The decorative plug plays the role of edging, which is visible outside. Strip after tissue tank at its docking with walls. The function is the same as the plinth that covers the edge of the pasted walls of the wallpaper at thenime of the walls.
Self-tapping screws or screws are needed to ensure a point fastening of the fabric to the walls. The drill is in advance the holes in advance where plastic sleeves are placed or homemade wooden plugs. In them, with a screwdriver, it is easy to drive self-tapping screws. With a large area, definitely, it is better to use the self-tapping screw, and on the 5-meter "Khrushchev" kitchen you can do and manually, using an ordinary screwdriver.
Calculate the area of \u200b\u200bthe web
As mentioned above, there are no special wisdom for tensioning fabric ceilings. Do not need and heat heating to stretch the canvas. All you need to know is how to correctly calculate the square. We offer a simple formula, tested by time: (room width + 15 cm) x (room length + 15 cm) \u003d fabric area in square meters.
It is easier to work when the ceiling has a strictly square or rectangular shape. But sometimes there are protrusions on the ceilings, there may be erkers, columns, decorful niches, ceiling ambrazurki, windows and other "non-format". Also, do not forget to cut out small holes in places where the electrical wiring of the suspended lamps and chandeliers will be.
In these areas, it is necessary to thoroughly makeware and hide the fabric accordingly. If you succeed, it will cost without seams. However, on large areas, sometimes difficult suture structures have to be mounted - this is not a problem, only you will need a little more time and more attention to not mistaken with Crow.
Video - Complex installation of fabric ceiling
Do not forget about light instruments
In places where lighting devices are derived from the ceiling, it is necessary to install a thermal insulating gasket. It has a round slot through which the electrically conductor will pass. Gasket provides fire safety.

Plastic liners are set before the tension of the total canvas.
Check a set of tools for work
Once again, carefully drawn with the list of necessary tools:
- water or laser level;
- electric drill or puncher;
- screwdriver (screwdriver);
- a hammer;
- scissors;
- roulette;
- bulgarian or hacksaw (for metal or wood - depending on the material of the baguette);
- construction knife.
And now act

Step 1. Using the level, we plan a baguette fastening line. From accuracy at this stage there will be a view of the future ceiling in a stretched form. In height, decide so that the fabric is as close as possible to the "native" construction ceiling, unless you want for some reason visually undress the room's height. Although it happens (in the case of complex structures consisting of several levels).
Step 2. On the perimeter of the room to fill baguette.
Step 3. Temporarily remove chandeliers and lamps.
Step 4. Tension in advance the ceiling fabric.
Step 5. Through the holes in thermal insulating rings, pull out the outward of the electric pipe from the ceiling lights. Install chandeliers and lamps in their places, carefully fix it.
Step 6. On the whole frame gently nurtures a decorative plug.
Step 7. Install a decorative plug in places of erkers, ceiling Ambrazurok, windows, etc. (If there are any). Sometimes on inclined ceilings of private houses or country buildings there are windows that have special frames - they need to remove them before stretching the tissue ceiling, and at the end of the work then plays back.

Stretch fabric ceilings do not require special care. They are unpretentious, and at the same time they are ready to delight you for many years. The production uses knitted weaving technology. This means that the elasticity is sufficient so that the fabric "breathe". But also to paint in another color - quite real. Use the water-making paint. It fell well, there are no cracks or spills on the surface.
No high-quality repair is bypassing the ceiling finish. To give the ceiling individuality, luxurious view, many use seamless fabric stretch ceilings. Consider their features and installation technology.
The content of the article:
Fabric stretch ceilings - a modern alternative to whitewash, wallpaper and ceiling tiles. The volumes of production of tissue canvases for the ceiling are growing, because The demand for them is constantly increasing. And this is not just a tribute to fashion. This type of surface finish has some advantages over transmitting technologies, but also has some restrictions on application and special principles of installation.
Advantages and disadvantages of tissue stretch ceilings

All positive and negative sides of tissue tension ceilings are explained by the technology of their production and characteristics of the materials used. A synthetic tissue or a fabric of natural origin is taken as the basis, which is impregnated with polyurethane.
Polyurethane in turn has widespread use. It is used in almost all industrial areas as a seal, rubber substitute, impregnation, which improves the characteristics of the strength of the base material. The operation of polyurethane products is limited to the temperature range - from -60 to +80 degrees.
The advantages of fabric tension ceilings are obvious:
- Increased heat resistance. Thanks to this characteristic, tension ceilings on a tissue basis can be installed even in those rooms that are partially or not completely heated. The product is not deformed and not destroyed with significant changes in temperature.
- The absence of connecting seams on the ceiling canvas. The width of the tissue canvases for stretch ceilings reaches 5 meters. Therefore, the ceilings in the rooms whose width does not exceed this length, seamless.
- The increased strength of the canvas provides protection against mechanical damage. During operation, the ceiling does not sag.
- Durability. The service life is at least 10 years.
- Moderate material elasticity facilitates the installation of the stretch ceiling.
- Fissure canvases for ceilings have micropores that allow air to pass through them, so the surface of the ceiling will breathe. This in turn in some cases prevents the development of fungus.
- When installing, thermal equipment does not use, so the installation of tissue tension ceilings is simpler compared to the installation of stretch ceilings from PVC film. All works are produced without the formation of construction waste. Installation speed is quite high, for example, the installation of the stretch ceiling in a room with an area of \u200b\u200b25 m 2 is carried out in 3-4 hours.
- The material of the fabric cloth for finishing the ceiling can be painted, apply a photo printing on it, thereby changing the appearance of the room. Large pictures are very popular, which look at the ceiling is simply incredible.
- Ecology. This characteristic is due to the use of safe non-toxic materials in the production of cloths.
- Saving space. Stretch ceilings steal only 3-4 cm height, while suspended ceiling - 10 cm and more. This little space is enough to hide electrical communications and defects of the plane of the main ceiling.
- The material of the tissue stretch ceilings is strong enough, but if a small area is damaged, then it is necessary to change the entire design, sometimes together with fasteners.
- If the size of the room exceeds 5 meters in width, then one canvase will not be enough. In this case, there is a need to poison cloths, for this, use a special baguette. Thus, the joints will be very noticeable, but they can be beaten with extraordinary design solutions.
- The fabric base of stretch ceilings absorbs odors, so it is not recommended to install such ceilings in sanitary rooms, kitchens.
- Unlike film stretch ceilings, fabric ceilings are available only in matte design. The range of colors is also small.
Manufacturers of fabric stretch ceilings
The main manufacturers of stretch ceilings are Germany, Switzerland, France and Russia. CERUTTI, CLIPSO and Deskor fabric ceilings are most in demand, the high quality of which is confirmed by numerous certificates. Ceiling manufacturers are constantly improving technology, embodying the latest developments.
French tension ceilings from clipso fabric

As a basis for the production of tensionable clipso tank ceilings, a synthetic knitted fabric is used, which is impregnated with a polymer composition. Such canvas are considered safe for human health, all sanitary requirements are complied with their production, as well as fire safety standards. Therefore, the manufacturer allows the installation of tissue ceilings in bedrooms and children's rooms.
The characteristics of the material of the tissue tension ceilings CLIPSO allow the use of a web in several planes, i.e. Bending it, giving the necessary relief, fix on the slopes.
When installing tissue ceilings, a special profile produced by patented technology is used. It is almost invisible after the completion of the work. The use of this profile provides the ability to dismantle the ceiling and set it again in another room.
Much attention in the production of Ceilings CLIPSO is paid to the creation of a uniform color of the canvas. Thickness of threads is the same. In the process of production, the fabric is tested to the uniformity of tension of both longitudinal and transverse filaments. Due to this, when mounting, the cloth is evenly tensioned on the frame of the stretch ceiling.
Clipso offers a soundproofing substrate for tissue tension ceilings to create suitable acoustics indoors and echo exclusion. Such a characteristic is in demand, for example, in cinemas, halls for conferences.
German fabric ceilings Descor

Fissure stretch ceilings Descor are produced in Germany. This type of finish is characterized by increased fireproof due to the fact that in production there is a special non-combustible fiber Trevira Cs. Used solutions for impregnation bases improve the characteristics of strength, elasticity, increase the water-repellent properties of the web.
All Descor products are certified, which confirms its high quality. Stretch ceilings Descor Antiallergenic, do not accumulate static charge, therefore, the dust is not delayed. The manufacturer's warranty on the product adds confidence in its high quality.
Fissure stretch ceilings are produced in rolls of various widths, which allows you to choose the most suitable option and save money. Maximum ceiling width Descor - 5.1 m.
Fabric Tension Ceilings CERUTTI

The company Alden Group produces fabric stretch ceilings CERUTTI ST. All materials and installation technologies are original, they are developed by company specialists and patented.
The production uses a multilayer fabric that is processed into several steps with various means on both sides. The final layer is a waterproof matte lacquer, which all the advantages of tissue stretch ceilings adds water resistance. The canvas of other manufacturers do not withstand a long-lasting water load, which can lead to leaks, as well as a change in the color of the tissue ceiling.
Called cloth is attached to the baguette using a cord. At the end of the installation, a decorative insert is installed, hiding small gaps.
Alden Group guarantees the most possible strength of the material. If the ceiling is punctured with a sharp object, then the gap will not increase in the future. Special impregnation "Anti-dirt" protects against the appearance of various spots. Manufacturer's warranty reaches 10 years.
Specialists of the company developed a special detergent, ideally suitable for cleaning Cerutti ceilings, taking into account all the features of the corporate canvase and impregnation. The composition of the detergent for tissue ceilings CERUTTI ST does not include caustic alkalis and acids. The tool must be applied to the cloth for 20 seconds, then wipe it with a lounge napkin.
The installation of tissue stretch ceilings and their operation is allowed in medical institutions due to their hypoallery and non-toxicity of materials used in the manufacture of materials.
Varieties of tissue stretch ceilings and their characteristics

Fabric cloths for finishing the ceiling are classified depending on the properties of materials and the functions performed. However, several functions can be combined in one product.
Consider the types of fabric stretch ceilings and their characteristics:
- Standard tensile ceilings. These are classic white ceilings that are suitable for any interior. Have improved strength characteristics. On the canvas of standard white color it is convenient to apply various drawings, photo printing.
- Colored ceilings. Have unobtrusive pastel tones. In production, only natural dyes are used.
- Acoustic stretch ceilings. Created with the help of a special impregnation with sound-absorbing and antishe properties. It is also possible to use special linings. An example of this type of ceiling finishes is the CERUTTI NEXT acoustic cloth.
- Translucent tension ceiling. It is based on the light scattering fiber, refracting light rays, which is impregnated with a matte varnish and a finish polymer characterized by an increased light-resistant ability. Light devices are installed in the inner space of the ceiling, the light rays are refracted, as a result, the impression of the weightless ceiling is created.
- "Star Sky". Special view of translucent ceilings. Technology for creating a romantic situation at home or in a restaurant using fiber optic threads.
- Antimicrobial ceilings. Suitable for medical institutions. The main fabric is impregnated with the antibacterial drug "Tinosan" using ultraviolet radiation.
In addition, moisture-resistant and dirt protective canvas are isolated for fabric tension ceilings.
Preparatory work before installing fabric tension ceilings

Before installing fabric stretch ceilings, make preparatory activities: Clean the surface of the ceiling from dust, remove unnecessary protruding elements of the main ceiling, pave electrical wiring and additional communications, install lighting devices provided by design.
The durability of the design directly depends on the quality of the profile and its installation. The sequence of actions is as follows:
- Make around the perimeter room markup horizontal level of the future ceiling, for this use a laser or ordinary water level. Proper marking is the key to the perfect plane of the stretch ceiling. Determine the lowest angle of the room, back from it down from 2 to 10 cm (depending on the dimensional parameters of the provided lighting equipment), read the line.
- Secure the baguette on the markup using the screws. If the walls are made of plasterboard sheets, the installation of baguettes does not take much time. If the walls are reinforced concrete, the process is somewhat complicated: drill in the right places with a perforator, fasten the baguette with a fastener of a dowel-nail.
- Carefully weld the junctions of baguettes in the corners.
Installation of fabric cloth on the ceiling

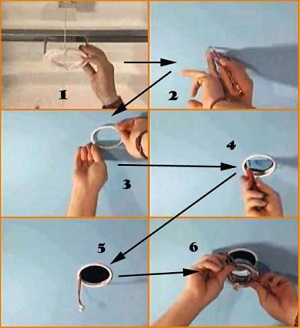
To properly install tissue stretch ceilings, use the following scheme:
- First, pinch the cloth in the four corners of the room using the clips. Start with the corners of a narrower wall.
- Next, follow the sequence of point mount in the middle of each wall: first on the first wall, then on the opposite third, second and fourth.
- And in the middle of each intermediate section in the same sequence. If the wall is a long enough, fasten the web from the middle of the wall in the direction of the angles of the room every 50 cm. At this stage, the maximum tension is not required.
- At the final stage, the canvas is used from the center of each wall to the corners. Observe the same sequence of walls as when pointing. Tighten the canvas carefully. Pleats formed during transportation are easily smoothed using a hair dryer.
- Install decorative lining if they are provided.
How to install a fabric stretch ceiling - Look at the video:
Stretch ceilings on a tissue basis will last long if their installation will make a qualified professional. However, if the principles and sequence of actions are observed, install the tissue stretch ceiling with their own hands will not be much difficult.
Stretch ceilings entered our lives so tightly that, perhaps, a good half of modern interiors is not necessary without installing them. And if it takes a fairly expensive thermal gun to stretch the PVC film, then the tight stretch ceilings can be made without such a bulky and costly tool.
In this article, I will tell you how I made a fabric stretch ceiling with my own hands in my apartment (and then - and the mother-in-law, for she also liked).
To do this, I needed:
- Perforator
- Level
- Dowels
- Selfless
- Screwdriver
- Special spatula
- Lighting Cable
- Suspension for mortgages
- Mortgages
- Terminali
- Saw and stub (for corners of 45 g)
- Baguette
- Fabric for stretch ceiling
A bit of theory
Read more about the types and properties of stretch ceilings, read.
The stretch ceiling is a fabric stretched to the entire area of \u200b\u200bthe room, and fixed to the walls or ceiling by means of a baguette - a special profile in which the edge of the fabric is inserted.
Fabric and baguette, naturally, we need special. The fabric used Descor. Baguette - wall, that is, the one that is attached to the wall, this is:
Installation of the ceiling
At the preparation stage, you need to determine where the lamps will be and stretching all the wires. You need to purchase these lamps (if not yet) and set the mortgages for them to determine the necessary minimum height over the ceiling.The next step is to install the profile - the most time-consuming, dirty and unpleasant, but it is almost everything you need to do). With the level of laying a horizontal on the walls in the plane of the future ceiling. Then self-drawing fix the bagent profile to the wall. It is necessary to fix it often, with a step of 7 - 10 cm, so that after tissue tissue, the gap between the baguette and the wall is not formed.
Well, you can move to the tension of the fabric. The fabric should be carved with a reserve of 10 cm on each side. Unlike PVC ceilings, there are no sides, kanta, sealing rings, etc. on the fabric. And, in contrast, from PVC, the fabric is not warm, and the stretch is beginning not from the corners, but from the middle of the sides. It is more convenient, of course, to perform work together. 

Starting from the middle of the first side, from the center to the corners, fill the fabric to the baguette. It is convenient to do this (yes, actually, and necessary) a special spatula. It does not tear fabric, and the form is designed to operate the tissue tank in the baguette. I have a spatula CLIPSO - very comfortable (I gave 1350 rubles for him, but it is worth it).
After taking excess fabric hangs along the wall. I turn to the opposite direction, fix the middle there. Then I fill the middle part of the remaining two sides, and turn to the corners. I am watching that the fabric is stretched well without "waves" and folds. They say small folds can be fixed by a construction hairdryer, but I did not check, but I did everything smoothly. 
Where there are risers in the room, the fabric cuts through the size of the pipes, and a plastic ring is installed for refining the edge of the opening. 


When the entire ceiling is filled, cut off excess, leaving 1 cm for finishing refueling. Then, the same spatula refuel the left 1 cm in the baguette. 

 So it turns out after refueling: