Laminate without thresholds throughout the apartment. How to lay a laminate with different types of locks how to connect laminates in different directions
Before those who independently puts the laminate in their home or apartment, often the question often arises: how to make a laminate and laminate or laminate and laminate and the other flooring so that the joke look neatly and prevented free move.
How to connect laminate
For a start, let's figure it out in what cases you have to perform laminate connections.
Why need a connection
It is not about the standard assembly, when each panel is connected to previously laid. And about those situations when you have to use a special connecting profile for laminate.
The need for this occurs:
- When moving from one room to another.
For reference. The fact is that the locking of the laminate is sufficiently dense, it does not allow separate panels to "walk" freely with humidity and temperature drops.
Therefore, the perimeter of the room is left damper gaps between the coating and the walls - the free space for the expansion of the laminate.
If you do not leave it every 7-8 meters, there will be no place to expand the laminate, and in the connecting places it will take it.
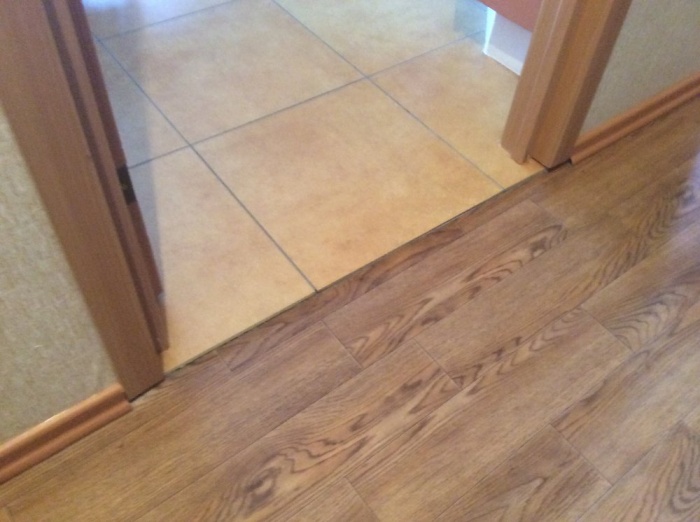
And in order not to make a connection in a prominent place, it is usually suitable in doorways.

- When finishing large areas. The reason is the same - the device of damper gaps.
- When used in one room, different types of flooring or different types of laminatewhose locks do not coincide.
- With floor level drops. For example, if you need to separate the podium or staircase laminate laminate.
When specialists are engaged in decoration, we do not even think about such trifles. But if the repair is done with your own hands, even such a simple task, as the connection of the laminate between the rooms, can cause difficulties.
How to issue a connection
Fortunately, all these little things have long been thought out, the solutions are found, and we can only take advantage of them. Almost all laminate manufacturers produce various components for it.
In addition to both the plinth, the connecting plan for a laminate, which is often referred to as a spawn or connecting profile.
Types of connecting planks for laminate
By purchasing laminate, you can learn from the seller and the presence of the connecting elements necessary in your case. They differ in both the shape and the material from which are made.
Form of profile
Depending on the purpose, the connecting planks are divided into the following types:
- Direct (connecting) profiles - Used to design, located with it at one level.

- Transient profiles - Connect floor coatings located at different heights.
- Corner profiles - Designed for the design of the junction of mutually perpendicular surfaces on stairs and podiums, decorated with laminate.

In addition to those listed, there is also a final profile for framing the open edge of the laminate.
All these products are performed not only the decorative function. The instruction on the software requires the expansion seams, and the connecting profiles allow you to make them hidden, imperceptible look.
Materials manufacturing
Connecting profiles are made from different materials depending on the purpose.
- Laminated - Made from pressed wood fibers and are covered with a laminated film with a decorative pattern.
The drawing is selected in accordance with the laminate decor. Since to connect the laminate between the rooms is required as soon as possible, this kind of profile is most often used in the doorways. - Metal - They are made of aluminum, brass or stainless steel and are coated with a decorative film.
They are distinguished by increased strength, so used in places with high permeability. - Plastic - Soft and flexible profiles, most often used for registration of curvilinear joints. Their main advantages are a wide variety of colors and a low price.
But the service life of plastic profiles is relatively small.

- Rubber - This is most often angular profiles intended for fastening on the stairs. They allow you to walk on them more secure, preventing slipping.
Installation of connecting profiles
All listed connecting elements are supplied with an additional fastening rail for hidden editing.
For reference. Metal profiles can be installed in an open method with dowels and screws.
The fasteners are included in the product package, and in the metal bar, mounting holes are made in production.

How to mount profile, you can look at the video presented on this page.
The fastener rail is mounted to the base for glue or screws. Moreover, the second option is considered more preferable, since it makes it possible to re-install and has greater durability.
The sequence of installation of the connecting profile is as follows:
- The fastener rail is installed next to the edge of the coating and fasten with screws.
- From the rails begin to retain the second coating.
- The decorative bar is installed in the fastener rail guide and snap the hammer through it through the wooden bar.
Conclusion
The quality of repair and the impression of the created interior is largely dependent on such small things as the design of joints, angles and transitions.
The photos presented in the article confirm it. Using the connecting elements specially created for this, you will not only achieve the excellent appearance of the laminated flooring, but also extend the life of its operation.
One of the most popular flooring is laminate. Conduct work on laying this material maybe even inexperienced person. At the same time, the laminate has a low cost. That is why it is quite popular outdoor coating. If the laminate is stacked in several rooms, the thresholds are not created in the doorways. But before carrying out work on the consolidation of the material, it is necessary to learn about the features of work in the interior space.
Materials and tools
Conduct work is qualitatively impossible without using the correct tool. For laying of laminate, a hacksaw has a small teeth. Also before work, you should prepare an electrolybiz and the construction level. In addition, the roulette and the marker will come in handy.

You can also purchase a specialized set for laying a laminate, which includes plastic wedges and a tool, which is a device for cutting boards. But such products can be replaced by infirred materials. For example, instead of wedges, many use laminate trimming.
During the acquisition of the floor covering, it is important to remember that when using poor-quality laminate, the coating can be used for a shorter period. The described material is divided into several classes.
If it is purchased for use in the bedroom, it is worth choosing a grade 23 material. It is characterized by low cost, but it is not intended for the load, which, for example, affects the floor in the hallway. If you still use a grade 23 laminate, in the living room it can serve about 6 years.
Choosing the material it is important to remember that the higher the class, the more qualitative products are purchased. It is also important to pay attention to the quality of the compounds of boards and on their density.

From density depends the reaction of the flooring on air humidity and temperature differences. If the castles of boards are not reliable enough. This can lead to deformation of the floor covering. During the acquisition, it is also important to remember that it is necessary to acquire with a margin of about 10 percent.
Laying of laminate without thresholds should be carried out only on a prepared basis. If this rule is not respected, defects may appear during operation. In addition, such materials will be needed for work as:
- waterproofer;
- thermal insulation material;
- grout for seams.
The thermal insulation material is usually installed only in country houses, as the inter overwhelming overlap in multi-storey structures securely holds heat.
Floor preparation for laminate laying
Almost all instructions for laying the described floor covering report that the optimal area of \u200b\u200bthe room in which the laying occurs, 45-50 square meters should be. If we put the material with a single array in a room with an area of \u200b\u200b100 square meters, this may lead to its deformation.

To this not happened, the builders usually establish the thresholds between the rooms, which are compensatory seams. So that in the process of using the rooms did not appear deformations, it is necessary to lay the material on the perfectly level surface. Usually, the distortion appears due to the fact that airbags remain between the draft floor and laminate.
During the work it is worth remembering that the more accurate work will be carried out to remove old materials, the easier it will be to equalize the surface.
After dismantling the old flooring, it is necessary to estimate the condition of the black floor. If damage is small, you can produce cosmetic alignment. Such work implies close-up of fine cracks and irregularities with cement mortar. If the draft floor has serious defects, you need to create a new screed.

After alignment, it is necessary to determine from which location of the material will begin, and where it will end. This is important, since the lining layer is located across the laminate. It is important to take into account that the substrate stripes should be shrinking with an overlay of about 10 cm.
In the case when laminate laying without thresholds is carried out in a private house, you need to create a hydraulic and thermal insulation layer. When the laying is made without thresholds, work is carried out at once all over the area of \u200b\u200bthe house. That is why the waterproofing material is fixed immediately in all rooms. If the material is too thin, it will not be able to perform its functions effectively. If the layer is thick, it can lead to deformation of the floor covering. Setting the waterproofing material you need to check the reliability of the joints.
Features of laying laminate
During the installation of the floor covering, it is necessary to take into account the features of such work:
- The first 3 layers need to be laid more carefully, as they are fundamental. Works need to start from the window.
- The boards are connected with the help of locks, so it may even have a person who has no experience. On the one hand, each board there is a protrusion, and with another groove, in which the protrusion of the next element is inserted.
- The first stacked board needs to cut the castle. The compound is made at an angle of 30 degrees. In this position, the board is inserted into the grooves of the previous one, after which it is pressed to the floor until the click appears. During the docking, you need to ensure that there are no clearances in the connection places.
- If the boards that will be near the wall, do not cut the protrusion, the floor will look less aesthetic.
- The whole range is mounted in the described method. During the laying of the last element, it is usually necessary to cut off its part, as it is rarely fully placed between the already fixed boards and the wall.

It is important to remember that it is impossible to lay boards to the walls, since when the temperature changes, they can shift. That is why restrictive pegs are installed between the floor covering and walls. When laying a material without thresholds between rooms, it is necessary to leave the gap of about 15 mm. After fixing all elements of the floor covering, it is worth viewing the floor for the presence of large gaps.
Important! If you need to close the junctions of the laminate and the tiles without a melting, it is enough to clean the boards and after laying to use the grout for seams or mastic.
Laying laminate between rooms is important to take into account the design of the rooms, since the flooring can look differently in rooms with different designs. If the tiled floor is in one of the rooms, it is important to cut the boards as closely as possible before laying and combining them with an outdoor coating of another room.
Features of creating a transition without a threshold
Before laying a laminate in the doorway without a threshold, it is necessary to make it in the door frame, it propelled so that there is a small space between the material. To spend all the work neatly, it is worth removing the door leaf.

If the transition is done parallel to laying boards, no more than two boards may be needed. In the adjacent room, the laying continues on the basis of a laminate, which is located in the opening. If space remains between the wall and laminate, it is laid by the sawn boards.
If the boards are stacked in the opening across, it is necessary to continue the creation of several rows from the door to the opposite wall. Only after that the remaining boards are beginning to attach, which are brought to the side walls.

When choosing a method for laying a laminate, it is worth considering that the fixing of elements in several rooms without creating a threshold is a rather complicated process. That is why in the absence of experience it is important to carefully prepare for work. Observing the described rules can be labeled laminate without thresholds throughout the apartment without the help of assistants and not spending money on professionals.
Despite the widespread view that laying of the laminate is a simple and unemptent process, certain difficulties in the installation process of the coating often inevitably occur. Particularly often people face a problem in the case when you need to connect one laminated coating with another. Such situations often arise, because in some cases the same model of laminated sex is rarely placed in all rooms at home.
The laminate with laminate is to be allowed, as a rule, only in two cases:
- When the laying of coatings in different rooms is made and it is necessary to docile them beautifully so that there is no sharp transition;
- When within one room you need to make a beautiful transition from the coating to the coating (for example, to zonate the room).
It is worth noting that in recent years the connection of two types of laminated floors has become a common designer solution that allows non-standard and originality to the interior of the room.
If in one room or at the junction of adjacent rooms, it is assumed to further connect two laminated coatings, then it should be envisaged that the draft floors were perfectly smooth.
If the draft floors are smooth, then you need to consider the fact that different laminate can have a different thickness, which varies from 6 to 12 mm. The optimal option is the purchase of floor coatings, substrates, thermal insulation and sound insulation materials of one thickness. In addition, technological pie (substrate, insulating layers, film, etc.) should also be made according to one technology so that there is no longer the slightest drop in height. It is also not recommended to keep laminated floors from different manufacturers, which will differ in the class of wear resistance and, as a result, operational period.

How to connect laminated coatings?
In fact, there are several sufficiently simple and simple ways to connect "Laminate Laminate". The most common of them are:
- The easiest option is to lay two types of laminated floors from one manufacturer. In this case, as a rule, the laminate and in the first, and in the second case there will be the same system of the lock connection, so it will be extremely simple to docile the panels of two different species. An excellent option in such a situation is the acquisition of various decors (for example, dark and light) from one collection of a particular manufacturer. True, this method is suitable if the laminate is kept in the same room.
If the compound of laminated coatings is carried out at the junction of two rooms (for example, in the doorway), then between the materials it is necessary to provide a technological gap. If it is not, then the likelihood of the formation of defects, bloating and decline in the life of the laminated gender is great.
- Using thresholds. In most cases, to connect two laminated coatings, use the threshings. With the help of modern docking profiles, smooth and low-net transitions between two types of coatings can be made. Thresholds also allow you to form a small gap, which is necessary for the temperature expansion of the wooden material. Connecting thresholds can be made of plastic, metal, wood - the selection of one type or another will depend on the stylistic solution in the room and the preferences of the owners.
In addition, many manufacturers of laminated floors together with laminate produce connecting thresholds. Of course, they will cost much more expensive than traditional options presented in specialized stores, but from the point of view of style and harmony of the transition, this solution will be as correct as possible. Such products can be found from QUICK-STEP, PERGO, TARKETT, EPI, Alloc and other major manufacturers from companies.
- Not so long ago, cork compensators appeared on the construction market, with which you can easily connect two different models of laminated floors. The main advantage of this method is the lack of a gap as such. Cork insert completely fill the gap between the materials. The laying of the cork insert is carried out after the installation of laminated floors. The compensator is enough to cut, approximately fit under the size of the gap, then insert.
In most cases, an externally cork compensator will be invisible in the transition, because His shade is neutral. If the insertion from the tube is noticeable and rushes into the eye, then it can be painted using a suitable color marker or special paint so that it turned out more or less similar shade.
- The use of construction installations and sealants, which in stores are presented in a wide variety, for connecting two laminates, is not a very frequent solution. At the same time, with their help, you can remove the bog between the panels of different dimensions.
The main disadvantages of such a solution to create a connection between the coating are: dismantling the panel without damage, which come into contact with the sealant, will not be carried out; In the presence of sealant or foam in the junction between coatings, the material will not be able to expand at temperature effects, which will cause damage to the boards and reduce the deadlines of the floor operation.

Conclusion
By and large, special problems when connecting two types of laminated coatings should not arise (especially when using the clad and cork compensator). In the event that it is necessary to roll up the floors without using any additional funds, or work must be carried out in a large room and the junction should turn out to be long enough, then the process is best entrusted by specialists. In addition, a professional approach is needed if there are serious differences in height between two coatings.

Laying the laminate is an important stage when repairing an apartment, because the floor covering is often striking the first and contact us. When working with a laminate, many difficult tasks arise, including the organization of the connection of the lamellas between the rooms. It is not difficult to cope with this task, and in this article we will tell in detail how to docile laminate.
The main solution to the problem
As mentioned above, the junction between laminate and laminate is simple enough, and there is only a similar question for beginners. Professionals in the field of laying outdoor coatings face similar cases when repairing any apartment, so the solution has long come up with the connecting strips.

By applying a laminate connector, you can create a durable junction between the plates from the connected lamellae. This joint will have not only aesthetic value, but also to prevent the deformation and movement of the planks under the influence of heat and moisture.
Is it worth applying connecting planks
Before starting in detail to tell about the types and installation of connecting planks, it is worth mentioning that they apply only if you are going to connect new lamellas with already laid material. Connectors do not apply to row planks when assembling flooring.

Specific cases where the docking plan for laminate may be needed:
- Laying the laminate in large rooms, you have to create damper gaps, which will help you and the connecting plan will help;
- The junctions between the rooms of the apartment are also often performed using connectors;
- If you are placing in one room, different types of lamellas that are fastened to each other with different locks, then without the connecting plank you can not do. This occurs, for example, if you wanted to create different zones in one room;
- Floor-level drops, or steps are separated by these planks.
How to choose a plank
The docking profile for the laminate varies the area of \u200b\u200bapplication, and, accordingly, the shape, as well as the material from which it is made.

First of all, you must decide on its shape:
- The direct profiles are used for a smooth laminate compound with another part of the laminate, or to connect to another flooring, for example, with tiles. Most often, the junction of laminate and tiles without a clad, but other options are also possible;
- Transition profiles are used if it is necessary to combine flooring, located at different levels;
- The angular profiles are used to finish joints, perpendicular to the connected surfaces, for example, when finishing the podium, or stairs;
- The final profile applies to the decorative finishing of the open edges of the laminate.
With any laying of the laminate, it will have to use at least one type of connecting profiles, because the instructions say that every 7 meters you have to make a gap that compensates for the expansion of the laminate, and the thresholds for laminate will be able to re-establish this path between the slats. If you do not make data gaps, then the laminate can take up in some places, which will spoil the connecting locks, and you will have to buy a new material.

As mentioned above, the connecting plan for laminate is also characterized by the material from which it is made:
- Laminated strips are manufactured like lonely flames from wood and pressed fiber covered with a special film. Such connections are usually used in the doorways, and the color and pattern of the planks are selected under the main flooring to make the joint as imperceptible as possible.
- Metal planks are taken exclusively due to their strength. The appearance of the floor using such slats is significantly worsening, but such strips made from brass, aluminum or stainless steel are perfectly coping with high loads, for example, on the connection of lamellae at the podium.
- Plastic connecting sheets are distinguished by their flexibility, so they are used on curvilinear joints, for example, on rounded staircases. Significant advantages of these planks are also the price and a huge selection of color solutions, however, the plastic is quickly supplied under loads, which is a great disadvantage.
- Rubber profiles are also distinguished by their flexibility, in addition, they have a high friction indicator, which will protect you from falling, for example, on the stairs.
Installation of connecting planks
By choosing the desired bar, it remains to figure out how to connect the laminate with it. First of all, you should pay attention to the fastener rail, which is supplied with the connecting plate. This rail is needed in order to attach the connecting bar without visible fasteners, such as self-tapping screws. A similar way is made to transition from tiles to laminate when necessary.

The installation process of the connective plank:
- First fasten the rail to the floor. This can be done using the glue or screws, and the second option is distinguished by increased reliability, so it is always recommended by professionals.
- After you put a fastener rack to a laminate laminate, put the second part of the floor covering.
- Secure the connecting bar in the racket groove, hitting the hammer over it through the wooden bar.

It is worth a correction here, because this method is not entirely suitable for metal profiles. They are attached to open screws, and the holes for them are prepared immediately at the factory.
Using this method, you can connect laminate with various floor coatings, such as tiles, linoleum, etc.
Conclusion
Do not forget that the jokes of the laminate between the rooms are at a high level, because it will have a positive effect on the beauty of all the premises, in what you can make sure you look at the photo.
Linoleum, parquet, carpets - it all remained in the distant past.
Even the high price pays for itself in the first days of operation, since the surface has incredibly resistant properties before exposure to external factors.
"How to dock laminate between rooms?" - The main question that occurs during the installation. If the usual layout is simple, then the joints require some knowledge and effort.
In order to during the installation of the laminate, there were no problems with transitions between rooms, thresholds and uneven floors - it is worth getting a connecting plank.
Laminate manufacturers have already found a solution that does not need additions.
When installing the floor covering, it is absolutely not necessary to use the planks. They serve to hide seams, as well as work with hard-to-reach places, sheets at different levels.
Nevertheless, professionals are recommended to be used at least one of the types during the calculation process. This is due to the fact that in the process it is worth making the gaps every seven meters, and you can hide them with a direct or final plank, while the aesthetics will not break.
This element is also used in the following cases:
- Is a solution in the question: "How to dock laminate between rooms without thresholds?"
- When using several types of laminate, where the docking locks do not coincide.
- When finishing steps and other elevations.
- When the floor is uneven and layers of laminate are at different levels.
It is possible to avoid working with straps, but it will harm the appearance of the floor covering and with time the gaps are formed, leading it to destruction.
How to choose a plank
To date, there are several types of this product on sale, which is divided depending on the shape and material.

To choose a truly suitable bar - consider each of the species separately. Depending on the shape, they are:
- Straight - serve to dock the elements on a straight surface without obstacles of two parts of the laminate or a compound with another flooring (tile, parquet).
- Transition - they are used in cases where the parts are connected on different levels.
- Corners are used when docking the laminate in the corners and other hard-to-reach places.
- Finishing - with their help hide the seams, other nuances of the calculation.
Depending on the material manufacturing material, there are:
- Laminated - the most suitable in the composition of the model, which is selected depending on the color of the selected one. It is used most often in the doorways and when docking two parts.
- Metal - visually look cheap, but differ in strength, because they are made of aluminum or steel. With their help mask or connect the seams in the most vulnerable places.
- Plastic - thanks to flexible properties are used in places with a figure surface.
- Rubber - by the nature of the application are completely similar, like plastic. Easily bent, durable and possess a good effect of friction.
Based on the features of the form, choose the planks of the necessary species, but note that in the process of installation will certainly need final and angular.
Installation of connecting planks
If there should be no choice and purchase problems, then with installation there are several nuances.

The sequence of actions is as follows:
- Secure the rail between the joints, which goes complete with the planks. It is advisable to do it with the help of self-tapping screws, but the dressing on the glue is also permissible.
- Move both parts of the laminate to each other as you would like to see ultimately.
- Secure the grooves among themselves by a strong impact of the hammer.
Many a question arose: "How to dock laminate between rooms with a drop?". The answer is much easier than you could imagine. For this, there are transitional strips that are created specifically for such situations, and the installation technology is completely similar.
If there are suitable plans, the installation does not take much time and will not at all cause additional questions.
Undoubtedly, install the joints independently can and it is not so difficult, as it seems at first glance. Focusing on the above recommendations, even connected pieces of laminate at different levels will not be an obstacle to the creation of a perfectly level and high-quality floor covering.
How to put a laminate between rooms without junctions - on video: