Different homemade to protect cottages. Homemade for giving and gardening: useful tips on creating original jewelry (120 photos)
The landscaping of the cottage will not be a problem and expensive attachment, if you manifest a little smelting. Create homemade with your own hands is easy - time, simple tools and devices will be required. You can use the residues of building materials, unnecessary boards, car tires, sawed trees.
What materials are used
From the stylish decor of the site will not refuse any dacket. Many firms offer original things. However, the sections created by their own hands will help to make surcharge.
Materials that are most often used in the work:

When decorating cottages, it is not necessary to restrain fantasy - the bold combinations of materials and non-standard use of unnecessary things are welcome.
 Do not necessarily comply with proportions or natural color combinations. The giraffe may have purple spots, and the locomotive to be small.
Original decor for recreation area
 Many citizens acquire country areas for a relaxing holiday. It's nice on the weekend to distract from the urban weekdays and feel connections with nature. Registration of the relaxation corner deserves attention, it is desirable to burn it from the agricultural zone of work. Fashionable solution - the construction of small arbors from the remains of the boards. We will also need pillars-bars for supports and transverse beams.
Sequence of work:
- In the corners of the site, pits are digging with a depth of 50-60 cm, where the bars are inserted and fixed with a solution.
- The support beams with the help of self-samples are fixed at the upper ends of the bars.
- The transverse boards are fixed on supporting beams. On the bars, the boards are fixed in a horizontal form, leaving the lumens with a width of 5-7 cm.
A neat conjugated lawn or a playground, taking a stone - for the design of the site any options are suitable. To revive the design, there are vases with flowers or planted near the curly plants near the platform.
How beautiful to place flower beds
 Fragrant flower beds - the best decor of the recreation area.
It is easy to make a non-standard fence of flower beds from the primary means:
- If there is a small amount of bricks, you can put a flower lea of \u200b\u200bany geometric shape to several rows. The solution will help secure the design and give it strength. Naturally, flower beds are also looking at the natural stone.
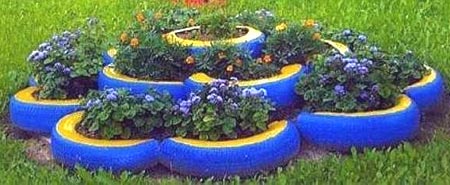
- Automotive tires have long become a popular material on dachas. To give the flower bed well-kept species, it is desirable to paint the tires to paint bright paint and put them in several layers, forming vases or lay down in a portion in the curved form, forming circles, ovals.
 A couple of plastic or wooden vases will help a non-standard view of the old bike. The transformation makes it quickly: the bike is painted with bright paint, the vases are fixed above the front and rear wheel. The picturesque type of construction will give the curly plants whose sprigs skillfully disguise metal structures.
The old bath will not look at the trash, if it is not standard to transform it. Of course, the most uncomplicated option is a colorfully painted container to use as a tank.
 However, meticulous and not lazy daches convert the bath to cozy furniture for recreation. For a wonderful transformation, it is necessary to cut a part of the side wall with a grinder, thoroughly glue cuts. Comfortable sofas are refined: painted in the desired shade, decorated with soft mattresses, head restraints.
The improvised flower garden in the form of a garden watering can be installed next to the sofa will create a real relax zone.
Stylish design of garden tracks
 Pulling metal tanks or old wooden barrels can be turned into original flowerbeds or even peculiar beds that successfully complement garden paths.
Stages of work:

 Barrels, ruddles, thick logs can be called the most pleasant material for work. It is wonderful that items can be positioned not only vertically, but also horizontally, sawing in half or build multi-tiered structures.
Products are not required specifically decorated - a colorful wooden texture will serve as a better decoration.

Figure compositions-self-creamers do it yourself
It is quite clear to the desire of each dachnik to give the site a unique view. In order not to spend money on the services of designers, you can create cheerful crafts from your handicraft materials with your own hands. Unnecessary garden equipment, broken products made of metal, household tanks, cobblestones and stones of different sizes - everything goes through.
How to make a metal decor
 The creative decoration of the tracks, the lawns will be unique figures collected from old shovel and broken robble, trim. Create expressive images is easy - the main thing is not to limit fantasy. To assemble a snail figurine, you will need literally non-fibrous sheet metal, cans from canned food. Black paint will give a figurine with a concise look and make it very noticeable on the background of a green lawn.
 The original solution is to combine different materials when creating figures. Exquisitely and naturally looks the Union of Stone and Metal. A fun view has a cat collected from rounded cobblestones of different sizes and metal elements. A stone pet cozily laid on a large stone to bask in the sun.
 The glittering decoration of flower beds will be flowers collected from table metal spoons. The improvised flower garden will delight dacnis at any time of the year - rainy autumn and snowy winter. The flirty and air view of the flower bed will give an umbrella collected from metal tubes. Cook the design at home is easy. To plant flowers, pre-make a frame of plywood or a dense film.
Original homemade with their own hands
 Wood products always bring comfort to the decor of the garden plot. A wooden composition in the form of large white mushrooms perfectly fit into the landscape design of the plot. However, you can give fungus a fun view using a non-emerged penneck. A funny grimace on the tree is easy to portray with a chisel. And the hat can be made of thick spis.
 The present work of art becomes decorative compositions collected from wooden sleeps or lane. Irivo looks at the animal figurines collected from old branches, sticks and several logs. A more practical solution - arrangement of flower beds from small logs.
Create a small flower garden in several stages:
- The log is cut into several equal parts, separately make thin wooden spins of branches for the design of the wheels.
- In each element, the inner part is removed and separately from small boards Mastery improvised car driver.
- The wheels and the composition are attached to the logs and the composition is placed on a plot in the form of a train.
To make it easier to care for flowers, plants are planted into separate pots, which simply put in recess.
 Functional self-teles collected by their own hands deserve separate attention - dacha furniture collected from undergraduate materials. The easiest way to make items made of spinal trees. It is enough to make the table from the base of the trunk, and less thick Polynen in the creation of chairs. From individual branches and boards collect a small bench. This furniture is not recommended to paint with colored paints - the natural wood texture is more refined, covered with colorless water-repellent varnish.
 The popular version of crafts - features of animals collected from the spikes of trees. You can collect a composition from a couple of sov, located on hemp. The assembly stage of the homemade, created by their own hands, takes a little time: from large sleeps make trusts, on which round eyes and wings are fixed.

Homemade with your own hands for a dacha kindergarten
 Any tree is an optimal option for decorating the playground for giving. Different materials will be used in work: logs, hemps, boards. Creating crafts for giving with your own hands is an exciting occupation in which all family members can take part. Simple forms, minimum of parts, bright colors - such figures look elegant and fun.
 Easily assemble figures from different materials. As an option - a set of wooden pillars, tires from the car.
Making a figurine near the playground is easy:
- Tire halfway roll into the ground.
- In front of the tires, a pillar is 8-10 cm thick.
- On top of the logs attach an improvised face of a small lounge. Details of the figurines (tail, ears, eyes) are cut out of plastic bottles.
- Coloring the figure can be for any animal.
For the child to have fun at the site, it is advisable to create not just decorative crafts, but gaming.
As an option - installed plywood figures of animals. In the canvas make holes of different widths through which you can throw balls.
 solution - registration of ferrous carriers of small logs of the same value. To build a design, you will need logs, paint, tools.
The main stages of work:
- In the basics basics (even number) the same magnitude makes wells.
- The bases are folded on Earth with equal intervals, color in one color.
- On the basics perpendicularly lay logs - "trailers" painted with multi-colored bright colors.
- To highlight the "locomotive", the pipe and a small block "Cabin" can be fixed on the log.
Flowers, decorated in small metal barrels, give brightness to the playground. The kids will like to independently care for flowers placed in colorful vases.
 Amazing crafts at the cottage are an excellent chance to give the products "second life" and decorate the plot originally. A little time and diligence - and you can give a modern laconic decor of functionality or simply decorate the plot figures-characters of favorite cartoons.
Video about original crafts in the country
Self-timers for giving are a special subject of pride for the maternity owner. To show a mixture, practicality may not everyone. But take note, to implement someone's useful experience in the masterpiece, under the power of many.
Original flower bed from automotive tires
Used auto strokes - popular material for the transformation of the landscape and practical structures.
Clutches from tires
Such homemakes for cottages and the garden got the greatest popularity. At the same time, classic single flower beds moved to the background. Currently you can see the following options:
Such homemade for home and giving with their own hands will take a worthy place in any landscape.
Playgrounds from auto strokes
Grandchildren and children are frequent guests at the cottage. Therefore, the efforts of adults who have decided on which they will define:
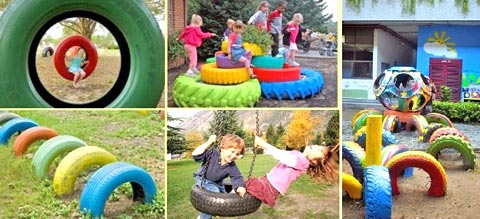 Options for playgrounds from auto strokes
 - and cartoon heroes made of tires. Bright little animals made from tires will be a special subject of pride in front of friends and neighbors.
- Swing. You can meet from ordinary suspended models to the rocking hours made of semicircles with the board installed instead of the seat.
- Machines, motorcycles. Different diameter of the wheel allows you to collect original racing cars and bikes. Any boy will trigger himself a real rider and will appreciate the efforts of adults.
- Furniture. Chairs and tables for playgrounds and improvised banquets - a dream of any little lady.
Read also
Installation of wicket at the cottage
Homemade with their own hands for the playground will provide an active, interesting summer for a child.
Useful crafts from tires
Tires are often used for the following structures:

Rubber crafts, homemade for summer cottages are popular with the availability of infirm materials and a wide range of applications.
Useful homemade plastic bottles
Another popular material for designer and practical surveys. Useful homemakes from plastic bottles are widely used for dachas:

Practical homemade for giving with their own hands from plastic bottles was widespread due to the high availability of material and ease of processing.
The summer cottage is the territory where it is possible to give itself freedom to carry out numerous experiments and torturing. This is manifested not only in the interior design, but mainly in the design of the garden or the garden. The inventive and ingenious hosts are not long been guided by expensive and standard methods for the arrangement of their sites, since there is a lot of alternative solutions in fact for all areas of activity.

There are several varieties of vertical beds that allow you to optimize the use of free space. Non-standard designs are an excellent opportunity to create an interesting garden design, garden, cottage plot.

This variety of beds in most cases is used to grow decorative plants or spicy herbs.
Materials for manufacture:

The length of the drainage tubes is regulated in accordance with the wishes of the landlord. However, it should not be made bulky beds, because they may complicate movement on the territory.
Creating a garden

Stage 1. Create a container. To do this, we take the drainage pipe, cut down along and put on two sides with special plugs.
Stage 2. We take prepared metal holders, put them on the resulting carcasters for the beds.
Stage 3. We do in the pipe hole. They are made in those places where metal fasteners will be.
Stage 4. Delighted through the cable holes made or durable rope.
Stage 5. Fix the cable / rope with fasteners.
Step 6. Fill out the seeds obtained by clay and soil.
Stage 7. Look at the garden beds.
Stage 8. Let the pipes to the selected place. Sometimes there is a special wooden crossbar for this, or rather the design in the form of the letter "P".
Stage 9. Alternatively, you can make a special design for pipes.

Important! The gardening from the drainage tubes is not distinguished by resistant to a strong impetuous wind, so it should be selected for it, which is not blown away from four sides by the winds. Otherwise, the frame quickly collapses, with all your efforts.


The garden, made of a plastic bag, is another modification of vertical beds. It is extremely compact, functional and interesting outwardly. You can make such a bed in a couple of hours.

Materials for manufacture:
- durable polyethylene film;
- sewing machine;
- priming;
- seedling.
In order for the garden to turn out to be strong, it is recommended to pay special attention to the thickness of the polyethylene film, which in this case will act as "frame" design. The minimum film thickness is 0, 2 millimeters.
The process of creating a polyethylene bed

Step 1 . Cutting 2 rectangular segments of the film, the size of which corresponds to the size of the generated bed. For each side, you should leave the allowance equal to one and a half centimeters. The recommended bed diameter is twenty centimeters.
Step 2. We cross the rectangles among themselves, leaving unconceded only the top of the bag.
Step 3. Send a handle to the future bed, the strength of which will allow to withstand the weight of the bag filled with soil. It should also be considered that when watering the weight will increase.
Step 4. Fill the bag of fertilous land.
Step 5. Make horizontal cuts on a bag in twenty centimeters. They are needed in order to plant seedlings in bed.
Step 6. Space seedlings.
Step 7. Regularly water the soil and add the necessary fertilizers.
With these simple actions, you can get cheap and useful beds.


An integral element of each country area is a compost pile. This is a place where all sorts of biochemical reactions occur, providing fertilizer creation.
To create fertilizers that will satisfy all requirements for them, you should thoroughly consider several key steps: creating a container and directly correctly manufacturing the most compost. We will tell about each of them.

Stage 1. We take eight reference columns of the same length.
Stage 2. Processing the bottom of the wooden columns by motor oil or tar.
Stage 3. Drop the columns to the ground so that they are reliable and stable. If the compost box is located next to the fence, then 4 columns (that is, one side) you can attach to the fence. This will avoid the need to dig 4 yams.

Stage 4. Between each two neighboring columns you feed the crossbars in such a way that in the end it turned out three independent sections. Be sure to leave the slots that will perform the functions for ventilation holes.

Stage 5. In two sections, horizontally nail the boards up to half the pillars height. In these places it is assumed to create two small doors.

Stage 6. The remaining section will be a large door, so you should navigate only one board. It should be located at the very bottom in a horizontal position, that is, as ordinary crossbar.
Step 7. Install the covers. To do this, you can use one large one-piece board.
Stage 8. Install the workpieces prepared in advance.
Stage 9. We provide doors with handles and leaks.
Stage 10. We process wood using special impregnations.
Stage 11. Color the box in any color that matches preferences.

Many gardeners mistakenly believe that any components can be hung in a compost bunch. In reality, "ingredients" should be carefully chosen to create the right biotrement.
Among the required components of the compost heap, the following components:
- peat;
- ash;
- needles;
- tree branches;
- leaves;
- hay or grass;
- wood ash;
- roots of plants;
- raw vegetables and fruits, etc.
All items in randomly mixed in a heap. To accelerate chemical reactions, it is recommended to cover a bunch of tarpaulos (this is especially true in the absence of a box).

A trip to the cottage with the family suggests the presence of entertainment elements on the site that will delight children. The most common way to take young dachensons are swing.
To build a swing on your own - the task is not easy, but quite perfect. Of course, you can always take a stick, tie it with a rope and hang the design on a tree, but it is difficult to call full swings. Real craftsmen prefer to build comfortable designs with a comfortable seat for seating.

Constructive components:
- two logs;
- durable rope.
Indicators:
- log diameter - 85 mm;
- length logs - 700 mm;
- distance between ropes - 500 mm.
Creating a swing
Stage 1. Extend the ropes between the logs.
Stage 2. Watch the ropes each log.
Stage 3. We release the rope out.
Stage 4. Tighten the ropes on 3 nodes.
Stage 5. Fix the swing on the tree.
Important: Such swings are calculated only per person.
Garden Material Garden
There are several types of garden tracks that can easily be done with their own hands.

Step 1. Remove the sidewall from the tire using a knife or saw.

Step 2. Cut the tires.
Step 3. Will withdraw the space with corrugated stripes.
Step 4. Color the paint path.
Step 5. Sprinkle a stone crumb.
This is an economical option for those who do not want to break their heads and spend time on a full-fledged garden path. The tire track is usually used for gardens, as it is easily fit into the ground.

Stage 1. Drag the plugs in different colors.
Stage 2. Dump a small trench.
Stage 3. Drive support to strengthen the future track.
Stage 4. Construct formwork using boards.
Stage 5. Install the struts on the edges of the trench.
Stage 6. We put in the ridge of the trench crushed stone and carefully tamper.
Stage 7. We make a solution from sand, cement, glue and water.
Stage 8. Pour the solution into the trench.
Stage 9. Press the traffic jams in an arbitrary order. It is interesting to watch even colorful stripes.

These are the most simple and rapid ways to make a garden track, not acquiring expensive materials.
Tools do it yourself
The expression "in the farm will use everything" turns out to be more relevant when it comes to canices. From this plastic container, you can make a large number of indispensable tools that are actively used in the process of dacha.


For the manufacture of this tool, we need only a sharp knife and directly container.
Stage 1. Cut the bottom of the canister.
Stage 2. We note on the container the cut line for the scoop so that the knob from the canister is a handle of the future tool.
Stage 3. Cut off the extra material.
Due to these simple actions, we get a great scoop with a comfortable handle.

Materials:

Manufacture
Stage 1. Carefully my canister so that there is no smell in it.
Stage 2. Cut the vertically to the canister into two parts.
Stage 3. On the table, we make a groove using a woodworking machine.
Stage 4. We apply glue to the Faneur and insert the canister into the lower part.
Stage 5. Color the resulting shelf with a canister.
Of course, such a design will not withstand greater weight, but it is quite good to store small parts.

Materials:
- 40 kanisters;
- scissors;
- rope;
- paper;
- marker.
Stage 1. I pierce the top of the canister.
Stage 2. We make stencils from paper.
Stage 3. Apply it to the canister, we supply the marker.
Stage 4. Cut large holes with scissors.
Stage 5. We fold the prepared canisters into several rows, taking each row by waying the rope under the tank handle.
Stage 6. We reinstall all the rows around the perimeter for greater strength.
Stage 7. If the cabinet is planned to lean to the wall, then weiss it to the surface.
Stage 8. We put heavy items in the lower row - stones or bricks.
The result is quite a spacious and functional rack that will help get rid of the question of storing many small details.

Be destroyed and bold in the incarnation of your ideas. Good luck!
Video - homemade for giving with their own hands
Video - do ourselves for giving
The private sector is associated with a severe permanent job. To plant a garden, trace the growth of plants, collect harvest. All this, of course, you need to do. But if you correctly organize the whole process, then the work will be in joy. And there will be many more free time for recreation. And they will help in this homemade for the garden and cottages, with their own hands made. Someone will objected that everything can be bought already ready in the store. This is true. But, first, to buy all the money is not enough. And secondly, the process of making from the primary materials of something useful can bring a mass of positive emotions.
Russian people have always distinguished resourcefulness and ingenuity. And a huge amount of homemade made by their own hands for giving and gardening, whose photos can be found in our article, this is confirmed. We will offer for consideration only a few options that will be suitable on any site.
Klumba-konta
Many gardeners recently have preferred flower beds located in boxes. They are raised above the ground and fenced on all sides. Thanks to this, the care process is facilitated, and the bed looks more attractive and interesting. Use such structures can be used (or even recommended) on scant nutrients soils.
Self-masses for the garden involve the use of infringement materials. Therefore, for the construction of the box, you can use boards remaining, for example, from the construction of the house. If there are no such, you will have to purchase them in the store. Of these, the box of arbitrary sizes is constructed. The dimensions will depend on the size of the site, its style design and plants, which is planned there to plant. The height of the sides makes about the knee so that the layer of fertile soil is thicker.
Metal mesh with a small cell is fixed to the manufactured box on the bottom. It will be protected from the penetration of rodents and moles. If there are no such a plot, then you can do without a grid. From the beds-box can easily make a small greenhouse. Its height is selected taking into account plants planted there.
Drip irrigation
Self-masks for the garden will simplify such a heavy process as watering plants. Make a drip irrigation system. This will require a large barrel (metal or plastic), hose, capillaries (you can make holes with a certain interval in the hose) and various connections (tees, clamps, and so on).

The barrel raise about 1.5-2 m from the ground. For this, metal corners can be welded a special stand. Due to this, the system will have stable pressure. The trunk hose is underway from the barrel. It necessarily installs the filter so that the garbage does not climb the system. Capillaries fed from the main hose.
Write your own hands
Self-timers for summer cottages and the garden will allow you to create something necessary and useful on the plot from the remedies and materials. For example, from old plastic bottles, which are always thrown out, you can make the rod for the garden and the garden. It will allow processing and watering plants of different heights. A sprayer is attached to the watering hose. To a long stick (the longer, the better), the same spray nozzle is screwed up. The lever is fixed with a threads pressed.
In a bottle of 1.5 liters in the neck, a hole was made with a hot nail. The bolt is inserted into the hole and the nut is fixed with the outer side. Bolt must be drilled through the drill. A hose dresses on it and fastened by a clamp. After applying the pressure into the system, the nozzle is unwind, and water is sprayed.
Tires
Old tires from passenger cars are one of the most popular and affordable materials for the manufacture of homemade for the garden. Of these, you can make even a compost pit. You will need only 4 pieces.

One of the tires that will serve as the base is cut. One sidewall is cut off from it. Two sidewalls are cut off the rest to get rings. Next you just need to install the tires on each other in the allotted place.
Bench
After all the work on the garden, you can relax. And on this subject, you can also choose the appropriate option made by your own hands homemade for giving and gardening. Having a small set of tools and materials, you can make an attractive bench of the streamlined form. It will become a place where it will be possible to relax and relax.

Materials will be needed:
- A sheet of plywood (better from pine) measuring 90 x 90 cm and 1.6 cm thick.
- Reiki from the same tree in the amount of 7 pieces (2 cm thick, 9.4 cm wide and 140 cm long).
- 2 x 6.9 cm boards and 100 cm long in the amount of 3 pcs.
- 2 x 6.9 cm boards and 140 cm long in an amount of 9 pcs.
The parts will be fastened with 0.5 x 5 cm screws. In addition, we will use glue to connect wooden elements, wood varnish, turpentine.
The plywood sheet is cut into three parts. They are fascinated by a template for cutting the sidewalls and central crossbars. The shape is cut out with an electroller. On the back there are 3 recesses for the rails that will keep the design.

Self-timers for the garden will help make their country life more pleasant and easier.
Drawings of homemade for giving and gardening with their own hands will be useful to everyone. Dacha - the limit of dreams if not any average person, then each second is certainly. Not everyone, of course, for his life will be lucky to become the owner of a country site, but those who are still lucky, it is necessary to keep track of and adding it to it, which requires considerable costs. Maintain their cottage in impeccable condition help homemade for giving and gardening with their own hands. Today we will tell a few secrets how to save on the purchase of necessary things for giving and make them at home. The grader with his own hands or self-propelled shifts for the tractor, of course, do not happen from everyone, but most of the homemade you will be useful to the farm.
Variator for machine with your own hands
If you need to constantly work at the machine, then the frequent change in speeds leads to the wear of the unit and has an additional disadvantage, which is to regularly stop the device. Alternatively, you can use a homemade variator for the machine. It can be made of wood personally, without significant time and money. The cones of the variator are made of solid wood, and for their manufacture it is not necessary to use a lathe, you can cut them out using a jigsaw at an angle equal to the corner of the cone.

If you collect a cone from the disks, then they are then required to glue or nail items. The finished cones are sled deeply on the rods from the metal, while attaching them with screws. To the belt on the machine move evenly, roller guides will be required. Rollers can be taken from furniture accessories, but if there is no, you can use ordinary bearings.
Old Washing Machine - Real Clay
If there is a working engine from a washing machine, then this is a very valuable find, as it can make a lot of useful devices from it.The easiest way from the engine from a washing machine to make a great emery for sharpening knives, different tools and drills.
The main problem in the manufacture of the device is the mounting of the stone for sharpening to the engine housing itself. In most cases, the grinding stone has a hole, which is not suitable in size to the shaft of the engine. That is why you need to make such a flange, which, on the one hand, will be able to pressed on the shaft, and on the other hand, it will have a thread, which will allow you to screw and fix the grinding wheel.
Image 1. The emery device from the engine of an old washing machine.
Wizards with experience recommend novice to use as a flange old trimming pipes 32 mm and no more than 20 cm long. On one cut pipe, we make a thread, which should be 2 times the thickness of the sharpening circle. The other end of the pipe is heated using a soldering iron and put on the shaft. To better hold the pipe, it can be copped with bolts. After that, they take 3 nuts and screw them up on the flange from the thread side until it stops, then wear the washer and, finally, the grinding wheel, then again the washer, fasten the nut. At the end, you can add a lock nut.
The hardest work is done, after that it remains easy to fix the engine, but it is a very individual procedure, since it is not known which holes are on the engine from your washing machine for fastening elements. Based on them, you need to hold a stand, it is best to use small corners, engaging them between themselves and installing the emery on the workbench. The steps will be the connection of the engine to the power grid. You can look at the ready version of the sharpeners in the photo, the drawings are also attached (image 1).
Image 2. Grill of a drum washing machine.Homemade for giving can be done from other parts of the machine, for example, an excellent barbecue can be obtained from the drum. The drum in washing machines make stainless steel, which in itself is important, as the body is very strong and reliable. Homemade for giving from the drum is very simple, you just suggest it from the body of the machine, but with the shaft and pulley. The dusted drum put the top of the top, and the wheel down. Here and the brazier is ready, with the help of a grinder, of course, to cut the front of the drum or sides, so that it is more convenient to throw firewood, but it all depends on your free time and fantasy. Such an improvised roaster looks very carefully, while the drum is littered with small holes, which allows air to be evenly distributed over coals and provide the necessary heat (image 2).
Manual circular saw from a grinder
Image 3. Circular saw device diagram.The circular in the country is a very useful thing, few people know, but you can make it from the Bulgarian. You will learn only 2 elements: sliding focus and axial handle. After that you can use your Circular saw from the Bulgarian at any time.
As a sliding stop, 2 small pieces of a metal corner are suitable. The edges of the corner are spinning so that they do not start the item during processing. Corners between themselves are connected from behind and in front with bolts or nuts. The housing itself of the above power tools is required to wear a metal tape clamp. To the helical screed of the clamp, which will be located below, fasten the folded twice strip of tin or galvanized with a hole for the rear bolt of the sliding stop.
In the gearbox, the grinders make 4 small holes under the M5 bolts. For convenience, the gearbox can be first disassembled to better consider where you can make a hole. These 4 holes are needed in order to attach the handle. The handle can be made from a conventional metal tube. On this hand-made saw bladder saw, if you wish to make a real stationary version of the circular saw, then you will need more skills in work, tools and well-calculated drawings (image 3).
Agricultural equipment and devices
Agricultural machinery - very important tools in the country, without which no owner do not. Agricultural machinery is worth a lot to date, and spend a lot of money on a thing that is rarely used, but at the same time they do not do without it, I don't really want. One of the most sought-after fixtures is a car, it can be made from the girlfriend, saving this most money. For its manufacture you need:
Image 4. Drawings of a homemade trolley.- wheel, preferably from rubber;
- plywood;
- 2 corners;
- wooden bar, 3 m long;
- nuts and axis from the bolt.
The method of manufacturing this tool for giving is very simple and will be understood even a novice master, here the main thing is to measure everything clearly, because if you do on the eye, it will be crooked. Drawings cars are attached (image 4).
No less demanded tool for the country area, which in winter will help get rid of snow, that is, a shovel, you can also do from plywood. You will need:
- plywood 10-12 mm in thickness;
- wooden stalk;
- nails;
- steel plate width 4-6 cm.
Plywood will serve as a bucket of shovels, and the timber will allow holding a cutlery. Metal edge the front and back of plywood is the future bucket.
Rake is often required to handle the garden. For their manufacture you will need a wooden bar 35 by 35 mm. The length of the handle can be corrected at its discretion, but too long is not recommended to be made, as it will be hard to use it. In addition to the bar and handles, you need to make a minimum of 4 metal teeth. Metal needs to be taken durable so that it does not be down to earth during operation. You can use metal from the old shovel, cut the teeth with the help of a grinder. The teeth are leveled with a hammer and drill holes for screws. Then the design is fastened.
Video about the manufacture of a cart do it yourself:
Rope
A homemade agricultural machinery includes roses for the garden, which can be made from almost the waste, which is found in everyone in the house. For the irrigation of the garden you will need:
- spray;
- rubber hose 3-4 m long;
- plastic one and a half-liter bottle;
- pump;
- wooden or metal stick of any length, but the longer, the better.
The sprayer is screwed to the top of the nozzle so that the lever is pressed with the help of kapron threads. They fit firmly so that the sprayer does not shifts. After that, we take a plastic bottle and with the help of a hot nail we spend the hole in the neck. Then the bolt props in the molten hole and fasten the nut from the outside.
Before taking a bolt, drill in it a cross-cutting hole with a simple metal drill of 3 mm. The hose is put on the bolt and fasten with a small hose with a screwdriver. The second end of the hose is fastened to the pump and again fasten the clamp so that everything is hermetically.
In the bottle, pick up the poison for spraying beetles or water for watering the harvest. Screw the tank to the top of the spray gun, which is attached to the stick. Next, with a closed nozzle, we jump a slightly pump, then we spinning the nozzle, and the sprayer starts work. In this way, you can spray trees of any height and large beds, if necessary, you can simply put on the ground and pump the pump from time to time.
You can make even small greenhouses from the film at the cottage, you will only need to drive a metal rod or a stick to the ground and fix the polyethylene film in the form of a cone.
Video about drip irrigation system with a plastic bottle:
From the bottom, the film is fixed with a circle from an old barrel or fit stones.
Conclusion on the topic
Now you know how to make expensive tools for the summer cottage without significant costs of money, time and nerves. The main thing is not what you use to improve your site, and the fact that the work should you like and stay in the country should bring joy.