Garden table with mosaic with their own hands. Countertop from Mosaic: the choice of material and the features of creating with your own hands
Mosaic is one of the oldest ways of decor of the room. Traditionally, the material is used to decorate the walls and floors, the paintings lay less often. The range of application of technology over time has expanded significantly, the mosaic tile has recently been used for pastile pasting. It is worth noting that it is easy to make a countertop with your own hands, for this you need minimal skills and many patience.

There is quite a large number of mosaic varieties. The most common are the following:
- Glass;
- Ceramic;
- Stone;
- Metallic;
- Wooden;
- Ceramographic.
The most optimal option, according to experts, is considered a combination of colored glass with flexible tiles. Flexible tile is products from crumbs treated under a certain texture of brick or stone.


Benefits of flexible tile:
- Moisture resistance;
- Long service life;
- Mechanical strength;
- Frost resistance;
- Resistance to aggressive media;
- Saving color under the influence of moisture and sun rays.
A spectacular artistic image of mosaic is ensured by the aesthetic and simplicity of laying, the material is ideal for past-tales with a mosaic with their own hands.
Features of the table top mosaic


The mosaic looks great in the kitchen, this option of decoration perfectly refresses the interior and makes it more original and bright. With proper care, the countertop will retain the initial appearance over the years. Mosaic tile is not recommended to glue on a not very new headset - the old table top is better replaced with a new one.
You can buy a new countertop in building materials store. Also, a board of polyurethane foam of different thicknesses can be installed as it can be installed.
To simplify measurement and cutting on the board, sometimes a centimeter grid is applied.
A stainless steel profile can also be sold, which passes on the edge of the product on the same glue as the mosaic. As adhesive, a standard elastic composition is used, a transparent or white glue is used for glass mosaic, which is suitable for mounting the tiles of any color. Such glue also performs a sealant function that is ideal for kitchen furniture. Mosaic coating involves many compounds, which can lead to the formation of mold. In order to avoid this, special antifungal cleaning products are used to clean the countertops.
How to decorate a tabletop mosaic

There are three main ways how to make a countertop with your own hands:
First method:
- Stage 1. From the slab in accordance with the size, the tabletop is cut out, its edge of their profile is also prepared. The edge perforated part is planted on the edge of the board;
- Stage 2. The selected glue is applied to the surface and smoothes with the help of a toothed spatula, the adhesive composition should also be applied to the top edge of the profile;
- 3 stages. The upper perforated profile is placed on glue, which forms the edge of the table top;
- 4 stage. After the glue dries, the tile in the form of squares is stacked on the surface. The same glue can be used as a sealant, its small part is frozen on the surface of the table top, so the seams are putting;
- 5 stage. Surplus of dried glue is erased with a damp cloth.
A ready-made tabletop is polished to a glitter with a soft cloth, no additional coating is required, it is only necessary to observe the conditions for the care and operation of mosaic surfaces.


Second way:
If the tabletop decor does not imply complex art compositions with their own hands, it is recommended to use the method of transferring drawings from paper on the worktop.
- Stage 1. The mosaic sheet neatly stacked on a pre-harvested adhesive base, the paper layer must be at the top;
- Stage 2. The paper neatly flushes with a wet cloth until it starts easily separated from the surface of the mosaic;
- 3 stages. Paper residues are removed without excess effort, which can provoke the position of the position of the elements;
- 4 stages. After removing the paper base, the drawing must be left for a day, after which the seams are torn;
- 5 stage. Surplus grouts are removed with a damp cloth.

Third way:
This method is considered the most simple, it involves laying a mosaic with a grid.
- Stage 1. The mesh base is immersed in adhesive solution, it must be done so that all parts of it are evenly immersed by one depth;
- 2 stage. The drawing is frozen by the day, after which the grout is applied;
- 3 stages. To remove excess traces of grouts, which cannot be removed using a sponge or damp cloth, it is recommended to use light solvents (Whitespirite type). Use solvents one week after the completion of the work;
Laying mosaic in the kitchen with your own hands (video)
All ways to make a countertop with their own hands have its advantages, with their help you can decorate any kitchen. Mosaic is not necessary to buy, beautiful pattern or patterns can be created from broken tiles or bottles.
Examples of boilers from mosaic in the kitchen (photo)


_Stoleshnica_iz_mramornoy_mozaiki_.jpg)


Every year the cost of building and finishing materials increases, which means that not everyone can afford to change the interior when he wants to refresh him. The same applies to furniture. It is no secret that the kitchen furniture is subjected to mechanical damage several times more than in other destinations. But how sorry to throw out a favorite kitchen table just because his countertop extended and spoiled!
If your table has a crampter, you can decorate it with a mosaic to breathe new life into it.
You do not need to despair, there is a way out. It's just enough to decorate the tabletop with a mosaic, and she will shine with new paints, giving the interior of a fresh and original look. In order to create a mosaic, it will be necessary to make enough effort, but they are worth it. Reprehensiveness of the work will fully pay off by the creation of an exclusive thing with minimal family budget consumption.
What makes a mosaic?

For mosaic, you can use both the finished tiles and pieces remaining after repair.
Perfect raw materials for creating a mosaic - pieces of ceramic tiles remaining after repair. Often, the owners specifically acquire a slightly more tile, because in the pasting process, it can break or tharge. Some stores sell the battle of ceramic tiles at the price of recycling or are given for the reduced price of the remains of unclaimed collections. All this tile is suitable for making a mosaic.
Before starting work, the material must be chopped with their own hands. The easiest way is to cut the elements on small pieces with a simple glass cutter. In this case, pieces may have different shapes and sizes. To create the same sizes, tiles are usually used. When cutting the tile, the drawing should be taken into account: if in one case the geometric correctness of the elements is important, then in another case the image will look more beautiful from chaotic cut pieces.
Preparation of the foundation and material to apply decoration
When all the tiles are cut, and the resulting elements are sorted in size and color, you can start a mosaic sticker on the worktop. The following materials and accessories will be required to work:

For mosaics you will need: glue, solvent, nippers, sandpaper and brush.
- latex-based glue;
- a spatula for applying adhesive substance;
- rag;
- paint solvent;
- gloves;
- composition for grouting seams;
- soft spatula for removing grout;
- sandpaper with different grains;
- furniture wax;
- a piece of canvas.
Before applying the decoration on the table, you need to think about the drawing well. You can draw a sketch of the future image on a sheet of paper, the scale of which will be equal to the worktop processed. Create a complex picture from the first time is quite problematic, so specialists recommend starting with abstraction, which can be performed from chaotic scattered pieces of tiles.

Before applying the mosaic, you need to decide on the pattern and draw it on the surface of the table top.
Then you need to process the worktop. First of all, it is released from a varnish or paint with a solvent. The wooden surface is enough to cover with a solvent and leave for a while. The composition of the lacquer, which will only remain erased with a dry cloth.
After removing the varnish, the table is processed by sandpaper. First, large abrasive No. 2, 3 is used, and then smaller - №№ 1, 0. The processing of sandpaper will make the surface more roughly, which will significantly increase the quality of the adhesion of the elements of the mosaic and wood or plastic. With insufficient attachment, pieces can easily fall off, which will spoil the whole result of the work.
Algorithm for creating mosaic
When the preparatory activities are completed, the process of creating a mosaic begins with their own hands. Here you will need to use a prepared sketch. With it, a drawing with a pencil is transferred to the worktop.
If there is no confidence in your abilities, you can use a simple circular pattern, which will be perfectly looked at the tabletop round shape.

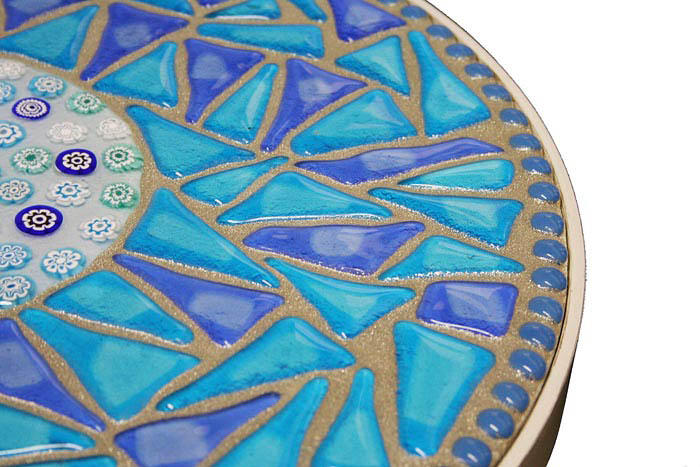
To create it, you need to draw diverges from the center of the circles. Each series of circles is laid out with a tile of different colors. It does not matter which geometric shape will have mosaic elements. It is necessary to take into account only one rule: larger and smooth pieces should be located at the edges, and small - closer to the center.
Then you can proceed to gluing tiles. Experts recommend starting work not from the center of panels, as required when processing walls, but from the edges of the tabletop. Each element must be maximally applied to the other, sticking onto latex glue. Unlike the walls of the walls, where the adhesive is covered by the base, when processing the table top, the tiles are smeared. Each particle is covered with glue using a spatula and tightly pressed to the base. Excess glue are removed immediately with a dry soft cloth.
As a result, a smooth and smooth surface with almost imperceptible seams should be obtained. After that, the countertop is left to complete drying. It is not recommended to use hair dryers and other heating appliances. Usually to dry out about 24 hours.
Grout and polishing countertops

After the mosaic is applied, it must be covered with a special grout.
Then the resulting decoration of the table must be covered with a special grout, which will give him strength and durability. Grout is applied with a soft spatula exactly on the seams between the elements and is well rubbed into them. At the same time, it is advisable to put on gloves that can protect the skin from the effects of the composition.
After applying the grout, the table again needs to leave until complete drying. It is not recommended to use a hairdryer or other heating methods. The longer the grout will dry, the stronger the image will be. In hot weather, the table top can be covered with a large wet web so that drying does not happen too fast. The referred composition is removed from the tile with a dry soft rag. In some cases, if the composition was frozen very much, you can use sandpaper with the smallest grains.
The last stage of work is polished countertops. It will give a mosaic brightness and beauty, allow to sue and wake paint. For polishing, a furniture wax is used, which is applied to a soft rag without a pile and thoroughly rubs into the elements of the tile.
The work is completed - the old spoiled kitchenware table acquired the second life. Such a piece of furniture is able to decorate even the simplest kitchen. In order for the table top it looks more harmonious, a similar pattern can be created on the wall in the kitchen room. Here, as a mosaic, not only ceramic tiles, but also porcelain, and pieces of the mirror, and pebbles can be used.
Mosaic countertop do it yourself - a stylish solution for the kitchen and a bathroom. In addition, you can make the author's table in the living room, on the veranda or balcony. Consider in more detail how to make such an idea.
Stylish and original solution
Features of tiled countertops
Mosaic is a type of thread of a miniature format. The dimensions of the fragments are more often installed in the range of 1.5-2.5 cm. Their form is square, round, arbitrary in more complex compositions.
If you started making your hands the table from the mosaic, consider that despite the seeming simplicity, the installation of stacking requires skill.
Separate fragments are fastened into the larger format modules. A grid is used as a connecting material, as well as a paper base.
Features of mosaic countertops - strength and visual perception. This is a decorative and stylish design in a bathroom or other room. With the help of individual fragments, the pattern is laid out or a whole drawing is created. Note that the weight of such a countertop will be considerable, so take care of the presence of a solid and sustainable base.

The surface of the mosaic combines strength and decorativeness
Execution options
The first to pay attention is a specific area of \u200b\u200bplacement. The most popular are:
- a separate surface of the mosaic;
- transition between furniture;
- the table like the journal.
All options made by their own hands will become an excellent addition to the interior of the living room, the veranda. In the kitchen, mosaic countertops in the headset well combine with the same apron. You beat the window sill, adding it to the working area. There are more options in the bathroom, for example, linked the washbasin with the screen, masked in a niche with a tabletop washing machine.

Most popular finishing options for mosaic
As a base, the following is used:
- moisture-resistant plasterboard;
- plywood, as well as other woodcuttering impregnation;
- concrete;
- tight polyurethane.
Necessary materials
- sandpaper;
- putty;
- primer;
- antiseptic.
To make the mosaic reliably on the table, use special adhesive mixtures. It is generally recommended to use plastic compositions of white. The usual tile glue is suitable, but only with opaque ceramics. For a glass mosaic, a white or transparent composition is required, also carefully prepare the surface so that the facing does not transform the base defects.

With mosaic use white tiled adhesive or transparent
Lastly, the grout is used. In the case of a mosaic, this is attached to this, as it helps to emphasize the drawing consisting of small fragments. For mosaic take white mixtures, as well as non-colored coating. Popular epoxy or sodium mastics are popular. Especially impressive looks such a finish with the addition of sequin in combination with a glass base.
Surface preparation
To make a mosaic gently without effort, the base is cleaned and aligned with a putty. Before carrying out further processing, remove the dust and degrease the surface. Be sure to apply antiseptic impregnation to avoid the appearance of fungus and mold in the future. Launch the worktop primer.
Also to facilitate the work, fasten the grid on the surface with 1x1 cm cells. It will simplify markup, and will also improve the quality of the clutch.
Laying mosaic and auxiliary finish
In order for the table top in the bathroom carefully, before starting facing work, appreciate the future result by laying the elements of the mosaic "on dry". So you will pick up the optimal version of the drawing and notice the remaining problem areas.

Paper Mosaic Application
Getting styling from the near edge. If you do not need a trimming of elements, start the installation of the facing from a more convenient position - from the far edge. As an alternative - retreat the desired distance from the wall and start laying entire fragments. The remains are applied last, and all irregularities will continue to hide the wall plinth. If you are planning a complex pattern with transitions around the perimeter, it is better to build a tabletop from the center point.
Laying is performed as follows: First, glue is applied to a small plot, a minimum thickness is sufficient, so align the surface almost to the ideal. Depending on the type of mosaic, the installation is made using:
- Grids. It is placed on the grid on glue and aligns strictly in terms of level.
- Paper. Mosaic is attached to the front side down, and after the installation is completed, the upper layer is swollen and removed.
Observe the smooth coverage and output the same seams across the area. Crew fragments of mosaics are formed with bodies. Also, aluminum or PVC edge is fixed on the glue, if used. At the end of the seams are climbing. To protect against moisture, use epoxy mixtures and latex masts. Such a tabletop for a bathroom or kitchen will become a real interior highlight.
Every year the cost of building and finishing materials increases, which means that not everyone can afford to change the interior when he wants to refresh him. The same applies to furniture. It is no secret that the kitchen furniture is subjected to mechanical damage several times more than in other destinations. But how sorry to throw out a favorite kitchen table just because his countertop extended and spoiled!
If your table has a crampter, you can decorate it with a mosaic to breathe new life into it.
You do not need to despair, there is a way out. It's just enough to decorate the tabletop with a mosaic, and she will shine with new paints, giving the interior of a fresh and original look. In order to create a mosaic, it will be necessary to make enough effort, but they are worth it. Reprehensiveness of the work will fully pay off by the creation of an exclusive thing with minimal family budget consumption.
What makes a mosaic?

For mosaic, you can use both the finished tiles and pieces remaining after repair.
Perfect raw materials for creating a mosaic - pieces of ceramic tiles remaining after repair. Often, the owners specifically acquire a slightly more tile, because in the pasting process, it can break or tharge. Some stores sell the battle of ceramic tiles at the price of recycling or are given for the reduced price of the remains of unclaimed collections. All this tile is suitable for making a mosaic.
Before starting work, the material must be chopped with their own hands. The easiest way is to cut the elements on small pieces with a simple glass cutter. In this case, pieces may have different shapes and sizes. To create the same sizes, tiles are usually used. When cutting the tile, the drawing should be taken into account: if in one case the geometric correctness of the elements is important, then in another case the image will look more beautiful from chaotic cut pieces.
Back to the category
Preparation of the foundation and material to apply decoration
When all the tiles are cut, and the resulting elements are sorted in size and color, you can start a mosaic sticker on the worktop. The following materials and accessories will be required to work:

For mosaics you will need: glue, solvent, nippers, sandpaper and brush.
- latex-based glue;
- a spatula for applying adhesive substance;
- rag;
- paint solvent;
- gloves;
- composition for grouting seams;
- soft spatula for removing grout;
- sandpaper with different grains;
- furniture wax;
- a piece of canvas.
Before applying the decoration on the table, you need to think about the drawing well. You can draw a sketch of the future image on a sheet of paper, the scale of which will be equal to the worktop processed. Create a complex picture from the first time is quite problematic, so specialists recommend starting with abstraction, which can be performed from chaotic scattered pieces of tiles.

Before applying the mosaic, you need to decide on the pattern and draw it on the surface of the table top.
Then you need to process the worktop. First of all, it is released from a varnish or paint with a solvent. The wooden surface is enough to cover with a solvent and leave for a while. The composition of the lacquer, which will only remain erased with a dry cloth.
After removing the varnish, the table is processed by sandpaper. First, large abrasive No. 2, 3 is used, and then smaller - №№ 1, 0. The processing of sandpaper will make the surface more roughly, which will significantly increase the quality of the adhesion of the elements of the mosaic and wood or plastic. With insufficient attachment, pieces can easily fall off, which will spoil the whole result of the work.
Back to the category
Algorithm for creating mosaic
When the preparatory activities are completed, the process of creating a mosaic begins with their own hands. Here you will need to use a prepared sketch. With it, a drawing with a pencil is transferred to the worktop.
If there is no confidence in your abilities, you can use a simple circular pattern, which will be perfectly looked at the tabletop round shape.

To create it, you need to draw diverges from the center of the circles. Each series of circles is laid out with a tile of different colors. It does not matter which geometric shape will have mosaic elements. It is necessary to take into account only one rule: larger and smooth pieces should be located at the edges, and small - closer to the center.
Then you can proceed to gluing tiles. Experts recommend starting work not from the center of panels, as required when processing walls, but from the edges of the tabletop. Each element must be maximally applied to the other, sticking onto latex glue. Unlike the walls of the walls, where the adhesive is covered by the base, when processing the table top, the tiles are smeared. Each particle is covered with glue using a spatula and tightly pressed to the base. Excess glue are removed immediately with a dry soft cloth.
As a result, a smooth and smooth surface with almost imperceptible seams should be obtained. After that, the countertop is left to complete drying. It is not recommended to use hair dryers and other heating appliances. Usually to dry out about 24 hours.
Mosaic is an interesting and original designer stroke, diluting the interior with symmetrical patterns.
This method of finishing can be used in the bathroom, in the kitchen and even in the dining area of \u200b\u200bthe house.
Mosaic will look great not only on the walls or sex, but also on the table top. In this instruction, we will tell how to make a table from mosaic with their own hands.
Such a table will profitably look at home or in the garden, creating an interesting emphasis and emphasizing the delicate taste of the owner. In addition, the cost of the homemade table is much lower than the purchase.
Instruments
- Transparent glue. It is necessary to give the additional fortress the finished pattern from the mosaic and fixing the corners. The glue should be moderately thick to prevent its spreading over the surface.
- Line. Sorokasantimeter engine is needed for tabletop markings. On these lines, then laid out the main guide elements of the pattern. For marking of large table tops, you can use the usual roulette.
- Simple pencil. Need to apply markup lines. Best of all for these purposes is suitable soft stylus. It will require frequent sharpening, but will leave clearer tracks on the surface.
- Rubber spatula. It is used for uniform distribution of grouts over the entire surface. The rubber spatula will not damage the mosaic tiles and will not leave scratches.
- Thorough sponge. It will help to get rid of surplus grout and clean the surface of the mosaic panel. It is possible to replace with an ordinary cloth, but it is more convenient to work with a sponge.
Materials
If you do not have the experience of laying the table with a mosaic, it is better to choose a model with a square lid. It is easiest to place a symmetric pattern.

We also need a waterproof chipboard, we use it as a basis for the future picture. Of course, you can glue the mosaic directly on the table, but its surface may not be flat for good clutch with tiles.

And finally the mosaic itself. In the classic version, individual pieces are applied to glue in turn, but it is much more convenient to work with already collected tiles on a self-adhesive basis. They can be pasted with all array, and can be separated in small pieces.

Assembly
- We place the chipboard using a ruler and pencil. The markup lines will help us not to get bored when drawing patterns and indicate the direction for the main parts of the pattern. Divide the model on equal sectors, observing symmetry.
- Secure the chipboard on the table lid with glue. Thoroughly proceed the panel, it must fit tightly to the tabletop.
- Separate the mosaic tiles from the total array, without removing the protective film from the adhesive side. Repeat the selected picture on the placed panel. Gently lay out the mosaic, remember the observance of symmetry. At this stage, you can experiment, but by the time you landing on the glue, you must be exactly sure in the picture.
- Having achieved the desired pattern, start the tiles gently. Do not disassemble the drawing completely, carefully remove one tile and plant it on glue. Then repeat the procedure with the neighboring and so until you reach the end of the pattern. This is the easiest way to not spoil the composition. Check with the battered lines and try to make the seams as possible.
- Making the drawing forget to glue unreliable seams and angular elements. In these places, the panel can break down, so pay special attention to the quality of gluing. The glue should not be strongly highlighted or create a surveillance.
- Having waited to dry the adhesion to mosaic grout. This is the final stage, after which the mosaic firmly entrenches on the tabletop. The grout must be distributed evenly throughout the surface using a rubber spatula.
- Remove excess grouts with a wet sponge. Do it better immediately after applying, without waiting for the solutions of the solution.
Main costs and cost
One square meter of mosaic on self-tier costs about 5000 rubles. The price depends on the supplier and company producers. The chipboard of the firm size will cost 100 rubles. Transparent glue limits 200 rubles. 250 grams of grouts for mosaics cost 230 rubles.
Marking of the panel and applying a mosaic to not - a rather painstaking process. Without having experience, you can spend from three to four hours. The subsequent treatment with glue and the grouting of special difficulties should not cause and will take a total of about an hour.