Sketch of houses for money from plywood. Crafts from plywood: the best ideas of creating products, toys and decorations from plywood with their own hands (140 photos)
Good day. Today we begin to unload articles on the topic of crafts from the tree do it yourself. In this first article, I want to show you what simple crafts can be made from wood - both children and adults. Many ideas will fit for labor classes at school - for boys. Some ideas will fit for school competition crafts from natural material. Some wooden crafts will be able to become decoration of your cottage or yard. Here you will find a storehouse of inspiration and joy from anticipation of such interesting and easy work. In this article I will prove - what to do beautiful crafts from wood maybe each. Because here you will find simple and worships. Even a fragile woman with a manicure can take half of the crafts from this article. So - let's fall in love with wooden creativity.
Let's start with simple magic.
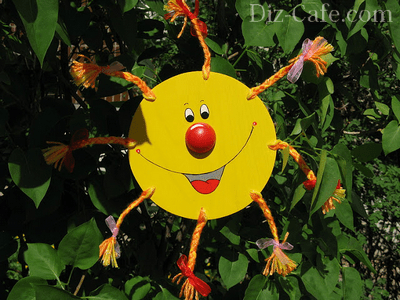
Tree + Sun.
Crafts that are glowing love.
Here are the simplest and cute country crafts from a tree. For a craft, you need a speaker of the log (ask when you cut the sawing with a grinder of firewood to make some thin sleeps). Or you can without drink - just take the board of any size.
In the tree we drill holes such a thickness so that a glass pebble bought in the store is entered. Such sets of multi-colored decorative glass stones are sold - in the gifts department, and in the department where candles, vases and everything for the decor of the holiday.

You can screw such holes with glass just in the board - and hang it on the apple tree. You can drill such holes in the fence - if the sun is at least once a day shines at a low angle.
That's very beautiful. Magically. As in the country of Fay. Your children will be delighted with such a craft from a tree.

Simple wooden crafts
from sleep logs.
If you have in the courtyard in the courtyard there is sawing logs on the firewood - you are lucky. You can freely gain invaluable diverse material. Ask men to cut to you flat sleeps, both from small logs and from large. Lovingly fold them away from the woods of firewood and start to come up with future crafts from the tree. For example, let it be wooden owls. It is done just and looks beautiful. Spies can be tipped to each other with nails. You can plant them on liquid nails (like glue).

The surface of the sleeps can be rude unusual (as in the photo with a craft bunnies). And you can pass out sandpaper and even coat with varnish such an intermediate material. Or paint the color you need.

From large sleeps, you can make large country crafts from the tree. And small logs (from thinner bans and logs) are suitable for miniature crafts - for example, such birds. Brying of such a thickness you yourself can be knocked out - manually, without chainsaws.

Spiles from the logs can become canvas for artistic installations. Such wooden crafts paintings can be made from any natural material. Go to the river and find smooth flat pebbles. They will become a source of interesting crafts. Stones are easily painted with markers, office fat markers or just a gouache (after work, fasten the gouache with a lacquer for hair, or nail polish).

And here is another way to make beautiful air crafts from wooden sleeps. Openwork end-to-end pumping of electric jib (photo with a maple leaf) looks simply magical.

Here is a small master class, from which it can be seen how the process of drinking openwork patterns on the thick heap of the tree is.
First, we will supply the stencil with a pencil. Then drill drill holes in key nodes of the pattern. And then the jigsion go from one holey knot to another.

You can come up with the device yourself which will help you drink products from wood with the help of a regular drill.Do it yourself make an electric jigsaw. Holding hands for comfortable handles You just move the device - following your drawing lines. The thinner the drill the smaller details of the picture you can cut them out. Perfectly invented.

Or it is possible buy electroballs - It stands on average 100 dollars. You can find and for 50 it is not on an industrial scale to work, so it is not necessarily a very powerful expensive tool to buy.
Mosaic crafts
From spirits thick branches.
If you have a boring wall of the shed right on you on the summer yard. That you need to make it disqual. Explain the Saratik using a craft from a tree. Do it applique Mosaic From wood spins small size. Such sleeps are obtained if you cook with hacksaw (or chainsaw) thick bows or thin logs.
Foundation Under such a craft from a tree, cut out of the sheet of plywood. First, we draw a silhouette of the future craft on it. We cut the plywood base with a manual logby or special power tool. And we stick wooden rounds on it - on liquid nails, on joinery glue or hot glue from a pistol.


And even at home you can make from sleep decorative frame for mirrors from wooden greek(master class in the photo below).
- Also buy a circular mirror. Put it on a sheet of plywood - to circle a pencil.
- Around the resulting circle, retreat several centimeters (on the width you want for the frame). And with this indentation to draw a second circle.
- Cut a large circle from plywood. And enclose the outer ring with spikes from the tree. It turns out a beautiful wooden dealing frame - it remains on liquid nails into the middle of the mirror.

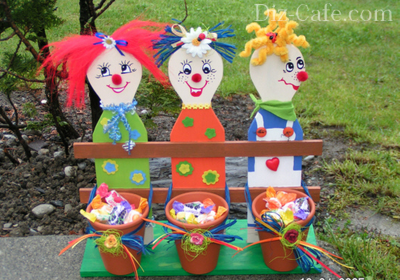
Puff crafts
from wood.
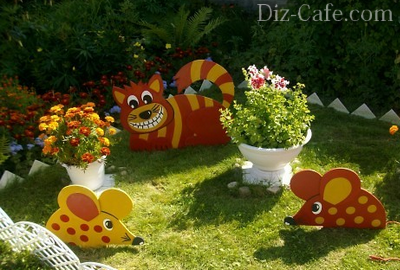
This is probably my favorite view of a tree craft. Here, the boiled shields fall on his friend creating a puff volume of crafts.
Here is a drawing of a cow of three layers of a wooden shield. The first layer is the body, the second - head, the third - bangs and nose.

You can paint all the layers of your crafts in one color (as a craft polar bear from wood) or in different colors (like a craft mouse on the moon - photo below).

Or you can leave the factory pattern of the tree (as on the crafts with the photo below).
Wooden Lisa It has a two-layer design - a layer of the back, and the head and tail are stacked on it.
Slicer duck It has 5 layers - the central layer of head, and two layers on both sides (tummy + wing).

The more layers You will apply on each other, the volume and convex will be your craft. Here is an example with a craft "Lions from a tree" can be seen like put forward the face of the beastThanks to the four layers of the thick wooden board.

If you paint your crafts. Dorisupe a fairytale, add small parts - folds, stains and so on. You can get very realistic and expensive crafts from a tree. Your little hobby can be your business. Such work can be safely put up for sale.

You can invent your characters yourself. Patch on a sheet of paper of their layers. Increase the cradle first in the paper template - to translate the contours to the wooden shield and cut off. Or find pictures in a children's brazer - and redraw them in an enlarged amount.

Crafts from wood
For school at school
In class lesson.
Such puff crafts made of wood can not be cut out of thick shields, but from thin plywood sheet. And then such work can be carried out in labor classes within the framework of the school program. On the topic "Lobzik on plywood".
Here's the idea - how out of 3 plywood shields Make a two-color craft-puppy. The first top layer of white plywood peeps only the tips of the ears, tail and one rear paw. We will cover the second layer (so that it darkened). Eyes, nose and lines can be drawn with a marker, or burn a special device to burning on wood.

In the same technique of shields with different colors, you can make a lot of volumetric crafts from the tree in school lessons in school or in a circle of wooden creativity.

Crafts from wood
in the form of appliqué.
In a very similar technique, you can make an applique of wood. It also takes the basis of a wooden tree array board (that is, not glued shield, but a solid board). Because we will grind it, and the glue shield from grinding can fuse and glue seams will be visible.

- On the paper drawn all the future handicraft. Shares lines to the details. Each detail is numbered. And is photographed (to then check the location of each element in the photo).
- Next, the drawing is cut through the lines to the elements. Each element we circle on a pencil board. Drink element from flat board. All elements are flat on top, rude over the edges of the cut and with sharp edges of the saw.
- Now our task all edges of each detail smoothed, wrestral. We put the sharp edges of the sawing agent. And we are calculated on the grinding machine (if you have it) or we make grinding by hand with sandpaper of varying degrees of rigidity-roughness.
- After grinding all the details stain in the satellite veil (Sold in construction stores). Depending on how many times you wipe the Detail of the Morilka - you will get the tone lighter or darker. Very bright details can be wrapped in just vegetable oil. You can check in advance Shades of painting on tree trimming left after sawing crafts.

You can also collect the details of the crafts from the tree in watercolor or gouache(Using not a brush, but a foam sponge). After painting, the item does not pack your hands, you can sprinkle her hair lacquer or impregnate with a cracker with another turning maker for wood (only before trimming what color will be).

It only seemsWhat a cow (in the photo of a craft from a tree above) is located behind the moon. In fact, all the details are in the same plane. On a sheet of paper. But thanks to the streamlord of the edges of the parts - everything looks in bulk, soft and as if depressed in friend. In fact, nothing is pressed - everything is simply lying along with each other.
Ideas for such flat craft appliques from wood You can take inside children's bookkeeping books. There are just pictures with large details. Children's picture-rationa can be found in Google - zoom and print. Or redraw directly from the monitor screen, putting the paper sheet on the glowing screen.

Methods of pollovka details
for crafts from wood
(instructions to help).
So that it was easier to open smooth edges of the details, without rubbing the corns in your arms, I want to give a few useful tips.
You can clamp a sandy grinding tape in special vice, also chocated from wood. This is how it is done on the left photo below. Or come up with your version of the device.

Here on the left photo - sandpaper turns around a thick plate with a semicircular edge. And the edges of the emery paper are wrapped in the grooves, and clamping the bolt twisted through the round cylindrical wood-clamp.

Also there are grinding nozzles on the drill. And then you can make a silvism of parts using rotary power drills and magic power strength.
Here we see grinding nozzles on a drill - plate and drum form.

There are grinding devices for a drill, where you yourself can change Entround paper - remove the old screaming sand and refill a new one.

By the way, it is possible to buy on Aliexpress at once the grinding drums on a drill for 3-4 dollars per batch of 100 pieces. If you can look and cheaper to find.

And in order for the drill when working, you cannot create a special fastening structure in your hand, which fixes Your homemade grinding machine in one place, and all that you will remain to bring items to the grinding drum.

The design of the mounting pallet may be different, with a wooden clamp (photo above), or with a retainer in the form of a metal bracket (as in the photo below).

With such an assistant to make crafts from wood with their own hands - one pleasure. Quickly nice and immediately beautiful the result. Such work can be put on the flow - and establish a whole manufacture of beautiful wooden (smooth and safe) toys for children, gift wooden paintings.
You can become a successful master. Completely unexpected for himself. That's so simple, looking at this article and falling in love with the idea.

Fantasy wooden craft is limitless. Remember the success formula - everything can be done from the tree. The main thing to start ... then continue ... and finish.
For example, puffing toys. Beautiful fun and for children and to decorate cottages. Such a hammer or woodpecker can knock on your door, reporting a guest on the porch. As in the fairy tale, you can drown for the rope, and you will open the door.

You can do your own decorations for the children's room. In essence, reincarnate and become a designer of interesting interior crafts from a tree. Any boy will be happy if his children's room will play with the jungle motifs.

You know ... I will probably continue the theme of wooden crafts for the design of the children's room in one of the following articles. I want to see what ideas are glowing here. And fall in love with someone in this good thing.
And also, perhaps, you need to create an article with wood toys for children - handmade. Also need to write. And then it will earn link.
In the meantime continue ...
Crafts from wood
and throwing material.
Where do future crafts live? .... Old half-satiest boards. For example, from grandmother's fence. Which usually go on firewood or exported from the yard as an extra garbage. Stop. Let's not throw them out. Run in this heap and create something wonderful - do it yourself from the tree.
Wooden mop-brush, if you cut it in half - turns into a mouth of an evil pp. A little fantasy and work. And now the service dog has grown and rocks on you.
Elegant artistic design. Tree and throwing material.

Any throw material (hardware, plastics) and old woods can populate your house with fabulous characters. They are alive. They have a soul and their own story.


Crafts from wood
Intense beauty.
Displaced veneer , from old furniture shields, quietly reacted in your Saraike - can also be a source for craft appliqués from a tree.
From this thin woody material It is possible to cut the details of the future craft right scissors and stick on hot gun glue (or on joinery glue).


And instead of a veneer, you can use a thin birch bark. And also make interesting flat crafts from the tree.

Crafts from wood
(lamps, firewood and bark)
Ordinary firewood from your lunite can become a source of inspiration for wooden crafts to the cottage.
If the round is crawled to cut down the painter, then you get a figurine with a person turned to you. It remains only to draw this face, add the elements of the eyes, ears, nose to it.

You can fold the body of the animal from the lanes and round chumbs. Churbans will be legs and laminated back. You can do the head from the round sleeve a small log. Or sleep the ax The face to the desired form from the same is full as the body of your four-legged trees from the tree.

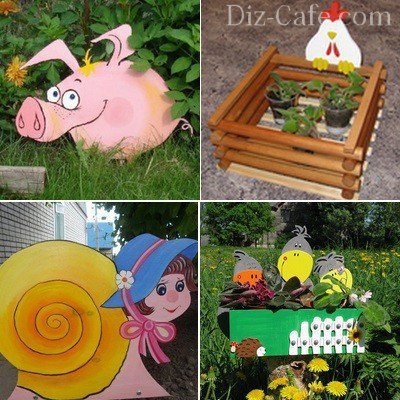
Show fantasy, do not stop before a difficult task. Squirrel from a tree or a snail from the lane - there is nothing complicated. We turn on the head and sense of humor - it will tell the most ridiculous, but effective ways to convey the delicate image of the animal using a coarse tree and another natural material.

You can work with a chainsaw or ax - drinking or shining your craft from a tree. You can make such pretty pigs with your own hands as a funny craft from a tree to the cottage.

And in the thickets of shrub, you can put a beautiful proud deer - too, a simple and fast craft of wood and branches.

Wooden crafts
from the chip from the village.
It happens that when the cutting of firewood, a figured big chip is chopped off. This church often has a bizarre form - already similar to something (bird, panther, face profile). You need such a gift of fate carefully to put aside in order to return to him and complete the cradle, started by nature. Something to cut a knife, to allocate paint, stick something like an additional part. And it turns out an exercise from the tree with their own hands - beautiful and original.


These ideas managed to find me for masters of wooden creativity.
Now you can also make beautiful crafts from wood with your own hands. Especially since this article is only the first of the cycle on the topic of wooden craftswhich are understandable and easy to do at home. You probably already fell in love with some ideas and fulfill their determination - I hold the cams for you - let everything get out best. And your handicraft from the tree will enjoy your whole family pile.
Other sorts of crafts from plywood and wood, made by craftsmen, are valued very high all over the world, causing universal admiration. Undoubtedly, the carving is creativity and art, but you will certainly be able to master it, putting efforts, and constantly honing your skills. This is the optimal hobby associated with wood and plywood, will require you not too much of free time and equipment, not very expensive. Of course, there is a phewl carving with the help of jigsaws!
Openwork thread
She is rapidly gaining its popularity: to whom I do not want to personally make yourself a great subject of decoration, decorating a housing, furniture, creating an artistic entourage! The carved products of different thicknesses are optimally embedded in many existing decor styles, and we get, for example, frames for photo cards with ornamentation, words, individual letters, curly shelves, made by the jigsaw thread on plywood. In addition, such creativity is an action that is accessible to everyone interested in the process, even a newcomer. You just need to get an idea about how it works. " And you can start to create!

Manual jigsaw work quite just
Video where to start:
Choose this material from a tree for such reasons:
- moisture resistant;
- temperature drops do not have a negative impact;
- rather low cost;
- easy in learning filling the jigsaw;
- small weight of products.
It is also necessary to choose the 1st and 2nd grades for crafts. The rest for creativity are not suitable: there are cracks on the surfaces with bitch and chips (except, can be used for internal substrates). More than all suitable for cutting birch plywood (3-10 mm thick).
At this time, this material is divided into a fairly large number of subspecies - each for specific purposes.
- Specialists and folk masters advise the use of a sheet produced by carbamide formaldehyde. Such material is labeled "FC". This kind of paneur can buy "clean" or - covered, for example, varnish. On the untreated sheets of plywood, it is convenient to carry the drawing for drying the jib.
- Plywood, marked "FOF", is intended for the production of furniture, and more often produced over 12 millimeters in thickness.
- The brand "FB" was originally developed as a boating material, therefore the cost of it is high (but if there is an opportunity to use, then it is suitable for drinking with a junk).
- But the "FSF" masters are not recommended to acquire. Having an attractive form purely externally, it has toxicity, as it is made with the participation of the composition of phenolic resins.

Released Working Materials
Falley Thread Types
It is divided into:
- Openwork
- Patterned, on a painted sheet of plywood,
- Discharge
- combined method.
What will need additional materials and tools
- Stencils and drawings with drawings for work. They can come up with themselves or copy on the network.
- Copied to translate patterns and lines according to the drawing;
- Glass paper and emery, set of files - for grinding parts;
- Carpentry (as an option, casein) composition, to glue parts;
- Transparent varnish - for coating;
- To do the holes inside the material to make the blade - drill as well as sewn.
- Before starting work on filling the jigsaw, carefully sew the material with glass paper, and only after translate patterns according to the drawing.
- The elongated shapes of drawings having narrow elements, translate to the phaneer so that they are located along the fibers of the "face" of the material.
Lobzik artwork: drawing, stencil and work
Get acquainted with devices
Lobzik - toolkit, which is designed for work on different circuits. The device includes a blade equipped with teeth, enough small, to make cuts of work material, practically without forming sowers and chips.
Manual
The "founder" of the genus is definitely a manual jig. All ingenious is simple: a metal U-shaped arc, and between the endings stretched the working blade, which is fixed by the clamps. They hold the pinks when working, the tension is also adjustable using them. The handle for convenient work is located with one side of the frame. The tool clamps can be rotated, thereby creating a different plane for carrying out work, providing opportunities for threads on plywood jigsaw high complexity.
- When creativity, with a manual device, you must observe the maximum accuracy: the design is fragile enough, and with intense pressure, the blade is sometimes rushes, and it must be replaced. Each novice master must be supplied with additional work out.
- When working the jigsaw, it is convenient to use auxiliary plank: it and the table protects, and solves problems on the convenient location of the blank from plywood.
Electrolovka
This device works with electricity. It is a hull, where the mechanism is located, the control handle is located there. The sawing element is located at the bottom of the front of the front. The blade is protected, and it allows you to cut along the contour very smoothly, without deviations. Professional equipment models have many nozzles that greatly facilitate the work process, for example, aligning the edge of the material. Electrolovka blades can also have teeth that differ in forms and sizes. It should be selected according to the material for the filling, so that there is no damage to the plywood sheets during operation.
- Household jigsaw electric for non-productive purposes, as a rule, low power (from 350 to 500 W). For beginners - this is the most common out of options when you just learn to cut crafts and figures from plywood (usually a small thickness). It is quite safe to work this device, especially when it is equipped with protection.
- Professional electrolybiz is intended for industrial purposes, has a capacity of more than 700 W, high speed and precision cutting. It can cut sheets with a thickness of more than 10 cm, aluminum, thin steel.
Video: Simple Electrolzik:
Mill
Sometimes this device is used for thread. It is a kind of manual instrument species, with the assistance of which in domestic conditions can be performed by a different type of wood and plywood. However, it requires a certain skill to work with it; But the masters, deftly controlled with this equipment, can create the most real highly artistic masterpieces of folk art.
Cooking stencil
Drawings for creative works are of different sizes, depending on the scales of manufactured products. For example, for a shelf or fragment of furniture, a sheet of Watman format A1 should be taken for a bulk toy, and the remaining roll of wallpaper can be approached, and for small figures (type souvenirs), we take office paper (A4 or A3 format).
On the surface of the paper with a marker or pencil applied the contours of the future object, sticking to the specified sizes. Templates are presented in open access in a wide range, choose the appropriate (for beginners, as a rule, not too complicated). And it is possible and come up with your options for drinking the jigsaw and after transfer to the paper basis.
Then we carry out the transfer of images to the surface of the working material (plywood, boards). To do this, cut out the piece of paper, we apply to the plywood and carefully circuit in the contour of the pencil. Lines must be accurate and smooth. If necessary, correct, erased by eraser.
The contours are applied "with the rear" of the material so that there are no remnants of the drawing on the finished form. Internal areas can also be shrinking, so as not to cut an extra piece, thereby designating an inviolable fragment.
Examples of drawings


Snowflake


How to carry out threads on plywood
Working with the device will not be difficult if you properly prepare for the process of creativity.
- Place to work should have good lighting;
- The working plane must be protected from damage. You can, for example, lay a plywood sheet or clamp it with a film;
- All the necessary tools as well as spare blades should be prepared in advance. And you can start.
The first step should begin with the application of the inner circuit of the pattern or drawing. To do this, carry out slots in which the blades of the device will be inserted. Usually, with a cut of large contours, the problem does not occur, but in small residues, the work with a jigsaw from the inside is capable of applying chip, sowing or dissection. You should act very carefully.
Operation electric bison

How to cut a manual logby
- Lock a piece of plywood with one hand, the second hold the device for cutting for the handle.
- Start moving along the applied circuits, weighing the jigsaw up / down. So should do around the perimeter of the picture.

Manual Lobzik work
As you can see, there is nothing superpower in this work. And you will gain the most real creative hobby, learning how to manage these devices.

How to cut puffer pubesy
Drinking electrical or manual jigsaw on plywood - the process is undoubtedly creative. And you can personally create decorative products of various directions: from fabulous characters from cartoons for children to decorations for furniture and home.
Stock Foto Gallery of examples of work

Dumping from plywood - one of the most fascinating and more useful leisure options! It develops creative skill, accuracy and accuracy, instill labor skills and helps to master various tools.
As part of our article, we want to introduce you to sawn technology from plywood sheets and two simple articles. All drawings are attached, so if you wish, you can repeat them with your own hands, along with children who will certainly be interested in this process from beginning to end.

General sawn technology + ideas of crafts from plywood

Plywood - universal material used in a wide variety of spheres! From it you can create many amazing things that we will do now. Like any other creative lesson, drinking from plywood sheets begins with the preparation of instruments and material.
Such a set of tools
So, we will need:
- . It is a wooden or metal frame, in shape resembling the letter "P". At the ends of this frame there are special clamps with screws in which the sawmill is fixed.

To minimize!
Lobzic files are thin and narrow steel stripes with acutely sharpened tooths on one side.
Alas, they will easily break, so it is better to take them with a margin.
Fortunately, the price of these devices is rather low.

- Special key for fixing the peel in the jigsaw.

- Three-layer plywood sheets (the thinnest) - This is the best material for drinking something like something. But if you do not have a thin, then you can use a thick paneur (from 4 to 9 mm).

- Support for drinking. It can be made independently from a table with a thickness of about 10 millimeters. There is a stand on the table in such a way that the part with the cut from the cut over its edge. It is possible to secure it in the workplace with screws or nails.

- Schucker (coarse and fine-grained).

- Shilo, Files and Nadfil.

- Passatii - in case the sawing is stuck in the plywood - they are very convenient to pull it out.
- Hoven (suddenly you have to).
- Copy paper.

- Somewhat acutely certified pencils.
- PVA glue .

- Drawings of the future.
Drinking technology
For convenience, below shows a step-by-step instruction in which the process of working with plywood is painted in all details:
- First you need to prepare the desktop. Wipe it with a damp cloth in order to cleanse the sawdust and dust from small mounds. Check if all the tools lie in their places. The room in which your workplace is located should always be ventilated and well-lit.
- Next follows the preparation of the most important tool - jigsaw. To do this, unscrew the screws, secure the ends of the file in its clips.
A pailer is inserted so that the direction of its teeth was not inside the frame of the jigsaw, and ahead with the tilt down. The slope of the teeth is easily checked - it is enough to spend your finger on them. Already the inserted file is tensioning using multiple tensioning screws.

Important!
The file must be tensioning tight, otherwise it will be bad to cut and quickly break.
In this way, the sawing is fixed in a wooden manual junk. As for the metal tool, this process takes place a little differently.
First, one end of the sawmill is inserted into the lower clamp, then the end of the jigsaw, where the upper clamp is located, rests on the edge of the table. Next, you need to slightly press the handle to the handle so that the junction frame begins a little and the clips got together.
Holding the tool in this position, you need to fix in the upper clamp the second end of the sawo. After that, the junction is released: the frame takes the initial shape, the ends with its clips are again diverged and stretch the saw.
- Noticed that the surface of plywood is a bit rough, and in some places there are cracks and chips? From them you need to get rid of sandpaper, creating all defects against fibers. It should be highly smooth, absolutely smooth, silky to the touch and glossy in the light.
After that, once again check the plywood sheet - if there are no visible defects, then you can move to the drawing.

- On a sheet of paper, a drawing of the future craft is drawn. The appropriate piece of plywood is covered with a copy-sheet sheet, the drawing falls on top, is fixed with the buttons and will be burned with a sharp pencil.

- Plywood with a translated pattern is placed on the stand, and the jigscription is located so that the sawing is in the roset of the stand. Drink details up and down movements. The sawing saws only when driving down, at this time it is necessary to slightly press it forward.

Tip! Carefully follow - the sawing should move directly perpendicular to the plywood, without tilt. And when the figure you need to make a turn, then turn the plywood, not the jigsaw.
In the event that there are internal holes on the details, then drinking should be started with them, and only then move to the outdoor circuits. To cut the hole with a high quality, make a shill or drill on its edge. Further, one end of the lobzik's sawmill is released from the clamp, to grind it into the puncture made and secure the clamp again. Drinking the desired hole, remove the pail in exactly the same way.
Attention!
During operation, the sawing is very hot and, becoming hot, quickly stupid and breaks.
Therefore, periodically cool it by wiping with a damp cloth or take a break.
- Specify all dug details: holes and edges of deep recesses - a file, the rest of the surface is fine-grained skin.
- The final stages are the assembly and gluing the craft of PVA glue. There should be no difficulties here, the main thing is to deal with the drawing.
Optionally, you can also paint the product, cover with varnish or smelted a beautiful pattern on it. It all depends on your imagination!
Mercedes car model

Try to cut out this simple Mercedes model, which can be the first in your collection of toy cars. DIRECTERS DIY MACHINES FALLERS Lobzik will be presented below. Collecting the craft, look at them, or rather the numbers for which the assembly is carried out.
This is done according to the following rule: the part number 1 joins another part number 1, two to the second and so on. If any details are not inserted into the necessary grooves - sign them, or clean the ones. Was it possible to assemble the product without any problems? You can safely glue all the details with each other! 

Animal figures
Very simple, but, nevertheless, an interesting idea. So, together with your children, you can have fun, drinking various animal figures from plywood. To do this, you only need to cut four legs and glue them to the body from two sides to give a toy sustainability. In some cases, stands are made and figures are strengthened on them. 
As a result, you can get a whole toy zoo or story scene. Believe me, the children will be delighted with such a fascinating classes, and it does not take a lot of time. Then you can ask for a wife so that she helps the guys to paint new "friends." 
Output
Predit creation of all kinds of products always captures! After all, personal labor, time and particle of creative thoughts are investing in each detail. Therefore, ready-made crafts are evaluated as a real work of art and are in the house at the most honorable places. In the video presented in this article, you will find additional information on this topic. Creative flight!
Related Materials

Sometimes you want to decorate the gray country area or dilute the interior of the room with an unusual craft, so that the eye is glad, looking at such beauty, and the friends who come to visit were surprised and admired by your originality. An excellent version of such a decoration is crafts from plywood with your own hands. And also such a homemade will serve as an excellent gift for your loved ones and friends.
Advantages of crafts from plywood
There are several advantages:

There are plywood and a couple of flaws. First, it is bad resistance to moisture (but it can be prevented by covering a tree with varnishes or a special water repellent composition), and secondly, it often comes across poor-quality, easily split and blurts well and burned.
What about more specific examples? There are many different types of crafts from wood and plywood in different techniques. The most famous of them:

Woodburning
Starting always needed with simple. Therefore, for a start, we will make a small picture in the burning technique. In order to perform the product in this technique, you will need:

If there are notched and irregularities on the plywood sheet, polish it with sandpaper.
 First do you draw or print on a piece of paper sketch. Now you should translate it to the plywood. To do this, put a copy paper on it, and from above - your sketch, and lightly circle it with a pencil. Sketch lines must be transferred to the plywood. If they found themselves on the backup paper - turn over the copy and repeat the same thing. When transferring the pattern it is impossible to move paper or plywood, take the picture to see what happened, since the drawing can be rolled. Drove the sketch consistently so as not to get confused that you have already moved, and what is not.
 Now you can go to the most interesting. Turn on the delicate in the outlet, wait until it is warmed up. On it there are several modes of operation (depending on the temperature as on the iron). To make thin and neat strokes, use a small heating temperature, and for more fat lines - high. If your plywood is thin, be careful with high temperatures, since the deceit can burn it through. Therefore, you need to put something dense to the working surface, for example, another sheet of plywood so as not to damage it.
 Move neat strokes from top to bottom, you do not need to press the tool strongly. Remember the technique of fire safety and rules for working with heating devices so as not to get burns and not spoil their property.
When the drawing is ready, it can be painted or left it. And then cover with a colorless varnish so that the glossy shine and the caretaker appears to be insured against the exposure of moisture.
Here is an example of the product from plywood with your own hands in the technique of burning - just and tasteful!
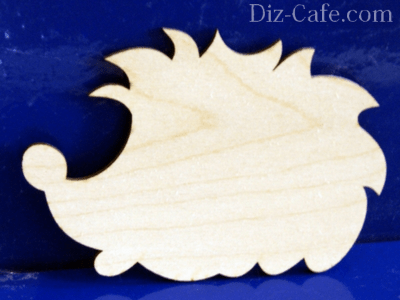
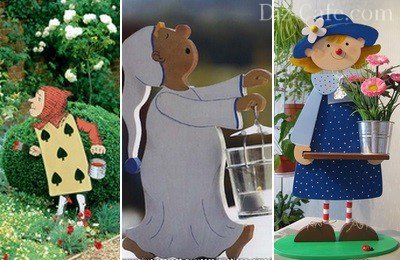
Figure peeping
 For the decor of the cottage or interior of the village-style house perfectly fit the figures from plywood, drunk using a jigsaw (both electrical and manual). For such work, you need to pick up the most simple sketch or drawing of crafts from plywood. For example, this is:
Before working, the tree should also be seized with sandpaper, and then move the sketch on the prepared material. You can start drinking! The resulting product is polished along the edge, paint (if desired) and also covered with varnish. If it is intended to decorate the household plot, which means it will be outdoors, it is better to cover with a special water-repellent solution.
That's what ideas can be easily implemented, showing patience and fantasy:
Openwork thread
 Beautiful sophisticated patterns that can decorate any of the most refined interior can be created independently with the helmet (jigsaw), hand drills, auxiliary tools (sewn, sandpaper, copy paper). A sketch will also be required (it can be easily found on the Internet) and a colorless lacquer for giving the product of the finished look.
Getting started similar to previous techniques.
 You need to prepare a fane, transfer the drawing. Then, in all places began, it is necessary to make small holes with a shell or a drill. And only after that, start working the jigsaw. Its when working should be directed from top to bottom, so it is better to work on the edge of the table, firmly attaching a sheet of plywood on it. Lobzik should move easilyFreely, without a big effort, otherwise the tree may not withstand and crap.
If it still happened, the place of breakage can be glulpted with a superclone, but the product will not be so durable and can lose a little appearance. At the end of the work of the saw, pass the edges with sandpaper and cover everything with varnish. Ready!
Useful things
From plywood and wood you can make not only decorative elements, but also useful things. For example, out of the thicker plywood, excellent shelves are obtained, photo frames, children's designers, model houses, cars and many other interesting products!
How nice to walk through your own garden, enjoying the charming nature and stunning fresh air. Thinking the design of the country site, each owner tries to make it special, adding a flavor and creating a positive mood. Garden figures made of plywood are able to successfully add vegetation compositions and in an amazing way to transform a plot by making it a pretty and cozy corner, which has a pleasant rest. Make such fun figures from plywood anyone can make. To create such an ornament, it is not necessary to own the skills of the artist, just to show fantasy and make a minimum of effort.
Such figures are designed to emphasize certain places on the plot, making them more elegant and attractive. Thanks to the natural naturalness of the decoration made of wood and plywood, the most harmonious fit into the landscape design.
Cut from plywood figures in garden sites look unusually
From plywood you can make a lot of interesting functional decorations for giving. It can be:
- Funny figures;
- Color containers;
- Feeders for birds;
- Decorative fences.
The variants of figures from plywood is a great set, and each of them is distinguished by originality and expressiveness.
Miniature toy houses, animal figures, bizarre fabulous sculptures and cartoon characters today decorate many country sites
Plywood is one of the easiest and most convenient materials to create crafts. It is so easy to work that figures from it are pretty quickly, and that the main thing is interesting.
Plywood is a sheets of wood veneer, bonded between themselves in several layers with a glue or synthetic composition. The strength and thickness of the material directly depends on the number of these layers. The plywood sheet thickness range ranges from 3 to 30 mm. The material can have absolutely different textures, which can affect the color and structure of the finished craft. For example: thanks to the beautiful structure and warm shades, birch plywood looks very aesthetically, the coniferous plywood is more suitable for staining.
For the creation of garden decorations, plywood sheets are perfectly hide, the material for the manufacture of which was: Topol, Alder, Aspen, Pine, Birch, Spruce
The main advantages of plywood:
- Environmental friendliness;
- Strength and durability;
- Waterproof;
- Good flexibility;
- Combination with other materials;
- Easy processing.
But since Plywood is still a tree, which is by nature exposed to the environment, when choosing a material, a number of moments should be considered:
- Moisture resistance. For registration of outdoor spaces and decorating a nursery area, you can use plywood sheets that have marking FKM and FSF. With their manufacture, melamine and phenolic resins, which have a moisture-repellent effect.
- Grinding. You can find sheets polished on the one hand (W1), treated on both sides (sh2) and unlocked at all (NSH). This moment is very important only in the case when you do not have time for additional processing.
Oil and acrylic paints are perfectly suitable for creating expressive and colorful garden jewelry. They perfectly fall on a wooden surface, creating saturated color combinations. Paints have resistant to ultraviolet rays, while maintaining attractiveness for several years.
When choosing materials for making decoration, it is important not only to competently pay attention to the qualitative characteristics of plywood. It is also important and the moment of choice of paints for registration, which will retain the color saturation for several seasons.
Create figures with your own hands
Most often, cottages are decorated with flat figures cut from moisture-resistant plywood sheets. To create an original decoration, we will need:
- Moisture-resistant plywood 2 cm thick;
- Stencil;
- Lobzik;
- Simple pencil;
- Small-grained sandpaper;
- Screwdriver and self-tapping screws;
- Acrylic paints, tassels and varnish.
If you plan to install a figure, without climbing it on any support in the garden, it is also necessary to provide the manufacture of pegs for its foundation. Their size depends on the dimensions of the figure itself. But, in any case, count on the fact that pegs should deepen in the ground at least 50 cm.
We offer you to remember the forgotten type of creativity - drinking the jigsaw, making an unusual decoration for the garden with your own hands
Figurine from plywood can be decorate any corner in the garden, hanging on the rope by fixing nails to the support and installing on the stand
Stencil for the manufacture of the figure can be done independently. To do this, it is necessary to draw a drawing on a sheet of paper, issuing in the form of drawing or silhouette, and then just cut it.
Master Class # 1 - Curious Snail
A pretty figurine of plywood is so simple in the manufacture that anyone can make it. Small assistants will gladly respond to the offer of adults to participate in an exciting process.
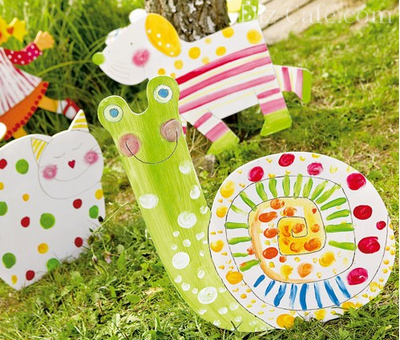
The charming snail will probably enjoy not only the little fidget, but adult guests of the site, becoming an elegant decoration for the playground and a favorite character of exciting games

On a sheet of paper, we make an outline of the future figure, the image of which is subsequently transferred to the foundation of plywood
If you are confident in your abilities, you can do without a paper template, drawing snail immediately on the sheet of plywood. Cutting the logs of a figure for security reasons you will have to do yourself. But hereby drawing the contours and the deactivation of the snail can be safely entrusted with impatient little assistants.

With the help of a felt-meter or dear, draw the contours of the snail so that even after covering the paint, they remained bright and expressive
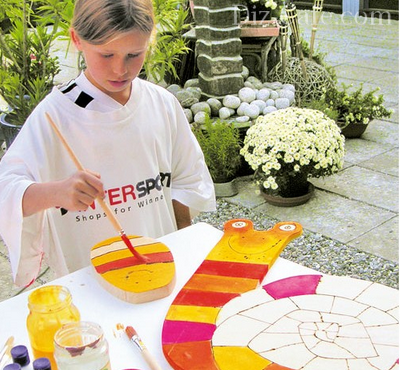
The billet is painted with acrylic paints, choosing spectacular contrasting combinations. To get saturated colors, acrylic paints better apply in 2 layers
Snail ready. Give a little to dry the paints, and you can safely disembark a nice character on any place in the garden.
Material will also be useful on how to make garden figures for giving with their own hands:
Master Class # 2 - Charming Scared
Holding only a couple of hours of free time for the manufacture of the horror of the horror, you can make a funny figurine personally, which will introduce a notch and heat to the site.
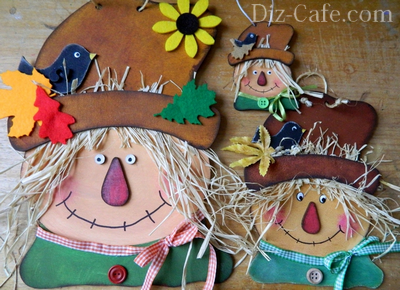
Here is such an incredibly cute and charming fairy character scared from the fairy tale "The Wizard of the Emerald City", can settle in your site
Making figures will be performed in several steps. First, we take a sheet of plywood, to which with the help of a stench we appline the outline of the future character. The finished drawing can be transferred to the paneur using the usual tracing.
If we do a figure, which will rely on the pegs, immediately attach them. To do this, in the body of the shape we drill paired holes, the diameter of which corresponds to the size of the pegs.
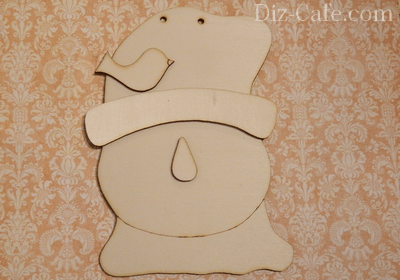
According to the outlined contour using the jigsaw, cut out the figure. Her edges are carefully polished by sandpaper, giving them smoothness
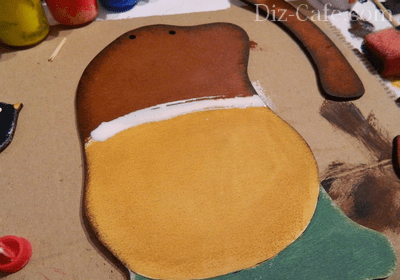
We draw out the figure: on the workpiece with a simple pencil, draw the character elements and paint them with acrylic paints
Having painted the front part of the workpiece, deactivate end facets. When the paints are dried, cover the figure with varnish.
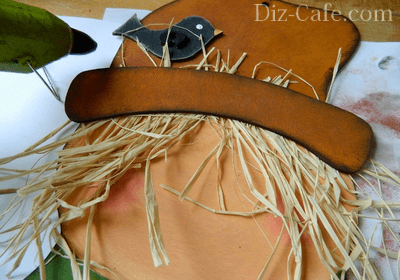
To decorate the figure, we used dried grass, which was scared, buttons and satin ribbon, from which the collar of the character was laid out
Our cute fabulous character is ready. It remains only to stretch through the holes in the wire hat and consolidate it on the tree branch or fence.
Little secret: If the leaf of plywood is labeling, the plywood sheet begins to decide, it is necessary to impregnate it with a solution prepared from PVA and water glue, taken in a 1: 1 ratio. Phaneur is impregnated 2 -3 times, bringing each subsequent layer after complete drying of the previous one.
Since such crafts are obtained pretty light, finished products should be securely fixed, partially driving into the ground, falling asleep with sand or gluing to the base.
By the same principle, it is possible to make thematic plywood structures, for example: a miniature fairytale forest with fancy trees or a pretty cleaner in a pond, filled with funny figurines of animals. Plywood structures made with their own hands, will decorate your plot by making it attractive and unique.