How to make it yourself beautiful and useful shelves from PVC pipes. Furniture with your own hands from water pipes! Book shelf from plastic pipe
Building a house or apartment repair is always accompanied by a bunch of residual remnants. The repair of the pipeline also does not become an exception, because after replacing metal pipes on plastic, many trimming remains, as well as connecting elements - fittings that many owners are simply emitted.
However, there are also creative people who can make solid and original furniture, such as tables or chairs, as well as other bodies such as an organizer. In this article, we will analyze some similar ideas from PVC pipes in detail.
Children's chair from plastic pipes with their own hands
Polypropylene is a hypoallergenic and non-toxic material, so you can make various children's furniture from it, not experiencing a child about the health and well-being of the child. The embodiment of the ideas of plastic pipes with their own hands, you can easily collect the table, a playpen, a chair, etc.
One such simple projects can be a comfortable highchair, which is assembled from pipes and fittings like a constructor. The magnitude of each part will depend on the size of the desired result, but below we will give the instruction in which we will tell how to make a chair for a five-year-old child.

For the manufacture of the chair, you will need the following materials and tools:
- Glue for PVC;
- Approximately 3 meters of the polymer pipe;
- 6 T-shaped fittings;
- 8 angular fittings (90 °);
- Durable fabric;
- Saw with a small tooth;
- Sewing machine;
- Scissors.

Build a chair:
- First of all, it is necessary to cut the pipe on segments: 7 pcs. 33 cm (a), 4 pcs. 20 cm (b), 4 pcs. 13 cm (C) and 2 pcs. 18 cm (D);
- Take two parts A and secure at all ends on the corner fit;
- In each of the fittings insert all the elements B;
- On each element B, T-shaped connections, unscrew their perpendicular part perpendicular to the element A;
- Parly connect T-shaped fittings by elements A. As a result, you should turn out the parallel legs of the chair;
- In the free ends of the fittings insert all elements with;
- Next, it is necessary to put the design so that the ends of the legs "watched" on you;
- Take two angular fittings and put them on the details with, located closer to you;
- Put two T-shaped elements on the details with, located on from you, deploying them so that the central connections look at you;
- Next, it is necessary to connect inserted fittings by parts and parallel to the legs of the chair;
- In the free ends of T-shaped fittings insert the details D and put on them angular fittings, referring to them with "face" to each other;
- We connect them to the element A, ending the back of the chair;
- From the fabric, do the seat, stretching it between parallel crossbars;
- Clear all connections, after which, let me dry the chair.
Office table with plastic frame
Buying even the cheapest office table can be a big problem for some people, so we will tell you how to make a table of plastic pipes. This project is different from the previous one with its complexity, so some parts you have to think about it yourself, however we will try to explain everything to you as much as possible.
First of all, you need to decide on the size of the table. In our case, we take a ready-made countertop (915x2030 mm), which we will collect the framework. Choosing a countertop for your own table, pay attention to its weight and follow the rule: the less weight, the better for your table. The best solution for the countertop will be the hollow door fabric. You can also assemble a tabletop yourself, using smooth boards, fasteners, saw and drill.

First of all, harvest 12 meters of the plastic pipe and cut it into the following details:
- 5 pieces of 7, 5 cm;
- 10 segments of 30 cm;
- 4 parts 50 cm;
- And 4 pieces of 75 cm.
From other parts for the frame you will need the following:
- 4 T-shaped fittings;
- 4 quadruple fittings;
- 2 crossed fittings;
- 10 plugs for pipes and fittings.
Prepared all the necessary details, you can start collecting a table from polypropylene pipes. It is better to produce the first assembly without the use of glue, and after the assembly, alternately glue all the connections. Build, start with the design of the side of the framework, to which the countertop will be dried.

Next, collect the back of the rear, which will connect the two already collected. To give the table additional stability, we recommend to make the rear wall of the third leg. Collecting the table, carefully follow the parallelism of all items to in the end to get a smooth design.
At the decision, it is necessary to connect all parts into a single design, receiving the table frame. Check it on strength, correct the irregularities, after which, proceed all connections.
To secure countertops:
- Put the tabletop to the floor, turning it down by the "face" down;
- Put the framework from above so that the upper plugs fit tightly to the tabletop;
- Circle adjacent plugs;
- Disconnect the plugs from the pipe screw them to the tabletop to marked places;
- Install the framework of the table, and put the tabletop so that all the plugs get into place.
As a result, you have a great table from PVC pipes with your own hands. This material is so universal that you can even make a PVC pipe onions that will be quite a worker.
Racks for dacha
After repair, there may be not only polypropylene tubes in the house, but also a metal profile from which you can try to make a rack for giving without the use of welding. To work, we need only a roulette, a pencil, dumping and hand-knife for metal.
First of all, it is necessary to design a future rack. Draw on paper a scheme, observing all the sizes. Next, you can buy a profile to the already existing, and also find several plywood sheets with a thickness of 15 mm. You can also make a rack of PVC pipes with your own hands using a profile scheme.

We will analyze the manufacturing process on a specific example:
- Take a profile and cut it apart: 4 vertical racks, 8 front and 8 rear crossbars;
- Collect 4 frames that should be regiments in the future;
- Using self-tapping screws, secure the resulting frames on vertical racks;
- Optionally, you can fasten the rack to the wall and paint it, after which, put the plywood on the frame, making the shelves.
Various elements of the interior of PVC pipes
To decorate the interior, as well as the creation of useful designs from PVC pipes, you can use very short pipe segments. So from short pipes can be made by organizers, where the shoes, writing accessories and other small things can be folded into the holes.
You can also easily make wine shelves from PVC pipes with your own hands. To do this, simply glue several pipes, and screw the resulting design to the wall. Similarly, you can make a glasses holder. To do this, it is enough to cut the plastic pipe along, after which, fasten it on the wall. The leg is perfectly included in the cutting hole, and the stiffness of the polymer pipe does not allow him to fall out.


If your house does not have enough space for the outerwear, the hanger of plastic pipes is an excellent solution of this problem. You can construct and collect such a hanger, pushing out from examples with a table and a children's chair.
In conclusion, I would like to say that plastic pipes are cheap and lung raw materials to create various decor elements. Any it is always possible to paint, cover with glitter, or decorate with various elements, such as shells glued with glue. Polypropylene rings can also be used for seasonal decoration of the apartment, for example, under the New Year you can make a wall panel and fill it with new year attributes, for example, balls and figures.
As you can see to create a cozy atmosphere and decorate the apartment, it is not necessary to spend a big amount of money, because the main thing is a creative approach that will create the desired result with minimal costs.
Having tried once your abilities in the installation of water pipeline polyvinyl chloride pipes, you will understand that the work with the material and the method of connecting plastic elements opens a wide range for creative possibilities. From plastic segments and various elements for their compound, you can make it possible to make practically any, having a frame base, the object of the situation, the useful device for the cottage. It can be a chair, chair, stand, table, bed. The shelves from PVC pipes with their own hands are perhaps entering a separate group, as it presents a variety of products for purpose, size and appearance of the product.
To make the shelf of pipes, you do not need to have special skills and experience. If the planned product consists only of plastic, only a tool for cutting and glue will be needed. Yes, and without the latter, you can do, making a collapsible design.
Items made of polymeric structures are neat, aesthetic even without additional decorative coating. Experts argue that modern plastic is a durable, environmentally friendly material, it does not represent danger to human health.
Creative Shelf for Collection
The easiest option of the shelf of plastic elements, these are assembled together segments of the material. Such an original composition is best hanging on the wall. The diameter of the pipe that will be used in the project, choose depending on the dimensions of the objects placed on the shelf. If, as in our embodiment, the cells will be occupied by machine, it will be enough 15-20 cm.

Preparation for work
Prepare for work:
- a piece of plastic pipe with a diameter of about 15 cm;
- hacksaw for cutting material (we advise you to use vice so that the plastic does not slide while working with the hacksaw) or pipe cut;
- roulette;
- pencil;
- glue;
- clamps or big clothespins;
- sandpaper;
- paint blue in a can or can
- brush.
To hang the product on the wall, use a drill and 2-3 screws with dowels.
Work description
- In the length of the pipe, put the mark with a step at 20-25 cm. The number of elements depends on the size of the regiment you need.
- Secure the material with the help of vice and cut pieces according to notes.
- Slightly pass the external edges of the details.
- In order for the product to be smooth, staining should be produced at this stage. Establish plastic elements on the coated with newspapers or protective film with a smooth surface. Color them on the one hand. When the paint dry out completely, turn the part and apply paint again.
- Start the formation of the shelf. The composition can be both completely symmetric and chaotic folded. Giving a form when connecting items, consider the features of the interior in which the subject will be.
- Bear parts starting with medium. After applying glue and compounds of pieces, secure them with clamps or large clothespins before drying the glue. Then go to the following items.
- Pret the finished shelf to the wall, mark the place to screw the screws.
- Prepare in the wall of the hole.
- Place a dowel in them.
- Screw the screws.
The work is completed, hang the shelf, help your son or daughter put a collection of favorite toys.
All ingenious just! Taking advantage of this idea, you can build a desktop regiment for wine bottles. The main thing is to choose the material of the appropriate size and take care so that the base is stable. For originality, combine the elements of different diameters.

Similarly, make an outdoor shelf for shoes. Of course, it will take a large pipe here, for example, as used when installing sewage. Take care of proper decoration. And note that the glue is unlikely to be able to keep a heavy large design. Therefore, items are better to connect the screw-wagon, pre-winding the hole in the right places.
Outdoor shelf for books
Make your own hands a bookcover from plastic elements - this is an original and accurately economically advantageous solution. Starting from the shelf, you can create an interior ensemble that will fit your individual style. The work will not require large costs of finance and time. Even novice will cope with her.
Dark matte paint and wooden parts give the product elegance and industrial view.
Materials and tools
- Roulette;
- pVC cutter;
- 1-inch (2.5 cm) PVC pipe with a total length of 30 feet (about 9 m);
- 1-inch polymer pipe, 30 feet
- pine board size 6x12 feet (1.8x3.66 m);
- a circular saw;
- glue for PVC;
- 1-inch three-way plastic connector - 12 pcs.;
- 1-inch rotary corners 90 degrees - 4 pcs.;
- 1.25х0,75-inch (3.2x1.9 cm) PVC bushing - 4 pcs.;
- paint in a vacuum can
- morilka;
- latex gloves;
- 1-inch (2.5 cm) 2-well galvanized loops for mounting shelves - 12 pcs.;
- drill with drills;
- screwdriver;
- 0.5-inch (1.3 cm) Metal screws - 24 pcs.
Before proceeding with the shelf assembly, make a polychlorine-related polychlorine in pieces of the desired length:
- 12 pieces of 18 inches (45.7 cm);
- 6 pieces of 12 inches long (30.5 cm);
- 2 pieces of 17 inches long (43.2 cm);
- 4 piece of 2 inches long. (5.1 cm).
Now cut wood with a circular saw by 3 parts of 2x12 feet (0.6x3.66 m). In advance, polish the edges and the surface of the blanks for wooden shelves.

Work description
- Take the 18-inch item, attach to it a trilateral connector. To enhance the connection, use PVC glue. Now attach another 18-inch item to the connector, so that the pipe increases up. Attach another trilateral connector to another end of the 18-inch item. Before the glue is completely dry, put the resulting fragment on the flat surface and make sure that all connectors are rotated the same. Then exactly attach the third element to the three-way connector. Complete the addition of another three-way connector to the top of the last 18-inch item. While the glue is not dry, put pieces on a flat surface, make sure that all connectors are the same. Collect similarly three more legs.
Each time you connect a plastic segment with a 90-degree knee or a three-way connector, apply glue for PVC to the inner part of the connecting part, as well as on the outer side of the pipe, about 1 cm. After the connection, be sure to remove the excess glue with a damp sponge.
- Two legs that you just created, secure together, placing a 12-inch polymer segment horizontally into the first row of three-way connectors on each leg. Do the same on the remaining two levels. As a result, you will receive one side of the bookshelf. Repeat the same actions with two other legs - get the other side of the shelf.
- Start assembling upper connectors. Take two 17-inch parts from PVC and attach to their ends of the rotary (90 degrees) parts to each side. Put the resulting structures on a flat surface before the glue dries - make sure that the curved elements are absolutely symmetrically arranged.
- Connect two sides. Attach a 2-inch polymer segment to the top of the trilateral connectors at the top of the legs. Now attach both sides of the shelf together, using the 17-inch items that you cut earlier. Attach the bushings to the bottom of the legs to give the shelf an additional support. You got a reliable design with good stiffness.
- At this stage, you can paint the frame of the shelf, evenly spraying the paint. We use a matte black color, but you can choose any other that will suit your interior.
To avoid uneven color, apply several layers. Each next layer of paint can be applied after complete drying of the previous one.

- Circle the wall of the workpiece of a wooden shelf by making the manufacturer's instructions on the label. If you want the tree to acquire a darker color, cover the details with several layers of the substance. Make sure you gave the same shade to each piece of wood.
- As soon as the veil is completely dried, it is necessary to pre-drill holes in the shelves for fastening to a plastic frame. Attach the shelf to its place on the frame, cut the metal loops from below, wrapped with plastic, put markings in the holes to indicate the places of the connections. Exercise with all three shelves. Each board must be attached to 4 hinges of 8 eurgoshurpa.
- Remove all holes with a drill.
- Turn over the bookshelf upside to easier to screw the screws. You may need an assistant to keep wooden parts on the spot. Attach the shelves with loops to plastic bases. This can be done manually using a screwdriver. If you prefer to work with an electric drill, you risk split wood.
The shelf of plastic and wood is ready.

Regiment-organizer for economic premises
The large shelf-rack will allow us to clean up in any economic room. In plastic containers it is easy to fold festive decorations, clothes and other household items. At the same time, all things are stored in affordability, and even a child will be able to get them. The whole design is made of high-quality plastic. The material is ideal for wet basements or garages, as it is waterproof and resistant to mold.
It will take for work
- 1.25-inch (3.8 cm) plastic segment - 92 feet (28.04 m);
- 1.25-inch (3.8 cm) 4-weekend connecting parts - 12 pieces;
- 1.25-inch (3.8 cm) 5-weekend connecting parts - 18 pieces;
- 1.25-inch (3.8 cm) plugs for the ends of polymer parts - 10 pieces;
- 12 plastic containers with dimensions of about 16x18 inches (40.6x45.7 cm);
- roulette;
- pencil;
- circular saw or piperaza;
- drill with drills;
- screws;
- a hammer;
- screwdriver.
Before assembling with a circular saw or pipe cut, cut the parts of the desired size from plastic:
- 15 blanks of 13 inches (33 cm);
- 54 16 inches blanks (40.6 cm).

Description of the procedure for assembling shelves for containers
- Take a segment of plastic with a length of 13 inches and attach to both ends to 1.25-inch 4-output connective parts so that its through hole is exactly in a vertical position. When connecting, use glue. Excess the substance wipe immediately. Make 6 such connections.
- Connect to each upper hole, which are located at both ends of the obtained billets, along a pipe of 16 inches. To the edge (0.5-1 cm), apply glue connected. Do these same actions with all 6 fragments.
- Now connect 3 finished fragments in one rack. To do this, place the free edges of the 16-inch segments into the lower holes of the connecting parts. Use glue. As a result, you will get 2 lateral racks of the rack.
- On both ends of the 13-inch segment, set 1.25-inch connecting part, which has 5 outputs, as shown in the figure below (in the central hole). When performing work, use glue. Total assemble 9 similar nodes.
- To all the free holes of the connecting parts (except for the lower and already occupied - central), attach the 16-inch segments as prompts the schematic image below. Use adhesive glue for fastening. There should be 3 such large nodes.
Attention! In this project, you can choose what way to strengthen the connection of parts by glue or by means of a screw connection. If you prefer the latter, use screws with a special anti-corrosion coating (galvanized).
- Connect into one design all three parts by inserting the free ends of the upper 16-inch elements in the free bottom holes of the connecting parts. Strengthen the method you choose the resulting node. The ends of the vertical elements of the top and all end should remain free (see image). The inside of the shelving is ready.
- Collect together the inner part of the shelving with side racks. To do this, place the ends of the end 16-inch parts into the corresponding loose holes of the connecting elements of the side racks. Build the design with screws or glue.
- To complete the assembly of the structure, you should wear on the free ends of the upper tubes of the plug parts. This will give a complete accurate type of product and will prevent ingestion of water, dust, insects.
Install colored containers in cell prepared for them. You can enjoy filling the useful and beautiful furniture. You made sure that from plastic parts it is easy to do both small fixture and a fairly large design. Think, perhaps with the help of plastic products you can without much costs and efforts to make your life even more convenient and organized.
You can make a rack for the garage from different girlfriend, the pipes are especially good for this. To assemble the storage system, it is not necessary to have a welding machine.
A few words about design versions
Before making the furniture under consideration, it is necessary to determine its tasks and design.
Most often in the garage installation racks made of pipes of the following types:
- Prienty - represent an autonomous design that is not attached to the wall. Thanks to this, the product can be transferred. Another advantage is that the design does not have a load on the walls, which is important when they are not very strong, for example, frame or tinted plasterboard;

- Stationary - Unlike the used, there are racks only from the front side, so the bearing function of the rear racks performs the wall to which shelves are attached. Therefore, similar models are called stationary;

- - Unlike stationary, these products have rear bearing racks, as a result of which the shelves are attached to the console method, i.e. Only on the back side, while the front side simply weighs in the air. The frame of such a product can be attached to the wall or be portable.
Note! Console models take some space, but have a small loading capacity, so they are not suitable for storing heavy items.

- Suspended - Unlike all the above products, it is suspended on the wall, so all the load falls onto the walls, and not the floor. In fact, it is ordinary shelves, but more overall and interconnected construction sites. They can be both cantilever and ordinary, i.e. with front racks.

The most versatile are victim and stationary structures, as they allow you to store everything from the tools and all sorts of trifles, and ending with the wheels and various heavy objects. If the garage is small, it makes sense to use suspended structures installed under the ceiling, with the result that the lower part of the garage will be unloaded.
Wailed metal stellage
Initially, we will tell how to cook with a rack or stationary rack from the pipe.
This work includes several stages:
- Design;
- Preparation of materials and tools;
- Build construction.

Project preparation
Initially, it is necessary to determine the location of the future product in the garage, so as not to be mistaken with sizes. Results immediately write on paper.
Then you need to portray the design scheme. If, then its base is the sidewalls in the form of two racks, between which jumpers are located.
The sidewalls are connected by the beams. In this case, the jumpers and beams form the base for the shelves. Stationary racks have the same design, but without rear racks, often there are no rear beams. Therefore, the jumpers are attached directly to the wall.
In the diagram, be sure to specify the following design parameters:
- The total height is to save space in the garage, it makes sense to make furniture height under the ceiling. On the upper shelves you can store items that rarely use;
- The length of the design and the depth of the shelves - these parameters are already recorded on paper, as they correspond to the size of the site where you want to locate the product;

- The distance between the shelves is selected depending on the dimensions of the items that will be stored on them. It must be said that the distance between the shelves is not necessarily identical. For example, the rubber storage compartments can be made enlarged - 600-700 mm, and it is advisable to make space between the other shelves to be smaller to fit more.
After preparing the project, you can proceed to work.

Cooking materials and tools
First you need to prepare pipes. Some specific requirements for their diameter or, for example, the wall thickness does not exist.
Therefore, if you specifically buy materials for these purposes, assemble future loads on the design, and in accordance with them, pick up the "eye" pipes. But, most often, such furniture is manufactured from what is "at hand", therefore you do not have to choose.
Tip! For the rack, it is desirable to use profiled pipes, as they have greater strength. But, if you have no such, use the usual, i.e. Round.
The only thing if you are going to make furniture not for the garage, but, for example, for home or cottage (see), it is desirable to use chrome pipes for racks, as they have a more attractive appearance.
In addition to the main material, you will need fittings for connecting all parts - corners under 90 degrees and tees. To find out the amount you need to count the number of connections under 90 degrees, as well as the "triple" joints.

For the legs of the future design and fasteners to the wall, flanges are excellent. The number of flanges that you need, also count on the scheme.
Also, the shelves should also be prepared - it can be plywood, OSB, boards or wooden slats. For mounting shelves to jumpers and beams, use screws and horseshoe brackets that are selected under the diameter of the tubes.
To protect the product from negative impacts and give it an attractive look, you will need paint and varnish materials on wood and metal.

As for the tool, prepare such a set:
- Bulgaria / Hoven for metal;
- Welding machine (if you do not have a welding machine, you can connect all the elements on the thread. In this case, you will need dies for cutting a thread or another tool for these purposes);
- Metal files and sandpaper;
- Roulette and pencil;
- Electric drill;
- Electrolovik;
- Paint brush.
Important! If you are doing for the house racks - a pipe chrome-chromium is cut with a special cutter that allows you to save chrome coating.

It is also desirable to have a workbench with vice, which will greatly simplify work.
Build construction
The instruction for making the rack looks like this:
| Illustrations | Actions |
|
|
Apply markup on the workpiece according to the size of the parts that are specified in the project. |
|
|
Cut the blank with a grinder or a special markup device. As a result, there should be racks, jumpers and beams. |
|
|
Cut the thread at the ends of all parts. |
|
|
So that fittings are easily screwed up on the prepared details, lubricate the thread with machine oil. |
|
|
Collect the design according to the project. At first, sidewalls from two racks and jumpers are assembled, and then connected by beams. If the design is stationary, the flange is screwed onto the free end of the jumper. |
|
|
If the tubes are not chrome, paint their paint. For these purposes, you can use automotive paint in the canister. |


This carcass is ready. In the same way, the product is made by welding, the only one, the work is somewhat simplified, as it is not necessary to cut the thread.
Now you need to perform the shelves:
| Illustrations | Actions |
|
|
For the manufacture of shelves, apply marking on the material from which you are going to do them according to the project. |
|
|
Cut the shelves according to the markup with an electrolovka or other tool. |
|
|
Collect the surface of the shelves with emery paper or electric grinding. |
|
|
Purchase the shelves or cover with a varnish with a conventional painting brush. |
|
|
Use brackets and screws to fasten the shelves to the frame. The lattes are screwed down from below, as a result of which the fasteners are inconsistent. The main thing is that the screws do not pass the shelf. |


Note! Shelves are not required for all types of racks. For example, car rubber is more convenient to lay in the space between the beams. Also does not require shelves and shelving for pipes, which, most often, has a console design.

On this, our rack is ready. For this principle, you can assemble the design of any type.
Plastic rack
Recently, pipelines in homes and apartments are most often made from polypropylene pipes (PP), respectively, in the garage at hand it can be exactly this material. It is also quite suitable for the manufacture of furniture.

Of course, the rack of PP pipes has a slightly less lifting capacity. However, in most cases, its strength is quite enough. It can well withstand a different tool and other trifle, which is usually held in the garage or preservation in the cellar.
The process of manufacturing a plastic shelving includes all the same three stages:
- Design;
- Preparation of materials;
- Production.
Preparation of materials
Since the design of the product is carried out equally, to lower this stage and proceed directly to the preparation of materials. So, in addition to polypropylene pipes, fittings will be needed, as well as the material for the shelves and brackets to fix the shelves. In fact, all the same as in the case described above.
Tip! For a plastic rack, you can make the shelves made of plastic windowsill. Such furniture will be resistant to moisture and other negative impacts.

A set of tools will be needed:
- Welding machine (soldering iron);
- Stripping;
- Scissors for cutting plastic pipes;
- Roulette and pencil.
Tip! The price of a good soldering iron is high enough. Therefore, for the manufacture of one rack, it is advisable to rent.
Manufacture
Production of parts and assembly is carried out as follows:
| Illustrations | Actions |
|
|
Apply markup on the pipes and cut them to get racks, beams and jumpers of the desired length. |
|
|
If the pipes are reinforced with foil, their edges must be cleaned. To do this, put on the edge of the details of a special device, which is called stripping, and check. Stripping on the principle of the exaggeration of the pencils will remove the top layer of the pipe along with the foil. |
|
|
Warrieve a soldering iron. Wait until it turns off, then gets warm again and turns off. |
|
|
Insert the end of the pipe and fitting into the nozzle and wait until the plastic softens. The heating time depends on the diameter of the parts and the apparatus itself. Therefore, complete to the device there is a table indicating the ratios of all these values.
|
|
|
Insert the pipe into the fitting until it stops. Follow the fitting to sat down exactly, without distortion. In this position, the details need to be held without shifting to cooled plastic. By this principle, collect the whole design. |


That's all the nuances of the construction assembly. As for the manufacture and fastening of the shelves, this work is carried out according to the scheme described above.
Output
As you can see, pipes are excellent material for the manufacture of racks, besides, working with them is completely simple. But, before making a rack of pipes, we advise you to spend a few minutes and view the video in this article, which contains useful information.
From gadgets.masterkit.ru. We write about the amazing inventions, useful gadgets, interesting ideas that may change the world, as well as publish instructions, how to do something unusual and useful. Today we offer readers of our blog to update your interior.
"Did you drink anywhere to play a flute of drain pipes?" (from)
You can keep books, and you can and shoes!
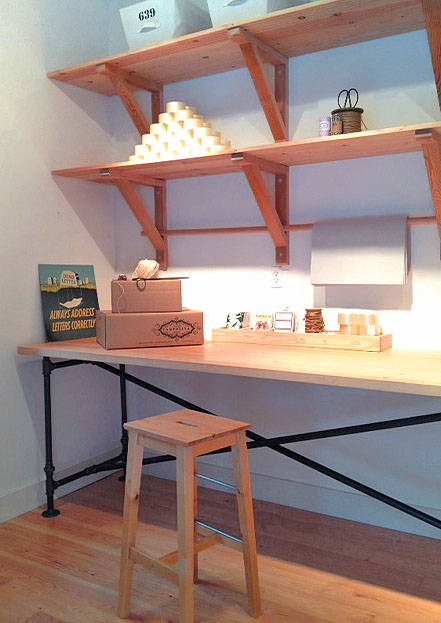
The shelf of plumbing pipes is a stylish project, implemented by any person whose hands grow from the right place. And however, the project is so simple that even if from the wrong, then everything will turn out. We just need to want to add something new to your interior.
The shelf is installed easily and quickly, and its stern, with elegant wiping, makes this useful design with an excellent design solution for any room.
All pipes have at the ends of the thread, which makes it possible to change the configuration of the shelf when the previous one is already getting tired.
Step 1. Materials
 Flanges and screws
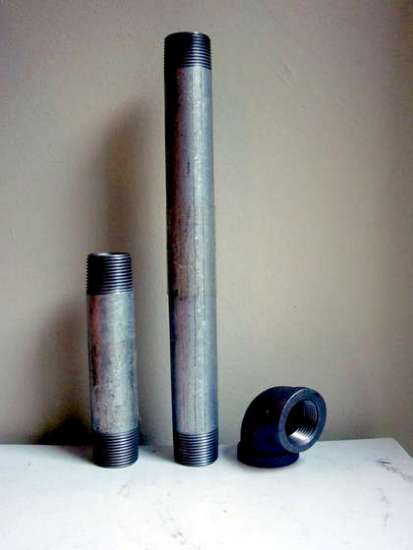
Pipes and corners

Drill and drill
Materials
Flanges for installation of pipes on the wall - 2 pcs.
Screws 12 × 2 "- 8 pcs.
Dowels - 8 pcs.
Water pipes with thread (12 × 1 ") - 8 pcs.
Water pipes with thread (5 × 1 ") - 2 pcs.
Corners of the type "Pipe pipe" (diameter 1 ") - 9 pcs.
Instruments
Drill-screwdelt
Drill
Pencil
Yardstick
Step 2. Installation of the flange on the wall
 Try on the flange and planning holes
 Drill holes
 Krepim flange screws
Search for crates
If you have concrete or brick walls without inner cladding, then holes drill with a winning drill of 6 mm, and we use the corresponding dowels under the screws.
If your room is lined with plasterboard plates from the inside, then it is better to choose a place for fastening the shelf where a wooden lamp passes. You can find it for wallpaper with a magnet, because the plates are attached to the crate of iron pins or nails.
Installation of flange
After the location of the shelves is planned, we determine where the first flange will be located and we mark the point of the holes for the screws for the screws.
Drills the guide holes using the drill, the diameter of which should be slightly smaller than the diameter of the screw (in the case of plasterboard walls).
We screw the flange to the wall.
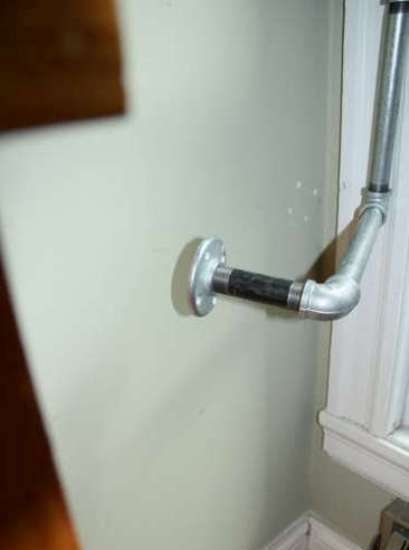
Step 3. Attach the pipe
 Finish the pipe 5 "in the flange
 Screw the corner on the pipe
 Attach the cut pipe 12 "
 Using cut 5 "pipes like a lever
 Mount the second corner
Let's stop while on these sizes
We proceed to the installation of pipes. We screw to the flange 5-inch pipe. On it, screw the corner, and a 12-inch cut to it.
Cunning: To easily twist the articulation, use a 5-inch pipe as a lever.
Step 4. Installation of the second flange
 We collect this node before joining the rest
Screw the last corner with the flange
Drill holes under the second flange

Fleet flange to the wall, and the design is ready
We screw the second 5-inch tube into the second flange and the crepim corner at the other end of the 5-inch pipe before connecting to the rest of the structure.
We determine the place of attachment of the flange to the wall and mark the holes under the screws. Drills holes and screw the flange.
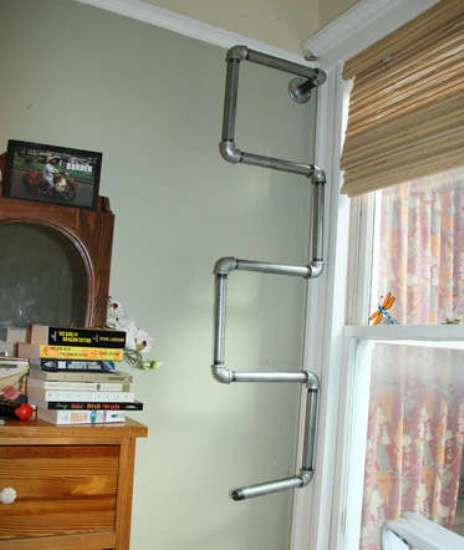
Step 5. Bookshelf
 Bookshelf looks like here and was
We put our books on the pipes vertically or put the plastics. In the latter case, it is better to balance the lower books, it will be a guarantee of stability for the entire stack.
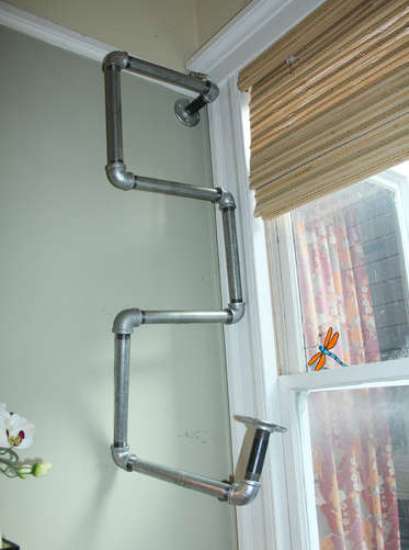
Step 6. Stand for shoes
 Stand for shoes also fit in the interior
Any girl will agree, how this stand for shoes is amazing! Many just love to look at their shoes, and on the usual wooden shelf shoes look awkward and takes a lot of space. Now that there is our amazing stand, your favorite shoes can always please the eyes.
But on this story does not end.
The craftsmen continued the project and screwed the bulbs - and, however, the wires can be carried out inside the pipe. Agree, stylish!
 How not paradoxically, but harmony is there!
By the way, a competition is announced on the method of fastening the base to such a design. The most elegant engineering solution we will publish in one of our issues. Write to us on the email address [Email Protected]
As well as in a new release:
Our gadgets: cost accounting calculator, Penguin voice memorization, video glasses.
Exchange SMS by hand using ... Handles (concept) - Communication Features sharply expand!
But this is already history! How much is the first mobile phone and what did he look like?
Subscribe to Mail Minijournal, get updates of our blog on the Lifehacker by RSS.
Share with friends of the article through the buttons of the social network, it is so comfortable!
Recently, the style of "Industrial" is increasingly in fashion: it combines well with a modern style, giving him a rustic and rude color and at the same time bringing a certain stylist gap to the face of the interior. Water pipes are cheap material with which you can create an interior in the style of "Industrial". There are pipes of all sizes and shapes, and this allows you to think and implement any project of your dreams with their use. Newcomers are very easy to work with them; The most time consuming part of the work is to cut the pipe (but do not be afraid, the manuals will help you do it!). Try homemade projects with plumbing pipes that we will tell below!
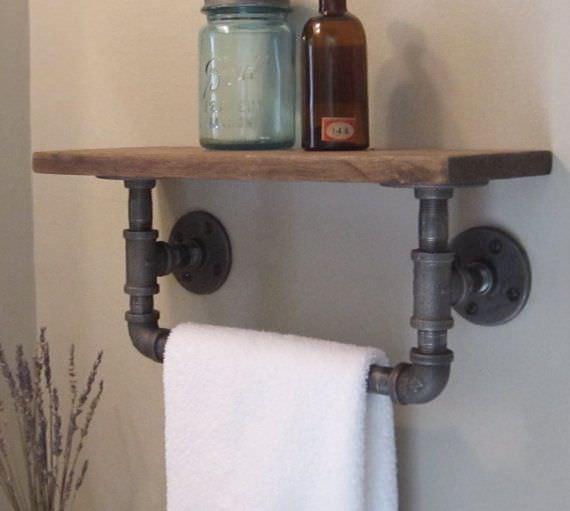
Pipe towels hangers

This is a very simple project in which you will also need to make a wooden base for the hanger.
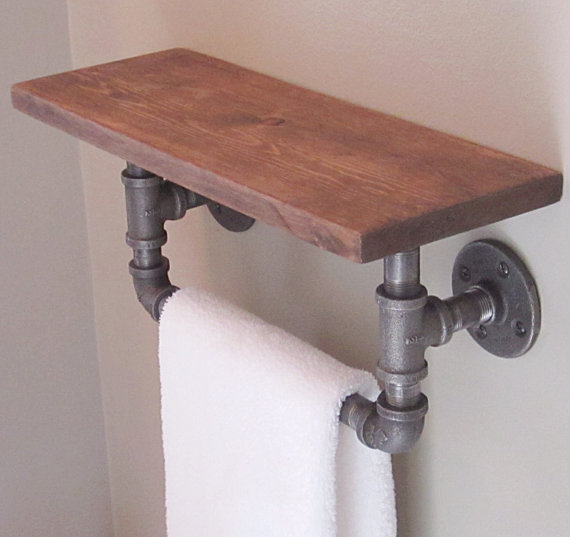
Want more inspiration for your bathroom? Then pay attention to this shelf with a towel hanger from a tap pipe. If you are creative enough, come up with your own, similar to the shelf design!

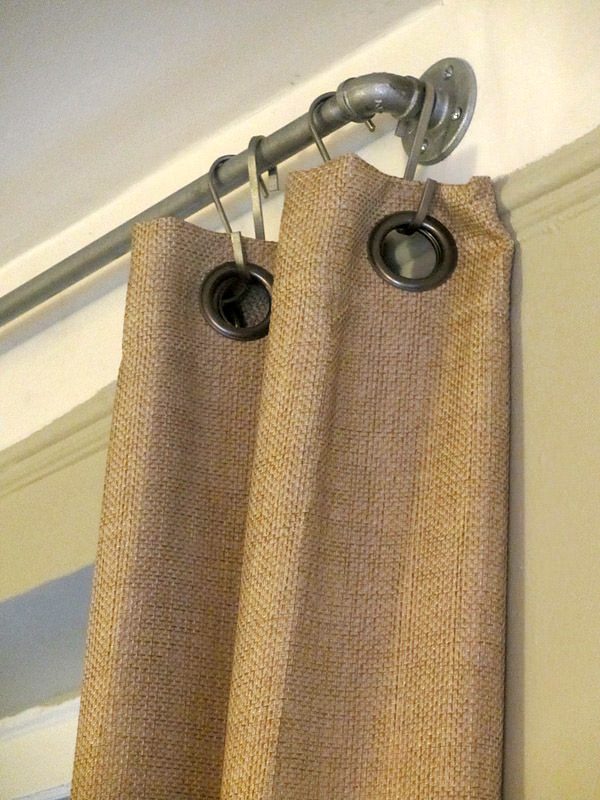
And how do you like a carnis cornice project in the style of West ELM furniture? Manufacturing Guide can be found on this page.
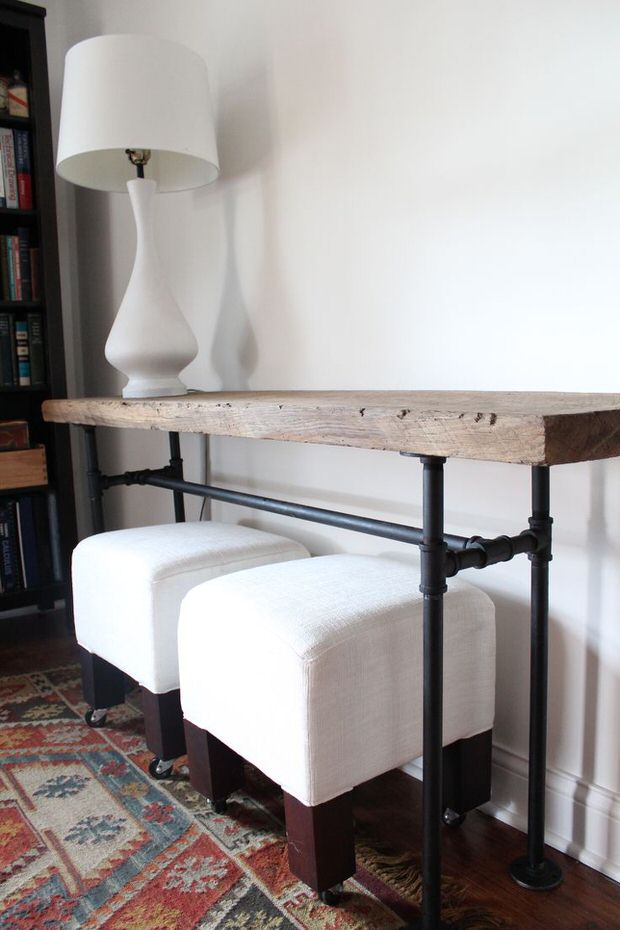
An excellent project is a bar table of black water pipes. It combines industrial, untreated wood and modern furniture, which gives the interior unusual, fresh look.
Do you need a coffee table? This option from The Golden Sycamore can you like. Just look at these two levels!

This firewood holder from The Cavender Diary is made in the style of Industrial, but is an element of a rustic interior. Especially good wheels! Those of you who have a fireplace, it can save from many hiking campaigns.

You will find full plans and manuals for the manufacture of this table on the Cafe Cartolina website. It will be your best office desk!