The veranda and the terrace to the house - how to make your country rest comfortable? How to build a veranda with your own hands - an open and closed extension to the house terraced construction.
The veranda allows advantageously to expand the useful space of a residential building. In the correctly erected and competently equipped an extension, you can comfortably spend time both in warm and cold season.

The extension is best to erect so that it covers the entrance door to the main house. Therefore, to build a veranda from any desired side of the ready-made main building you will not work. Otherwise, the veranda will be divorced from the main building and will have to go into it across the street.

The enabarits of the extension are selected individually. For a family of 3-6 people, there is enough veranda with dimensions of 3x4 m. It is also important to take into account the general view from the street. For example, if you live in a large two- or even a three-story house, and the veranda will be very small, the overall architectural ensemble will be negarmonic. To the compact houses you can safely add the verandas width over the entire wall of the main building - it looks wonderful.

Important remark! Regardless of the selected dimensions and in general, the features of the extension, its erection must be pre-bonded. For this, you should have a project in your hands. You can find it in open sources or order in a specialized company.
With the finished project, go to the local architectural department. Employees of the department will study your project, make the necessary edits and will be issued permission. Consider that it takes about 2-3 months on average for consideration and approval of the project, so the solution of this issue is most profitable to do in winter before the construction season.


Marking of the construction site
We begin the preparation of our construction site.
First step. We shoot around the perimeter of the future building about 150 mm of the upper layer of soil and take it onto flower beds, in a garden or another place.
The second step. Align the resulting deepening.
Third step. Perform markup. First, focusing on the project, drive metal or wooden pins in the corners of the site, then in a similar way we drive the intermediate pegs every 1-1.5 m, and after stretching the rope between the pins. We will be focused on it in the process of arrangement of the foundation.
We do foundation
Most often, the verandas are built on the bases of the columnar or tape type. The depth of the support is taken equal to the depth of the foundation of the main house. Binding the basic support with the foundation of an extension is urgent not recommended, because These designs will have a strong weight. Consequently, their shrinkage will also differ. So that a heavy house does not pull a relatively light extension behind you, the latter need to be erected on a separate foundation. To do this, we leave an approximately 3-4 centimeter clearance between the foundations.
Important moment! When choosing a type of foundation, consider, first of all, the peculiarities of the soil in your region and the total mass of the veranda. For the construction of heavy structures on bunching soils, monolithic are best suited. Lightweight structures, for example, from wood, can be built on bar supports.
Ribbon base
The foundation of the ribbon type is optimally suitable for the further construction of verandas from construction blocks or bricks. The thickness of the base, as already noted, withstand an equal thickness of the foundation of the house. If this is a new building, keep the thickness at 70-80 cm.
First step. ROOM trench around the perimeter of the walls of the extension.

The second step. Align the bottom and walls of the trench, from wooden boards or shields in the height of the future concrete support.
Third step. We consistently fall asleep the bottom of the trench with a 10-centimeter layer of sand and the same layer of rubbanks with a mandatory dump of each bowl of frighting.
Fourth step. We lake the reinforcement grid out of 10-12-millimeter rods. The recommended size of the mesh cells is 10x10 cm. So the base will be as strong as possible.
Fifth step. We pour concrete made from the portion of cement, three portions of sand, 4-5 portions of rubbank and water.
Thorring the fill thoroughly and leave it to dry and gain strength for 3-4 weeks. In the heat every day shed concrete to prevent his cracking.

Basic base
For the veranda of a bar or polycarbonate perfectly suitable. Poles for pillars are recommended to make a depth of 80-110 cm. If the veranda is small (about 3x4 m), it will be enough to install supports in the corners. However, professional builders recommend setting intermediate racks for any sizes of the veranda. The distance between the supports withstand in the range of 0.8-1 m.

First step. Roy Poam in the places of future pouring poles. It is convenient to do this with a bora.
The second step. I fall asleep the bottom of each recess 15-20-centimeter layer of sand. Additionally, it is recommended to pour about 10 cm rubble. Each layer is tamped.
Third step. We pour concrete to the level of the soil and give him to frozen.
Fourth step. Ready concrete supports are missing bitumen.
Fifth step. I fall asleep the slot between the earth and the supports.

Sixth step. We build an overhead part of brick columns. Height make an equal height of the foundation of the main house.


Making a draft floor
The floor can be wooden and concrete. For example, in a frame veranda of a wooden bar, the wooden floor will be more relevant. In the extension of the brick, the concrete fill will be better fit.

Wooden rough floors do this:
- fix the bottom strapping bar on the foundation. We use suitable fasteners, for example, anchor. For connecting directly bars, pre-samples in the places of their joints and additionally fasten with galvanized nails;
- to the lower strapping, the wooden lags are fed. Step with stand at 50 cm - so the floor will not completely fail. We use the compound version described above;
- we fall asleep space between lags by clay;
- we make flooring from the unedged board or plywood thick of about 50 mm. Elements of flooring fastened to lags with galvanized nails or self-drawing.
Concrete screed do this:
- i fall asleep the base with a 10-centimeter layer of sand;
- on top of the layer;
- we put the reinforcing grid. For the floor, the veranda is enough mesh from rods with a diameter of 6-8 mm with cells 25x25 cm;
- pour concrete.
Important! The screed must be as smooth as possible. Work with the mandatory use of the level.
Build a wooden veranda
The main properties of the material
The tree is one of the most popular and ancient building materials. Even after the market for all sorts of blocks and other budget and simple elements in the arrangement, wood practically did not pass positions.
With the erection of a simple frame wooden veranda, almost everyone can cope. It is only necessary to correctly mount the frame racks and sew them shields, clapboard or other suitable material.
The indisputable advantage of wood is its environmental friendliness, a beautiful appearance and a relatively small weight. The last property allows you to abandon the arrangement of expensive and complex in the construction of foundations.
The main disadvantage of the wooden veranda is its fire hazard - the installation of a mangaal in a similar extension or in close proximity to it is a very responsible event that requires accounting for many nuances and trifles. Therefore, the source of fire is better to carry out somewhere away beyond the limits of the wooden veranda.
Another significant disadvantage of wood is its bad tolerability of high humidity, in view of which the material needs a serious pretreatment special. Without such training, wood is very quickly rotating.
Erection procedure

For the construction of the frame, we use a high-quality wooden bar with a cross section of 100x100 mm. The lower strapping and the draft floor we already have, so further we work, adhering to the following instructions.


First step. Cut in the bottom strapping of the groove to install vertical supports. Withstand a half-meter step.
The second step. Install vertical racks. For fastening frame elements, we use brackets and self-tapping screws or nails.

Important! The roof of our veranda, as noted, will be inclined. Therefore, the vertical timber installed at the bottom point of the skate, we make 50 cm below the opposite racks.


Third step. We mount the top of the upper strapping. At higher racks, no questions arise - the connections do the same in the same way as in the previous stages.
When installing the strapping of lower supports, we do the following: first connect the pillars with a longitudinal strapping bar, and then fix crossbars connecting high and low racks at the height of low racks. With high crossbar racks, fasten through pre-created samples and nails.
Fourth step. Upper strapping is ready. The resulting slope will allow us to lay rafters for the roof. Additionally, we feed the beam-run near the roofing slope. For bonding beams with all supports, use anchor bolts. For greater reliability, it is recommended to bore the strapping bar with transverse boards or bars, if possible and need to (focus on the weight of the future roofing material). We will attach racks and soars for greater strength of the solo system.
Fifth step. Mount with 50 cm increments. To do this, use a wooden timing with a cross section of 100x200 mm. Connection of structural elements perform any of the previously discussed methods.


Sixth step. We are slaughtered. For the inner sheat, the lining is perfectly suitable for outdoor - siding or other material. Between materials of the outer and inner covering, lay the layers of hydro and thermal insulation. Film attach to frame. The position of the insulation is fixed by transverse rails. The material of the finishing finish is also attached. When sheeling do not forget to leave openings for windows and doors.


Prices for various types of timber
Brick verandas
Basic information about building materials
Brick is great for the construction of capital veranda. In the construction of this material will be cool in the summer and, provided that the insulation is properly performed, heat in winter. Brick masonry durable, fireproof and unpretentious in care.
The main lack of a brick building is a big weight. Such structures are erected solely on, which is not the best way to affect the total cost of construction.
Procedure for the construction of the veranda
The foundation is ready and waterproof, the screed of flooded, the base is flat and no additional preparatory activities require. We proceed to layout the walls.

Pre-choose the appropriate type of masonry. The simplest options, perfectly suitable for self-erection of the veranda, are as follows:
- spoonful masonry. The total thickness of the wall will be 120 mm;
- tychkin masonry. Wall thickness - 250 mm;
- chain masonry. Allows you to get walls with a thickness of 380 mm.
First step. Attach at the two opposite ends of the foundation with a coupler cord-moor. It must pass along the edge of the base.
The second step. I exhibit angular bricks on the cord, and after filling the space between them in accordance with the selected masonry method. To fasten the building elements, we use a standard cement solution.

Third step. We check the smoothness of the first row and in the same way distribute the walls on the desired height, not forgetting to leave openings for doors and windows.
Important! It will be inclined, so the wall coming to the bottom of the skate is, as well as the lateral walls adjacent to it, we make a row below compared to the wall that supports the roof.
Having laid out the last series of walls, we equip the armoomas. To do this, fix on the upper surface of the walls formwork a height of about 70 mm on each wall, exhibit an anchor bolts in the corners, put the reinforcing rods and pour concrete.
We give concrete to frozen, and then fastened to the anchor bolts, the strapping from a wooden bar with a cross section of 10x10 cm. Further order to arrange the rafter system remains similar to the situation with
If the veranda is planned to be used throughout the year, the wall masonry can be performed in two rows, filling the gap between the rows of thermal insulating material. With single masonry insulation, moisture insulation and interior decoration are carried out by analogy with a wooden veranda. Outdoor decoration remains at your discretion. You can simply be carefully sutvized and finish.


| Masonry size | Length, L. | Width, B. | Height, N. | Brick excluding thickness dissolved seam PC. | Brick Taking into account the thickness mortar seam 10 mm, PC. |
|---|---|---|---|---|---|
| 1 m cubic. Easy brick masonry | 250 | 120 | 65 | 512 | 394 |
| 1 m cubic. Brick masonry thickened | 250 | 120 | 88 | 378 | 302 |
| 250 | 120 | 65 | 61 | 51 | |
| 1 square m masonry in Pollipich (masonry thickness 120 mm) | 250 | 120 | 88 | 45 | 39 |
| 1 square m masonry in one brick (masonry thickness 250 mm) | 250 | 120 | 65 | 128 | 102 |
| 250 | 120 | 65 | 189 | 153 | |
| 1 square m masonry in a half brick (masonry thickness 380 mm) | 250 | 120 | 88 | 140 | 117 |
| 250 | 120 | 65 | 256 | 204 | |
| 1 square m masonry in two bricks (masonry thickness 510 mm) | 250 | 120 | 88 | 190 | 156 |
| | 250 | 250 | 65 | 317 | 255 |
| 1 square m masonry in two and a half bricks (masonry thickness 640 mm) | 250 | 250 | 88 | 235 | 195 |
Prices for construction and facing brick
Construction and facing brick
Making roof veranda
And rafters are installed. It remains to make a crate, mount the insulating layers and lay the finishing roofing material.
The doom can be solid (for rolled materials) and rarefied (for sheet roof). A solid crate make from OSB plates. To do this, secure them to rafters with a 1-centimeter gap. The bars of the rarefied cladder are secrets with a step recommended by the manufacturer of the selected roofing material. On average, it is 30-35 cm. For fastening the crate to rafters, we use galvanized nails or screws.
Cells between the bars of the crates fill the mineral wool for thermal insulation. From above, we laid the waterproofing film and attach it to the crate using a stapler with brackets. In case of arrangement of a solid crate, heat insulation fixing from the inside of the room. Fixation of insulation slabs provide with the help of transverse speakers, feeding them to the crate.
Finishing remains to mount. It is better that it corresponds to the roof cover of the main house. Otherwise, focus on your preferences and affordable budget.


Finish floor
If the draft floor is wooden, label in the space between them the insulation and stuffed to lags flooring from edged boards. Boards are paints and covered with varnish.
On top of the concrete screed, you can also equip the boardwall, similar to the previous method, or put another material at its discretion, for example, linoleum.


On completion, the doors remain, to fulfill furnishings at their discretion and connect lighting if necessary. We will not pull the wiring. It is enough to withdraw the extension from the house and include the necessary lighting devices.

Good job!
Video - the veranda do it yourself
The terrace is a platform attached to the house or standing separately. Usually it resembles a large porch, adjacent to the wall at the entrance to the house. In the southern areas of the terrace, as a rule, are open. In the middle lane - are coated with marquises or canopies. The construction of the terrace can be initially included in the construction plan of the house and is built on one foundation with it. But, if the house already exists, to attach a terrace to it will not work for any homemade master. Let's talk about what basic structures of the terrace exist and how to build them on their own.
Before proceeding with the construction of the terrace, design and decide what kind of design variant to give preference.
The most simple designs of the terraces are performed at the soil level. These are platforms that are paved with paving tiles, a paving or clinker. Power is performed according to the gravel-sanded pillow, laid in the pre-arranged recess in the ground, 20-30 cm high.
On gravel, you can build a wooden terrace with a flooring from boards or composite decoins. On top of the swelling lay wooden bars or steel profiles, playing the role of lag. Wooden supporting beams are mounted on them. On top pinned flooring board.
More complex terrace designs raised above the ground level. Moreover, they can be raised, both by 15-20 cm and 2-3 m (the level of the second floor). In this case, no foundation can not do. Such a terrace relies on reinforced concrete plates, blocks or piles that play the role of monolithic, columnar or pile foundation. An example of a raised terrace: a platform in the form of a reinforced concrete plate, lined with ceramics or porcelain stoneware. During the construction of a wooden raised terrace, on the selected foundation (concrete columns, plates, stamps), wooden lags are fixed, which are trimmed with a edged or terraced board (Deoping).
We will provide several options for the construction of the terrace decorated in the form of information master classes.
Option 1. Clinker terrace
This terrace option is constructed on a sandy rammed pillow, at ground level. The clinker tile from which the floor is laid out, allows you to form curves curved platform lines. To clearly designate the borders of the terrace, it is installed on its perimeter. For example, small wooden columns impregnated with antiseptics.
Works are performed as follows:
1. Clean the ground in the location of the device of a paved terrace. Clean the stones, squigs, remove the top layer of the soil, 20 cm thick.
2. In the resulting excavation, sand, layer 15 cm.
3. According to the planned area of \u200b\u200bthe area, the trench with dimensions of 70x70 cm (depth, width) is digging. At the bottom of the trench, a layer of gravel or sand is poured, 15-20 cm high. It is necessary for better removal of water at the place of installation of enclosing columns.
4. In the trench, on the drainage layer, two rows of wooden columns are installed (on the inner and outer side). Their vertical is controlled by the construction level. The columns installed in the ends of the fence are bonded by self-draws. Such a solution provides a more durable adhesion of structural elements, does not allow them to be shifted and fall out from the row.
The fence has the form of a closed "pocket", which will later be used as flower beds framed terrace. If the device of the flower beds is not included in your plans, the curb can be performed in one row by setting bricks into the trench, ready-made plastic fences, etc.
5. In order to prevent the soil flushing from the future flower beds, the rubberoid layer is placed inside the enclosure "pocket", the crying on the walls of the columns. Ruberoid is placed on the height of the planned level of snowflows in the soil. At several points, the waterproofing layer is fixed on the walls of the columns by self-draws or nails.
6. To the ground, from the wall of the house to the fence, pegs with a pitch of 3 m and stretch the cords with a slope of 2-3 cm on 1 perm. Thus, the level of sandy backfill is planned, which must necessarily form a slope for draining the rainwater from the terrace site.
7. Sand backing is tamped and smoothed by the level of stretched cords, sleeping, if necessary, the missing amount of sand.
8. Start mounting clinker tiles. Each tile is placed on the sandy layer, tightly pressed and tapping on the surface with a rubber hammer.
9. The remaining free areas, between paving and fence, fall asleep with a large decorative gravel.
10. The seams between the tiles are filled with fine sand using a rigid brush.
11. Sand surplus on the surface wash off a jet of water from under the hose. The pressure should be small so that the sand is not washed out of the seams.
12. In order for rain moisture to be able to smoothly flush with a paved platform, drainage performs. To do this, along the bars of the fence, laid out a drainage tube with slots, wrapped in the jute canvas (so that garbage and soil fall into the slots). For disguise, the surface of the pipe is covered with gravel.
The end of the laid drainage tube is connected to a storm sewer pipe. Through the tee, the drainage of drainage is connected here. A drainage chute with grille is installed in the right place.

Option # 2. Wooden terrace on gravel sinking
Durable and simple performed terrace, built on gravel sinking, can be easily accomplished from steel profiles (lag), wooden bars and boards. Since they will practically lie at the ground level, for this variant of the terrace, it is allowed to use only wood from solid, non-rotation, rocks: larch, oak, garapa, teak, merbau, etc. Before using the board are processed by antiseptics protecting them from moisture, rotting, insects, UV rays.
Progress:
1. At the place of the future platform, the top layer of soil is removed, 20-30 cm thick.
2. Fall asleep with gravel.
3. The steel profiles are placed on gravel by forming a bias of 2-3 cm on 1 perm. The distance between the profiles is about 500-600 mm.
4. Carriers are fixed to profiles. The distance between the beams is about 600 mm, if the thickness of the terrace board is 27 mm. With a thickness of the board in 20 mm, the beam step will have to cut to 400 mm. For additional protection of the beams from moisture, in places of their contact with profiles, rubber gaskets, carved in the width of the boards, are placed.
5. The beams are covered with a dark protective tissue (geotextile, for example) to prevent weed germination.
6. Perpendicular to the beams are harvested from boards with gaps 2-3 m. Between the boards and protective tissue, the struts are installed to prevent moisture accumulation in the floor space. Between the walls and flooring, leave a compensation gap of 1-2 cm.
7. At the end of the assembly, the boardwall is covered with antiseptics, painting impregnation or varnish.

Option # 3. Terrace on the Foundation
Wooden terrace on the base foundation is the traditional and most win-win option. The design adjoins the house and, in fact, is one whole with it. The column foundation is capable of lining a platform by 15-60 cm. At the same time, the formable space formed under the flooring contributes to the effective ventilation of the terrace elements and minimizes the possibility of driving wood.
Step-by-step construction instructions:
1. To connect the future terrace platform with a house, on the wall adjacent to it horizontally (at the terrace level), the first beam is fixed. Above the upper edge of the beam is mounted with galvanized steel.
2. In places of installation of concrete columns make ground removal. The columns should be installed in increments of 1.5-2 m. The recesses are carried out taking into account the desired elevation of the terrace, the height of the columns and the mandatory layer of gravel bearing, a thickness of 10-15 cm.
3. In the deepening, the gravel swelling falls asleep, then the trapezoid concrete column column. To the top platform of each column fasten a metal mortgage detail under square beams.
4. The support beams are inserted into the mortgage parts on the columns, secure them with screws.
5. On top of the support beams perpendicular to them, the platform beams are mounted at a distance of 40-60 cm from each other.
6. The terrace boards are screwed to the platform beams, observing 2-3 mm gaps between them. The gaps serve to prevent rainwater accumulation on the flooring and its free flow into the underground.
7. If unprepared edged boards are used for the terrace, at the end of the installation, the floor surface may look uneven. Therefore, the floor is equalized by grinding, leading all the points of the terrace to one level. After grinding, wood dust is removed and the boards are impregnated - antiseptic or staining. When using a special terrace board, an additional surface grinding is not required.

A columnar foundation for the terrace can be built from flat concrete blocks. Such a terrace construction is presented to the video:
Option # 4. DPK terrace on a pile screw foundation
Sometimes it is irrational to install a terrace on a column foundation. For example, with high groundwater running, on wet and unstable soils. In this case, the ground will be removed and pushed concrete column columns. Difficulties in the standard basement device may occur in areas with large levels of levels, on the slopes. In all these cases, for light buildings, another type of foundation is more successful - pile-screw. Screw piles make it possible to raise the terrace pad to the desired height (even 2-3 m!), Hold wooden flooring with all the necessary furniture. In addition, screwing screw piles for the terrace occurs within 1 day.
Consider the construction technology of the lightweight terrace from the DPK on the screw piles.
Progress:
1. Determine the pile installation points. They are screwed into 2-3 m in increments, with a mandatory installation in the corners of the future platform.
2. Screwing the piles is performed using special equipment or manually. With manual screwing in the slots on the upper king, the pile is inserted with a metal scrap serving a lever. In the process of scrolling this lever, the pile of blades breaks the soil and falls on the necessary depth (below the level of primerization of the soil).
3. Screwdrived piles are cut to the level of the future carrier frame.
4. Inside each screwed pile, cement mortar is poured to increase its strength and prevent the inner cavity corrosion.
5. On top of the piles, the steel metal frame from profile pipes is mounted. The frame has a form of a frame with intermediate elements located in 50-60 cm increments. The finished frame is covered with primer, special attention is paid to welding places.
6. Aluminum lags are placed on piles. Since when contacting aluminum with steel frame, the process of corrosion is launched, the lags are recommended only through rubber gaskets.
7. The fastening of decoping boards on aluminum lags is performed using the terminals that insert into the slot of the lag. Terminals allow you to mount the boards without the use of screws and the need to drill holes in them. If the aluminum profile used does not allow the installation of the terminals, the deconge board fastening is traditionally performed with self-tapping screws.
8. After assembling the composite flooring, the decing deconge is assembled by a fencing aluminum profile. Now the terrace from the composite deconge is almost indistinguishable from expensive wooden design!

How work on the installation of the terrace on the screw piles is shown in the video plot:
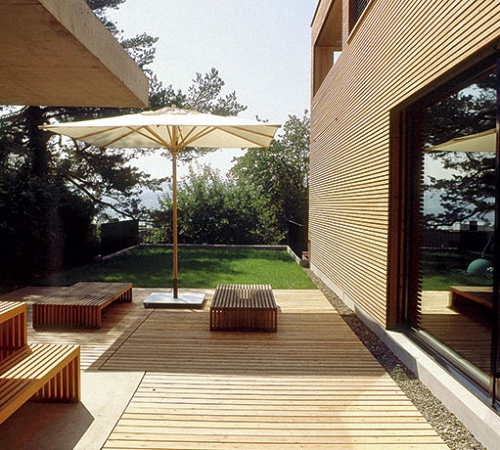
The simplest construction near the country house or at the cottage of an additional well-established space - work at least, and the pleasure of maximum. This is a veranda, patio, the covered area of \u200b\u200bthe mangala or an open terrace. Here in any weather you can enjoy dinner and dinner outdoors in a family circle or with welcome guests. Or after lunch, to communicate online with friends, breathing the flavors of the blooming garden behind a bowl of mint tea with a berry pie. But it is better in solitude to read the book during the midday heat or in rainy weather and indulge in pleasant memories and dreams under the measuring sofa swing. Yes, you never know how to do in the most pleasant part of the garden - at the junction of wildlife and urban improvement with garden furniture and sofa pillows?!
Selection of terrace format
Whatever a beautiful new home outside the city, without garden tracks, flower, a porch and a thoughtful open terrace, he looks unfinished. Yes, and in the summer, no matter how comfortable in the house, I want to make a chair and a table, in order to eat the whole family outdoors. And it is better when it rains behind the neck does not eat, and the sun does not blind. The veranda and terrace, the covered platform under the brazier, the gazebo, the patio and the covered gallery, shady arcade with grapes or bushes of the plenty rose ... All this is close to the concepts, although each construction has its own characteristics. But we will not go into details and differences, although it is worth telling more about open terraces, a photo:

1. Open summer terrace - the simplest construction in the form of a canopy on one side of the house used in the warm season. Based on a well-maintained platform, and it can be with or without a fence, on the foundation or paved by paving slabs, with simpleness between bases for overlapping or decorative decorations with thread or forging.
2. The closed country terrace is used year-round, therefore it assumes the wall and insulation. This is usually a more thorough building with waterproofing and the foundation that should be built on the project, it is desirable to simultaneously with the construction of the house. It resembles a lightweight extension at the entrance to the house, that is, another opportunity to increase residential space. The medium-sized room involves heating and lighting, air conditioning and ventilation, as well as stationary furnishings, which is not taken into the garden. Often there is a winter garden or an early seedlings are being grown, and if it is provided for full heating, then the family rests there and in winter. Such a structure is also an additional thermal buffer between the house and the external environment in the cold climate.
3. Another variety is a universal open terrace to the house, for example, with frameless glazing, which is maximally open in summer and closed and insulated in the cold season. Sometimes it is advisable to put ready-made double-glazed windows and doors that are removed in the summer. The closed room is heated at the time of visiting the owners of giving with effective electrical heaters, and with unrequisite, heating is not used. It is convenient when the country household is visited periodically, and the overall heating is calculated only on the residential part of the house. Such a terrace is projected initially for the needs of the owners so that seasonal transformations are possible.
ATTENTION: There is no point in planning the expensed construction of a warmed closed terrace if the cottage is used only in the summer season. If it is a country house or cottage, where it is not supposed to live all year round, a fairly simplest canopy or an open terrace. And when visiting private households, each weekend is better to use the 3rd option.
Tip: It is not necessary that an open terrace in the country is built in principle to one of the walls. It can be a well-developed platform between two auxiliary buildings, such as a bath and a garage, where instead of the roof - grapes.
One wall of the intermediate platform with a full-fledged roof without curly plants is better made from translucent material to limit drafts. And in the remote part of the garden, build an open terrace by Mangala, where it is convenient to relax with your family in the evenings.
If you already understood what type of terrace you need, then it is important to decide on the construction area. It is not necessary to make it too big if there is little place in the courtyard or on the site. In addition, it will require a lot of building materials, even if it is the simplest foundation and puzzle boards. An example - an open terrace to the house, photo:

The terrace or veranda is a courtyard decoration, so it makes no sense to save on construction, thanks to the tight-grade materials and the use of poor-quality "humpback" wood. It is better to make a slightly small platform without a foundation, in the form of a simplified design, and then decorate with carved semisalithic or neat wooden sideboards.
Tip: Any construction is done once and for a long time, therefore, with a lack of high-quality building materials, it is better to perform a phased part of the works, and when new financial resources are received, it is necessary to finish a spectacular building. For example, an open terrace at the cottage, photo:

If an open extension is done near the big house with a scope, then it is important to take into account the stylistics and the common landscape design of the site. Everything should be harmonized with the appearance of the manor. There is no point in the "Blue" terrace is gorgeous than a small country house, although a modest porch at a luxurious house also looks some kind of "kuts". A great impression creates a single architectural ensemble.
You can also make an inner patio with a swimming pool, which is different from the terrace - it is more attached to the house and raised above the ground level. Sometimes an outdoor terrace is a modified or extended porch, involving steps and railing. A refined pad in the courtyard of the house is sometimes zonied by a lively hedge, lay out the paving slabs and make the crate instead of the roof under the curly plants - also the simplest option under garden furniture.
Tip: While your site has a full-fledged roof in the construction process, use awning or beach umbrella using an unfinished terrace for its intended purpose.

Is it possible to make an open terrace yourself?
There is nothing easier than the construction of the simplest country buildings, such as open terraces with their own hands. The main stages of work:
- allocate space under the terrace construction site;
- draw an exemplary sketch or draw up a design of the structure with the size of the sizes;
- remove all objects, garbage and residues of vegetation;
- make markup on the project or drawing;
- preparing a place under the foundation and make it;
- put the beams and lags under the flooring;
- around the perimeter of the foundation we strengthen the carrying support supports;
- we make the foundation for the roof or visor;
- between the supports lay out the simpleness;
- complete the finish or trim, leaving a place for window openings, if it is a warmed option;
- complete the roof structure in accordance with the general intent;
- engaged in interior decoration and arrangement.

Tip: Whatever the option from the proposed illustrations you liked, it is important to correct it under your conditions. The facility of the terrace must be functional and practical adapted to your site and home, as well as take into account the lifestyle of the owners and seasonality of using the construction.
Let's discuss the choice of places for the construction of the terrace and its form
The optimal place for the open terrace is the combination of the functions of the porch or veranda, that is, at the entrance to the house. Sometimes a large country house is supposed to be 2-3 doorway, then it is the most convenient to make out of the kitchen or an entrance hall leading to the living room. It happens that there is no place to take the terrace at the bottom, because everything is already asphalted to the garage. As an option - an open terrace on the second floor, like an extensive balcony with a visor. It is convenient to do if the living room is in the same place, glad to bedrooms.
Most often, the construction of an open terrace is made instead of a porch, and it is reasonable, especially at the main entrance. If there is no separate exit under the indoor canopy, performing the function of the terrace, it can be made from the kitchen side so that dishes and drinks are served through the window. Then it is desirable that the window had a wide window sill on both sides, like the countertops.
Attention: winter on the terrace will fall snow and roll from the roof, so the light awning of tarpaulin or a weak design may not withstand loads!
When a well-maintained platform on a small courtyard is built arbitrarily, without binding to windows and doors, always take into account:
- in which climatic zone of the cottage;
- where and how the sunshine falls to sharpen;
- are there any drafts and strong winds to close the wall;
- there are protracted torrential rains in the summer;
- whether lighting is enough or a lot of shadow from garden vegetation;
- is it possible to organize artificial lighting in the evening, especially if the family is staying for dinner in the evenings.
Tip: In the cold climate, the terrace is built on the southern side of the cottage, and in hot - near the northern wall. An additional shadow is created by curly plants. If there is little light, then the roof or visor makes transparent - glass, polycarbonate, plexiglass.

It is important and what kind will open from the terrace, because I want the garden ensemble to please the eye. If there is a need to hide the family from prying eyes, it is better to rest in the courtyard. Those who want to impress the neighbors with landscaped design and beauty of households, you can make an open terrace at the entrance to the courtyard. When no one can see anyone in anyone, except for periodically invited guests, the location of the furniture is not fundamentally, it would be convenient to hosts.
The form of the terrace should not necessarily be rectangular, the semicircular site is originally, or in the form of a polyhedron. However, such an open terrace device will require much more building materials, the amount of sawn wastes will increase, there is a need for additional finish. The same can be said about the configuration of the roof. And do not forget about the roof drain!

Does the project of the terrace need?
Before making an open terrace in the country, usually make a project. It may be the simplest drawing or sketch with an indication of all sizes for the simplest design of the Wall. If it is a holistic architectural ensemble of a country manor, then the design should do a specialist.
Everyone knows that any quality work begins with a well-thought-out plan and cost estimates, up to the smallest detail. Then for the home and terrace make a common foundation, you can combine the design under the overall roof.
If the terrace is constructed later, all the same its completion is preferably made from common roofing materials. At the same time, it is important how it will be "sewn" to the main construction through reinforcement, and sometimes it makes it as an autonomous indoor structure. Careful study of all parts when designing reduces construction time and minimizes unrecorded factors that have to be eliminated along the way.
A light covered terrace is not a capital structure, so it can be without a foundation and binding to the house. All these moments are important to take into account in the project, thanks to which it is easier to calculate construction costs. And the more competent, it is compiled, the most clear the stages of the construction of the indoor platform and the consumption of materials.

If the project makes the architect, it takes into account:
- the features of the soil;
- climatic conditions;
- the intensity of precipitation;
- load for the foundation;
- dimensions and total dimensions;
- a variety of supporting design;
- the roof configuration and the angle of the skate;
- the type of glazing the terrace;
- staircase;
- decorative finish.
Building materials for external structures are selected resistant to moisture and fire. Wood is better to take with antiseptic impregnation and fungicides, with fire treatment. It is the perfect material and for the construction of a design support, its finishes and furnaces. Brick for simpleness is used light (hollow inside).
It is undesirable to make thick walls to minimize the shrinkage of the construction. Light foam concrete blocks are ideal for a warmed "winter" terrace. You can also use composite materials and homemade bricks, if it is appropriate to design a country facility. Waterproofing is needed between the foundation, concrete structure and flooring.
Any project of the terrace should be as economical and thoughtful as possible, taking into account the alleged furniture and free space. If there is only a sofa-swing and a couple of chairs at the folding table or console, then 2-3 meters in the width will be quite enough. In the case when a whole set of soft garden furniture from rattan with soft pillows, a full-fledged table and chairs for 6 (or more) persons, the area of \u200b\u200bthe covered construction can be increased to 5-6 meters from the wall of the house.
Choosing a material for an open terrace, it is important to know that the full roof is not always justified. In the garden, it will be successfully replaced by curly plants, grapes or flowers, but it is important to decide:
- what type of green plantings is preferable;
- what periodicity they will be planted;
- on which side of the terrace they are comfortable to develop;
- how watering and feeding will be organized;
- whether harvest is convenient if it is fruit plants.

ATTENTION: Honeymills and strongly smelling plants should not be used. This will attract a comfortable platform for lunch outdoors insects - bees, OS and flies. It is worth thinking than scare them.
Tip: The right choice of materials and competent design - a warranty of fast work. As a rule, for the construction of such structures is invited to take on those who have elementary construction skills, tool and work practices with wood. If it is difficult to find certain stages, such as laying the foundation or roofing, it is better to charge it to those skilled in the art.
Finishing stage:
- outdoor and interior trim;
- gardening and furnishing garden furniture.
At a very modest country, it is not necessary to order an expensive project, which is assumed to be entrusted to those skilled in the art. Here you can restrict ourselves to 2-4 pillars to support overlaps under the awning canopy or visor from polycarbonate. For such a landscaping, it is enough to lay out the floors of the terrace of pebbles or tiles, decorate with plants in pots, adding suspended porridges with flowers. The wall can make a sofa-bench with handrails in the form of a small table - this is the easiest option of the open structure in the form of a veranda or terrace.
We build a terrace at the cottage (video) - warm the country house and add to it to the terrace.
falls organizing a place to relax on the country site set. The fastest and easy way to attach a wooden terrace to the house. This simple structure allows you to comfortably enjoy fresh air and take sunbathing. And if you make a closed type terrace, which reliably protects from wind, dust and precipitation, then you can relax in any weather.
The practicality of such an extension was estimated by many homeowners. With a sufficient area on the terrace, the whole family is comfortably located along with guests, and if you install a barbecue or barbecue, the resting platform turns into a convenient place for cooking and eating. In short, the possibilities are endless!
Themed Material:
The best option for beginner builders will be an open summer terrace adjacent to the house. To build such a structure correctly, it is necessary to figure out all stages - from the compilation of a detailed project to finishing and decorative works. Why start?
Features of the construction of the terrace
A place to relax in the country area can be decorated in the form of a separate arbor, a closed veranda at the entrance to the house or the open terrace.
The latter option has a number of features that allocate it against other buildings:

Where to build a terrace
Place for the construction of an open platform, consider considering:
- what side of the house is illuminated by the sun;
- view that opens from the terrace;
- the features of the soil - the nature of the soil affects the choice of the foundation;
- landscape of the site - the construction should organically fit into the overall design of the yard and harmonize with the style of the house.
Often the open platform is located near the pool or natural reservoir. The form of structures can be different: rectangular, round, asymmetric, curved.
Interesting multi-level terraces that save themselves to make individual steps and providing effective drainage.

Place the construction can:
- next to one of the walls of the building on the general foundation;
- around the whole house;
- separately from the dwelling - in this case, the terrace resembles a gazebo.
Selection of material
What is better to make a terrace? Many options.
- Wood. The wooden structure is distinguished by durability, reliability, ensures maximum comfort and homely atmosphere. Construction will come out the most economical and least labor.
- Stone, concrete, brick. It is more difficult to work with these materials, they cost more and do not allow to implement part of the designer ideas.
- Metal. Of the steel or cast iron make beautiful railing and standing design. But this option is spent from a financial point of view. Also, it is not necessary to work with the metal at all - you need at least one to own the welding machine. In addition, rest on such a terrace will be less comfortable, since the steel is heated in the sun.
- Polymer composite, or DPK. This raw material is the cheapest and simple processing. Thanks to the coating of PVC, the material does not need to be protected by impregnation from rotting, like elements of a wooden structure. Externally attractive DPK - resembles natural wood texture.
With the construction of the terrace, it is not necessary to apply new materials, you can make a platform for recreation from residues after the construction of the house. The main thing is that the boards, concrete blocks for the foundation and other elements did not have defects and were processed by special impregnation, protecting the moisture, temperature drops. Only in this case, the design will turn out to be strong and durable.
Drawing up drawings
Before it is important to figure out all the design details of the design. A properly compiled and approved plan of structures - a guarantee of the quality and legality of the construction.

What should be in the project?
The following technical characteristics are reflected in the drawing:
- area with accurate indication of sizes;
- materials used;
- mass of the structure;
- type of foundation.
When drawing up a project, it is important to take into account the features of the place selected for the placement of the terrace: the type and structure of the soil, the technical condition of the wall and the foundation of the house, climatic factors.
Users are often looking for:
Since it is quite difficult to make a drawing of the terrace, the best solution will be the appeal to a specialized project organization. Professional engineers will make up the plan of structures taking into account the construction norms and wishes of the customer.
Project approval
Despite the fact that the house is the property of the owner of the land plot, making changes to the design of residential premises should be coordinated and approved:
- fire safety service;
- sanitary and epidemiological controls;
- local administration.
Without a complete package of documents, the construction will be considered a self-employment that will not allow to sell, give, exchange the house or use the property as a credit pledge.
Stages of construction of an open terrace
An extension to the home area for recreation is carried out in several steps:

The last stage can be omitted, but additional items will make the design of the original and functional.
For the terrace, a tape or bonded base is suitable. However, often builders resort to a simpler version - the use of border stone under the foundation. In this case, the work is as follows:
- With the help of fittings or wooden pegs indicate the boundaries of the future building. For the convenience of further work on the perimeter stretch the twine.
- In the corners, temporary supports of bricks with a height of about 40 cm are installed.
- The tops are laid at the corner to the house of about 2 ° (this will provide a good stock of precipitation). For leveling use a construction level.
- At the top of the lag stretch the twine, the lags are cleaned.
- Instead of temporary supports make columns from concrete.
- Between the racks, trenches are dugged under the curb stone and poured concrete.
- Stones are installed.
- When the mixture is frozen, the gaps between the foundation elements fall asleep with a clamzite for thermal insulation.
If the construction is new, the founding of the house and the terrace does not need to connect it - the building shrinkage will lead to the destruction of the extension. If the house is worth a long time, the foundations are combined with a metal fastener.
Design wooden flooring
Step-by-step instructions for the floor for the terrace:
- Lags are installed on the foundation.
- Market places for fastening timber.
- The crossbars are fixed using metal corners.
- Mount the boards. Before this tree is carefully treated with impregnation from rotting, bacteria and fungus. Between the boards leave small gaps for ventilation and temperature deformations.
- The edges of the flooring are trimmed for greater aesthetic.
- The surface is varnished or stained.
It is advisable to use larch, because it is rich in natural resins and is ideal for street buildings.
If the deck terrace seems too simple, the construction can be supplemented with auxiliary elements, such as the roof.

The roof options for the terrace are several:
- the construction adjacent to the house - is placed on a rafter from a wooden bar, fastened to the upper strapping on vertical racks;
- polycarbonate roof;
- construction from a transparent slate;
- removable canopy in the form of a stretched awning.
However, the construction of the roof can not be bored - from the Sun will perfectly protect simple umbrellas. However, in this case, the furniture and decor will have to be removed every time abundant precipitation.
Terrace design
Decorative elements are affected by a variety. For example, wooden fences consisting of three parts are installed on an open area for relaxation: racks, railings and balasine. These elements are attached to the supports on which the roof is kept, or to its own vertical beams.
As an alternative to a wooden fence, light tulle tulle, which creates a feeling of air, decorating a terrace and protecting against sunlight.

Required elements of recreation areas - tables, chairs, lounge chairs and other furniture. Additionally, decorate the room can be vegetation in pots or a lively hedge around the perimeter of the structure.
Thus, the construction of the terrace is the best option for a beginner wizard. To build an open platform with your own hands is easy - you just need to carefully follow the recommendations and comply with the technology of work.
527 viewsThe terrace attached to the house is a comfortable place where it is nice to relax in the circle of loved ones and, oddly enough, its construction can be easily accomplished with their own hands. To understand how to do this, you need to learn more about the main features of this extension.
Distinctive features of the terrace
Before designing an extension on the household plot, you should decide how the design will be framed - in the form of a terrace, veranda or arbors. All listed varieties of buildings are similar among themselves, but also have significant differences.
Compared to analogs, the terrace has several distinctive features:
- located on the total foundation of the building or on a separate but combined with the main one;
- its main purpose is summer holiday, since, mainly it is built in the form of a large open area;
- not protected by the walls, their role is carried out by the railing;
- it can be installed near any wall of the house or even around the entire main building.
All kinds of attachments to the house have one target destination - this is a place to relax in the fresh air in a large campaign circle. The choice of the optimal version will depend on the solution of the landlord host.
How to choose the best place to build a building?
Since the terrace is built for a pleasant pastime, it is thorough to choose from its construction site. It must comply with the following parameters:
- well covered with the sun;
- have a wonderful appearance;
- harmoniously combined with the main building and with the features of landscape design.
In addition, when choosing the location of the future structure, it is necessary to take into account the composition of the soil, as it will depend on this, which material is better to use during construction, and what kind of form it becomes the most appropriate.
What material is used for the construction of the terrace?
Most often, wood is used to build an extension of this species. It is strong enough and reliable. In addition, the wood terrace will create a comfortable and cozy atmosphere during pastime on it.
Some house owners prefer to make an extension of brick, concrete or stone. Such materials, though durable, but also costly cost, and also harder to work with them than with wood.
The foundation for the construction of the design can be the most diverse, but in order to make it easier to independently build a terrace, use a finished curb stone as a base. Thus, part of the work is significantly reduced.
Therefore, the initial stage of construction will be considered to launch the foundation of the structure. To do this, it is necessary to designate the perimeter of the future building with the help of wooden stakes that the twine is stretched. In the corners of the markup, temporary supports made of bricks with a height of about 0.4 m.
On top of the lag stretch the twine, after which they can be removed, and instead of bricks put support from concrete. Between them, testers are broken under the curb stone, it is installed and poured with cementing solution. After the cement fully freezes, the entire base area can be covered with a clay to provide heat insulation.
Construction of the terrace site
After laying the base-foundation, you can start the construction site of the terrace. For this, the most often used wood.
Lags are stacked on the foundation, for which the bars are fixed with the help of fasteners in such a way that small gaps for ventilation are fixed between them. Before laying, the boards must be carefully treated with antiseptic solution in several layers.
After the flooring is laid, its edges should be swallowed, and the surface is painted or registered.
Installation of roofing
Installation of the roof is not required during the construction of the terrace, it is considered an auxiliary element. For these purposes, one of several roof options can be used:
- wooden bars;
- transparent slate;
- polycarbonate;
- awning.
As a rule, the roof on the terrace is not fixed. Many building owners usually use structures that can be quickly removed, for example, large umbrellas.
Creating an internal decor
It looks beautiful even on the open terrace a wooden fence, which consists of racks, balaasine and railings. Such elements are between themselves and are attached to roof supports or separate beams.
An extension is decorated with the help of various elements of the decor, such as live flowers, overlap from the seal tissue and others. Mandatory on the finished terrace should be placed furniture for convenient location of all guests, as well as sun loungers, if you can take sunbathing.
