Door arches from plasterboard. Arch with your own hands, or how to put the doorway
To date, even an ordinary Khrushchev can become very beautiful inside, it does not need to demolish the walls or lay out new ones.
Plasterboard will help to replace complex construction work and exclude dust formation. It is inexpensive, easy to work and install, and is also considered the most sought-after material. With it, the surfaces are leveled, drywall is used to make partitions, rebuilding, and you can also create door arches. It is about the door arches from drywall and will be discussed in the article, and leadership will be presented, how to make an army from plasterboard with your own hands.
Select Arch
The first thing you need will be stopped - arched opening and its appearance. The arches are different, there is a complex design, there is a simpler, some use a shelf for things, there is no one in the others. Among the common and frequently used, the plasterboard arches are distinguished, which are presented in the table:
| Art type: | Description: |
|---|---|
| Classical: | The plasterboard arch is performed symmetrically, the dome form. |
| Asymmetric arch: | The arch is created with a shifted center. This method of creation is simple and economical, does not require great effort and can be suitable for any room and interior. |
| Gothic: | This Arch has the highest point due to the compound of planes at an angle with a slight inclination. |
| Openwork: | The arch is different from other species, since it has niches, through holes that pass through the doorway door. |
| Multi-level: | In this case, the arch may be any form, as a rule, such arches are unusual, but to create a good fantasy and the ability to work with plasterboard. |
| Segment: | Arch, in which there is a shelf, niche and other places where various items are put. The option is suitable for any room design. |
| Romance: | Very practical version of the arch, ideal for combining the balcony and room, is often designed by the kitchen of this type of plasterboard arch. |
| Portal: | The simplest and cheap arch is drawn up in the form of the letter "P". |
| Half a day: | A stylish version of the design, the arch is drawn up by a quarter of the circle, but you can round up and the small part of the opening, if it is wide. |
Make an arch in the apartment with their own hands from the drywall, each can, with the form of the arch Used any, depending on the taste, how the installation is properly carried out, will be shown below.
Materials and inventories
In order to do not waste time during the repair, it is necessary to immediately prepare the materials and the necessary inventory, only then you can build a plasterboard arch. To create an arch need:
- Several sheets of plasterboard, depending on the size of the arched opening and the selected shape. It is recommended for the construction of the arches to use drywall sheets of 6.5 mm in thickness. Such a material is ideal if the opening will be figured, like most arches, it will be easier to work with it.
- Several metal profiles for creating a frame.

- Dowel.
- Self-tapping screws, different lengths, during the creation of the Arch, it will be necessary to use a screw of 3.5x25 mm, as well as 4.2x13 mm.
- Scissors for metal for cutting profile.
- Pliers.
- Stationery knife for cutting plasterboard.
- Drill and screwdriver, depending on what the wall may be required by the perforator.
- Needle roller.
- Level, Roulette for measurements and marker, pencil.
- Sherryanka.
- Spatula of different sizes and plaster replacement.
- Emery paper of different grain.
- Perforated corners to accommodate the corners of the arch.
- Soil and finishing materials.
Important! Before proceeding to creating a plasterboard arch, it is recommended to dodrawing Arch itself, and also cookproject Rooms tointercomed Arched opening joined aesthetic in the overall design.
How to bend plasterboard for arches in the doorway (video)
Preparatory work
Before starting the construction of the Arch, it is necessary to cook the doorway, where the installation will be made. Initially, you need to remove the door and the door frame, it allows you to slightly make the opening more in size, which is important, because the arch will always visually do less height. After removing the box, you need to remove everything, clean from dirt and dust and residues of building materials.
Often, the classic design of the arches, which have an oval contour. This design consists of three parts of drywall:
- 2 parts of the plasterboard sheet are the same in shape, they are the side parts.
- 1 part of the plasterboard will be curved.
To create lateral two parts, it is necessary to place plasterboard:
- Using the roulette, the size of the width of the opening is removed and the radius is determined, the angle of the arch.
- Next, it is necessary to use a kapron thread, in length, which will be the same as the radius of the future arch.
- A pair of loops is made on the thread, in one of which you need to insert a sewer, and in the second pencil.
- Next, sews need to stick in Glk, evenly stretch the thread and draw a pencil arc.
- When the size of the radius is transferred, it will be necessary to cut one side part with a stationery knife.
- The finished gypsum arc arch is applied to another sheet of plasterboard, and a new drawing is drawn in its circuits, after which the procedure is repeated, cutting the second drywall arc.
This preparation ends, the room is removed and you can start installing the frame for the future arch.
Montage of carcass arch

The framework - the base of the whole arch and reliability must be taken immediately, during construction. The scheme presented below will allow you to correctly make a frame from the profile:
- Initially, at the top of the doorway, you will need a dowel to attach guide strips from metal profiles. By analogy of the profile, mounted on the wall itself. Such parts should be installed on both sides of the arched opening, ranging from the top point and ending the end of the rounds.
- Next, using a conventional metal profile you need to create an arc. It is easy to do this, it will be necessary to simply create cuts on the profile with metal scissors, with a distance of 5-10 cm from the size. After that, the profile is bend, for maximum accuracy of the finished design, for the template you can use the ready-made plasterboard sheet, which is cut on an arc.
- When it was possible to bend a profile, it should be installed in the plank of the opening, for this, the arc vertical parts is fixed by dowels. For the army from drywall, you will need to bend 2 profiles, which will later be attached to the prepared arc from drywall.
- For the reliability of the carcass arch, it is recommended to fill the space between arcs. This is done with the help of the same profile that is inserted between a pair of arcs, but you can use a wooden bar and insert between them.
- When the frame will be ready and the two parts of the drywall will be fixed to it, they are installed on the side using for this self-tapping screw. The distance between Samorezmi must be made approximately 10 cm.
The next step will be the installation and flexion of the plasterboard sheet at the bottom, as well as the arches finish.
Montage Arch
Important! In order for the door arch to the correct radius of the lower part, it will be necessary to cut a flat strip of drywall, which will approach the length and width of the arch. In this case, it is recommended to use a flexible meter for accurate measurement. In addition to the plasterboard band, add 10 cm.
To make drywall flexible need to use some water. The lower part of the carved band of the drywall is wetted with water, after which the lest is carried out with a needle roller and you can leave the material for graze, not long. Further, the plasterboard strip is neatly applied to the arch and bends in shape, the sheet must be fixed with a scotch tape or a painting ribbon and leave in this position until complete drying. It should be remembered that for the arch, the lower part of the drywall should not be very much wetted with water, otherwise the material softening, and will give cracks.

When plasterboard is barely wet, it can be screwed to the frame of self-drawing on both sides. The start of installation is carried out from the middle of the arched opening and is attached to the edges. After 12 hours, the plasterboard will dry completely and you can move to the following steps.
There is another option, how to bring rectangular drywall, for this, on the one hand, cutting cuts are made, after which the material is applied to the arch and gently bends and fixed with self-draws. This method can not always be used, but only if you need to make a small angle, the radius of the arch. Phased process will be like this:
- Plasterboard cuts almost all the depth on one side.
- Dome of the drywall for the made cuts is carried out, the main thing is that the plaster remains to keep on the cardboard and the paper is not damaged.
- Further, the slots immediately need to sharpen, and additionally each incision is recommended to close with sickle.
- The finished item is installed in the arch and is attached to the frame. It is important not to twist the self-tapping screws at the edges, so that the arc from the plasterboard does not lose its form and is not deformed. Samores themselves need to be dragging in drywall.
- Each covered plot will need to be cleaned with sandpaper, using initially larger grain, and then move to the small grain, so that in the end there was an ideal, smooth surface.
Installation of plasterboard arch is finished and only finishing and facing remains. After installing the arch, the design should turn out like such as in the photo:

Final work
The framework of the frame is over and you need to start the final stages of the construction of the arc from the plasterboard. Step-by-step instruction for the final stage will be as follows:
- Initially, plasterboard on the arch must be processed by testing its corners and edges of the sandpaper, if there are large defects, it is possible to cut the sides with a knife carefully. Due to such actions, all irregularities and defects will be eliminated, the protrusions will be obtained rounded and beautiful.
- Next, it is necessary to plaster the surface. Initially, you will need to buy a putty for the seams and it is used to close all the mounting joints, while you need to remember the use of sulfays on the seams, in order to further do not form cracks.
- The joints are embedded and it is necessary to close the holes under the self-tapping screw using the same putty.
- Before emphasizing the entire arch of drywall, it is necessary to install perforated corners, it is better to use plastic corners. With their help, it will turn out to achieve smooth corners that will keep their own forms. Installation of the corners is carried out on the putty material, after which it is closed by putty.

- The spacure itself needs to be breeded as it says the instructions for it, it is recommended to use an acrylic composition for drywall.
- The putty is applied throughout the arc, not a very thick layer. After that, the design is left for several hours to lose weight. When the surface is white - this is a sign that the putty dried. The surface of the arch must be sanded with sandpaper, in order to remove unevenness and defects.
- Next, you need to re-tap the surface of the Arch and also give time to graze, after which go to sandpaper.
- Removing dust and dirt, applied a layer of primer, the arc from the drywall is left for graze.
- Now the last layer of putty is applied, and when it dries, then you just need to stall the surface and remove dust.
On this installation and processing of the arch of drywall is complete and will only remain to decorate the surface.
Decorating interroom arch
Make a plasterboard arch with your hands is not yet an end, because it will be necessary to improve the designs and it is necessary to give it a species on the basis of the design of the apartment or repairs in a separate room, the corridor. Decorating should be not only original and beautiful, it is also important that the arch remains practical.
After all, from time to time the arch from the drywall will be in contact with human hands, possibly legs, as well as objects that will be transferred. Due to this, the decoration of the Arch can suffer or stain and the finish must be approached carefully. Such a device as an arch of plasterboard can be reapged by the following type of materials:

- Bloom the wallpaper. This method of decoration is often used to design an arched opening and the method refers to standard. Due to the large selection of wallpaper, with different textures, colors or patterns, such a design can be very original, spectacular and individual. If we talk about practicality, it will depend on the material from which the wallpaper is made. For example, a vinyl coating on a fliesline basis is best suited for the arches from drywall. They are high-quality and will be for a long time on the arch, you can also wash them. It is perfectly suitable if the arch goes into a large hall or the arch connects the bedrooms and the corridor. It will make it easier for rectangular or square arched opening.
- Staining. In this case, it is better to use water-free paint, such an option for designing the arches from drywall is also often used and is considered to be a very practical choice, because if necessary, it can be painted a surface many times. It is worth noting that for the archer from the drywall it will not be necessary to make a lot of paint, so buying it better to choose more expensive, but it is high-quality. The cost of the material will pay off, but the arch will be more beautiful and more reliable, more practical. Paint can be used on any arc if it is oblique, with a curly arch or with niches. In addition, it is possible to make a drawing or painting around the arch, but in this case it is necessary not only fantasy, as well as artistic skills.
- Tissue covering. To shelter the arch with a cloth is not very practical, but beautiful, noble and unusual. In this case, the fabric for the arches can be any, but the decoration method must be selected for a specific interior and, depending on the envelope of the arches from the plasterboard.
- Stone design. Arched opening of drywall in the corridor or in the kitchen, often decorated with a stone. This method is very reliable and beautiful, though, the price of the stone will be high, and the decoration process becomes more complicated. But the life of the stone is not limited.
Arch design Every person chooses individually, based on various factors.
Sophisticated arches

Not always partition, the arch of the drywall is placed simple form. In some cases, additional niches are used in the arc, which are also made from drywall, because not all arranged an oval in the arch. If shelves or niches are used in the arch, the backlight is very effectively combined.
Initially, making the arc from drywall, you should decide on the size, as well as the arrangement of the structure. Marking is carried out, according to conditions in the apartment. When the arch is defined, you can begin the installation of a complex plasterboard design.
Using the level must be made on the wall of the line, which will serve as a part for the plasterboard arch. Further, a profile is installed on the lined line, and the second is mounted at the top of the arched opening. On the finished profile, which will be in the form of the letter "g" it is necessary to fasten the sheet of plasterboard, which is pre-cut. On drywall, you can make any shape or drawing using a pencil and a jigsaw or knife.
From the sheet of drywall, it is necessary to cut a pair of identical parts, then fasten to the frame, the thickness of which can be different, each person itself sets the arch thickness, using the profile. In essence, complex designs made of drywall are created according to the scheme described above, but the complexity can only be in the lines for which you need more time to cut. If it is not clear how to make a complex arch of drywall, then you should look at the video, a master class to create complex plasterboard partitions.
The creation of plasterboard arches or partitions allows you to add a highlight to any apartment. Working with drywall is easy, the cost of the material, including drywall is low, therefore it is advantageous to use the means for the construction of the arches in the house.
Photo gallery of finished work


Several years ago, arched openings were included. This design of the entrance to the room is beautiful, originally and allows you to do without installing doors. Using modern materials, you can make and separated arched archdo it yourself. Work is not too complicated, but requiring great accuracy. In addition, you will need to think in advance how finish will be performed operactions. You can make design in various styles, considerhow to make the arch in the doorway.
Arch is a very spectacular way to revive the interior and make it more attractive. Beautifully decorated arched opening in the arch will emphasize the beauty of the interior in the room, will make the situation more original.
A huge variety of arches forms and a harmoniously chosen finish will allow the room to transform. To make sure this is enough to see the photo of the room before the arch was inserted into the opening, and after repairing the repair. Consider how you can create a niche in the form of an arch, install it in the walls of the wall and separate it with your own hands.
Types of Arok.
When designing interiors, arched openings perform not only decorative, but also practical functions. Perform a niche in the edge of the wall separating adjacent rooms, or set the partition with the opening of the arch in the large room in the large room can be used to separate space on the zone without using interior doors.
In most cases, semicircular openings are used, the following types of arches are distinguished:
- The classic arch is a structure in which the bending radius of the arc is half its width.
- Arch Modern. It has an original form in which the arc is performed with some lift.
- Romantic arch. It is almost rectangular opening, the edges of which have roundings.
- Elliptical arch. In this case, it has the form of oval, with an extension in the middle and narrowing at the top and bottom.
Tip! What do different types of arches look like, you can see in the photo in the magazines in the interior.
Preparing for installation arches
Consider how you can install it yourself and separate the classical arch of drywall.

Make measurements
Starting the creation of the arch is necessary with removing measurements from the opening. It will be necessary:
- Remove measurements on two diagonals of the opening. These measurements must coincide, otherwise, it will have to first work on its alignment.
- Remove the width. This measurement is useful for determining the radius of the arc bend.
- Measure height.
Acquire materials
In order to install the arch required:
- Arched plasterboard sheets 6.5 or 8 mm thick. If the opening in the standard size room is enough of one sheet. This material is very convenient in work. You can use Phaneur, but it is more difficult to work with it.
- Metal profile. It will take 2 pieces of the guide profile of 50 × 40 and 1 of the profile of the racking 50 × 50 mm.
- Fasteners: Dowels with screws (25 pcs.), Self-samples of 3.5 × 25 mm and Self-breeds of "Seeds" 3.5 × 11 mm.
After the construction is completed, it will be necessary to separate the arch. To do this, you need to stock:
- Primer;
- Putty finish;
- Perforated arched corners.
The rest of the material is purchased depending on which the design of the opening and the wall adjacent to it is planned.
Mounting work
First, the framework is performed. Stages of doing this work with your own hands:
- We cut off the two profile segment at the height of the opening and one in width and fix them in the opening, using a dowel with screws.
- Now you need to prepare the arcuate part of the frame. The length of the profile for this part is determined by folding the two values \u200b\u200b- the radius of the arches and the height of the retreat from the top of the opening.
- To make it possible to bend profile, you need scissors for metal or grinder to make cuts in parallel side parts of the profile. A step of the arrangement of the cuts is 4-8 cm. After that, the profile is bent, giving it the necessary form.
- I fix the carcass made of the made part, after aligning it.
- The finished frame is wearing bilpers from plasterboard. First, the frontal parts are trimmed by overlooking the parts of the opening. Then the inner part of the arch is manufactured. To bend the harvesting from drywall with your own hands, it is necessary to perform cuts from the wrong side, without damaging the outer layer. The prepared part of the drywall must be installed, consolidating on the frame using self-samples.

Finishing work
The arch of drywall is practically ready. But as you can see in the photo, it looks not very attractive without finishing. Consider how you can perform the design and framing the collected arched opening with your own hands.
First of all, you need to sharpen all the seams and locations of the self-seat. On the outer edges on the putty composition, secure a perforated corner so as not to mess with the shape with a putty.
Then over the entire surface of the arch, we apply a layer of finishing putty, and after it is drying, spinning the surface, seeking smoothness. It remains to be uploaded to the surface, after which a finishing finish can be performed.
How can I split the arch? The selected option should be harmoniously combined with wall decoration. For example, if walls are floating with wallpaper, the same material can be applied to the decoration of the arch.
You can use other options that combined with the wall decoration. For example, to separate interroom artificial stone, tiles, decorative plaster, and a combination of different materials can also be used. As far as beautiful and original can be an arches finish, you can see photos.
So, interior openings in the form of the arches are an original and very attractive way to decorate the interior and arrange the opening between the adjacent rooms without installing the door. If desired, making the arch will not be difficult. And as it is interesting to separate the arch can be seen in the photo in the interior magazines.
Often, in front of the builder, the task of building arched overlap, the arrangement of the dome-shaped roof or the original "humpback" bridge over the reservoir, which is becoming an increasingly popular small architectural form. At the same time, in most cases, the masters do not bother with complex calculations using two values \u200b\u200bthat even know the seventh grader. Such values \u200b\u200bare the width of the span, subsequently overlapping the arch, and the arrow lifting height, which is calculated by determining the distance between the imaginary horizontal line, carried out between the points to which the arches are stopped, and the highest point of the arch. According to experts, these values \u200b\u200bare not enough to equip a reliable arch with high performance characteristics. The main role in the design of the arched overlap is given by the selection of materials from which the arch will be built, and the arches associated with it, the correctness of which determines its subsequent operational characteristics. Following these recommendations, you can construct a reliable arched overlap, which will become an excellent solution and not only diversify the design of the apartment, but will become an excellent decoration of the garden landscape design. Specialists in this area will easily produce all the necessary calculations, but what to do if there is no opportunity to use their services, and have to do all the work on your own? In this case, use our recommendations that will help you easily cope with the task.
Arched systems in terms of professional
From the point of view of engineers specialists, architect structures are called a scrawing or curvilinear system, on the support elements of which vertical loads acting, leading to inclined reactions directed inside the opening. The horizontal component of a similar reference reaction is spaced, which indicates that the arched systems are spacer structures. This is their main difference from beams that experience only normal mechanical stress. In modern construction, the Arches are used as the main supporting structures of structures of various purposes, whether economic, industrial or agricultural buildings, a span of 12 to 70 m. As for foreign construction, in this industry, the construction of arched spans is even more developed, which allows the arch up to 100 m or more.

Classification Arch: Main varieties
In accordance with S. static scheme , distinguish shavnian , double-coarse and three-starry arches ;
Also, the reference end of the arch can be connected by a horizontally located rod that perceives the horizontal load and called tightening . The calculation of the arches with a tight is somewhat different from the calculation of the two-coarse arch or a three-starry argy without a tightening.

For each of these types, their advantages and disadvantages are characteristic, in connection with which the choice of design is carried out by a designer engineer, which will calculate the three-starry arch, taking into account the strength requirements for it, materials used for its design, and architectural tasks assigned to it. On this or that design.
In accordance with the content scheme, allocate arches with tight and arches without delay . If the first perceive the crop, then the last space is transmitted to the supports. Tightening is made of profile steel or reinforcement. If the operation of the Arch is carried out under conditions of aggressive media that contribute to metal corrosion, the use of wooden glued tensions is allowed.

The form differences:
- Triangular arches consisting of direct seeds. The calculation of the triangular arch does not represent difficulties, and you can produce it yourself;

- Pentagonal arches;
- Segmental arches, the axis of the seven colors are located on the total circle;
- Strelded arches consisting of several seventeals whose axes are located on two circles;

How to make the calculation of a three-starry arch with a tight: recommendations of specialists
If you plan to implement a small arches, the calculation and design will not give you special difficulties, since it is preferable to use the sheets of building material of huge sizes, such as plywood, drywall or OSB-slabs. The greatest indicators of their width length are 250 and 120 cm, respectively, which makes it easy to draw the arch on a sheet of material and cut down at least two components of the parts of the beams. At the end, such arches are squeezed by sheet material, after which it can be considered that the arch is ready. Despite the speed and ease of installation of the Arch by this method, it is also characteristic of both its drawbacks, among which a large amount of material spent on waste, the decorativeness of the finished arc and the inability of the design of the load.

The arrangement of arched structures is significantly complicated if the Master is the task of mounting the arches over a large lumen (up to several meters) or arches capable of withstanding the highest loads. Due to the fact that it is difficult to find materials on the construction market, the dimensions of which make it possible to carry out such an arches, it is constructed as a typical design consisting of several parts. In this regard, before the master, the task of accurate calculation of the Arch and determining the size of its parts is faced.

As mentioned earlier, the arches differ in accordance with such parameters as a form, size and height, and before implementing a project for calculating the wooden arch, it is necessary to clearly imagine the design and the approximate dimensions of the desired arch. Taking into account these parameters, it is easier to determine the selection of materials for its installation and the subsequent calculation.
Amateurs, having heard the phrase "Calculation of the Arch" often scared, but calculations in this case are simple and are based on the use of school formulas from geometry. In addition, to facilitate calculations, it is necessary to draw an arches in a somewhat reduced scale on millimeter paper. After that, the architecture template is made in real size, having which you can most effectively carry out further calculations, as you can apply the so-called copy of the arch to the place of installation and evaluate the accuracy of the calculations. For the manufacture of a template, you can use a dense cardboard, fane or Fiberboard sheet.

Arched structures occupy an extensive niche in architecture, and their use is the widest topic, which is impossible in one article. In this material, we will look at the manufacturer of the arch in an apartment or a private house, as the traditional rectangular opening, decorated in the form of an arch, will become an exclusive detail of an apartment interior, which benefits from other apartments.
Consider an example of calculating the three-stroke arch:
In most cases, regardless of the experience of the master, he is known three parameters of the arch, among which the width of the span overlapped by the arch, the height of the arch, as well as the depth (width) of the wall. Before the master, it is worth the task of calculating the parameters of the details of the arch, collect them into a single arched construction and firmly consolidate it.
Method number 1 - empirical
Despite the fact that any calculation of the arch begins with the calculation of the radius of its circumference, the arch does not always represent an arc of the circle. There are situations where the arch consists of two arcs (this refers to the arches performed in the Gothic style) or are characterized by asymmetric outlines. In this case, the calculation of each arc arch is made separately. But, back to the calculation of the arches circumference. It is more convenient to produce it on paper, while having reduced the size, on the scale, for example, 1: 50. Prepare paper and the circuit, blacksmith on a sheet of door opening, taking into account the scale and carry out the symmetry axis that divide the opening in half. After that, the axis of the circulation must be changed by putting a leg with a needle directly on the axis of symmetry. Next, you need to draw a few arcs and, stopping your choice on the most optimal, the rest is removed with the help of an eraser.

To visually demonstrate this example, you will show arc arch:

where R is the radius of the circumference of the arch, and L is half the chord of the arc, while the size of the chord corresponds to the length of the arched lumen. As for H, this indicator displays the height of the arch.

Method number 2 - mathematical
To carry out the mathematical calculation of the arches circle radius, use the Pythagores theorem, according to which:
R \u003d L2 + (R2 - H2)
R \u003d L2 + (R - H) 2
Declaring bicked, we transform the expression in the view:
R2 \u003d L2 + R2 - 2HR + H2
Subscribe from both parts R and get:
L2 + H2 - 2HR \u003d 0
We transfer the term with R per sign of equality:
2RH \u003d L2 + H2
And finally, we get the desired R:
R \u003d (L2 + H2) / 2H
Important!Formula for calculating the radius of the circle Arch: R \u003d (L2 + H2) / 2H where R is the radius of the circumference of the arch, H is the height of the arches, L is half the chord of the arc (the length of the arched lumen).

Due to the fact that the arch consists of several parts, for the manufacture of which will have to use the board of a certain width, we will calculate the size of the part that can be made from the board with specific sizes. To do this, it is necessary to solve the opposite task. Taking into account the known radius arch and the height of its lifting (in this case, this is the width of the board), we calculate the maximum possible length of the part that can be made from the board with a certain width, that is, we will calculate the length of the arch. Due to the fact that certain relations are already known from previous calculations, we will withdraw the following formula:
L2 \u003d 2RH - H2
HR - H2.
To make the arc properly, it is necessary to prepare a slightly more details, given the fact that during the installation process they will have to be allowed. The docking method is chosen depending on the purpose of the arch. The use of overhead details on the "cheeks" of the arch and docking of the two arches, taking into account the shift for half a favor.

In the process of calculating parts, it is necessary to consider what side of the arch, depending on its location relative to the details, most of all are interested in (internal or external). Simply put, we need to understand how the carrier parts of the Arch will be located in relation to the Arc itself. For example, with the arrangement of the dome-shaped roof, the carrying parts of the arched design will be located below the arch, and when the arched arch is edited. There are situations when it is necessary to equip a bilateral arch. In the latter case, the calculation of the details of the arch will produce on the smallest rounding.

If during operation, the arch will carry high loads, it is necessary to produce it with various beams and fumes installed between the arches nodes. Thus, you can equip the carrier farm, which is able to withstand increased loads.
If you decide to equip the arch in the Gothic style, you need to accurately determine the radius of rounding the arches at the ends. In this case, you facilitate your task using the empirical method of calculating the arch, with which you experimentally select the point of rounding the arch, then you will hold the line in parallel to the wall, measure the resulting distance and hold the same length on the other side. Then the circular leg is put on this line, determine the distance (radius) and, moving down or up parallel to the line, determine the point where the wall line and arc arches will clum up by means of a second (smaller) arc. On the second side of the drawing, it is necessary to produce the same.

To make it easier for the task and maximize the calculation of the arch, you can make several drawings and choose the most suitable. As you already understood, the examples of the calculation of the arch are far from the only one, and there are other methods of calculation, however, the empirical way demonstrates you how the arch will look like after the installation. In addition, in the process of making calculations, you can easily adjust the drawing until you reach the desired result.
By making a drawing and make sure that it is necessary to make the arch template, using which, you can easily install any arched design.

A few words about choosing a material for the arch
For the manufacture of the arch, you can use various materials, including metal (the calculation of the metal arch is performed somewhat differently), as well as brick and concrete, but the most simple and cheap way is the manufacture of plasterboard arches. Due to the fact that the arch, made of brick and concrete, will be very heavy, it is necessary to mount the reinforcement frame. Armature is easily bending, and you can easily cook the frame from it. After that, using the perforator, it is necessary to drill holes in the walls, drive in them pins and weld the arched frame to them.

The manufacture of plasterboard arches is much easier and faster, however, the finished design will be less durable than its brick or concrete counterparts. To do this, it is necessary to make a frame of tin profiles, to strip their drywall on the sides, and to use segments to use segments (for their manufacture, drywall are cut on one side, fuses and conclusted with self-draws). The resulting areas must be smoothed by putty.

Calculation of a brick arch: Highlights
To make the calculation of the brick arch, it is also necessary to make a pattern from the fiberboard, the quality of which largely determines the operational characteristics and the appearance of the future brick arch. First of all, it is necessary to calculate the dimensions of the template, which will require knowledge of the width of the arched opening. For example, the width of the arched opening is 15000 mm.

Since the width of the template should be 5 mm less, it means that it will be 1495 mm. Even if there is a swelling of the template from moisture, you can easily make it dismantling at the final stages of work. The height of the template must correspond to the height of the arch, in our case, let it be 168 mm. Since the whole face brick is recommended to put in the upper part of the arch, it is necessary to calculate the number of bricks. Since the height of one row is about 72 mm (the height of the brick + seam height), and the total number of rows is 4, the arched height is 72 * 4 - 120 \u003d 168mm. (120mm at the same time - the height of the brick, laid on the edge).

In conclusion
Most often, the installation of arched structures is carried out for decorative design of the room, regardless of its purpose. It can be a house, an apartment, and an office.

Often with the help of the arch design the doorway between the kitchen and the living room. However, the installation of the arch can also be used in the process of larger construction types. If you plan to arrange the interior of the room with the help of the arch, the specialists recommend making an arched construction from drywall, as it is much cheaper, easier and less labor. In this case, the finished design will not give way to arches from brick or wood. In order not to be disappointed in the beauty and correctness of the arch, the specialists are recommended to approach the installation of arched structures with due carefully and carry out the calculation of the arch, which can be carried out in several ways. In our article, we offered you the two most common and effective ways to calculate the Arch, using which you can build a reliable and aesthetically attractive arch.
A simple way to increase the space of a small apartment and home-removed. To transfer or dismantle the walls is not always possible, and the event is quite costly and time consuming. The opening with the door-shot looks not too aesthetically, so it must somehow arrange in a new way.
The most popular way to do it is the design of the arch. More with the help of this element, it is possible to divide the long corridor into separate zones: it eliminates simplified geometry.
Such an architectural element can be equipped in any part of the dwelling - in, or living room. He will add home individuality and originality, will make it unlike standard apartments.
Making your own army is quite real.
This requires certain tools, materials and a detailed description of the process.
Instruments:
- pencil, roulette ,;
- scissors for metal;
- bucket;
- sharp knife;
- rapid grater;
- respirator, gloves and glasses.
You can build it where you are pleased with any dwelling zone. But in order for such an element perfectly fit into the design, we need Doorway not lower than 2.5 meters. It will be wonderful to look at any interior, but most suited as alternatives to kitchen doors or for long corridor.
Most of the arches noticeably reduce the doorwaythat in some cases is a significant disadvantage. You can check in advance how the selected type of arch will fit into the existing doorway. For this, a blank is cut out of cardboard or paper, which is attached above the door.
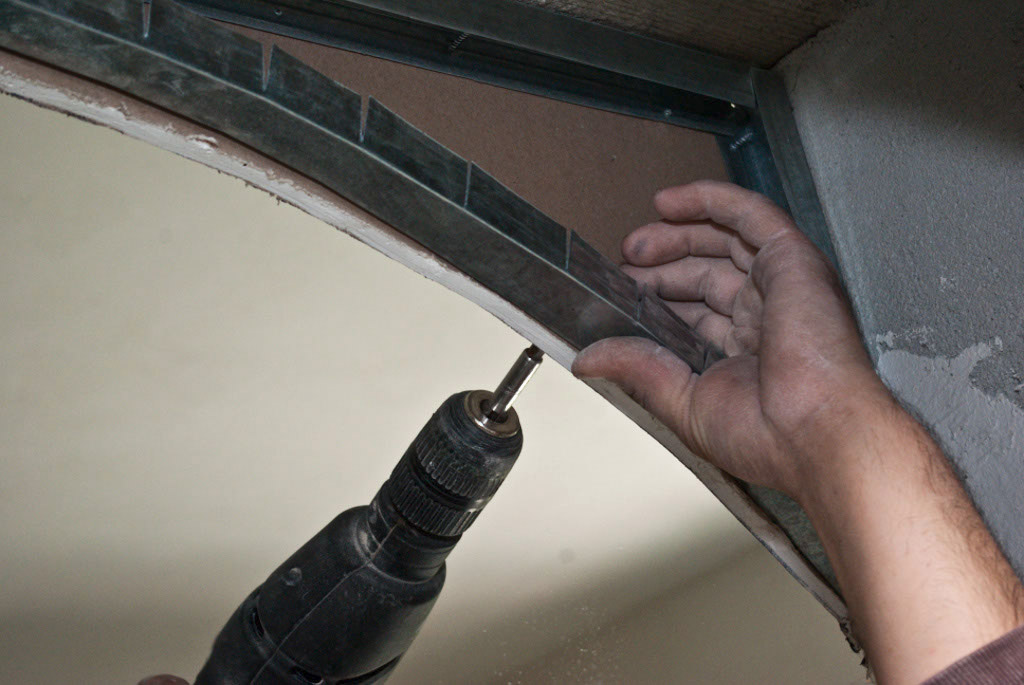
When metal profiles are firmly fixed on the wall surface, go to the installation of sheets.
It will be more convenient to apply electric with torque. If the thickness of the material is 12.5 mm, the screws of 3.5 x35 will be required, and for the sheets of 9.5 mm it will be sufficiently smaller to the size of the screws.
The inverse side of the arched frame is separated in the same way.
Screwing the screws with a screwdriver, should be controlled so that the caps of them are in the same plane with the surface of the material. If they are wrapped deeper, the resulting recesses will need to be lured.
For reliable fixation on the frame of plasterboard parts, the screws need to be placed at least every 15 cm.
Further, to enhance the rigidity of the structureThe curved metal profile is needed to fix around the edge of the arch. For this, the cutting of the metal profile is cut into the dimensions of the arc. Are used . Since the edges of the material are sharp, it is better to protect your hands with dense gloves.
How to bend a metal profile?
 According to his side, it is necessary to make small cuts, at a distance of about 10 cm from each other. With their help, the profile is easier to bend, as we need. The stronger it is necessary to bend it, the greater the number of these nuts will be required.
The profile acquired the shape of the arched arc is fixed in the lower parts of the previously mounted metal frame with its ends. Then the walls of the arches are neatly attached with self-draws to the curved metal guide. This is an important part of work that deserves close attention.
The frame is considered to be completed only after perpendicular short band bands that bind two walls of the arch will be installed. Such special jumpers are located at several points.
Installation for the arch of a wooden frame drywall
 For work, wooden bars will be required and. Which thickness should be bars? From the width of the discharge, you need to subtract the width and, the desired value will be. A curved line of arched arc is planned on the plywood, according to which the workpiece is cut by a jig.
She (the arch of plywood) should be strengthened, the role of which is played by wooden bars, fixed on the plywood 50 mm self-drawing. Next, it should be fixed in the opening of long self-stakes, with a step of step 15 cm. The same manner is mounted the second wall of the arch of plywood. After these events, plywood is trimmed with drywall with special self-tapping screws.
When the frame is completed, and the side arched walls are installed, you need to fix the lower section of the arch - arcuate. The length and width of the arc is measured, and the size of the drywall is cut down the size of the size. Next, it must be bent - how to make it easier? You can take advantage of the next cunning.
 On one side of the details are made every 10 cm parallel notches, for which the top paper layer is caught with a sharp knife. It is important that these cuts are strictly perpendicular to the edges of the part, but in parallel relative to each other.
If you need to bend the leaf is quite a bit, it is enough just to moisten it.
The resulting element is applied to the bottom of the argy up with cuts, gradually and carefully giving it the required form. In order not to damage the material, when flexing drywall should not make much effort. It is important to level the edges of the plasterboard rectangle with arches arcs. It is fixed by self-drawing first at the top of the arch, then to its edges.
When the installation of the arc from drywall is complete, one should make smaller elements of the structure. Maybe somewhere the panel is cut not perfectly smoothly, there are notched and donkeys. With the help of a sharp knife, the edge is thoroughly aligned. All work is desirable to lead in protective gloves.
Only then the Arch will appear in front of us in all its completion. What is required? All joints and edges of drywall should be placed by a fiberglass mesh or paper tape. Next, several layers are applied (at least three), and careful grinding of emery paper of different graininess is carried out. These procedures are not complicated, they can be made with their own hands.A acrylic composition for internal works will be required. But for the seams it is better to use the putty of another variety, more reliable and durable. It is necessary to prevent the formation of cracks and flaws in the fields of joints. The putty is well mixed, only after that you can begin to apply it to the junctions between the opening and plasterboard. This is done by a special spatula of rectangular shape. Hats of self-tapping and closed with a composition.
 All surface defects (holes, drenimes, dents) are filled with putty and align. There should be a perfectly smooth surface, located on the same level with other parts of the Arch and the wall. Then such errors fix much more difficult.
Next, to hide the irregularities and preventing the cracking of the joint and the edges, it is flooded. To do this, you can take a paper tape or a fiberglass grid - both materials are great. Then the layers of putty are applied, which are polished after complete drying. After applying the last, third layer, about twelve hours waiting for its drying: it will become dazzling white. After the finishing grinding of a fine-grained sandpaper, a smooth and smooth surface is obtained, which is ready for the subsequent staining.
Do you dream to create an original interior on your residential squares and make some kind of highlight in this space? Pay attention to the design of interroom openings, which can become a central object specifying the tone of all design. Arches with different shape and decor are very popular.
The arch in the apartment creates beauty, comfort, emphasizes the refined taste of the owner.
If your apartment has openness at least 1000 mm and you do not want to hide a room for interroom doors, then we will tell you how to make the arch in the apartment. At first glance it seems that this occupation is not for an amateur. But after studying the features of the arched openings, the possibilities of modern finishing materials and the detailed instructions for mounting the arches, you decide to make it with your own hands.
 The correct form of the arch will emphasize the dignity of the apartment.
This, of course, the question is rhetorical. Many people who are interested in art are familiar with the arch, have been in beautiful buildings with high ceilings and big passages, examined the interiors of country houses in the photo. Many places are the subject of admission and the binding element of the interior. The shape and size of the arch depend on the opening in which it is created:
- semicircular;
- ellipsed;
- rectangular with small roundings at the edges;
- rounded on one side of the passage.
You can list infinitely, because each passage and room are individual. But there are certain standards for arches that have a certain form and name:
- classic;
- modern;
- ellipse;
- romance;
- portal;
- trapezium;
- transom;
- arch with verte elements.
We offer to see photos of the listed items:
 Choose the form of the arch, which is relevant to your apartment. Take into account the features of the room, especially height.
 For yourself, you can choose a ready-made version How to make an arch in the apartment with your own hands or enable fantasy, take into account the features of the opening and make your own template.
 You can come up with your arch design, viewing ready-made options.
 Just remember about one nuance - in low ceiling apartments you can choose more elongated forms, so that the arch does not make the impression that your ceilings are lower than it really is. The rest of the arch helps to expand the space, eliminate the overlap of the room with the door web. But it is impossible to make the arch in the apartment if the design does not fit it. Before making a decision, we advise you to view different photos How to make an arch in the apartment and what form to prefer.
Arched structures are appropriate not only in interior aisles, but also in the design of walls, where a beautiful baguette or vase will be located.
Fireplaces are often found, the top of which is made in the form of the arch. Perhaps and in your apartment you can make such elements so that the interroom arch does not look alone.
Talking about what Arc is moving to the practical part of our conversation, namely how to make an interroom arch in an apartment, which material for this can be used.
How to make an arch in the apartment: Select the material, prepare the opening
To correctly make the arch in the apartment with your own hands, examine the interroom opening. It should be even, without holes, curvature, reliable. If doubts arise, run work on stripping and leveling the surface by plaster, primer. Decter to which the wall is made - brick, blocks, wood. This is important because it is possible to fix the arched construction by different fasteners, depending on the material of the walls.
Materials for arched structures in the apartment
You can make the arch with your own hands from different finishing materials available to you by price:
- plasterboard (GLK);
- plywood;
- Fiberboard;
- board;
- brick;
- a rock;
- plastic (for example, wall panels);
- stucco;
- finished arched structures.
Perhaps after studying information, you will have your ideas from what to make an interroom arch in the house with your own hands.
The simplest in the work, affordable is plasterboard.
 Plasterboard is better than other materials suitable for the manufacture of arches with their own hands. The material easily cuts and snacks in skillful hands.
 In skillful hands you can make any designer object, including interior arch. It can be bent to the desired form, and this is important for the arch, because the bottom of the portal will be curved. The area of \u200b\u200bthe sheet allows you to cut a large semicircle. It is also very convenient. GLK is dug with a jigsaw or a stationery knife, not leaving the dirt indoors. The remaining materials are also available for self-use in creating an arch, but will require more skill, time, tools. For example, brick must be beautifully lay out, pre-taking care of a reinforced metal frame. The weight of the design is large and can threaten with a collapse with incorrect masonry.
Wood has a drying property, wondering, which also affects the quality of the final result. Carpenter's skills will be required to make the army with their own array.
 The finished arches from the array look flawlessly, but require careful preparation of the doorway.
 It will be affordable to buy a finished arched opening of an array if the tools allow. But here there are nuances - interroom opening may not correspond to the factory set. Then you have to customize the opening under the finished product.
What will take to create an arch in the apartment
The key to the success of any work depends on the preliminary preparation of everything necessary, object measurements. We will need:
- dimensional dimensions;
- template of the future arch;
- glCl sheets;
- metallic profile;
- fasteners on a tree / metal (depends on the walls);
- roulette;
- level;
- drill;
- lobzik or stationery knife;
- scissors for metal;
- screwdriver;
- roller with spikes;
- primer;
- putty;
- decorative finish for arched facilities.
Deciding with the form of the arch, it is necessary to make the correct measurements of the arched construction in the apartment. The main parameters is the width and depth of the interior opening. With a sufficient height of the ceilings in the apartment there is no need to emphasize about the height of the arched rounding. Here the size will dictate the form of the arch and the width of the passage.
 Even the simplest arch requires the correct measurement of interroom opening.
 Having obtained the size, transfer them to a sheet of plasterboard. It is necessary to make a pattern on cardboard so as not to spoil the main material.
- Draw the shape of the front part of the arch. To do this, you can use the circus made by your own hands. Take a simple pencil and a tight rope that does not stretch. The rope in length should correspond to the radius that corresponds to the size of the arch. Tie a rope to the pencil. Install the griffel into the center of the sheet and swipe the semicircle line or other selected shape. Facade template ready.
- You still need one detail - the lower part of the arch, which closes the wall at its depth. It is important here is the width of the part. It corresponds to the distance from the wall of one room to the wall of the adjacent room. Take the length with the reserve, because only a specialist can accurately calculate the size of the arc. And we are superior then withdraw.
- We carry the template on the sheets of plasterboard - the front of the arch two pieces, the bottom plank in one instance.
Collect a metal frame for a beautiful arch in the apartment
Metal profile must be prepared before installing the interroom. Apply the desired bending will help scissors for metal. It is necessary to make small cuts along the entire length of the profile. Step Tear from the shape of the arch. You can attach a profile to the front part of the arch and bend it along the contour of the part, making cuts in the collapsion. Such elements should be two, on both sides of the interior pass.
I fix the radius profile to the wall with screws for metal or wood. You can pre-screw into the wall of the dowel for better profile clutch.
 Machine metal frame from the profile to secure the elements of the arc from the plasterboard in the opening.
 Now you need to strengthen the design. This will require a direct profile that set the depth of the arch. How to make a frame for a beautiful arch in the apartment can be viewed in the photo:
Collect interroom arch in the apartment
It remains quite a bit to the logical completion of the process - fasten the parts to the metal frame and reorganize the surface of the walls.
- Take one front part of the arch and reappear to the wall and metal profile. Spin the screws in the frame of the arch more convenient and faster the screwdriver. Well, if you have an assistant. Keep smoothly and twisted the fastenings to one very difficult. There should be no distortion. The beauty of the future arch in the apartment depends on this.
- Similarly, we do with the second part of the Arch, fixing it on the reverse side of the opening.
- Now install the lower bar of the arched facility. It is a little more difficult, because the plasterboard needs to give an arcuate form. For this, GLCs should be wetted with a damp cloth along the entire length and leave for a while near the wall. The leaf will begin to bend forward, then you can take the item and gently start mounting on the wall. Even for smooth bending, the sheet is used with spikes roller. Complete them all over the area of \u200b\u200bGLK, the gypsum will begin to take the right shape. Secure the item in the opening of the screws and cut the surplus if they are.
- The vertical walls of the interior opening can also be placed drywall, unless other finishes are provided.
- Check the result resulting before the finish finish. Hats of self-tapping screws should be slightly recessed in Glk, so as not to interfere with further finish.

The surface is ready for decorative trim to the rest of the walls or something else.