How to make the outer corner of the tile. How to lay out external corners with ceramic tiles
The tile is one of the most popular, practical and inexpensive finishing materials. That is why the tile can so often be found on the walls, floor and ceiling in the kitchen, in the bathroom or toilet room. But when facing a tile alone, the tiles can not do. In order for the interior to look beautiful and finished, it will be necessary to use and additional elements, including a corner.


Benefits
The tile corner is not a mandatory element of the facing, but, nevertheless, solves a very important functional and decorative task.

To fully estimate the benefit of the corner, it is necessary to carefully consider its advantages:
- The possibility of registration of complex geometric surfaces.To cut the tile at an angle of 45 ° is very difficult, and sometimes it is impossible at all. Using the corner allows you to solve this problem and do it completely without cutting.
- Masking of irregularities and rough edges of the tile. The cut, decorated with a corner, is perfectly smooth and smooth.
- Decorative factor.The corner made in contrasting, gives the finished canvas finished and neat look.
- Waterproofing. The use of the corner is the perfect solution to the issue with moisture getting into the joints between the tiles. The corner prevents the formation of mold and the appearance of fungus, the service life of the coating itself is significantly increased.
- Safety.Using the corner allows you to prevent possible injuries when slipping on the wet floor. Corners and tile ends can have chips or irregularities that can lead to different cuts or injury.


If the design provides for a lining of a bath or other room in a complex stylistic solution, such as baroque, folklore, an ethnic, then the corner may be a mandatory part of the composition.
Types and types
The corner serves to design the corners, the junction between tiles, complex surfaces, places of compound plumbing with a wall, etc. In their form, it is divided into two groups: external and internal.
- Outer corner.It is used to design protrusions of walls. This is necessary because this part of the coating is experiencing a constant mechanical load. Closed corner sharp tiles ends completely exclude danger for nearby people. In this case, the corner performs and purely protective function. An outer corner can be put immediately when laying a tile or after the end of work on the finished coating.
- Interior corner It is used to design an angular jacks of tiles when crossing adjacent planes, such as walls and ceiling, as well as connectivity of the shower and wall. Such a corner has several rounded, concave shape. The application of an inner corner prevents moisture from entering the seam between tiles or tiles and a wall.


Depending on the functions performed, the corners can be decorative or functional. Decorative corner is used purely for aesthetic purpose. The contrast or same color with the main web and the interior is more harmonious and stylish appearance. The functional corner assumes a serious mechanical load.

Most often, the corners are made of plastic, metal or ceramics. However, the fastest, inexpensive, but also short-lived and less attractive embodiment is a ribbon border. Most often, such a corner is self-adhesive. Some models are pre-treated with a fungicidal composition to prevent the appearance of mold and fungus. Such a corner is very easy to operate, it beats well and does not crack.

Material
For the manufacture of corners, the following materials are used:
- Metal (aluminum). Universal material, the shade of which is harmoniously combined with any color decision of the interior. In addition, aluminum is perfectly combined with other metal designs of the room, such as a shower cabin or other plumbing. The advantages of such angle can be attributed to its ease, high strength, durability, corrosion resistance.
- Corners are often performed from metal alloys. Most often, they are covered with gold or silver paint (such options are considered universally suitable for different color interior solutions). Corners are nickel-plated or chrome.
- A corner of PVC (polyvinyl chloride) is distinguished by a number of advantages.It is very lightweight, quite durable, has excellent waterproof ability, and is presented at a huge range of color solutions, which makes it easy to choose the appropriate option even for the most exquisite interior.
- Ceramic corner (or profile "under ceramics") - One of the best options from the point of view of the aesthetic integrity of the interior. Often a ceramic corner is part of the collection of tiles, so it is best to get this model.


If you compare corners from different materials in several criteria, then not the first place for durability will come out, of course, metal. Materials with the lowest service life include polyethylene and PVC.

Metal corners also provide the greatest tightness. Plastic plastic has the worst indicator in this list.
The advantages of the polyethylene ribbon can be attributed to the simplicity of its installation and the lowest cost from the above materials. However, the constant impact of moisture leads to the fact that after a couple of years, the ribbon will have to be changed. Plastic is a very democratic material, it is easily mounted, resistant to fungus and mold, is quite elastic.
The advantages of a ceramic corner, in addition to high strength and waterproof, can also be attributed to weak thermal conductivity and impeccable aesthetic look throughout the service time. From the disadvantages you can allocate high cost, the complexity of installation, especially in the interiors with non-standard architectural design. Perhaps the only factor of ceramics is shockproof. After a strong impact, ceramics can quickly start crumble, so it should be replaced as soon as possible.
How to choose?
Selecting a corner for tile depends on several factors:
- Tile thickness. Depending on this indicator, the corner can also have a number of different thicknesses. Professional builders recommend choosing a 1 mm corner greater than the thickness of the tile acquired.
- Constructive features. By type of rigidity, the corners are divided into 3 groups (hard, semi-rigid and soft). Depending on the complexity of the architecture, you can pick up the most suitable version of the corner. Plastic perfectly cuts out and is suitable for the design of complex geometric structures, including curvilinear. Metal profile is ideal for geometrically clear and direct space.
- Before buying a corner, it is best to grab a sample of a tile, which is planned to be used for cladding. So you can pick up the corner, the most suitable in color. This concerns, of course, in cases where the corner and tiles are purchased from different collections.


Options for laying
Before choosing a laying option, it is necessary to determine which ceiling coating will be used. If the ceiling is made of HCL or he suspended, then it is the perfect option. Corners are installed exactly to the mark, where the ceiling coating will be held. Before installing the corner, you need to produce the necessary measurements and perform trimming.
There is no unequivocal decision on what previously stacked - the tile or tile.
- The first option is to lay the corners along the pre-stated surface. Then the main canvas is placed, and the tile on the junction with the corner is cut.
- The second option is the lining of the walls of the tile and laying of the corners. This method is a little simpler than the first, however, when the first finished coating looks more accurate.
Before starting the laying, experts advise to perform careful measurements and make marking of the walls, as well as to feed the corners in the places of docking. From how correctly and neatly this stage of work is made, the view of the finished interior depends.

How to install?
Usually laying the tile begins with a place around the bath.
Staying the corner over the tile is as follows:
- The surface of the tile must be carefully prepared, cleaned and degreased.
- Then the sealant processes the places of contact with the wall with the wall. Even if the bath is closely adjacent to the wall, the cracks still eat. There may be moisture, and provoke the appearance of fungus and mold. After sealing the joint, the corner is treated with an adhesive solution (liquid nails) and stacked to the surface of the bath. At the same time, the bar must close the entire surface.
- Next lasted the tile in the vertical direction, and then mounted internal and external corners.

The greatest complexity in the process of finishing works, the cafeter represents the design of the joints.
Despite the apparent correctness of the geometry of the room, there are no perfectly smooth surfaces. It is for this reason that it is necessary to choose the optimal version of the corner pairing tile, which can be presented:
- laying the corners by trimming;
- installation of an external angle with a special corner;
- laying tile "Shake into the joint" with an angle of the front side of 45 degrees;
- styling with the execution of the ends;
- corner laying "Shake in the joint" without washed.
Tiles and tile joints
The standard docking of the tile is performed in the corners and the version of the execution is entirely depends on the view of the angle: the internal and external (classification of angles is the same as when mounting the ceiling plinth described in this). There is no universal council and technology will depend on many factors. In addition, each method has not only advantages, but also disadvantagesthat need to be considered when choosing a docking option.
Inland Corners
Docking under internal angle can be decorated in two different, but equally effective ways:
Docking internal overhead
It is used for angular arrangement quite often and based on the use of plastic corner. Refers to less appropriate due to the presence of additional, and sometimes excess details.
Standard conjugation
The most favorable option that allows not to use additional parts and is based on the design of a simple seam. As a rule, the seam is performed on the invisible part of the angle. The main thing is to correctly calculate the seam size so that at the final stage it was possible to use high-quality grout.
The main disadvantages include a possible education. cracking in places of groutWhat is due to the tile leaning towards expansion-narrowings. Experienced technologists are recommended for filling the vertical seams of inner angles to use the filling method of sanitary silicone. It is especially important to comply with this requirement for designs.
Joints on external outer corners
External angles suggest several embodiments of the joints of the joints, which allows you to perform high-quality registration even in the absence of experience in this kind of work:
Using the overhead
Is the most common way. It is allowed to use outer corners of plastic, aluminum or brass. Such elements are mounted during the styling process, but have a property of collecting a significant amount of contaminants.

Using the overhead
is the most common way. It is allowed to use outer corners of plastic, aluminum or brass.
The method of having tile
This technology is based on the action of the end of the tile at an angle of forty-five degrees. The method is different naturalness and harmonyBut requires the use of a special tool and the presence of certain skills.

The method of stepping tile. This technology is based on the action of the end of the tile at an angle of forty-five degrees.
Method of alternation
Pretty rare and unpopular option, which is most often used when laying a cable tile. Due to the alternate installation of the end of the tile from different sides of the outer corner. Sometimes this method has one-sided execution.
Through the grout
A rather rare method consisting in the design of the angle by the location of all tiles in its planes, without protrusion on the corner line. Interior inner corner formed as a result of this installation is made in a semicircle with a special grout.
In the presence of uneven walls, before the start of the facing process, it should be performed, as a result of which it is necessary to determine the level of the linker of the vertical direction.
In each particular case, the size of the slot space under the ceiling should be minimized, since such an option makes the wedge on the wall more noticeable. The rule should be followed, in accordance with which large pieces of tiles should be mounted on the edges. The dimensions of the fragments used in the work should be at least 23 full tiles. Such a trimming allows you to make the deviation of walls from the vertical less noticeable.
Wall and floor joint
The competent interface of the floor and wall tiles is performed in the installation process using a ruler that should be attached to the floor and walls. It is necessary to apply the carbon to the line and stretch the roulette to the opposite wall. The resulting perpendicular line serves as the main orientation To perform finishing works.
To get the right and high-quality junction, the laying should be performed from a long corner from the doorway. At the initial stage, it is necessary to determine not very noticeable areas for using a cropped tile.
The inner angles of the joint and wall masonry are separated by means of special trims - plastic profiles, which perfectly decorate the places of the tiles. Tight docking trim with wall or floor tiles is due to flexible top scallop. You can read the tile laying on the floor.

The competent interface of the floor and wall tiles is performed in the installation process using a ruler that should be attached to the floor and walls.
Rules of facing Nishi.
If necessary, place the window opening should designate parts of the tiles to be cropping. The cut line is neatly conducted by the tile cutter, and then an unnecessary tile fragment is careful with the help of forceps. The standard procedure and any difficulties does not cause non-professionals.
Skos edge shlifmashina
To perform a neat beep of tile edges, you must use the corner grinding machine and a diamond disk for dry cutting. Grinding required to produce extremely carefully. It is advisable to make several trial or training cuts on the substandard tile. When working with double firing tiles, it is advisable to use tiles to perform a wet cutting.
The docking of the bevelled edge allows you to get very thin, barely noticeable gapwhich is ideal for making any noticeable places.
The angular grinding machine allows you to stick any tile and make the laying of tiles with raws at an angle of 45 °. However, to minimize the damage to the glaze, it is not recommended to grind in the immediate vicinity of the glazed surface. The optimal distance to the glaze is about two millimeters.
Two tiles perfectly joined the bevel edges at an angle of 45 °, which allows you to get a neat straight angle. All minor irregularities are easily eliminated by a special solution for seams.
If there is a need to use a special tool or geometry of space is distinguished by significant irregularities, it is recommended to invite professionals for work. Simple finishing options can be performed independently.
Read about comparing flow and accumulative water heaters.
Video instruction
When finishing the ceramic tiles of surfaces in the apartment often the question arises: what are we going to do with corners? Options Modern technologies offer a lot. We'll figure out.
Let's start with the types of corners, there are two: external and internal.
Finishing options inner cornerstwo too.
For the first option, a plastic corner will fit. True, recently, this method is used by tilers more and less. Why is an excess detail?
The second method is a simple docking tiles with a seam. This is usually done on imperceptible sides of the corners, if we put a tile without a seam, then after the grout there will be a dark gap. It will be possible to close only with silicone. With this method there are nuances, the color of the grout and the color of silicone may not coincide. There may also be a crack on the grout with such a connection.
The Master Council is if the wall is from the GLC or such material, it is better to use silicone, for brick walls is not necessary.
External corners.
When cladding external angles, 5 finishing methods are used:
The first and most common is the use of a corner, plastic, brass or aluminum.
How to put a tile in the corners: Methods for docking ceramic tiles
Installation of the corner is produced in the process of laying tiles. The lack of the same as in the inner corners is an excess detail in the design. In this case, the corners are faster and more difficult to rub.
The second method is the stratification of the tiles of tiles at an angle of 450. The angle in this case is obtained natural and harmonious, there are no extra details, but requires a custom mastery. And since the stratification of the material occurs, such angles become more vulnerable, chipsets are easily formed when they hit.
The third way is less common in facing the cable tile. Its meaning - in the alternate placement of the tile end, then on the other.
The Master Council is to expose painted tile end. On many tiles, one of the four ends has a tile color. Another embodiment is possible when cladding with natural stone.
The fifth way is not the most common, his idea is that none of the tiles protrudes on the corner line, but is located in its plane. The inner corner formed from two ends of the tiles is drawn up with a semicircular grout.
Which method you select depends on your desire and level of skill. And put the tile, so that it does not disappear in the first year after repair, the tiled adhesives can help. Choose glue that matches your task using our navigator and, observing the application technology, proceed to the finish. Beautiful solutions to repair.
How to put the tile in the corners
In the construction of perfectly even straight corners simply does not exist, it will confirm any professional builder.
Proper establishment of tiles in the corner
And if there is a theorem in geometry proving that the sum of all angles in the rectangle is 360 degrees, it does not act in the rectangular premises.

Qualitatively decorated angles that hide the disadvantages of the premises are the indicator of professionalism of the tile master.
That is why the laying of tiles in the corners always causes certain difficulties not only among home masters, but also from professional tilers. The only difference is that the novice craftic theoretically knows one or two ways, how to put the tile in the corners, and the master knows no less than five such ways and is facing a dilemma to be used.
Preparation for the workflow
As there are no angles at 90 degrees, so there are no and even adjacent surfaces that form them. Before laying the tile, it is necessary to make a laying layout, taking into account all the features and condition of the surfaces to which the tile will be laid.
In apartments, tile are facing, as a rule, a kitchen, a bathroom, a bathroom and, less likely, the floor of the corridor or hallway. The glazed balcony or loggia can also be covered with tiles both by walls and as a flooring. In all these premises, Tiler faces internal and external corners, niches under the central heating batteries and niches in the walls.
The outer angle is formed when cladding window and doorways, the perimeter of niches.
All these nuances are taken into account when laying tiles in rooms and rooms to be facing.
An example of laying tiles taking into account sizes, corners and other features of the room.
The layout is an essential operation for facing work. From how correctly and mathematically, it will be done, the final result and quality depends. Do not confuse layout and calculation. The layout is the process of technological when the tile is taken out of the packaging, sorted in size and color scheme, laid out its "dry" on the surface for selecting a pattern or ornament.
From how the laying of tiles on the corners will be dependent, the laying of the entire room and the final count of the amount of the required tile material and building mixtures for laying, processing and grouting the tile will be dependent.
Methods of laying - Nuances
First of all, it is necessary to find out what methods there are laying of tiles in the corners and which applicable in specific cases. Currently, the following ways of working with angles can be distinguished:
- booking angles with trimming;
- installation on the external angle of a special corner;
- laying the joint in the junction at an angle of 45 degrees on the front part;
- styling with the stammer;
- the tile in the corner is stacked in the joint.
Masters on facing tiles divide these methods on lungs and difficult in work. But for such an assessment, it is necessary to familiarize themselves in detail with them.
Trims - features of elements
Trim for the inner corner allows you to make a high-quality transition from one plane to another without circumcision tile.
Trimims are decorative elements intended for the completed design of internal and external corners. Can be made of aluminum, plastic, metal. They have the most diverse color, which makes it easy to choose trim under any color chamber of facing. In addition to the angles with trimes, transitions from one level on another, with a decrease in or increasing, joints of different types of facing tiles, strengthen the deformation points and other problem areas of masonry.
Trims are structurally constitute a profile that in the context you can approximately be taken for a rectangular triangle. Cates This conditional triangle is attached to the conjugate surfaces, and the hypotenuse serves as a decoratively decorated joint. The facial part of the trim (its hypotenuse) can be both convex and concave form.
One of the cathets is attached using silicone to one of the conjugate surfaces on the already laid tile. The second catt includes tiles on a different surface.
With the help of trims with a concave facial part, the transition from the floor to the wall, when it is practically a plinth, and also design an inner corner on the vertical walls.
Trim for the outer corner protects the end tiles from the chips and hides the irregularity of the angle.
The convex part of the trim decorates external angles. At the same time, trimmes additionally perform protective functions on the outer angles of trimes, preventing chips and other damage to the angular tile.
The selection of trims occurs both by the thickness of the tile and in the color scheme. The choice of material from which the trim is made will depend on the planned load on that section of the facing, which it will be installed on.
This method of sealing angles is the most aesthetic on the final result of the work and can be applied even novice tiles. Experienced masters have long mastered it and is readily used.
The advantage of this method is that it completely disappears the need for a climbing of a tile or the number of circumstances is significantly minimized. From additional building materials, only silicone sealant appears for fastening trimov, and from the tools - the metal sawder for trimming aluminum or metal profiles. The profile made of plastic can be cut with a knife.
Corners - everything is quite simple
Corners are one of the varieties of trimov, but much easier by design. They are formed only one catat, and hypotenuse always has a convex surface.
Corners are installed on the outer angles of the passages, window and doorways. Corners are attached not to silicone sealant, but directly on the adhesive mixture under one of the vertical rows, which is suitable for the outer corner. The adjacent vertical row tile is supplied to the "joint in the joint".
It must be remembered that all external angles are decorated only with whole tiles. Although, of course, this is a matter of taste and the requirements for the quality of the facing put forward by the customer. But you need to recognize that cropping on outer angles look not only unprofessional, but also extremely inestoretically.
Put the front part at the angle
The most complex method of laying tiles in the inner corners of the floor surface. Applied by experienced masters, as well as in cases where the angles are strongly deviated from the mark of 90 degrees.
On the floor work on laying tiles start from the center to the corners.
With the classical layout of the tile on the floor, the walls and corners are suitable with whole tiles, leaving the clearance under the installation of crops. There is a distance between the whole tile and the surface of the wall with such a layout, which is more than the width of the tile half the tile, so it is not difficult to put fuses even for newcomers. All rectangular cuts and depending on the type and thickness of the tile can be obtained both with glass cutter and using manual stoveturis.
The sequence of laying tiles on the floor surface is as follows.
- In the classical layout, at the beginning, the center of the floor is determined and the whole tiles to the walls begin to lay it from it. Having finished with the installation of a whole tile, begin to lay down the trims along the walls, while the laying occurs until the penultimate cut in the inner corner.
- The last two cuts, which will form an angle, require trimming with a certain angle one smaller side of the rectangle. With inner angle of 90 degrees, and such an angle may turn out when the walls are aligned with the help of sheets of plasterboard, the cropping occurs with an angle of 45 degrees of both conjugate crops.
As already noted, the direct internal (and external too) angles are extremely rare, therefore, in each corner, individual embedders are produced.
I washed the angle of the end tiles - a complex process that requires high tool accuracy.
For this, the edge is applied to the corner and spend on the front side of the tile, the line from the inner angle to the outer angle of the last whole angular tile. The same actions are carried out with another cut, but already along another wall.
Cut off the tile at the same time the method of laying the angles is best with the help of electric stovetur, installed on a stationary bed and with a diamond cutting roller. Then the trim line will be smooth and not requiring additional processing.
However, such tiles are quite expensive, and their rent is also not different cheaper. With small volumes, trimming at an angle can be used by hand stoves, but the edge is done with a slight tolerance. The tolerance is necessary in order to align the cutting line using a grinding machine and adjust the tile cutter at the placement location.
It is necessary when marking angular cuts or solid tiles to take into account the width of the intercutric seam so that it does not stand out among the row seams.
Trimming the ends of the angular tiles
This is the most complex method of laying the tile both internal and external corners. With this method, the tile ends are drilled.
The angle washed when laying in the inner corner having a slope towards the front part, and, accordingly, for external angles, the tilt will be to the back of the tile.
This work requires not only the mandatory presence of electric drive electrical drive, diamond roller and tough fixation, but also greater experience and skill. At any distortion from the perfectly level line, the tile can be safely allowed on rectangular circumfers.
What method to use when bookmarking the corners, each tiler decides itself, based on its experience, available to the instrument, specific state of the working surfaces and the wishes of the customer or its vision of the final result.
How to put the tile in the corners
 You know about the main stages of laying tiles and have already started work, but reaching the corner, did you realize that you can not imagine how to put tiles in the corners? Laying tiles in the corners of the room is not such a simple process and it can be performed in three different ways. Having learned over one of them, you will not make facing with your own hands and the corners of the room will not be a problem.
Method number 1.
Laying tiles using trimes - special corners. The result, as a rule, exceeds all expectations, as the tile falls beautifully and perfectly smoothly.
Laying tiles on the wall: in the bathroom, in the kitchen (photo, video)
This method is used by specialists, but for beginners it will also be quite suitable. Trims are special profiles that closes the tile end during the corner masonry.
They are produced in a variety of versions and are metallic, aluminum and plastic. Trims are presented in a large color spectrum, so you can easily choose them into tone to the tile. Select the corners should be in accordance with the thickness of the tile, which will be inserted into them. On the one hand, the trim is a flat surface, the tiles are joined by this place, on the other side of the groove, for tiles. To the wall of the wall, it is mounted with silicone sealant.
Method No. 2.
The tile lays in the corners of the joint into the joint with further grout. In this method, there should be no special difficulties. The tile is placed in the usual way, while its visible parts close the edges of the adjacent tile, which is perpendicular. It is not very beautiful, but for beginners in this business is best suited.
Method number 3.
This is the most difficult of three ways. The tile is placed in corners with trimming under 45 degrees. In order for the result of the work to be close to the ideal, you need a tile cargo, but a better plastic machine equipped with a swivel bed. So you can independently cut the tile at an angle of 45 degrees no worse than doing this at the factory. The main thing is good to cut off, then the laying will turn out to be beautiful.
Do not forget to make the sputs of the seams, it is most effectively carried out after complete surface drying, that is, not earlier than 24 hours. If you made a trimming near a different angle, you are waiting for big troubles. In this case, the right solution will entrust the professionals to lay the tile in this way. They have experience and they know exactly how to put tiles in the corner.
1. Using plastic or aluminum outer corners.
The fastest way of docking tiles:

Especially if the factory ends tiles are joined. When docking the tile in this way, one surface is coated in such a way, in this case the main wall:

Although, of course, it would be possible to start with gluing tiles on the slopes, but the smooth wall in this case is more important. After the main tile (1) is pasted to the slopes, an outer corner is attached. Corner can be screwed to the wall to the wall, but easier and faster paste, for example, on liquid nails before the tile is glued to the slopes, or on the same tile glue directly in the process of laying the tile. In the context, it will look something like this:

As can be seen from the above pattern, the outer corner is well adjacent only to the factory ends of the tile (2). Outdoor corners are for tiles 6, 7 and 9 mm thick. Corner for 6 millimeter tiles is suitable only for factory butts, a corner for 7millimeter tiles can be used to dock the cut tiles. The fact is that in the context of the ceramic tile is not quite rectangular and in the midst, it is always thicker than from the edges. And if the tile is still curved or concave, and it often happens, then a 9 millimeter corner may be needed to dock the wall tile.
Disadvantages of this method:
- if the cutting tiles are joined, then you still have to customize the tiles in size very carefully, and if too thin corner is selected, then the tile base is also selected so that the cut end goes into the corner.
- the choice of outdoor color colors is strongly limited, mostly used white, and this means that the outer joint becomes clearly dedicated and therefore it should be done particularly carefully.
- not all people love explicitly dedicated borders or frames, some like the transition to be almost imperceptible.
- this method can be used if the angle of docking is 60-135o.
2. With subwinding tiles ends.

As an example, the decoration of walls and slopes of the doorway in the bathroom are shown. The old door box was not perfect, but the owners did not want to put a new door and the use of the corners would only emphasize the shortcomings of the old door. With this method, the outer joint of ceramic tiles looks quite naturally, in addition, some illusion is created that the walls are composed of natural stone blocks.
To dock the tiles in this way, it will have to work a lot. To stick the tile by factory ends is a bit simpler, but still every tile on the junction needs to be seen, in the context of the junction will look something like this:

Between the tiles it is desirable to leave a small gap, so that the outer joint can be lost to the grout, and the more subtle ends of the tiles will not be rolled in the process of laying or thermal deformations. The greater the angle between the tiles, the less need to be cut off the ends, so this method of docking is good at the angles of docking from 90 to 180.
Cut ends in different ways:
How to lay out the corners with tiles.
Manually. The longest, but also the safest method for the tile. To lift the work, you can use at least 2 types of grinding skins, for example No. 40 and No. 60 or No. 80. Large Schurd No. 40 - for rough fit, smaller for an accurate fit.
2. Ribbon grinder.
3. Angular grinder (grinder). This is the most dangerous method for tiles.
4. Combined. Since neither a ribbon grinder nor a grinder will be able to perfectly send ends due to the large risk of enamel damage on the front side of the tile, then, as a rule, the end is erected with the use of one of the power tools, and then the last millimeter-two are emitted manually. In the presence of a certain skill, it is also possible to first cut through the cutting wheel with a depth of 3-4 mm, and then neatly peeling the surplus with pliers. In this case, the amount of dust and noise will decrease in three times, but all the same garbage will be enough.
If the ceramic tiles are connected not by factory joints, and cuts, then I usually cut the tile with a margin of 1 mm, after that I have come the end first in the plane perpendicular to the facial side of the tile, and then there is already a concentration of the end at an angle. In order not to clamp the enamel on the front side of the tile, the direction of movement of the grinding skin must be down from the enamel layer:

If grinding up, then the pieces of enamel will be cleaned, but if it does not bother you, you can not pay attention to this warning.
The tile for hundreds of years is one of the most sought-after finishing materials. However, many newbies still face the problem of laying in the corners. It is very important to correctly perform the docking of the items in this place, any defect will immediately rush into the eyes. In order for the resulting result, a neat and harmonious look, use one of the methods discussed below.
Perpendicular location
The beginners who first have encountered the finishing works of this kind, it is worth a preference to the simplest way of direct docking. The method is perpendicular to laying tiles relative to each other when one of them is partially closed by another. The choice in favor of this location will allow you to cope with the task easily and quickly. The lack of a method is that the seam remains at the place of the joint. Grouting, of course, will help him hide, but the wall surface will still not look perfect.
For lining of the bathroom frame, borders and protrusions, many also use this laying option. The main thing is that the finish cannot be viewed below. Her edge should hang a little (within 5 mm).
Trimming edge

To implement this method, you will need a professional tool. Its use will allow not only to reduce temporary and labor costs, but also to perform work more accurately. The edge trimming is performed at an angle of 45 degrees. You can use for this sandpaper, tiles or a grinder.
The main condition for the successful completion of the whole event is a thorough preparation of walls. They must be perfectly even so that it subsequently did not have to lay the tile on the layer of glue of different thickness. Before laying, the treated tiles, as a rule, are cut and the solution is installed on the angular surface so that they formed a single integer. This method is quite difficult given to beginners, so it is not necessary to immediately experiment on the clean material, to begin with, practice.
Using trimes

Today, the use of special plastic profiles is becoming increasingly popular not only among ordinary people, but also in the circle of professionals. Depending on the purpose of using profiles may have a M-shape (for external protrusions), manufacturers also offer convex models of a small width.
Profiles can be glued to the cafée three ways: liquid nails, glue or sealant. As a rule, builders laid a special plate under the tile on the solution and fixed with tiled glue. The process is quite simple, but the result exceeds all expectations: the joints are protected from the penetration of bacteria and moisture into them, and the wall surface looks beautiful and neatly.
If an external plastic corner is used or special profiles in docking places with plumbing, then use acrylic or silicone sealant. It does not matter what exactly you will glue the plastic to the cafes. This method of facing the corners is suitable for any type of material.
Advantages of using profiles:
- protection against mechanical damage;
- beautiful view;
- simple in attachment;
- you can choose the models for both glossy and for walls;
- there is no need to use expensive equipment;
- clause with special glue, silicone or liquid nails.
Corner tile

The use or walls of a special format is another common facing of corners. In the range of some manufacturers presented the angular elements. These are parts interconnected at right angles.
Laying of such corners is no different from the laying of an ordinary tile. The process is extremely simple. If you decide to stop your choice on this option, the material must be put on the corner. But, as a rule, this method is used to finish borders in the room. This is an excellent alternative to plastic, which allows you to preserve the integrity of the ornament.
Differences of the corners

Regardless of the level of professionalism, each of us has an idea of \u200b\u200bthe internal and external elements. In the first case, this is the space between the two walls of one room. In the second - an angle coming forward.
When choosing trimes for lining a bathroom, the difference is particularly visible. They differ fundamentally depending on which type of angular surface will close: inner or external.
The cutting parts are always easier to install inside. And defects in this case fix easier. On the inner corners of the fugus looks more organically than plastic and serves longer. Using it outside, you risk the rapid destruction of the grout.
Elimination of defects
Unfortunately, the result does not always correspond to expectations. Errors can allow both newcomers and professionals. But, with the right approach, resolve some flaws are quite possible. For example, if you did not manage to lay out the angular protrusion of the wall smoothly, try to compensate for the defect with the solution. It will help raise individual parts to the desired level.
If the seam turned out not perfect, there are two options for solving the problem. The first one, the most common option, provides for the use of the Foundation to eliminate defects. The second is the installation of a plastic profile that masks any chips perfectly. Liquid nails or silicone are used to fix it.
To achieve the maximum result, it is necessary to pay sufficient attention to preparatory activities. Carefully learn the range of materials for finishing. You must be completely confident in the correctness of your choice. As for coloring, it is better to buy everything you need in one store. Otherwise, there is a risk of acquiring materials whose tone will not coincide. And having studied the features of the use of the selected method, you will definitely create a beautiful room interior.
Shop "Tile from Plant" - official representative of Kerama Marazzi. With us you can buy products of this world-famous brand at minimal prices. A wide range includes matte and walls, porcelain and much more. In addition, each client of our online store has the ability to get a ready-made 3D interior project with the use of selected materials. This will help you make the right choice.
Facing a cafeter is not by the use of one ceramics. The finished type and operational reliability depend on other materials. Corners for tiles (they are also called the layout for the tile) - one of them. They mask the shortcomings, decorate the corners and protect the tile from chips, fungus and mold.
Today it is often refused to use layouts under the tile in favor of a more decorative method - the alarm of the angles under 45 degrees. The monolithic laying is appropriate when using expensive ceramics, a corner for a tile in this case may not look very presentable. Nevertheless, the layouts for the tile are still leading. Moreover, in some cases, without them, it is not necessary, for example, when cladding steps (anti-slip profile) or apron. On hazardous outer corners in the bathroom, where you can easily slip, it is better to install a plastic corner than leaving a sharp corner of the fed tile.
Corners for tiles are all sorts of shades and various forms. When lining may need an outdoor profile for tiles, internal and for stairs. Consider each option in detail.
Fast navigation on the article
Outdoor corners
The most popular type. Used when cladding external corners. On sale, mainly there are dimensions 7, 9, 11 mm (with a length of 2.5 m). One side is a groove for a tile, the other serves as a decoration and protection of plates from shocks and chips. The hidden part is perforated for better clutch layouts under the tile and ceramics. Produce decorative elements from:
- plastic;
- aluminum;
- brass and other materials;

Installation of corners
The profiles for the tile are mounted when it is already ready by one of the two walls that form an outer angle. Sometimes trimes (layouts for tile) leave at the end of work. This happens in case of unforeseen circumstances: problems with the delivery arose, marriage was caught, etc. However, such a situation requires high qualifications and more serious calculations from the tile. The slightest inaccuracy can lead to convert or humility with flaws.
Getting Started by the next wall, with the back side, the grooves for tile layout are already ready. The product must correspond to the size of the tile. In the corner of a smaller format, the tile will not fit, and the larger in the size of trim will force the use of more glue and will hang out.
If the tile does not climb into the corner, keep the reverse side (3-5 cm from the edge).

To start laying the next wall, and the tile corner did not slip, it is attached to the tape or tile glue apply. The perforated side should adjust the cafél in parallel to give perpendicular ceramics to lie tightly and smoothly. The joints necessarily fill in glue - empties deprive the design of the functional point. Without hung eyes, it is better to spend time to extrude an excess mixture than to come with hollowness.
The video shows the installation of layouts on the example of a complex place - slopes with a double outer angle:
http://www.youtube.com/watch?v\u003db-9jpxpx2ks
Conditioning corners
If the ceiling is suspended and falls on the tile, cut the layouts under the tile, do not leave yourself or other the need to continue to study under cutting.
A separate conversation deserves installation of trimes in the field of door and window openings (or in similar situations). To position the elements perpendicularly, you need to trim their edges at an angle of 45 degrees. Do it very carefully, otherwise there will be slots or profiles for the tile and do not lie at all without bends or burrows.

Remove the layout for the metal tile for metal or a grinder. Better first, since the method involves the possibility of using stusl. And without this tool, it is very difficult to achieve the necessary angles. In any case, the exact trimming is impossible without practicing, and this is not such a slight thing, as it seems at first glance. Sometimes geometry assumes a trim combination, for example, at one point, horizontal corners for tiles and vertical are joined. It is necessary to possess skill to virtuosively juggling compliance with the requirements for facing and installing profiles.
Repair of corners
It happens, layout under the tile stopped like, and maybe the profile for ceramic tiles was damaged. In such cases, you need a repair, but how to extract trim, and even more so, install a new one? The case is a vigorous, but feasible:
- gently, so as not to damage the tile, cut the old outer corner for the tile;
- prepare a new one;
- cut the back of the trim;
- if necessary, align the place under the profile, not the touch of space under the tile;
- with liquid nails or silicone, glue the layout;
Interior corners
Unlike external, these are not very common. To make outdoor angles, you need to cut a tile or decorate profiles. Internal not necessarily, because without them the interior does not suffer. Yet a certain percentage of people is experiencing sympathy to them, so consider them. 
Represent a slightly more complex design consisting of:
- groove;
- perforated rib;
- facial concave part;
As in the previous case, mount the layout under the tile, licking one of the walls. In fact, it's easier to trim the back and stick the corners to silicone. This facilitates the installation process:
- glue easier;
- work can be done at the end of the cladding;
Using both types of corners, before grouting seams you need to clean the joints between profiles and tiles from glue. If the profile is plastic, keep care, so as not to scratch it or cut the layer.
Options for registration of inner corners:
Corners for steps

The use of profiles on the stairs is the dispute room. The question concerns the aesthetics and durability of the facing. The layouts on the steps are two types:
- ordinary - similar walls;
- overhead;
The first does not bear greater functionality, serve decorative purposes. However, their use undermines the monolithic design, the risers are at a half-bentimetting distance from covering plates. On the one hand, layouts for the tile provide a certain protection of the joints, but on the other, as a result, lead to a decrease in the life of the stairs. They admit the possibility of accumulating water, which due to temperature fluctuations gradually destroys the integrity of the steps.
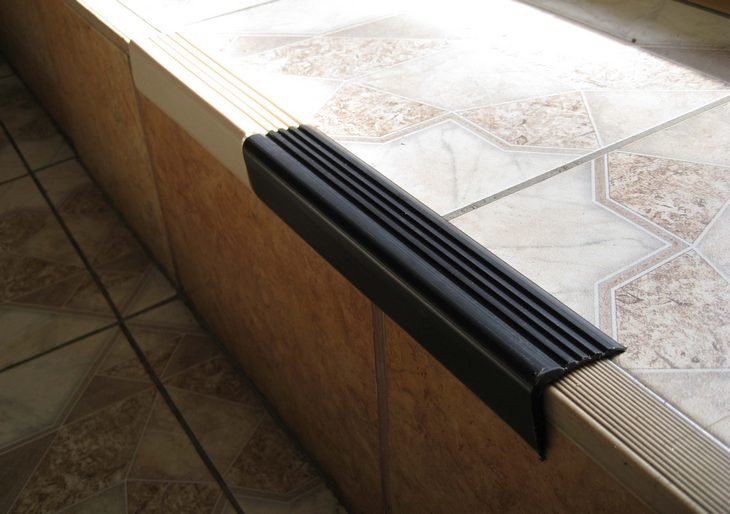
Patch profiles provide sliding resistance and, unlike simple, often necessary. It is important to understand the nuance of operation: the water accumulating near the corners, negatively affects the facing. To avoid this, it is not recommended to mount a continuous web. Do between the layouts for the tile drainage gaps, and the staircase will last much longer.
When installing on the steps we are talking about metal materials, no plastic.
Other corners
Profiles are required with the device of iron and at the joints of heterogeneous materials. Variations There are many, as a rule, they are mounted mechanically - with fasteners. Installation is associated with the edges of the tile, so observe caution to do without a tile chip.
Sometimes layouts for the tile when the device is low winding steps. For such cases, there are corners with a smooth working part and the comb backward side, which allows you to smoothly curb profile. It is important not to disturb the border of the "painless" bending.
We looked at the options for corners for tile. Despite their collective farm, it is still not necessary to abandon them in traumatic places and inexpensive repairs.
Comments Powered by Hypercomments