How to make butterflies decorative. Ideas for decorating the room with paper butterflies
Often, many people have a thought to change the appearance of their apartment or at least refresh it without making a lot of effort. Usually, this is meant at least cosmetic repairs.
However, to give an updated look, while not conducting exhaustive, consumable repair work, it follows creatively to this issue.
It would be nice to remember about one wonderful way of decor - this is the creation of a decorative panel. And in this case, a simple version of the decoration of walls can come to the aid, for which templates or stencils use.
If you attach a little strength and effort, then, undoubtedly, ordinary walls will have stunning views and the room will gain a completely different, fabulous look.
To do this, it is necessary to explore the basic ways to decorate the walls. What is so awesome decoration? This is an applique, and, more precisely, a panel of butterflies do it yourself on the wall. To perform it, a variety of materials are used. In the future, it is attached to the walls in elegant compositions.
How to make a stencil butterfly with your own hands? For the manufacture of small moths on the walls there are different options for using materials for cutting butterflies of different sizes and already based on these parameters, the final type of decoration will depend on. Make patterns with their hands butterflies from paper to decorate the interior under the power of each.
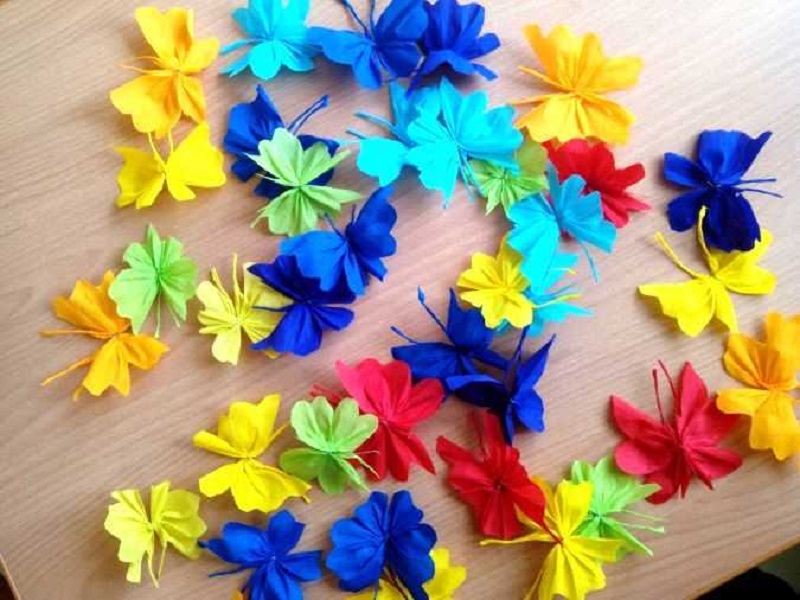
The more you try, the more effectively make an impression on everyone who sees such an applique. therefore choose a suitable decor, and then fasten the butterflies on the wall. Imagine that on the wall, for example, scattered from the center a lot of openwork butterflies. All of them are different sizes and colors, circling in the dance and vibrate with wings.
Undoubtedly, it will attract attention and will be delighted, although the butterflies will not be dried, but made of the girlfriend.

Important! Butterflies should be highlighted on the wall background, and for this it is better to make them bright. So they will not merge with the interior.
For the design of the wall, butterflies of various sizes, shapes and paintings cut along the contour from paper are suitable - the most suitable material. The implementation of such an enchanting spectacle will depend on many factors, the main of which is sketch quality and accuracy.
The pattern of openwork butterflies for cutting out of paper must be carved very carefully.
 Butterflies on the wall do it yourself, photo
 What to pay attention to the creation of butterflies
Firstly, should decide on the form. If there are no own ideas on this issue, then you can search for offers on the Internet. There will definitely have templates and stencils for cutting, examples of finished work. You can also see the creation of such a panel on video:
Secondly, you need select color future butterflies. After all, the design of any apartment is individual, so it is so important to pay the time to the selection of a suitable coloring option for the future butterfly decor on the wall. Use the most successful combinations of colors, then the decor will best fit into the room and will be harmonized with all the elements.
Separate attention deserves a form. To date, ready-made multicolored butterflies are offered in the form of stickers. They can be ordered at any store. They are the most diverse color, as well as a simple and intricate form. But we consider the scenery that are manufactured independently, so for beginners it is worth familiar with the main recommendations.
 Stencil of butterflies on the wall - scheme, photo
 At the initial stage, create a sketch of butterflies for cutting. This can help the use of a program drawing or editing image. In the future, leaning on the sketch, made butterflies stencils for cutting different sizes from the corresponding material. Templates can be made, not even using a computer.
You just need to take a pencil into your hands and create sketches on ordinary paper or tracing paper - butterfly contours and then cut them.
Tip! The best option is not to use strict symmetry. And for this it is worth trying to mirror not copy wings. It is best to depict them a little different in size - literally a little bit.
Thanks to this, decorative butterflies on the wall will be more voluminous and dynamic. BUT applique will look great, regardless of the fastening method to the surface.. But it is not necessary to exercise too much, because the wings should differ from each other in moderation.
 Stencils of simple butterflies for wall decor, photo
 As soon as the drawing of the butterfly for cutting is ready, you can move to the following steps.
It is necessary to determine the format of the future element of the decor, the number of butterflies, as well as the way they are fixed. Then you can modify the image and make it in several sizes, then print. You can also fully draw everything if you do not have a printer, and cut.
After that, we make the stencil of butterflies for cutting. It will not be so difficult to implement it if the printout is put on a sheet of cardboard - and the contour of the butterfly for cutting is ready.
The printed silhouette of the butterfly is first cut along the outer edge, only then you can begin to the inner holes and cut them, where necessary, thin manicure scissors or a special knife.
 Stencils of butterflies on the wall of paper - photo of the process of trimming
 For the design of walls with decor from butterflies, this option as origami can also be used. You will not need to spend the forces on drawing a butterfly silhouette for cutting out of paper, but only have to learn the ability to collect origami.
Important! It is not necessary to seek the grace of butterfly by increasing the number of folds or roures on the wings: openwork butterflies look air.
Further cutting with scissors or paper cutter will be a scrupulous and many parts of you quickly tired.
In fact, the creation of such elements is not very difficult. On the Internet there are quite a lot of ready-made training videos, how to make butterflies on the wall, and the lessons for the manufacture of origami are presented. Here is one of them:
Features of fastening elements
When you already cut the moths on the stencil, you can start creating a picture on the planned surface. It is worth originally to see various options on the Internet, if your fantasy has exhausted itself.
Most often, if a person decides to create such an element of the decor of the room, it already has its own assumptions in the location of the pattern itself on the plane. The most popular images of the vortex, growing flow, the location of the blanks in chaotic order, in the form of creating a decorative pattern and so on.
Important! Attaching butterflies to the wall, you can select the boundaries between certain areas indoors.
The main thing is to comply with the correct placement of moths and do everything possible so that they do not fall on the wallpaper pattern.
 Original decor - Butterflies on the wall, photo
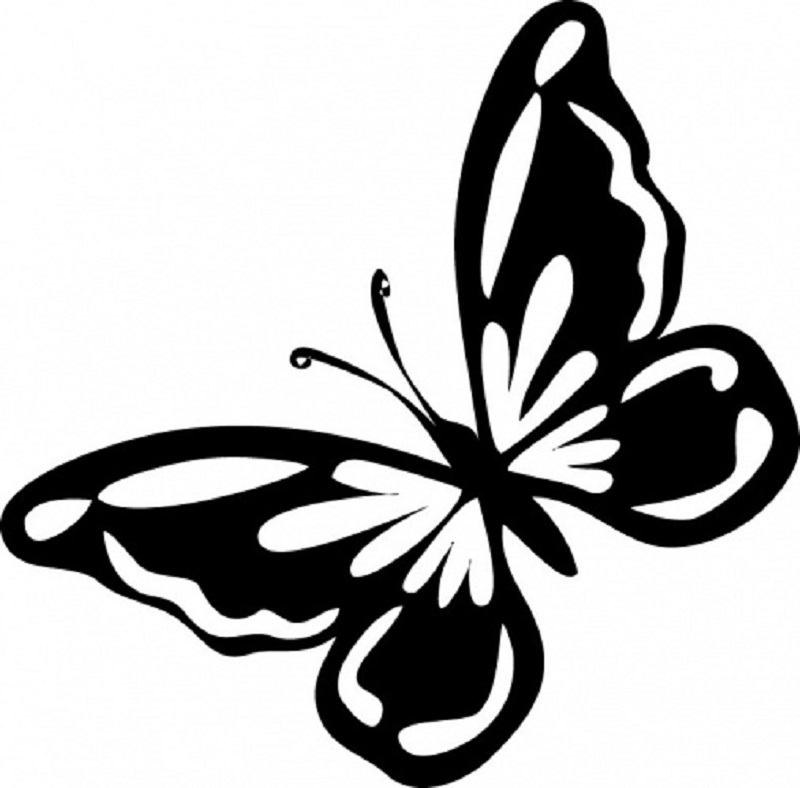
 For color wallpapers (with an ornament and repeated pronounced pattern), it is preferable to make butterfly with monophonic (ideal black or snow-white color), for one-photon palette, you can expand and cut silhouettes of butterflies from bright juicy colors.
When the blanks are cut and prepared, you can begin to fasten it. Before you begin to do it, you should recreate your idea on paper to understand how well it will look after the implementation. Next, you need to make a pencil already on the wall of the place where the butterflies will be.
All the marks should not be causing fat, so that in the future it was possible to remove butterflies, without leaving the marks on the walls.
To attach these items to the wall, you can use glue, pins, or suspend them on a strong thread.
 Decor walls with butterflies do it yourself, photo
 Materials
Decorating the interior with butterflies created by the personally, you can pick up various foundations for this:
- cardboard;
- the cloth;
- vinyl film;
- paper.
Choose any of them follows, based on the complexity of the picture you've been thinking. Paper is the most affordable basis of all listed plus from it easier to cut blanks. White sheets can be painted and creating multicolored butterflies.
but minus this material is that he is continuing. It can be selected in case you want to attach butterflies for a short time.

Cardboard is a stronger base. You can choose bilateral and create one-photo blanks. Beautifully look at the butterflies from vinyl films. Such a decoration will delight the eyes with bright colors and its glossy surface.
To create a more "warm" appearance, it is worth the preference of the fabric, but except on the glue, they cannot be kept on anything.
If you prefer the vinyl option, you should fix the butterflies in the middle of the torso, so that with the slightest flow of the air they started to move with their wings. Then the spectacle will be simply awesome.
When choosing hard cardboard for the manufacture of butterflies, if you try to try, you can give them various forms. In addition, such applications will delight the eye a long time and not lose their unusual volumetric 3D-form.

Everyone who wants to make a bulk paper butterfly with their own hands will remain pleased with the result obtained. Although this method of changing the interior is not easy and requires a lot of time, the emotions that you get after the completion of work will be really unforgettable.
Read about how with your own hands you can make: an equally original decor, which can be successfully complemented with butterflies from paper.
The process of creating such an applique is very fascinating and guaranteed to make your room original without repair work.
See the selection of photos of interiors, decorated with artificial butterflies - an incredibly beautiful sight.
Decorations for different premises made by their own hands may emphasize the individuality of the home owners. In this case, you can give style and spectacular interior. This uses various motifs. Various decorative butterflies Garmoniously fit into the interior of the bedroom or children's room. Showing a fantasy and creative approach, you can create various decorations for the walls on such a motive.
To make the decor in the form of butterflies yourself, you will not need special knowledge or skills. Therefore, to bring gentle beauty in the design of the premises will be able to almost everyone.
General principles
There are many ways to transform an existing interior. Butterflies are associated with us with summer and youth. They carelessly flush from a flower on a flower. These are light and excellent creatures. It is not surprising that they can decorate a different interior by adding style and grace.
Decorative butterfly stickers Sold in specialized stores. However, it is much more interesting to create compositions with such motifs on their own. At the same time, you can show fantasy. Butterflies are applied to the walls, ceiling and other elements of the interior of paint or create their bulk figures.
You do not need to draw beautifully. Templates can be found in various sources and print them on the printer. Create a decorative panel can be on one or all walls, the ceiling in the room. There are many approaches to create butterflies from different materials.
Where to begin?
Any decorative decorations must fit into the overall interior style. Butterflies can be made of various materials. The general impression of the panel depends on their choice. Motilla figures can be made of rigid, durable materials, such as cardboard. They will be well kept form, allowing you to create clear pictures. Such varieties of jewelry are considered the most durable.

If you use light paper or even a film, corrugated paper, butterflies figurines will be light and gentle. If they are fixed only in the center, this will allow the wings of the moth tremble from the slightest blow of the wind. Such a composition will be incredibly light and air.
The color decoration of the room must be taken into account when choosing a decoring of the decor material. From this will depend on whether the butterflies will fit harmoniously into the existing interior. Each moth must be clearly visible. Therefore, it is better to give preference to contrast shades.
Decor configuration
Manufacturing decorative butterflies on the wallOne should take into account a number of advice of professional designers. First of all, they recommend making a different size moth figures. This will bring some dynamism into the panel being created.
Better if the wings are not mirror identical. When making figures, you should be guided only by the reception of horizontal symmetry. The upper and lower wings are better to make different sizes.

Choosing in various sources a blank for a butterfly, you should not give preference to intricate figures in which there are a large number of parts. Cut Ryushi will be extremely uncomfortable, and the decorative effect may not satisfy the expectations. For one composition, many butterflies will be required. Therefore, it is better to give preference to a simple configuration.
Formation of the composition
Before making a decorative butterfly or kiss them, you need to think about their location in the room. First you need to evaluate the pattern of wallpaper or other wall decoration. In places where the composition is harmoniously fit into the interior, you can place several moths.
The composition may look like a flock of butterflies, which smoothly moves from one corner of the room to another. Their concentration may be stronger in the center or from one edge. The chaotic feature of the figure creates a unique stylistic effect on the beauty. It is initially recommended to draw on a sheet of paper.

Also, a group of butterflies can form a certain form. For example, it can be a flower or heart. There are no restrictions for fantasy in this direction. The planned pattern should be designated on the surface of the wall with light lines. They should be barely noticeable. It is best to use a subtle simple pencil. It can then be erased from the surface.
Paper and cardboard
Decorative butterflies, as mentioned above, can be created from various materials. Cardboard and paper are very popular. From the last cut figures of the moths will be very simple. Coloring the wings of such butterflies will also be easy. This is one of the most inexpensive ways to decorate the interior.

You can buy white or colored paper. It is also possible to start the page of glossy magazines or newspapers. It all depends on the style of the interior. They are combined in color. Paper butterflies just attach to the wall.
Big reliability known butterflies from cardboard. These are strong, dense figures. They are quite difficult to cut. However, it will be much easier to form from them different bends of the wings. The preparation is made in water, and then fix it in the desired position. After drying, the material acquires the required form. Such moths need reliable fastening.
Film and fabric
You can create from a film or tissue. In the first case, a special vinyl material is applied or presented in a wide range of "self-flick". Moth will have a glossy texture. If you create proper lighting indoors, their wings will reflect the glare. The room will be elegant and light.
The manufacture of film figures fully corresponds to the technology in which the cardboard is applied. If the material has a special adhesive layer on the reverse side, the butterfly can be fixed on the wall simply. So that the moth flutter, the wings are not glued to the base. Only in the center of the workpiece remove the protective layer.
The butterflies from the fabric look original. Billets are completely glued to the base of the wall. If you want to make a tight fabric capable of keeping the shape, it is impregnated with a mixture of water and plow glue. For very thin materials, a soap solution is used. The composition is applied to the fabric, the workpiece is fixed in the desired position. After drying, the butterfly will take the desired shape.
Production of paper butterflies
Creating decorative butterflies for interiorshould follow a specific instruction. Before starting work, you must prepare the required materials and tools. First of all, color, white paper or cutting wallpaper will be required. The template is printed on the printer. You will also need cardboard, pencil, scissors and glue.

First, several butterfly patterns of different sizes are printed on the printer. They are cut and applied to a sheet of dense cardboard. The contour needs to be covered with a simple pencil. Next you need to create a stencil. The inner material of the butterfly is cut. It turns out a blank for the figurines of moths.
On the reverse side of colored paper or wallpaper, you need to draw many butterflies using a stencil. They are cut and a little bend in the center. This will create the effect of floring.
Type of fastening
Decorative butterflies on the wall do it yourself You can fix in different ways. To do this, you can use glue. Paper and cardboard are firmly attached to the base with the help of PVA. To do this, glue is applied to the center of the butterfly or over its surface. Next, the billet is pressed against the surface. It is necessary to ensure that the glue does not play the edges of the wings. When applying the PVA on the reverse side of the butterfly, it is necessary to control its quantity. Surplus are immediately removed. If the glue is applied only in the center, in this place the butterfly is tightly pressed against the wall. This allows you to clearly fix it on the surface.
Pins can also qualitatively and quickly fix the moths on the places provided for them. This option is not suitable for painted or plastered walls. But for other types of decorative trim, the pins will become the best solution. If desired, the butterfly can be moved. At the same time, on the wallpaper almost no traces remain.
Butterflies can be swallowed using threads to eaves or ceiling. To do this, you can also use a thin fishing line. Butterflies that will be suspended in this way must be made of cardboard. Moth, folded according to the origami method, will also effectively look at this method of fasteners.
Vinyl record moths
Original decorative butterflies obtain from vinyl records. They are simple enough to do. In addition to the plates, it will take to prepare chalk or pencils of white and black color, moth patterns and scissors.

With the help of the template and chalk, you need to apply the form on the center of the plate. A white chalk is used on the black field, and on the label - black. Further on the foil you need to put a plate with a painted butterfly. It is sent to the heated oven (upper compartment) for 45 seconds. During this time, the material will become soft.
Sharp scissors need to cut a moth. In this case, the material will quickly cool and harden. It will need to be sent to the oven several times. After the butterfly is ready, its wings need to be a little.
Other decor options
Can decorate not only the wall. Showing a fantasy, they can decorate the ceiling, chandelier, eaves, etc. There is a technology for creating butterflies using origami. They will also look original in the interior.
From paper, cardboard blanks can be created a beautiful chandelier. Motillas seemed to be enveloped by a plander. In this case, you can pick up any color for staining. It is correlated with selected colors in the interior.
White paper butterflies can be calculated by acrylic paints. On the fabric you can make an additional finish with beads and rhinestones. It all depends on the fancy of the wizard, as well as the presence of a large amount of free time.
Having considered the main approaches to the creation of decorative moths, everyone will be able to decorate with these motifs the interior of their dwelling.
The end of the repair comes in pleasant trouble to decorating the room. Sometimes the desire to refresh the situation arises spontaneously. A budget version of the original design of the room will be butterflies from paper on the wall. Make your own hands An individual decoration will help the butterflies patterns, a large number of which is presented in this publication.
Preparatory work
Tradition to use as decoration on the wall of butterflies from paper originated relatively recently. Multicolored moths are able to quickly transform the interior of the room, filling the atmosphere with romanticism and pleasant dreams of rest. To achieve the desired result will help the preparatory stage:
- Butterfly from paper is better to remove the wall as free from foreign objects. A good review enhances aesthetic pleasure from the creation created by your own hands.
- Determine the area and shape of the image on the wall. It can occupy a compact area or scatter on the surface.
- Make butterfly is the easiest of all of the colored paper, but there is another mass of interesting ideas on the design of the wall with original moths. Material of manufacturing and its combination with the interior of the room is thought out in advance.
- Speecually looks like a wall with butterflies of different sizes. Quickly cope with the task will help in advance prepared stencils for cutting.
Comment! Picking up the pattern, it is worth remembering the complexity of cutting out intricate figures.


Characteristics of individual materials for butterflies
Make elegant moths on the wall with their own hands from various materials. Only paper models have several solutions options:
- classic colored paper or double-sided colored sheet;
- cardboard;
- corrugated paper;
- newspapers and glossy magazines.
In addition to the paper decor, other options for the original butterflies are used in the interior of the room:
- from vinyl records;
- the contour, painted on the wall with luminous paints, applied using a stencil;
- from kapron tights, which are covered with a wire frame;
- from tin cans or plastic bottles.
Tip! In the absence of experience, it is recommended to make several instances from various materials, then attached to the wall and select the appropriate option.

Paper
Most simple and cheap make it yourself moths from ordinary colored paper. There are several techniques for design. If you plan to stick onto the wall of the butterfly completely, then the paper painted on one side is suitable. When creating a bulk composition, when only the torso of the moth is fixed, it is preferable to take two-sided colored paper to work, so the appearance of decorative elements will only win.


In addition to classic colored paper, it looks original on the wall of copies from corrugated material. The butterfly turns out to be more air and light, the figure is easier to give the volume.
An extraordinary look on the wall of the moth, in the manufacture of which glossy magazines, postcards, newspapers or wallpapers are involved. In addition to the simple cutting of butterflies from paper, they can be additionally painted, combine with other shades of similar material or make multi-layered. Borders for the flight of creative fantasy practically does not exist.


Cardboard
For cutting on the wall of butterflies, the cardboard pick up a small density. Otherwise, the process will deliver a lot of trouble.
Comment! Cardboard is considered the most suitable material for clearance on the wall of the volumetric decoration of moths. He keeps the shape of the shape well.
Naturally, in this case it will not work to make a corrugated butterfly instance. Hard material cannot be folded into small folds.
Cardboard is optimally suitable for cutting out openwork moths. For registration it will take a sharp stationery knife and the supply of patience. The quality result of the decor on the wall is possible only in the presence of prettiness and ability to gently work with small details.
The stencil of butterflies for the subsequent cutting of numerous instances is also better prepared from the cardboard. Original templates for cutting butterflies from paper are presented below:

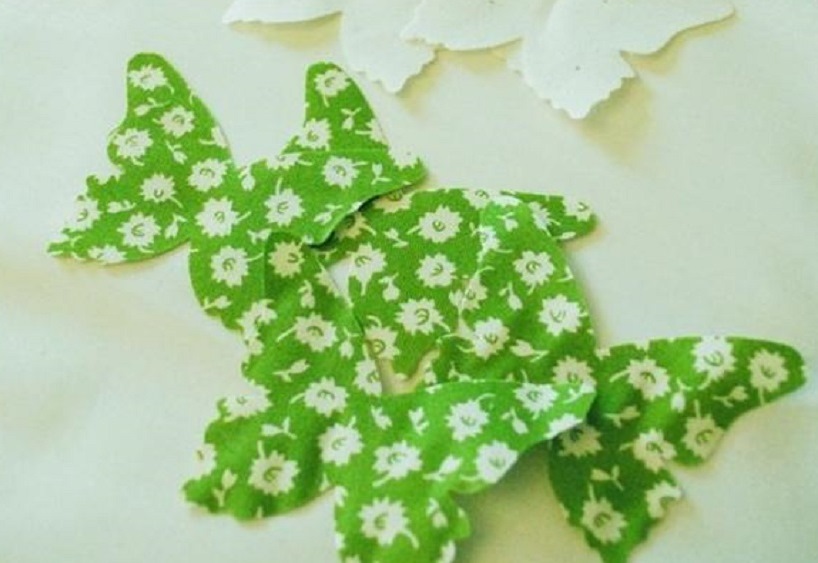
the cloth
To make the decor on the paper wall acquired the completed view, it is sometimes complemented by similar elements on the lampsure of the lighting device. But paper moths are not suitable here, so they turn to tissue counterparts. The butterfly made from the matter did not differ in difficulty:
- with the help of a cardboard stencil, the figure shape is applied to the fabric;
- detail is cut;
- the workpiece is attached to rigidity;
- if necessary, moth additionally decorated (muster mustache or beads on the wings);
- the butterfly is attached to a suitable surface.
Tip! Experimental needlewomen can be tried using a thread with a needle to mimic on the wings of the residence.
A little exotic
Extravagant Persons will have to dofully create a decor on the wall, which is based on vinyl records. Key steps process:
- Initially, the contour of the butterfly is applied to the vinyl chalk.
- In the original state, the material is tough enough to cut out the figure, the plate is required to soften. Run the intended helps the oven with the shining foil counterfeit or microwave.
- When the vinyl becomes plastic, it is taken out and quickly cut out the shape. If the butterfly does not acquire the desired outlines before cooling, the heating process is repeated.
- At the final stage, the moth give the desired volume.
Fix the vinyl butterfly on the wall is more difficult than an instance of paper. It will not be possible to further remove without damage to the surface.

The material for the manufacture of a moth can serve a sheet of fuster or beer bank, which is pre-washed and straighten. The circuits of the selected stencil are transferred to the material with a marker or seed, the workpiece is cut. Decorate a figurine with nail polish or colored markers.
Attention! The edges of the butterflies are very sharp, so it is necessary to work extremely gently so as not to cut down.
Tin decor can be suspended. It will be appropriate in the interior of the Loft, for classic design, still the optimal solution will be moths from paper.


Production of contour butterflies
Let's start with the most simple option how to make contour butterflies. The main stages of the creative process:
- The stencils of butterflies on the wall are better cut out of the cardboard of medium density. A suitable material will be package from dry breakfasts or tea.
- The original moth can be selected and print out of the templates below.
- The silhouette you like is applied to the cardboard and cut out. It looks more colorfully a wall on which butterflies of different shapes are fixed.

Several useful tips for paperwork from paper:
- For cutting use the entire figure completely, if you wish to achieve perfect symmetry, the workpiece is folded in half.
- More naturally look at the walls of copies with minor asymmetric deviations.
- If there is a need to get moths of different sizes, the template is converted through a graphic editor.

Registration of openwork copies
Openwork paper butterflies are best obtained based on cardboard. To work, you will need a sharp knife, blade and printed pattern with lines for cutting. Obtaining on the wall of high-quality decoration is possible under the condition of painstaking work. The algorithm of action is only slightly different from cutting out contour butterflies. First choose and print the template. It cut the required number of items.

The use of the blade and sharp knife can damage the surface of the table, so it is recommended to protect the tabletop with a sheet of plastic, plywood or chipboard. Openwork butterflies from paper on the wall usually give the volume. Little trick is able to relieve the process. The product is slightly wetted and spinning, the resulting bending is fixed. After evaporation of moisture, the blank will retain the desired form.


Options for bulk decoration of paper
Speeciously looks on the wall volumetric figures of paper moths. Options for creating butterflies of complex configurations several:
- multilayer specimens are created;
- use corrugated paper;
- figures are formed by adding a sheet into several layers;
- the art of origami is enjoyed well-deserved popularity.
Multi-layered
To settle on the wall of multi-layer moths is quite simple:
- several blanks of the same shape cut out of the paper;
- the color and size of parts may differ;
- the elements are superimposed on the other, glue the body, and the wings are flexing in different directions.

Multilayer butterflies are impressive, not only from contour blanks, but also openwork parts. This requires paper of contrasting colors or similar shades. For the upper part, an openwork blank is taken, the bottom remains contour. Assessing the result will help the following photo:

There is an interesting technique when you can make a multi-layer butterfly on the wall from one sheet of paper, by adding it in a special way. The photo further demonstrates a simple manufacturing process:

Corrugated paper
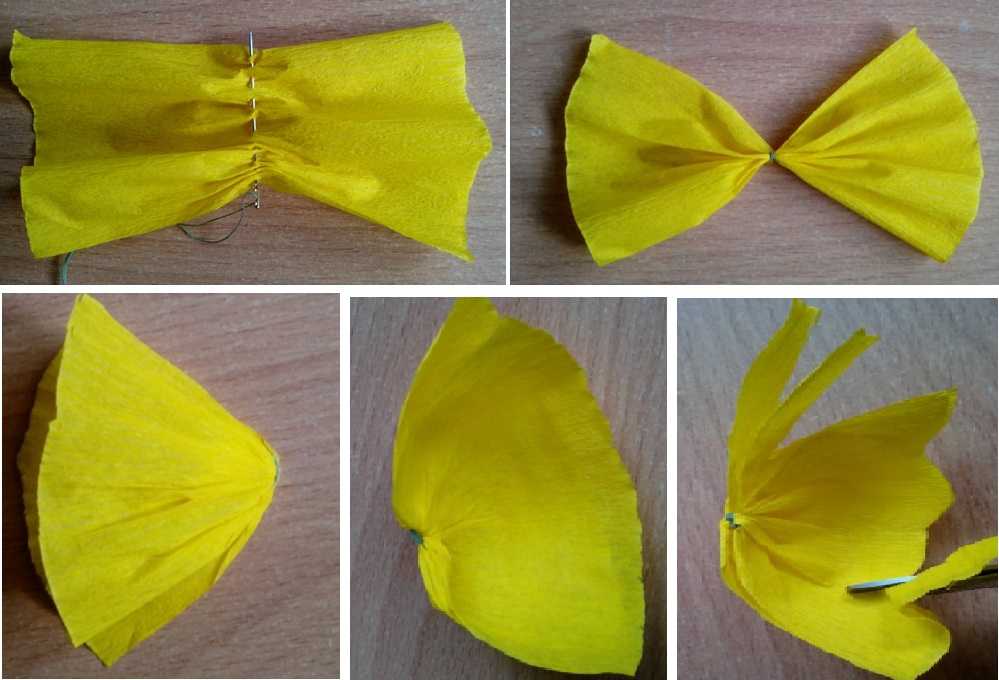
It is easy to work with butterflies on the wall of corrugated paper. An action algorithm includes the following steps:
- Separate paper colors are selected.
- Cut rectangles with approximate size 7x10 cm.
- The workpieces in the center are stitching with large stitches, after which they are collected by the harmonic and fixed with a thread in several turns.
- The resulting bow of paper folds twice, future butterfly wings are spread.
- Then, along the edges, cut the desired configuration.
- From the narrow strips, flagellas are formed for the mustache, which are glued to the body.
The entertaining process clearly demonstrates the photo:

Ideas for beginners and professionals
Very easy to prepare for decorating the wall of butterflies from duplex colored paper:
- First cuts rhombus or square.
- The figure is folded by small harmonica.
- Two blanks are connected together and fixed in the middle thread.
- The mustache is formed from the wire.
To follow the main stages of the manufacture of butterflies on the wall will help:

Some complexity is distinguished by the origami process, which is so interesting to children. One paper moth manufacturer is presented further:

Fastening options
It is safe to fix on the wall of paper butterflies from paper in various ways:
- If the question of the preservation of the wall surface is not relevant, fasten the figures from the paper will help the PVA aluminum or wallpaper solution.
Comment! Regardless of the selected template, it will be a contour or openwork butterfly, the volumetric figures made of paper more effectively look at the wall. A light breeze can lead the wings in the movement, forcing you tremble as real.
- Create in the process and small pieces of foam, which originally glued to the body of the butterfly, and then on the wall.
- Similarly, instead of foaming use bilateral tape.
- When the task is to maintain the integrity of the wallpaper after removing the moths from paper from the wall, they are fixed using English pins.


Options for creating decorative images on the wall using paper butterflies set. A huge heart or whirlwind, removing in the distance, separately distributed copies or cozy on the colors of the flock - the boundaries of creative fantasy does not exist.
Butterflies in the interior are always a festive mood, a reminder of summer. Butterflies made of paper are very simple. This material allows you to transfer not only a two-dimensional image. There are several ways to convey the dynamism of this beautiful insect. Butterfly manufacturing technologies are diverse. It differs in quality and paper from which they can be made. For one models, one-window cardboard with a velvety surface is ideal, other models can be collected from glossy magazine sheets.
Butterflies in the interior are always a festive mood, reminder of summer
For the manufacture of this butterfly, you can take any thin paper that will keep the fold lines. The most spectacular such crafts turn out to be used as the material of their manufacture colorful pictures from glossy magazines.
When choosing a thinner paper, small corrugated butterflies can be suspended on the line under the incandescent lamps, they will turn on the light on the light. The only warning: butterflies should not be close to the light source, otherwise they will light up.
Paper butterflies: simple stencil for cutting
The easiest stencil for the manufacture of butterflies with wings of different lengths and forms consists of the simplest figures - a square and a circle.

- The ratio of the dimensions of the figures is two to three. More can be both square and circle.
- A big figure is a blank for the bottom wings. Little for top.
- When building a template, with any scenario, you need to draw a square. Only one of its corners should be in the middle of the bottom of the sheet.
- When choosing a point of the center of the circle, you need to consider the fact that the top corner of the square enters the part of the circle.
- The workpiece is built, it remains only to cut the circles and collect.
Butterfly formation process:
- It is necessary to fold the harmonic blank. Corrugation step can be selected different for top and bottom items. So the drawing will look more interesting.
- Lower folds are decorated with a lower blank. The formation of convex elements begins the bottom of the workpiece.
- The circle is in the harmonica from above towards the connection point with the second part.
- Having folded the harmonic blank, it remains to assemble it in the middle into the ring from the glued fine paper strip of contrasting color or on decorative tape.
- From the aircraft wire to twist the butterfly mustache, skip them through the paper ring. From the big beads will be headed.
- The bead is fixed simply - it is installed on the top of the workpiece. The ends of the mustaches are loaded through its hole in the counter direction.
- The upper ends are tightened on a thin pencil.
Volumetric butterfly
The middle of the room, the space in front of the window can be decorated with suspended multilayer butterflies. They will become a good addition to brilliant balls on the tree. The main thing in their manufacture - choose the optimal size.

Using this stencil, you can cut out all the details from paper from paper from paper from paper. The most difficult process is to make a butterfly assembly:
- In order for the aircraft to be neat, it is better to use adhesive pencil. With it, only the middle of the workpiece is missing.
- Stencils are superimposed on each other in descending order.
- You can use sequins or carved elements as decoration for wings. They will be wrapped in sunshine and with artificial lighting.
- If necessary, decorated with butterflies with walls, wallpaper, you will need French pins with beads. This ball will help make a butterfly with a volumetric head.
The pin must be stuck in the direction of the body of a paper insect.
Butterfly: origami from paper (video)
How to make your own butterfly pattern
The simplest solution in the manufacture of an openwork butterfly is to print a finished drawing from the Internet. But there is a lot of opportunities for a person who does not know how to draw, draw up a pattern with the help of those under hand. One of the most simple variants of drawing beautiful smooth curls is the use of Pekal, which are used by the dressmakers. Such rules, as a rule, are in the folder for labor in high school girls.

Butterfly, drawn on lecture
The size of this stencil allows the applique of a large size.
- Details marked in red will become a field for sticking jewelry. An ideal material for this applique will be velvety dense paper.
- The sections that need to be cut with the blade are highlighted with yellow.
- The workpiece with slots can be pasted on a sheet of cardboard of contrasting color. It will give a butterfly visual volume.
How the butterflies of different sizes are obtained from one drawing
If necessary, make a postcard, a large format is inconvenient. You can reduce it using a computer. No special software use for this.
Reduced pattern
Enough:
- Copy drawing into a Word document;
- Allocate it with a click of mouse;
- At the top of the window, the "Working with a Pattern" tab opens over the toolbar.
- Clicking on it, you will open the appropriate toolbar.
- It remains to find the format tab and click on the arrow under the size indicating "down" until the size of the picture will arrange you.
Extracted pattern
Using the same drawing, there is always the ability to slightly correct the image shape. It does not need to spend precious minutes, drawing elements again, changing their direction.

So that the wings of the butterfly were stretched up, and not to the sides, you need:
- Copy, like the image in document Word;
- Click on the drawing;
- By installing the cursor on the square, located on the drawing frame, pull the manipulator (mouse) down.
With the help of so simple manipulations with one drawing, you can get a lot of identical butterflies of different sizes. If you work only on a decrease in the stencil, the openwork butterfly can also become a multi-layer.
Attention! Make a decrease in the image, when displaying printing, you can use the scaling function. Each subsequent copy is reduced, for example, by 10% of the size of the previous one. This method is faster, but not economical in terms of paper spending.
Silhouette for openwork butterflies of paper
For the manufacture of an openwork butterfly stencil, the size different from the specified input pattern, it must be printed on a thin sheet of white paper. A thin sheet that swallows light is needed to clearly copy the circuit and all openwork elements, the finest lines.

To change the format when the image is transferred, the projector will need. With its absence, a homemade device is suitable, consisting of a table lamp with a flappon on a flexible or adjusting tripod and frames for placing the pattern in a horizontal position.
- By setting the frame opposite the vertically attached clean sheet of paper to which the image is planned to be designed, it is necessary to find the position of the lamp to achieve the desired increase or decrease in the source pattern.
- When you change the angle of falling light, the image can be pulled out or expand.
- Also, under the influence of oblique rays, it is possible to reduce one part of the pattern, increasing its opposite side. This method is used to create a dynamic image. In the case of butterflies, this is the effect of flight.

Using only the direction of light on one source pattern, you can get completely different butterfly angles. Due to this, all the details even the most unusual openwork on its wings will be the same organic as in the photograph made at the appropriate angle.
An important role in creating a cozy setting is played by decorative things and compositions. But not always and not everyone can have enough funds to adequately decorate their home by expensive scenery. The creation of such interior items with their own hands is often becoming the best way out of the situation, moreover, such a needlework brings a lot of pleasure - both the process and the final result. To date, a popular view of home decorations were moths and butterflies. These creatures fluttering on the walls can cause a lot of positive emotions, reminding of beautiful sunny days. We will dedicate our article to the review of the various possibilities of independent decoration of walls with butterflies, as well as consider ways to make them.
Wall-mounted compositions from butterflies
Butterflies in the interior of a particular room can be represented in different ways: they are placed in the form of panels, dissipate in chaotic or ordered compositions, decorate certain territory (for example, around lamps, artificial trees, etc.) or painted on the walls, Often with the use of luminous paints. It is worth only to look at the photo of the beautiful panel in the form of a scarlet heart from butterflies, as it will immediately want to place this romantic composition in its bedroom.
The advantage of the decor of the moth is their ability to supplement the interior of any room, regardless of its functional destination and present style. It is important to choose the right color solution so that it corresponds to the overall design. For example, on a beige wall, red or green moths will look, on white - black. In the children's room, you can create multi-colored patterns from butterflies, having fun fluttering over the crib, and in the living room it is necessary to issue a swirl from monophonic butterflies an empty wall.
Unusually beautifully looking glowing moths created using special paints. In the evening, they become an original decoration of the room, reviving him and filling with mysteriousness.


Butterflies on the wall do it yourself: Methods of manufacture
If you decide to independently decorate the apartment with such decorations, we suggest familiarizing yourself with various ways of making butterflies. Although work will require some costs, time and amplification, but the result, believe me, will undoubtedly please. So that the composition looks more natural, it is better to make moths of different shapes and sizes for it using templates that can be drawn or take ready-made from the Internet.
How to make butterflies of paper and cardboard
The easiest way to make paper butterflies. To do this, you can take white sheets and decompose the winged beauties at your discretion or get a set of colored paper. The advantage of this material is the simplicity of working with it, therefore, it is quite possible to attract a child to the manufacture, arranged, for example, a panel of butterflies in the nursery. In addition to paper, you will need such accessories such as scissors, templates, pencils, PVA glue (for bulk products).
Make a paper butterfly in two ways. The first is to take a ready-made pattern and with it to transfer the outline of the moth onto a sheet of paper, cut with scissors. The second method is simpler. Cut out first from the paper square (rectangle), we fold it in half, we apply to the fold line of the half butterfly pattern, result in a pencil and cut out. Then we unfold and get a beautiful moth. The advantage of butterflies cut out of paper is their airiness - if a light draft, their wings will move, as if real.
You can give the wings of butterfly of greater elegance, cutting with a manicure scissor or stationery knife in advance drawn internal parts. To make a lush butterfly, cut two identical blanks from paper of different colors or the same, and then glue. In this case, the lower plane is the base - may be simple, and the top is decorated with patterns or cuttings. Bilateral tape is used for fastening.
The cardboard butterfly is also cut into two ways - with the help of complete or semi-love. As the basis, not only the usual color cardboard can be used - beautifully looks at multicolored moths cut from old postcards and logs.


Corrugated paper butterflies
One of the successful methods of manufacturing volumetric moth is the use of corrugated paper. To do this, you must additionally prepare a needle with a thread. You can find the material from various motley color and create a real colored moth cloud.
First you need to cut out the paper striped with dimensions of 7x10 cm (you can use other dimensions depending on the desired butterfly value). With the help of a needle with a thread form in the central part of the harmonic and we are tightened as shown in the photo. The resulting side canvases we fold, connect and, slightly stretching them on the parties, get rid of the folds - it turned out a billet of two wings, which now need to give a beautiful wavy shape. Cut must simultaneously have two wings, not forgetting also to highlight the stones for the mustache. In this case, the templates do not need - the form can be given at its discretion.
At the end stage, we deploy and spread the workpiece, and the mustache twisted with your fingers. Butterfly is ready!


Origami butterfly paper
Beautiful, bulk butterfly can be made by origami technique. Make it a little more difficult than in previous cases, however, when you make a couple of such beauties, it will be much faster. Beginners need to take advantage of the schemes of such work, which are quite a lot on the unstashes of the World Wide Web, are patient and preferably. The art of origami does not stand still, constantly developing, so there are a variety of ways of folding butterflies - from simple to modular, able to move wings, etc. As we learn how to make the origami moths for the wall decor, you can use simplified technique.
To begin, it is necessary to carve a paper square, pass it on possible diagonals and twice through the center. The opposite sides are folded, and the lower angular tops bend, turn over - it turned out a double triangle. His vertex flex in such a way that the tip is layered above the entire part, after which we wrap it up and put half the central guide. At the final stage, we fold the part twice. Thus, making a bulk butterfly, no need to intensively block folds of folds.


Production of butterflies of fabric
Knowing the Origami technique, you can make a magnificent butterfly from matter. To do this, you will need two rectangular loskutka from different tissues of the same size. We sew them among themselves around the perimeter - we get a canvas, from which, following the step-by-step scheme, presented below, we form the product. To fix all the necessary folds and final construction, use iron. Butterflies made of fabric will become an excellent room decoration. In the work, you can use materials of various colors and structures, including tulle and lace.


Butterflies from tin jars
If you have left empty beverage jars, do not hurry to send them into a trash can - they can become excellent material for the manufacture of shiny winged beauties. With the help of scissors, it is necessary to cut off the top and bottom of the banks, cut it in half, having received the web. Next, we use the template and apply the image of the moth to the surface, cut out, giving the edges of the waistness. So that the wings do not twist, you can give them a corrugated finish by making a stupid side of the knife or scissors longitudinal recesses. The resulting billet is cleaned with the help of multi-colored markers.

Glowing butterflies do it yourself
Amazingly and excellently look in the interior glowing moths capable of charm their mysteriousness in the dark. In this case, their images will be applied to the wall with the help of luminophore paints. To get the effect of the glow, you need to take care that there is any source of light next to the decor.
So, the paints of different colors, a sponge, brush, glue-spray and stencils will be needed. First, prepare from cardboard stencils of future moths and glue them to the wall. A piece of sponge is adhere to the tassel and with the help of this uncomplicated tool cleaned butterflies. To better understand what paints will be more profitable to look, it is better to work in the twilight. After applying, you need to wait with a quarter of an hour and remove stencils. The paints are completely dried in two hours, after which the pencil need to circulate the contours. To "revive" the composition, you can apply additional strokes of paint near the wings. Decor ready. Turn off the light and admire the beauty of our luminous fluttering moths.


Butterflies on the wall - photo of decoration
In conclusion, we propose to visit our photo gallery. Here we tried to collect the best examples of decorating the apartment with compositions from butterflies. We hope these creative work will bring you a lot of pleasure and inspire to create our own wall decorations. Happy viewing!