Step-by-step instructions for self-enclosure at home siding, photo and video. How to shelter a house by siding - all stages of work laying Siding
Reading time ≈ 4 minutes
One of the most economical ways to give the facade of the house of an attractive look is to finish the house siding with their own hands. In addition, this product is very easy to install. To do this, it is enough to have all the necessary tools and materials, as well as desire.
The advantage of finishing siding with the attraction of workers is that they will be able to accurately calculate the amount of materials and help you choose the highest quality of them. It is for this that you need to use the services of specialists. But to complete the finish at home by siding can be completely and with your own hands, and how to do it, look in our article with photos and videos.

In order for siding to serve for a long time, it should be correctly made its installation with your own hands. The following recommendations will help you handle it:
- The panels should not be mounted tight to the crate, as siding, like other facing materials, is inclined to compression and expansion under the influence of temperature. In the process of work, you should leave a gap of about two millimeters;
- If products are connected using accessories or superimposed on each other, the gap for temperature extensions should exceed 6 ml;
- It is possible to cut the material at a temperature of not more than -10 °;
- The finish of the house siding provides for the use of short galvanized screws as fasteners. They must have a rounded head, and at the end there should not be a bora. It is also permissible to use tolseri nails;
- It is necessary to arrange the fasteners in the middle of the slot;
- No need to cut the product in advance. It is best to do so as it work.
Schemes and drawings


Cutting device

With the help of the crate, you can organize the system of the ventilated facade. The shade for the siding device can be metallic or wooden. Depending on the type of facing material, it is suitable vertically or horizontally.
Sayding Mounting Tools
Significantly facilitates the work of the application of the bunch of notches and perforator. In addition to them, the following tools will be required:
- Scissors and Hacksaw for Metal
- Screwdriver
- Two-meter construction level
- Special Pencil for Marking
- Roulette with a length of at least eight meters
- Carbon black
- Construction rope.
Step-by-step instructions for finishing at home siding do it yourself

Standing at home Siding can be performed using a special H-rail, which is specifically designed for these purposes.

This method provides for the device edges of the panels in the product grooves. This eliminates the need for dospene panels over a flat line. It is best to select rails under the color of siding so that they do not stand out.

Before installing the rail, it is necessary to fix drain staps at the bottom of the wall. They need to arrange starting rails that will be the basis for fastening the first siding panel.

When fixing, initially fasten the upper lock of the singing row with the lower lock of the next and attach to the crate. Only after the installation of the finish n-rail can you mount the last range of products and it is not necessary to fix them. It is worth aware that the decoration of siding provides its indentation from external and internal angles. The gap should be at least ten millimeters.

It is also necessary to make the trim and for the coating of the roof. To do this, you can take the remnants of the material. You can use special panels with perforation. This procedure allows us to provide a natural space under the roof.

The finish of the house siding is quite easy to perform with their own hands, but it is better to get an assistant. Recommended when buying a material for finishing the facade to additionally take from the seller instructions on the device in which these all processes needed to be executed.


Recently, siding, both brick and wooden houses use siding, so much will be interested in how to collect siding with your own hands.
Siding is a modern material that allows you to quickly and cheap outside any construction and give her a beautiful and neat appearance.
Using siding began at the beginning of the last century in Canada and America.
They did siding from the tree and stoned them mostly popular houses there.
Today, siding is produced from a variety of materials - steel, aluminum, vinyl.
The most popular and affordable option is considered vinyl siding, which may look like a stone, brick, wood or log.
It is made from polyvinyl chloride and various plasticizers, so the material is obtained very durable and durable.
How to install siding, look at the video:
To properly bind the house with this material, you need to know its main characteristics. What advantages and minuses have vinyl siding?
- this material is not amenable to rotting, does not twist from moisture, not rust;
- siding weight is very small, so the building finishes will not bear any load on the foundation and wall;
- installation is pretty simple, so it can be attached with your own hands in a short time;
- does not fade in the sun;
- the service life is very large, manufacturers give a fifty-year-old warranty on this material;
- it is possible to mount this coating on any surface - brick, wood, slagoblock, sandstone and more.
- this combustible material, and even despite the fact that recently the manufacturers are introduced into the siding fireproof, it still remains flammable;
- at very low temperatures, it becomes fragile, begins to crumble, if you live in the region, where in the winter the temperature often drops to -20 degrees and below, there is not desirable to use siding there;
- it is not desirable to mount the material on the walls at temperatures below 10 degrees, as it becomes brittle.
Types of siding
Siding under the log. Panels for logs and boards recently very popular.
A log can have a variety of shades, everyone can choose a finish to their taste.
Houses decorated with siding under the log look very natural and naturally.
The panels under the log will fit perfectly in the design of the cottage or country house.
If you build a house in a country style or an alpine house, then the log will become an excellent option for design.
Siding under the stone. Siding under the stone will make your home respectable and refined.
The panels, imitating stone, are used for cladding both at home and only the lower part of it - the foundation.
Siding for stone can be combined with other panels - under the brick or under the log.
Some specialists are combined in the decoration of one house two or three types of panels under the stone, getting very unusual solutions.


Siding under the stone can be painted in different colors, as well as portray the texture of different stones - granite, marble, sand, tuff.
Siding under the brick. This option of panels can be used both for small cottages and for large country houses.
Such panels are also performed in various color solutions. Beautifully looks at the combination of panels under a brick with panels under the stone.
Wall Facing Technology Siding
The material is carried out by strips whose width is 20 - 25 cm, and length up to 4 m.
Before proceeding to work on the facing of the house, the amount of material you need to purchase should be calculated.
Pre-calculation will help save the number of siding and fittings and not to purchase extra.
Manufacturers of this material also offer to purchase the desired fittings and fasteners that will be suitable for cladding.
Preparation of walls
A big advantage of such a facing is that the walls of the house do not need to prepare to work in any way.
If you mount siding on a metal frame or a crate, then the wall surface can be any.
Before mounting the coating from the surface of the walls, dirt is removed, old cladding, as well as all the protruding elements - platbands, plinths, drains, lamps, eaves.
If there are potholes, cracks or large irregularities on the wall, they should be previously aligned with cement mortar.
If you do not make it, the moisture will be collected in the cracks and holes, which will freeze in winter and lead to even greater destruction of the walls of the house.
If the house is built of wood, then the walls need to be cleared of the fungus and mold, after which the wood is treated with a special protective antiseptic agent of deep penetration, which will save wood from damage to rot and fungus.
Preparation of walls to mount with your own hands on video in the section.
Installation of crates
When the walls of the house visually look sufficiently smooth, many are wondering if it is necessary in such a case a doom, or you can attach siding straight non-wall.
Experts argue that the crate must be attached always.
The shap is used to fasten the panels. The appearance of the facing will be directly dependent on the quality of the crate.
Before you roll the framework, you need to check how smooth walls you have.
The doomle also becomes necessary if you want not only to bind the construction, but also insulate it.
For fastening the material to the wall, a crate for which metal profile or wooden rails are used.
Metal frame made from aluminum profile, and wooden from bar from 20 to 40 mm.
Wood for the frame must be treated with a special antiseptic.
If you have chosen a wooden framework for yourself, the length of the bar must be greater than the height of the walls.
So it will not be necessary to connect the bars among themselves, which will make the design even more durable.
The frame of the frame should be well succeeded so that after the construction of the frame and its facing, the bars were not deformed.
The moisture content of the tree may not be higher than 12 - 15%. The use of poor-quality wood can lead to the fact that the facing will break and crack over time.
Therefore, it is better, despite the high cost, make a metal frame.
It should be known that for basement siding anyway, you need to use a metal frame, as this part of the frame is close to the ground and moisture.
Montage of the frame can be viewed on our video.
If the frame will be metallic, then you need to purchase a galvanized SD profile with rigidity ribs, it should be bending and depressed points, which increases its strength.

The thickness of the galvanized from 0.4 to 0.55.
The doomle is attached to the walls in the vertical direction. With the help of the carbon and water level, you need to check whether the lamp is fixed correctly.
Start mounting with an angular vertical guide from the left corner of the house.
You should also mount the crate around the windows and doors. In addition, additional rails are also attached for plots, various communications, lighting devices.
In the process of cladding, with their own hands, the walls, frontones and the base, for which the glass wool, stone wool or foam are laid between the frames of the framework of the framework are most often insulated.
It is important to know that the insulated space between the facing and the wall should be well ventilated.
Ventilation is needed so that there is no rotting under siding. Therefore, laying the insulation, the ventilated channels should also be laid.
Fastening siding to the crate
When installing the coating on the walls with their own hands, the base and the frontoth of the construction, the basic rules should be followed.
First of all, it should be taken into account the property of the material to expand in warm and shrink at minus temperatures.
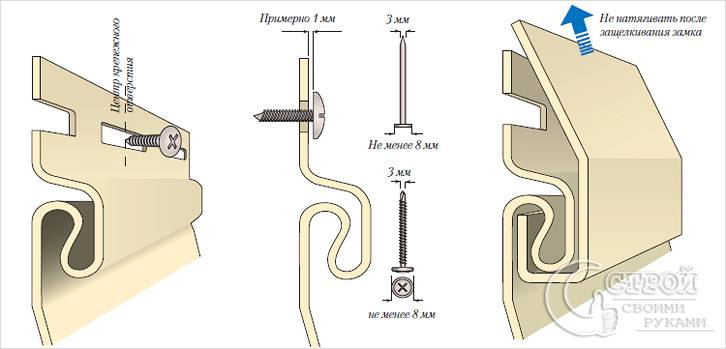
If you are creating the material in winter, then between the panels you need to leave the gap 8 - 10 mm for expansion. In summer, the gap can be 6 mm.
For fastening siding to a frame use special fastening accessories:
- corner slats on external and internal angles;
- carrier bar, which is set at the bottom;
- profiles covering the uneven edge of the panels serve as a decor;
- profiles for finishing windows and doors, lowers;
- facing fittings - flexible profiles for windows, chamfers, sofa.
The panels themselves and all accompanying accessories must be attached to galvanized screws.
You need to twist them in the panel, it is necessary to remain between the hat and the surface of the siding should remain a distance of 11 mm. This gap to expand the material when heated.
Starting the mounting bands need to be moving up, if you use horizontal siding, and from left to right for vertical cladding.
When you attach vinyl siding with your own hands, you need to hear a characteristic click, which indicates that the panel is installed tightly and reliably.
Fastening siding with your own hands on video.
You have decided to make a lining of your home, siding panels chose as finishing material, and now decide for yourself the question of how to put siding. In this article, you will find the answer to this question, in it, from several types of siding for consideration it was the Siding PVC or vinyl siding.
The fact is that at present it is this species that is chosen as a finishing material for facades in a little more than half of the cases of the facade siding. And before finding out, but how to put siding, we will define, but why exactly vinyl siding.
Why exactly vinyl siding

- Beautiful, bright, attractive. After the facade of the house will be separated by siding, the house looks very elegant and attracts his eyes. Even those buildings that have been built long ago will look like new ones.
- Numerous designer solutions. Vinyl siding is produced in a variety of colors and their shades. A combination of various types of siding, combining various colors and additional elements, will allow you to complete the facade finish on the themes: "I have, not since everyone", "better than a neighbor", "I dreamed about such a long time."
- Durability. It will take many years and the facade, separated by siding, will look like the finish was made quite recently. Specially added components are capable of maintaining the structure of siding panels and protect them from fading. The warranty period for the best siding varieties is up to 50 years.
- Withstand any atmospheric influences. The temperature range in which it can be operated is from -50, up to +50 degrees. He is not afraid of water, snow, hail, wind, rodents and insects. Siding panels do not rot, do not darken by the earth, are not covered with mold.
- Able to hide construction errors. It happens that the material of the walls is not aesthetic, but if there is a laying of outdoor siding, it does not play any role. Under the siding trim, defects will be not visible.
- Siding styling technology is very simple. The most important thing is that the instructions for laying siding are complied with. To fasten the panels among themselves, they have special locks, so the installation is performed simply and quickly.
- Sidding panels have a very low weight. Therefore, additional strengthening of walls and foundation is not required. And such a job as laying with your own siding hands can be performed by one person.
- Unpretentious in operation. If plastered walls or natural materials require special care, for example, undercutting, tinting, impregnation with antiseptic and anti-fashion solutions. The siding panels are easily and quickly clean with a hose water, and it is enough once twice a year.
- Relatively low price. Taking into account the durability of the facade of vinyl siding, comparing with other finishing materials, it can be said that the costs of such a finish are significantly lower.
Installation of vinyl siding
Surface preparation

In general, the installation of siding does not require careful cleaning of the walls of the walls from the residues of the previous finish, such as paint, plaster, etc. But before laying siding, it is necessary to remove everything that can interfere.
These are curly plants, tree branches, waterproof tubes, on the walls of the lanterns, etc. Additional elements should also be removed in the form of staven, wind boards, decorative slats around windows, doors, waterproof and corner boards.
If the facade is old, then mold, rotting and fungi may form on it. To get rid of these not very pleasant things, the wall should be treated with special antiseptics.
Using the level or plumb, determine the quality of the vertical of the walls, as well as the verticality of window and door frames. Existing breaks, if possible, should be eliminated. The vertical of the walls is checked in order to find out where to start mounting the crates, or at least determine the distance from the plane of the crate to the walls.
Installation of crates
The mounting panels are not recommended directly to the wall, as there will be no ventilation between the wall and siding and therefore mold and fungi may appear. And because of the possible curvature of the walls, you can forget how to properly put siding and how beautiful it will look.
The lamp is a special frame that is secured with the wall, and siding is mounted on this frame. By type of material, two types of crates can be distinguished.
- Wooden doom.

It is easier and for such a crate, any wood is suitable, no less than 12% humidity.
ATTENTION: Our main task is how to put siding correctly, but if the wood is raw, then in the process of drying it can be "a story", and then the plane of the crate will not be smooth. To correct this lack, the facade will have to be disassembled.
Wooden crate is better to do if the walls are wooden, out of a log or bar, it's easier to fasten bars and easier to adjust the distance to the wall. Wooden bars need to handle fire-bio protection, to extend the service life.
The distance between the bars should be about 40 cm if the wind is very strong, it is worth the step to reduce and make it equal to 20 cm. Well, the thickness of the bars is determined by the presence or absence of the insulation.
- Metal profile lamp

The material for the walls of your home can serve as a brick, foam block or just concrete. Or as an option for insulation, a tougher frame is required, you can perform a crate of special metal profiles with a galvanized surface.
To secure such a crate on the wall, the fastenings are placed, the holes are drilled and with the help of a dowel-nail to these holes are attached special metal suspensions. With these suspensions, you can easily adjust the distance from the plane of the crate to the wall.
The galvanized or anodized surface of the fastening elements will avoid the appearance of unpleasant rusty divorces.
Do you want your home to look new without big investments? Then excellent and most importantly, the modern option is the finish of the facade siding. It is used to finish a variety of buildings: the facade of the bath, garage, houses and others. It prevents the direct hit of the rays of the sun on the wall, closes from the rain, protects the house from temperature drops, and is also excellent wind protection. Moreover, it is easy to operate. It is easy to put in order, wash and rub with a damp cloth. These are just some advantages of choosing siding for walls. Now consider how to perform the installation of siding with your own hands, learn what tool for this you will need, and how to prepare for work.
Tools and equipment
Before the start of preparatory work, you should make sure that the entire instrument is available. To mount siding you will need:
- shears for tin
- bulgarian,
- sharp knife
- perforator
- punch,
- lobzik,
- stapler
- level,
- a hammer,
- roulette,
- protective glasses.

In addition to the tool, you should purchase all the building material in advance. In addition to the siding and its components itself, you need to be built with nails, self-drawing, brackets, etc. Now that you have everything at hand, you can proceed to preparatory work.
Preparatory work

It should be noted that independently mounting siding is not executed. Therefore, take care of a reliable partner. Together, using a water level (or its laser variation), you can make the marking of the facade. At every corner of the building, an accurate mark is made.
Note! It is imperative that the last mark coincides with the first mark. If the marks do not coincide, then measurements inaccurate. Accordingly, the procedure must be repeated. If you ignore it, then as a result you will have uneven walls.
After it is necessary to find the highest marker focusing on the basement. Next, at each corner of the base the mark is set, which will show the level of the first strip.
We make a crate for siding
One of the important stages of work is the manufacture of crates. For this you can use wooden bars.
Note! If siding will be laid horizontally, then the fence should be installed only vertically, and vice versa.

For the manufacture of a frame, it is necessary to prepare in sufficient brus with a cross section of 50 × 50 mm and 25 × 80 mm. When buying, make sure that they are perfectly smooth, otherwise after mounting the siding wall will repeat the form of the "sea wave". When installing the crates must be traced over the distance between the bars, which should be equal to 30-40 cm. If you want to pre-insulate the facade, then the incarnation is first done in the width of the insulation. The skeleton for the insulation will be made perpendicular to the crate for siding. It is also necessary to hide windows with wooden bars. After laying the insulation, the surface must be closed by waterproofing film using a stapler. This film needs to be placed making a latter ten centimeters wide.
When everything is ready, you can start making the frame directly for siding. To do this, you can use a metal profile. This has its advantages. For example, wooden bars need to be treated with antiseptic against corrosion. Moreover, under the influence of weather conditions, bars can be deformed or refused. Because of this, siding can do badly. As for the metal profile, it does not threaten it.
Installation of siding. Technology
When mounting siding, one must comply with the condition. It is to provide siding movement under the influence of temperature drop. To this end, nails should be clogged into the provided openings in the center. It is also important to carefully score nails. Excessive power should not be made to put them.
Note! Do not navigate the nail hat close to the crate panel. It is recommended to leave a gap of 1.5 mm. This also applies to self-tapping screws if you are fixing siding them.
In no case can not allow panel tension. Otherwise, the subsequent panel can become uneven, and this will lead to curvature. Between nails can be a distance of up to 400 mm.
Sequence of installation work
Finishing window opening

The first thing is carried out facing the window opening. To this end, you should take the window bar and cut it up to the desired size.

A band that is mounted on the inner perimeter of the slope is set to the final strip. To start, the bar is installed on the lower slope, after the lateral and only last turn on the upper slope.
Installation of base siding

Before starting the installation of siding on the facade, pre-decide whether it will be installed on the base. If so, then this work must be done in the first place. To do this, the starting plank is installed. It is extremely important to install it exactly horizontally. To accurately dock the first panel with an angle, its edge is cut. The next panel is installed on. When it comes to the last panel, it must be cut it in such a way that there is a small gap between the panel and the angle.
Installation of siding on the wall

The first thing is lit by the line of the baseline with a level. It is from above that the starting plank will be installed. Next is mounted by the H-profile. It is needed for a beautiful docking siding. Some decide to do without it. However, with time, dust can be clogged, in addition, moisture can accumulate there.
Accordingly, the junction will be visible. Moreover, with severe wind gusts, this joint may not withstand and tear. For this reason, it is best to use a n-profile to connect siding. The panel assembly begins on. Naturally, the installation begins with the bottom starting plank, which is snapped by the next ordinary plank. And so a number of over, to the very top. As for the last row, the last panel must be adjusted exactly in size.
This method is set to install siding panels. The main advantage of the technology is that this work can be done without the help of specialists.
If you have already done this work, you can share your opinion. Perhaps when you work, you encountered some problems, tell me how you coped with them. If you have questions, then ask them to us.
Video
This is how the correct installation of siding is carried out:
And these are typical installation errors:
Photo


The design of the facade or base of the private house is not always dictated by the desire to make the house original. Often, exceptionally practical goals are being pursued - the protection of the walls, the hide of obvious flaws. Therefore, it is not always possible and expedient to apply expensive facade materials. And in these cases, vinyl siding comes to the rescue.
Features of vinyl siding
Vinyl siding is a relatively new and practical material for finishing facades, which is a facing panel with a thickness of about 1 mm and stylized under natural building materials for the trim. The panel can be both vertically oriented and horizontally, but the essence remains one - the change in the appearance of the facade and the protection of the walls is natural impacts, mechanical damage, to install insulation, etc. On its aesthetic qualities can argue, but the main indisputable advantages of the material Called:
- low price;
- easy and economical installation;
- the ability to install "dry" methods at any temperature;
- a huge number of visual solutions;
- PVC panels do not support burning;
- no need for additional processing before installation;
- does not require complex care during operation.

In order for PVC panel to show all its positive sides, it must be installed correctly, and this is a rather painstaking process. Montage of vinyl siding with its own hands a video lesson in which we have prepared, in general, it is presented in the lesson, and we will touch some features and tricks when installing.
Preparation for styling vinyl siding

It is very important before putting vinyl siding, decide on its appearance, based on the design of the exterior of the house. The fact is that the store on one model panel is very difficult to judge how the house as a whole will look like. Incorrectly choosing even the color of the panel, you can harm appearance or not to achieve the desired results. After siding is already purchased, you need to start preparatory work.

PVC siding is mounted only on a frame or a crate. Their design depends on what siding, vertical or horizontal, we have chosen to finish. Wooden rails or galvanized metal profile are used as a frame, which is used for mounting drywall. In rare cases, it is possible to do without a crate, if we are talking only about aesthetic design and the wall at the same time perfectly smooth. But siding, as a rule, is stacked on a layer of insulation, and this makes some difficulties, so with insulation, perhaps, we will begin.

Regardless of whether the insulation is provided in the design of the facing, or not, the marking of the facade is a mandatory stage. Despite the fact that the panels have perfectly smooth geometric shapes, the markup is necessary both in the vertical and in the horizontal plane. With the help of a level or a plumb on the walls of the building, places of fastening of frame elements are applied. Depending on the type of siding panels, rails or profiles are located both vertically and horizontally strictly on the markup. Profiles from galvanized metal are fastened at a distance of 40 cm, and wooden slats are not more than 50 cm from each other.

- Installation of the insulation is made according to such an algorithm, and on which finishing material is applied, the installation scheme changes very rarely:
- The remote bar is attached directly to the wall, which provides the wall ventilation. Its thickness can be about 10 mm.
- The plank is naked a coolant layer.
- In the intervals between the main frame racks layer or several layers of thermal insulator - mineral wool, as a rule, in this case, the most likely complicant for installation.
- On top of the insulation mounted windproofing.
- Sometimes installed on top of it the remote bar for better ventilation.
- Only after that the siding panels are fixed to the base frame rake.

I would like to note that all wooden framework elements must be processed by an antiseptic. This will eliminate the possibility of the appearance of fungi and pests in the frame, which in turn will affect the durability of the whole design.

Vinyl Siding Installation Price

Of course, the installation of vinyl siding with their own hands will save significant funds. How many? We'll see now. As a rule, companies that sell vinyl siding are offered and its installation. The average price is indicated in the table.

And here is an approximate estimate of the design of the house of the facade of the house, the table indicates only the cost of the work:

As you can see, performing siding installation with your own hands, we save a significant amount. At the same time, we reserve the right to choose materials and technologies. Carefully sorting out with the technology of mounting siding panels, spending some time on the installation, the house will receive a completely different appearance and reinforced protection from the cold and wind.