How the decorative plaster is properly applied. Decorative plaster technology with photos and video
Decorative plaster looks not only very attractive, but also significantly expanding the possibilities of masters in interior design. The cost of the finished construction mixture for decorative wall decoration is quite high, which significantly limits its use. In some cases, experts disclose their secrets of skill and shown on the examples that the performed decorative plaster is not inferior to the finished solutions with their own hands.
It was such a master who wants to make separate thanks for understandable and available video instructions, allowing to implement various ideas on the design of the premises. The review includes the cumulative experience of masters, which is assembled in a separate publication. The recipes and tips will help endlessly experiment with decorative design in any premises, where each wall can purchase a unique appearance.
Decorative plaster in various techniques
Versailles plaster from ordinary mixtures
How to make decorative plaster with your own hands like the walls in Versal's apartments? It turns out that such an invoice can be achieved using conventional dry starter plaster plaster and finishing putty, which, when mixing and applying, give an attractive texture with light inclusions of the average fraction. This finish requires the use of acrylic varnish, metallized paint and glytter. A detailed master class from the studio "Redecoration" is given in the video at the end of the publication.
Sequence of work on the application of Versailles plaster:
- plug the perimeter of the future coating with a plaster ribbon;
- progress the surface of quartz-ground, which will ensure good adhesion and will allow working longer with the model mass. For these purposes, Ceresit "Paint primer for thin layer plaster and paint" is suitable;
- the model mass for decorative plaster works is mixed with water in proportion of 1: 1 finish putty and starting plaster plaster. The manufacturer of the mixture is not important, but you can use for example a dry mixture G-START and SATENPRO;
- the mixture is mixed with a mixer twice, for the first time immediately after adding mixtures, the second time after the mass stands for several minutes;
- the plaster is applied on the wall with a layer of 2-3 mm with a spatula and a celma, making random divorces to create the desired texture, special attention is paid to the corners and space near the ceiling baguette and doors;
- the model mass is applied with a flat layer on the wall, and then with the help of plastic Kelma, an additional "factory" layer is made, which creates the required volume;
- after drying the plaster, the resulting irregularities are smoothed and sandwiched with a spatula, painting grater and sandpaper (No. 60), resulting in a beautiful smooth coating with severe, but shallow texture;
- at the next stage, the primer of deep penetration is applied, dislike all irregularities and avoiding the inclination;
- after the primer, the surface is painted, it is mixed with white paint with any selected dye, it will take about 2x hours to dry out this layer;
- the next layer of the wall is painted with a metallized decor, silver is divorced on a primer in a ratio of 1: 1, then with light movements are applied with a foam roller on the first layer of paint, without filling all irregularities (note that there are no traces from the roller);
- the finishing layer of the surface is made by varnish with the addition of glytter. First, the varnish is diluted with water by 30% to avoid the lacquer "peel" on the finished coating, then the glytter is added at the rate of 1 tsp. per 1 l. During work, the lacquer must be intermedible to "raise" sequins.

Obviously, in such a way you can make plaster in any color with a metallized paint finish of any shade and decorate with a color and monochrome glitter. You can change the maneru of the plaster, creating various textures. Varnish gives the coating fairly high strength and protects the wall from burning into the sun, you can use both frosted and glossy lacquer coating.

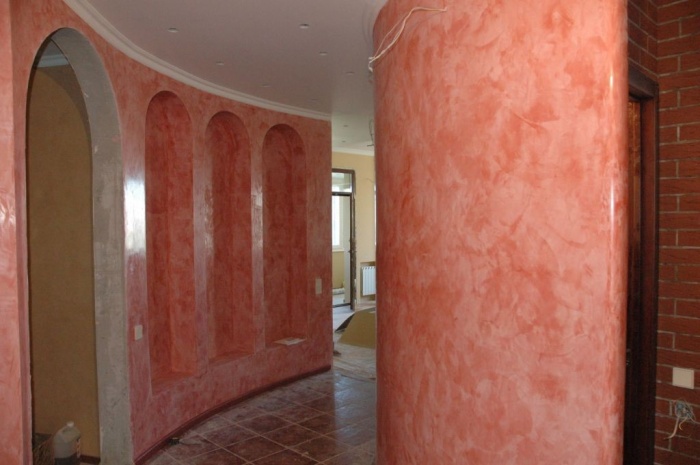
Flemish Plaster - Tinted in Mass two-color
Working with Flemish Plaster differs from the above-mentioned Versailles and Venetian method of applying and finishes, it is also made from the usual putty based on the model mass, the recipe of which is given above. Approximate consumption of such plaster - 80 g per 1 square. m.

The key difference of this coating is that the finished decorative putty is tinted in the mass, that is, the dye is added in the plaster finish mixture, and not applied by a separate layer. In the video, the lesson is used yellow-brown and coffee plaster, which is applied with a large spatula on the prepared surface of the movements "from Himself," thus creates a beautiful two-color texture.
At the next stage, the wall smoothly smoothed using a cell or spatula. It does not need to achieve perfect smoothness. The main goal is to mix the plaster of two colors and get an interesting two-color coating.
Flemish plaster is applied in three layers, while the spatulas of different sizes are used, reducing their size from the layer to the layer. On the second and third - you can use a 20-centimeter tool. The subsequent layers are applied in such a way that the texture formed on the wall and irregularities inside smooth surfaces are formed. The size of "islets" will depend on the volume of the mixture used in one cycle of putty. The larger the model mass on the soldier - the topics of the "islands" of a larger size of a smooth surface can be made on the wall. The latter layer can be applied by the Venice Clavma according to the "Press-Free" scheme, in this case there is a different texture.
After applying the plaster, the wall is painted with primer deep penetration. After complete drying, the plastered area is covered with a zone using a cell. The mixture can be prepared according to the following recipe (consumption of 120 g per 1 sq. M. m):
- glue for flieslinic wallpaper, in divorced according to the instructions form - 2 parts;
- panel lacquer - 1 part;
- paint "Silver" - 0.5 parts.
According to its structure, the azure is a conventional wax that covers the plaster as the finish layer. Please note that in the deepening the wax is not completely removed, due to which the texture with sections of varying degrees of silvering is obtained. Instead of silver for the preparation of lazuries, a pearl or gold can be used, which makes it possible to achieve different light effects.
If desired, the wall may be additionally decorated with varnish, which will give strength to the coating. For wet premises, a yacht varnish or waterproof facade plaster can be used.

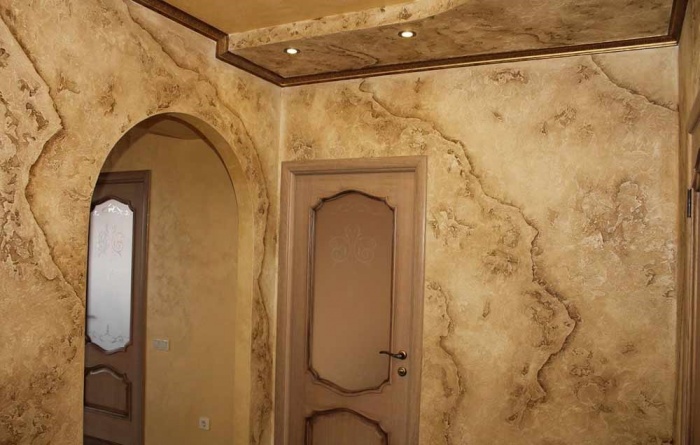
Prague Plaster
Prague plaster or, as some masters, "Venetian fresco" is called on a pre-toned surface. For this purpose, the facade paint and the color of the desired color is added to the ground. The main task is to simultaneously make the soil to make a colored base layer. When applying the primer layer, it is not necessary to achieve uniform "shellability".

In order to prepare a model mass of decorative Prague plaster, any acrylic putty is used, 1/10 of the sand and a color is added to it (the preliminary consumption of 1.5 kg per 1 sq. M). The first layer of putty is applied by the Venetian Kielma, forming an uneven surface in the form of "islets". Due to the sand, it turns out a more voluminous texture and a rich finish.
The second layer of putty is applied to the wall by the technique of telma. Movements are implied by pressing the cell with a solution to the wall in chaotic order. Please note that the necessary two layers are applied one by one. First, approximately 1 square meters. The surface of the surface and the first layer is applied, then the same area is decorated with the texture method of the torch.

In the same way, the next section is covered with solution. After that, you need to return to the previous site and to invite the plaster "on the tops" with the help of a 20-centimeter spatula, removing the residual solutions from the tool. After five minutes, a finished surface must be prepolyting Venetian Clavma, while not attaching a special effort. The degree of readiness of the coating to this operation can be determined by touching the hand, the putty should not stick to the fingers.
At the final stage, the finished surface is painted after applying a layer of deep primer and its complete drying. For the finishing coating, a special composition of paint based on Venetian plaster, diluted with water (consumption of 150 g per square m). The use of Venetian plaster as paint will result in the result of a more interesting slightly brilliant surface.
At the final stage, the lined surface is covered with special wax for decorative plasters, this is done with a plastic wallpaper. For these purposes, the so-called parmesan azure can be used, which gives a very beautiful effect of noble glitter.

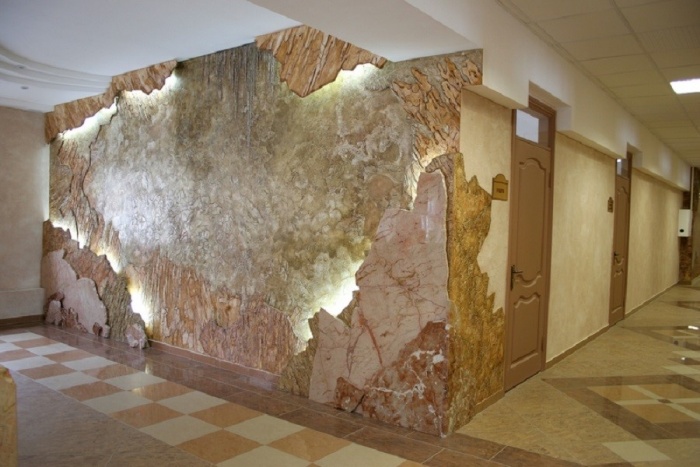
Decorative plaster for finishing facades and fireplaces - finish under stone
The proposed method for decorating surfaces can be applied to finishing facades and fireplace portals, but other mineral fillers are used for these purposes. A good option for choosing the "under the stone" finish can be considered a dolomite plaster, but, unfortunately, its price is high enough to finish the facade.

In order to reduce the cost of the original decorative mixture, the dolomite flour is used, which is added to the Stylor Acrylic Dispersion (UCAR ™ Latex DC 640) for external work, which has a high water-repellent ability, or acrylic putty (Sniezka Acryl-Putz) for internal works. The finished material also contributes the dye, metallized filler, glytter or pearl.
Dolomite putty on the fireplace is needed in two layers, first - with a flat layer of the Great Venetian Colelma, then draw a layer of the surface with the subsequent smoothing by the same cell.
The surface slightly grind the sandpaper No. 150, is ground and further decorated with Venetian plaster. It is applied in diluted water as paint using a conventional roller. After applying, the plaster is polished by Kielma.
Natural stone texture is always featured by brilliant splashes, therefore the surface "Under Dolomite" is also decorated with a coating with a metallized filler. To do this, copper is added to the wax, it is applied along the surface texture, bypassing smooth sections of the facing. At the final stage, the surface is covered with wax without sequins and is polished with soft cell. Two-color plaster "under the stone" can be obtained by the method of Flemish application written above. As can be seen from the examples, make it yourself a decorative stone on any surface is not difficult at all and it will be no expensive, but the effect will exceed all expectations.

Facade decorative plaster
After receiving the experience of applying decorative plaster for internal work, the question arises about the exterior finish. For this purpose, you can use liquid glass with which the waterproof option is made:
- first, the primer layer is applied using a diluted solution of liquid glass;
- the model solution of waterproof (hydrophobic) plaster is mixed in the following proportions: A finished solution of a plaster mixture is used in a ratio with a liquid glass 7: 1 or coating 1: 2: 5 of liquid glass, cement and sand.
Video instructions for applying decorative plaster
In conclusion, we give examples how decorative plaster is done with your own hands video in all mentioned methods. Good luck. The examples presented will help make an expensive repairs in your low cost housing.
For a long time passed the times of total deficit generated by the Soviet era. After all, then the decoration of the walls in the room was a thing of understandable and simple. Today there are many of the most diverse finishing materials:
- liquid wallpaper;
- facing panels;
- modern paints.
But decorative plaster is a real breakthrough in construction and repair technologies. This is absolutely not the plaster, which is placed under the wallpaper, but a completely new independent material.
Excellent decorative plaster qualities do not need additional recommendations. Two rooms, even decorated with the same person, with the help of the same materials and techniques, will never be the same. Each exclusive, because the drawing of plaster on the wall is impossible to repeat. With it, you can create interesting effects, you only need to master the necessary technique. Such a coating is very strong to different kinds of harmful effects. It is difficult to stain, but if it somehow happened, it is easy to launder.
Plaster eco-friendly, does not highlight harmful chemical compounds.
In addition, it improves the soundproof of the walls. In stores such material is sold in a dry form, it is manufactured on the basis of binding materials. As fillers, crumb, sand, stones or fibers with supplements of antiseptics, dyes, thickeners can be used. In this article, we will tell you how to make decorative plaster walls with your own hands, what methods and materials for this exist, as well as demonstrate photos and video instructions.
Conditionally, the plaster is divided into:
- interior.
Facade plaster is much more resistant to aggressive environmental impact and is used for external work. Interior in turn is divided into:
- mineral;
- silicate;
- latex.
There is also a classification according to the type of surface, which is obtained as a result. For example, under the "roller", "fur coat", "Rust", etc.

In general, each type of plaster has its own features in applying. For example, the expensive "Venetian" plaster is applied in several layers, a special way requiring solid professional skills, it can be covered on top of wax. This is not a newcomer, so it is better to turn to a professional.
If you still want to make repair with your own hands, it is better to choose a "Coroed" type plaster. To apply it, only an ordinary spatula will be required.
Working with an ordinary decorative plaster will be submitted even a newcomer, because to spoil such a coating archative. And too thoroughly prepare the walls there is no need - it will smooth all the defects. Such decorative plaster walls will also give flight your designer thought.
Preparation of walls to finishing

It is necessary to carefully clean the wall from the remains of the past coverage (paint, wallpaper, etc.). Displaced areas are removed, and the gaps are closed. This will be sufficiently under the plaster type "Coroed", but the "Venetian" and some other varieties require a perfectly smooth surface.
After priming and drying the surface, it is necessary to decide whether the wall area will be plastered, or part of it will go under the other coating.
Zones of different facing can be divided by painting tape or window seal.
Minimum tool kit:
- Spathers of different sizes.
- Grater (wooden or plastic).
- Metal ironing.
- Capacities for solution and for water.
- Roller for textured plaster.

The solution should be prepared on the basis of the recommendations on the package, then you will receive the necessary consistency. And you need to prepare such a portion to choose it at a time, because otherwise the solution "grab" directly in the container. This is a job that does not tolerate long smokers.
Apply the plaster need a spatula. When it thickens a little, you can walk on it with a grater without excessive pressure, creating the desired pattern. It is better to practice pre-on a small area.
To create a unique relief enough spatula, graters and your own hands. You can use any remedy.
Most often, newcomers create rains on the walls of different directions, circles, waves, crossed lines. The most simple is the horizontal relief. You can also use a special curly roller, then apply the pattern is much easier.
All this needs to be done at the maximum pace, because the layer of plaster dries very quickly. It is necessary to pay special attention to the joints of the plots to avoid the influx.
If your wall was prepared for different types of coatings, then the tape in the areas of separation of zones must be removed until the plaster is completely drying, it will be more difficult to do it, and small defects may remain.
After complete drying (usually about 24 hours), the plaster must be treated with shallow skin, which will remove all excess.

On this, the wall decoration with decorative plaster can be considered complete. But there are people who do not suit it, and they want to paint the wall. In this case, only high-quality paint resistant to moisture, solar rays and mechanical effects should be used.
When carrying out work, you must first paint the texture sections of the surfaces, and only then smooth.
After drying the first layer, we should apply a second layer of paint.

For the finish of the facade, the decorative plaster of the coroede is increasingly used. Even the apprentice will be able to apply it, the main thing is to get acquainted with the technology and adhere to it as accurately as possible.
As a rule, the coroede is used for facade works, but due to the attractive texture, this type of decorative plaster has recently applied in the interior design, for example, in Eco-style.
Coroede is applied to finishing vertical surfaces, but if you have experience in this matter, you can apply it even to the ceiling.
Preparation of walls and primer

Before applying the cores, it is necessary to send the surface of the walls, if we are talking about plastered walls. It is very practical to inflicted a corefield right on the foam, pre-pasted on the facade of the house. Alignment will be reduced to the seams.
In order to avoid the formation of cracks at the joints of the foam, the reinforcing grid should be used when applied to putty.
To achieve proper clutch of plaster with a wall, you should use the primer, which contains quartz sand, providing an excellent clutch of plaster with the base of the wall.
The most in demand in the market of manufacturer's manufacturer Ceresit. If you decide to purchase such a primer, then the decorative plaster should use the brand Article 16.
The walls are covered with a primer shortly before the application of the Coroed. At a temperature of + 20 ° C, the primed surface will dry for 30 minutes. The consumption of composition is 150 g / m 2.

The primer is slightly shouted from under the plaster, so its color should be as close as possible to the color of the cored. To do this, it should be simply composed in the corresponding color of the corefish shade.
If the coroede will be applied to cement-sand plaster, then there is no need for surface priming. Just moisten the wall for an hour before the application of the border. To achieve maximum clutch, moisten the base with plenty of water.

In the market, you can purchase a ready-made mixture, it can be Ceresit CT 63 or a dry mix that will need to prepare yourself. If we talk about the price, then from an economic position it is better to get a dry mixture, as it is cheaper.
To prepare decorative plaster from a dry mix, you need a drill with a mixing nozzle, water and a container for the kneading.
The cored will dry quickly and cannot be mixed with water. Therefore, make a small snack, especially if you have no experience in working with decorative plaster.
Given the magnitude of the marble crumb, the number of cores is calculated. For a small fraction XS, consumption is 700 g / m 2, for XL - 1700 g / m 2, and for XXL - 2000 g / m 2. So that the jokes were inconspicuous to perform the applying of the kororad on the wall at a time.
So, for the preparation of the mixture, pour the amount of water into the container indicated on the package. In this case, the water temperature should not exceed 15-20ºС. Enter the dry mixture in water gradually, while stirring the composition of the drill with the nozzle mixer. Leave the ready-made plaster for 10 minutes, and then mix again.
You can only scroll on the basis of acrylic, all other species are better painted on top.

The main thing is when applying a koroeda - distribute the composition on the surface evenly. It is possible to do this with a metallic semiral, having a length of 30 cm. Excess the Cororad you can remove a 10 cm long spatula from it.
The cores layer must correspond to the magnitude of the marble crumb, that is, within 2-3 mm. This is an important condition, because if the layer is too thin, the primer will be too thin, as a result of which the protective properties of the finish will be deteriorated. Well, if the layer of plaster will be unnecessarily thick, then the texture of the kororad will not be visible and the appearance of the facade / interior decoration will suffer.
Since, as already mentioned above, the core will dry quickly, then work will also have to work quickly. In order for the surface of the walls as uniform as possible, it is better to apply plaster at a time. But if it is unrealistic due to the large area of \u200b\u200bthe wall, then separate the strip by painting scotch and apply the composition slightly on the tape. Then separate the tape, without waiting for the drying of the plaster. Continue the application of plaster in the same way until it is covered with it all the wall.
Trituration

The most responsible stage of the work is the rubbing of the Coroed. It depends on what will ultimately be a picture on the wall. This work should be started immediately after the plaster starts to be filled (after about 20 minutes). If the palm does not stick to the wall, you can begin rubbing, which is performed using plastic cells.

When rubbing marble crumbs, chaotic recesses are formed.
Thus, you can get the desired effect:
- "Bashek" - the pattern is formed due to short circular motions. So, chaotic furrows remain on the wall, which are visually similar to the wool lamb.
- "Rain" is the most common technique of rubbing. It is created by movements up-down. So, you will have a vertical rain. If you do rubbing from the upper left corner to the right lower right, then the rain will be diagonal. So that the corner of the tritis remained unchanged, you can place the wall with painting scotch.
- "Carpet" - rubbing should be carried out by alternate movements up-down and right-left.
If you fail to apply plaster for one reception, then do not rub it to the very edge. Better separate the following part of the wall, and after carefully set the joints. So you can make an imperceptible transition.

Color the walls are possible the day after the application of the koroeed. Painting has some advantages over the tinting plaster. After drying, the cores without a flaper can be finally aligned with a layer of sandpaper. Stucco with a kel is alumming this way, because the lighted pieces will be noticeable.
Painting provides more opportunities for designer work. This aspect is especially relevant when using a corehouse in the design of the interior of the premises.
Very spectacular look at the darker stressed by a dark shade. To achieve it, first you need to paint the wall with dark color. After the paint layer is driving, apply the second lightest layer of paint. In this case, the second layer must be applied with a semi-dry roller. In this case, the paint will not penetrate the grooves, and they will remain dark. The flow rate of the paint composition is 300 g / m 2.
To increase the operational characteristics of the walls (especially it is appropriate for the interior of the walls), it is possible to cover them with a varnish - glossy or with sparkles.

Preparation for the application of homemade decorative plaster made from putty, begins with the definition of the room in which it will be applied to the walls. From this depends on the choice of invoice, collecting the instrument and even the method of kneading the composition.

So, for successful decoration of walls, we will need a putty:
- Putty.
- Capacity for kneading.
- Spatula and trowel.
- Metal grater.
- Construction mixer.
- Polyethylene film for pattern or package.

Make measurement of walls, which will allow you to roughly calculate the amount of source material for finishing. It will help you in this specified on the package approximate consumption of putty. To save money, you can purchase putty in the form of a powder. For the manufacture of the solution in this case you will need:
- 6 kg dry putty;
- 200 g of PVA glue;
- 2 l of water.
Instruct putty with water in some suitable capacity. You can do this with a mixer. You must have a homogeneous mass. Then add PVA to the mixture and bring it again to uniformity.
For decoration of walls in low humidity rooms, you can use gypsum or cement plaster. And for premises with high humidity, it is better to use cement.

If the walls are damaged, then all the racking parts need to be cleaned. All recesses should be shred out by cement. So, you can align the walls. If the surface is unreliable, then it should be plastering the plaster grid, which you subsequently covered.
After the layer of putty dries, set it up so that the surface is smooth. Then the walls should be refined. Use the composition of deep penetration for these purposes.
Application of homemade plaster

Apply decorative plaster made by putty from putty, in several ways:
- Scales. Apply putty with a layer thickness of 3-5 mm, and then make vertical strokes with a spatula with a width of 10 cm. After the makeup is dry, it can be painted in the desired color.
- Rock. Start apply a thin layer of putty from the top corner of the wall. The layer must be about 3 mm. Then take the metal smooth iron and attach it so that one side remains in the air, actually did not touch the wall. Without taking hands to spend straight lines on putty.
- Cave. Apply putty on the wall, align it. Then compressed in a piece of polyethylene, make a pattern, pressing it to the wall. It is possible to do this in another way by attaching to the wall to the covering film. It will need to tear off the putty in a day.
- Venetian from putty. Type a slight putty on the spatula, make it uneven strokes. After 24 hours, pass the walls with fine-grained sandpaper. If you need to erase only sharp corners, then make it a grid. Immerse the surface and let it dry. Color the wall with the base color, after superficial. It needs it immediately after applying is slightly erased from the convex parts of plaster with a wet vet. Ultimately, the walls should be covered with wax / lacquer on an acrylic basis / gilding.
- To create an original pattern, other stamps from girlfriend can be used. For example, pieces of foam rubber, branches, foam, flowers, tissue cuts, roller wrapped with fabric, stencils, etc.
After your homemade decorative plaster dries out, color it or open with colored wax.
In general, science is not even in force even inexperienced "plaster." If you did everything right, the interior of your home will delight you with originality and identity for long years.
Photo


Video
We bring to your attention a series of video about various decorative plaster and methods of applying:
If you want to order decoration of walls with decorative plaster, we recommend contacting professionals, since the price of this product is very large. You can find out the cost of decorative plaster on the websites of companies for the production of decorative coatings. Also pay attention to the Venetian plaster, it is superbly suitable for wall covering.
Walls from dry plaster - drywall must be impregnated with water-repellent primer, crossing the reinforcing ribbon, align the surface to the finishing putty.

All joints and cracks need to be hushed out with a solution and cry for the reinforcing ribbon
If the walls are freshly plastered by the usual plaster, then they need to give drying within 4-5 weeks, to the complete formation of the layer. Further depends on the type of decorative plaster selected for finishing. If it is coarse-grained, with a pronounced relief, it is not necessary to put the walls, if with a fine fraction - it is better to apply a thin putty on the walls.
General rule
Scaled Walls must be passed by small abrasive, well mix dust formed after grinding. Next is applied primer that increases the adhesion of surfaces. After drying, for many types of plasters, it is necessary to apply a basic, shelled layer of primer, usually white or gray, sometimes melted under the finish finish.
Look at the learning lesson how it is properly made by the preparation of walls for decorative plaster, video shows in detail all stages of preliminary work.
Many beginner builders have a question: is it possible to apply decorative plaster on the plaster? It is worth paying attention to this issue, as this is primarily a financial issue, and then the question of beauty. If you master well the technique, you can save on costs.
You can finely cope with this work, not referring to the specialists. It is worth considering:
- What is decorative plaster?
- How to apply it?
- What instruments need?
Is it possible to apply decorative plaster on the surface of the main - the features of the material
Under the decorative plaster implies weight. It is used to arrange different types of surface. Since she has an attractive appearance, it wears the name decorative. After all, when it is applied to the wall, it looks pretty aesthetic.
In order to start plaster walls, two types of materials will be required. To the first species should be attributed.
For more information about the decorative textured plaster, watch the video:
To another type of materials includes structural plaster.
It is worth noting that in the composition of the material already there is a coloring substance. However, after tough and polymerization occurred, the wall needs additional coloring. And sometimes it is enough just to toned.
An even more beautiful surface will look, if you treat it with metallic and pearlescent pigments.
Structural spacure
And what can be said about the structural putty. They are less plastic than textured, when working should also be considered. Thanks to the mineral granules that they contain, and the texture is formed. Including a large role is played by quartz, marble, granite and other. The relief is achieved due to the fact that the grains are located or on the surface itself or inside it.

In specialized stores you can find several more types of materials. Including fibers, plaster software, as well as almost transparent mixtures for plaster. Use them less often than previous ones. Therefore, we will not talk about them.
In principle, there are other types of materials on the market - fibrous products, translucent plastering mixtures, etc. However, they are used quite rarely, therefore it will be more expedient to give the focus of more common finishing techniques. Let's talk about how to apply decorative plaster on plaster.
Required tool
First of all, it is important to decide which tool will need to be plaster. Interestingly, in some cases one spatula can be used. However, if we are talking about fast work, then it will not work. This option is suitable only in the case when a specialist took the case.

Without a workshop, you can not do. In order to work successfully, it is important to use the following tool:
- specially for kneading work - the capacity of large volume;
- for direct work - a small capacity;
- a drill having a nozzle mixer;
- for coating seashers;
- celma;
- from plastic and metal grater;
- different sizes of the spatula;
- having hard pile, flat-shaped brushes (one of them McList);
- sponge of a rigid structure;
- roller having a drawing to create relief on the walls.
In the course of work, you may need more tools, but for starters enough and these. The main thing to purchase everything in advance is not to be distracted from work. About the decorative panels under the brick, for the interior trim, find out.
Preparation of walls
We prepare the foundation for a strong future decorative composition. It is worth remembering that it is quite possible to apply decorative plaster on plaster. The only question is how correctly the preparation of walls is performed. Let's talk more about stages of working with plaster.
The first thing we proceed to, we remove all unnecessary on the ground. When you approached the plastering layer, then make sure it does not fall off. Each case is individual and stands to solve himself, to remove the plaster completely.
How to determine what is better in your case?
Take a heavy hammer and start tapping the entire surface. Determine whether the material begins to turn or remain in place. Also identify possible empties using a characteristic sound.. If all this is not, you can safely apply decorative plaster on the old plaster.
Now it is important to determine which condition is the surface. Remit, whether there are cracks, slots or any other defect. Using the composition of cement, or, fill in all these voids. When you have already applied the repair mixture for polymerization, drive all the walls with a penetrating agent.
For this it will take about two layers of primer, but not less. Before applying the next layer, stop and wait about 5 hours that the material is completely dry.
After these steps, the first primer layer is applied to the walls. The thickness of this plaster should be 20 mm. Thanks to this approach, the base will be reliable, and the whole surface is smooth. It is important that any big differences are eliminated. In some cases instead of basic shuttering, applying putty.
At the same time, when the material dry it does not grind it, because adhesion will decrease. This concerns the processing of the hypin. And what can be said about different types of walls? How are plaster apply on them? Wood and the material that is created with its use is distinguished by hygroscopicity. There will tell about the price of putting the walls under the wallpaper.
During work, the putty can begin to grind on the basis and deform. Also, the mode of drying the plaster will be broken. Therefore, if you decide to handle wooden walls, then use the primer in which there are moisture-protecting components.
If the surface is coarse (plastic or plywood), then use rough abrasive. After all, without this, the plaster will start to crawl off her. And what can be said about the metal elements that you will meet when repairing? If you use a decorative composition for processing, then over time there will be spots from rust.
What to do? Use an anti-corrosion coating and you will avoid unpleasant moments.
Varieties of structural compositions
Consider spray "fur coats". We defined that it is suitable for the basis of plaster for the scenery, but now it is important to determine which finish technology we will use. As for structural coatings, they rather easier to apply them than others. It is worth starting with them.
"Shuba" is one of the types of decorative coatings. He is quite popular, and based on cement-sandy solution. We mix all 1 to 3. That is, on 1 part of the cement we put about 3 parts of the sand. Now we apply all on the walls with splashes.

There is a special plastering machine that facilitates the process of applying plaster. After all, its work is based on the fact that the resulting pressure begins to throw away the solution. At the same time, the mixture flies to the walls and the necessary relief occurs on them.
What to do when you have no car and nowhere to take it? Then the simple broom is suitable. To do this, take the right hand and begin to omit into the solution. Take the amount of means you need, but a little. When the broom is brought closer to the surface, it is necessary for them to hit the stick (they were kept in the other hand). Also read how to make a dry floor screed with your own hands.
An interesting technique is interesting. Use the brush. To do this, you need to take a long pile. Put a few solution on it. Now spend the board on it. Show effort and move it to yourself. When the bristles are straightened, the solution will fall on the surface in the desired small quantity.

In now, that you can apply - a metal grid placed on a wooden frame. For this design is attached to the wall and aligns. Pressed with bricks. Now with a cell solution, the solution is attacked on the surface. Remove the grid and then eliminate possible defects.
With the brush, lay the wall.
Use mineral granules
Apply such formulations is quite simple. Among them, the "Coroed" became one of the popular. This type of plaster look looks like wood, which is damaged by insects. Apply the composition is easy and not difficult. For this, it is necessary to prepare in advance and align with the help of the composition of the plaster walls.
We apply on them a decorative mixture. In this case, the grater will need. The angle of its holding is about 60 towards the wall. It is not necessary to make a layer applied thicker than the biggest grain in the composition. This is important to stick. When you have already applied a mixture, then dry the wall. On the consumption of putty Knauf on 1 m2 will tell.

And only as you noticed that the hands stopped sticking to the surface, you can start decorative plaster. We take the grater from plastics and put it on the wall completely. I press a little and move further.
When the movement occurs, the grains begin to move and at the same time leave on the walls of a furrow.So the beautiful drawing occurs. This is not finished about this. It is important after final work (drying and processing) to paint the surface with the help of pigments on acrylic.
Features of textured plaster
This type of surface is somewhat different from the previous one. Than? It is important that the person who is doing this has a certain skill in his business. After all, the processing technique does not quite affect the result. Relief in this case looks like painting or sculpture.
Therefore, if you decide to take advantage of this option, then practice in advance to understand how best to behave with the specified material. Initially, it is important to apply the main layers. Of course, the work is applied to the aligned surface. The base of the first layer has a thickness of a couple of millimeters.

This will ensure adhesion. This is a background for future design. It is worth paying attention to one detail. Since the material is applied to a small layer, it is important to paint it in advance to the color you need. To do this, pigment is introduced into the plaster for applying and mix it.
It is necessary to thoroughly dry the foundation before the state while the tools no longer leave the traces when they append a little to the surface. Now it is necessary to use a spatula to the surface of several smears.
Take a very little mixture, especially if you are just starting work.
The thickness of the layer of application should be thin - about 3 mm. And at the end this thickness of half a millionth. How you send the strokes will affect the fact that you will get. If this is "Venetian" finish, then direct them in chaotic order. But if it's "rain", then make diagonal movements and apply the markup at first.
Alternative to spatulas and graves you can apply brushes. Then we apply to the base of the fatty plaster and begin to ram it with the help of a grater. In the end, it is necessary to handle everything with a hard brush. Thanks to the footsteps that remain from the bristles, an interesting relief will be on the wall.
You can apply another interesting technique. Using polyethylene film. Special tricks do not need. Polyethylene is glued on the pre-applied 2-millimeter layer. It should have a lot of folds. We are waiting until the material is dried.
After a couple of hours, the film is removed and the unusual relief drawing is obtained. However, there is advice. It is not necessary to dramatically remove the film, because the coating will be damaged in this case. But do not stand the film. After all, it will dismissed her parts to the base, and the plaster will disappear along with it. About the finish putty for outdoor, facade works Find out at.
The use of the roller is suitable for those who are not confident in their abilities.. Purchase a special roller. Thanks to its protrusions and varnishes, a drawing is formed. He is imprinted on a non-frozen plaster. So her appearance will be very beautiful. Available to use and conventional painting roller.
However, for this it is necessary to pull out the pile. You can still wrap the work part with a cord or other tool to create folds.
Output
Summing up can be said that the decorative plaster can be freely applied to the plaster. The shortcomings can be attributed, the need for additional wall processing, surface preparation to apply a new layer of plaster, as well as testing for the strength of the old layer of plaster.
The advantages include saving time on the removal of the old layer of plastering financial costs for additional work.
Decorative plaster, as well as, with proper preparation of the walls and the ability to apply it, is easily applied and becomes a beautiful part of your interior. At the same time, it will be very durable and practical, but provided that it will be applied in compliance with all the conditions described.
The time of the monotonous design of walls in the form of pasting wallpaper was caught in the fly. A period came on a shift when the surface finishes turned into a creative process that allows you to create a unique design of the room or the facade of the building from the same material. Platform for the manifestation of aesthetic taste and artistic talents is decorative plaster. The various techniques of its application contribute to the formation of an individual interior. What includes the preparatory stage, and what methods for the design of walls and ceilings with decorative plaster exist, consider in detail. The proposed video will help deepen the knowledge of the topic under study.
Varieties of material
Before describing the technologies for applying finishing material, a brief excursion should be made by the diversity of its species. There are several parameters for which the classification of decorative plaster is carried out. Depending on the binder, the plaster happens:
- Acrylic. Posted in the form of a finished mixture having a pasty consistency. Such decorative plaster is extremely convenient for the use of various surface structuring technologies.
- Mineral. Cement acts as the base component. The inexpensive mixture is optimally suitable for outdoor work and indoors with high humidity. Powder before applying is bred by water in the specified proportions. From the point of view of environmental safety is the most harmless product.
- Silicone plaster, based on synthetic resins. Its numerous advantages provide a wide range of applications in harmful effects of the surrounding climate.
- Silicate product based on liquid glass. The most reliable material for decorative decoration. Maximum strength and stability in front of negative factors are the cause of the high cost of the product.
The composition of decorative plaster affects its final appearance. On this basis, the decorative plaster can be divided into the following types:
- structural;
- silk;
- venetian, etc.
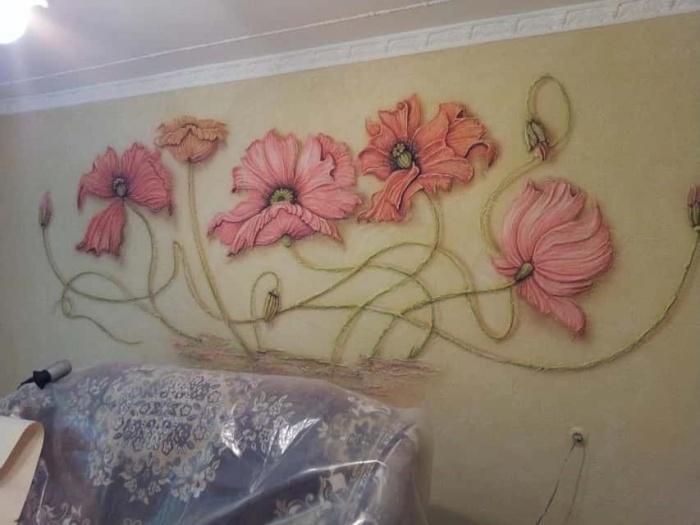
Depending on which the technique of applying decorative plaster is selected, the material is able to imitate various surfaces, ranging from stone or tree, ending with wallpaper. The presence of artistic skills allows you to create an exclusive panel on the wall.
Preparatory activities
Preparation of walls before applying decorative finishing is a prerequisite for obtaining high-quality coverage, regardless of the selected technology. The process contains steps the same for all types of plaster and nuances that depend on the composition of the material. The entire preparatory procedure precedes the application of the decorative layer includes the following steps:
- Removing the old coating, the presence of a layer of the old plaster is excluded.
- All fat and oil spots are derived by special means.
- Cracks, chips carefully close, protruding surfaces are knocked down. To eliminate significant damage, cement mortar will need, minor shortcomings are processed with putty.
- After removal of dust and dirt, applying a primer composition is recommended.
Tip! In conditions of high humidity, it is better to use an antiseptic tool warning the appearance of mold.

The technology for designing the surface with decorative finishing material includes a preliminary application of a thin layer of plaster. It is not necessary to strive for the perfect surface, in the future, all meager shortcomings will be disguised. After drying, following the rules of application techniques, it is recommended to re-treat the wall with a brutal composition of deep penetration. These measures significantly increase the adhesion of contacting layers. Surface preparation nuances and simple finishing material techniques are described in the following video:
Options for designing surfaces by structural plaster
The choice for applying the decorative finish of structural plaster opens a wide expanse of the manifestation of creative abilities even with minimal skills. There are many techniques for applying this material, which can be divided into several groups:
- using textured rollers or stencils;
- spray method;
- the use of all sorts of girlfriend.
After familiarization with several application technologies, choose the most suitable way will be easier.

Work with roller
A decorative plaster should be directly from the material at hand, the wax on an acrylic basis and a kel can be used as an finishing coating. Basic tools for work - spatula and roller (flat or with a pile).

The technology of applying decorative plaster with the use of a roller having a pile is quite simple:
- Work on the distribution of the solution begins only after the complete dying of the primer.
- Stucco Correct in mass. Please note that as the shade is drying, it gets dark on two tones approximately. To avoid lumen, the primer composition also needs a pre-tinting.
- According to the installed technique, a partial application of the solution is made to the surface, the layer thickness is 1-2 mm. Given the rapid grasp of decorative plaster, the area of \u200b\u200bthe treated surface should not exceed 2 m 2.
It is important! Ribbled seams are formed between the application sections. This technology will make them practically imperceptible.
- The direction of movements on the distribution of decorative plaster with a pile roller depends on the invoice that is planned at the end of the work.
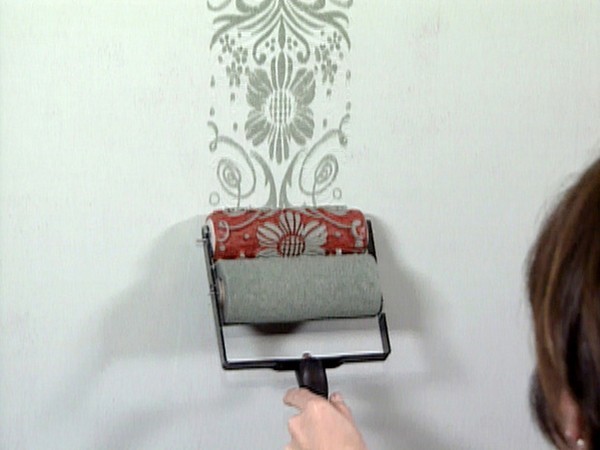
The use of textured roller changes slightly applying the finishing material technique:
- First, the surface is completely decorated with decorative plaster. The layer thickness varies within 1-2 mm.
- Then the drawing like the textured roller is applied.
- All movements are made in compliance with strict parallels.
According to the proposed technique, an option is allowed when the roller is simultaneously applied with a layer of decorative plaster, and a pattern is formed. During the day, the layer of plaster dries, after which they are moving towards applying a protective coating. In this role, wax serves, its application is carried out with a roller with an average pile. In conclusion, the wool cloth is carried out polishing the surface.
Sprinkle method
It is interesting to look like the final result when using decorative material spray technique. This method is applicable both for external finishing works and when designing an interior. Application technique is not capable of complexity and includes the following actions:
- Initially, the spatula is formed by an even starting layer. Only after a complete drying of the first layer is transferred to the next stage.
- For applying the second layer, various devices are used. It can be a brush, a brush with a rigid bristle or even a grid.
- When choosing a brush, it is dipped into a solution of decorative plaster, and then distributed the mixture by tapping the tool about the stick.
- The technique of applying decorative material using a brush is a peculiar purification of the tool from the solution with a stick.
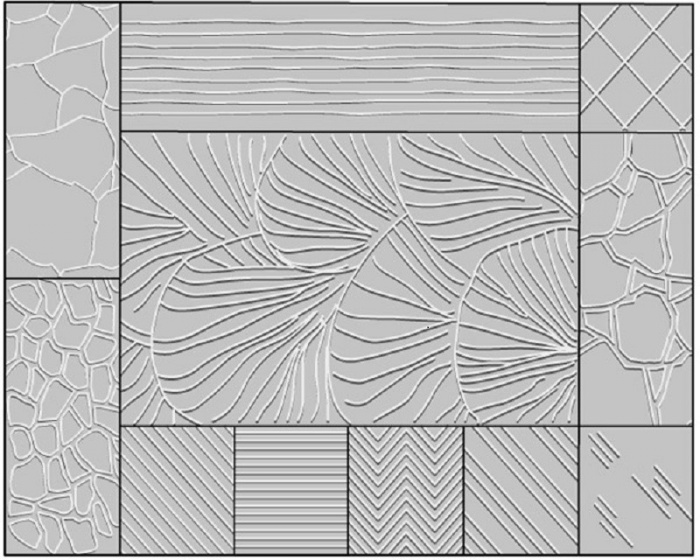
- For the finishing of the facades we use a mesh through which a solution of decorative plaster is thrown by a spatula on the wall.
The outlined technique is clearly shown in the figure below:

If you wish to improve the process, the first layer can be made a little darker, and for the final distribution, take the decorative material of the lighter shade. A little different texture is obtained if you treat the surface with the second layer without waiting for the starting finish.

The original spray technique is clearly described in the following video:
Application of girlfriend materials
Options for designing surfaces with decorative plaster with the use of submitted means a set, most of them can be mastered even to a novice master.

The technique of hatching remotely resembles the formation of "rain" from the decorative plaster Coroed:
- First, the smooth layer of finishing material occurs.
- Without waiting for the solution to dry, it is treated with a metal brush.
- After 24 hours of excess decorative plaster are removed with a spatula or sponge, depending on the size of the roughness.
- If the solution is not cleaned in mass, the surface is produced.
Much more difficult in the work of the "Sgrafito" technique. For applying, the plaster of various colors will be required, the main thing is that they are combined with each other. First, the surface in several layers is treated with multi-colored decorative material. After drying, with the help of an acute spatula or cutter in some sections, the layers are partially deleted. With this technique on the wall, unique patterns that are similar to the application are identified. In conclusion, decorative finish is subject to neat grinding.


Application of Venetian plaster
The desire to issue the wall of Venetian plaster involves the presence of skills to apply decorative finish. It will be difficult to master the techniques to master the technique. From materials you need to have:
- primer under venetian plaster;
- directly the very decorative mixture;
- wax;
- capacity with warm water.
Kelma and sandpaper shallow grit paper are basic appliances for applying and processing. The essence of the entire process is to alternately applying the layers on each other, with alternating these actions by grinding the surface.
Note! Mandatory condition for the qualitative application of Venetian plaster are perfectly smooth walls.
The main stages of the work are:
- The adhesive of the walls passes with a special composition designed specifically for the selected decorative finish.
- The tools are selected from stainless steel, otherwise rust will appear on the plaster.
- Application of decorative material on a dry surface is carried out by small sections, the approximate area is 1 m 2. Work starts from the top corner.
- The base layer makes minimal in thickness. The spatula is pressed against the wall at an angle of 20-30 o, the direction of movement is a semicircle. The first layer does not need grinding, he is given time to dry carefully.
- According to the technique adopted, the application of the next layer of decorative plaster is carried out by chaotic movements so that the strokes are not found on each other. In this case, the tool needs regular rinse with warm water.
- Then the area is leveled with a large spatula, the treatment of sandpaper occurs after drying the wall. Dust is removed with a wet cloth. Depending on the desired result, the number of layers varies from 5 to 12.
- To the next stage of the design of the surface of Venetian plaster start a week later. The finishes of the decorative decoration will give the applying of wax. Choosing a pearl, gold or silver material, the wall is processed by any convenient way. Application technique allows the use of spatula, fabric or gloves with a pile.
- At the final stage, grinding, using for this machine, equipped with a pile nozzle. With its absence, the wool cut of the tissue is suitable.
With insufficient experience, any of the proposed techniques for applying a decorative finish can be tested on a sheet of plasterboard. Detailed work on working with Venetian plaster can be studied in the proposed video: