Hiking bath - how to get in the field. Hiking bath do-it-yourself: all the subtleties of the construction of a bath from polyethylene
If there is an opportunity to take additional cargo with you, the bath in the field is quite comfortable. The need for body content clean people realized in time immemorial times in all ends of the Earth. Peoples in those distant times shared on nomads and settled. Accordingly, the baths were used in the field, or were stationary.
A bit of history
Baths are found in archaeological excavations of the ancient buildings of Aztecs and Incs.
In ancient Greece, baths are complex engineering facilities with aqueducts and centralized heating. The Arab and Turkish Bani sincerery are famous in the world.
When excavations in ancient Egypt, remnants of structures recognized as the baths were found. These were two-story buildings. On the ground floor there were devices for water heating, on the second - oil and pools.
In ancient China, the use of the bath was erected into the cult. In the legends and myths of China, hot water and steam, in addition to direct destination, helped in the fight against evil spirits.
The use of the bath is mentioned in the expanded sources of the ancient crit island disappeared.
In general, no specific people or even the continent will not qualify for the presence of copyright on the use of a bath.
Mobile baths are also an ancient invention. Another Greek historian Herodotus in his works mentioned such a bath in which the Scythians were bathed. In those days, nomads were tightened by the frame of the felt of the felt.
The field bath can be divided into three following groups:
- hiking;
- hiking suite;
- mobile.

Bath hiking-suite
Matching option
This is a bath with their own hands from the remedies in extreme conditions, which is very easy to build. Dmitry Expedition Shparo more than seventy days in the most severe polar winter conditions moved to the North Pole. Having reached the goal, they arranged a bath in a tent. According to the evidence of the expedition participants, it was one of the most vivid impressions.
Our climbers Balyberdin and thoughtlovsky also used the experience of polar explorers. A few days of voltage at the limit of human opportunities at a sparse mountain air during an entrerest. And invigorating pair of hiking bath. How to make a bath in nature, they knew exactly.
The design of the hiking bath is very simple. Put the tent, with its absence - Slash from the branches. Stones are heated in the fire. Preheated stones are burned in the prepared premises, "just add water" and the steam room is ready.
To choose the stones you need to go with all seriousness. They should be without cracks and not to allocate harmful substances when heated, otherwise the bath does not work with their own hands.
How to make a hike luxury
Need awning or polypropylene film. The rest is done with your own hands. Pilments for the device canopy are cut down on the spot. A small pit is digging, under the size of the hearth and the shone shovel in depth. From large stones the focus is constructed.
The requirements for stones are the same. Rolled stones with cracks when they hit them, water can fly out fragments and hurt the awning. Harmful substances released when heating some stones will spoil the smell and pleasure of the bath.
Such a bath is different from the simple hiking fact that the focus is attacked to the desired state, and then the framework of freshly edged jeres is constructed around it. Then the frame is tightened in a predetermined awning. Everything, the bath is ready.
Mobile option
Hiking bath and mobile sauna are two big differences. If the hiking bath is made from the girlfriend, then the mobile bath is a high-tech product. Its production uses the most modern materials and innovative design solutions. But the principle itself is the same. This is a tent. It consists of a frame and awning.
In the 21st century, a special fabric is used for the awning. This is a polyester or its analogues. In the construction of the awning there is a door, ventilation holes, sometimes windows, a hole for chimney in a fireproof version. The door, as a rule, can be closed from the inside and outside.
The frame is assembled from light and durable duralum, sometimes titanium, tubes. Assembly, as they say, intuitive. In some models inside the frame tubes, the cable is missing and do not insert them differently. In other - tubes are connected by hinges and sufficiently fasten the locks.
The furnace is designed specifically for field bath. The designs of different manufacturers have several common characteristics. This is a small weight and protection against sparks. Often the furnace has a built-in tank for water and a heater, which is just enough to add stones.
The tent tent is spreads on Earth. The framework arcs are inserted into the grooves below the zipper. All zippers are fastened, put the oven and the bath is ready.
Mobile baths are produced in equipment from 2-3 people, to army versions for dozens of people. Russia is an unconditional leader in the production of such products. Other countries produce only mobile toilets and souls.
Field bath, made in nature with his own hands, will bring the maximum satisfaction of the body and soul.
We had 10 meters of three-million meters of the caprochy cord, 20 meters of four-millimeter, 3 meters of roll lightning with runners, 2 meters of red slings, half the meter PVC-250 film and a whole coil of lavsan threads, as well as 25.5 square meters of pink oxford 75D with PU impregnation. Not that it would be the necessary amount for the bath. But if I started to design something seriously, it is better to take with a margin. The only thing that caused me fear is whether we can collect all together. But I really wanted to get into the weekend!
It all began with a campaign to the water park on the coupon coupons. The roller grotes themselves are no longer so impressive, but the bath complex always goes well. And I thought after that - as it would be good to have access to such entertainment more often, in particular on trips outside the city. Later, thought stepped further, in the memories of last year's campaigns, where we often saw the remnants of homemade baths in the parking lots. I scored the search for ready-made solutions in Yandex. The most affordable is the Nova Tour N. tent - the cost of about 5 thousand, but the main minus is the frequent complaints about the quality of the goods of the new tour.
I thought and decided to go to another way. Engineering thought is, the sewing machine is, and the time and the start of the season allows. So, taking the basis of the dimensions of the new tour, we began to design the campaign bath.
The main awning was decided to do from taffett or Oxford with Pu-impregnation. Such an awning material is sold a lot where, but the shops are mainly working on weekdays from 10 to 17, which we categorically did not fit. In-depth search gave a link to the "Materials and Accessories" on Elizarovskaya, where we drove on the day of the opening of a cycle season, aligning a pleasant with useful. The store turned out to be exactly what you need. The choice of fabric was huge, all the accessories from the threads, to the lightning and all sorts of cords. Initially, I was aimed at the cloth 210d with impregnation, cost somewhere up to 100 rubles for the temporon meter. Sales also noticed the remnants of a similar material, in just 59, the truth of nuclear pink. But this is not so basically for the bath? Therefore, we saved well, and you will be waiting for a series of outlined-colored cards :)
Everything cost somewhere in 1300 rubles.
We returned home and at week began to design. First, the dimensions were outlined, the material stripes were measured (the roll of one and a half-meter width) and the location of the input and windows.
2.
Then they cried the walls and roof.
3.
The responsible moment of cutting the pattern is always coming when the error in the markup can spoil the future strongly. But everything went through this time.
4.
On the markup, pattern and work with scissors left the whole evening.
5.
The next step was the designation and creation of the windows, as well as the cutting of PVC "glass" for them. Another evening.
6.
Along the way, I began to think over the design of the stove-Kamenka. With cobblestones, everything is clear, but to fold it with a dome, with risk sooner or later, it did not want to enjoy all the design into the fire. Therefore, I decided to use some lattice as the overlap. That's just where to take it? Options from available materials were excluded, they were not. Something suitable in stores I can't remember either. The search has come to the rescue again and the solution was found - the reinforcement grid! But where to take it? I wanted the smallest cell. Similar, 50x50, was in Petrovich, but on weekdays, I didn't want to go there in the evening, but on weekends we were already going to try the finished design. The option is more or less found in the "metric" on science, no matter how I loved her. Grid 510x2000 d \u003d 4mm with cell 90x50.
Therefore, in parallel with the sewing work, I started metalworking. With variable result, but successful outcome.
7.
Initially, we went long. Note, notice and only then on the sewing machine. Therefore, one window with unaccustomed left, if without fanaticism.
8.
Slowly mounted to lightning.
9.
It turned out to be not easy. The runners refused to sit down, the signs of stitched edges popped up at the most inopportune moment and opposed we were opposed.
10.
True, as a result of watch battles, they were still defeated and sent to the place.
11.
So there were days, and Friday night came slowly. And here we realized that we only have fragments - walls with windows, part of zipper in the doorway. We do everything, not in a hurry, already the second week, and in the campaign tomorrow morning. Will-unillires had to remember the student past. Impact rates by 5 in the morning we all have mercy. Very timely replacing the desilation with a simple brine pin.
12.
The design was ready, but the alarm clock from 8 am were translated at least 10.
13.
Products were purchased back on Friday, so though late, but we have moved to the place. The most comfortable parking for such a rest, I believe, are under Primorsky, the entrance is the most convenient to the monument to Mikael Agrikola. Moreover, now it is not a season and choose a place for every taste, often already equipped with order.
14.
More active classes came to replace the cut and sew. Firewood on the stove and fire had a lot!
15.
Upon arrival thought what to wear stones for the stove. It turned out that the coast is still under the snow, and the stones must be signed one by one in the sand on the former Finnish trenches. Helped ready-made parking. Having walked along the shore on the empty camps, found a great basket, which helped me in the "time to collect stones" :)
16.
Late departure did his job. So far so-yes, slowly evening. But all the materials were collected, and it's time to mount the conservation.
17.
Location, you swing up a foil.
18.
We associate the frame.
19.
We lay out the first level of the heater, ignite the fire, we look at the result.
20.
The bonfire seems to be spoken well, so I put the grille on top and poured the rest of the stones. Now it remains only to drown a few hours and wait.
21.
If in the morning the weather was very decent, during the day there is nothing, and I already believed in the error of the forecast, then the evening showed my mistake. With darkness began morok, which passed into full rain. The stones did not want to warm up, only the top hide, but it was cold with rain. The neighboring parking lots with the remnants of the film came to the rescue.
22.
It happened amazing. Whether the film has changed the flow of air from above, or the stones still warmed up, but the fire fangled, and a great fever went out.
23.
We cut stones for some time and decided that it was time to put the bath and bathe.
24.
On 5D there is no flash, I did not take the external, so there will be no night photos. I will limit the story. We set the bath, climbed inside, led park. Of course, it was impossible to steamed, the first experience revealed a number of constructive flaws.
First, the dimensions of 2.1x2.1x1,8 could be completely reduced to one and a half meters. It would be warmer much easier, it would have weighed less, there would be less seams where steam goes. On the other hand it would be closer. Here is a stove-kamenka need to definitely make larger and more from stones. The current very quickly cooled. I think also affects the air temperature, there was only a light plus on the street. In summer, probably heat the air to the desired temperatures is easier.
But the experience is still chic! By the way, some morning frames, I can not show the results at all.
25.
General view of parking.
26.
Window povered. And inside even with stopped giving steam stones was warm for a long time.
27.
So we climbed inside.
28.
Then I read on the network that such bathrooms are used for a company of 4-6 people!
29.
But in any case, the process of creating, and the result captured us 100 percent. A little modest, and in the upcoming season it will be possible not only to sunbathe on barychka, and it's great to wave a broom!
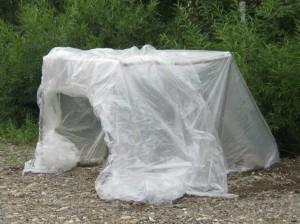
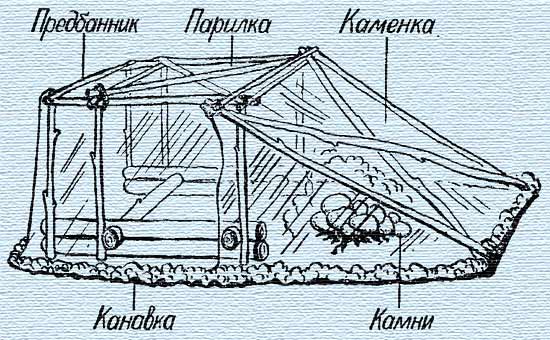
The hiking sauna is the simplest tent equipped with a stove. Both facilities are folded on the place of rest from the natural materials on hand or brought with them the collapsible structures of factory manufacture.
Hiking bath do it yourself
A mobile tent of a bath of a frame, covered with film, awning or tarpaulter. Inside install the stove. There are 2 versions of the organization of the baths: collect the design of the available materials or install the factory manufacturing tent.
In the first case, the frame of the hiking bath is optimally folded from metal thin tubes, but it will have to be transported to the resting place. In nature, a similar skeleton of structures are collected from long durable stories. Cobobugs use cobblestones for masonry.
The second version of the hiking bath is a finished factory tent. She will have to transport the place of recreation by car. Plus tent take a metal stove. She is small, but weight has, and manually transfer such a burrow hard.
Tip! When using a tent, optimally give preference to a product of another Soviet sample.
The choice is explained by the fact that tarpaulin serves such models. Material keeps heat, moisture, does not distinguish harmful evaporation when heated.
Features of the design of the hiking bath
The basic requirement for such designs is that the hiking bath must be lightweight, safe, quickly understand and gather.

The best for the bath is the frame of aluminum tubes. In collapsible form it is easy to transfer even manually. The collected frame is durable, fireproof. If the skeleton of the tent is made of wooden racks, the best material is the long thin trunks of young trees. Pilia can not be taken dry, as they are fragile and fasterly susceptible to ignition from the furnace.
The best observer material for the bath is the tarpaulin of the Soviet sample, but he is heavy, dear and not everywhere you can buy. Primitive shelter will serve as a regular film. For a tent designed for 5 people, you will need a piece of 6x6 m. The disadvantage of the film is rapid exercise when the spark from the stove is hit, but it is easy to wear with you in the hike.


Any bath tent must be equipped with a stove. There are 2 options to choose from:
- The furnace is folded at the place of rest from large cobblestones. The design resembles a well-closed well. On the side, leave the window to lining firewood in the furnace.
- Portable furnace for baths welded from metal. The design resembles a burzhuyk. From above on the stove organized a playground where you can heat the water and split the stones to organize the steam room.
A hiking furnace chamber can be folded inside the tent and beyond. The first option is called "in black", since inside the bath together with the ferry there is a smoke. The second option is called "in white". Smoke from the furnace does not penetrate the inside the tent. The stones warm outside the baths and are chosen to enter inside.
Important conditions
Install a portable bath-tent is not anywhere. Optimally choose a plot with suitable conditions:
- The presence of water. At hiking conditions, the appropriate option for the bath is the coast of any reservoir or river.
- Stones. If there is no metal portable oven, it will have to be folded from cobblestones. By proximity there must be stones, but not laminated, but solid. Otherwise, the cobblestones will crack from heating. The departing fragments can face a person. Optimal cobbled dimensions - from 10 to 12 cm. Small stones are quickly cooled, and large for a long time warmed the bone. The cobblestone shape is optimal slightly shiny, elongated. From round stones stove hard, as they will roll.
- Young trees. If there is no frame with you, it is collected from long jelia 3-4 cm thick. Material is looking for in the near forest or landing.
- Firewood. The furnace in the hiking bath is drowning about 3 hours. For firewood is needed. Trees are chosen from the thickness of the barrel of 10-15 cm.
In the campaign, it is not always possible to find a place under the bath with all the conditions, but you need to try to choose something average. First of all, in demand with water. Stones, firewood, rhe you can search and bring manually.
Making stages with their own hands
The tent sauna is equipped almost one principle, regardless of the material available. The difference is the location of the stove.
Production of a hiking bath "Po white"

"White" is equipped with a bath in a tent with their own hands without stove. It is built outside the steam. Only hot stones are entered into the tent. Plus this method is the lack of smoke. The disadvantage is a long warming of a hiking bath and its rapid cooling. The tent is optimal to build a little to have enough space for the necessary procedures. The bulk hiking charge will have to warm up for a long time, they will need a lot of stones, and it is almost impossible to achieve this in cold weather.

Due to the lack of inside the stove tent, the film can be used. The frame in the hiking option is most often made from Gheria. It will take 8 sticks with a length of more than 1 m. Between themselves are associated with wire or scotch. Must get a cube or parallelepiped.
Tip! With a collective rest, the bath is better to build for 4 people and bathe in turn.
For 1-2 people you can do the frame in the form of Wigwam. Three thrills set at an angle, forming a cone. Before pulling the film with scotch, wrapped all sharp knots on sticks. Polyethylene sleeve is blown with a knife. The resulting single-layer blade is covered with a frame. To the jerry, the film is primed up with scotch, fasten with linen clothespins.

From the side of the entrance, there are 2 large canvas of the film. Doors should be closed to the mustache so that steam does not go out of the hiking bath. Inside, plans for hot stones. It is fencing with a length of 30-50 cm long in the ground. The floor of the bathing bath ripped up with a snack. For seating, you can lay a rug or find a fuken.
The stove is equipped at a safe distance from the tent. Spark should not fly to film shelter. It is impossible to remove the stove too much, because you still have to wear hot stones into a tent. After the construction of the stove, the remaining stones are not thrown away. They pressed the bottom of the film shelter tent to the ground. Stones are important to put tightly with each other, otherwise steam will come out from under the non-pressed areas.
Production of bath-tent "in black"

"In the black" method of a bath in a campaign with your own hands is installed in the same way. The distinction of the design is the arrangement of the stove inside the tent. The frame of the hiking bath is associated with yawa rods or vines. The easiest option is to be made up with a tape 4 tape about about 1.5 m long. If you manage to find long sticks about 3 m, then 2 pieces will be enough. Peregi is just bend, tying a cross in the center so that the shag's shape turned out.

The shelter of the hiking bath can serve as a film, but polyethylene is afraid of fire. The stove will have to be folded qualitatively to protect the film tent from sparks to the maximum.

For a hiking bath "in black" it is better to establish a collapsible frame with thin aluminum tubes. It is guaranteed not to ignite the oven. Instead of film, the tent is covered with tarpaulo. Durable racks will withstand shelter, even if it is snowing with snow or rain will be accompanied by a strong wind.

A fast hiking bath with a stove is organized in a factory tent, only with tarp shelter. Frames in a few minutes are collected from folding arcs. For convenience, first in the tent lay out the stove from the stone, and then stretch the tarpaulin shelter.
Oven for hiking bath do it yourself

Kamenka-stove for hiking baths are made on the place of large cobblestones. In fact, the design resembles a bourgeois. First lay the furnace in the form of an unfinished ring, leaving the window to load firewood. The arch do, as shown in Figure: Solid, vaulted or with a jumper. The first scheme is worse due to the poor warm-up of the upper cobblestones, as the flame is missing.
The main stages of the device of the bathroom
The bath tent with the stove is raised by the exhalar travelers. Newbie should perform actions step by step, adhering to recommendations. After several workouts, a hiking bath will take no more than an hour.
Selection of place

The appropriate area for hiking bath is chosen with important conditions. Be sure to require any source of water, firewood and stones. Wear cobblestones from afar hard. The same goes for water. You can bring a couple of buckets, but the pleasure of bathing will be small. Stop well on the shore of the pond, where you can plunge after the steam.
When choosing a plot, it is necessary to explore the soil. The land must be solid. In soft and bulk soil it is impossible to reliably strengthen the tent arches.
Construction stove

The most responsible point is considered to install a furnace for the baths from the cobblestones found in the neighborhood. The simplest heater is built according to the following rules even before shelter the tent with a tarpaulter:
- Under the stove of the sharp spatula is cut off the top of the soil. In the deepening by cobblestones lay out the base. If there is a dry grass nearby, it is believed to be a spatula in order to avoid fire.
- Using the flashed cobbled cobblestones with a size of 200 mm, the focus lay out. Its height and diameter is approximately 700 mm. For bookmarking to the focus of firewood leave a small opening. From above, the focus is covered with a large flat stone. We're lucky if there is a sacking sackage. To the flat stone it is convenient to put a bucket with water.
- Bonfire in the stove hiking bath tents are bred 4 hours before swimming. The readiness of the stones will be aslaring their red or white color, which depends on their breed.
The first watering with water on the stove is made with caution. If the stones do not crack and fragments are not flying away - cobblestones are chosen correctly.
Frame device
In the collapsible tent, the frame is folded from the tubes. When using self-made design, the fired rods cleaned from the bitch. The most convenient and safe is the hiking sauna of two compartments. The skeleton of the tent makes that the steam room turns out slightly removed from the stove.
First, 4 racks are bought in the corners. They are connected on top of the perimeter and cross-cross-hour crossbars. The tents form a durable tent outline and do not allow to ride a tarpaulter on the ceiling. One way from any wall put two long rods under the tilt. From above, they are fixed to the carcass of the tent, and the bottom rest in the ground. It turns out the second compartment for the stove.
Color for hiking steam
For the tent it is desirable to use a solid piece of film or tarpaulin. In size, it must be greater than the frame so that the bottom of the edge can be well to strengthen. The canopy presses to the ground by cobblestones or the ground. The most successful option is to pull the trench around the frame, put the canopy, sprinkle with soil.
The warm floor inside the tent is laying out of the facothy. Top of the rug or lay thin twigs with foliage. Birch is ideal.

Use a bath tent is easy. Several tips will not prevent novice travelers:
- during burning firewood in the tent leave a small open window to weathering smoke;
- water bucket put on the stove for watering the heater;
- after heating stones, the burned out heat is carried out of the heating, and the tent is tightly closed to avoid the loss of heat;
- stones are watered as needed to form a comfortable amount of steam.
The cooling of stove stones lasts about 2 hours. During this time you can get comfortable. To protect the walls of the tent from fire and people from random burns, the stove is fencing against branches.
Conclusion
Hiking bath is not built too spacious. From a big tent leaves warmth. It is better to install a small design and bathe in turn.
When we talk about the bath, then we understand the first of all, it is not that it is an opportunity for high-quality wave, but that is a great health benefit. Going to the hike, we know exactly what we get rest, strengthen health, charge energy. And if there is a hiking bath with their own hands done, then all useful impacts increase repeatedly.
Why do you need a hiking bath

In conditions of a long trip, sometimes problems arise. But if you imagine that you can go to sleep not only clean, but also relaxing and splashing after visiting a great bathhouse. The difference will not immediately, and your holiday will allow you to fully spend the next day.
Hiking baths with their own hands are made to help those dacifices, which are the main bath in the construction stage. In addition, it is an excellent option for building brigades, for a long time tied to the construction site.
What does a hiking bath look like

The principal differences of such a design from the usual bath is not: the organization of a closed space that performs the functions of the steam and the manufacture of an oven for such a hiking bath. Sometimes a special oven is not used under the campaign conditions, and using stones, it is built something similar to the fireplace, where the fire is divorced.
In such a fireplace, it is later putting stones, and the main task is the heating of these stones to the temperature necessary to obtain the desired amount of hot steam.
When installing such a homemade bath "Furnace", the stones are trying to use rounded, due to the fragility of flat and layered. Heaving, they are covered by cracks, fragments are formed, which are flying out to the parties, which can lead to damage to others. Therefore, there are two options here: to stay away when heated stones or there is another, more civilized path to buy or finished oven, or entirely, the whole design.
In addition to the stove there is a framework, which is closed by any material that prevents heat leakage. In order to attend the heat in the bath constantly attended, firewood should constantly vote.
Ready designs of hiking bath


When it comes to ready-made mobile structures of hiking baths, then you need to say that the choice is quite large. You can only buy a tent for organizing a hiking wage or complete with a furnace. There are only awnings, without a frame that is assembled independently.
After purchasing a ready-made kit at once and if the furnace is included, the problems associated with the organization of the wage in the so-called field conditions will not arise. True, the price will be much higher.
The only negative is that all the elements, although they are most easily facilitated, still not just to wear them. Therefore, it is necessary to have any vehicle. Although the builders or dachants will be the perfect option.
It is possible to purchase a special awning, knowing that on the spot you can find the material for the frame or it can be a tent-bath, complete with a frame.
Be that as it may, it is quite convenient, because the tasks of the heat conservation are solved much simpler, since such awnings perfectly retain the temperature. After the construction of the stove, a full-fledged steam room turns out - warm, cozy and, especially important, hermetically closed.
We make a hiking bath
So, you are faced with the task in how to make a hiking bath with your own hands. There is nothing difficult, the first is clearly planning, what actions do and what materials you will need.
We harvest the material for the frame

For mounting frame, racks are required that can be carbon or aluminum. Wooden rods can be used, especially if it is in the forest, but they do not have reliability and are short-lived. Also, the tree is a flammable material, so it constantly follows it.
Tip: Very convenient to use ready-made racks included in a four-seater tent. There is an opinion that there is no "bath" temperature, but from practice it is known that these materials are safe and relatively durable.
Cooking underpox material


If the acquisition of a special awning is not planned, then the use of conventional wide polyethylene is possible. Buying it, it is necessary not to make a mistake, calculating the dimensions.
It is necessary to perform calculations, pushing out from the area of \u200b\u200b6x6 meters. There is enough such a number of film for the manufacture of a wage, in which 6 people will fit.
Tip: An old advertising banners can be used as a covering material. It will not fit the use of awnings from modern tents, quickly fail, while the Soviet tents from tarpaulin are able to fully withstand the temperature.
Surrounding conditions
- Firewood. The hiking bath is placed where firewood is present in large quantities. Dry firewood is most suitable for the bath, the diameter of which is not more than 15 cm. Thick logs will burn badly.
- Stones. Must be prepared in advance. For one right, approximately a bucket of stones. Stones must be rounded, the same that have chips, impurities of other breeds, layered or flat stands to immediately reject.


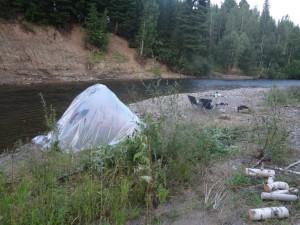
- Water. Excellent if the bath will be built on the shore of any reservoir or river, it will be possible to swim in cool water. If there are no such conditions, it will still have to be stocking.
Construct a hiking bath
As already mentioned, it is not difficult, and the instruction showing how to build one of the variants of the hiking bath looks like this:
- A bonfire is divorced and with the help of Rogatin and the crossbar above it is made a bucket with stones, the volume of the bucket is selected according to the principle - the more, the better. It is necessary to warm until the stones redden or include intuition. Here heats water to wash.

- The prepared racks and of them are taken, the frame is going near the fire. You can bind the angles with a rope or scotch, thereby constructing a cube that does not have a bottom, or a slash.
Tip: The ends of the jelia should be closed by any unnecessary cloth so that they do not tear the film.
- The film is stretched on the resulting frame, in the places of the adoption is sickling with scotch. Below is pressed against the ground and falling asleep.
- The bucket with stones is transferred to the resulting placement, water is also entered there, and you can wash.
The second option may be the so-called "black bath". In this case, a special oven is made inside the frame for a hiking bath with your own hands. It is made in the form of the letter P, over it using a rod or a thick wire is made a box or a pyramid in which the stones are stacked.

ATTENTION: A similar furnace is unsafe, as it is necessary to follow it carefully, because materials can burn or melt.
After the stones are warm up to high temperatures, wait until the firewood runs at all, the room is ventilated, soldered and wash.
- In the process of heating, the stones can severely crack and fragments can fly away from them. Therefore, it is necessary to be careful.
- Watering the stones preferably with hot water, so that water almost immediately began to evaporate. Cold water can lead to cracking.
- Bath in the campaign with their own hands has a disadvantage: low temperatures at the surface of the earth, and the surface itself. Therefore, under the feet it is necessary to drain any rug or a layer of dry ground.
Output
Summing up, it can be said that the bath in hiking conditions is the necessary thing, and it can be done independently. About how to do it and found out, the same information can be obtained on our portal or watching the video in this article.
Hiking bath tent: do it yourself and choose ready + video
Bath tent is the easiest possible options for baths. Hiking Balke will restore during long-term hunting or fishing, in walking or during jeep safari. It can be installed on the cottage (if the "stationary" bath is built or is only in the project stage).


Hiking Bath Tent - Great Recreation Option in Dacha, Fishing or Hunting
Variants of the battery of bath-paltics set. You can buy a ready-made tent with a stove or without, and you can completely build everything from the girlfriend. It is not recommended to use conventional tourist tents. First, such fabrics are not intended for high temperatures and soon you will have to acquire a new tent, and secondly, during heating, they can highlight harmful substances. Well, they are not designed for use in such aggressive conditions. But the old tarpaulin tent as a bath can be used: and heat keeps well and no harmful evaporation. If there is no tarpaulin, the polyethylene film is suitable for suitable size.


How to make a hiking tent
You need to start with the selection of space. You need a smooth area of \u200b\u200bsoil near the reservoir. Such a bath is better to arrange on the shore of the river, a stream or lake: to plunge into cool water after the steam room, and it will be necessary to wash somewhere.
We collect materials
Then you will need to take care of the search for the material of the frame, firewood and stones. If you have a finished awning or an old tarpaulin tent, the wruffs will be less if there is nothing like that, you can do a piece of polyethylene film. Its sizes depend on the size you are going to arrange a tent. If a couple of people are steaming, then a sufficiently small structure, and for 4-6 people it will need a piece of polyethylene 6 x 6 meters (the thickness will be the film, the better).
Pilia for the frame can be found in the near forest or landing, there you also need to find dryer for the stove (or bring a couple of coal bags). And one of the important classes is to search for stones, thanks to which you can bathe. They, heating, accumulate warmly and allow for some time to maintain the desired temperature in the steam room. Stones are preferably picking on the shore of the river or lake. They must be homogeneous, smooth, without extraneous enclosures and inclusions (sequined mica, quartz layers, etc.).


Stones for a bath can be selected on the river bank
Important! Layered stones when heated can be broken into small pieces, applying serious wounds. Stones must be not very large, but not very small. The most optimal size is 10-20 cm and slightly elongated form. If you take a smaller stones, then many heat they will not accumulate and quickly cool, and to warm large instances it will take a long time. Although, if you have enough time, you can lay large stones as the base for the hearth.
Do not forget to make a broom for the wage. The benefit of the materials and in the forest and on the field for him the mass. True, it is possible to do this a little later when the bulk of the work will be done, and you will wait until the stones are increasing.
How to make a furnace for a hiking bath here.
Stages of manufacturing hiking bath-tent
When all the materials are assembled, you can proceed to the device steam. For this, first of all, out of the stones fold the hearth / bonfire / fireplace - who has enough skill or desire for.

One of the easiest options for layers to lay firewood and stones, then ignite the fire. Then you only need to maintain intensive burning until the stones are red or white (depends on the degree of heating and type of stones).


When the focus is organized, you can use the iron sheet for which stones
When the furnace folded, the fire was burned, you can start a framework. If you have an iron frame from the old tent, it will also fit. And if the height of the iron racks is not enough, and they are hollow (as usual), they can be increasing them all the same jerseys. So, you need four angular racks that you need to drive into the ground. From above around the perimeter you need to tie a ride, which will all connect into one design.


Make a frame around the hearth / fireplace / oven
It is desirable to tie a few sticks on the roof - they will prevent the sagging. If the tent is high, you need to add another strapping around the perimeter in about the middle of the height (do not forget to leave the place to enter, raising the strapping on one side higher). Pilot can be fixed with rope, wire, scotch, etc. The main thing is that the design gets quite reliable.
In real tourists, private travelers, in the arsenal there is a ready-made frame for a hiking bath. As a rule, such frames are made from alloy tubes.

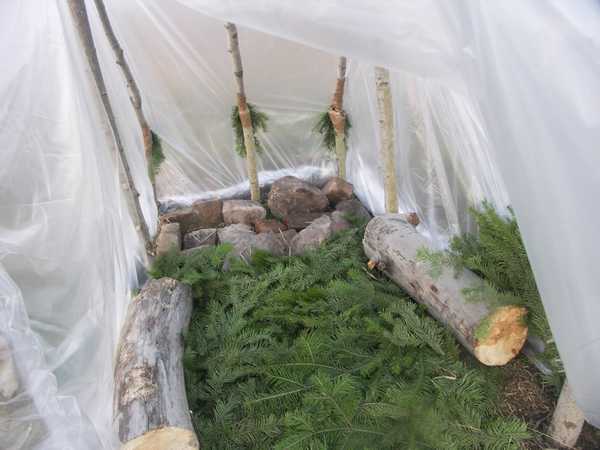
After installing the frame, you can catch a chamber. While the stones are warm, do the floor with the floor. The best option is to the bottom of the coniferous husk, and on top of the birch, oak, linden - any trees that are nearby.

War down the floor of the bath tent with a coniferous savor
When the stones begin to crack, put the water, and while it heats, you can start pulling the awning and fasten it. Just until all the firewood breaks, it is impossible to hermetically close the tent - you can imagine smoke, or, which is much worse carbon monoxide. You can leave open or one of the sides, or the roof - depending on the design of the awning / film.
When all the firewood, ash, and coals are burned, and put out of the tent, leaving only preheated stones. Now you can close it all hermetically. By the time you all embellished, the air in the hiking steam warms well. You will only need to set a couple, lining to the hot stones water or boiled grass. Hiking bath tent is ready. You can bathe!
If a polyethylene film is used, the heat is not enough for a long time and you need to bathe quickly. If a tarp was used, then the heat should be enough for 3-5 full-fledged occasions, and this is almost a real bath.
Ready Mobile Bath Tents
If you lead an active lifestyle and long trips for you are not uncommon, it makes sense to purchase a ready-made bathing tent. Models, manufacturers, configuration options. There are just awnings without a frame and stove. They are sewn from a material that is well holding warm and enduring high temperatures. As a rule, they are easy and compact (weight of the tent for 4 people - 2.5-3 kg) and they are easily transferred in a backpack. But it will be necessary to fold the stove of stones (or acquire a portable embarking option), search for a rider for a frame and to build it.

There are tents with a ready frame and a stove. They weigh and the places they are understandable, they take more, but it is not necessary to worry about anything. In her hands or on their back it is already hard to wear, so rather this is an option for led or car travel.


The only thing that needs to be found is on the spot - stones for the heater, but they are required much less than when the center of the hearth and the time it takes a little, although they can be treated with them, if there is where to put it ...


When choosing a finished tent-bath, you need to pay attention not only to the size and cost. One of the important characteristics is the installation / assembly speed.
Mobile Bath "Mobib"
For both large and small companies, you can pick up suitable products from the Mobiba model range.


Mobile bath "Mobiba" for a small such company
Bathhouse-tent company "Mobiba" can be a single-layer and two-layer. In a single-layer bath, you can bathe at ambient temperature to -25 degrees Celsius, and two-layer up to -40 degrees.
The tents are made of Oxford (Oxford) - a durable fabric of chemical fibers (nylon or polyester) of a particular structure is usually applied, which provides complete waterproofability of the tissue. Also, the fabric has water-repellent properties.
The frame is made of Aluminum Aviation Alloy D16T, which combines two important qualities: lightness and reliability.
A rather popular model is Mobiba MB-104. It turns out that our compatriots bring such baths even to America.
Bath Mobiba is designed to use furnaces. The ceiling has a hole under the smoke pipe. For the purpose of fire safety, the passage under the pipe is trimmed by heat-resistant materials.
Important! It should not be used for the heating of a bath-tent not intended for this wood furnaces, such as Chinese production. The fact is that when the furnace furnaces are firewood, one way or another will fly sparks that will burn the ceiling. For bathing Mobiba, it is better to use specially designed fashionable wood furnaces, eliminating sputs - in them built in the opposite. Such furnaces are "median" and "optima".

Furnace "Mediana"
More about the Optima furnace for Mobiba MB-5, Mobiba MB-12, look in a video clip.
Hiking Bath Tent Nova Tour
Tourists are popular with Nova Tour tents (Nova Tour). The tents are very lungs, which makes it possible to wear them even in a backpack with hiking. For example, a sauna-tent designed for 4 people, weighs only 2.5 kg.

Tent material - Poly Taffeta fabric. The fabric is made of polyester (polyester tissue), which, unlike nylon, is more resistant to ultraviolet rays and is less stretched during wetting.
The tent has windows, so there will be no problems with lighting in the daytime. The entrance to the bath is sealed using a zipper.


Bath closes on a lock zipper
Nova Tur's tent for 4 people, you can buy for 4 thousand rubles.
Attention! Included there is no framework, so it will have to be built in a hike from the remedies. You can buy a ready-made frame for a bath tent or make it yourself.
Conclusion
More selection - more benefits. There is always a choice. If it is not possible to purchase a ready-made bath, then buy a piece of thick polyethylene and can always build a hiking bath while in the forest.
If you are interested in auto-tourism, then it is logical to purchase a ready-made bathhouse, which can be installed within 30 minutes.
That's all. Enjoy Your Bath!
Temporary bath on nature- features of operation
Many compatriots have acquired a traditional Russian bath in the country area or near the country house. Such a structure requires a solid approach to construction and arrangement. But the self-made traditional sauna is a structure that is built from several months to a year.
It will not ask if everything is possible to make everything faster so that the bath is ready now, and tomorrow it could be disassembled? It turns out that there is nothing impossible and the washing department for temporary use to collect with their own hands forces to each wishes. Mobile quick-planning design can be used in the campaign, at the cottage, during field work, etc.


Build technology


Despite the fact that the instruction of the assembly of temporary structures is simple, it is necessary to approach its implementation.
The construction of a quick-sized bath is a multi-step process, the entrance of which:
- Plot is prepared;
- Building materials are harvested for framework frame and for assembling the Kamenka stove;
- A wage and a woeful compartment is going;
- It is equipped with a furnace and a container for heating water.
Preparation of a room for the installation of a bath
Despite the fact that the construction of a temporary bath is held in unsuitable conditions for this conditions, it is advisable to find the most suitable area.
First, in close proximity to the construction site should be water. It does not matter whether it will be a lake or river, but the natural reservoir will serve you a good improvised font. In addition, the reservoir is needed to ensure effective water supply of the bath.
Secondly, the plot under the assembly of the structure should be as smooth as possible. Therefore, before installing the framework, align all the relief and remove large vegetation around the perimeter of the square with a side of 3-3.5 m.
Construction of carcass
In fact, the temporary bath, which you can assemble in nature is a canopy, closed from all sides by a film or a denser cloth. Building material for assembling the frame will serve young trees with straight subtle trunks. In order not to bring the nature of excessive harm, you can apply the willow branches associated several pieces into a single helper.


The construction of the frame is performed as follows:
- at the edges of the base of the future bath, we set four rods in one thing from each corner;
- in the upper part of the vertically array-standing porcelies, KREPIM horizontal rods so that the design formed parallelepiped with straight angles at the connection site;
- next, the ribs are collected from the stiffe, which are mounted diagonally from each of the walls;
- a similar design is mounted from above, where two pants are located diagonally in the shape of a cross and connect four angle at the top of the canopy.
IMPORTANT: Given the temporary nature of the construction of the structure, any techniques can be used as a fastener for a branch of branches in the frame, starting with pieces of wire and ending with shoes from the boot.
Film and closure to close the walls

Unfortunately, the materials necessary to cover the frame in the campaign, it will not be easy to find, so the polyethylene film and the cloth will have to bring with you from home. For the construction of a small bath, there will be a sufficient piece of dense polyethylene film with a size of 3x5 meters. In addition, from dense fabric it will be necessary to hide a cloth with a size of 1, 5 x 3 m in advance.
For fastening film and fabrics, a rope will be required to the frame, it is quite suitable for thick twine. Fastening the materials to the frame should be in small strings. For this, the rope is cut into fragments of 10-15 cm and these pieces of film, and the cloth are tied every 20 cm. The polyethylene film is attached through the walls, while the cloth is hardened onto the walls from the inside in that part of the bath where the oven will be located.
Construction of the furnace

Considering the fact that the temporary bath away from the house is built purely from the remedies, the stove will also be collected from what can be found in place. Stove laying out of a rectangular stone. The best choice will be the large-sized pebbles or granite.
To begin with, the square base of the side of 1 meter is laid out on the platform. The biggest rectangular stones that you can find are laid out by two parallel to the ranks. The distance between the rows of the stone should be at least 30 cm. The laying of stone in height should be 30-40 cm.
From above, across the direction of the masonry, the flat stones are laid out that will perform the function of the stove. Stones spread so that a hole needed to be closer to the back of the rear. Further, on the flat stones in front of the bath furnace laid a couple of rows of small stones.
In the heart of the furnace, you can install dishes for water heating. As such dishes, a campaign kittel can be applied. Of course, the water will have to spend economically, but, given that the bath hike, with such inconvenience you can put up.
Accessories for baths


Bunities can be prepared from bath accessories right on site. To do this, it is enough to find branches of birch, oak or linden. These trees remain green throughout the summer, until mid-September. Therefore, we collect branches up to 50 cm long. From the collected branches we form a bath broom with a diameter of the handle of no more than 5 cm.
Immediately before use, a broom need to hold in a container with hot water to unpiring the leaves.
Important: For maximum comfort, a temporary bath must be equipped with shelves.
Furniture in the improvised pair can be collected in place.
For these purposes, knitting branches are used on which it will be convenient to settle.
Output
The price of the construction of a stationary bath is high, while the assembly of a hiking bath will not be worth a smooth account. On average, you can collect a steam room away from home for half an hour, you will agree for a long time. Build such a structure with the same success in the campaign, during field work, in the country, etc.
When assembling temporary giving it is not necessary to literally comply with the above recommendations, it is enough to reproduce the concept of building in general terms. In order for the assembly of the bath on hiking conditions does not cause questions, see the video in this article.
Take yourself hike ... bath

 Lovers of tourism know that in nature to lead themselves is quite difficult. And this also has a feature and, perhaps, some charm of active recreation. But if your journey is protracted, how do you want to relax. And here it will be a hiking bath. It will come in handy and summer houses that do not have the ability to equip a full-fledged bathroom, and construction teams that work for a long time at the facility where there is no place to wash.
Paul and housing
In general, the hiking bath can be erected in different ways. But in any case, she will have an earthen floor, and to "do not knead the dirt", it is better to impose a layer of straw, hay, fern, huskies, branches, pebbles, well, or another similar material that you will find on the site of the camp. The dimensions are calculated as follows: 2-2.5 cube space per person plus the hearth.
As for the corps, today the hiking bath is most often performed on the basis of tents of synthetic tissues. This is justified by the fact that such products:
- Very easy
- Compact
- Absolutely waterproof
- Have everything you need to install
- Do not rot, even raw, in the rolled form
But, of course, we are not talking about all the products in a row, namely about those modifications that have a awning, it is just needed. It is put on a standard frame in the case if it is installed without the tent itself, or under it makes a frame from stories. The edges found on Earth lay the turf, stones or raise the earth. The main task is to achieve maximum tightness, and what specifically tools to solve you. Just do not forget to leave the entrance!
How to install a hiking bath, if you do not have a special awning? You can use any moisture-proof material, for example, polyethylene, rubberoid or even old banners. If you have such a little bit of such programs, then try to apply natural resources, turn on the smell and fantasy.
Tip from Master!
Some successfully use clay cliffs from South, Southwestern and Southeast Parties. The main thing is that the surface is warm and dry. Others - make a canopy over the arms, etc.
Speaking about the bath, we mean not only the opportunity to quietly wash away, we are talking about health. Going on a campaign, we also go for rest, health, beauty and energy. So, the bath in the campaign is health in the square! And how to strengthen it? The only option is a mobile bath. That's how you can get it, we will talk ...
Who and why do you need hiking baths?
Remember how you wash in a long campaign: after a whole day of active recreation (from which, by the way, you get tired more than from hard work) You find the first reservoir, break the camp next to him and put yourself in order how God gives it. Sometimes, it happens, you have to go to bed with a scorge wash. No pleasure. Now imagine that you have the opportunity to lie down not just clean, but relaxed and rejoiced after a good bathhouse. The difference is huge! And you feel it immediately! From how you rest at night, the whole day depends. Make conclusions ... Often the baths hiked by dachas who do not have the opportunity to build a full-fledged building. Also, this is a great option for the construction team, for a long time "tied" to the object near the reservoir. In general, if you know the price of a good rest, take care of the health and love the steam room, then, of course, the mobile bath is for you.
What does a hiking bath look like?
The design of the structure is almost no different from the usual: it will take a closed space that performs the functions of the steam and oven for the hiking bath.. Sometimes in hiking conditions do not use a special furnace, and they build something from stones resembling a fireplace in which the fire is bred. Stones are then put in it. The most important thing is to warm up these stones so much to get the right amount of hot steam. If such a homemade "oven" is installed, then it is usually tried to find rounded stones, because flat and layered can crack. Floating, in different directions, the fragments of stones can arise around others, so during the warming the bath it is better to stay away or go to others, more "civilized", by purchasing a finished furnace, and possibly the whole design.

While the stoves for hiking baths heat the stones, you need to build a frame from Geria. You will need four vertical racks, four more porses for connecting from above. Four diagonal stiffs will keep the "walls" and two more - "ceiling". Having gathered the frame, it needs to be covered with its plastic film - it will be a kind of warming of the steam, the cracks must be carefully closed. This will be the steam room. To get down, you will have to constantly throw up firewood. It also does not have to count on high temperature. So, it is labor, but "one-time" option. It is better, of course, to make anything more reliable and durable or still go to the finished design. Read on all this on.
Finished hiking bath: what, why and how
As for ready-made mobile designs, there is a choice here. You can just buy a tent for mobile wage or with a stove. There are also separate awnings to which the frame is not attached: you will have to assemble it yourself.

If you buy a ready-made kit together with the furnace immediately, then the problems will be treated "in the field" you will not be at all, but it is desirable to have any vehicle: not so easy to wear a tent and stove, even if even Maximum lightweight. But this is the perfect option for dacms and builders.
You can simply buy a special awning based on the fact that in the place where you are planning a rest, be sure to have a ride for the frame. You can also buy a bathing tent in which the frame is already provided. In any case, it is convenient: the problem of heat loss is solved much easier, since these awnings are perfectly held by couples, unlike the plastic film. Only a stove for hiking bath will remain. Completing it correctly, you get a full-fledged steam room - warm, cozy and, most importantly, hermetically closed.

How to make a hiking bath: features
If you firmly decided that you need a mobile sauna with your own hands, boldly construct it. There is nothing difficult in this. How to do it? You will need the following materials and conditions:
Frame
For frames need racks. It is quite suitable carbonted or aluminum. Take ready-made racks from 4-bed tents. It is believed that they may not withstand the "bath" temperature, however, practice shows that these materials are quite safe and relatively durable. You can, of course, use and wooden rods, but they are unreliable and quickly fail. In addition, the tree is a fuel material, and you will constantly have to worry about security.
Purchase material
If you do not buy a special awning, then take the usual wide polyethylene. When buying, watch not to be mistaken with a piece of sideways. Calculate it, based on the fact that the area you need to hide is 6x6 m. This amount of material is enough for the construction of the steam room for 6 people. Some of our practical compatriots have adapted to use as ancient material of old banners. You can try and you. The main thing is not to risk and do not put a regular awning from a modern tent, otherwise you will definitely definitely with him, but the tarpaulin tents of Soviet times have perfectly withstand temperatures.
Conditions:
Firewood
You need to put a mobile steam room in place where there are firewood in excess. Moreover, for the bath you will need dry firewood with a maximum of 10-15 cm with a diameter. Do not harm too thick logs.
Stones
They also need to prepare in advance. You will need approximately a bucket of stones for one approach. Drive more - good. Pick large rounded boulders. Carefully inspect the finds: stones with chips and impurities of other breeds, flat and layered do not take any way. If you failed to collect the right amount of large stones, take more small pebbles.
Water
Hiking bath is constructed on the shore of the reservoir. If necessary, adjust the dam in advance so that you can reappear normally.
Phased instructions built
Stage First
Place firewood in one layer on the ground, and on top of the layer of stones. Divide the fire. When he defeats well, put the second layer of firewood, after which - again the stones. The procedure for making firewood and stones continues until all the collected stones will be in the fire. After that, just maintain a good flame. The fire must give a good heat.
Stage two
Take the prepared racks and install the cross. Frame Collect not far from the fire. If you decide to use porshi, then they should be a thickness of 3-4 cm. With the help of a rope, scotch or tapes, build a cube without a bottom or shala, closing the ends of the tart to the cloth so that they do not break the polyethylene.
Stage Third
When the stones in the fire will become red, it's time to install the tent. Take a shovel or long thick sticks and rush stones from a fire in the frame. The ideal option is to dug a fence in advance for them to not drive throughout the camp. When all major stones are under the frame, remove all the small fragments and water to be swallow "track" on which they rolled out. So you will save the future tent, and your own legs. Next, cover the frame of the film, avoiding the place where the stones are located. The edges press to the ground with pebbles, logs, can sprinkle with sand. The steamer is ready. With the opposite side of the stones side, make the entrance.
If you make a bath hiking in black, then the frame and awning can be put right above the fire. In this case, the stones will not have anywhere, but the fire is preparing a little different. You can build something like a stove letter P, put over the usual bone a box with stones from rods or thick wire, or build a design like a pyramid with a large boulder in the center. Keep in mind: such a bath is less safe, so constantly monitor the materials to be burned and did not melt.
Some nuances of the hiking bath
Remember: Stones during heating are severely crack. So try to stay away from them. But there is also good news: when you wipe them, they are no longer scattered on the fragments, so you can safely bathe. Making conclusions about how high in the room temperature, you can, watching the ferry. If it rises up the hot wave, then the temperature is high, you can stay long. And if the couple spreads across the entire tent thick fog, then this approach is the last. Lack of hiking bath - in a relatively low temperature in the earth. In order not to catch a cold, squeeze the rug or dry grass under my feet. War on your health!