Cabinet corner detail. How to make a wardrobe with your own hands
Sometimes you create some kind of furniture with your own hands much easier and cheaper than buying ready-made headsets in the salons. For example, to create an angular cabinet with your own hands, it is not at all necessary to be seven spans in the forehead and have a whole set of skills. In fact, the project of such an element of furniture is simple, and there should be no problems in implementing it.
Making the corner cabinet
We will create a closet that will have a sliding system of two facades. At the base of the box will be a square, one the angle of which we cut. Before making an angular cabinet with your own hands, we need to measure two values: the depth of the sides and the distance between them (the sliding system will be embedded). The height of the cabinet also matters. Suppose our design will have the following parameters: 600 mm 1500 mm per 2300 mm.
We prepare a project, first the diameters of the upper part, two sides and an angular support. The latter will be two parts that are connected to each other at right angles. The same details will be partially the rear wall of our cabinet - shelves will be mounted on it. On the right side, we will have the shelves, on the left - the pipe that the outerwear hangs on. Thus, it will be the foundation for the cabinet.
Preparation of the box
Our corner cabinet will consist of two boxes. The first will be represented by a module with shelves (their quantity can be different. The second module will consist of two elements - direct and angular, which will allow you to open access to the pipe for outerwear. The first module is going: the chest of drawers and shelves are embedded in it. At this stage it is very important to correctly calculate the depth, because otherwise the sliding system will not close completely and will rest in the facades. With the second module of work even less, because only the installation of the plank will be required.
How to choose a configuration?
Before making an angular cabinet with your own hands, it is not bad to figure it out in its dimension. Thus, the standard height is considered to be 2200 mm and above, which means that the opening for facades should be at least 900 mm. If the doors are swinging, then the sash should be as small as possible in width. In addition, the load on the loop will be moderate, and therefore the wardrobe justs longer.

The second important point is to take into account the parameters of the room and the intended cabinet load. Under each particular room, you can choose a certain design. For example, the cabinets in the form of a trapezoid and triangle are too complex in terms of calculations, besides, they will have to take into account and special accessories and certain details. To adjust the correct facade without a professional measurer in this case is almost unrealistic.
Or maybe classics?
The classic version of the angular cabinet has five walls: it is inserted between sections in the furniture headset. The system seems difficult, but in fact it is most common and easy to manufacture. But if you put such a design as an independent element - it is too difficult, and a lot of materials will be needed for its creation. The cabinet will be overall, will take a lot of space, but to remove many things to it simply will not work. So if it is possible, it is best to create a built-in corner cabinet with your own hands: the workspace in it will be more, and the materials will need much less.

Options for kitchen
Of course, creating a huge hand is not easy. Therefore, most often in the bedroom or dressing room, this element of furniture is bought. But what to do when a constructive solution is required for the kitchen and it is impossible to buy a separate locker? The answer is simple: "Make it yourself!" For example, a M-shaped design may become an ideal configuration for the kitchen, consisting of two modules that are installed in the angle.

A similar corner kitchen cabinet with your own hands to create very simple. It will have a compact and ergonomic design, and therefore even in the smallest kitchenette he will look harmoniously. As for the number of shelves and opening-closing systems, the main role is played in this matter. It should be remembered for mandatory nuances.
- You should not try to cut LDSP at home yourself, since the feature of the angular structures is that they need to be accurately customized to each other and thoroughly observe geometry.
- Creating an angular kitchen cabinet with your own hands, do not save on the accessories. For example, using a sliding door mechanism, buy full equipment for openings, and savings can lead to the fact that in a year your locker will order for a long time.
- It is worth carefully referring to the alignment of the floor and the ceiling so that your design perfectly fit into her opening.
How to collect?

Assembling an angular cabinet - the process is not from the simplest, and therefore you can spend a lot of time on it. To do this, it will be necessary to stockpur with a screwdriver, hammer, nail-holder, hex keys, perforator or drill, hacksaw. It is worth remembering that all modules of such a design are attached using which are inserted and secured immediately. Be sure to ensure that the holes come together to each other. Before mounting the doors, it is worth installing the installation of mounting slats and plastic linings for the corner loop - it is attached by means of screws.
If you need to attach the corner module to the closet, then you need to make fasteners in several places. This will make the design stronger and more reliable, and it will just just longer. As can be seen, it is not very easy to create a simple wardrobe coupe with your own hands, but it is quite possible. This is a universal element of furniture, since it allows you to more rationally and competently use free space. If you create it with your own hands, you can give the system any structural and stylistic features, thanks to which it perfectly fit into the room or kitchen. Well, do not forget about the timely compilation of the drawings - they will definitely be worth it, if you want the corner cabinet, with their own hands created, was solid and high-quality.
Recently, became one of the most common piece of furniture. This design provides convenient. Most often, they are not purchased in the finished form, but they make to order. But if there is an opportunity and the necessary materials can be made of furniture headsets yourself. Before proceeding with work, it is necessary to determine the amount / location of the shelves and drawers. It is important and planned design with the size of the room. In any case, all these moments need to be studied before making a wardrobe with their own hands. In this case, the drawings are some shipping point, and our today's review will help to cope with this rather difficult task with a minimum of errors.
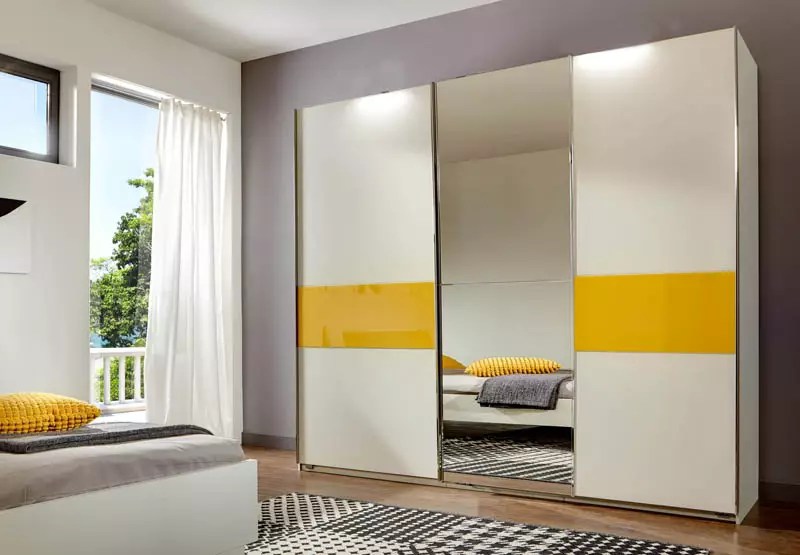
The feature of the furniture designs of this type is that allow you to save the useful area in the room. At the same time, the sliding doors for the wardrobe can be glass, mirrored, from rattan, plastic or bamboo.
So, consider the main advantages of furniture heads:
- variety of structures: embedded, straight, cabinets and;
- furniture headsets allow you to effectively use even a small space. This is the perfect solution for small rooms. In this case, mirror surfaces allow visually to increase the space;
- laconicity of structures;
- filling the wardrobes. Similar furniture headsets allow you to hide everything too much. They are used not only and clothing, but also for various household accessories and small equipment;
- models can be embedded, cabinet and with mezzanine;
- as the walls of the cabinet, the wall of the room can be used, as well as the floor or ceiling;
- the wardrobes are made according to individual order;
- the possibility of self-construct.

It is worth noting some minuses:
- rapid wear of the sliding system;
- requires high-quality internal filling of the cabinet;
- aluminum profile can be deformed;
- careful maintenance is required: cleaning all surfaces and guides.
For your information! So that the door does not come off from the rail, the stakes and the ends are used by the Schlegel for the wardrobes. It must be pasted, which will allow you to create depreciation with a sharp opening of the doors.
Types of cabinets
Consider the main varieties of the wardrobe:
- built-in Models that have no floor, rear wall and ceiling. Such headsets can not be moved or rearranged. They consist of side walls, shelves and internal partitions. Built-in models are made to order, but you can also purchase individual elements for self-assembly;
- separately standing Sliding wardrobes are equipped with doors that move on the rail. This design has a floor, rear wall and ceiling;
- corner The headsets are suitable for small-sized premises. It is characterized by compact sizes, but inside it is very spacious. The angular construction is suitable for a small rectangular room or a square hallway;
- diagonal-corner The whole corner occupy entirely. Such designs are more compatible stylish. Inside, you can hide not only the wardrobe, but also bed linen, as well as with blankets.


Materials for a wardrobe
Before making the corner cabinet or any other, decide on the manufacture of your own hands.
Wood
For durable heads it is worth choosing an array of wood. This is a prestigious furniture material. It should be borne in mind that wood is not the best option for the built-in wardrobe. Humidity level is higher in niche. For a wardrobe from a tree, it is necessary to carefully choose wood without cracks and bitch. Frame frames are also performed from wood. It must be glued together.
Wooden headsets possess the following advantages:
- ecology material. The tree does not contain toxic components;
- elevated level of wear resistance;
- aesthetics of products. Wood furniture is distinguished by natural colors and a unique pattern;
- the naturalness of the material;
- the ability to perform restoration works;
- ergonomic use of space;
- mature styles.
Plasterboard

One of the popular materials is made from wood pressed chips. To create a dense composition, thermoactive synthetic resin is used. This material is easy to handle.

When working with plywood, it is necessary to consider the softness of the material. Products can be deformed when twisting. It is recommended for such connections to apply strips in the form of washers.
Enjoy popular and laminated plywood. At the same time, plastic reduces the effect of formaldehydes in resins.

Furniture shields
The best material for homemade structures are furniture shields. This material is known for strength, environmental friendliness and reliability.
It is worth noting the following advantages of using this material:
- significant cash is required;
- it is possible to implement unusual design ideas;
- the product may have various forms and design;
- for a furniture headset, you can choose a functional fitness.

Location of the wardrobe
Before you start creating a wardrobe with your own hands in a hallway or to another room, it is worth considering its location.
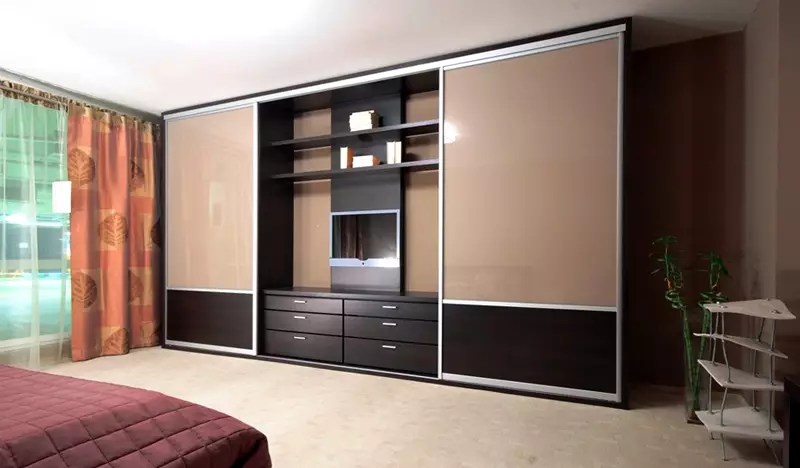
If you put the headset along the solid wall, then the furniture itself will be perceived like a wall. Better if the cabinet is before the ceiling. Doors can be mirrored, allowing to visually increase the room.

If you place two identical cabinet along the wall and leave the distance between them, then the alcoves turn out. In the resulting niche can be put or. In the living room Alcovka can be used to create a zone with a false fireplace.

The installation of the headset on the edges of the door and window openings will be a practical solution. You can install meresol over the opening. The cabinet can be deepened in specially created niches. If the size of the room is allowed, then you can smallest.
Depending on the design of the room design, it is not necessary to make built-in wardrobes or mask them. For retro style, or Glam vintage cumbersome furniture will only complement colorful design.

It is necessary to choose correctly and the extension mechanism for the wardrobe. He should not be noisy.
Parishion

Children's
In the children's room, it is necessary to place many things. This is seasonal clothes and shoes, children's toys, board games and sports equipment. In addition, you need to find a place for books, notebooks and bedding.
The wardrobe is a spacious headset in which you can place all things and objects. The sash of this furniture subject is moved to the parties, which takes not so much space.
Consider that the cabinet furniture is selected for children, so the shelves should be at the necessary height. It is important that there are no sharp corners on the ends of the shelves and racks. For each thing it is necessary to take a certain place, so the child will quickly take care of order.
Note! When ordering on the side, as a rule, it is not possible to control the consumption of the material.
It is important to choose high-quality fittings, it depends on the correct adjustment of the doors of the wardrobe. Doors should not jam and move. Slide systems consist of a profile and sliding support. Roller mechanisms can be axial or on bearings.

Choosing a wardrobe filling
Internal filling helps to solve and what a layout will be. It is not worth a section for outerwear to place in the center, as the moisture from it can spread to the parties. It is better to locate this compartment on the side. Bed linen boxes are not recommended immediately above the floor.

How to comply with the elements and how to collect a wardrobe with your own hands, you can see in the video below:
Number and size of doors, guides, clips for a wardrobe
Choosing the guides for the wardrobe, special attention is paid to the material of their manufacture. The lowest cost has a plastic profile, but it has a little reliability and low service life. The best solution will be the use of combined rail guides, in which the support surface for rollers from metal.
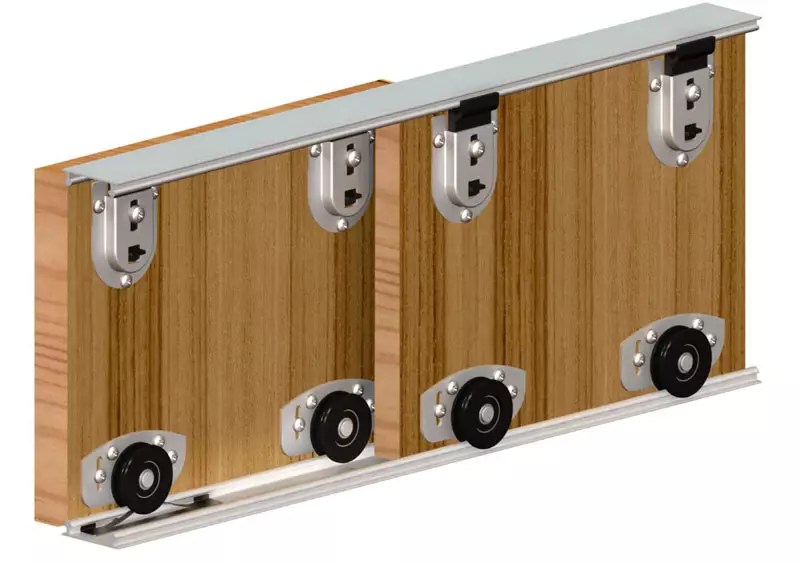
The steel profile for the door and the coupe has increased reliability. Aluminum placed rail supports for furniture of famous brands.
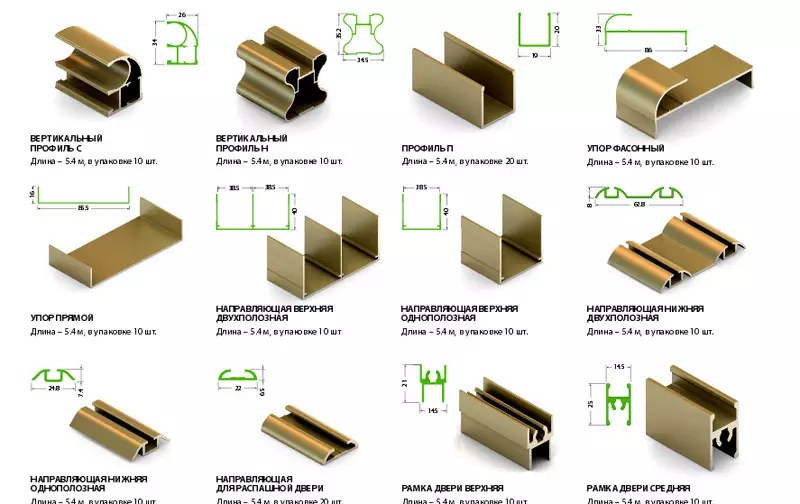
Rollers are made of metal, as the plastic does not differ in strength. The roller contains a ball bearing internal mechanism that allows you to freely move the door in the horizontal direction.
Build a cabinet and door coupe with your own hands
We invite you to familiarize yourself with the process of assembling the wardrobe, with your own hands in the table below:
| Photo | Description of work |
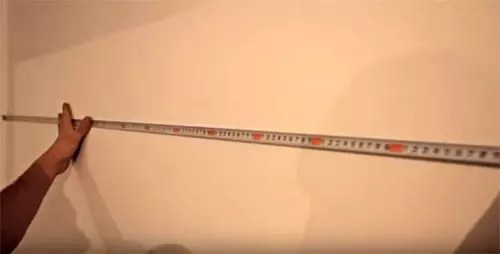 | To assemble the wardrobe, you must apply markup. It should be noted the size of the cabinet width and location of the vertical rack. There are heights on which shelves will be recorded. |
 | Drills holes for dowels. |
 | The profile is worn before installation. |
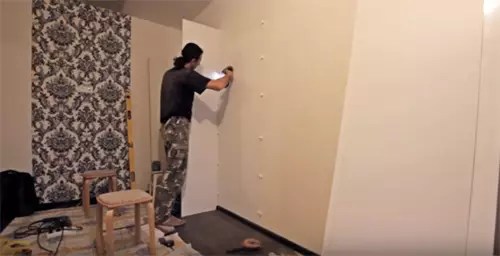 | Install the vertical rack. |
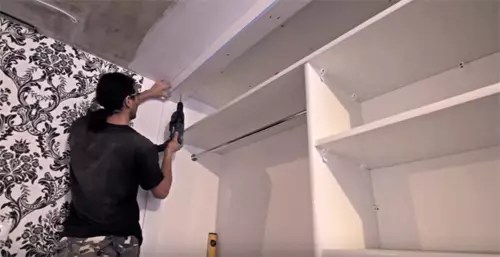
 | We apply marking for the antlesol shelf and install it. |
 | A side wall is installed. |
 | Marking under the shelf and their installation. |
 | It is placed in size and installed a rod for clothes. |
 | False panels are installed. |
 | One panel is fixed at the bottom. |
 | The support top is fastened. |
 | Using a screw, the bottom guide is recorded. |
 | The upper guide is attached similarly. |
 | Mounted doors. |
A more clearly presented process in this video:
Interesting solutions of the wardrobes: photo examples
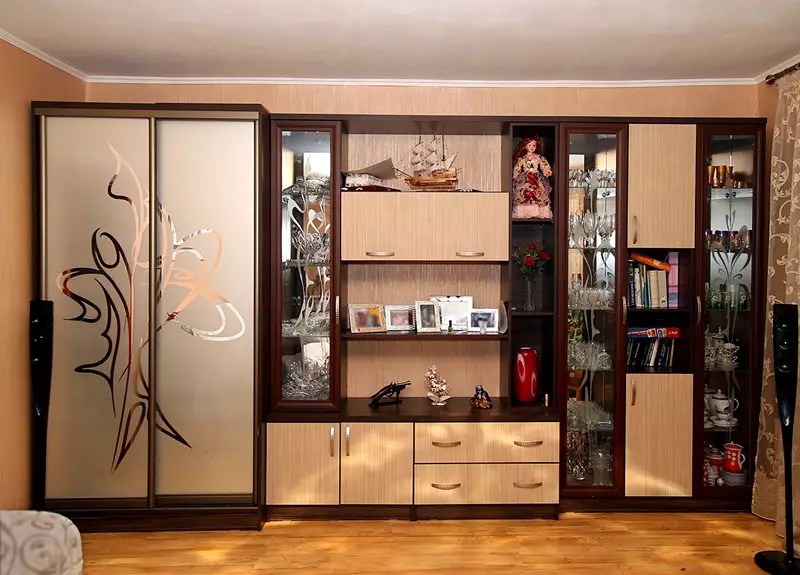
Do not forget about the decoration of the furniture headset. Pilastry can be used as decoration. These elements are made from a wood array or MDF. Furniture cornice can be installed on the roof. An interior baguette is applied to decorating. You can choose a baguette of different shade. Stylishly looks and furniture with photo printing.

Article
Modern furniture has a high cost, and various materials can be used for its manufacture, and the models differ in size, form, appearance and filling. An excellent solution for the living room, bedroom or other room will be an angular cabinet that does not occupy a lot of space distinguished by high capacity and interesting appearance. Created an angular cabinet with your own hands, if you carefully understand this process.
Immediately before the design process, the design should determine the size, materials and tools that will be used, and also to consider the purpose of the cabinet. Initially, a project is formed, for which the drawings are created, according to which the details are prepared firmly connected to each other. The decision is made whether the angular cabinet is triangular or r-shaped, trapezoidal or five-lane.
If you decide to assemble the furniture yourself, you should prepare for this process and acquire the necessary materials and tools:
- direct material for creating a cabinet, and the formation of a design of plasterboard, which is distinguished by the available price, ease of use, environmental purity and durability is considered to be relevant.
- profiles from which the framework will be formed;
- suspensions;
- self-tapping screw and glue;
- mirrors, if planned to make them the cabinet;
- accessories, ensuring the ease of use of the design;
- rollers and guides if the doors are made of the coupe;
- cabinet material material;
- drill, screwdriver, Bulgarian, a sharp knife for cutting drywall, level and other minor tools.
Work with plasterboard is considered as simple that it is usually not required to have specific tools.

Instruments

Sheets of plasterboard
Preparation of details
The drywall cabinet is done only after pre-creating the scheme. Initially, it is necessary to determine the size of the structure, which is taken into account the size of the angle, where the furniture is planned.
It is necessary to decide which parts will consist of an angular cabinet. Typically, one large department is made for things that are located on the shoulders. Another department is narrow and divided into several small compartments, for the separation of which the shelves are used. Often, an open penalty is formed from any side. Standardly dimensions of such elements are:
- the height of the cabinet itself can vary from 180 to 220 cm;
- the width of two different elements of the corner cabinet can be from 45 to 80 cm;
- it is desirable to leave the distance in the range from 30 to 35 cm;
- boxes and shelves usually have a width of 40 to 45 cm;
- boxes are desirable to make a depth of 25 to 30 cm.
The optimal is considered to be from above two large departments, called meresers, which are used to store large and rarely used products and things, and at the bottom, a narrow compartment for shoes is organized.
After determining the size and compartments of the design, it is necessary to complete the sequential steps:
- determine the angle where the cabinet will be located;
- depending on its parameters, determine the exact dimensions of the cabinet;
- create a sketch, which will allow you to calculate the base, lid and base;
- split all the internally space of the cabinet with individual sections, for which vertical and horizontal partitions are used;
- make the calculation of the design doors;
- calculate the desired number of ends closed by the end ribbon.
Based on the obtained scheme, you can prepare the main parts of the cabinet. To do this, in accordance with the sketches, the main elements of the framework are made. Metal profiles are cut by a grinder, and the sections are cleaned. Next, on the basis of pre-made drawings, parts of plasterboard are formed, and it is desirable to use a thin and sharp knife for cutting this material. All elements should have the same thick.

Materials
Selection of place and markup
With the place of installation of the cabinet, it is desirable to decide in advance, since the design itself is done under the available parameters of this angle. It is usually installed in the living room, but it can be intended for a bedroom or children's room. Filling and dimensions depend on the number of things that will be stored in furniture.
After determining the installation site, the markup begins, which allows you to determine where the main elements of the cabinet will be located. Since the product of drywall will be created, then all the framework elements are attached to the wall, therefore, the attachment sections are scheduled. They will have to focus on attaching and creating a frame.

Preparation of the surface and markup
Montage Karcasa
How to make an angular cabinet with your own hands using drywall? To do this, it is originally necessary to do installation and fastening of the frame. The whole process is divided into steps:
- if there is a lamp in the cabinet, the sections are noted, where they will be fixed, after which the electrical wiring is supplied to this place;
- a shock-absorbing insulation of rubber is glued to the guide profile, and it is important to have it from the part that will be laid on the base of the furniture;
- on the lines of the previously applied markup, all guides are recorded, and a dowel of nails are applied to their reliable consolidation;
- next, direct suspensions are recorded on the wall, and for this you need to constantly focus on the markup;
- the fasteners for fixing the suspensions depends on which material was used to create a base, since, if it is concrete or brick, it is desirable to use a dowel with nails, and if the base is wooden, aerated concrete or clay-concrete, then sufficient self-tapping screws or nails are allowed apply special dowels equipped with spacers and notches;
- in the fixed guides, the racks are inserted, located vertically, after which they are fixed by the suspensions, and it is desirable to use short screws equipped with a pole;
- between the rack profiles, strong and reliable stiffeners are installed, and the more these elements will be used, the more stable the design will be obtained, and especially many of them should be in areas where heavy items are planned.
It is allowed to create a frame to use not only metal profiles, but also wooden rails, but such a solution is used extremely rare, as the wood can absorb moisture or so much, therefore the dimensions of the cabinet will change, which will lead to the appearance of distillaces or increased fragility.

Damping Ribbon Profiles

Metal profile easy to cut

Ready carcass
Saving framework
The angular cabinet made of drywall is quite simple, since after the formation of a qualitative, durable and stable frame, you can begin to cover it with elements of plasterboard. For this, steps are performed:
- makers are made from drywall, for which parts are cut in accordance with the drawings, and it is recommended to use for these purposes with a hacksaw or electric jigsaw;
- it is desirable to create a cabinet to choose a durable wall plasterboard, the thickness of which will be at least 1.25 cm;
- all edges are processed by the edge planer;
- the finished elements from drywall are inserted into the appropriate parts of the frame, after which they are screwed in special self-draws for the metal;
- sheets are finally fixed, for which it is important to calculate the number of self-tapping screws so that between them was a distance of 20 cm;
- all hats of self-tapping screws are accumulated by 1 mm;
- in areas where shelves will be located, furniture corners are installed;
- mounted rods and lamps;
- according to the existing dimensions, the creation of doors begins, which can be ordered in the finished form.
After the work performed, a full-fledged cabinet will be obtained, but in order for it to have an attractive appearance, you should take care of the use of finishing materials.

Marking of plasterboard

Cutting drywall

Fastening the plasterboard panels

Screwing screwdriver screws

Finished Wall
Finish
Finishing involves performing steps:
- all surfaces outside and inside are covered with high-quality primer;
- the joints are filled with plaster plaster;
- next is the serpent;
- malanted corners are mounted on the corners;
- a putty is applied, which is grouped after frozen;
- it is advisable to make two layers of putty;
- next, the primer is applied again;
- after applying final finishing materials that can be represented by decorative panels, tiles or other materials.
It is advisable to take advantage of the mirror during the trim to improve the comfort of the design of the design.

Perforated corner corner

Cabinet finish
Drawings and schemes
The most important during the creation of an angular cabinet is to build a correct and accurate scheme and drawings. If they have any errors, then build a full, durable and stable design will not work.
Drawings and schemes can be obtained in different ways:
- independent creation, and the process can be done manually or using special programs for the computer;
- order from specialists, which will require significant financial investments;
- search for ready-made drawings, but it is worth using them only if you are sure that they are correct and accurate.
Corner cabinets are considered an excellent solution for different premises. They can be created from different materials, but the most optimal is considered to use drywall, which is sacked by a frame of metal profiles. Such a wardrobe will not require investment of essential means, as well as easy to create. During independent work, their own wishes and the available dimensions of the selected angle are taken into account, so the design will be perfect for the installation site.
Owners of small-sized apartments face the problem of lack of space. Although almost all the corners in the rooms, in the kitchen and the hallway remain empty.
But if in the corner to make a closet you can "kill two hares at once" - decorate the interior and solve the problem of superfluous things. Let's consider the question of how to mount it.
Corner cabinet with your own hands
Corner cabinets can be multiple configurations:
- triangular;
- in the form of the letter "g";
- in the form of a trapezium;
- 5 walls.
Classic - 5 Wall, perfectly fits between furniture. Now go to the manufacturing process.
Work begin with training:
- Make up the scheme;
- Determine the required amount of material;
- Prepare the material and tool.
Required material:
- Chipboard, MDF or boards;
- dowel;
- glue;
- self-tapping screw;
- mirror;
- furniture fittings;
- rollers - you need to choose high-quality, otherwise they will quickly fail;
- profile-silently steel.
Mounting tool:
- perforator, drill;
- roulette;
- building level;
- a hammer;
- hacksaw or electric jigsaw.
Remove the details better to order in a workshop or store, but if you are not afraid of difficulties can be done on your own.
Video: Corner wardrobe.
Select dimensions
The size directly depends on the area of \u200b\u200bthe room where it will be. At the same time there are several recommendations that desirable to follow:
- the upper clothes department should not be less than 80 cm;
- minimum height for outerwear 1.4 m;
- rigel should be located at such a height, so that it is easy to get to it, for this you need to take into account the growth of all family members.
Assembly
To the ceiling, walls and sex, in those places where the walls should be fastened with a metal corner. In order not to skew the doors check all the level. From the blanks we collect the framework, with a responsible approach to the discoloration, the assembly will pass without problems. Rollers are fixed on the door.
Mounted guides and the door is installed. After that, you can fix accessories and equip the internal space of the cabinet:
- mounted partitions;
- rowing hangers, shelves, mirrors;
- finish door handles.
That's all the angular wardrobe-related and functional is ready to serve you faith and true.
Corner cabinet in the kitchen
The question with a lack of space in the kitchen is in the first place. To get a high quality cabinet, it is advisable to build on the following recommendations:
- the cutting parts is better to order specialists, it will help to keep geometry;
- before ordering, you need to make a drawing;
- it is necessary to perform measurements after alignment of the floor, ceiling and walls;
- use only high-quality fittings, it will cost more, but it is worth it.
In the constructive design of the corner cabinet there may be two types of compounds:
- at an angle of 90 gr., Under it you can install a regular countertop;
- at an angle of 45 gr., You can install an angular sink.
The design with a compound at an angle of 90 degrees differs from the standard. The model with such a compound has such structural features as:
- additional inserts that tighten the boxes between themselves and are a facade;
- the ledge in the upper and lower part.
Corner cabinet connected at an angle of 45 gr. This design also has two features:
- Dimensions - if the lower will be 60 cm wide, then mounted - 90, 90 cm.
- The location of the details. In the standard design, the side parts are located between the upper and lower, and then the opposite is the upper and lower between the side. And otherwise install the facade will not work. Under such an angular cabinet and the countertop should be the same form.
From drywall
Installation of the corner cabinet made of drywall begins with drawing:
- first you need to determine the place where it will be installed;
- then make a scheme on which the dimensions are applied and the size of parts, even the smallest;
- we determine the number of drawers, hanging baskets, doors and location where they will be installed;
- we indicate the thickness of the plasterboard, without it it is not possible to make an accurate calculation.
Frame device
On the floor, walls and ceiling we apply the markup of the future cabinet. If you plan to install lamps, we put markings for their fastening. In the guide profile, fix rubber isolation from the other side that will fall on the base. On the lines of the markup lines, the guides using a dowel of nails.
Also Breppy on the applied markup and suspension. Depending on the base, fasteners are selected. For example, a nail or self-tapping screws are fitted with a brick or concrete wall, and nails or self-tapping screws are fitted for a wooden wall. The strength of the entire structure depends on the choice of fasteners.
Then the vertical racks are inserted into the guides and are fixed with the suspension with the help of self-pressing with a press washer. Now you can mount the rigid ribs between vertical racks. It is worth noting that the more such edges will be, the stable will be the design.
The most fortified should be the places where the boxes and shelves are installed.
The metal profile for the frame can be replaced with wooden slats, the main thing is that the wood is dry, the raw tree will give a shrinkage and deformation will occur.
We are slaughtered
Cut the billets from drywall can be electric jigsaw or hacksaw. The edges are treated with a special edge planer.
We set the items in the places allotted for them and grab yourself. Now you can finally fasten sheets, screws screwed every 20 cm. Self-tapping caps are drowning by 1 mm in a sheet.
In places where shelves are dripping furniture corners and lay the shelves that can be made of two glued sheets of plasterboard. After that, we mount the rods, install the lamps.
And only after that you can make accurate measurements and order doors. If the door to order before, then the sizes in fact may not coincide with the original.
Finish
After the design is mounted, it must be created. For this you need:
- close all the joints with putty;
- protect external and internal surfaces;
- stick sulfyan tape;
- on the corners to set paint corners;
- sharpen when the putty dries to stick together, after which they sharpen again;
- again to brands, and after the primer dries, carry out the finish finish.
The finishing finish is done on your taste, it can be painting, and trim with mirrors, in the bathroom you can be trimmed with tiles.
Watch the video: how to assemble a wardrobe with your own hands. Installation video structure.
The corner is a design that is installed between two walls.
With it, it is advantageous to beat free space, and fill the empty angles.
A distinctive feature of such furniture are sliding doors that allow you to save free space and add charm to the room.
Preparation
Form and size
In the form of an angular wardrobe, the coupe happens:

There are standard diagrams and dimensions in the manufacture of corner cabinets and non-standard. Standard schemes and sizes are considered:


As for non-standard products, it is advisable to install them in small, narrow and tight premises. When designing a drawing of a non-standard size of the corner cabinet, its own hands should be borne in mind that:
- minimal depth The cabinet should be at least 35 cm. But the maximum allowable depth should not be more than 0.9 m;
- minimum width The non-standard furniture object should be at least 0.1 m. Then the doors will have a width - 45 cm. Thicken doors will be inconvenient and exploited and unstable;
- height Non-standard products have no restrictions. Depending on the wishes and requirements of people, you can make cabinets under the ceiling. But the optimally convenient height is 2.1 - 2.4 m.
Interior arrangement
 When designing furniture it is worth thinking about the competent zoning of space. Namely, you will need:
- shelves for things. They are the main filling element. They can be made stationary or retractable, solid, ventilated, half or all depth;
- rods for shirts and other short things. Most often they are made of metal;
- hooks for bags and bathrobes;
- shelves for shoes. In the upper part on the antlesol, it is convenient to store shoes in boxes;
- retractable drawers for underwear and socks;
- trousers. On them pants will always be alpashed and ready for dressing;
- rod for ties. It will be convenient to choose the products. They will not bliss and lose the form;
- hooks for belts;
- retractable baskets For small things. All things will be visible in them. They will be convenient to store bracelets, glasses, clock. Inside the basket can be divided into separate cells.
Scheme and drawing

After it was decided with sizes, form, materials of manufacturing and the design of the cabinet, you should draw a scheme with the designation of all internal compartments, boxes, shelves.
Council. If you own a PC, you can make a sketch using a special program. With it, it is created both simple elements of furniture and quite complicated.
When creating a project of future furniture, it is important to consider:
- product dimensions;
- dimensions of doors, base and cabinet cover;
- materials and sizes of the rear;
- interior space - vertical and horizontal sections, boxes, shelves;
- the presence of antlesole;
- the arrangement of fittings.

Materials and tools
An important criterion for the manufacture of furniture is the choice of consumables. For the manufacture of the frame is used:
- natural tree. Wooden products are the most durable and environmentally friendly. Such furniture will delight owners of natural beauty, an interesting texture and texture. But its cost will be quite high;
- MDF. This material is characterized by good performance, durability and affordable cost. The distinctive features of the MDF are its ease of work, environmental friendliness and safety, excellent decorative qualities;
- Ledp.. It is distinguished by practicality, strength, acceptable cost, moisture resistance and aesthetics. Modern manufacturers provide a wide color palette of laminated chipboard. Thanks to this, stylish and original furniture items are obtained.
Doors can be made of:
- tree;
- plastic;
- MDF or LDSP;
- calen glass.
Important. The durability of the designs directly depends on the driving mechanisms. Therefore, special attention should be paid to choosing accessories and guides. Save on these materials is not worth it. It is recommended to acquire products only well-proven manufacturers.
 To build a cabinet on the finished project, the following tools will be needed:
- a hammer;
- screwdriver;
- drill;
- corolnic;
- pencil.
Also before installing, check availability:
- ready drawing;
- furniture shield;
- guides and fittings;
- boxes, shelves, hangers, handles;
- dowels and screws;
- upper and lower false panels.
Manufacture
How to make items?
Having on his hands a project of an angular cabinet with all calculations, you can go to the firm where you will be cutting materials.
If you have decided to make all the details you independently need:
- From the sheet material to cut all the items of the product: walls, doors, shelves, elements of boxes. You can make parts using a circular saw. It is possible to cut it possible to hack, but in this case, chips may appear on the items.
- After that, we process the edges, using a suitable edge ribbon from PVC. Torkering of cabinet elements can be performed using an iron or construction dryer.
- We apply crossing the glue surface to the part and stroke the iron or warm with a hairdryer.
- We spend on the edge with a soft cloth, tightly pressing it to the product.
- Cut the residues of the ribbon with a knife.
Build construction
 Angular cabinet can be built-in or case. The process of assembling different structures is somewhat different.
To build an embedded product, there is no need to install the rear wall and angular ends. The product assembly process will consist of the following steps:
- If necessary, we proceed and align the walls in the room. Kych them or salable by wallpaper.
- In places of future fixtures drill holes.
- We connect all the details of the case.
- Check the work done using the level.
- Next, go to the inner arrangement. We mark the location of the internal shelves of boxes, sectional partitions.
- Install the doors.
Cabinet framework Collecting on the following principle:
- We make markup at the place of installation of the furniture subject.
- We collect a special device from a metal strip and two segments of the board, connected by an angle. Also need 2 quick-pressure clamps. Using the tools data, it is convenient to connect the blanks at a right angle.
- We check the details of the coated and measured from the top edge of 7 cm.
- On the upper and lower parts we make marks for drilling and drill items.
- Using a screwdriver, tighten the confirmation.
- After fixing the sidewall, we place the location of the shelves and we make holes for them. Install the crossbar and screw all the shelves.
- Next, we collect the lower part of the furniture subject.
- After assembling the housing to the back of the cabinet, a sheet of fiberboard furniture cloves is fastened.
- Install the door.
Door installation
 The last step of assembling an angular cabinet with your own hands is the installation of doors. They should be ordered separately in the company that is engaged in similar systems.
Sliding systems consist of the following elements:
- upper guides;
- lower guides;
- top door;
- lower door;
- vertical rack for lateral parts;
- sealing gum. It not only softens the opening and closing of the structure, but also prevents dust;
- sets of the upper and lower rollers;
- cup to secure doors.
- vertical side profiles. They are symmetrical or asymmetric.
- door filler (mirror, wood, glass). Performs a purely decorative function, giving originality to the general interior of the room.
Important. All components for doors should be covered with a protective film that will prevent their damage and the appearance of scratches during delivery.
 Door assembly instructions as follows:
- We have a door in a horizontal position to access it from all sides.
- In the upper part of the vertical rack, we make two holes for fasteners - the lower hole diameter will be 6.5 mm, the top is 10 mm.
- At the bottom of the roller.
- Insert the rubber sealer in the mirror in the mirror and fix it with a profile. We put the seal around the perimeter.
- Next, set the vertical profile with the handle.
- I connect the top profile with the crossbar and tighten the screw with a hexagon key. The screw is not screwed up to the end, as the top rollers will be installed further. Only after that, the screw is dragging until it stops.
- Next, set the bottom profile and tighten it with a hex key.
- We dress the final vertical profile and tighten the screw with the top roller.
- We prepare everything to install the bottom roller, press the spring and gently insert the roller into the drilled hole. Fix all the screw.
- Fix the upper guide. The bottom guide is not screwed.
- We insert the lock for the door and exhibit everything in terms of level. Only after checking that from the outdoor side with the closed doors, the gap is formed the same width, fix the lower guide of the screws.