Build wooden greenhouses - easy and accessible. How to build a greenhouse from a tree with your own hands - step-by-step instructions and drawings Wooden greenhouse scheme for polycarbonate
Fresh early vegetables love many, but their price is sometimes "offshore". One of the options for solving this issue is a greenhouse from a bar and polycarbonate with their own hands. Although they are stationary structures, however, experts claim that they should periodically be transferred from place to place, giving the soil to relax.
In this case, they do not make a stationary concrete base even for severe design, as it is inappropriate. The ideal solution for collapsible buildings is the foundation for greenhouses from a bar. Then the opportunity to restore the soil and observe the correct landing cycles of various crops.
Calculation and creation
If you do not go into details, it is enough to bring down the frame of the greenhouse (greenhouse) from the BRUSEV.
But, she may after a while:
- swell from moisture;
- swallow
- spoiled by insects.
The service life of such a wooden base will not exceed two years.
General
The foundation under the greenhouse from the bar is the base of the light type under the construction of a total weight of 70-120 kg, which can be easily moved to another place. Do not forget only to foresee for the framework.
If you decide to install, be prepared for the fact that over time it will see. How fast will it happen?
Depends on the stability of the soil to excessive moisture. But the installation of the greenhouse on the bar will give the opportunity to prevent this trouble.

Advantage of easy foundation:
- Provides stiffness design.
- Processed wooden foundation will protect the ground from the blur inside the greenhouse.
- It will protect the metal frame from corrosion, due to the fact that the upper part of the foundation will be located above the surface of the Earth. In addition, it will help increase the useful amount of building, provide additional airspace.
- Serves "anchor" for easy construction, providing resistance to wind and snow load.
- The price of the design will not be able to make a hole in the budget.
- Installation of a greenhouse from polycarbonate on a bar does not cause difficulties, it is enough to fasten it with self-draws.
Tip: Before installing a foundation from a bar, and regardless of wood, the material must be treated with modern impregnating antiseptics, which will prevent rotting and saved from insects and rodents. It is necessary to process the tree on a separate platform, excluding the hit of impregnation into the ground.
Technology
To assemble the frame from BRUSEV is not a difficult task, even a schoolboy can cope with her. It is easy to do without compounds "groove-ridge", as it is not fundamentally. The main point of the process will be the installation of a wooden foundation in the ground.
If you install it on the backups, for example, from a brick, then you will have to carry the additional amount of fertile soil into the construction.
- Follow the area on the future foundation and dig a small trench by the designated circuit. Its depth must be at the rate of half of the bar plus 50 mm for a sand pillow. For example, for a bar, a cross section of 150x150 mm depth will be: 150/2 + 50 mm \u003d 125 mm. The width of the trench should be equal to the width of the bar.
- Align the bottom of the trench and confuse.
- Put the finished sand trench as a smaller fraction. Failure it.
- Pour the sandy pillow with water, it will give 1-2 cm shrinkage.
- Put the layer of waterproofing material on the sandy pillow. To do this, you can use or runneroid. The best option is to lay the sheets "trough", the bottom and the bottom of the trench simultaneously.

- Prepare the bars that previously processed the antiseptic.
- Collect the frame on the dimensions and the shape of the future greenhouse. Do not forget to protect the antiseptic all the place of attachment. Use screws, anchors, long nails, wire or bolts for connections.
- Install the finished design in the trench. It is better to do it with an assistant, so as not to break the walls of the latter.
- Align the foundation using the construction level. Ensure that its upper part is raised above the surface by 5 cm. Use for aligning the grounding of the soil, which must be compacted.
- Cover the top of the foundation from the bar with waterproofing and secure it so that it does not move.
Tip: All locations of the connection from the bar and drove with antiseptics. Watch that chemicals do not hit the soil, as the process will occur at the site of the assembly. Use, for example, a litter from a greenhouse film.
Greenhouse from a tree
It is not necessary to acquire a finished greenhouse or a greenhouse from metal. It can be made with your own hands from the most affordable material - a wooden bar. The cheapest wood is a fir, the best of all opposes rot - larch, pine - "Golden Middle".

Tools for processing timber
Pine and spruce bar for greenhouses are treated with an antiseptic to protect wood from rot and insects. There are two types - chemical and biological. So, what to treat the bar under the greenhouse?
Antiseptics can be:
- water-soluble;
- water repellent;
- combined.
Also, the wood can be covered with varnish, pre-stuck it.
Often use folk remedies for the protection of a wooden bar from rot.
- Take the exhaust car engine oil. Before use, it is pre-heated to 70 ° C, and then apply to the bar.
- Use a soldering lamp that burn the wood surface.
- Take advantage of the bitumen, pre-warmed it and pour a thin flowing into a bucket with diesel fuel. After it is dissolved, the composition can be used as protection for wood.
Tip: Pour hot bitumen in cold diesel fuel, and not vice versa.
Instruments
In work, do not do without measuring instruments. Therefore, prepare them in advance.
Water level
Allows you to monitor the height of the foundation. In use simple and does not require any qualifications.
It consists of two plastic cylinders with marks and a connecting tube. For better visibility - liquid tinted, for example, ink.
Building level
It makes it possible to control the verticality and horizontal surfaces. If it has a special turning bubble with the deposited marks in degrees, it can be controlled by corners.
Design
Very often, greenhouses from a wooden bar are made of collapsible, so it is worth marking parts and nodes. Then the next year to collect her will not be difficult.
Prepare materials:
- Wooden bars with a cross section of 30x40 mm and 40 × 60 mm;
- Screws, screws;
- Greenhouse film with a thickness of 0.3 mm;
- Twine, roulette, pegs;
- Metal pipes with a length of about 40 cm and diameter 1 1/2 ";
- Thin rail, short nails.

Have you ever tried to do greenhouses from the bar with their own hands? If not, do not despair.
The following simple instruction will make it possible to do without any difficult tasks:
- Calculate the size of the greenhouses that will depend on the width of the film. For example: Width is 2 m, the length will need two segments, with a slope of 30 °, there will be about 1.7 m, the height is 1.4 m.
- Take the roulette, twine and pegs. Follow the platform.
- Wheel at the corners and the perimeter of the greenhouse at a distance of each other equal to 80 cm water pipes so that 50 mm remains above the surface of the soil.
- Insert the racks from wooden bars.
- Spire from the outside of all the bars about a quarter and attach longitudinal side rails to them. At the same time, the junction must be on the rack.
- Install 2 central racks. Align their tops and attach the skate rail to them.
- Secure the rafting racks, pawing them in place.
- Install horizontal transverse rails from the end of the frame. When the length of the greenhouse exceeds 3 m, set the first vertical rack in the middle, as well as a transverse rail.

Film stretch
- Two canvas of the film, using thin rails and small nails, to the skate rail.
- Attach the film from the northern side of the structure to all adjacent bars and raids.
- Join the bottom of the earth film.
- Make on the side edges of the pockets of pockets and skip the twine through them so that you can raise it from the south side.
- Attach to the bottom of the film cloth of a lumber 30 by 30 mm. The film will be filled with the opening of the greenhouse.
- Lock with small nails on bars and rails cord to seal windows. When closing the greenhouse, the film canvas will firmly facilitate bars and racks on rafters.
- Use the bottom for fixing the bobbin of three cavals, scoring them from medium and extreme racks.
- Object the film ends of the greenhouse.
Output
The greenhouse made of wood is a reliable, lightweight and inexpensive construction that can be installed in any mete of the site and transfer from place to place yourself. In the video presented in this article, you will find additional information on this topic.
Build a greenhouse independently is a fascinating process. First of all, I want to admire with your own creation, secondly, the construction is obtained exactly what he saw in the imagination. And most importantly, the homemade greenhouse costs cheaper the facilities of the factory production.
Design and functionality of wood greenhouse
The design of the greenhouse frame and constructs from Bruusyev. Running runs provide upper and lower racks. The top of the frame consists of rafting legs.
The design is made up of a variety of bars fixed at the same distance from each other.
In one end side of the greenhouse inserted a door frame. It, the walls and roof of the facility are closed with a film, glass or polycarbonate.
On the wooden frame of the greenhouse often stretch the polyethylene film
The greenhouse as a design with a wooden frame, decorated in any transparent, but durable material, performs certain tasks:
- collects from outside the heat radiation and holds it, creating the necessary conditions for rapid growth of plants;
- vegetables from negative environmental impacts: strong wind, snow, pest insects and animals that can break the stalks of plants.
Drawings and schemes of wooden buildings of different configuration
The greenhouse can be a single-table attached to the structure or separately standing on the plot.
The design with a single-pate roof is collected from longitudinal, vertical and transverse wooden elements.
Another choice of greenhouses is built with a double roof, tilted by more than 30 degrees.
The height of the design without registering the roof is 1.5 meters
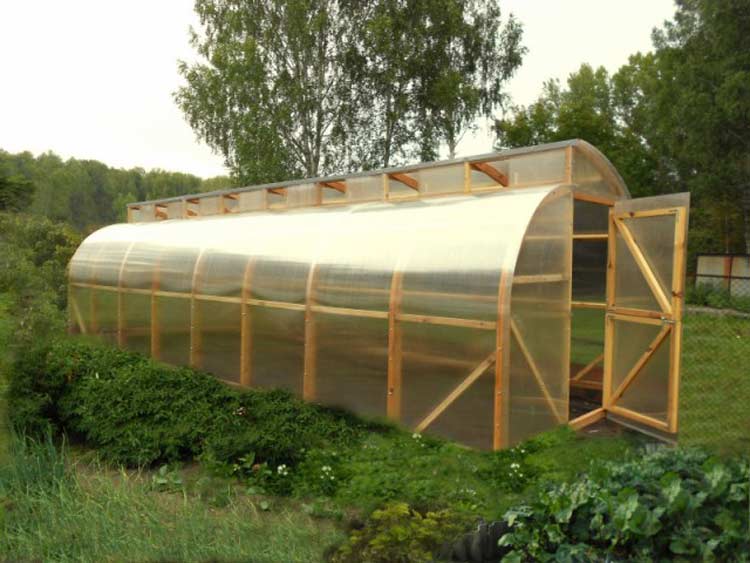
An arched arctic design for growing plants is equally popular. The difference between this construction - the ceiling in the form of an arch, making a beautiful greenhouse and very warm.
To create a carcass greenhouses you can use bars with a cross section of 30 × 40 mm in a complex with arcs
The weight of the tree construction is significant, so it requires installation on a solid base. But some do without it, using boards or pins as anchors.
The ends of the design racks can be wrapped with polyethylene, immerse in the ground and fall asleep with rubble, which will ensure their reliable fixation without the use of the foundation
However, the foundation is important for any structure of large sizes. Especially reliable foundation requires a greenhouse that is delivered on the slope. The plant for growing plants is customary to fasten on the ribbon brick or bondage foundation.
The column foundation will ensure reliable fastening of the structure, although, in contrast to the belt base, is constructed from a small amount of materials
But most often, in order to spend the minimum of finance, and at the same time well fix the greenhouse in its place, use the base from thick bars.
Under the foundation of BRUSIV, crushed stone must be poured and the waterproofing canvas are put
By drawing up a drawing, it is necessary to understand that the functionality of the greenhouse depends on its dimensions. Optimal construction sizes are 3 meters wide and 6 meters long.
The greenhouse should be such that there is enough space and plants in it, and man
The height of the structure is always caused by the growth of man. In order for the gardener to be convenient to care for plants, there should be at least 2.5 meters of free space from the surface of the Earth to the highest point of the roof. In the duplex structure, the height of the walls is usually 2 meters.
Do the greenhouse too high meaningless. It will break from side to the side and will not be able to warm up to the desired temperature.
Subtleties selection material for building greenhouse
In order to build a good reliable greenhouse, you need to choose high-quality material. It should be durable, easy and resistant to external influences.
Wooden framework
Reliable Wooden Bony Greenhouse - the key to its long service life. Therefore, the frame is better to build from larch - a variety of wood, which is not a long time to rot and is characterized by high strength.
In addition to the larch for the construction of the greenhouse, the bars, asleepled from ate and pine, are suitable, but they are less durable. This means that the lumber from trees is not hardwood should be thicker.
Brux for building greenhouses choose carefully, sifting
The carcass of greenhouses should be created from boards or bars with the following characteristics:
- humidity no more than 20%;
- ideal appearance (without rotten and traces of wood damage to the bugs-koroedami);
- smooth surface (chip, cracks and knots - signs of defective material).
The size of the bars, of which the framework of the construction will be assembled, depend on the weight of the underfloor material. In most cases, wooden greenhouses are closed with a polyethylene film with a thickness of 100 to 200 microns, the glass, the density of which ranges from 5 to 10 mm, and a four-millimeter polycarbonate.
Gardeners are more familiar to cover the frame of the greenhouse with a film, rather than glass or polycarbonate
Purchase material
A very important role is played by the choice of observer material for the greenhouse. After all, it is on it that the main function of the greenhouse is: keeping the heat that will provide rapid growth of plants. There are three main underlining material.
- Film. The material is lightweight and therefore does not have pressure on wood. This means that the construction raw materials of the average size can be safely used as racks and rafters, for example, 5 × 5 cm bars. But the base of the greenhouse should be made from the sawn timber with the parameters of 5 × 10 cm, because it will have to experience substantial loads.
The film is able to keep a relatively thin bar
- Glass. This underfloor material needs a reliable support. A glass greenhouse frame racks are more expedient to make a thickness of at least 7 cm with a thickness of at least 7 cm and a width of 7 to 9 cm. And the rafter system is better to construct from the lumber with the parameters 4.5 × 9 cm.
The slim pace pressure of the glass will not stand, so for the construction of a glass of glass greenhouses use a thickness of at least 7 cm
- Polycarbonate. The greenhouse, which is decided to close the sheets of polycarbonate, requires the construction of a bone from materials with different cross-section. For the ridge of the roof and base of the design, a bars with a size of 5 × 10 cm are suitable. The door frame and racks are leaning from wooden elements with a cross-section of 5 × 5 cm, and the door sash and frame frames from the bar with 5 × 4 cm parameters The greenhouses are well performed by the boards of 40 × 180 mm.
Polycarbonate greenhouses are superfined to make only the basis of the design
Preparation for construction
We will build a classic greenhouse with a wooden frame from Bruusyev. Glass is chosen as a covering material.
Necessary materials
For the construction of the greenhouse, it is necessary to purchase the following materials:
- crushed stone;
- ruberoid;
Ruberoid - material for waterproofing design
- 4 bars 9 cm thick, 9 cm wide and 4.2 m long;
- 4 bars 9 cm thick, 9 cm width and 3 m long;
- 12 bars with a thickness of 9 cm, 9 cm wide and a length of 3.6 m;
- 38 bars with a thickness of 9 cm, 9 cm wide and 1.8 m long;
- 2 boosters (semi-cen) with a cross section of 4.5x9 cm long 3 m;
- 4 fauces with a cross section of 4.5x9 cm with a length of 4.2 m;
- 24 fauthes with a cross section of 4.5x9 cm with a length of 2.4 m;
- 28 yokes with a cross section of 4.5x9 cm with a length of 1.8 m;
- 34 fauthes with a cross section of 4.5x9 cm with a length of 1.2 m;
- 102 fauthes with a cross section of 4.5x9 cm with a length of 90 cm;
- 8 sheets of plywood 12x1220x2440 mm;
- 34 m² glass thickness of 10 mm (18 m² material will go on the wall, and 16 m² - to the roof);
- antiseptic composition for wood processing;
- steel cornice;
- 3 pairs of door loops;
- door handles and locks;
- sealant;
- strokes.
Stroke function - ensure reliable fastening of glass on sealant
Instruments
Work on the construction of greenhouses imply the use of such tools and fasteners as:

Stepitary construction of a wooden greenhouse
The greenhouse with a wooden frame, decorated with glass, constructed step by step:
- On the plot make the markup of the perimeter of the construction. For this use pegs and fishing line.
Perimeter Greenhouses advise posting with pegs
- They dig 1 meter depth of 1 meter and 50 cm wide. Floor dumps with rubble, which is carefully pressed. Ruberoid is put on the rammed stones, and it is a foundation made of 4 thick bars with a length of 4.2 and 3 meters. The wooden base is covered with an antiseptic agent.
The base of the greenhouse is put on the rammed crushed stone
- The foundation put the walls of the walls, that is, the bars with a cross section of 9 × 9 cm. On time, these wooden elements are supported by boards. How far there are racks, check the level and segment of the cord.
First put racks, and then go to the installation of the upper strapping
- At the top of the racks fasten with each other, the bars of which are connected by the method "in Polterev". Runs on the side of the design are placed under the installation of the rafted. In the noted points hollow out sloping sockets.
At one end of the bar, it was done up to half of its thickness, on another timber, it was done as soon as possible, but on the other side of the end
- Collect the fronttones of the roof frame. Racks for them are constructed from thick boards. A wooden element that will be a skate, put under the rafter feet into the pre-created grooves. The flatness of the finished skate is estimated by cord. Stropile legs are treated with antiseptic composition.
The first collects the frontaths that are with the edge of the design.
- From the bars of 4.5x9 cm in size, the greenhouse frames make. Details It is important to connect with each other under the same angle. In the manufactured frame create grooves. They insert boards - elements of the canvas.
- Make upper frames designed to install brakes. As panels use only well dried boards.
- Starting with the ends of the frame, on the nails for the finish finish are attached previously collected from the panel board. Later, the same task is performed on the sides of the greenhouse. At the same time, they do not forget that the width of the side panels is greater than that of the end. Plates of the plates put between racks and coated with an antiseptic.
The first thing is collected the end panels, and then - wide side
- In two outlook, which are in the ends of the design, insert simple door frames. The door is completely glazed. The handle is attached to an additional wooden element.
- The details of the fronton are attached a rake of a small cross section, which is called a stroke. The element is covered with a sealant, and in the formed grooves are placed already cut out windows. Their fastening is carried out with thin nails.
Glass is inserted using sealant and strokes
- The roof of the greenhouse is glazed just like walls. As a support, the rake is used, nailed to the sides of the rafted in a special way: with an indent from the top edge to the thickness of the glass blank and the stroke. The glass is inserted by applying the sealant, and is fixed by the strokes and nails on a thin leg.
- A glazed roof, a wind board is nourished to the end parts of the rafter feet.
Greenhouse glazed only half, which makes it original and durable
Video: Greenhouse from a bar do it yourself
Features of the greenhouse finish
If you want to make a beautiful greenhouse, then from the outside of its wooden elements is recommended to treat breathable facade paint. We are talking about water dispersed painting emulsion.
You can apply paint at temperatures above three degrees of heat. Only in such conditions, the coloring composition dries over two days, and then for three days crystallizes.
However, many gardeners say that in the paint there is no particular need. It will not improve the functionality of the greenhouse, but only give the structure an attractive appearance.
As a result of special processing, wood is covered with a protective film
When I want to achieve attractiveness, and the durability of the carcass of the greenhouse, it is worth using the impregnation on the tree. This tool is distinguished by a pleasant color, protects wood from damage by bacteria and will inshast it from rotting.
It is recommended to handle wooden elements and outside, and inside the greenhouse. In order for the means to be a sense, it is required to apply on the surface in 2 or 3 layers, which depends on the financial capabilities of the host of the construction.
Photo Gallery: Greenhouses with wooden frame
 The greenhouse on the mitlider is distinguished against the rest of the unusual roof design.
  Warm air in the toddar structure accumulates under the roof and is output due to the windows, which provides better ventilation for plants.
  Arched greenhouse on mitlider provides an influx inside the design of fresh air
  Arched greenhouse with a frame of wood is often covered with polycarbonate
  Wooden greenhouse can be built of old wooden window frames
  If it is possible, you can attach a greenhouse to one of the walls heated at home - this will provide additional heat inside the construction
  One of the ways to combat the negative effects of the external environment to the greenhouse - painting the frame of the paintwork material, which will restrain the destruction of the design
  Build a round greenhouse from the tree is difficult due to the large number of parts and docking angles, however, the greenhouse looks very impressive
The owner of the dacha is absolutely nothing preventing the greenhouse of the desired configuration based on wood. This material is combined with any observing materials. To make a greenhouse from it, you just need to thoroughly explore the instructions.
For the feasibility of use for the construction of greenhouse wood, skeptics express many counterproofs. They relate mainly to such problems as the gradual destruction of the material (it has enough "enemies" - moisture, temperature differences, biological pests) and its regular deformation during the service life.
And, nevertheless, the greenhouses from the tree are most often erected at the receiving and garden sites. The main thing is to correctly organize and comply with technology. What to take into account when designing, how to make a drawing and build such a specific object - about the nuances of the design and construction of the greenhouse will tell the proposed article in detail.
To tell the reader about all the advantages of wooden greenhouses will not be. Once the choice is made, it means that all "for" and "against" are already analyzed. But something is still needed.
First, the standard drawings of the greenhouse does not exist. It is designed based on the size of a plot of construction, the form of cultures, the cultivation of which is planned to be organized, and "production volume". This is primarily taken into account when determining the optimal dimensions and an internal device, including the degree of automation.There are typical schemes of greenhouses, which should be followed. A full drawing, indicating the exact linear dimensions, is compiled individually in each particular case.
The fact that not every breed is suitable for the construction of the greenhouse, it does not make sense to explain. Even if "experts" say that without difference, it is not worth listening to such advice. The best material, given the specifics of using the object (first of all, the increased humidity inside) is considered to be larch. It differs from many other coniferous rocks in the structure of a special variety of resin. It is its composition that gives the tree strength, and when the material absorbs moisture. For greenhouses - an invaluable property.
Perhaps, only oak can be compared from rocks growing in our country. No wonder from it, high-quality barrels are obtained, but the larch experienced masters are always used to build a lower crown of a church. The only minus of these trees is the high cost of sawn timber. But if the price does not confuse - the best option for the greenhouse.
From cheaper products, you can only highlight pine. It is it that in most cases is purchased for individual construction. Partially get to save, if you focus on a fir. It is only necessary to consider that the structure of this tree is less dense, and it is possible to build greenhouses from only small sizes. Although for the rail (garden) section within 3.5 x 4.5 m, as a rule, it happens enough.

Preparation of materials for construction
In fact, everything comes down to the pre-treated tree. What kind of wood to purchase, solve the owner. But you need to take into account a number of moments.
- Snip prohibit the use of material in the construction industry with humidity< 22%. Но такая древесина будет все равно давать усушку, поэтому лучше потратиться и купить более качественную, обработанную промышленным способом. Можно организовать снижение содержания влаги самостоятельно, но это процесс не одного дня, да и правильно выполнить все операции вряд ли получится.
- Since the concept involves some savings, including on materials, it is advisable to use non-purchased drugs for the impregnation of the tree, but to work out machine oil. In any car service can be agreed. Perhaps and will be given, especially since it does not need a lot. The effect is the same, but significantly cheaper.
- The fact that each workpiece is processed before use (for example, a plane), should not be explained. Dirt remnants should be removed by abrasive. The method of "laundering water" is better not to practice. Then you have to dry again, and it is not a fact that the finished item will not lead.

Someone will seem that the author "signed up somewhat" if he is distracted by similar nuances. Not everyone is equal, if only the tree was without defects. It should be explained that the peculiar feature is a transparent skin. Be something cheap film or more expensive polycarbonate, glass, even with a small frame deformation they will give cracks, breaks, gaps.
Consequently, it is no longer necessary about tightness. With this attitude to the greenhouse, it is possible to do it easier - to plant seedlings into the boxes, put it on the street and cover them with the film P / E. Therefore, it is necessary to pay attention to the humidity of the tree.
Calculator calculating materials for rectangular greenhouse
Features of building greenhouses
For individual sites, the optimal dimensions are 6 x 4 or 4.5 x 3.5. But as already mentioned, there is no standard.

Foundation
The choice is large, but if you focus on the already equipped and planted area, then options are not so much. The author is optimal considers support from the bar. Such a foundation does not imply large-scale construction, which gives a great advantage of this decision.

What to do:
- Drop the ditch around the perimeter of the greenhouse. Depth - about 10 - 15 cm. You only need to see if the roots of garden plants will not be damaged.
- Turn the ground, pour a little clay (fat) and seal again. It turns out the primary waterproofing layer.
- Equip a "pillow". It will take the sand of large fractions (river) or PGS.
- Fit bottom film P / E (Tolstoy). Ruberoid is better not to use. In the ground, he will last from strength 2 - 3 years, and then you have to change.
- Prepare a bar. In this case, in each workpiece, it is necessary to make a rumble at 2 to 3 holes.
- Place the timber in the resulting "chute" and grind separate parts (brackets, plates, corners).
- Check the compliance of the entire assembly of the horizontal plane. If necessary, to align.
- In the hole drive pins. They will prevent (together with the "pillow"), the bruis displacement in soil moves. It is easy to make from the reinforcement bar for 10 - 12. If you think about durability, it is preferably to immerse the pins in the molten tar, and only then install it in the landing sockets. Such superficial protection will protect metal from corrosion.

All specified operations to perform with their own hands under the power of any man, not even especially dismantling in the nuances of construction.
Frame greenhouse
Another advantage of such a foundation - do not have to make a strapping, that is, to mount the support frame. This feature will perform a laid bar. It is easy to attach vertical racks from the same billets. Depending on the size of the greenhouse, a timber and a smaller cross section can be used. Here you should navigate the type of glazing. If a film or polycarbonate is selected, then the load on the "skeleton" will be small.

In the regions with snowy winters, the glass is inappropriate, and that is why. The film can be removed, the polycarbonate on the roof is bent, thereby ensuring the natural gathering of snow. With glass it will not work. We will have to remove or take the top of the top, or take thicker samples. And this is a significant weight, requiring the strengthening of the entire structure, and the rise in the cost of construction. One of the advantages of its conduct of his own hands is economy - loses.
Surface treatment of frame
Just - not quite practical. It is necessary to apply aluminum primer, which is placed in one layer. And then - paint. Preferably, the category is a moisture-repellent. It will cost more, but a couple of years will be launched. When using cheaper composites, you will need to paint every year, or even twice. In the total price about the same.
Everything else is the doors, windows, shelves, lifting the water pipe, light - at the discretion of the owner. In principle, the inner structure of the greenhouse is the topic requiring separate consideration. With your own hands you can do as more convenient. The main thing is to ensure normal conditions for cultivated plants.
The specificity of the use of the structure is also taken into account - whether it is possible to grow seedlings, or for year-round harvest. In the latter case, you need to think about the design of the structures. For example, to equip one more layer of film inside the greenhouse, "fastening" it "to the frame. The same applies to automation. If the owner constantly lives on the plot, then it may not be needed.
The general plan instruction is more than detailed. And on what drawing (scheme) stop the choice - at your discretion, dear reader. The main thing is that everything is working out with your own hands, without any assistance.
A greenhouse made of wood is the best gift for plants that you plan to grow in a closed soil. Durable, reliable, well maintaining heat, ecologically impeccable material - wood. Under the condition of the right choice and processing of wood, the greenhouse from the tree will serve it no worse than the most expensive purchased option. And it does not matter whether you will make a coating of polycarbonate, glass or film - a wooden base will withstand any load.
What greenhouses can be built from wood?
From the tree you can build any greenhouse, which you want. The main thing - there would be skill and financial opportunities. Given that wooden "waste" are available on many household plots - if desired, the costs of greenhouse can be significantly reduced.
Consider more - what kind of construction is better and easier to put on your site.
Homemade wooden arched greenhouse and dome design are projects that are available to true talents in the field of wood work. Greenhouses of this type (see photo) The average gardener is easier to purchase in the store than to do it yourself.
Therefore, we will not consider the details of their manufacture and install. Let us dwell on the simpler and affordable options that each gardener can do - wooden greenhouses "house".

We offer you two real projects from a conventional wooden bar, which can be made of well-made materials.
Features of the installation of foundation
Various types of foundations and features of their installation were already considered in detail in the article "". In the manufacture of greenhouses from a tree, it is necessary to consider the main thing - the weight of the wooden structure is very impressive and, accordingly, it should stand on a solid foundation.
Best of all, in this case, the belt type of foundation is suitable. Raise it above the soil level of about 30. And do not forget about the reinforcement, which will also strengthen the strength and prevent sending the entire design.

How to make a classic wooden greenhouse?
New is always well forgotten old. We propose to build a standard wooden greenhouse that stood in areas even in those days when there were no construction "delights" in the form of profile pipes or metalplastic.

The design of the greenhouse frame, based on racks from a bar of 90x90mm. Runs bind the racks from above and below. On top there is a rapid system of a two-tie roof. Two doors in the end walls. Between racks up to half go deaf panels that are collected from thick boards and conclude in the frame. The upper part of the walls and the roof is glazed by ordinary silicate glass.
To implement this project, you will need materials: Brew with a cross section of 90x90mm
- 4 things. 4.2m long;
- 4 things. 3m long;
- 12 pcs. - 3.6m;
- 38 pcs. - 1.8m.
Half a segment of 45x90mm
- 2 pcs. 3m long;
- 4 things. 4.2m long;
- 24 pcs. - 2,4 m;
- 28 pcs. - 1.8m;
- 34 pcs. - 1.2m;
- 102 pcs. - 0.9m.
6-8 sheets of plywood or other sheet material - 12x1220x2440m. Glass thickness about 10mm - by 18 sq.m. walls and 16 sq.m. Roofs.
And also: Construction nails, antiseptic for wood, roofing eaves, handles and locks for doors, door loops (3 pairs). Perhaps - something will have to buy in connection with your mistakes on one or another stage of work.
Tools: hammer, square, level, measuring roulette, screwdriver, circular saw and a piece of cord.
Foundation and framework of the frame
The greenhouse is placed on the ribbon foundation. It is assembled and stacked on the waterproofing layer the lower part of the carcass greenhouses. Carefully impregnated with antiseptic. On the bars of the foundation, wall racks are also set by section 90x90.
When installing, use additional boards as temporary backups. Vertical and straightness Check the level and cord.
The racks are connected on top of the strapping in a parastron from a bar. In the side runs, make marking on the installation of rafting beams, extend inclined sockets.

Fronteon frames are harvested using racks from a thick board. Riding the skateboard, set the slingful bars into the pre-cut sockets. Due to this from above, it will be easy to put the glass panels.

The rafters collect on nails with a length of 100-150mm. Using the cord, check the flatness of the rods. Mark the entire design with an antiseptic thoroughly.
Installing wooden panels and doors

In the details of the front, install the stroke (this is a rake of a small section). Loading it with sealant and insert in the resulting nests in advance cut out windows. Similarly, the windows are strengthened outside and fixed with thin carnations.

Similarly, placed glass and roofs. The support is the rail, nailed over the side surfaces of the rafting beams - with an indent to the thickness of the glass and the stapper from the top edge. The glass "sit down" on the sealant and fix the stroke on sealants and subtle nails.
It is desirable to work with glass. Hands protect with thick mittens.
After glazing the roof to the ends of the rafter beams, bring the wind board, which will give the work a finished look.

Project greenhouse from a wooden bar of Mitlider type
This greenhouse project can be conditionally called the "greenhouse by mitlider", because at the continuation of the construction of the rafter there are also ventilation windows. 4 window openings are closed in pairwise two rectangular windows. Due to the best regulation of air flows for plants, the most favorable thermal regime is created.
The carcass of the greenhouse is made of wood, is covered with a film or glazed. Additional stiffness is attached to the corners. Reliable timing will ensure the strength and durability of the design, which will be in contact with the wet environment.

Start of construction
Construction begins with the preparation of materials. To the greenhouse of this type must be purchased:

Do not forget as well: door hinges, handles and locks, antiseptic, construction nails, metal brackets, screw screws on wood and narrow polyester tape.
Marking for a belt foundation
With the help of a cord, roulette and pegs, markup is made for a ribbon foundation.

In the simplified version - you can dig a trench around the perimeter on the width and depth of the bayonet shovel, fall asleep with her rubble and tamper. Next - waterproofing is done. From the bar with a cross section of 100x100 fold the foundation frame, it is connected to her toleneese and carefully soak the antiseptic. Rama is placed on waterproofing.
Conductor manufacturing and wall assembly
To assemble the walls, a conductor is made: a full size wall is drawn on a flat base, the stops are installed in the right places, which will hold the wall beams in the desired position. Thanks to this, the blanks can be cut off exactly in size and correctly connect. Face walls are going to the same way. In one of them put the doorway with a height of more than the side walls. In the opposite wall is also an overestimated design, but without a door.

Installing rafters and plywood books
Sleeping beams are put on the end walls, which will define important planes of the roof rods and a vertical plane for ventilation windows:

Scroll thoroughly discontinue with cord and level. After recovering all the planes, install the remaining rafter farms:

So that the installation passed exactly - tension between the extreme rafters of the cord, and collect farms in advance in the conductor.
To strengthen the design, it is convenient to immediately connect the farms with two beams that immediately form window pastes. Upper beam Install under long rafting beams, lower - on the place of the joint of short rafting beams with farm risers:

Secure the entire design of the roof of plywood nitsami, as shown in the diagram:

They are installed on screws, under which you need to drill holes in advance. Under the heads of the screws is made in the zenkovka holes.
The books of the books from the edges of the roof beams should be as small as possible so that then you can more accurately pull the film.
After installing the books to the ends of the upper rafting beams, a wind board is nailed, which will finally issue the top edge of the roof. Later on the lower edge of this board will be installed a loop of ventilation windows.
Assembly and fixation of window frames
For assembly, the frames are used 30x50mm rails. If your high-level carpentry skills are collecting the parts of the spike groove. Otherwise, the rails are collected in the ends on nails or screws. The holes with a diameter of 0.75 are prepared for the fastener diameter, which will be used.

The windows are tightened with a film. The loops are crashed into the desired edges of the window frames and the windows are put in place.
The technology is the same as when installing the window. Additional strength can be strengthened by plywood nitsimi:

You can also put 3-4 crossbars from an inch on-board jack with door crossings.
The assembly is better produced by screws, pre-drilling holes under the fasteners by 0.75 from their diameter. At the end of the work, install the handle.
After the greenhouse frame is completely ready - cover it with a polyethylene film. The cut is better to pre-make on paper to avoid the lack of film in the most unexpected places.
The film is attached through a polyester ribbon - a stapler with metal brackets. It is not forbidden to secure the film by any other way that it will seem more convenient to you.
You can cover the entire greenhouse with a film from two sides. This will give an additional layer of air, which will reduce the daily fluctuations in the temperature in the greenhouse, but it will slightly worsen its light-permeability.

This type of greenhouse is well suited for glazing.
To make a high-quality design - do certainly, first draw the drawing of the greenhouse from the tree on paper with all the marks in size and consumption of material. The finished project and video will help you not only correctly establish a structure, but also to calculate all expenses in advance.
The carcass for the greenhouse can be performed from metal, wood and even PVC pipes. In this article, we are step by step, we describe the construction of greenhouses from the tree with their own hands. Such a frame will cost much cheaper than metallic, and with proper operation, it will last much longer than the design of PVC.
Greenhouse size and shape
To accommodate two beds and the device tracks between them, it will be enough to build a greenhouse width 2.4-3 m. Length The structure depends on the area of \u200b\u200bthe land plot and the planned number of plants. The optimal length is 6 meters. The greenhouse of this size is quite enough to provide fresh family vegetables from 4-6 people. Since cucumbers and tomatoes require different moisture and temperature regime, a separate greenhouse will be required under each of the crops.Most often for greenhouses, the shape of a trapezoid with a duplex roof is used. Wherein height Constructions for placing racks and curly plants should be 1.8-2 m.
Does the foundation need?
Stationary glazed greenhouse or construction from heavy window frames is better to install on small breeding Or a pile foundation with a height of 40-60 cm made of brick or concrete with a sandy pillow. Over the soil level, it must rise by centimeters by 30. The lower bearing of the greenhouse bars in it is attached to metal corners, poured into the base of the foundation. The greenhouse on such a foundation will be warmer and suitable even for the earliest landing of vegetables. If necessary, it establishes furnace heating with chimney passing under racks.During the construction of a lightweight greenhouse, a film, the foundation can be replaced. brusade strapping. Such a structure can be easily transferred to another place or even transport another area.
Stopping the brusade strapping right on the ground is not worth it - the tree is buried too quickly. Therefore, the distance from the soil to the bar must be 4-5 cm. For fastening the strapping along the perimeter of the frame in a tightly rammed land, pointed trimming are clogged metal corners 800-900-mm long. So that the metal in the ground does not rustle, the corners are preferably covered with primer. A layer of rubberoid can be paced for protection against moisture.

Foundation from Bruus
Then the wooden strapping is screwed to metal corners on the anchor bolts, and the design is clogged into the ground. In the future, the gap between it and the soil falls asleep the earth and tamper. Installing the strapping can be on bricks, but this design will be less durable.
The strapping should be strictly horizontally. After all, in the case of the skew of the structure there is a high probability of its collapse. Therefore, we check the horizontal styling of the strapping using a construction level.
Required materials
For the construction of the greenhouse, it is better to use pine or larch. These breeds of trees are most resistant to moisture and fungi. Bruce from birch or aspen in a couple of years will be swam. In order for the design to stoke as long as possible, and the tree did not rot, before assembling the barcas bars it is better to cover with spent machine oil, an antiseptic or primer.For the framework we will need:
Block for strapping (greenhouse base) with a cross section of 100x100;
Bar 50x100: We will use it for racks;
Film or glass for the trim;
Boards or slate for the device of sides of beds.
The greenhouse itself at the garden level is also desirable to sew the boards - it will make it stronger and allow you to save on glass or film. Polycarbonate greenhouses make arched. Produce from this material the structure of the trapezoidal form is irrational - there will be too many trimming.
Council. When using a non-disassembled tree, the greenhouse may be a story. You can avoid this by replacing the bar 100x100 with pair bars 100x50, bonded by self-drawing. This option will be more durable.
Build frame. Step-by-step instruction
For greenhouses of large sizes, it is better to prepare a detailed drawing (see photo).

Drawing of greenhouse
1. The minimum corner of the roof of the greenhouse is 30 °. In areas where a lot of snow falls, the roof slot should be sharper. Of course, it will require more consumption of materials, but the likelihood that the snow fur coat will sell the roof will be minimal.
2. The greenhouse can be collected from individual frames. In this case, it will make it easier to repair it. Yes, and the frames from the roof can be removed for the winter.
3. We make a markup: I fill 4 kolaska to the ground and stretch the twine between them. All parties align the construction level. Check the horizontal and verticality of the location of the bars can also with the help of diagonal twin extended between the angles.
4. Corner racks Brepim to base with metal corners or brazers (wooden pins).

Fastening BRUSEV
5. Vertical transverse struts Located in a step of 50-70 cm. They are also attached to the strapping using metal corners. If you are not acquainted with a carpentry business, you can use a liveli for a compound.

6. For the frame during assembly, it is not overwhelmed, all the racks are additionally enhanced by hide (see photo). After complete installation, the greenhouses are removed.

7. For a greenhouse 6 m long in the center of the structure, two intermediate racks should be provided at a distance of 2 m from each other. They will be laid spacers under the upper lags.

Intermediate racks in the center of the greenhouse
8. To give the greenhouse, the strength between the side racks is better to provide ribs (diagonal crossbars).

It is possible to strengthen the design using diagonal crossbars
9. rafters - a system of inclined beams (legs), racks and pods for the roof - assemble on the ground on an even base. In order to collect them perfectly smoothly, the cord is stretched between extreme rafters. To strengthen it is better to immediately connect the farms with transverse beams. (Farms are called supports collected from bars, which are stacked by rafting legs).

Slinge system
10. Using metal corners, the finished lines are fixed on the racks.

Fastening rafted to frame

Connection timing
11. In the greenhouse install 2 doors In the end walls. The distance between the door supports is 80 cm. They are enhanced by additional planets. Door handle is better attached to an extra board attached to the main bar.
12. Ceiling lag and windows are mounted on clamps or self-tapping screws.