The lamp for the kitchen do it yourself. Shade for the kitchen with their own hands: Practicality, simplicity and individuality
When the kitchen repair is completed, a new furniture and technique is installed, stylish curtains hang on the window, and the purchase of such an interior component, as the lampshade was not planned - should not be desirable. With your own hands, you can make an exclusive model that can largely exceed the factory analogues and create an original design, because the originality is set, as a rule, small accessories or decor elements.


The design of the future product depends largely on materials for its manufacture. The lampshades in the kitchen can be made from any means available at hand. For the manufacture of kitchen lampshar, you can use with your own hands:
- Metal, plastic and ceramic dishes;
- Cutlery;
- Newspapers, wallpapers and paper;
- Threads;
- Ribbons, lace, textiles;
- Chinese or skewed sticks;
- Milk packages;
- Foil;
- Clothespins;
- Old audio casseurs;
- Vinyl records;
- CDs;
- Glass and plastic bottles;
- Molds for cupcakes;
- Knitted napkins;
- Wire and beads;
- Tennis balls;
- Old light bulbs and more.
The downtown for kitchen chandeliers can be performed in any style that will most suit the kitchen design, and in any technique, be it crochet, and papier-mache.
Before taking the case, you should pay attention to the advice of more experienced people. First of all, you should not forget that the kitchen is the room of increased moisture content and pollutes. And if I want the man-made product to light a little longer than a disposable trinket, you should consider the choice of the material more seriously.

The main rules that should be adhere to with the selection of material and techniques for the manufacture of one or another lampshair do it yourself:
- Energy saving lamp - a safe solution. If flammable materials are selected for making lampshar, it is strictly not recommended to use conventional incandescent bulbs. It is better to make a choice in favor of energy-saving lamps that are not heated to a dangerous temperature.
- Valya simplicity.Even if there are such inexpensive materials such as paper or plastic bottles for the manufacture of the chandelier, it does not give a product of the right to be performed vulgar.
- Accuracy in work.When working with any materials or objects, you should be as neat as possible, since the slightest awkward movement can lead to a damage of the product or injury.
- Light - Symbol of the Sun.Light, the source of which will be covered with the lamp manufactured by the lamp, is the symbol of the sun. It is this rule that it is recommended to be guided when choosing an image of the future product, since the lamp should dispel the light, exaggerating it, and not being up.
- Dust.The accumulation of dust on the lamp is able to reduce the light several times, besides, even a slight layer of dust on the lamp looks like a huge cluster of dirt. It is this restriction that is a significant obstacle in choosing materials. However, if the lamp is needed for a festive room design, it can be made disposable.


Several creative ideas
In order to make your own hands lampshade for the kitchen, it is important to accurately know the technology of manufacturing you like. Here are some key ideas that can help you in the manufacture of lampshair do it yourself:
Laptop label
If you are interested in crochet or you inherited a grandmother with a lot of knitted napkins, - do not hurry to throw them out. You can take the base to the desired size of the air ball and decompose on it the peaks moistened with plow glue napkins in any selected order. In this case, the napkins do not have to be one size, a single ornament or color. After the glue is completely dry, the product is removed from the base, the wire is started in the central hole of the main napkin and the cartridge with a lamp is attached. As a result, you can get such an original lampshade, which will decorate the kitchen in your apartment or country house.


In the same way, you can make lampshade from threads, lace or tissue pieces.
Abazhur of fabric
If we take a wire frame as a pattern, on the pattern, the curtains can be sewed with an elegant lampshade, which will fill the kitchen with comfort, harmoniously fit into the interior and give the room a special charm. You can decorate such a cute product with lace, rushes, bows, ready-made decorative elements.
Also on a wire frame you can make lampshade from ribbons, threads, lace or wallpaper.


Abazhur of dishes
If you have been in the collection a souvenir cup with a saucer of large sizes, drilled exactly in the center of the product hole for the wire, you get ready-made lampshade. Also, for these purposes, a ceramic flower pot can be used. However, based on old believers, there is an opinion that an inverted vessel in the house is not a good sign for his well-being, but remember that all the signs of truth are exactly as much as you believe in them. Analogue can be a kitchen lamp shade in the style of "Heavy" from kitchen terk.


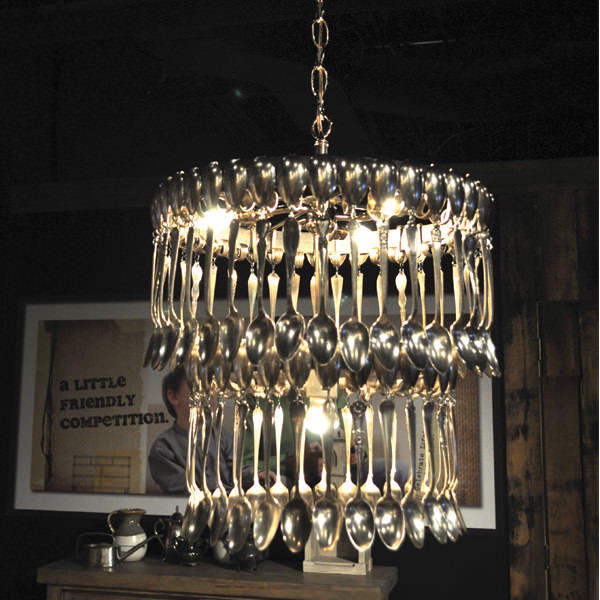
Lampshade from cutlery
Often, as a gift for a wedding, we get a lot of cutlery, which lie in the package for many years and remain unexplored. By turning on the fantasy and taking advantage of design ideas, you can get a real original lampshade for your kitchen, which is also resistant and durable.

Acceptable in narrow circles Style "Heavy" gives rise to the exquisite accessories

Similar methods can be made with their own labels from disposable dishes.
Even if you take exactly any of the ideas and you do not have a desire or opportunity, you can use them in part, taking the basis of the method of manufacture or the material itself and do something special. Here are the main, most common ideas that can be a fundamental factor in choosing a model and the manufacture of the lamp. Good luck!
Luster lamps for the kitchen: photo of original ideas


.jpg)


Luminaires are not just a source of artificial lighting in the interior, but also an important decor element, without which the composition looks unfinished. You can create bright accents by making a ceiling for chandeliers with your own hands, because it is quite necessary to spend huge funds for the purchase of designer models. About the nuances of work - read in our article!
Where to begin?
When creating a ceiling, you will consider with your own hands that the use of a conventional incandescent lamp is not the most successful idea. It is better to stop on energy-saving light bulbs, which are not so hot and, accordingly, do not heat closely located parts, thereby ensuring the safety. In addition, they are quite economical, which allows not to spend money on electricity, and also durable.
Choosing a material for a ceiling, focus on both aesthetic properties and specifications. First, it should be eco-friendly, preferably, natural bases that will not disseminate unsafe substances with minimal heating.
Secondly, the ceiling should not collect a lot of dust: some surfaces, such as fabric, are more prone to it than others. Choose an option that is easy to care is easily wiping with a damp cloth. This does not apply to paper, but due to the cheapness and simplicity of the material - such a chandelier can always be replaced by necessity.
Thirdly, the chandelier must well cover the room, not the darkening of it. However, for some interiors, muted light is suitable: in a nursery, bedroom or living room for an intimate atmosphere. In such cases, you can show a fantasy, making a lampshade, creating light patterns in the room. You like the author, you can embody any of my decision - and this is probably the main advantage of self-made plafimon.


We select the plander under the style of the interior
The chandelier can become a bright emphasis in the interior or its invisible, but important addition. With any choice, the ceiling must harmoniously approach the stylistics of the room.
Unfortunately, you can not create with your own hands any product. For example, the classics are characterized by elegant crystal, glass or metal products that will not work independently. But there are other options.
Minimalism
The laconic and a few minimalism composition can easily break due to one unnecessary detail, which in such an interior will be especially noticeable. Regardless of the type of room, there will be simple geometric shapes, no suspended elements, as well as monotonous color gamut, which is included in the common palette of space.
Metallic framework structures are well suited, which are slightly darkened light, or paper plaffones without decorative parts.


Loft
This is where you can really get roaring, so it is in the Lofst interior, in which homemade products from unusual materials will organically look. It is not scary if the appearance of the chandelier issues their non-productive origins, because many details of this style, as important dignity, put forward their imperfection.
Even familiar items are allowed for plafimons: transparent banks, metal devices, frames from thread or wire. If the height of the ceilings allows, a long suspension chandelier with a minimalistic cap will be an excellent option.

Scandinavian style
Despite the northern origin, this direction in the interior looks very cozy and modern. Minimalistic in its essence, Scandinavian style prefers natural materials, as well as light, mostly white, color gamut.
The options for the design of the chandelier are a lot - the style is not very limited in forms. But not everything can be created independently. Fit spherical, air models from threads or paper.


Provence
Come to us from the distant French villages, Provence prefers simple cozy aesthetics of natural materials, floral patterns, as well as bright shades. Approximately such a chandelier flaf should be.
It appropriately looks products from fabric or lace rounded shape. With a small level of skill, you can make a glass cup with decoupage, thereby saving money - after all, despite its simplicity, authentic provence involves considerable costs during arrangement.


Paper beams
Despite the fact that the paper is not considered the most reliable basis for lampshadows, but simplicity of work with it and noticeable cheapness made this material very attractive among the needlewomen. In addition, with its help you can update the interior at least every month, creating new crafts.
Origami-Plafones
Who was not fond of origami in childhood, constructing animals or complex modular products from paper? Now you can apply your skills for more practical purposes. However, even people who first encountered this occupation will also be able to easily master it and make origami-plaffers for chandeliers with their own hands.
These are concise structures of different geometric shapes that perfectly fit into the modern interior. It is not recommended to use very durable paper, as it misses the light well.


Curly products
However, lovers of a more diverse decor can create cepions from paper of a wide variety of forms. For example, surround the lamp with paper houses, butterflies or envelopes.
The appearance of such a ceiling depends also on the surface - one-photon, patterned, newspaper, and so on. Combining these materials, you can achieve completely different effects.

Chinese lanterns
If you have a paper lanterns at home, do not rush to use them as an independent ceiling, because it is an excellent basis for other experiments.
It can be placed by all anything, but to avoid a homemade species - we suggest decorating a ball with small paper scales or long "rugs" that will be elegantly hanging down to the bottom.


Plafones from thread
Various threads and ropes are an excellent base for lampshar, which is suitable for creating an intimate atmosphere due to the effect of dimming.
Elegant cocoon
It is very simple and at the same time stylishly looks like a round ceiling of arbitrary twisted threads. In order for such a material to hold the desired shape, it is fixed with glue on the balloon, which, after the end of the work, is delicately removed.
Although the field for creativity is here and small, but you can always experiment with flowers, which is crowded a few shades.

Knitted plafond
It looks less chaotic such a solution from threads. The main conditions for its manufacture - the ability to knit or the presence of a grandmother, which will kindly contact your napkin. The finished product must be placed on any basis - a metal frame, a transparent container, a Chinese ball. Similarly, with the first option, you can fix lampshade on a balloon with glue.


Plafones from bottles
Stylish chandeliers for premises of different types can be created even from bottles. In this case, it is implied both glass and plastic containers.
Glass bottles or banks
The principle of working with such a basis is simple: Choose the most beautiful and hiding in it the lamp. Empty bottles or small jars can be used. You need to make sure whether the glass required for the room is missing for the room, and in case of disadvantage, you can apply multiple sources.
If the chandelier plays more decorative function, the bottle can be covered with acrylic paint or painting.


Plastic Plafones
Plastic bottles should not be used in untouched. But to make cheap parts for homemade ceiling, quite real.
Luxuriously (as far as this word is generally applicable to plastic) there are chandeliers from the bottom of the usual bottles, which in shape resemble a flower. They fasten with a wire for better fixation, creating a variety of compositions.
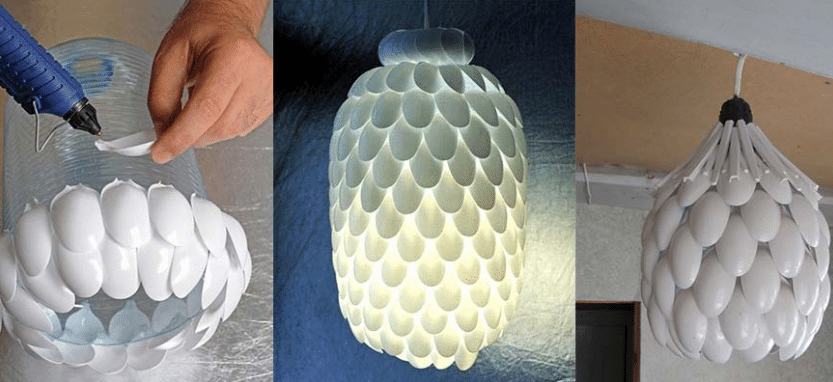
Another option is a 10-liter eyecillage, plastic spoons, which lined up in several rows, as if scales. The design will skip muffled, but uniform light that will additionally decorate the product.


Metal elements plaffers
Pretty unusual solutions for chandeliers also offer metal products. Fortunately, it is not necessary to make them independently, so that special skills of working with metal will not be required. But the spectacular appearance is provided anyway.
Kitchen appliances
Do not hurry to throw out old spoons and forks - they will be useful to you to create an original design. Having placed a dozen devices around the lamp, you will get a great ceiling chandelier, which perfectly fitted on topics.
The same effect can be achieved by using, for example, a grater. In general, experimenting will work with any devices, especially if your interior is decorated in the Loft style. Just follow the metal parts not very much.


Dome of gear
If you want to add a little width in your life, make a ceiling for chandelier from gear. They can be reached, disassembled the old bike, or buy on the flea market. But the result unequivocally worth the effort!


We looked at the features of making plafoons for chandeliers with their own hands and the most popular solutions from various materials. But interesting options, of course, much more - proof of which is our selection of photos. Happy viewing!


The stores present a huge range of lighting devices for any room. But the chandelier with their own hands to the kitchen or another room will be a truly exclusive version of the home decor. There is no such thing to find another, and the process itself will bring pleasure.
Materials and security
In the process of working on a particular model of a homemade chandelier will be used to be used, and therefore, the total cost of the device will be minimal, but the exclusivity of the product is maximum. Selecting the material, such moments should be considered:
- It should be non-flammable. Still, it is used to create an electrical device, and there is a risk of fire.
- Determine which type of lamp will be used. Thus, luminescent and LED sources are practically not warm, but the heat lamps and halogen - on the contrary.
- The feasibility of use. It is worth remembering that it is not always possible to make a homemade from the first time, the material must be chosen such that its damage is not a problem.
- Since the chandelier will be used in the kitchen, the material of the lamp and ceiling should be easy to care, and the elements of the lamp are removable.
- A homemade chandelier can not hang on the electrical cable, as far as it is either either. For hanging, you should use chains, special tubes (soft or rigid).
Most homemade chandeliers are made in the form of a single plaffron or a closed lampshar. Therefore, it is not worth it for too much the light stream. Such a lighting device will definitely become a central element in the kitchen and attract attention, but it will necessarily need to provide additional light sources.
Homemade chandeliers give little light, although they can be very thematicFrom thread
This material that is at hand or can you buy it quite inexpensively, will help create an original light chandelier. If you choose white threads, then the chandelier is easily able to paint in any color. The chandel size can be any, it depends on your desire. The appearance of the product is simple, which will allow it to enter it into the interior of any kitchen, but at the same time the original one.
Important! The base of the lamp is a thread, you can use thick cotton, but not woolen.
The paper needs: Threads, PVA glue, brush, round inflatable ball of the desired size. Creation Procedure:
- Inflate the ball, at the bottom of it to draw a circle.
- Glue pour into the container in which it will be convenient to immerse the threads.
- To wind the threads pre-impregnated in the glue, in chaotic order, bypassing the circle zone, which was drawn in the first step. Simplify the process can be punched a bottle with glue closer to the bottom and turn thread there. So it will be evenly wedged with glue.
- When the winding is completed, the ball should be suspended and sucking the thread. Depending on the size and winding layer, it will take about 24-48 hours.
- When the future lampshade is completely drying, the ball is tedious to extract, pre-blown.
- It remains only to select the size of the cartridge and connect the wires to it.
 Step by step making chandelier
 Tip! In the large kitchen, 2-3 looks good, or even more such small luminaires. They can highlight certain zones. The powerful light stream is difficult to get from them, but their effects are at a high level.
By the same algorithm you can create an original openwork chandelier. The main material is ready-made knitted napkins. They are soaked in the glue for 10 minutes, after which they are pasted on the ball. They dry longer, about 3-4 days. A similar chandelier can be made from one large round napkin and from individual elements of any form. The second option looks very original.
From wood
Such chandeliers are extremely simple in the creation, but the appearance of their extremely non-standard. They are not suitable for every interior. It will be possible to enter without problems in the kitchen decorated in the style of country in oriental style. The kitchen should be big, as to cover the beauty of this chandelier in a small-sized kitchen will not be released.
In the process, you can use both massive bars and a vine and even bamboo sticks. Options for homemade chandeliers of wood:
- To drive together in the shape of a cross 2 bar and placed on them cartridges. This is the easiest option to be implemented, even without having special skills to work with the tree.
- It is useful for an old wooden wheel from rifts. If such a rarity is found, then the chandelier can create a very original one. The wheel need to sand, cover with varnish or paint and attach suitable plaffones, mount the cartridges.
- Ceiling lamp made of untreated branches. A very modern option that any eco-interior can be supplemented. The algorithm of work in this case is similar to the process of creating a chandelier from threads. Only on the basis of the ball is not a yarn, but branches are glued. It is necessary to do it so that every new branch has a plot of support on the ball and on the already glued.
- Another version of the branches. We need thin, different lengths. They drill holes through which the wire passes, with its help the mounting to the round base is carried out. Cartridge is installed in the center.
 Original Chandelier of Country Style Chandelier
 Important! Any wooden elements, be it branches or a bar, you need before or after creating a chandelier to cover with varnish or paint.
From glass canas
Such chandeliers have an original look and are absolutely safe. Glass - heat-resistant, so even incandescent lamps are allowed in such chandeliers. For work, we need banks with screwy lids. Step-by-step algorithm for creating:
- On the cover to make a hole, the size suitable under the cartridge, which will be used.
- Insert a cartridge with a light bulb and tighten the lid.
- Connect.
For such a lamp, it is necessary to provide suspension, it may be a chain or rod. The chandelier created by this algorithm may be:
- With one plastic bank. Such models are located on the ceiling in the number of several pieces.
- With several ceiling. As a base, a wooden board or plywood is opposed to securing them. They can also collect "beam", which will look even more unusual.
- Glass is easy to decorate. In the process, you can use: the twine, a special heat-resistant decorative composition, paint. The last option will help create imitation of stained glass.
 Easy and originality - chandelier from cans
 By a similar algorithm you can make chandelier from:
- Glass bottles. In them, the cartridge starts through the neck, the locking element is a cork plug. The bottom must be removed and handled the edge to the edges are not sharp.
- Graphics. The process is similar to the previous one.
- Cups and saucers, plates. For the kitchen, such a thematic chandelier is a real find. Do not forget that ceramic cups are heavy enough, so you need to provide a suitable base and fasteners of the chandelier itself to the ceiling.
- Forks, spoons. In the handle, they are drilled by holes, they have a wire, which is attached to the perimeter to a wooden rectangular or square tree bruc. Cartridges are mounted in the construction center.
- Colander, pan, grates, metal bowls, and in general, any kitchenware, which is not operated.
From fabric
The fabric is a convenient material from which you manage to create original and intricate chandeliers. The procedure for creating a tissue lampshar for a chandelier is approximately the same, specifically:
- Need reason. They can be an old lampshade, any subject of a suitable form. If the base is metallic, it must be examined for the presence of rust spots. If they are, then clean it. If this does not make a fingerprint on the fabric, it is impossible to remove or paint.
- Make glue. Need a composition that is used to stick fliesline wallpaper. Powder should be divorced according to the instructions when the glue is ready to immerse the fabric into it, leave for 10 minutes.
- Remove the fabric and put on the base. It is advisable to make folds over the surface, so the texture of the finished product will look original.
- Leave to complete drying at room temperature. Depending on the material density, it will take 1-5 days.
- The next step is staining. If the folds turned out a lot, then the tassel will be disadvantaged, it is better to use a sponge. If necessary, apply several layers.
- It remains only to create a desired decor. The process can use: artificial flowers, leaves, branches, ribbons, rhinestones, sequins. Here, the main thing is not to overdo it, because in the kitchen there is too decorative chandelier for nothing.
 Fabric chandelier maybe such
 Important! Such chandeliers give little light, as their lampshade is obtained dense. It is convenient to place them on the dining area, it will help to highlight this area. Creating additional lighting is a prerequisite.
Make a fabric chandelier is much easier. Finished lamps of lamps, rings, hoops of their metal will come to the rescue. Cutting their cloth is not more difficult than wrap a gift. Using light tulle, it will be possible to create an original effect and dispersion of light.
From beads or beads
From ordinary wooden beads or beads, you can create a beautiful chandelier. Order:
- Prepare a metal frame or other material. In this case, you can even use a frame from an old lampshar. Its state does not matter, since it is easy to decorate.
- Beads or beads are drawn on a fishing line or a dense strong thread. If the beads are used, it is better to take multicolored and various forms, so the lampshade will be more interesting.
- It remains to fix the threads on the basis and attach the cartridge. Fixing the threads are made with tension or with free savory, depending on the idea.
Such chandeliers that mimic the large crystal last century look very original. Such chandeliers are suspended, a chain is used as a binding element with a ceiling.
 Chandelier from beads in the interior
 From plastic bottles
If many plastic bottles have accumulated them can be used very useful.
The first option is weaving. In the bottle, cut the neck and bottom, cut into thin stripes. The more colors of bottles, the better, they will also get painted. Now the foundation is taken - a metal frame, rims to pull the tight fishing line or pieces of plastic and fix. Next, the process is creative - weaving on the principle of creating a shoulder. We need to weave a tight to the lamp shape.
Second option: Decorative chandelier. Creation Procedure:
- Prepare bottles as well as in the previous version.
- Cut leaves, flowers or any geometric shapes of different sizes.
- The edges to handle a soldering iron so that they are slightly twisted. You can draw accommodation, so they will look natural.
- From the copper wire to make branches, to fix leaves on it.
- Branches fix on the frame.
- Light bulb will be made through the foliage, which will create an interesting effect.
 The process of creating a chandelier of plastic bottle
 Third option: from plastic bottle and disposable spoons. In the process, you need a plastic bottle of 5 liters, disposable spoons, glue-gun. Process of creation:
- At the bottle to cut the bottom.
- In spoons, cut off the handles, only "scales" are needed.
- On the bottle, apply glue and glued along the rows of spoons, starting below. Spoons are placed by a convex side out.
As a result, the scaly chandelier is obtained. It can be painted or left white.
From sticks for kebab
The original chandelier chandelier can be created from wooden sticks for kebabs. In addition to them, you need glue and tape from organza. What form can be chosen yourself. The easiest option is square, when the skewers are formed by the "house". Each wand fasten with glue. As an option, you can make a star, a hexagon or invent another form.
In the process, it is important that the sticks lay smoothly over each other, otherwise the chandelier will look inactively. The size of the design can be any. After drying the glue, you can decorate the chandelier ribbon. It is drawn through sticks in any suitable place. On top of a wooden design, it is recommended to cover with varnish or paint.
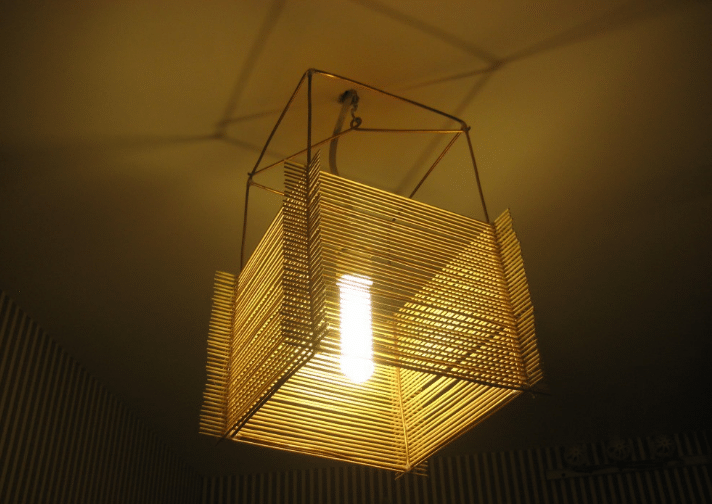 Previous chandelier of wooden sticks for kebab
 From laser drive
From this material, it turns out to create an original chandelier with a lively light effect. It is possible to make it in the form of a bowl, according to the principle of like a thread chandelier. Another option to chop small elements and stripped them on the threads that secure on the frame.
Discs - the material is convenient and easy to use, so that with them should be enabled fantasy and then it turns out to create an original decor element.
Important! Whatever the idea does not occur to remember that it will be possible to enter such a chandelier, it will be possible not to any interior of the kitchen, but is except in the style of high-tech.
From cardboard, paper
Oddly enough, but even from such materials you can make a very beautiful and original chandelier. From cardboard make it the easiest way to do this:
- Find a suitable stencil. Beautifully looks like a chandelier chandelier in a classic style. Make from it 2 the same details, cut them so that with the connection they create a bulk design.
- If necessary, paint cardboard.
- Collect details, strengthen wire or thread. To do this, pre-make holes.
- She hangs on the chains, a cord is done through it. The cartridge is fixed below.
By the same algorithm, it will be possible to make a chandelier of plastic or organity. Such materials are much stronger and durable. In addition, the exploitation of such chandeliers in the kitchen is more convenient. Chandelier elements will have to be cut by an electroll.
Master class creating chandeliers from paper:
- The base will be required, it can be an old ceiling chandelier, a circle of plywood or wood.
- From dense white paper cut butterflies. It is convenient to use a pattern of cardboard. In the finished product, butterflies of different sizes look original.
- On a dense white thread or fishing line will attack butterflies. It is convenient to do it with glue, you can also drive them through 2 holes on the workpiece.
- Threads with butterflies secure on the frame. Moreover, these threads can be of different lengths, which creates the effect of motion.
- At the request, the chandelier can be additionally decorated with beads, rhinestones, separate butterflies to paint.
 Paper chandeliers: options
 Tip! You can cut no intricate butterflies, but circles, they look at no worse.
Lamp and cartridge selection
Making a chandelier, it is important to use suitable electrical materials. The first essential element is the cartridge. In most cases, you need such in which there is a ring for fixing the lampshade.
For some of the presented models, the cartridge is suitable, which is rigidly fixed to the base with two self-draws. Secure it will be possible on any surface. As for the type of cartridge in size of the base for it, it is better to use standard. This will make rid of the problem of finding non-standard light bulbs.
Regarding the light bulb, it is better not to use incandescent lamps, they warm too much and consume a lot of electricity. LED and fluorescent products are the optimal solution for both operational qualities and economy.
How to choose chandeliers for stretch ceilingsHouse decoration on their own favorite occupation of many hostesses, this article reveals how to make a lamp with their own hands. You can revitalize the interior of the living room, bedroom or hallway with the help of a primary means, only by changing the chandelier chandeliers, flooring or desktop lamp. Plafones for lamps made by their own hands can be used not only in a residential interior, but also in the halls of the cafe, pubs, pizzerias.
Choosing materials and lamps for lamp
Products made for children's rooms must be made of natural non-toxic materials and painted with environmental colors.

In the manufacture, it should also be remembered for fire safety, so the flames from combustible materials made of paper, plastic, feathers or threads should be used only with lamps that have a small heating temperature.

You need to use LED or fluorescent lamps. They have a number of advantages:
- large service life;
- minimal heating base with glass part;
- the light has three shades: warm, cold, neutral.
In addition, such lamps are also called energy-saving, their only disadvantage can be called high cost.

It is also desirable that the wire connection to the baseman produced a specialist. No need to try to independently perform this operation, as this may lead to undesirable consequences. It is more convenient to decorate the already existing frame frame or make it from durable and not very heavy materials.

The following materials are used to create lamps: scissors, mounting knife, fishing line, wire, pliers, hot gun, in some cases can be replaced with super-glue. They should be used by an adult, a child to attract to gluing is unacceptable. Since in one case it will get a burn, and in the other you can glue my fingers or stick to the details of the future product.
What can make a ceiling?
Many craftsmen make lamps from very unnecessary materials:
- from plastic or glass bottles;
- newspapers, fine or colored paper;
- artificial or natural threads;
- dried branches of an unusual form;
- disposable spoons;
- old disks.

Plastic lamp
From plastic containers of different volumes, a homemade chandelier is easily obtained.
- For the base, you need to take a bottle of 5 liters. The bottom is cut off from it. Then the surfaces are drawn with a diameter of 1.5 cm. They need to be cut by mounting knife or small scissors.
- From bottles for the decor, the bottom is cut off and the entire surface is cut by scissors on the strip of 0.5 - 1 cm wide, then the billet is heated above the burning burner. Under the influence of heat, the band will acquire a chaotic look.
- Then in 5 liter containers with holes insert blanks, and the covers are screwed from the inside. Then through a large neck, the wire is taking place and a plane is installed. For such a ceiling, you need to use an energy-saving lamp.
- In some interiors, you can find a fancy lamp made on the basis of the usual hanger or straw hats. In general, to limit the scope of fantasy both homemade masters and professional designers can nothing.
Glass bottles
A very interesting option of a homemade chandelier is obtained from glass bottles. They are used to decorate the halls of food enterprises. It is also a good option for the kitchen in a residential building or apartment. It may be a plafof consisting of one or more bottles, which are cut down the bottom. You can do this on your own, but it is better to use the services of the workshop where the glass and mirrors are cut.

How to use threads
For lampshar of thread or ribbon, you will need: ready-made frame of durable wire, threads of different colors, scissors, glue.
- The frame consists of two rings, interconnected with metal segments. It can be done independently from a durable wire.
- One color is needed or a few shades of the thread.
- Thread is fixed on the bottom, then it needs to be stretched through the top ring, lower down and move through the bottom ring. It is necessary to ensure that the thread is stretched and the coils firmly fit to each other. As soon as the thread ends, you need to attach the following segment to the bottom ring.
- Carefully trim the remnants of threads and glue them from the back.

Spoons for lamp
You can make a multi-tiered, color lamp from ordinary disposable spoons.
- It is necessary to make a wire frame, for a round small lamp you need to make three circles with a diameter: 12, 18, 26 cm. Then the circles are fastened with each other with a fishing line. The above will be the largest diameter, there must be the same distance between them.
- In spoons you need to make a small hole with a thick needle at the top of the handle.
- Spoons are painted with acrylic paints in three colors, for example, yellow, orange, red.
- Build homemade chandelier: the fishing line is cut in length equal to the distance between the circles. To one end, the fishing line ties a spoon, and the other to the frame. To the lower circle of the small diameter you need to tie a spoon of yellow, to the middle - orange and to the top - red shade.

Easy and elegant plander
Paper or thin cardboard is suitable for the paper. Such a ceiling can be both rectangular and square shape. You must first consider the size of the ceiling, the larger the room, the wider there can be a design. In a small orphan or hallway, there will be a good ceiling with a diameter of 30 - 35 centimeters.

The frame can be made of wire, it will consist of the upper and lower part, consider the manufacture of a cylinder formation.
- You need to make two circles from the wire of the desired diameter. They are connected to each other with the help of a fishing line, the distance between the lower and the upper frame - 12 - 15 cm, the fishing hoops are bonded in three, four places. The greater the diameter of the base, the more it is necessary to make connective elements.
- On paper blank, you can draw circles of different diameters, figurines of cartoon characters. The contour drawings can be taken from the Internet and print them, then redraw using a copy. For drawing circles, a special ruler is suitable or you can draw lids or buttons of different diameters. Some drawings are cut by a fully stationery knife, some cut through the contour.
- Paper is based on the basis and glue a mustache. Then glued to the wire, you can also fix with a thin wire. To do this, first in paper make a hole with a thick needle or selent, then they make the wire and gently tie to the frame. It is desirable to glue thin paper, as it is easy to spoil.

Exclusive metal pelvic plander
- Tases from any metal are used, an interesting option will be made of copper or aluminum tanks. The old pelvis is suitable. If it has a through hole, it needs to be boiled or stuck, for example, epoxy resin.
- The inner surface must be painted in a light color so that the light is maximally reflected from it.
- The outer surface can be painted in a dark, rich color, harmonizing with the interior.
- On the bottom of the rim glued with hot glue with a fringe of about 5 centimeters. In the central part of the basin, it is necessary to make a hole for the wire. It can be drilled drill or punch with a nail.
Such a ceiling can be decorated with mosaic from CDs. For this discs are cut by sharp scissors into small fragments, which are pasted on the outer surface of the pelvis. You can enclose only the bottom contour, and the rest to paint. Or decorate with such a mosaic all the surface of the ceiling. The more convex surface, the smallest should be disk fragments.

Natural materials
The original lamp can be made of a dry branch of an unusual form. It needs to be cleaned of the bark and coat with a verse, then, if desired, handle with a transparent varnish. The branch must be attached to the hook on the ceiling with a conventional fishing line. Then the wire with a lamp is screwed several times on the branch. It looks beautiful, the branch, accusing several wires.

You can make a lamp of plastic hangers. In detail told on the video:
Lamps in different rooms
The chandeliers of bottles made more suitable for the kitchen made. Designs made of glass or plastic will be easy to clean from dust and, if necessary, washed. For a kitchen, an entrance hall or a living room is suitable for a lamp of a natural tree.

For the children's room, the ceiling of painted plastic bottles is suitable, butcher from bright threads or paper composition. The last option can not be called durable, but it is precisely such an option to children. Girls will like a plate with butterflies, vegetable elements, boys fit construction with machinery, superhero or bright plastic plastic plastic.

In some cafes, the pubs are used for the decor of the hall the original lamps of bottles. It can be beer bottles. They can serve as a light bulb, and to be an interesting framed for the lamp.

Ideas of homemade lamps at the placement
With your own hands you can give a new look by outdoor Torsh. You can decaffeve with a cloth, threads, paper with slit patterns, it is also not necessary to leave the base and leg of the lamp. They can be painted with acrylic paints, put the glaze, decorate beads. The decor of the lower part of the flooring should elaborate with the elements at the top. The easiest option is to decorate a plane of monophonic color with lace or guipure.


Decorating lamps
The lower part of the bertow can be decorated with pompons of the same size hanging on a thread. They are glued with the inside of the frame of the glue. Pumps can hang both on the same and at different heights. They can be made of one color or combine a few shades.
To decorate paper luminaires, you can use lace, dense fatin, beads of different sizes. Glass cans or bottles can be decorate glass pebbles that can be purchased in accessories stores. You can also use buttons of different sizes and colors. Small buttons can be glued even on PVA.

On New Year's holidays, it is customary to decorate the Christmas tree, but plaffers of lamps, lamps can be decorated. Here you can use the usual rain, cut off with your hands with snowflakes, figurines of the Christmas tree, decorative balls and the usual garland. If an energy-saving lamp is installed in a wall-mounted or floor lamp, then its ceiling can be decorated with paper snowflakes.

Wall sheds are installed in living rooms, bedrooms, children's. After repair, you can use old sconce, only changing their appearance. You can paint the luminaire case into a light color, and from above apply a bronze or silver paint brush to create a patina effect. If the glass is a glass, the liked pattern is applied to its surface using a glass stencil. Here you can use contour (they are used to create stained glass) or aerosol paints.