How beautiful to glue the ceiling tiles. How to beat the foam tile on the ceiling: step by step instructions with photos and video
The ceiling polystyrene tile is the most common, reasonable way to update the ceiling. Everyone tries to approach this responsibly and individually. Before walking the ceiling tile, it is necessary to carry out preparatory work to make a beautiful ceiling cover, with the original finish for many years pleased with the eye. Choosing a finish option, everyone tries to approach this responsibly and individually. It tries to familiarize themselves with the varieties of this material, the rules for calculating the required quantity, which glue glue, as well as some nuances of the combination of tiles with the interior of the room.
Tile Tiles for Ceiling
In the construction market, the ceiling tile is represented by the following varieties that differ in their production methods:
- The pressed ceiling tile is made by a stamped method from polystyrene blocks. Thickness of the finished product MIN - 6 mm, max - 8 mm.
- Extruded blocks are made from polystyrene strip by pressing. They have a brilliant smooth surface. The plates can be structured under the marble slab, a tree trunk slice and other natural materials.
- For the manufacture of injection tiles for the ceiling, a method is used at which the feedstock is sintered. As a result, the product has a correct form with a deep pattern. Its thickness from 9, but not more than 14 mm.

Selection of ceiling tiles in physical parameters
To properly glue a ceiling tile, during the purchase it is necessary to pay special attention to the product geometry. If the tile is selected by squares, then all its corners must comply with the required parameters, that is, equal to 90º. The slightest deviation will further result in the formation of uneven seams. Corners of ceiling tiles are not allowed to round or fasten.
Another indicator when choosing a ceiling tile is the material from which it is made. When buying polystyrene tiles, it is necessary to ensure that the edges do not appear, and all the grains were the same in size. The one is considered to be the one whose grain size is especially small. Polyopolster plates should not break under their weight, if they are kept for any of the corners on the weight. On the selected tile for the ceiling must be a clear drawing. No flaws are not allowed, any small inaccuracy or dent will immediately attract attention.
Calculation of the required amount of material and selection of glue
After selecting the type of ceiling tiles in its physical parameters and external design, it is necessary to determine how the amount of tiles will be required to the entire ceiling area. More experienced owners immediately buy 10-15% more, in case of chopping due to broken corners or errors during trimming. In general, the calculation is not difficult. You need to know the ceiling area and the size of each element. Typically, the ceiling tiles are produced by the sizes of the side faces of 50-50 cm. If the dimensions of the ceiling are not painted the length of the side of the tile, then the ceiling edges will remain when finishing. Therefore, when calculating such a nuance must be taken into account.

Tip of an experienced master: if you want to save on the glue, instead of liquid nails, it is better to use transparent glue with a more liquid "rubber" basis. Its consumption is significantly lower. But for solid fixation, it is definitely a little dried with glue already applied to the tile.
Having calculated the required amount of tiles, it is necessary to determine what glue glue. Many people use "Titan", "Economy", "Liquid nails", "moment". They grab well with any surfaces and quickly dry out. After gluing the tile holds firmly. Only for this it must be sealing for a few seconds to the ceiling.
Procedure for performing work
Many owners of apartments and private houses prefer to stick the ceiling tiles with their own hands. Therefore, it is important for them to know that the work should be started with the markup of the center of the decoration area. To do this, with diagonally arranged corners, you need to stretch two threads. Their intersection place is the desired center. If the room is hanging chandelier, then you can start work from this point. At the same time, the angles of docking at the wire of the lamp are slightly cut. As a result, they will close a curly cup of chandelier rod.
Many begin work from one of the walls and a row behind next to the tile. This option is the easiest and fastest. But there is a small nuance here. The first row is better laying from the wall opposite to the window or the entrance door. Then the gaps that are closed by partial fragments will not be noticeable.
Before proceeding with the sticker, the fits on the edges of the product should be neatly cut off. At the same time, the surface of the ceiling will be perfectly smooth, without seams. It is also necessary to strictly observe the symmetry of the pattern on the jacks of tiles. The slightest deviation violates all the integrity and beauty of the finish.
The options for the location of the ceiling tile relative to the walls of the room relatively many. The most common is parallel and diagonal about the limits of the intersection of walls and the ceiling. You can choose a monochon, color and combined tile. Of the combined laying options, the following are most often practiced:
- alternating or intersecting diagonals,
- in a checker
- snake
- around the ceiling perimeter or in its center, etc.
At the end of work, plinth is installed throughout the perimeter. They are glued with the same glue as the tile itself.
Options for sticking ceiling tiles on bliss
We will be glued directly to whitewash, so it is worth choosing one of two ways:
- The first is that primer is applied on top of the old whitewash. It is absorbed into the old coating layer and climbs with the main surface of the ceiling. Then it is necessary to wait for the complete drying of the primer and proceed to the finish.
- The second method implies a partial scope of a falling spatula with a spatula. In the consequence, a layer of adhesive is applied to the purple surface of the tile, and it is pressed for a few minutes to the place of gluing. The glue is absorbed, through a thin layer of whitewash, remaining on the ceiling and grasate with overlapping.
How to glue the ceiling tile do it yourself: video instruction
The ceiling coating update is a labor-intensive and cost. In addition to the tile, you can arrange stretch and suspended structures, mirror panels of various configurations and sizes. Here everything solve the financial capabilities and fantasies of the owner.
(No ratings no)
Good tips, helped especially about whitewash. When I glued with the dad tile, we first tried to scrape the blotch, but then I decided to punish it so much ... Two days tried to shove, she was glue, she fell off with whitewash ... The primer tried to apply and then beat him in a couple of hours.
By clicking the "Add Comment" button, I agree from the site.


The cheapest and easy way to pasting the ceiling is the sticker ceiling tiles. Before starting work, it is necessary to conduct preliminary work. This is a simple process that allows you to achieve an ideal result. You can fulfill such work yourself, without the help of a specialist.
Preparation for sticking ceiling tiles
Given the ceiling area, it is necessary to make certain calculations - how much tiles and glue are needed. Usually, the tile is 50x50 cm. We must consider how many tiles will have to cut and buy it with a margin of about 10%. Since, during cut, the tile can crumble and break. It glues on any surface: plasterboard, concrete, fiberboard. It is not glued to the seminal surface, as the design will be fragile.
There is a different method of fastening the tile, it is placed on the frame, which has a gap of 10-15 cm from the ceiling. In this case, you can hide the wiring, pipes, ventilation. The disadvantage of the design is that the space cuts and decreases.
For sound insulation, plates with a fabric substrate are used. Acrylic structures make the room visually above. Mirror tile expands space. Metal tile attached strict, cold look. The most expensive tile is wooden. Before use, it is necessary to process special composition, as the tree is afraid of moisture, mold.
Ceiling tile selection rules
You need to choose the ceiling tile. In construction stores present different colors of products. It is important that the surface is smooth, without dents and chips. Compliance with these rules will allow you to smoothly stick the tile on the ceiling. Throughout the surface area of \u200b\u200bthe material, there must be homogeneous with a clear pattern, without crumbling.
It is important to make sure the safety of the product used that does not cause allergies. Each material must have a quality certificate. There are several types of tiles: injection, extruded, extruded.
After purchasing tiles, it should be adapted to new conditions. She must lie in the room in the room. The advantages of finishing material: a wide range, affordable price, ease of installation, non-combustible, durability.
When choosing, pay attention to the tile grain, the smaller the grain, the better the tile.

How to choose glue for ceiling tiles
For a good tile clutch with a ceiling, you need to choose organic or mineral glue. The best glue for the ceiling tile is the "moment" glue. Often use the compositions "Titan", "eco-inase". The use of any of these compositions gives a good result. For more humid premises, use hygroscopic glue.
Harmony is a water-based glue, but it will dry for a long time. Polymer glue dries quickly, as it includes alcohol.

Thermoplastic composition allows you to facilitate the work process. Epoxy is very flexible and easy to use.
The most budget and quick-drying option is liquid nails. This means is applied using a mounting gun or from the bottle itself. It is necessary to glue, lubricating five points of the tile, i.e. the edges and the middle. It is recommended to acquire seamless tiles, it is easier to customize.
Full pouring of glue, occurs within two hours, setting time, lasts a few minutes. If you use the adding solvent, you can speed up the work.
Preparation of the ceiling surface
Before repairing the surface is degreased, purified from excess paint and blots. It can be cleaned with a grinding machine, until the particles are completely removed from the ceiling surface. Treat the surface of the ceiling with PVA liner or diluted beastilate.
If there are chips and cracks, then these defects are cleaned and put off. The wooden surface of the ceiling is grounded, for better tile setting with a surface.

Sticker tile on the ceiling
Tile can be glued in different ways. It is necessary to determine the central part of the ceiling. Two threads diagonally stretched, their intersection will be a central point. The hole is cut under the chandelier, you can make it a knife. If the ceiling is made of drywall, it is recommended to be impregnated with glue, for better hitch.
By gluing the first plates, you can make marking on the surface. It is important to accurately notify everything, the quality and aesthetic side of the work will depend on it. Manufacturers indicate in which direction it is necessary to glue the tile. By gluing the first, the rest are glued, focusing on the first. The tile can be placed parallel to the wall or placing diagonally.


We wash the tile with glue, applied to the ceiling, then quickly cleaned, the glue film will remain on the ceiling, it must light up slightly. Five minutes later, the tile is applied again. It is necessary to hold it carefully so that, not damage, connect the items without spaces. It is better to use a wooden bar, equal to the size of the tile.
The extreme rows are configured under the size, then apply glue. All seams are watched by sealant. When drying, it is impossible to arrange drafts, otherwise the tile hitch and the ceiling will be broken.
It is necessary to apply the adhesive substance in moderation if the surplus was sold in the design seams, then they need to be removed with a rag. During the docking of the extreme plates, slots appear, they are sealed with putty. Camping ceiling does not take much time - one, two days, it all depends on the area of \u200b\u200bthe planned work.
On the perimeter of the ceiling, the foam plinth can be glued, which is glued along the same technology. Molding is a bar, performing a decorative function, has a small weight. It is easily cut into parts, not cracking, it easily helps to hide the irregularities and slits around the perimeter of the room.

The advantages of such a finish are that the tile is quickly settled, holds firmly. With proper operation will last long. You can care for the tile by wiping with a damp rag moistened in the soap solution. Over time, the material does not turn yellow, does not change its color. Works are made quickly and accessible in terms of saving funds to the finishing material.
Light foam tile is the most popular coating for the ceiling. With its help transform space in the kitchens, halls, bedrooms, and even in halls for receiving guests. First of all, this finishing material, people choose due to the fact that in comparison with the stretch ceilings it costs the dear penny.
Well, of course, without exception, it is also like that, even the person who for the first time in life makes repairs with his own hands. For such newcomers, we will tell you how to properly glue the tile on the ceiling and what methods it can be done.
How to properly and beautifully glue the ceiling tile of foam: different ways
Scheme number 1.
 Scheme number 2.
 For those who do not know the ceiling tiles are squares with perfectly smooth sides that have a facial and purl side. In view of this, when finishing, you must carefully watch whether you lock them on the ceiling.
After all, if you glue the tile, not paying attention to this nuance, then in the end you will not get folded the perfect drawing. Also, when planning such work is extremely important to determine how the way you will glue the tile. It must be done in order to understand what exactly the amount of material may need you.
Methods of foaming foam to the ceiling:
- Parallel wall. This method of finishing assumes that finishing works will begin to be carried out by the wall, which is located opposite window or doorways. The first tile will need to smear with glue and lay it exactly parallel to the wall, a little from her retreating.
- Diagonally. If you choose this method, you will need to start the ceiling finish accurately from the center of the room. In order to determine this place, you will need to stretch the thread through the corners located opposite each other. That place where they cross and will be the center of the room.
- Rhombuses. Immediately I want to say that this method is considered the most difficult, so it is better not to take newcomers for it. In this case, you will also need to find the center of the room, to postpone several squares from it, and then from them diagonally glued tiles. If you all do it right, the tile angle will look exactly in the center, and one side coincide with the diagonal on the ceiling.
How to place the ceiling under the ceiling tile?

 Recommendations for drawing markup
 As already mentioned a little higher, in order for the ceiling tile to look perfectly, it is necessary to carry out pre-marking before it. Remember, if you do not want to redo all your work from the very beginning, it must be done.
After all, only correctly applied to the ceiling markup will help you place the first tile as it is necessary, and subsequently create a perfect pattern. If you are fixing the tile to the scene or diagonally, the markup will help you to disguise the seams as much as possible, thereby making the canvas visually smooth.
- To begin with a measuring tape, measure the approximate distance (diagonally) from one corner of the room in another
- Next, cut off two pieces of ropes (their length must comply with the data obtained)
- At the next stage, you will need to stretch these two blanks from the angle in such a way that they intersect in the center of the ceiling.
- Next, take, for example, the level and simple pencil and read on the ceiling space formed diagonal, and be sure to designate the central point of the room
- Remove the ropes and draw the central point of the square, which easily enters the ceiling tile. From this place you will continue the finishing of the entire ceiling cover.
Where to start glue the ceiling tile?
 Starting the stream finish from the central point
 If you carefully read our article, then surely realized that it was possible to start glue to the ceiling from two places. If you do this for the first time, it will be better if you prefer the method at which the tiles are glued in parallel wall. In this case, you will not need to carry out any preliminary measurements, and you can literally immediately go to the main stage of the work. All you need to do is find the perfect place on the ceiling surface and fix the first slab on it.
After it is fixed, you will need to check whether you have placed it correctly, and you can move to fixing the rest of the decorative material. If you want to create a more complex pattern on the ceiling surface, you will need to make a markup on it (how to make it right we told you above) and then you can begin to transformation of residential space. In this case, the first tile will need to be placed in the center of the repaired premises.
How to apply glue on the ceiling tile?
 Glue Application Scheme
 Most people who for the first time in life make repairs think that the applying of glue on the finishing material does not require any special knowledge. But as practice shows, even so simple, at first glance, the process must be carried out correctly. In case you apply glue chaotically, as a result, the tile will not be fixed as it is necessary and that the most unpleasant will not be perfectly lay down to the ceiling coating formed seams.
So, for a start, apply a small amount of glue into the very center of the tile, then check the droplets diagonally from this point, and at the very end apply a line throughout the perimeter of the finishing material. Applying glue on the tile, follow the droplets not very large. If the adhesive is very much, then when pressing the tile to the ceiling, it will begin to go out and as a result, you will have to remove excess, and this can damage the structure of the finishing material.
Yes, and remember, if you want the adhesive substance as well fixed the tile on the ceiling, it will be necessary to hold it in front of 1-3 minutes. During this time, the glue will enter the reaction with air and it contributes to the fact that substances that are responsible for the grip will become more active.
What glue is better suitable for ceiling tiles?

 Ceiling tile glue
 As a rule, people think that the more precious is the glue, the more qualitative. Of course, in most cases an expensive agent is much better cheap. But still, in the case of ceiling tiles, you need to pay attention to other factors. The most important indicator of the quality of the adhesive is the force of clutch. The more this indicator will, the more reliably decorative material on the ceiling surface will be fixed.
In addition, you should pay attention to how the glue quickly. The faster it will happen, the better it will be for you. After all, if it is captured not 30 seconds, and 2-3 minutes, then you simply get tired of keeping the tile time and most importantly, you cannot fix it correctly. Also, when buying, it is necessary to pay attention to the viscosity of the adhesive.
In the event that the glue you selected is very liquid, then try to pick up another option for finishing works. As practice shows, too liquid the base of the glue will not let you reliably fix the tile on the ceiling and it is likely to be completely removed from the very beginning.
Types of adhesive for fixing ceiling tiles:
- Universal
- Titanium
- Glue-compound (on silicone basis)
- Acrylic spacure
- Liquid Nails
- Polyvinila acetate glue
How beautiful and properly paste the ceiling tile diagonally, rhombus: description, video
Before you begin to lock the tiles, it is necessary to prepare the ceiling space. If you do not do this, then in the end, with all your desire, you will not be able to correctly fix the finishing material. For this reason, it will be better if you first carefully inspect the ceiling and make all the defects.
But keep in mind so that the tile lay perfectly, close all the cracks and pits. If you want the grip between the ceiling and decorative coating to be maximal, then you will definitely need to grind the surface, and then it is thoroughly projected.
- For starters, measure the ceiling area and count how much you need tiles. Note that if you record it rhombus, it may be more needed than if you were adapted to diagonally.
- At the next stage, you will need to mark up and designate the central point of the ceiling, as well as the diagonal lines, equal to which you will lay out the diagonal and diamond.
- After the markup is done, you will need to apply glue to the entire tile and fix it at the central point. If you want it to be fixed instantly, do not forget that it must be withstanding at least 1 minute.
- In order for the tile to be fixed, it must be pressed to the ceiling coating and hold in this position for 30 seconds. After you make sure that it does not move, you can proceed to applying glue to the remaining decorative material.
- Initially, you will need to lay out the tiles on the diagonals that were drawn at the markup, and when it is done, you can move to the filling of the empty space.
- It is necessary to fix the tiles on the ceiling, moving from the central point to the corners, trying to watch it in order to be visually formed in the perfectly flat line.
How to glue the ceiling tile without seams?
 Punching seamless tile
 In principle, the seamless tile is glued in the same way with which we introduced you a little higher. Therefore, in this case, you will need to initially measure the ceiling area in a repaired room, apply markup on it, determine the central point, and only after that move to gluing the decorative material. But still, if you want as a result of getting the perfect ceiling coating, then the coolness tile is either diagonally or parallel to the wall.
Yes, if you give preference to the last way to finish the ceiling, then start to fix the tile on the opposite wall opposite. Such a small trick will help you to make less noticeable those gaps that are formed when finishing like a material. And finally, I would like to say that, although some sources argue that in the case of seamless ceiling tiles, the glue is not necessary to apply all over its perimeter, it is still necessary to do it.
As practice shows, if this is not done, then after drying, the clearance formed during the installation is quite strongly striking. Well, of course, do not forget that the ceiling tile is made from a very soft material, so it is necessary to hold and smooth it with hands, but a foam sponge or a soft cloth.
How to glue the ceiling tile on the uneven ceiling?

 Potting ceiling tiles on uneven ceiling
 As a rule, in old houses and apartments, the ceilings are far from ideality. Most often they are covered by cracks and small deepening, which are very stronger. If you live in a house with the same ceiling coating, then if you wish, you can correct the appearance of the dwelling with the ceiling tiles.
If you do not want to mess with align and grinding the ceiling, then just buy a foam tile and go to it in a way parallel to the wall. True, you must remember that it is possible to act in this way if defects on the ceiling are the most minimal. If they are too big, then you will need to either be solved on the complete breaking of the surface or on the installation of a special frame.
It usually installs it slightly below the ceiling itself and it makes it possible to hide even very speaking defects. True, in this case, it will have to fix more expensive tiles, such as wooden, metal or ceramic.
How to close the seams between the ceiling tiles?

 Recommendations for finishing seams ceiling tiles
 As already mentioned a little higher, even the so-called seamless tile requires additional processing of gaps that are formed after the ceiling canvas dry completely. In view of this, planning such finishing works, immediately lay down special tools in their cost, which will help you make the repaired surface as smooth as possible.
As for what to do, then in this case it is best to give preference to acrylic sealant. If you want to close the seams without any problems, then wait for the sealant in a tube and a gun that will help you distribute it evenly.
- Lock the gun on a tube with sealant
- With the help of scissors, cut the tip at an angle of 45 degrees
- Press the resulting hole to the beginning of the seam
- Smoothly push the gun on the handle and lead them exactly by seam
- Filling out the seam, carefully remove the gun from the ceiling and give time to sealant
Is it possible to paint the ceiling tile?
 Paint ceiling tile can
 Sooner or later, the desire to paint the ceiling trimmed with tiles appears in all people. But as practice shows, only a small part of novice repairmen is solved on this step. Most of these people believe in the fact that the paint simply spoil the ceiling tile and they will have to spend the cost of expensive repairs again. In fact, you can simply paint the tile of painting.
For example, a seamless tile cannot be treated with coloring substances as it will definitely make seams darker and as a result, they will be highlighted quite strongly on a common background of room space. All the rest of the tile can be painted calmly, though consider that in order for the color of the renewed ceiling to be as saturated as possible, it will be necessary to apply the paint at least two layers.
How can you paint the ceiling tile from the foam?

 Painting Ceiling Scheme
 As for the choice of paint to update the ceiling, then when it should be purchased, it is necessary to pay attention not only to the color. If you want a ceiling for a long time remaining in perfect condition, you must choose the correct coloring substance.
This means that it should prevent the reproduction of mold, be moisture-resistant and have dust-repellent properties. In addition, it must necessarily have a moderate level of glossy effect. In view of all this, it can be unambiguous to say that it is best to paint the ceiling tile with a water-level or acrylic paint.
Video: K. ak quickly glue the ceiling tile?
Many who did not come across finishing works seems to seem that all conversations about how to glue the ceiling plinth is a simple time spending, because this process is not much difficult. But it is only necessary to encounter, and it turns out that work requires increased attention. It is impossible to install cartel if their features are not taken into account, there is no clear action plan, and also does not define the composition for fixing. If all this is not taken into account, then the consequences will be very sad: fragments will begin to fall off, cracks in the joints will occur, the incorrectly formed angles will spoil the entire appearance.
Installation of the ceiling plinth should begin with the choice of cartel. There are many types of products that have significant differences.
First of all, you need to know that baguettes differ in form. So, it is customary to allocate:
- Details with grooves, well-noticeable longitudinal recesses are an extruded option.
- Elements with well-convex, highly embossed surface - injection view.
- A variety having a very smooth coating belongs to the laminated form.

But much stronger the differences in the manufacturing material appear. It is this feature that determines the final characteristics of the product, gives the best idea of \u200b\u200bhow to properly stick cartoons into place.
This option is considered the most versatile and very practical. It has a lot of advantages:
- Due to high strength, the profile has a long service life.
- Does not lose its external properties even if straight sun rays fall on it.
- There is a variety that is characterized by flexibility, which simplifies work on complex geometric structures.
- Not exposed to moisture, which makes it possible to use not only in bathrooms and shower rooms, but also in rooms that are constantly high humidity: swimming pools, saunas, baths.
- It has a wide range of colors and textures.
 Polyurethane profile is the only option that can be used on strong curved structures.
 Punching of polyurethane baguettes on the ceiling is carried out using special adhesive compositions that do not react with the material, have a good degree of fixation. Mounting such a profile is simple enough, you will need a minimum set of tools.
With all its advantages, this material has very noticeable minuses. They conclude that its value significantly exceeds other options, especially if we are talking about a flexible variety. Also, it is also taken into account that the elements have a rather large weight, which limits their use along with stretch ceilings.
Foam profile
Foam cartoons are rightfully considered the most popular, because they are available to the majority of the population, while endowed with excellent qualities and appearance. In addition, they have a number of other advantages:
- They have a slight weight that allows them to use them for stretch ceilings, as well as perform work without attracting additional forces.
- Easily daily processing, which reduces the time required for installation.
- If necessary, the surface can be painted repeatedly, and this creates endless possibilities for design solutions.
It should also be forgotten that such a kind of cartoons has negative qualities that are associated with the fact that the products have hanged fragility and are easily damaged.

In addition, it is this option that has the most restrictions on the use of fixing compositions. Taking decisions on how to glue a foam plinth on the ceiling, it is taken into account that the adhesive solutions used should not contain any solvents in their composition. The fact is that their presence is a direct path to complete deformation of parts that are literally dissolved from the effects of this substance.
Profile of PVC.
Such a type of cartel is a product that is made of polyvinyl chloride. And if it's simpler, then this is a simple plastic. PVC profile is most often used in the case of wall cladding with plastic panels. But this is an optional condition.
Polyvinyl chloride cartoons have the following advantages:
- Quite cheap, although this parameter is significantly higher than that of foam products.
- Have an abundance of colors and imitation. If necessary, you can choose the details that will repeat the natural cut of the tree or stone.
- Immune to the effects of moisture. For this indicator, they exceed polyurethane.

Universal adhesive compositions are used for sticking, which have a mark that are suitable for PVC. Although plastic has impressive advantages, it cannot be stained that it is important to take into account.
Wooden profile
The ubiquitous use of wooden cartoons is declining. This contributes to:
- Material expensive. At the same time, it is not about rare rocks, even widespread species have a high cost. Of course, in specialized construction stores you can meet inexpensive baguettes of wood, but they differ in very low quality.
- Not the easiest procedure for processing. To perfectly fit the details, they must fit on a flat surface, and the trimming is done very carefully. The emerging defects are very difficult to hide under the layer of putty.
- Installation is a number of time-consuming procedures. Before glue the ceiling plinth, you should decide: whether it will occur by means of putty or glue. The first option is often preferable. Next, additional measures are carried out on fixation - on the self-tapping screw, dowel or nails, the choice of fasteners depends on the basis.

Of course, a wooden box is a real luxury. It is she who can give the room a certain aristocratic look. It is important to take into account that the walls are covered with clapped, panels of wood, can not look good without such an element. Attempts to replace the profile with a modern option will lead to the fact that the interior will lose its appearance.
On a note! Gypsum varieties are less popular. They are distinguished by unsurpassed appearance. But this feature began to copy many synthetic products. In addition, the stubble sticker is possible only for a solution of plaster.
Sticking taking into account the width of the product
It is impossible to talk about how to glue the ceiling plinth with your own hands, if you do not take into account its width. This indicator directly affects the technology of stickers and a general view of the room. The following features are taken into account:
- Wide details are perfectly suitable for premises with high ceilings, because they visually reduce their height. To obtain reliable fixation, the composition is applied over the entire invasion side, this will avoid the fact that the cored elements will begin to disappear.
- Small cartel width is a great solution when the ceilings need to be visually lifted. The mount carries out if light products apply.
- The most acceptable is the average in width of fragments, they are used everywhere. Clean ceiling plinths of this size can be used by all known methods.

On a note! Large importance when installing has an appearance of the product. So, fully processed, painted, textured elements need a very neat application of adhesive compositions. The fact is that their entry on the face can lead to the fact that the cartel will be irrevocably spoiled.
Punching taking into account design
Particular attention should be paid to the external features of the cartel. So, the color of the elements can visually make changes to the perception of the room. For example, if the shades of decorative parts and walls will coincide, then the room will seem significantly less.
But then how to properly stick the ceiling plinth, given the form of the product? For this, there are a number of simple recommendations:
- The drawing should be chosen based on what style will dominate in the interior. Thus, classic variations suggest that baguettes will have a complex texture, patterns that resemble stucco. Modern minimalism is striving for simplicity, therefore, thin cartonings are suitable for him, the ornament on which is missing or has a clear geometry.
- With bulk figures it is better to use for monophonic surfaces. This option is significantly weighting the atmosphere, so it is categorically not suitable for small rooms.
- To achieve harmony, the drawing should be combined with walls or ceiling. This will make the transition of the most smooth.
 Create the most harmonious interior will succeed with a combination of drawing cartleters with walls or ceiling
 On a note! Performing work with baguettes that have a complex form and invoice, take into account that these parts are very difficult to customize in the corners. Therefore, for them it is better to acquire special angular lining.
Main Methods of Montaja
There are various methods that are used when the ceiling plinths are performed. It is so accepted to allocate two main technologies that allow you to mount the most popular product options: polyurethane and foam.
The first method is to use putty
This option is great for situations in which the wallpaper paste has not yet been completed. Many masters rightly consider this method most acceptable. The fact is that the unprocessed surface allows you to achieve the best clutch.

Preparation
To work, you will need the following set of materials:
- Heart. It is very convenient that this method is universal practical for all varieties.
- Putty. For the process, the most ordinary mixture is used, which is universally sold in stores, remnants from previous repairs can be applied. It is important to pay attention to the shelf life and integrity of the substance. If the material does not have crumbs, it takes it.
On a note! Gypsum composition can be selected. But he has one larger minus - rapid grasp. It limits the time of use of the solution, and also does not allow to correct the resulting defects.
- Priming. It is used to increase surface adhesion. It is better to choose the compositions with deep penetration.
For gluing the ceiling plinth, a necessary set of tools is selected:
- The cutting of parts is carried out with the help of an ordinary hacksaw metal. It is necessary to apply a stationery knife only when the width of the elements does not exceed two centimeters, otherwise the quality will not be as conceived.
- To form an angle, it is resorted to the services of a primitive, but very effective device - stusl.
- For applying putty fits the average spatula in the width - 8-10 cm.
- It often happens that the surface of the killer has a very tangible roughness that prevents quality work. It is removed using sandpaper.

Before mounting the plinth, the presence of all materials and tools is checked. Work is much more efficient when there is no need to search for the desired devices in the process of its execution.
Fixation
The cartoons are glued according to a specific scheme, which consists of several stages. It should be borne in mind that when performing work, all actions are adapted to a specific situation.
Stage first:
- It all starts with an inspection of the area, where the baguette will be installed. It often happens, especially after the finishing finish is fulfilled that small defects, irregularities remain on the surface. For their removal, sandpaper is used, which is fixed on a special bar. Of course, it is better to fulfill such preparatory work in advance.
- Walls and ceiling are processed by primer. It is important to take into account that even this composition needs to be prepared. The easiest option is the usual stirring, but if concentrate is used, it must be properly diluted. Further procedures can be carried out only after complete surface drying.
- Be sure to mark up. The easiest way is that the item is applied to the right place. Exactly the line outlines the line that will serve as a guideline.
 Wall surface markup
 - Many masters advise to measure the length of the cartoons in advance. That is, measurements are removed from all sections, fragments are calculated. Much more convenient to make a scheme on a piece of paper. You can skip this step, then the markup will have to be performed on each individual item when immediate fixation is performed.
- Protecting parts. It is this process that can deliver many problems. Especially carefully you need to work with foam, which will easily crumble from the wrong exposure. To form corners - use stub. It is better to practice a little to determine the correct location of the products in this instrument.
 Plinth trim at an angle
 Stage Two:
- Installation of the ceiling plinth begins with the preparation of the spacion mixture. It should be noted that it is seated immediately before work to eliminate the loss of the properties of the finished solution. This process is quite simple: a dry substance is diluted into the container, which is diluted with the desired amount of water. Must get a thick and well-stirred composition.
Tip! It is important to exclude the appearance in a mixture of lumps or dry residue. Therefore, it is recommended to first add water, and then to plunge putty. Each manufacturer places an instruction on the label, which must be strictly followed.
- Now the most responsible moment comes - fixation. To do this, with a spatula, a small amount of prepared solution is recruited. It is uniformly distributed over the entire surface of the baguette, which will directly interact with the ceiling and walls. This procedure is not difficult, but it is necessary to ensure that the surplus do not fall on the front part.

- Installation starts from one of the corners. It is believed to be better to choose a plot for this, which is in the field of constant visibility. But before sticking the ceiling plinth, check that the applied mixture was not too much. Otherwise, too many residues will appear with which it will be difficult to cope.
- The detail is pressed against the specified place. It is at the moment that those lines that were previously applied. It is reconciled by the installation correctness. There is no need to press too much, the fresh solution allows you to fix the item very quickly. In any case, an unnecessary mixture will appear from under the edges. While the solution is not frozen - it is removed.

Tip! It is not always appropriate to clean the surplus. Very often it happens that there are minor irregularities on the surface, in this case the putty fills them perfectly. Thus, edges are formed cartoons that have no defects.
- When fastening the second fragment, a natural question arises: how to docile the ceiling plinth correctly? Many allow a typical error - they forget to apply the solution directly to the end part. The mixture requires a small amount so that the surplus was missing at all or were minimal. The product is pressed into its place, combine with the first element. It is important to achieve the perfect coincidence, because any distortion will rush into the eyes.
Each glued part must be installed clearly along the line. It takes time to make the material well cluttered and completely dry. It goes about a day. Further work consists in the fact that possible flaws caused by the residues of the mixture are cleaned. If necessary, the cartoons are ground and covered with paint. To avoid staining of adjacent surfaces, rapid tape passes at the edges of the ceiling plinth.
On a note! When the work is carried out with cartoons, which are high fragility, pressing is carried out by the back of the palm, without a point stop. This will help to avoid the appearance of dents.
The second method is the use of glue
This option is usually used when glue the ceiling plinth is needed on the wallpaper. Although this does not mean that it cannot be used on bare walls. An important condition in this case is that the wallpaper should be glued very securely, because you can hardly install the cartel, but because of the defects of the main coat, they will begin to lag behind the wall.
 Installing the ceiling plinth with glue can be made on top of the finish finish: coloring or pastries with wallpaper
 Selection of glue
Before glueing the plinth, you need to decide on the choice of adhesive composition. Currently, there are many options that are suitable for such a task. So, among the whole manifolds are allocated as follows:
- Universal substances. This category includes solutions that have a very viscous and transparent mass, frozen for a very long time. The most popular options are called "Titan". These products are recommended for working with polystyrene and varieties, suitable for any foamed materials. But they are uncomfortable to use them: they are long on the surface, while fixing is not always high quality, you have to hold the items for several minutes.
- Liquid Nails. These are very comfortable compounds that many masters give the unconditional palm of the championship. We are produced in tubes for the construction pistol. But when this option is selected, it must be borne in mind that the composition should have an inscription confirming that it can be used with polystyrene foam products.
- Acrylic sealant. A rather original solution that helps to find a way out when there is no possibility to purchase one of the above-mentioned materials. But in this case it is very important to choose proven formulations.
Fixation
Now it should be sorted out how to glue the ceiling plinth on glue. The instruction is as follows:
- Prepared surface. It is necessary to carefully examine it for any irregularities or defects. If any, they are completely eliminated. This is required in order for the planks to be pressed tightly, and also did not occur strong curvature.
- Marking is performed, the details are prepared. It is better not to neglect this procedure, it allows you to produce work better.
- Next, proceed to applying adhesive composition. It is most convenient to distribute in the center of the sections adjacent to the surface.

- The details are applied to the specified area and pressed. It is important to follow the instructions that are available in each glue. Thus, different types of compositions require a different approach: retention, breaking and new gluing. It is better to stick to the specified scheme.
Tip! It is on these parameters to pay attention to the purchase. They help to understand how to shove the ceiling plinth most quickly.
- The remaining elements are stacked. After that, the cartors leave until complete fixation. This time is determined by the composition used. If there are cracks, they are embarrassed by sealant. Also close and joints that are not always able to fit closely.
 Elimination of gaps using sealant
 - When you have to correct a large number of defects, it is better to produce subsequent staining. It will help hide the shortcomings.
Indeed, the glue helps to significantly reduce the time required to work, but it is important to take into account the features of each composition.
Currently, many popular solutions have similar names, but differ by the manufacturer. Therefore, the manufacturer is the main quality indicator.
Proper formation of angular and intermediate joints
It is this procedure that causes the most problems: a little wrong to be mistaken in order to irretrievably spoil the workpiece. Therefore, it is impossible to argue about how to properly glue the plinths on the ceiling, if there are no concepts about the formation of the joints.
So, there are a number of tips that will help in this situation:
- For such a work, a stub is used, which has a set of stencils at different angles. To make an angle of 90 degrees, it is required to trim two parts at 45 degrees.
- The inner corner is obtained if the quilt is placed pressed to the bottom and the side of the stub. In this case, the surface of the part that will adjust the ceiling must be located at the bottom of the tool.
- To get the left vector of the angle - the element is located from a similar side, and the knife should be in stencil in the direction of the right left. If you need to get the right vector, then everything is done on the contrary.
- But how to glue the plinth on the ceiling when you need to get an external angle? In such a situation, the cut should be directed differently. That is, to get the right vector you need to position the knife to the right left.

If there is no stouch at hand, you can resort to creating a stench with your own hands. For this, the baguette is placed on the table on which two lines corresponding to its width. So, for example, with a width cartoons in 80 mm, both lines will be located at such a distance. Between them, the square, which should have all directions in 80 mm. It has diagonals. They will make an angle of 45 degrees. Now it will remain only the desired side to attach the item and trim. This option is bad because the fragments are difficult to fix, any shift can lead to the fact that the angle will be uneven.
The mounting of the ceiling plinth is complicated and intermediate joints. There are several recommendations:
- Baguettes from plaster and foamflast are best laying at right angles, especially when using putty. It should be noted that the thin layer of the solution is applied to the joint (next) element shake.
- Troubles may occur if the edges are damaged. Then it is necessary to trim the item so that you can form a complete pattern in two fragments.
- Polyurethane products need more attention, they have a joke better when it is made under the inclined. Spitched seam will rush less in the eye.
Indeed, trimming angles is not the easiest lesson that requires concentration and attentiveness. To better understand the whole process, we suggest watching the video below.
Property features for different ceiling surfaces
Difficulties arise and when there is no proper idea of \u200b\u200bhow to glue baguettes on the ceiling made from different materials. It is mistaken to assume that different surfaces need a completely identical approach.
Stretch ceiling
This option is very popular. It is easy to explain, because it is possible very quickly and without much effort to get a smooth surface that can have a different design. It is important to consider one feature when you need to pick up a quilt for such a coating: the part side that will be addressed to the ceiling remains without adhesive composition. That is, fixation is carried out directly on the wall. Therefore, products must have the following qualities:
- Small weight. In this case, foam foam, polystyrene foam, plastic and some types of polyurethane are suitable. At the same time glue ceiling plinth on compositions that have quick and reliable fixation.
- The side that is addressed to the ceiling must be less than that that adjoins the wall.
- To install wooden baguettes, you will need additional points of the support. It can be: dowel, counted anchor.

Designers advise choosing products from PVC, they are best harmonized with stretch structures.
Ceilings from GLC
How to glue the plinth on the surface of the drywall? This is a pretty simple procedure, because the basis is almost perfect. A little attention should be paid to the places of the plates of GLC, because they may contain spacure residues. Any irregularities are easily eliminated using sandpaper.
On a note! For such surfaces, any cartoons are suitable. But it should be borne in mind that the use of drywall leads to the fact that the size of the room is reduced, especially when installed on the frame. Therefore, designers have come up with a great solution - to have a wider side of the baguettes on the ceiling, which visually increases the room.

Playing ceilings
Such surfaces have their drawbacks. Therefore, before installing the ceiling plinth on a plastered ceiling or a wall - their evenness is checked. If defects are small, then there is no need to eliminate them. For such a case, you can use cartel with soft edges that will not create strongly noticeable irregularities.
Summarizing the foregoing, it becomes extremely clear that the installation of baguettes requires a proper relationship. All conversations about how to quickly glue the plinth on the ceiling, but keep quality, do not make sense, as it is the key to the fact that the desired effect will not be achieved.
Tired of wallpaper or monotonous coloring - glue tiles on the ceiling. This is a very simple and fast way to change the interior of the room. To fulfill such work will be completely able to anyone, even a novice master. We will tell about how to glue the ceiling tile.
The material from which this coating is made is a foam. It not only well delays outside noise from neighboring apartments and premises, but also performs the function of the heat screen. Polyfoam creates the effect of the thermos and significantly reduces heat loss.
The stove ceiling of foam plastic is produced with all sorts of patterns, so you can choose the material for every taste. Lightweight tile weight makes it possible to quickly perform mounting works almost alone. However, it is worth noting that the ceiling marking is recommended to perform together.

There are even foam plates that imitate the caissional ceiling. Such ceilings can be observed in medieval castles and palaces. To arrange an old ceiling in your apartment or house is not difficult and special financial costs. Powing the ceiling refers to a budget variant of the finish, and do not require large financial investments.
After pasting, the ceiling plates from foam can be colored acrylic paint for internal work. This allows the glued ceiling to tone, the color and style of wall coating and floor. The ceiling tile looks finished when conjugated with foam ceiling plinth. Such rails often repeat the gypsum stucco.

Calculate material
Tile ceiling format or size has the following - 0.3 x 0.3 m, 0.5 x 0.5 m. There are various figured (carved) plates, however, they have a clearly indicated area.
Before gluing the ceiling tile, you must calculate the quantity. To do this, it is necessary to divide the total area of \u200b\u200bthe ceiling of the room on the area of \u200b\u200bone tile. When performing mounting works are inevitable trimming in size or even accidental destruction by negligence. To take into account all the losses and random overrun to the number obtained, it is necessary to add 10-15%.

If you do not know which tile is going to choose, you can use another option:
- Multiply the length and width of the room
- To the resulting ceiling area Add 10-15%
- Purchase in the building of building materials only such an area of \u200b\u200bceiling tiles, which was obtained after the calculations
In the event that the ceiling tile is glued diagonally, the material of the material is calculated in the same way.
In order to properly choose the glue for the ceiling tiles, you need to clarify the store manager to glue the ceiling tile or read in the instructions or certificate attached. Usually such glue is always in the same place.
The calculation rate of the adhesive substance is indicated on its packaging. You need to buy glue according to its cost per 1 m. KV is regardless of what the size of the ceiling tile. It is also worth thinking about choosing a ceiling plinth, without which the ceiling will not be completed. Its amount is equal to the perimeter of the ceiling of the room.
Important to remember! To compensate for the length of the plinth during trimming, 3-5% is added to the overall digit. Printed with the same glue as ceiling plates.

Installation
Before the ceiling tile sticker is made, it is necessary to align the existing ceiling. To do this, it is recommended to completely remove the old whitewash or coating from the waterfront paint.
After that, the ceiling is carefully putty, and all irregularities (drops, pits and cracks) are removed. When the putty dry, it is pushed by sandpaper or abrasive mesh until the surface becomes smooth and smooth. The prepared surface is grounded by the composition of deep penetration, such as "cerepes" or similar.
After 3-4 hours, the primer dries and you can start the ceiling markup. To do this, it is necessary to determine the center of the ceiling. To perform this enough, to diagonal the existing ceiling. At the place of their intersections and will be the center of the ceiling. This point is as important when the ceiling tile is mixed diagonally.
Mark the mid-opposite walls and pull the thread regardless of which types of ceiling tiles are mounted. Their intersection must pass in the center of the ceiling. If the walls of different lengths, then enter the appropriate amendments. On threads, the axial lines are out of the pencil. On them, consequently, the ceiling tile pasting will be focused.
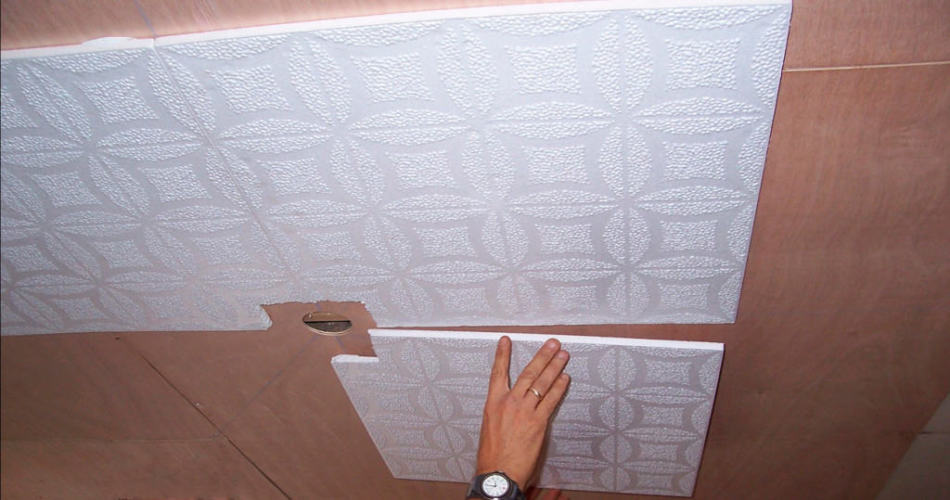
The first tile is applied with strips with a step of 15-20 mm. From the edge of the tile retreats 5-10 mm. It is necessary that the excess glue does not fall on the facial surface. It has a delicate surface on which prints can remain.
Ceiling tiles or foam plastic is applied in any corner from the intersection of axial lines in the center, and tightly pressed over the entire surface. Excess glue for ceiling tiles along the edges are removed with a clean cloth or sponge. The second tile you need to stick the first in the second corner from the center of the ceiling. Hold it about 1-2 minutes, after which they are released and go to the pasting of the next stove.
It's important to know! Before gluing, it is necessary to remove the existing burrs from each plate from its edges.
If this is not done, then achieving minimalization of the junctions will be very difficult. The ceiling plate is covered in a circle from the center. If necessary, perform trimming. Cut the foam tile for the ceiling is very simple. To do this, it is placed with a pencil and a ruler and cut off with a stationery knife. Carrying from the ceiling tile holes under the chandelier is also not difficult.

After the entire ceiling is covered with tiles, cracks can be covered. Now you need to put the ceiling plinth. Glit foaming racks from foamflast is quite difficult, however, there are some secrets that will make it easier for work.
In order not to press the liquid nails treated with glue or composition for for 3-4 minutes, it is possible to gently nail it with small nail to the wall in the layer of plaster. It makes it with an interval of 0.5 m, when the glue dries completely (18-24 hours) the nails are removed, and the holes are filled with acrylic putty.
Also, the joints of the ceiling plinth are shuled. To obtain the right and beautiful jokes of the plinth in the corners, it is cut in a joiner's stouch at an angle of 45 degrees. After putting all the joints of the ceiling panels and the plinth, it is recommended to paint the entire surface of acrylic paint. Now such a ceiling is difficult to distinguish from real plaster stucco