Porch to the house do it yourself projects. Porch to the house do it yourself: projects, drawings
If you wish to build a porch to the house with your own hands, then we have excellent news for you - it can be done with your own hands! Moreover, you can even choose one of several available options - a concrete, wooden or metal porch! At the same time, in the last version, the design will be equipped with a beautiful polycarbonate canopy.
Consider more detailed each of the available options. To begin with, you will get acquainted with the instructions for the manufacture of a concrete porch to the house.
Option first. Concrete porch
The strongest and durable design, which also looks quite solid. First, decide on the size of the porch.

Step number 1. How to calculate the size of the porch

In most cases, the porch of the house is just a few steps. You must choose the optimal dimensions of this design. Ideally, the width of the stairs should be from 0.8 to 1 meter. If there is an opportunity, you can make it even wider - so the whole porch will look more attractive and comfortable. Making the same width is extremely recommended.
As for the angle of inclination of the stairs, it must be within 28-45 degrees. The table below shows the optimal dimensions of this design.

The width of all the steps of the porch should be the same and make up approximately 25 centimeters, the optimal height is from 12 to 20 centimeters (it all depends on which the porch is intended).
Note! When arranging the upper platform, try to be below the front door somewhere on 5 centimeters.

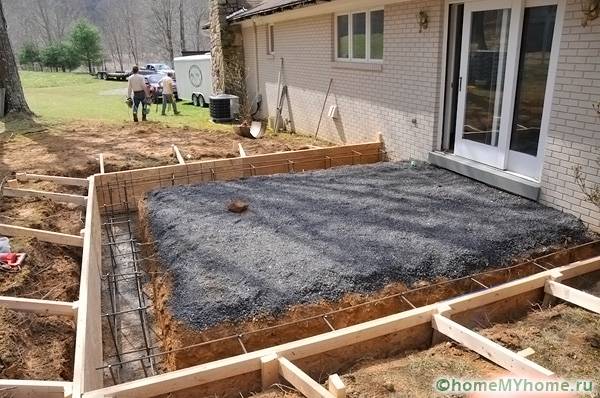
Step number 2. How to make a foundation for a porch
First, dig up the pit for the sizes of the future design (at least half a meter depth). Around the perimeter build formwork.

Then take the crushed stone and pour them down the bottom of the resulting pit (the layer thickness should be about 20 centimeters). Thoroughly endure the rubble, then pour over the sand with a 10-centimeter layer over it. Sand is desirable to pour cold water to make it easier to ram it.
The resulting area is covered with rubberoid. Top to put a reinforcing mesh with cells of 100x100 millimeters, then fill it all with a concrete mixture. You can easily prepare yourself, for this, follow the following proportions:
- one part of the cement;
- five parts of rubble;
- three pieces of sand.
After completing the fill, align the surface of the concrete, pour it into some places by reinforcement rod to remove air. Now it remains only a few days to wait that the primary set of concrete strength occurred.

Step number 3. How to build a formwork for steps

To build a formwork for steps, you will need fat plywood. It is important that the height of such a formwork be 20 centimeters greater than the height of the porch itself. The process of construction is nothing difficult: cut out from plywood all the details of the formwork (according to the height of each of the steps), then install them in the right places. For tightening shields with each other, use metal plates, brus from the tree or any other suitable fasteners.

Note! Shields located on the sides must necessarily strengthen through additional rigid ribs.
In addition, reinforce all the steps, and lay the reinforcement in such a way that it is immediately in all 3 planes. As an option - you can cook the iron frame, the form of which corresponds to the planned staircase, and build a formwork already around it. So it will be more convenient. In short, do the way you are more convenient.


Step number 4. How to pour steps for the porch do it yourself
To begin with, lubricate using the oil, all the inner surface of the formwork. This is necessary so that you subsequently removed the design without much effort. As for the solution for the fill, prepare it in the same way as before.

Start pouring in stages, starting from the first step. After the fill of each new step, make a small break so that it dries a little, then proceed to the fill of the next. So your porch for home with your own hands will get the most durable and durable. In the course of the fill, fasten the additional details of the formwork on the front of each step. The height of this should be like the first step.
Note! The surface of the formwork, which will come into contact with the solution, must be as smooth as possible.
After the fill, the concrete thoroughly thoroughly, and then push it with reinforcing rods.

It is possible to dismantle the formwork not earlier than in a week, and even better days after 10. At the end, you draw the finishing decoration of the structure. For cladding you can use tile or natural stone, boards or, as an option, any other finishing material (solve yourself).

Set the railing is not at all, do at your discretion. If nevertheless decided to install, then note that the height of the handrail should be at least 0.9 meters. As an example, we give the option that is equally suitable for both metal / tree structures. Install on top and bottom of the porch support racks made of metal pipes. At the same time, the length should be such that the angle of inclination of the railings was similar to the slope of the stairs. The ends of the racks are connected with the help of iron pipes, but already smaller diameter. Use the welding machine to connect.
The top tube will serve you as a handrail. To fill the space between the pipes, you can apply completely any rental. When installing the element, the gap can also be any - everything will depend exclusively on your personal preferences.

Upon completion of the installation, thoroughly clean all metal parts, cover them with two layers of the primer mixture. Thanks to this processing, the period of operation of the railing will increase significantly.
Video - Concrete porch building to the house with their own hands
Option second. Metal porch (with polycarbonate roof) with their own hands
Immediately alleged that the option described below is successfully combined with almost all types of private houses. The process consists of several stages, read the peculiarities of each of them.


In this case, any fundamental differences from the foundation, which we previously created for a concrete porch, no, is the exception. Is that the fact that the support racks for the future visor must be set at this stage. We recommend installing supports in each of the corners of the structure - thanks to this, the design will be more stable. If the sizes of the porch are large enough, at its length do several supports with a step of 2 meters.
First dig a pits with a depth of about 1.5 meters for support (by the way, steel pipes can be used in the role of the latter). Place each pipe into the appropriate hole, then pour with concrete solution.
Note! Wooden bars can serve as supports. The sequence of actions here is the same, here only the lower parts of the bars should be pre-squeezed or wrap the rubberoid, as well as to be treated with an antiseptic preparation.
Still set the supports under the stairs. Also dig a holes, place the metal racks in them, then pour with a concrete solution. It is hardly the length of the stairs will be too big, therefore, quite enough supports from above and below the design. Although for a lot of reliability, you can additionally put supports and in the middle of the staircase.
Pouring concrete solution, make sure that the staircase is somewhat drowning in it. Concrete Pour not until the top of the site - leave a small gap (within 10-30 centimeters, the specific digit depends on the current dimensions of the design). Later, when the assembly of the metal structure will be completed, you can pour the cutting to the top.


Step number 2. How to cook the stairs

To begin with, take a pair of metal chambers. We breed their supports that were installed and filled with concrete at the previous stage of work. Later, steps will be welded to these chambers. Take an iron corner (mandatory equitable), cut it in accordance with the lengths of the steps, adding the width of the weld. After that, you brew your corner along the contour.

Take the second segment of the corner, weld it in the same way, just already to the attached corner. At the next stage, you need to welcome the second corner to the channel. As a result, you should get about the following.


A kind of M-shaped product is obtained, you have to connect them to each other. For the upper connection, use an equalone corner - weld it along the contour to both items so that the shelves are placed inward. The lower connection is performed using the same corner, but the shelves should "look" outside.


To fill the steps of the staircase, which will decorate the future porch to the house with your own hands, can use any materials - for example, Phaneur or tree. For fixation, use screws, spinning them from below. And in order to additionally secure wooden elements, use glue or, as an option, a silicone-based sealant.


In principle, you can do further finish at your discretion. If you want, horizontal openings can generally not close anything - the trim in this case will be mounted directly on the steps.
Step number 3. How to make a visor over the porch with your own hands

So, we set the racks even at the stage of fillings of the base, so the further algorithm of action should look something as follows.

Take cross supports and install them in accordance with the skeleton dimensions. If you want, your future canopy may have a curved shape. To achieve this, care a profile every 4 centimeters and bend it as you need. The advantage of canopies with a curved form is that precipitation and all sorts of garbage will be easily crazy with them.


Take the polycarbonate, install it on the frame and fix the self-pressing (we recommend using special thermoshabs). The fastening step in this case should be 30 centimeters. Clean the edges with glue. Everything, canopy can be finished!

Video - porch to the house from the profile pipe under polycarbonate with their own hands
Option third. Wooden porch
With a porch pattern made of wood, you can read below.


Work consists of several stages, read the peculiarities of each of them.

Step number 1. How to build foundation
The optimal option in this case is the pile foundation. The fact is that such a base is distinguished by the utmost simplicity and speed of installation, but its reliability is at a fairly high level.
First dig a holes where piles will be located - not only in the corners of the future design, but also along the length of its sides (the step is from 0.8 to 1 meter). It will be perfect if you do it below the level of soil freezing. After that, take the supporting bars and treat them with an antiseptic preparation, and the lower parts wrap the rubberoid for waterproofing. After that, insert the bars into the pits. Align them vertically, and then fill with concrete solution.
After the concrete freezes well, you can proceed to the next stage.
Step number 2. How to mount lags
If there is such a need, cut the upper parts of the bars so that all supports are located at a single level. It is worth noting that when calculating the pile height, it is necessary to act so that at the end of the installation of the site between the entrance door and it remained a 5-centimeter height drop.
Step number 3. How to make a tutor (Kosur)


Now start doing the carrying part of the staircase. It is to this part that the steps will later be attached. In other words, Kosur is like a side line of steps.
To make a tutor, you will need boards whose thickness is 50 millimeters. Take one of them, draw the steps on it and cut them out with a saw or jigsaw. At the end, connect Kosur with lags using the Schip-PAZ connection.
Step number 4. How to arrange steps and platform

This is the last stage, after which the porch to the house can be considered completely finished. At first, attach the objects of the trim to lags (you can nourish them and fasten them). If you want, you can also put any finish coating on the boards (everything is here, again, depends only on your personal preferences).
At the Kosouro, attach a sticking and risers, and you need to start working only from the bottom step. The sequence of actions is as follows: Lock the risers on top of it, install it coming on top of it and so on. Fastening performed using a zip-groove type or screws.


As for the arrangement of the visor and railing, there are no special restrictions. Step-by-step instructions on the installation of these items, we led above. The algorithm itself is the same, that's just instead of the elements of the trim and the supports it is necessary to use similar wooden parts (you can use any other material like).

Video - original wood porch with their own hands
Common errors in the process of building a porch to the house
There are several errors that are performed at work most often. Read them.
- Error number 1. The construction of the porch is made after the construction of the house itself. In such cases, the depth of the foundation is not significant, moreover, it is not associated with the base of the house. Consequently, underground water, soil beamies, as well as a number of other factors leading to the fact that cracks appear between the porch and the house.
- Error number 2. Wooden reference pillars that are used in the case of arrangement of a wood porch are not processed by antiseptic drugs. The result of such an error is obvious - after a while, the design has to be built again.
- Error number 3. The height of the site is the same as the height of the entrance to the house. In winter, when the soil rises, the height of the porch increases, which is why the inlet door can occur.
- Error number 4. There is no vaporizolation or it is low quality. As a result, the moisture will be seeded through the design and reach the facing that steam does not miss. Next, this pair will turn into water and simply remain under this material. With the onset of cold moisture, it will begin to expand, which will lead to a breakdown.
Porch of stone or brick on their own
This option we left at the very end, because it is perhaps the most difficult and time-consuming, so far from everyone is able to do everything with your own hands. And it is not surprising, because to build a foundation from brick, where exactly there is no particular need - this is one thing, and I perfectly spread it perfectly - quite another.

It's no secret that professional bricklayers are engaged in the laying of bricks only under the condition of the presence of several submissions, the work of which is to prepare a cement solution and its timely submission. As for the stone, there's a bit more difficult to things about him, because the uneven edges are extremely reluctant to each other suitable. In a word, if you do not have experience and couples of assistants, then it is better to forget about the porch of stone or brick, otherwise I simply spend time and money.

It is much easier to build a concrete staircase, then choose a facing stone or tile for steps, whose size is as close as possible to natural. After that, you can easily sow all the design. Among other things, this method is attractive by the fact that even if you allow some kind of mistake, then without any problems, we will break the desired piece of cladding and repeat the finish.
What about the visor over the porch?
If we talk about the visor, then it will serve not only the protection of the porch and the ladder itself from rain or snow, but also as a decorative design element of the design. On the Web you can find a lot of different visor options, in addition, there are photos and in printed publications specializing in country construction.

Note! In most cases, visors are made from the frame - metal or of coniferous wood - and polycarbonate / plexiglass as a casing material.
What is characteristic of the visors made of wood, necessarily be asked every few years or, as an option, covering special compositions, otherwise wood will fuse and start cracking along the fibers. The thickness of the polycarbonate, which is used here, should be 7 millimeters, and the material is recommended to be placed by the spans by a maximum of 0.7 meters square. It is not necessary to use glass for this, because in winter it may not withstand the masses of snow cover and simply crack (another reason for this can be deformed wood).

Note! The visor should have a large area than all the porch to the house with your own hands, approximately 50 centimeters. Otherwise, the implementation of the main function is protective - you can forget.

In the instructions on the pouring of the base, we have already mentioned that the support pillars for the visor is preferable to set even during the formation of the foundation. At such supports are better and installing your visor. In addition, this option will allow in the future (if such a need arises) literally in two or three hours to equip a closed glazed veranda.
As for the coverage, they can serve as a sheet metal, on top of which a beautiful tile is laid, but it is better to use polycarbonate or plexiglass, which we have just mentioned.

Note! To protect the metal, which closes the visor, from corrosion paint it with two and three layers of suitable paint.
It is also important that the visor turns out to be scathing, and on it there was a metal chute installed under a slight bias. We also recommend attaching the chain to the end of this gutter length almost to the earth itself so that water during the rain was not sprayed on the sides. And in this case, it will smoothly drain along the chain. In order to avoid the appearance of the puddle near the porch at the point of the drain, you can equip drainage.

Glazed porch - Is it possible?
Such a solution as a closed porch, gains increasingly popular in recent years. Transparent glass facilities look extremely attractive, because of what many light up with the desire to build something like that and next to their home.

What is a glazed porch? In essence, this is a simple foundation from stone or concrete with a staircase and a canopy (the latter must be on the piles). Through the corners whose length corresponds to the height of piles, a framework is created.

Note! Sheets can have any height, while the width should be a maximum of 1.2 meters. If the sheet is wider, then its sailboat will be so strong that the wind having a speed of 30 meters per second, it will easily disarm the 5-millimeter glass.
If the distance between the pile is more than 1 meter, then it is better to break them with pseudo-eyed. In the same way can be divided and the height using for this a pair of twined corners. Due to this, you will reduce the load on the sheets of glass, and the porch itself to the house will still be light and transparent.
As we see, some specific skills or knowledge for self-building the porch is not required, because even with the most complex options you can cope with your own hands. Each of the described operations is for the construction industry base, and a person with skillful hands will fulfill them without problems.
That's all, good luck in work and warm winters! And for more detailed familiarization with the question, we recommend to see the following thematic video.
Video - make a porch with your own hands
Send the material to you on E-mail
TO a stupid is a functional element of any home ownership and is its business card. Such a structure should be at the entrance to the building and fit into the created exterior of the building. By choosing the appropriate material, you can build a luxurious porch to the house with your own hands. Projects, photos and drawings of the design will be easily found in our review. In addition to practical functions, this construction performs a decorative function. At the same time, the canopy and railing are decorated with beautiful carvings and other elements of the decor.
In many buildings, the porch is part of the project and fits perfectly into the general exterior
The porch in a private house, which can be viewed on the site, is an open area with a staircase in front of the entrance to the house. It can be any forms, as well as made of various materials.
Such a structure can be performed in the following variations:


- the structure of the attached type is more mobility.

Helpful information!To avoid overwhelmed steps and cracks necessarily mounted foundation.
Foundation: Event features for all species of the porch
Strong foundation is necessary to make a porch to the house with their own hands. Projects, photos and descriptions will help create a qualitative basis.
Article on the topic:
Porch to the house with your own hands: Projects, photos of various types of porch
Will help choose the best design of the porch of a private house photo that can be found on the site. It should be decided on the material for the future design. Traditional options include wood, concrete, stone with brick or metal.

Metal structures: Nuances of the device
Metal products are mounted with electrical welding. The design is collected from standard parts. If you wish, you can use the forging elements for a metal porch in a private house. The photo will allow you to choose interesting solutions.

This design is mounted in several stages:
- two channels are stacked in parallel at the distance of future steps. Then the corner is cut under the size of the steps;
- a part is cut from the corner equal to height between steps. Both elements are welded in the form of the letter G;
- Mr. details are attached to the chapeller;
- the schweller is then connected using the corners.

Ready. Steps from any material are mounted on it. If more than three steps are provided, the railing is mounted. Completes the design of the visor.
Concrete options: design features
Concrete design involves the continuation of the foundation in steps. At the same time, reinforcement is used, which will prevent the appearance of cracks. This building requires additional cladding with a stone or tile.

Formwork is made for each stage. The finished design is covered with decorative material.
Helpful information!The space between the foundations of the main structure and an extension is sealed with mineral wool, which provides better stability of the structure.

Wooden porch for a private house with your own hands: Mounting features
It is popular with a wooden porch to the house made by hand. Projects and photos of such structures are distinguished by a variety. The best material is the larch and the rest of the coniferous rocks. For such raw materials, special protective impregnations are required.

Installation of a wooden structure consists of the following actions:
- the manufacture of the staircase includes the formation of the thest. These elements are connected to the base;
- the installation of the site consists of mounting the shelf boards to the finished base;
- mounting steps. At the same time, compensation and compensation and preventation are attached;
- the design is performed using a railing and a canopy.
Helpful information!The durability of the structure depends on the correctness of the preparation and processing of the tree. Raw materials should be well dried.

Article on the topic:
Brick or stone porch
Run a brickwork for the porch is very difficult, as the brick need to be laid perfectly smoothly. Even more difficult to put a porch of stone without certain skills. Slot edges do not fit each other.

Simple options include the construction of the stairs made of concrete and cladding it with a stone or brick.
Variants visor
An important addition of an extension is a visor over the porch. Photos on the site allows you to see interesting options for this item.

The visor is created from a bar, metal, plexiglas or metal pipes. Designs made of wood you need to process with special solutions every 2-3 years so that the wood does not spoil.

The visor should, although it is half a meter to perform for the area of \u200b\u200bthe main structure. Piles for trump support are mounted at the base creation stage. Polycarbonate, plexiglas or tile can be used as a coating. This element must have a scope form.
Helpful information!Wooden design or metal sheets can be covered with paint in several layers.

What porch is better: glazed or open?
It is often used closed porch for a private house. Photos of projects can be found on the Internet. Most often it is transparent metal and glass designs. Metal is made frame and piles. Walls are made of glass. The roof of this design can be combined with a balcony on the second floor.

The glazed option is performed with a concrete foundation, a visor and a staircase. Using the corners the frame is performed. At the same time, the corners are attached to the set pile.
Save time: selected articles every week by mail

- Selection of material
- Base
- Wood
- Metallic porch
- Concrete porch
- Canopy and visor
Having decided to build on an individual project, the German developer often discovers that at the porch, built at the same time with the house, accounts for a disproportionately large proportion of estimated costs. Designers and builders here are not scolded here: the extra angles of the foundation and its protrusion under the porch require in-depth settlements and technical measures to ensure uniform shrinkage of the structure. Therefore, in many cases it turns out to be appropriate to build a house without a porch, and then attach a porch with your own hands. Moreover, the work is such a thing about a person with the initial experience of the amateur builder or at all that does not have any, but properly attached to the house the porch will not affect the strength of the building structures.
Selection of material
The porch to the house can be attached brick, stone, concrete, wooden or steel, welded from profiles or cold forging. Brick is undesirable: Natural soil chemistry, microflora and microfauna fall on it with splashes during the rain, rather quickly destructive material. It is for this reason that brick houses are built on the base height from 400 mm. Fully wrought or stone porch is complex and will be very expensive. It is much easier and cheaper to build a porch of simple forms and then bore under the stone or the same brick or decorate with overhead items.
As for the aesthetic qualities of the remaining materials, the statements that, they say, the concrete house is needed to the concrete house and the porch is concrete, to the wooden - wooden, are not substantiated. Houses in the photo below with the porch of materials, it seems not to be combined and with each other, and with the main structural material of the building. Nevertheless, it is immediately seen that they are combined. Technically, it is quite possible to attach the porch from any material to any house. What we will do.
Base
It is necessary to build a porch so that during seasonal primers of the soil and due to the unequal shrinkage house and the porch did not affect each other. Cracks on the contours of the pairing of the house with the porch are undesirable in any case, but in no case should not disrupt the designs of both. Suddenly, the crack still went, it is necessary to have the opportunity to close it, not clue complex construction work.
The fulfillment of these conditions provides a properly performed base of the porch. The private house and subsequent porch must have separate foundations; This, generally speaking, the general principle of the construction of attacks to the house, already giving the shrinkage. Pork base diagrams for different occasions are given in Fig., And we will analyze the porch conjugation methods with the main structure along the way, because For different materials, the porch is different.

Note: If the height of the slab basement under the porch is greater than 200 mm, then its reinforcement (see below) needs to be made 3-level. Replacing the unlucky and columnar foundations of masonry from ready-made concrete blocks with rare exceptions (see below), it is extremely undesirable, because Then due to the low weight load, the base of the porch will be unstable.
Wood
The wooden porch looks great at any home and with any decorative design. Build a wood porch is the easiest way. The base of the wooden porch is also required for execution: a columnar or unlucky foundation, see Fig. The latter (right in Fig.), In general, as they say, the song is one of the 2nd cases, when you can use ready-made concrete blocks - "bulls" 400x400x200. If the span of the porch ladder (see below) from the board-forties up to 900 mm, there is enough pairs of "bulls". The span up to 1300 mm - the stacks of steps are reinforced from the bottom with the lining bars of 40x40. The span more is needed additional support blocks.

On 3rd. Below are typical projects of wooden poles. The typical design of individual housing is made to study the requests of developers, so it is quite possible, you will find here a porch suitable for you. But the main thing is to pay attention to the ways of connecting wooden parts.


The huge advantage of the porch of the tree is that it can "play" according to the primations of the soil, while remaining tightly attached to the house. Therefore, a wooden porch and does not need a particularly stable foundation. But it is not necessary to "tighten" the frame of a wooden porch too, he must go a little like on the hinges, see fig. on right.

Some special hinges are required, ordinary carpent connections for this are enough elastic and pillars. Each porch in fig. The projects are made so that it will search for soil movements up to a rapidly, without transmitting excessive stresses to the design of the frame house. And withstand the "sander", withstand and any other.
Stairs
The staircase is the most complex knot of any porch, and the wooden staircase is more complicated by others. However, heavy long work for this is not required and a wooden staircase can be attached to any other porch. Therefore, it is from the stairs and should begin to develop your own porch to the house.
Main elements
The staircase, as you know, can be performed in assets and on cosomes (cowgamps), see fig. In the ladder in the assets, the ends of the degrees - concerns are closed with beams with beams, and the stairs on the cows ends are free. Wooden staircases for operating in the open air, it is preferable to do on platters so that the moisture is not stored in the gap between the guy and the step and did not cause the rotting of the wood.

The gap between the ultra-stage ultra and coming is called the opposite; It can be open and closed (deaf). The steps of one span of the stairs collected in assets or on the cosos, make up the march of the stairs. Svet step over the opponational (step socket) makes it possible to increase the width of the sticky, without reducing the angle of inclination of the march, and, acc., Departure of the stairs - the length of its projection on the underlying surface. Giving a row of more than 30-40 mm undesirable, people will cling to shoe socks. So that the shoes about Sve be less shot down, the deaf risers sometimes make a beveled kleon flush to the front edge of the top stage.
Note: General schemes of the device and fastening of wooden stairs are given on the trail. Fig., And with details we will figure it out further.

Payment
The outer staircase may be wet, icy. It is often tired of tired, extended and wet. Therefore, the height of the steps of the outer staircase should be withstanding the optimal - 160-175 mm, and the angle of inclination of the march in the range of 30-40 degrees. The width of the sharpening for the same reasons take more than for the inner stairs - 280-320 mm. It is not necessary to give it over 350, it will not be uncomfortable. The span of the outer staircase, based on the walking in the upper clothes, it is necessary to take at least the internal dual pass stairs if possible, i.e. from 1300 mm.
Note: The tilt of the march is calculated as arctg (H / W), where H is the height of the stage, and W is the width of the sticking without a sweep.
Also for the convenience of walking and reducing the probability of oskaliing the stairs, it is designed to make a person with the last step by the same foot that followed first. It follows that the steps of the stairs should be an odd amount. According to these data, the area-affordable area outside, and calculated it. If the calculation does not converge in any way, you need, firstly, to "play" the sink value. In addition, the staircase on the porch comes out most often on the platform. This makes it possible to the upper last, t. Frierry step, do already. Well, and places in front of the house, to make the removal of the stairs, most often enough. Finally, you can vary the width of the site, but if it goes less than 750 mm, it is better to refuse the site at all.
Staircase on Kowras
The most responsible assembly of the staircase on the porch is to connect it with the building. Left in fig. The methods of pairing the stairs on the cosoms without a platform are shown. Conjugation by pos. 1 (Kosur with a wrote) is preferable for a wooden house, which also "plays well" and gives a smaller shrinkage. The cross section of the playing beam (which in this case is attached to the lower wandes of the frame or cut) here is enough 75x50 mm.

For attaching a Kooowa without drinking (pos. 2 left), a platform beam is required from 100x50 mm in the diameter. This method is preferred for fastening the staircase to stone and concrete buildings. In any case, the boost of the top stage should be located 50-60 mm below the top of the door threshold based on the further shrinkage of the house.
Right in fig. - Molding methods of the march of the stairs to the site with a dependence on the width of the frieze stage. If the platform is wooden (see below), then it will be a damper between the staircase and the building; In this case, Kosur can be mounted on the platform beam tightly, for example, steel corners and self-draws. Otherwise, Kosur is attached to the beam of the insert without drinking.

The level of external stairs in the assets need to be put on the lining bars or the siblies. This, firstly, reduces the ability to accumulate moisture in the grooves under sticking / concerns. Secondly, the frame of the march can be collected and, if necessary, fill up to the installation of steps. That and the other makes the manufacture of a wooden staircase in the assets of the sat for beginners.
The ladder assembly scheme in the assets "for dummies" is given on the trail. Fig. In this way, the green novice-joiner can even make bevelled stiffers (shown by a pale tone). Right in fig. - Methods for fastening steps to her. It should be added to the above that it is not necessary to put sticks to steel corners in the outer staircase - rust flows.

Metallic porch
The porch made of metal is the second most popular after the wooden. With your own hands, the steel porch is most often done for the cottage: here the appearance, as they say, does not have little beats, but the whole design can be prepared in advance in production conditions, bring and put ready. Steel porch without wrought decorations and will cost cheaper than wooden, not to mention concrete.
Due to its elasticity, the metal structures are very little susceptible to damage to soil movies. But also efforts on the construction of the building it is capable of transmitting large. Therefore, on the soils, the middle porch is medium and stronger than the middle porch, as a concrete monolithic (see below). The foundation for it can be linked to the slab facilitated, with a stove with a thickness of 100 mm flush with the surface of the soil and single-level reinforcement. On weak and non-empty soils, the steel porch is possible to perform console-reference (see below) with supports from a pair of blocks - "bulls" under the heel.
The steel porch is usually collected on the crosses as shown in Fig. Schwellers on the platforms and the frame frame take 60-mm; The corner for frames of steps is equal to 40 mm. Lags under the flooring platforms make from the same corners cooked in T-shaped profile (semi-automated). On the support pillars are steel pipes from 100 mm.

This design is optimal for production in industrial conditions, incl. piece and small handicraft. The fact is that for accurate welding frames of steps, bulk conductors are needed. When welding on the street on the weight of the step at the beginning of the welder, they will certainly come out. Or, to build such a staircase in place, a certain experience is needed, see for example. track. video.
Video: An example of assembling metal stairs
Newbie here you can get out of the situation in several ways. The first is shown for pos. And rice above: Instead of the volume frames of steps on the plaza (smooth durable fire-walled platform), flat faskets under steps are boiled. Sick them - either wooden hanging, or any (eg stone) laid in flat frames from the same corner. In the other case, compensation or frame for it are attached to the lumps on the screws, which allows to align the steps. Bad in this way its big labor intensity and increased material consumption. Wooden sticky to the same will not receive a proper support, so that you need to take thick.
The second method is shown on the left to the trail. Fig. Here, the complexity and consumption of material is less, because Stands from pipes after welding are trimmed into the horizon with a grinder in terms of level and cord-moor. According to this scheme, there is a temptation to reduce the volume of earthy and concrete work, making the staircase on one koser, to the right in Fig. However, it requires a cutting machine: the slightest skewers of the supports of the chawller - and the steps went to walk. The cutting machine can be made by itself, consolidating the grinder on the swinging lever, the hinge is installed in a durable frame, but whether it is worth doing this - the master's business.

Finally, the simplest solution is a porch under the OSB trim or plywood, and on it a decorative finish, on a direct frame. The device is understandable from the next. Fig. All parts of the frame are flat, boil on the plaza. The foundation under such a porch is not needed at all, it hangs on the foundation of the building, this is T. Naz. Console porch (see also below). On the bottom of the house, it relies with adjustable screw legs, so you will consider: the fastening of the frame to the foundation of the building - only at the top, as shown in Fig! Fasteners - bolts from M8X130 from steel collet anchors. The step of the attachment points is up to 600 mm. Since the porch is always wider, in the rear frame of the frame you need an intermediate rack. Which do not interfere and in the rest of the ramp with a height of more than 400 mm.

Concrete porch
The porch from the concrete option is actually a little better brick: time consuming, and hard work, material consumption. Requires a reliable sustainable foundation, the building matches very badly. True, it justs on a separate foundation at least at home. Aesthetically concrete porch justifies itself only at the house of purely utilitarian design (on the left in Fig.); Technically combines well in the patch patch (terrace, veranda, on the right in Fig.), But the terraced porch is struggled together with the house.

Also at the same time with the building is built a console (hanging) and a console-support porch, pos. III and IV on the trail. Fig. Since here we are talking about the porch additive, we will confine themselves about them with the comment that the cavity under the concrete porch (tinge) must necessarily be well ventilated, otherwise it will turn into a focus of dampness and nest of any non-abdominal livelihood.
Addition to the existing house only floating concrete porch, pos. I and II. More The scheme of its device is shown on the right below in Fig. Instead of rigid minvata, the deformation seam (width - 10-12 mm) can be, and even better, lay a basalt cardboard. The compathedral of Minvates or a leaf of basaltocarton is carried out on the sides beyond the monolith of the porch and temporarily attach to the foundation of the building with self-draws in dowels through wooden slats. Fasten the filling of the seam to the foundation of the house in the field of adjustment to it, the porch cannot be!

Typical, one can say, the defect of the floating concrete porch is a chronically arising crash between it and the foundation of the building. It is not dangerous, but in love with the form, like a red nose and bags under the eyes of an alcoholic and in general without cracks. Therefore, a concrete porch to the house is better to add on a separate foundation, slab or pile, looking through local conditions (see Fig. With the foundation schemes).
About the foundations for a concrete porch in RuNet what only miracles are reading! We advise, let's say, do it on the twisted, pressed or clogged stilts. And the house is there close, closely, what, on a monolithic doctor rock is worth it? The pile works on the reliability of its foundation will not affect? If the concrete porch is made on the pile and slab foundation, you need to keep in mind the following:
- The wells for piles are manually manually in a gardener.
- Piles are reinforced and poured into rubberoid closures by a typical method.
- Piles are located symmetrically on the diagonals of the foundation plate with an indent of 250-350 mm from the corners.
- If any of the sides of the projection of the porch is more than 1.8 m, piles lay the envelope (pos. 1 in Fig. Below).
- The belt (levels) of the reinforcement lattice plates is fixed with knitting wire to the vertical branches of piles reinforcement immediately after graspting concrete in them. The distance from the lower belt of the reinforcement by the top of the submission is 40-80 mm.
- To accelerate the work, a sandy-gravel pillow under the stove can be poured through the plates reinforcing grille. Favoring remnants with armaturin sweeping.
- The stove thickness up to 200 mm is poured by one layer, and more thickness - layer in 15 cm.
- The allocated layer of concrete is picked up by a pointed steel rod around the middle of each grid cell to release air.
- The subsequent layer of concrete solution is poured as soon as the previous one starts. With this method, the fill occurs t. Naz. Concrete hydropling.
Note: Reinforce the foundation of the concrete porch is possible both steel and fiberglass (composite) reinforcement.
The porch is poured when the concrete slab will type OK. 15% strength. Practically - on the 2nd - 3rd day after setting the foundation plate concrete. Reinforcing a concrete porch multi-level powerful reinforcement (pos. 2 in Fig.) No need; It is enough to each step of one reinforcing belt from the steel grid from 40x40x3 to 60x60x5, pos. 3.

Formwork boards need to be soaked in advance with mineral oil (throughout, eg) so that it is easier to be easier. If the concrete porch does not go under the finish, the formwork from the inside is preferably thoroughly, and the seams between the boards should be put off with a putty on the tree. So the external surface of the porch will turn out smooth.
Profi, working to order / by employment, pour the porch in one taking, the time is expensive. Working for yourself, the porch can be poured outdoor, pos. A-e in fig. In addition to saving the material, the porch will be insulated and less susceptible to displacement of soil moving. Each subsequent step is poured as soon as concrete has been grasped. The concreting of the porch steps is made in the next. order:
- An aligned and rammed gravel or clamzite filling is poured with cement-sand 1: 3 with a solution of increased fluidity, with a water-cement ratio (HC) 0.72, until all pebbles or granules will be labeled. Those., The solution must be thickness of liquid sour cream;
- As soon as the primary fill will begin to be captured, the usual concrete solution is poured (cement: crushed stone: sand 1: 5: 3) normal consistency with a layer of 4-6 cm;
- only grabbed the first layer of concrete fill, put the reinforcement and pour the step to the top of the formwork section. If wooden or stone sticky will be installed on concrete, screw anchors are stirred for them at this step;
- The stupid step is deaerica (monitoring), as described above;
- Immediately on the pouring of the subsequent stage, the previous merpure: sprinkled with a dry cement M400 and carefully rubbing it with a wooden bar (pos. 4 in Fig.)
Note: Scheme for pos. A-E is given for a floating porch. The pouring of the porch on the foundation is distinguished only by the lack of primary fill of the first stage cement-sandy solution.
The rear wall of the porch (pos. E) is poured in a layer of 15 cm with a monitoring and hydropling. The order of her fill is the same as for steps. Wooden or stone sticky put on propylene spacers with steel washers, pos. five.
Canopy and visor
The porch with a canopy is definitely better open. Not only in the sense of the convenience, but also the preservation of the building: the opening of the entrance door is a place, from which the violation of the building structure is most often begins under the influence of weather conditions. The roof of the attached porch can be a canopy on the columns or hanging a visor attached to the wall of the building.
The columns of the attached porch must be concreted separately from the foundation of the porch and even more so from the floating porch. Removal of the base of the columns forward and on the side of the external angles of the porch or its foundation - from 0.5 m; Better - 1 m or more. The reason is the same sorceration difference in the porch and at home. If the bases of the columns are not associated with a harsh with a porch, frosty powder forces will be pressed against the wall. On the contrary - tear it from the wall.
Note: Processing by bitumen The lower parts (roots) of the wooden columns must be at least 400 mm above the ground level. The reason is the same on which it is possible to build from brick only on the base. Wrapped roots of wooden columns Ruberoid in addition to the impregnation won't hurt, but do not care - it will not protect the column. In the light of the rubberoid eventually destroys from the solar ultraviolet (UV).
The hanging visor of the problems of approval of the shrinkage does not create fundamentally. It is impossible to mount it only on skeleton and team walls; In all other cases, the suspension visor is technically preferable to the columns. The schemes of welded from 40mm A corner of the frames of visors for the porch are given at the top., And the drawings of a wooden visor of the porch - there at the same place. All these visors, except arched and double, should be equipped with a drainage gutter with a tump to the side (to the sides). The overall width of the wooden visor from the 75x75 timber can be increased to 2.5 m; For this acc. Increase the size marked with an asterisk.

The attachment of the visors to the stone or concrete wall is 8x130 self-pressing in propylene dowels or M8X100 bolts in the collet anchors. To a wooden wall - M8X120 tree screws. Roof flooring visor - any suitable (soft, steel or ceramic tile, polycarbonate, slate, etc.); Under any roof, except polycarbonate, a dory is necessary. We need a polycarbonate trumps by observing the rules for working with this material: to turn it out with a resistant to the UV side, the channels of the structure on the slope, close the edge of the filtering ribbon, secure to the frame using thermoshab, etc.
On the glazing of the poles
Glazed porch is cool and fashionable. In many cases, it is also convenient. But - only the porch, built together with the house, is possible to glass without fears. As for the porch house attached to the house, then no technical guarantee for the safety of their glazing for more than one time of the year is not possible in principle.
Finally: how to search for information
You may need accurate working drawings of some kind of typical porch. For example, you were built by self-building according to a typical project, but so far without a porch. Include in the review article at least part of the technician even on one project, unfortunately there is no possibility, but the most chassis from the typical projects of individual residential buildings are on the Internet in a free distribution.
In order not to "google" in vain for a long time and painfully, but immediately to the porch immediately, in the search bar of the browser you need to dial "typical project 18 ..." or "typical design solutions 8 ...". You will populate a number of preliminary results on available for free download documents like "Typical project 186-214-9.87" (this is a prefab-concrete porch from ready-made monolithic parts) or, say, "typical design solutions 820-1-088.88" (metal porch drawings ), or "typical project 189-000-362.85" (these are the drawings of a wooden porch), and the like. Further - understandable. We look at what is suitable - download, we determine with materials and expenses, we build.
Almost always the porch at home we like your reliability and thoughtfulness in use. Among all the projects available in the realization with their own hands, most often we choose not the most sophisticated in architecture and external design, and those that for many years will regularly serve as faithful to the owner and the house, as in the photo.

Porch projects, most often implemented with their own hands
Most of us know and know how much, you know how to keep a drink in your hands, and you can easily work with concrete. The lack of full-fledged joinery or welding skills will prevent a simple, but a pretty porch. In this case, for work with your own hands, the folk projects of the porch to the house will be most suitable:
- The design of the porch with a direct stair march on concrete supports and with double races;
- The project of the porch on a concrete pillow with one-sided adjoining of the stairs to the wall of the house, one-sided railings;
- Porch made of concrete or bricks with wooden flooring steps, metal or clinker bricks.
The porch projects shown below in the photo are not a dogma and can be corrected, supplemented or completely redesigned with their own hands at their own discretion. But the main principles of constructing the porch in front of the house are largely predetermined by the requirements of the strength and stability of the structure.
Despite the external simplicity, all projects will require the use of high-quality materials and the conscientious performance of work with their own hands. At the same time, the majority of enthusiasts, of those in practice, at least one of the above projects, did almost all the work with their own hands, with a rare exception, when they had to master the veligation of fittings.
Before proceeding with the construction, disperse in the details of the project, read the drawings and photos, make up for yourself the sequence of performance of work with your own hands. The style of the porch must be withstanding in unison with the facade of the house, but it does not affect the strength of the design and the design of the project.
In the photo you can see several options for designs with your hands the porch to the house on a concrete basis.


Porch projects with cast from concrete steps
Concrete buildings will require more severe physical labor, but often such projects are easier and more clear than the options of the porch of wood or options on screw piles. In most part, such structures are performed in the form of casting reinforced with steel reinforcement. The photo is clearly visible as a large mass and high strength of such a design allow you to implement projects with a mass of additional decorative finishing elements, use a stone fencing, a powerful heavy visor on massive supports and an unlimited-shaped staircase.

Projects of the porch of steel reinforcement and concrete
The design of the porch with concrete steps can be divided into three main projects:

Despite the seeming similarity of the designs, in the projects of the porch to the house there are certain differences in the construction technique and in the way of a ligament of a staircase span to the house. And the execution of such conditions is no less important than ensuring the proper design of the porch.
Durable Porch
The porch project provides that the design of the porch will not have a tight connection with the foundation of the house and its walls. This will exclude the appearance of cracks as a result of the sidelines of the walls or the porch itself, the junction between the "body" of the porch and the wall of the house must be sealed with glass gamble, as in the photo.

The staircase and the top platform will be formed into a single concrete block. The weight of such a scheme will be considerable, and therefore the foundation will be required.
The best option will be a simple monolithic foundation, a depth of 20-25 cm and dimensions under the size of the porch, as in the photo.

A pit under the foundation fall asleep with sand with rubble and perform waterproofing. Next is the laying of the reinforcement grid from the sixmillimeter bar, then poured the wooden frame formwork with a concrete mixture.


The next step will be the construction of a reinforced frame and formwork for further fill with concrete. Thanks to the free principle of building a framework of steps, it is not necessary to make a staircase in the form of a rectangular march. If the place and dimensions of the area under the porch, the steps can be made in the form of several articulated elements, or even a semicircular shape, as in the photo.


But the main thing in such a project is to comply with the rules for constructing the foundation base and ensure the correct reinforcement of the steps and the framework of the stairs to the house.
Due to the large volume of working material in such projects, it is often going to a certain rationalization. The main internal volume is filled with a gravel mixture, broken brick, sand, thereby fill in the inner volume and create a pillow - the basis for support of the board frame and formwork. Thus, almost 3 multiple savings of the concrete mixture is achieved. The form boards themselves must be as much as possible by the side stands, otherwise the pressure of the concrete mixture can squeeze the formwork.

If the project provides for the use of vertical supports, to support a canopy in the side zones of a ladder march close up special bolts, with which you can fix and adjust the vertical racks for the visor.
Sometimes to simplify instead of a bolted or flanged attachment in the thickness of the concrete, thick steel pipes are directly close, with a diameter of 50-70 mm, aligned vertically using a plumb. When mounting a canopy, the top of the pipe is cut into the height of the visor and is connected to its frame.
Attention! Such a project of fastening the bellows is considered not the most successful due to the fact that the visor is rigidly fixed on the facade of the house, and the concrete staircase into which the rack is concreted has its foundation and is subject to microspeakers.
All the attachment points of the supports, the visor and the surface of the stairs or the upper platform must have flexible moving connections.
Hard-tie porch project project
One of the varieties of a concrete porch is a project in which the staircase is located along the wall of the house, which allows the left or right-hand side of the staircase directly to the surface of the walls. To obtain a rigid connection of the frame of the porch with a brick masonry at home, it is most often used to seal the steel reinforcement of the staircase in the "body" of the wall at home. To do this, with the help of a perforator along a staircase, pieces of fittings are clogged with departure of half the width of the stage and bind or weld with the main reinforcement frame of the porch, as in the photo.

Next, the formwork boards are sewn to the wall of the house and are additionally amplified by external struts. The longer the staircase and wider steps, the more reinforcement elements need to be used to enhance the porch.

Thanks to the rigid connection with a wall of the house, the length of the staircase of the porch of this project can reach almost unlimited sizes. Often, such options of the porch have stairs reaching the level of the second floor. In addition, the mixed fastening scheme makes a porch less sensitive to the oscillations and sediment of the soil practically does not affect the foundation of the house itself.
Features of the porch with a support on the wall of the house
The first project is the most difficult in realization with your own hands, first of all, due to the use of a large number of steel reinforcement in the project. Unlike two other projects, the option of the porch with a support for the reinforced cantilever shelf in the wall of the house has a low weight, which means that it will require significantly less building materials, concrete and reinforcement.
A feature of such a design is the use of two side steel beams from a chawller or a heateur. In some cases, the beam can be made in the form of a composite of two steel corners or a square, as in the photo. They perceive the entire main load on the weight of the most stairs, the upper platform and concrete steps. From the upper side, steel beams are moving to the upper platform and rest on the console shelf. At the bottom of the staircase, the staircase is based on a ribbon foundation and a small concrete slab, which performs the role of the precession and the reduction in the pressure of the porch design to the ground.

In addition to the side beams, the body of the concrete staircase close the three layers of steel reinforcement, with a diameter of 6-8 mm. The reinforcement scheme is not different from the usual options for the manufacture of reinforced concrete slabs, with the difference that the rods of the fittings of the staircase march, the lower support and the upper platform bind or weld into one design, as in the photo diagram.

If the width of the stairs is not more than one meter, a small change can be made into the project - the upper and lower layer of concrete casting is reinforced using a grid of thick steel wire or fiberglass fittings. The longer the staircase span, the more powerful the reinforcement should be.
The staircase itself and the steps are cast along the formwork formed from the board. The use of steel lateral beams allows you to simply fasten the vertical balasins vertical racks using a welding machine. The thickness of the concrete staircase is relatively small, support on the cantilever shelf and a small foundation under the bottom support allows you to freely react to all drawdowns or soil moving at any time of the year. The presence of free space under the staircase will improve the conditions for removing moisture from under the foundation of the house.
Ultimately, the porch turns out not only light, but also very comfortable and beautiful, as in the photo.

The project is easy to implement if a console shelf has been provided for the house for the house for a staircase support. But often the project of the house was not envisaged, in general, the presence of a porch in this place. It often happens that the apartment is translated from the housing stock in non-residential with a commercial purpose, and the consequence of this is the construction of a new porch and a separate entrance to the premises.
In this case, the support surface can be formed from short console ductable beams embedded in the wall of the house. Often, according to the terms of the strength of the capital wall, it is simply impossible to do. In such cases, for the top platform, the porch build supports from ordinary bricks. The supports themselves in the new project should be tied to point steel reinforcement with a wall of the house.
It is no secret to anyone that to build a porch in the country is not the most simple task, given that it must fit into the general type of building, as well as to be truly functional.
In most cases, it is an original decorated porch can be an unusual business card for home.

There is a huge number of various options for the final stage in the construction of the house. Everything priority depends on how you see a beautiful truly porch for yourself and what budget you have.

It should be noted that if you are interested in how to make a porch with your own hands, then it is quite simple and all that is needed for this is to read this article and it is possible to take advantage of some builders' tips.
What is a porch?
In fact, a constructive porch, built in a private house, is the simplest platform of an open type with a staircase that is done right in front of the building. The porch can be the most diverse shape, with an additional canopy or without it.

If we talk about the design itself, which can be selected for the porch and defining for most of its design, they can be divided into three main types: simple, attached or built-in.

The porch of the last type is almost always designed at the construction stage of the house.
The porch of the most popular simple type is a platform, which has extra steps and canopy over them.

During the construction of this type of the porch, the hardest is the fill of the required foundation, which in any case it will be needed, even if it is a light design and you planned the porch of the tree to do it yourself.

The porch of the attached type externally is very similar to a beautiful porch of the built-in type, but at the same time it is very often rebuilt and modified in various ways.
Basis - Fundam
An important point to which it is worth paying attention to the labeling of the foundation is that its depth during construction work must be coincided with the depth of the foundation of the foundation in the entire building. Otherwise, after precipitation of the soil, it is quite possible that the deformation will occur completely in the entire structure of the porch.

If after the sediment of the soil, the design shift will be carried out towards the house, the destruction will begin with the foundation of the porch. With cosmetic repair, in this case, it will not be possible and to build a porch will have from the very beginning.

Be sure to build a special attention to the construction of the foundation, it is worth paying waterproofing the foundation.
Porch varieties for the future house
First priority before the start of construction, the porch must define what material you like most. Most often it is either concrete, or expensive metal, or a stone, a classic brick, acceptable by the cost of a tree.

Deciding to make a porch to a house from a tree, many just hope that this is the easiest and most affordable option, in fact, without even suspecting the large number of nuances.

It is the photo of a porch made of wood, without any problems can be found in various magazines more than others. This is due to the fact that the tree many consider traditional material.

All that will be needed during the construction of such a porch is the minimum construction skills, circular saw, as well as a construction kit.
Note!

If it turns out, it is best to use or larch or any coniferous rocks. They are characterized by good strength indicators, as well as fairly easily processed.

After a specially performed impregnation, the material will definitely not give up, for example, material from any other solid rock.

Above the porch must be taken care of the visor. It will not only allow the stairs to protect the stairs and its platforms from different precipitation, but also will interest the wooden porch in a short time without serious financial investments.

Photos of the most different canopies can also be found on the Internet and magazines dedicated to the construction of a variety of country houses.

Photo of the porch do it yourself


Note!


