Installation of plastic windows according to GOST - detailed instructions. Installation of plastic windows according to GOST - SETFULL ™ and basic installation system - SETECO ™ windows mounting drawings
In addition to the cost of plastic windows, intermediary companies also include in the final amount of installation and delivery services. In order not to spend thousands of rubles and save, you can install a plastic window yourself. In this step-by-step master class, we will teach you to correctly dismantle the old window and prepare a new one, taking into account the installation technology for GOST.
Step number 1: Dismantling of the old window
In our case, we dismantle the plastic window. The old wooden window is removed from the opening by the same principle, so there should be no problems at this stage. To dismantle, we will need the next set of tools: hacksaw, scrap, or rubber, chisel, spatula, nail, perforator, screwdriver (crosshead screwdriver).
First, delete the slopes. If they are collected from PVC panels, clean the seams from sealant or glue. Take the chisel or flat screwdriver, remove the decorative panels. If the slopes are attached, with the help of the chisels and the hammer, remove the layer of plaster. Remove the sash with the loops. In plastic windows, remove the decorative top overlay, press the passage of the rod. From the bottom loop remove only the pad, lifting the sash up.
With wooden windows more difficult. Often, the loops are painted with paint or rusted at all, then we knocked the rod by hand with a hammer or tear off the flap from the frame with a rubbish, scrap.
Remove the glass. We take a spatula, insert his stroke jack, which fixes the position of the glass package, we are looking for and removing. We remove all 4 strokes that hold the glass. Latest removing the top stack. Pull the glass, not forgetting to wear tight gloves so as not to be hurt. To safely remove glass from the frame, you can use special suction cups.

Go to the windowsill. Old concrete window sill remove with hammer and perforator. Our windowsill plastic. Since it is in good condition, we gently take it out and consider the old layer of the mounting foam. One light jerk is easily dismantled. Remove the tump, unscrew the fixing screws with a screwdriver or a screwdriver.

We take the hacksaw and cut through the tool around the perimeter of the old layer of the mounting foam. Remove fastening. Remove or pull the anchor plates or screws on concrete.

After all the stages of dismantling in the opening remains a frame. Gently take it out, better with a partner. The wooden frame is more convenient to remove in parts, sawing first the impost (frame separator), the bottom, and then remove the sidewalls and the upper crossbar.

Step # 2: Fastening the new window frame in the opening
Before starting work, we remove dust, the rest of the garbage, pieces of concrete on slopes, large nails. For better adhesion of the mounting foam with the base, cover it with primer across the entire width. We insert the frame into the window opening and try it, after having removed the sash and double-glazed windows.

Place under the corners and exposure connections of the lower profile of the frame support pads. Watch that the frame came on both sides of the frame for a quarter window opening. We use the mounting wedges, and not pieces of wood or old window frame. The gaps between the frame and slopes should be about 2 cm on the sides and from below and at least 1 cm on top to fill the space by mounting foam.

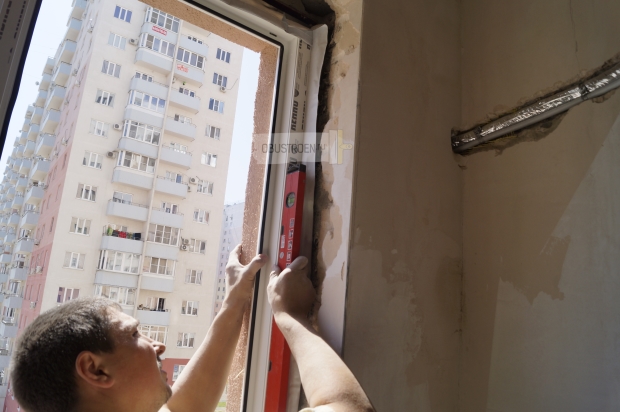
We check possible deviations horizontally and vertically levels.

If you install a metal-plastic window according to GOST, we recommend that the frame is placed on the outer perimeter. It will protect the assembly seams from ultraviolet radiation, moisture penetration, fungus and mold formation, will create reliable sound insulation. At the end of the frame of the frame (on the sides and on top) we stick a two-way vaporizolation tape. She takes out an extra moisture out and does not allow her to penetrate from the outside, provides good ventilation. The stressed ribbon should be wider by the seam to dock the brass.

We drill in the frame and wall hole under brazen. We retreat from the corners of the frame in each direction 15-18 cm and check the deviations by level. Itself is difficult to do everything. Therefore, one person works by a perforator, and the second holds the level. The distance between the fasteners on the frame should not exceed 70 cm.
At the bottom of the frame, we retreat at 12-18 cm from separators (Imposses) on each side and we make holes under bent. Similar actions are done in the upper part of the frame.

Insert into the holes braided, tighten them until the end. We check again the design in terms of the level and finally fix the fasteners. Wear a decorative cap caps on the caps.

Step No. 3: Outer waterproofing and marking of seams
For waterproofing of the external mounting seam, we launch a vapor-permeable ribbon under the pack. It will protect the seam from moisture and provide the necessary ventilation.

We pave the tape along the entire length of the window opening. We remove the lower base and fasten it with a sticky side to the base. Fixing waterfronts. In our case, we use an old sample with fitted sizes. When installing a new slope, measure the distance between the quarters. According to the measurements made, cut off the desired fusion length. We retreat 2 cm on each side and cut off the edge. We insert the drop in the groove and fix it with self-draws on the undercut profile, drill 3-5 holes for fixing.
Installation according to standard
Installation of plastic windows involves following GOST standards. Household owners do not always prefer to mount windows on all necessary standards and rules.
Installation scheme of plastic window.
Experts strongly recommend all residents to adhere to these rules, especially those who have office premises, shops, various public institutions. Most buyers are confident that the quality and reliability of the entire design depends on the profile. But besides this, assembly plays a key role and, accordingly, installation. Sometimes the owners, hiring specialists, do not think if the installation will be done according to GOST. Profile Manufacturer always indicates that the assembly must be made in this way, but the installers can not make this rules.

Plastic window installation circuit.
Installation according to GOST is not mandatory. This is rather a recommendation.If the home owners decide to install windows, guided by the requirements of the standard, you need to invite qualified employees, preferably from a large construction company. This company consists of an agreement that includes a specific clause, where it is indicated that the installation will be made precisely according to GOST.
When buying, the seller must pick up a suitable profile that will correspond to specific conditions. The design should be tested for optimal air exchange and heat transfer, to sound insulation, dust penetration and so on. As a rule, well-known supplier firms have certificates that the window structures have passed the necessary verification. Accordingly, it is better to acquire the goods from them.
Basic requirements in the installation process
It is important to take into account the fact that most problems with plastic windows occur if the installation is incorrect. Therefore, if you decide to install plastic windows, it is not worth saving on the installation process. Today in Russia there is GOST 30971-2002. The rules are specified for the correct installation. First of all, the types of profiles are specified, also examples and various mounted options. In the process of installation, it is important to follow certain rules: There must be no gaps, openings. It is necessary for isolation from the cold. In places of fastening windows vertically and horizontal, three sutures are made: internal, external and medium. Moreover, to properly mounted the window, you need to take into account the expansion of plastic when heated.

Window installation circuit in the opening.
It is also necessary to remember that when choosing should be guided by sanitary standards and tightness standards. From this will directly depend on the optimal temperature and humidity level. In order to learn such standards, it is necessary to consider the requirements of SanPiN 21.2.1002-00, where the norms of ventilation and heating in the residential premises are prescribed. If you do not comply with these rules, a risk of infection with fungus or mold may occur, this may occur due to an excessive level of humidity.
It should be noted that the installation according to GOST is a guarantee of your safety and a favorable functioning of the window structure. In addition, the installation according to the required standards provides a favorable microclimate in the house.
When mounting the seams, you must arrange at 3 levels. The first is able to protect the room from the penetration of precipitation, water. The second (internal) level should be protected from vapor penetration. The third level is done using construction foam. Standards are prescribed and wall types, which also need to be considered. All rules Installation need to know. They are conveniently followed both when purchasing and in the installation process. Once again it is necessary to repeat that only high-quality certified products should be purchased. The seller must necessarily provide you with documents where all the technical features of the product are prescribed.
Installation requirements
The quality certificate should be assigned not only to the firm that is engaged in the implementation of windows, but also the one that is responsible for installation. It is important that qualified specialists be taken for the installation of the design. The emergence and implementation of the certification system will display a business at a high level. Today, the buyer places increased requirements for the quality of designs and maintenance in general.
Before installing, it is necessary to produce all the necessary measurements by comparing them. It is important to know what loads can withstand the design, the wind load is determined. From this there is a conclusion, whether an additional installation of a frame with metal plates is necessary. Some windows can pass the air. In this case, the frame is set to normalize thermal insulation.

Window installation circuit.
It is important before installation thoroughly prepare the room. It is necessary to remove all foreign things in advance. Furniture is recommended to cover with a wide cloth or film. Household appliances in the room should be isolated from dust. First, they pull out the sash and gently take out the frame. The opening should be free from unnecessary parts, all slopes are checked using a level.
After the design is delivered, it is necessary to divide the frame and double-glazed windows. Rama is inserted into the opening with special wedges. Then make the frame marking and determine how it will be located in the opening. After the frame is fixed. For this use anchor bolts and screws. The glass is fixed using a stroke. In order to correct all the measurements, you will need a laser line. It is important that the whole design is firmly fixed. To do this, there are certain rules, for example, the distance between points of fasteners should be about 70 cm. The distance to fasteners from the inner corner should be a maximum of 15 cm.
The wall structures differ in each other. From the features of the wall depends on the choice of fasteners. Basically make fasteners with anchor bolts, anchor plates and screws. The most practical way is to use anchor plates. It is important to correctly install the slopes that cover the opening between the profile and the wall. To install, remove the remains of plaster from the old window, align the irregularities with a putty.
Instruments
- a hammer;
- perforator;
- lomik for pulling out old nails;
- building level;
- mounting foam and construction gun to work with it.
The installation of plastic windows should be carried out only by experienced specialists, it is advisable to install, following all the requirements and rules of the GOST. In firms that are engaged in plastic windows, there are quality control departments where you can contact if you have problems with the installation.
Load more
Thus, the insulation must somehow protect direct moisture or water vapor from penetrating it, and for moisture, it still has an opportunity to evaporate to the insulation to evaporate that any described problems of the installation seam did not threaten. For this, special vapor insulation and waterproofing vapor-permeable materials that we produce are created. The first are installed from the inside of the room and prevent the moisture penetration contained in indoor air inside the mounting seam, that is, to the insulation. The second are installed outside. These materials protect the insulation from the penetration of direct moisture (water) from the street. And also, which is very important, being vapor permeable, ventilate the inside of the mounting seam, allowing it to breathe. Thus, condensed water, or water vapor, which came there from the inside of the wall - (from its condensate plane) from the seam. The stagnant processes inside the insulation are eliminated, figuratively speaking, he "breathes out." Such a mechanism of action of special materials to protect the main element of the mounting seam - insulation from the harmful effects of moisture.
However, the moisture is not all, from which the insulation may suffer and the entire assembly seam. Let us dwell on two, factors that have the most critical impact after humidity.
In second place - ultraviolet solar radiation. This radiation destroys the insulation (polyurethane foam foam, it is used in almost 100% of the installation of windows) in a very short period of time. So, in the southern regions of Russia, the process of almost complete destruction of the assembly foam can occur in a couple of months. In the middle lane, it will take a year - one and a half, depending on the side of the world, where the window structure is drawn.
Conclusion - the insulation must be protected from the destructive effects of ultraviolet. The task successfully solves the same vapor-permeable waterproofing tape, which protects the insulation from the direct exposure to water from the street.
In third place - linear expansion (movement) of the window structure due to temperature fluctuations (thermal expansion). And such movements are essential and can reach from 5 to 10, and in some cases 15 percent of the width of the assembly seam itself! At the same time, the insulation does not suffer because it is well resistant to deformation loads and, in addition, glued to the wall and window frame. It is clear that the means of protection should be resistant to such colossal deformations.
Imagine if you apply a plaster solution or solid sealant - at what moment it collapsing, or breaks away from the smooth plane of the plastic window frame? (GOST allows for the use of separate types of acrylic sealants to protect the outdoor contour. These must be elastic (do not dry up to the end), vapor-permeable materials with good adhesive abilities). Here again successfully solves the task of the same vapor-permeable waterproofing tape, since there are no clogs of 15 and even 30 percent for it.
- Date: 08-04-2015
- Views: 179.
- Comments:
- Rating: 47.
Modern plastic windows have a sufficiently large number of advantages. Their installation is capable of ensuring reliable sealing and thermal protection. In order to save a certain amount of funds on the installation of windows, you can make them installation with your own hands. The design is quite complicated, but its installation does not require the use of any specific tools. To obtain a quality result, you will need to explore the rules for the installation of plastic windows, which are contained in GOST 23166-99 and GOST 30971-02.
Figure 1. Measures of the plastic window.
The order of installation of plastic windows:
- First of all it will be needed to measure the openings.
- After that, the dismantling of old windows is performed.
- The openings are prepared.
- The installation of new windows is performed.

Elements that will be needed:
- Building level.
- Plumb.
- Chisel.
- Anchor.
- Foam.
- Screws.
- Perforator.
- Primer.
- Marker.
- Documents containing standards for installing plastic windows.
Required measurements: a sequence of actions
Visually measurement process can be seen in Fig. one.

Installation standards say that the first thing you need to measure the rectangular window. The width of the opening is performed. To do this, it is necessary to determine the distance between the extreme points of the opening. Next, it is measured the height of the window opening. To do this, it is necessary to determine the distance between the upper slope and the windowsill. The result will need to add the windowsill thickness.
Measurements need to be minimized in three places for each size, at least and in the middle. Smooth openings can be found quite rare. As a basis, you need to choose a smaller from the values \u200b\u200bthat will be obtained.

Installing PVC windows: double-glazed windows, slopes, tump, fittings.
With the help of a plumb with a medium-sighted end, check the curvilinence of the opening vertically. With the help of the level it is necessary to check the windows horizontally. If there are deviations, they will need to be denoted on the sketch. The drawing of the frame is a rectangle that is inscribed in the sketch of the opening on the measurements. Based on the sketch, it will be necessary to make a frame size amendments.
Installation standards imply measurements for all positions indoors. The width of these structures can differ significantly, but the height should be the same.
Next, the location of the window block is determined. Mount the design is needed on 2/3 width of the wall from the inside. If it is planned to perform the walls of the walls with thermal insulating material on the outside of the house, the windows can be installed a little further.

After that, the outdoor tump is measured. Most often you only need to measure the length of the mounted low waves or to the width of the opening add 50 mm to bend. The lifting width is defined as the distance from the mounting plane to the outer part of the wall, the stock on the protrusion (35-40 mm) and on bend. If thermal insulation is performed, it is important to take into account the thickness of the layer of the plating.
Next, the windowsill is measured. The width of the design is equal to the distance from the inside of the wall to the mounting plane and the size of the departure. In this case, it will be necessary to exclude the width of the window frame. The departure must be calculated based on the fact that the windowsill must overlap the heating battery for a third of its size.
Sucks are measured after installing plastic windows, as the width of the design is quite difficult to determine.
Back to the category
How to choose the design of plastic windows by attachment?

After the design measurements are performed, you can purchase windows. In the process of choice, you need to consider the type of construction system system. Installation standards imply the following attachment methods:
- Installation through the frame in the plane of the window installation.
- Fixation with fittings, which is pre-fixed on the frame in the manufacture.
Most used the first way. When using this method, you will need to completely remove the window structures with deaf flaps.
The second method is recommended to be applied if independent installation of plastic windows is performed. In this case, it will be possible to eliminate the likelihood of damage to the glass windows and tightness of the structure during the disassembly of the assembly. However, when installing the entire window of the window, the design will be much larger, so insert the window will be quite difficult to insert.
Back to the category
How to perform preparatory work?
When windows are ordered, you should clarify the terms of production and delivery. Until the arrangement of the structure, it is not recommended to produce any work.
First of all, you will need to clear the place in front of the windows, after which you retain all furniture. The floor and heating radiators are recommended to cover with a special film.
Back to the category
How to prepare the profile of windows?

If old windows are installed, they need to be dismantled. To do this, you will need a chisel to pry a stroke, with the help of which the double-glazed glass is fixed, after which we need to lush it out of the groove. First of all, you need to remove the strokes that are located vertically. After that, it is necessary to dismantle the bottom and top. Strokes are recommended to designate. With modern manufacturing, the dimensions of such devices may vary, so if they are confused, small gaps may appear.
The frame must be tilted so that the double-glazed windows fall from the grooves. After that, it should be returned to the wall under a slight inclination.
From canopies of swinging flaps, you will need to remove the decorative plugs and unscrew the clamping bolts. If there is a frame system, it is necessary to release the top of the sash and remove the hook from the lower canopy.
As a result, only a frame with imposses should remain. In the inner part of the frame, it will be necessary to do holes for fastening anchors. It is necessary to make at least three points of fastening on the sides and two on the ends. For the manufacture of holes, it is necessary to use drills for metal, since inside the plastic structure there is an insert from a metal for strength. Mounting windows will need to be anchors with a diameter of 9-10 mm. The drill need to choose the appropriate size.
If the windows are attached for the ears, you do not need to disassemble the design. It will only be necessary to install fasteners in the frame and consolidate them using screws.
Back to the category
How to fill the profile of foam and prepare the opening: installation standards

To eliminate the possibility of the appearance of cold bridges, in the place of attachment of the profile to the frame it will be necessary to fill with polyurethane foam all the space inside the profile. It is recommended to do the day before installing the windows so that the foam can fill out all the base and froze.
If you save the old frame not necessarily, it is better to dismantle it. Fasteners need to be removed from canopies or snatch together with fastening screws. The frame and the windows box must be written in several places. With the help of scrap, you need to pose every part and remove from the opening. In some cases, it is necessary to pre-dismantle nails that hold the window box.
The seal and insulation, which are located under the box, will also need to be dismantled. Using the perforator, it will be necessary to remove part of the slopes.

All garbage needs to be collected in packages and take it out.
Outmam ends need to be counted and clean from dust. The surface will need to be projected.
If windows are installed in the old wood building, it is recommended to pave waterproofing material throughout the way to exclude moisture in the foam layer. If there is a need to enhance the design, you can insert a box of wood.
Before moving to questions directly related to the installation of windows, it is necessary to clearly determine what regulatory documents are regulated by the implementation of these types of work.
The most detailed description of the works on the installation of windows and the requirements for them are the following documents:
- GOST 30674-99. Contains general information about "window blocks from PVC profiles" and the requirements for them. Directly about the installation practically nothing says.
- GOST R52749-2007. Contains information about the installation of window blocks using cops (vapor-permeable self-insulating sealing tape).
- GOST 30971-2012. The finalized and existence of the standard introduced into operation 1.01.2014, instead of outdated GOST 30971-2002, which in most cases were guided previously.
At the end of the regulatory part it is necessary to note the following. The listed regulatory documents, like most of the other, directly related to security, are valid, but not mandatory for execution. Nevertheless, following the rules of GOST when installing window designs with their own hands, or when purchased with the installation, it will make it possible to achieve the quality of the work done.
In GOST 30971-2012, it is sufficiently detailed to describe the requirements for the device and filling the seams, the size of window openings and gaps for installation, as well as the types of fixing structures. In addition, general requirements for the performance of work, the design of the necessary documentation and minimum warranty obligations are given.
Instructions for installation do it yourself
Measures
The width and height of the existing opening window are performed. The dimensions of the windows are defined as follows:
- The width is equal to the measured width of the opening minus the double width of the assembly clearance;
- Height is calculated similarly. The minimum width of the gloor is 20 mm. In the calculations, 25-30 mm is usually accepted.
Quite often in brick houses, the opening windows are arranged using an exterior quarter. In this case, measurement is performed on the outer part.
- The width is equal to the width of the width between the quarters plus the magnitude of the frame of the frame on a quarter (according to GOST - from 25 to 40 mm.);
- The height is equal to the measured distance from low tide to the upper quarter with the addition of the plant value on the upper quarter (according to GOST also from 25 to 40 mm.)

Fastening method (according to GOST)
- Directly through the frame in the plane in which the installation is carried out. The most frequently used option that requires a preliminary dismantling of double-glazed windows with deaf flaps and teams of swinging flaps.

- Using mounted in the frame in the manufacture of reinforcement. The design is mounted entirely, which requires skills and qualifications due to considerable mass.

Preparation for installation
After the manufacture and delivery of window structures, it is necessary to carry out preparatory work, namely:
- clear the seat in front of the window;
- remove furniture;
- walls, floors and all available designs to cover with a film or a dense cloth;

- if necessary, dismantle the sash with the frame (when installed through the frame);
- fill out (preferably, per day before installation) the insulating foam internal cavity of the undergraduate profile. This process, not mentioned in Guest and often not performed by the builders, is made to prevent the occurrence of the cold bridge in the place where the profile is attached to the frame.

Installation of a window of PFC profile
- To put bars from a tree or plastic substrates from below to the end of the window opening.
- Install the frame or the entire team design on them (depending on the type of fastening). Supports remain an integral part of the design for its greater reliability and stability.

- The pegs are driven from the top between the window and the wall. They fix the frame from the sides.
- Then it is necessary to check the horizontal structure. If required, perform the necessary alignment of the promotional substrates.
- Check the vertical structure of the design, spend the adjustment if necessary.
- Secure the frame with one of two options:
- drilling through holes prepared in the frame in advance, perforator the mounting holes in the wall followed by insertion and fixing the anchors. It must be remembered that you first need to drill the bottom holes, securing the lower part of the structure; Then drill and outline the middle and upper part of the mount. At the end, check the design to vertically and horizontality and fasten finally;
- curving the ears of the attachment for the most dense adjustment to the wall, dried the anchor hole in the wall and secure the anchor. Starting also from the bottom of the mounting designs, then go above. If possible, it is necessary as often as possible to check the correct position of the window designs.
Installation of plum
Usually from the outer part of the window structure there is a groove for installing waterfront. According to the requirements of GOST, it must be mounted during the installation, it is also allowed to adequately fix it with screws to create greater reliability of the design.

Check and assembly window
After the installation of the anchor attachments and drain, it is necessary to check the horizontal and verticality of the installation. Then you need to build structures (if necessary), which is performed in the reverse order, with the establishment of all accessories, handles, limiters, etc.

Filling gaps
The process occurs with tightly closed sash and is performed almost always by the mounting foam of polyurethane. It should be remembered that the foamed polyurethane foam is a material proven and having a long history of use, however, it also has certain disadvantages. In particular, it is not sufficiently racks to the effects of open ultraviolet and the external environment.

Therefore, to avoid possible gradual destruction of the insulation and subsequent freezing and fogging windows, GOST prescribes compulsory seam isolated from all sides. For this you need:
- from the inside paste around the perimeter of the window (from the side and the upper part) waterproofing self-adhesive tape, which has a steam resistance and used specifically for plastic windows. A foil strip is glued below, which will subsequently be under the sub-circuit board;
- from the outside, the membrane moisture resistant and vapor-permeable adhesive strip must also be glued along the perimeter, which can elaborate steam.


Mentioned materials in a sufficient assortment are proposed in the building materials market. Their use practically will not increase the cost of work, but significantly increase their quality, as well as the service life of the mounted design.


Immediately the clearance is filled with a pre-moistened surface from the inside after the flexion of self-adhesive bands. An ordinary gun and a foam intended for year-round use is used to apply. GOST is allowed to use conventional foam, but such windows can be used at temperatures up to 30 degrees. Naturally, in almost all regions of Russia, the windows with such insulation seam cannot be applied.

Installation of the window sill

A fairly simple process, consisting in fitting (if necessary - trimming) of the window sill for its accurate entry under the window frame with a focus on the lining profile. GOST provides its burst on the walls - from 50 to 100 mm. Then the spicles are given the level on which it must be, and the cavity under it is climbing with a solution or mounting foam.