Tourist bath do it yourself. Mobile sauna with their own hands or learn to bathe in hiking conditions how to make a bath from polyethylene
Hiking bath is a mobile analogue of stationary structures. The design is assembled on the spot from the girlfriend or specialized tent and stoves that can be purchased in stores with goods for outdoor activities in nature. If you are going to make a hiking bath with your own hands, you will need to prepare before the event. To do this, you need to familiarize yourself with the installation process and the choice of materials necessary for it.
What are hiking baths
There are several versions of the tourist hiking bath.
- based on the acquired stove and tent;
- fully composed of subwoofers;
- combined from specialized and primary materials.
The first way to build a hiking bath is the easiest, however, it has several significant minuses:
- acquisition costs;
- transportation of the overall stove and frame;
The option is suitable for tourists who often go to nature on their own car. If the installation of a hike bath-tent is planned very rarely, then there is no particular sense to acquire specialized goods.

Attention! It is not recommended to use synthetic tents for the bathhouse. They are not intended for high temperatures (even if they have a refractory impregnation) and can quickly deteriate, as well as highlight toxic substances during heating. The performance of the tourist bath is possible from the tarpaulin tents.
Choosing a place to install a hike bath
To install a hiking bath, you need to choose a place where there will be enough stones for the furnace structure. The most appropriate option will be the forest river, since in a similar area you can find stones, materials for extracts and construction of the structure. The presence of water is also an important role, thanks to which there will be steam without extra effort.

Before you make a hiking bath with your own hands, you need to arm yourself with a tarp or polyethylene film, as well as a frame or to make it in place from sticks. For the construction of the frame on the spot you need to take the adhesive tape or the twine. An indispensable attribute in each campaign is a tourist knife, which does not occupy a lot of space, but has a wide range of applications in nature.

How to install a hiking bath
To install a hiking bath will be needed:
- drop a small deepening in the sand or earth (the bottom is recommended to lay stones);
- install the framework of the future stove and folded the stones on it;
- place the fire inside the furnace (the fire must be large, since the stones are heated very slowly);
- when the stones are warm and fire freeze, you need to install a frame of a bath (purchased or homemade) and pull the tarpaulin on it (film).
Instead of the first two items, you can use a purchased furnace for a hiking bath.
The frame can be assembled in advance so as not to waste the heat of the stove, and already after fastening the tarpaulin and start using the bath. It is advisable to pour hot water on the stones, which can be booked parallel to construction.

Attention! Try not to install a stove for a hiking bath directly to the ground. Heated stones can begin to burn land under it, which will lead to the appearance of carbon monoxide. If it fails to find a sandy basis, it is recommended to make a thick pillow of stones under the oven.
In order to make a small bath frame with your own hands, you need to pick up a few elastic branches, fasten the bases in the ground or sand and combine them with a tape or rope in the middle. It is very convenient to use the adhesive tape, since using it you can bore small sticks in the desired design.
Wet and especially raw stones as well as fresh sticks and logs can be broken under the influence of heating, so it is recommended to choose dry building materials for the stove. If there is no such possibility, you need to be as cautious and carefully as long as the stones are disappeared completely. Under the influence of high temperature, the water contained in the stones turns into pairs and tries to get out. If moisture in a gaseous state is not enough space for the outgoing, the stone will explode due to a large pressure inside. Compliance with such a simple security rule will enjoy the rest in nature without any problems.
Hiking bath is an excellent way to relax the body, especially if it is tired after long-term exercise. But such a bath will be useful not only in this case. Her will appreciate the fans of hunting / fishing, recreation in the country. There is a lot of models of ready-made "mobile" baths. But also, having studied photos and videos, you can make a mini-bath with your own hands using polyethylene or a tent. We offer you a detailed instruction that will help to build on hiking conditions, ideally corresponding to your requests.
What do you need hiking baths and how they look
Hiking baths are the perfect way to "get out" in conditions when there is no access to a full-fledged bath / sauna. Lovers of long hikes especially appreciate the opportunity not just to wash after a hard day along the way (if you're lucky), but also relax your tired body in the bath and feel the updated.
They will not remain indifferent to this type of relaxation and purification of dackets that do not have a bath, as well as builders who have to work in the distance from civilization for a long time, but next to forests and reservoirs.

Hiking Bath Based
So what is it, Mobile Bath? Simple words, this is a small isolated construction (akin to the steam rooms in the real bath), inside or outside the furnace is located. Furnaces can be both ready-to-use and made from girlfriend, usually stones. With the first, everything is simple, but with the last option is somewhat more complicated, but about it later.
And of course, fuel - firewood (without them anywhere). They will help maintain a steadily high temperature in an improvised steam room.
Preparation of necessary materials
There are several options for the facilities of the campaign bath:
- Finished tent bath. Akin to the usual tourist tent (only the material is somewhat different). Equipped with a special oven. It can be purchased in a specialized store. It will only be necessary to install the "Banhouse" in the right place on the lap of nature.
- Special awning for hiking baths. It will only remain to build a frame and buy or build a furnace.
- Homemade hiking bath. The structure, fully performed with its own hands from the frame, coatings (the polyethylene or the tent of the Soviet sample) and the self-made stove of natural stones are suitable.
Council. If you plan to use a tourist scarf as a bunny building, then in no case of a modern sample. The fact is that such tents are not intended for high temperatures, moreover, heating, they can highlight toxic substances. But the tent "come from the USSR" will perfectly cope with such conditions.
In order to build a reliable and convenient construction, we will need the following elements:

Simple frame for hiking bath
- Frame. As a support for the future design, you can use as wooden rods collected right at the rest of the rest (discovery in the forest, forest plantations, in general, places where there are a lot of wood). Stands made from carbon fiber / aluminum will be done well with their task. Some believe that they are not suitable for bath temperatures, but in practice the opposite was proven.
- . You can use the finished furnace for an independently built field bath, and you can also make it with your own hands, especially since it will not be much difficulty. Enough to have under hand stones and wood.
- Purchase material. It is usually used polyethylene, a purchase tarpaulin or an old tent.
Council. Strust for a bath stuff stones with a rounded, slightly elongated shape, without any bundles (other stones can simply be broken under the influence of high temperatures). Ideal for river / lake boulders with a diameter of about 20 centimeters (too small in size "give" very little heat, too big - just do not have time to warm up).
Construction of a bath structure: "White" and "in black"
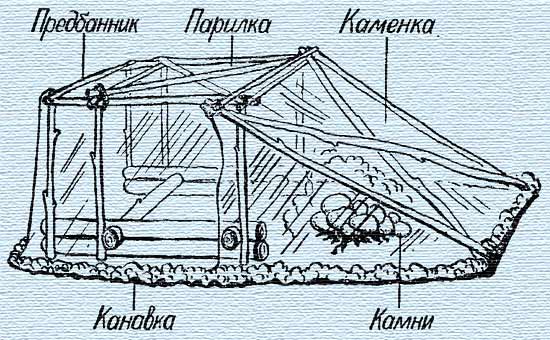
Consider the stages of installation process baths "in white" (The stove is located outside the steam room):
- We make a framework. Take the wooden pole with a minimum of 1 m high in the amount of 8 pieces. We need to build a framework. We drive 4 supports into the ground, with the help of the remaining sides of the tent. Fresh corners with a large amount of scotch.
- Construct Kamenka. For this, it will take 3 stiffs with a length of about 30-50 cm. Brepping them at an angle to the smaller side of the frame with a tape.
- We are tightening the basis of the film. Standard film sleeve width - one and a half meters. We cut it and get a three-meter concerning material. Now you can carefully cover the basis with prepared polyethylene. It should be careful to do so not to damage it about sharp frames of the frame.

Hiking bath in white
- Fix polyethylene with the help of old-good tape or clothespins, leaving its sufficient amount for the door of the structure. In the future, it can be closed either by clothespin, or with the help of a person who will keep it outside.
- Fix the film to the ground with heavy stones. The roof and the floor will rip the sweetheart for better heat conservation.
- Of the strokes harvested in advance, we build a small structure in the form of a well. We look around the perimeter with a dense layer of firewood and ignite the fire (sufficient heating of the stones will occur approximately in an hour).
It remains only to move the hot stones into the heater with a sperm blade, for example. And the bath is ready!
The main difference "Black" bath From "White" in the arrangement of the stove. In this case, it is directly inside the steam. The installation process of the bath in black at the same time is somewhat different from the previous one:
- We make a small frame from reinforcing rods with a height of about 50 cm. From above laying down the stones. Such a furnace design is very convenient and practical.
- At that time, the stones are heated, you can go to the framework of the frame (right above the stove). We do this using the same principle as in the previous case, or simply put the tent.
- When the stones are split to the desired temperature (it will take more than one hour), cover the frame with polyethylene (you fix the tent tightly to the ground around the perimeter). You can remove coal. The steamer is ready!
Shake in the bath - great. And even better when it is always "at hand." Now you can feel the heat of steam room, going to rest, because to build a hiking bath easily and just worry with pleasure!
Hiking bath: video
Hiking bath do it yourself: photo


28.08.2016
If you intend to go on the weekend, well, or another day, go to nature, and at the same time think about the bath and think, whether the campaign is not to cancel, the answer suggests the obvious. Take the bath with you or build a new one there. After all, a trekking campaign and a campaign can be combined and make one whole. We are talking about the bath in hiking conditions, which can be built with your own hands.
Is it possible to buy a hiking bath?
For beginners in this matter, it is necessary to easily know that it is necessary to have in stock in the construction of this design, so that, in the end, still the outlined event with washing and the steam room occurred. If a hike is scheduled for personal transport, it is better if the racks for the frame of the hiking bath will be available. Also, if you want to avoid unnecessary work, but after all, if a hiking bath is needed - it is not possible to buy such a construction today. You can buy a battle bath whole, you can buy - according to the components of the elements: only the oven, only the frame, only the awning. In short, it is more economical to buy what the most will not want to invent and do it yourself. The bought sauna looks, of course, more aesthetically, so it's best to buy it for a country house or cottage, if there is still no stationary bathhouse there, but I really want to wash it, and even more so. The principle of such baths, whatever designs they, alone - the hot stones are watering with water or braveractions from herbs.
What you need in order to make a bath in a campaign
For those who are planning a walk on foot, of course, it is wiser to build a bath right at the place of rest. Something, after all, you will have to capture with you. But in order to fulfill the conceived, you need to know whether all the missing need will be in this place. After all, in order for a hiking bath from an imaginary object to become something real, some conditions are needed. At the place of the privala necessarily and necessary:
- Water availability. Without water, actually, it will be very difficult to wash. It can be the coast of the river, the sea coast or lake.
- Availability of stones. Couples with splashing on - without it, the bath in hiking conditions will turn into a simple downturn with water. Well, if this is the coast, stones will probably find. Select them is thoroughly. It is better to take homogeneous round big boulders, the fact is that different components of the stone can react differently to the temperature difference and, as a result, when heating the stones will crack and fly into small components. In the absence of boulders, you can do and pebbles. Stones need a lot, approximately 1 bucket - on 1 wash. In short, each participant of the bath procedure must collect a bucket of stones.
- Availability of young subtle trees for framework frame. You can also stand in advance with racks. It can be simple aluminum racks from trading tents. They are quickly and easily collected and disassembled, easy to transport. Some hike lovers use carbonistic racks, they are also safe. If there is no such available, you have to chop young trees. In diameter, the finished porsages should turn out about 3-4 cm. But here it is necessary to take into account that the wooden racks will be disturbed within the framework of security, and it will always have to think about it. About the way they are bonded among themselves, too, you need to think. Moreover, every hike will need to be inventing new stiffs. Therefore, permanent lovers of hiking baths take a campaign racks. This allows you to not think about fire safety, as well as saves construction construction time.
- The presence of firewood. Also need a lot, at the rate that they will burn at least 2-3 hours. No need to choose too thick logs. They are badly burning and time from this is not at all saves. The size of the firewood should be a maximum of 10-15 cm, then they will have time to burn and give all their heat.
But what to cover the construction frame to think even in advance. By observing material must be taken with you, as in nature, nothing suitable, unfortunately, will not find. There are also many options here, you can buy something, maybe something is found in the economy. The easiest option is a square piece of polyethylene size of 6 by 6 meters. You can also use awning from the old tent, the bottom of which, naturally, you need to remove, or a piece of tarpaulin of a similar size.
Stove facing: first option
When all the above is already available, it remains the main question, how do you all collect together, so that it earned, in other words, how to make a hiking bath? First - inener, it is necessary to do the fire, as it burns to him at least three hours, so you can go to the frame and later. Well, if there were a lot of people in the campaign, and everyone wants to wash, let them participate in the work. Then all the work can be done in parallel: some are collecting stones, others build a framework, others are engaged in an awning, the fourth - the firewood chopped, well, the most responsible - of course, leads the whole process. The stove in our case will like a puff cake. A layer of stones are poured on a layer of firewood, which are also covered with a layer of firewood. Now you need to make a bonfire and when it turns around, put a layer of stones. This procedure with layers must be repeated until the stones end. For 2-3 hours, it is necessary to maintain a good heat, the stones should fool up to red, in the dark, this is more noticeable.
Construction of carcass
Making a frame must be durable and not far from the fire (in meters of two) and water. The neighborhood with water provides fast and uninterrupted water supply, and if desired and replace the presence of the pool. And the fire should be at a safe distance, and at the same time it is necessary to remember that there are still stones to transport. It may happen that they will have time to cool down until you get to the wage. For stones, by the way, on the territory of the carcass you need to dug a pit, in it and stones will be gathered when they warm up to the desired condition. If the frame will be from the poles, they can be connected to the example of a shala or cube. The jokes can be associated with a rope, closer with scotch or tape (all this must be grabbed with you). After the assembly, the ends of the jeres should be "packaged" into the soft material so that they do not stick the film. If there are racks for the frame, the construction does not take it a long time. Insert the racks into each other, according to the design technology, and the frame is ready for use.

Installation of observer material
If the stones have already heard to the desired condition, it's time to move them into the frame, in a specially dug hole for them. Stones move someone as can, who rolls, who shovel drags, the main thing is to make it quickly. Strongly unfolding should not be taken. When all the stones are already in place, it is necessary, for the purpose of fire safety, the location of the contamination of the fire (either stones) with the ground, pour water. Now you need to hoist awning on the frame. It is necessary to do it neatly, not assisted hot stones. Outside, you need to leave a "skirt", settling on it everything is heavy that is at hand: stones (cold), logs, and the like that as little heat can be outwarded. The entrance is better to do in the opposite side of the stones, but directly to the water, there, after the park you can dive and rinse. To check whether everything is ready for the park, you can splash the water on the stones if the pair rises up the hot wave, it means that the bath is ready to the steam, if the pair filled the design with a thick fog, it means stones cooled, and it will not work again.

Food stove: second option
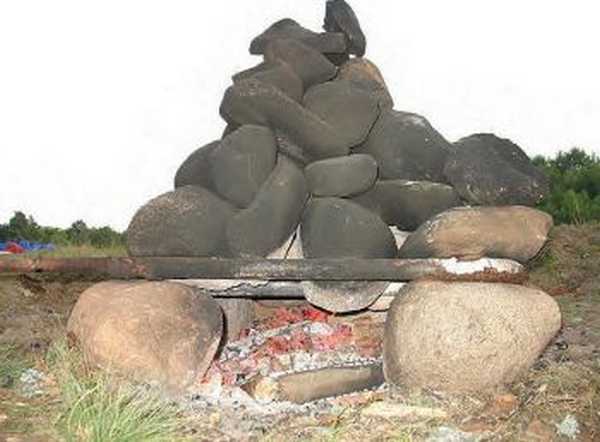
There is another version of the stove design. Hiking bath, in this case, will remind the Russian bath "in black". Such a bath is understandable, more smoking, but also more hot. The stove for such a hiking bath must be constructed somewhat differently, and the essence will be alone, and the forms are different. The first attempt is to put a huge stone in the middle of the alleged stove - the boulder, they are poured around it, all the other stones are superimposed. All firewood is spilled immediately on this pyramid so that new firewood is no longer planted. When the whole bonfire burned down - the bath is ready. The second attempt is to make the construction of the letter "P" from the stones, and lay firewood in the middle. We'll have hours 5-6, the sauna is ready. The third attempt - to make (in advance) a non-combustible box for stones and hoisting it over the fire. And this is the bath is ready.

Installing awning
The option is convenient for those who do not like the game of golf, with rigging stones in one hole. Here, on the contrary, the skeleton with an awning is installed above the incandescent location. But it is first necessary to remove all unburned logs from the fire and crawled fragments of stones, pour around the fire with water. It is necessary to equip places for the steam room, laying out around the stones, for example, a layer of needles. The entrance to the bath can also be done, as well as the previous version - opposite from the stones, next to the water. Well, to the question of security, in such a variant of the hiking bath, you need to approach the most carefully. If everything is ready - you can bathe.

So, options are exhausted. Of course, they all have a chance to exist. Which one is better to choose, the practice will help. One is undoubtedly - after a day spent in nature, the steam room in the bath is the best completion. You can only feel it when you experience all the magnificence of this procedure for yourself. It is better to try and do not regret what not to try and regret the lost chance of everything that remains until the next trip!
Hiking Bath - Video
Hiking Bath (Video Instruction):
How easy it is to make a bath in nature:
Hiking bath
If you intend to go on the weekend, well, or another day, go to nature, and at the same time think about the bath and think, whether the campaign is not to cancel, the answer suggests the obvious. Take the bath with you or build a new one there. After all, a trekking campaign and a campaign can be combined and make one whole. We are talking about the bath in hiking conditions, which can be built with your own hands.
Hiking bath from tarpaulin
Is it possible to buy a hiking bath?
For beginners in this matter, it is necessary to easily know that it is necessary to have in stock in the construction of this design, so that, in the end, still the outlined event with washing and the steam room occurred. If a hike is scheduled for personal transport, it is better if the racks for the frame of the hiking bath will be available. Also, if you want to avoid unnecessary work, but after all, if a hiking bath is needed - it is not possible to buy such a construction today. You can buy a battle bath whole, you can buy - according to the components of the elements: only the oven, only the frame, only the awning. In short, it is more economical to buy what the most will not want to invent and do it yourself. The bought sauna looks, of course, more aesthetically, so it's best to buy it for a country house or cottage, if there is still no stationary bathhouse there, but I really want to wash it, and even more so. The principle of such baths, whatever designs they, alone - the hot stones are watering with water or braveractions from herbs.
What you need in order to make a bath in a campaign
For those who are planning a walk on foot, of course, it is wiser to build a bath right at the place of rest. Something, after all, you will have to capture with you. But in order to fulfill the conceived, you need to know whether all the missing need will be in this place. After all, in order for a hiking bath from an imaginary object to become something real, some conditions are needed. At the place of the privala necessarily and necessary:
- Water availability. Without water, actually, it will be very difficult to wash. It can be the coast of the river, the sea coast or lake.
- Availability of stones. Couples with splashing on stones - without it, the bath in hiking conditions will turn into a simple dumping with water. Well, if this is the coast, stones will probably find. Select them is thoroughly. It is better to take homogeneous round big boulders, the fact is that different components of the stone can react differently to the temperature difference and, as a result, when heating the stones will crack and fly into small components. In the absence of boulders, you can do and pebbles. Stones need a lot, approximately 1 bucket - on 1 wash. In short, each participant of the bath procedure must collect a bucket of stones.
- Availability of young subtle trees for framework frame. You can also stand in advance with racks. It can be simple aluminum racks from trading tents. They are quickly and easily collected and disassembled, easy to transport. Some hike lovers use carbonistic racks, they are also safe. If there is no such available, you have to chop young trees. In diameter, the finished porsages should turn out about 3-4 cm. But here it is necessary to take into account that the wooden racks will be disturbed within the framework of security, and it will always have to think about it. About the way they are bonded among themselves, too, you need to think. Moreover, every hike will need to be inventing new stiffs. Therefore, permanent lovers of hiking baths take a campaign racks. This allows you to not think about fire safety, as well as saves construction construction time.
- The presence of firewood. The firewood will also need a lot, because of the calculation that they will burn at least 2-3 hours. No need to choose too thick logs. They are badly burning and time from this is not at all saves. The size of the firewood should be a maximum of 10-15 cm, then they will have time to burn and give all their heat.
But what to cover the construction frame to think even in advance. By observing material must be taken with you, as in nature, nothing suitable, unfortunately, will not find. There are also many options here, you can buy something, maybe something is found in the economy. The easiest option is a square piece of polyethylene size of 6 by 6 meters. You can also use awning from the old tent, the bottom of which, naturally, you need to remove, or a piece of tarpaulin of a similar size.
Stove facing: first option
When all the above is already available, it remains the main question, how do you all collect together, so that it earned, in other words, how to make a hiking bath? First - inener, it is necessary to do the fire, as it burns to him at least three hours, so you can go to the frame and later. Well, if there were a lot of people in the campaign, and everyone wants to wash, let them participate in the work. Then all the work can be done in parallel: some are collecting stones, others build a framework, others are engaged in an awning, the fourth - the firewood chopped, well, the most responsible - of course, leads the whole process. The stove in our case will like a puff cake. A layer of stones are poured on a layer of firewood, which are also covered with a layer of firewood. Now you need to make a bonfire and when it turns around, put a layer of stones. This procedure with layers must be repeated until the stones end. For 2-3 hours, it is necessary to maintain a good heat, the stones should fool up to red, in the dark, this is more noticeable.
Construction of carcass
Making a frame must be durable and not far from the fire (in meters of two) and water. The neighborhood with water provides fast and uninterrupted water supply, and if desired and replace the presence of the pool. And the fire should be at a safe distance, and at the same time it is necessary to remember that there are still stones to transport. It may happen that they will have time to cool down until you get to the wage. For stones, by the way, on the territory of the carcass you need to dug a pit, in it and stones will be gathered when they warm up to the desired condition. If the frame will be from the poles, they can be connected to the example of a shala or cube. The jokes can be associated with a rope, closer with scotch or tape (all this must be grabbed with you). After the assembly, the ends of the jeres should be "packaged" into the soft material so that they do not stick the film. If there are racks for the frame, the construction does not take it a long time. Insert the racks into each other, according to the design technology, and the frame is ready for use.

Insulated hiking bath
Installation of observer material
If the stones have already heard to the desired condition, it's time to move them into the frame, in a specially dug hole for them. Stones move someone as can, who rolls, who shovel drags, the main thing is to make it quickly. Strongly unfolding should not be taken. When all the stones are already in place, it is necessary, for the purpose of fire safety, the location of the contamination of the fire (either stones) with the ground, pour water. Now you need to hoist awning on the frame. It is necessary to do it neatly, not assisted hot stones. Outside, you need to leave a "skirt", settling on it everything is heavy that is at hand: stones (cold), logs, and the like that as little heat can be outwarded. The entrance is better to do in the opposite side of the stones, but directly to the water, there, after the park you can dive and rinse. To check whether everything is ready for the park, you can splash the water on the stones if the pair rises up the hot wave, it means that the bath is ready to the steam, if the pair filled the design with a thick fog, it means stones cooled, and it will not work again.

Kamenka for hiking bath
Food stove: second option
There is another version of the stove design. Hiking bath, in this case, will remind the Russian bath "in black". Such a bath is understandable, more smoking, but also more hot. The stove for such a hiking bath must be constructed somewhat differently, and the essence will be alone, and the forms are different. The first attempt is to put a huge stone in the middle of the alleged stove - the boulder, they are poured around it, all the other stones are superimposed. All firewood is spilled immediately on this pyramid so that new firewood is no longer planted. When the whole bonfire burned down - the bath is ready. The second attempt is to make the construction of the letter "P" from the stones, and lay firewood in the middle. Stop such a furnace will have hours 5-6, the sauna is ready. The third attempt - to make (in advance) a non-combustible box for stones and hoisting it over the fire. And this is the bath is ready.

Construction and installation of the stove
Installing awning
Bath option "in black" is convenient for those who do not like the game of golf, with rigging stones in one hole. Here, on the contrary, the skeleton with an awning is installed above the incandescent location. But it is first necessary to remove all unburned logs from the fire and crawled fragments of stones, pour around the fire with water. It is necessary to equip places for the steam room, laying out around the stones, for example, a layer of needles. The entrance to the bath can also be done, as well as the previous version - opposite from the stones, next to the water. Well, to the question of security, in such a variant of the hiking bath, you need to approach the most carefully. If everything is ready - you can bathe.

Hiking Bath - Transformer
So, options are exhausted. Of course, they all have a chance to exist. Which one is better to choose, the practice will help. One is undoubtedly - after a day spent in nature, the steam room in the bath is the best completion. You can only feel it when you experience all the magnificence of this procedure for yourself. It is better to try and do not regret what not to try and regret the lost chance of everything that remains until the next trip!
On the weekend, a campaign campaign and the usual regular trip to the bath will have to cancel!? And completely optional. You can make a hiking bath with your
Tourist bath - easy way to remove tension in hiking conditions
At the mention of rest, almost everyone appears an association with rest in comfortable conditions that contribute to the maximum relaxation of the body and its cleaning from slags. Meanwhile, the tourist bath with their own hands or the ready-made mobile version has long been included in the use of travel lovers. Such a steam room is not at all like the traditional, but possesses the same therapeutic effect and is able to remove the tension after a hard day.
Many people do not like hiking for antisanitia - without hot water it is difficult to wash well, but the hiking bath allows you to rest clean and rested. In addition, when few days or even weeks live in the country, the question of purity also gets sharply, in this case the improvised bath will have to be likewise.

Any tourist will gladly visit the Parin far away from civilization
Bath version, erected with your own hands
If you travel on foot, it is difficult to transfer with you a ready-made mobile bath, so you have to do with remedies.
At the same time, the following facts should be remembered:
- The cheapest concerning material is polyethylene, a piece should be purchased, sufficient to reliably shelter the bath frame.
- The tarpaulin is more reliable and better keeps heat, so you can sew a range of a certain amount or use the old tent.
- There are ready-made mobile baths in trading, which are a tent without a frame. This option is quite attractive - you only need to build a frame of the desired frame from the undergraduated means, after which the tent is put on it. The price of this option is quite democratic, in the twisted form, the canopy takes a little space and weighs very little.
- At the venue of the tourist bath, there should be enough material for the construction of a frame, firewood to maintain fire in Kamenka and stones for the facilities of the hearth.
- Stones for the hearth must have a round shape and a diameter of 20 cm and more. They should not have a layered structure, as it is fraught with the fact that the stone will explode in the heating process.

Tarpaulter is much more reliable than the film, in addition, it is better to keep warm
Stages of the device bath
The heating and construction of the bath takes some time, but if working in parallel with the work on the arrangement of the camp, then you can save a lot of time.
So, the simplest instruction on the construction of a tourist bath:
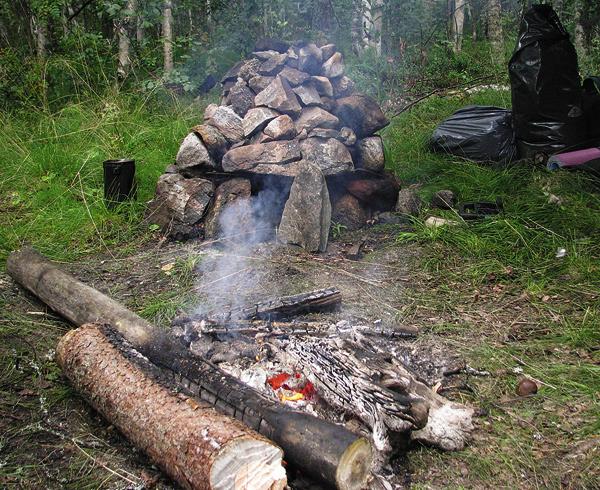
- On the site of the stove location, Dern is removed, after which the bottom is littered with stones, and the focus is satisfied with the top, inside which the bonfire is neglected. Fire must be maintained before reaching the temperatures sufficient for bath procedures (the stones are most often whites or blushed).
- When the fire is lit, you can proceed to the frame of the frame, which is best made from a tree and combine rope pieces, as it does not split like a wire from high temperature.

In the photo - the frame can be any shape and size: it all depends on the number of soared, the size of the canopy and the number of stones
- After the frame is put on the frame of the film or another material, while one wall or ceiling remains open to the removal of smoke. Upon reaching the stove of the desired temperature, the tent hermetically closes, it is better to dig a groove around the perimeter, to put the material edge into it and fall asleep its land, it will significantly reduce heat losses.
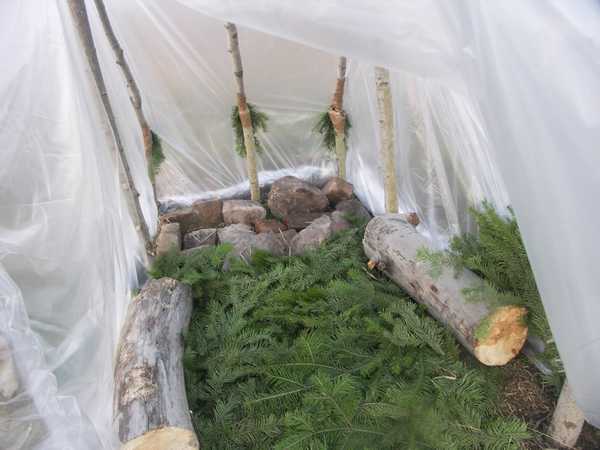
- A rather large amount of heat is lost through the floor in a hiking bath. It must be carefully laying the coniferous sweetheart, and on top to put the branches of deciduous trees - this will allow to keep heat.
- A bucket with water is put on the focus after heating the stones when the time comes to steam, she will be stones.
Tip: It is better to put a bath near the reservoir - after the steam room, it is especially pleasant to plunge into cool water.

Hiking bath on the shore - great solution
Disadvantages of this type
The main disadvantages include the following factors:
- For a long time heating the stove and the need to collect stones every time the bath is erected.
- The complexity of wood blank for the frame and its construction.
- The disadvantage of the plastic film and small heat retention indicators, as a result of which the sauna cools much faster.

If you have little concerned, the bath can be built even in the dugout
Ready Mobile Baths - Specificity of Use
Many lovers of Parilov acquire ready-made tourist baths that are used in hiking conditions.
There are several basic varieties of mobile baths:
- Tents without a frame, such systems weigh very little and comfortable in hiking.
- Tents with frame, weigh more, but also provide fast and convenient construction. All racks are made of light and durable materials.
- Mobile tents with a stove heater. A full-fledged version that does not require anything other than firewood, and you can carry with you. Temperature is dial enough quickly, which improves usability. However, even the most compact stove weighs a lot of enough and hard to carry it with you, this option is ideal for cottages and automotive travel.
Important: When choosing a finished tent, it is worth considering the approximate number of people who will relax in it.

The finished bath is easy to erect and just exploit
Despite the presence of indisputable advantages: reliable heat retention, ease of installation and highly efficient use of heating materials, this type has several drawbacks:
- High price for mobile baths.
- Large weight of equipment that makes it impellent with hiking.
Tourist parches are an excellent solution with prolonged hikes. With their help, you can maintain good hygiene conditions even away from the benefits of civilization. Thanks to the simplicity of their construction, virtually any tourist group can cope with this task.
Tourist bath: video installation instructions do it yourself, photo
Tourist bath: video installation instructions do it yourself, Price, Photo
Hiking bath tent: do it yourself and choose ready
Bath tent is the easiest possible options for baths. Hiking Balke will restore during long-term hunting or fishing, in walking or during jeep safari. It can be installed on the cottage (if the "stationary" bath is built or is only in the project stage).

Hiking Bath Tent - Great Recreation Option in Dacha, Fishing or Hunting
Variants of the battery of bath-paltics set. You can buy a ready-made tent with a stove or without, and you can completely build everything from the girlfriend. It is not recommended to use conventional tourist tents. First, such fabrics are not intended for high temperatures and soon you will have to acquire a new tent, and secondly, during heating, they can highlight harmful substances. Well, they are not designed for use in such aggressive conditions. But the old tarpaulin tent as a bath can be used: and heat keeps well and no harmful evaporation. If there is no tarpaulin, the polyethylene film is suitable for suitable size.

Polyethylene film tent
How to make a hiking tent
You need to start with the selection of space. You need a smooth area of \u200b\u200bsoil near the reservoir. Such a bath is better to arrange on the shore of the river, a stream or lake: to plunge into cool water after the steam room, and it will be necessary to wash somewhere.
We collect materials
Then you will need to take care of the search for the material of the frame, firewood and stones. If you have a finished awning or an old tarpaulin tent, the wruffs will be less if there is nothing like that, you can do a piece of polyethylene film. Its sizes depend on the size you are going to arrange a tent. If a couple of people are steaming, then a sufficiently small structure, and for 4-6 people it will need a piece of polyethylene 6 x 6 meters (the thickness will be the film, the better).
Pilia for the frame can be found in the near forest or landing, there you also need to find dryer for the stove (or bring a couple of coal bags). And one of the important classes is to search for stones, thanks to which you can bathe. They, heating, accumulate warmly and allow for some time to maintain the desired temperature in the steam room. Stones are preferably picking on the shore of the river or lake. They must be homogeneous, smooth, without extraneous enclosures and inclusions (sequined mica, quartz layers, etc.).

Stones for a bath can be selected on the river bank
Important! Layered stones when heated can be broken into small pieces, applying serious wounds. Stones must be not very large, but not very small. The most optimal size is 10-20 cm and slightly elongated form. If you take a smaller stones, then many heat they will not accumulate and quickly cool, and to warm large instances it will take a long time. Although, if you have enough time, you can lay large stones as the base for the hearth.
Do not forget to make a broom for the wage. The benefit of the materials and in the forest and on the field for him the mass. True, it is possible to do this a little later when the bulk of the work will be done, and you will wait until the stones are increasing.
Stages of manufacturing hiking bath-tent
When all the materials are assembled, you can proceed to the device steam. For this, first of all, out of the stones fold the hearth / bonfire / fireplace - who has enough skill or desire for.

How to fold the furnace for bath tent
One of the easiest options for layers to lay firewood and stones, then ignite the fire. Then you only need to maintain intensive burning until the stones are red or white (depends on the degree of heating and type of stones).

When the focus is organized, you can use the iron sheet for which stones
When the furnace folded, the fire was burned, you can start a framework. If you have an iron frame from the old tent, it will also fit. And if the height of the iron racks is not enough, and they are hollow (as usual), they can be increasing them all the same jerseys. So, you need four angular racks that you need to drive into the ground. From above around the perimeter you need to tie a ride, which will all connect into one design.
Make a frame around the hearth / fireplace / oven
It is desirable to tie a few sticks on the roof - they will prevent the sagging. If the tent is high, you need to add another strapping around the perimeter in about the middle of the height (do not forget to leave the place to enter, raising the strapping on one side higher). Pilot can be fixed with rope, wire, scotch, etc. The main thing is that the design gets quite reliable.
In real tourists, private travelers, in the arsenal there is a ready-made frame for a hiking bath. As a rule, such frames are made from alloy tubes.
You can use a ready-made compartment frame for a tent bath.
After installing the frame, you can catch a chamber. While the stones are warm, do the floor with the floor. The best option is to the bottom of the coniferous husk, and on top of the birch, oak, linden - any trees that are nearby.

War down the floor of the bath tent with a coniferous savor
When the stones begin to crack, put the water, and while it heats, you can start pulling the awning and fasten it. Just until all the firewood breaks, it is impossible to hermetically close the tent - you can imagine smoke, or, which is much worse carbon monoxide. You can leave open or one of the sides, or the roof - depending on the design of the awning / film.
When all the firewood, ash, and coals are burned, and put out of the tent, leaving only preheated stones. Now you can close it all hermetically. By the time you all embellished, the air in the hiking steam warms well. You will only need to set a couple, lining to the hot stones water or boiled grass. Hiking bath tent is ready. You can bathe!
If a polyethylene film is used, the heat is not enough for a long time and you need to bathe quickly. If a tarp was used, then the heat should be enough for 3-5 full-fledged occasions, and this is almost a real bath.
Ready Mobile Bath Tents
If you lead an active lifestyle and long trips for you are not uncommon, it makes sense to purchase a ready-made bathing tent. Models, manufacturers, configuration options. There are just awnings without a frame and stove. They are sewn from a material that is well holding warm and enduring high temperatures. As a rule, they are easy and compact (weight of the tent for 4 people - 2.5-3 kg) and they are easily transferred in a backpack. But it will be necessary to fold the stove of stones (or acquire a portable embarking option), search for a rider for a frame and to build it.

Species and models of finished bath tents a lot
There are tents with a ready frame and a stove. They weigh and the places they are understandable, they take more, but it is not necessary to worry about anything. In her hands or on their back it is already hard to wear, so rather this is an option for led or car travel.

Bath tents with a ready-made frame and the team stove weigh quite a lot, so you are more convenient to carry them in the car
The only thing that needs to be found is on the spot - stones for the heater, but they are required much less than when the center of the hearth and the time it takes a little, although they can be treated with them, if there is where to put it ...

Tent baths with stove
When choosing a finished tent-bath, you need to pay attention not only to the size and cost. One of the important characteristics is the installation / assembly speed.
Mobile Bath "Mobib"
For both large and small companies, you can pick up suitable products from the Mobiba model range.

Mobile bath "Mobiba" for a small such company
Bathhouse-tent company "Mobiba" can be a single-layer and two-layer. In a single-layer bath, you can bathe at ambient temperature to -25 degrees Celsius, and two-layer up to -40 degrees.
The tents are made of Oxford (Oxford) - a durable fabric of chemical fibers (nylon or polyester) of a particular structure is usually applied, which provides complete waterproofability of the tissue. Also, the fabric has water-repellent properties.
The frame is made of Aluminum Aviation Alloy D16T, which combines two important qualities: lightness and reliability.
A rather popular model is Mobiba MB-104. It turns out that our compatriots bring such baths even to America.
Bath Mobiba is designed to use furnaces. The ceiling has a hole under the smoke pipe. For the purpose of fire safety, the passage under the pipe is trimmed by heat-resistant materials.
Important! It should not be used for the heating of a bath-tent not intended for this wood furnaces, such as Chinese production. The fact is that when the furnace furnaces are firewood, one way or another will fly sparks that will burn the ceiling. For bathing Mobiba, it is better to use specially designed fashionable wood furnaces, eliminating sputs - in them built in the opposite. Such furnaces are "median" and "optima".

More about the Optima furnace for Mobiba MB-5, Mobiba MB-12, look in a video clip.
Hiking Bath Tent Nova Tour
Tourists are popular with Nova Tour tents (Nova Tour). The tents are very lungs, which makes it possible to wear them even in a backpack with hiking. For example, a sauna-tent designed for 4 people, weighs only 2.5 kg.
Hiking Bath Tent Nova Tour
Tent material - Poly Taffeta fabric. The fabric is made of polyester (polyester tissue), which, unlike nylon, is more resistant to ultraviolet rays and is less stretched during wetting.
The tent has windows, so there will be no problems with lighting in the daytime. The entrance to the bath is sealed using a zipper.
Bath closes on a lock zipper
Nova Tur's tent for 4 people, you can buy for 4 thousand rubles.
Attention! Included there is no framework, so it will have to be built in a hike from the remedies. You can buy a ready-made frame for a bath tent or make it yourself.
Conclusion
More selection - more benefits. There is always a choice. If it is not possible to purchase a ready-made bath, then buy a piece of thick polyethylene and can always build a hiking bath while in the forest.
If you are interested in auto-tourism, then it is logical to purchase a ready-made bathhouse, which can be installed within 30 minutes.
Hiking bath tent: do it yourself and choose ready video
Bath in hike is not a dream. It can be done even from a piece of film and several poles. The most important thing is to find a sufficient number of stones for the Kamenka and also -
Hiking bath do it yourself
Long stay away from civilization is not a reason to refuse its achievements. The avid steambags can do without disturbing their tradition, as the hiking bath is almost no different from the baths usual. Need a steam room - a closed room for procedures, as well as a source that provides heat. In stores of outdoor activities for sale collapsible hiking baths, equipped with even the furnace. But to show a special chic - it is to organize it with your own hands.
Appointment of hiking bath

Mobile hiking baths are perfectly suitable for tourists during long transitions, summer residents, in which the site is at the stage of development, construction teams located on the road and attached to its object.
Requirements for the bath in hiking conditions

For the construction of the structure, you will need an outline or drawing of a hiking bath, a necessary set of simple tools and compliance at the site of some conditions:
- Water availability. It will be difficult to wash without it. Therefore, to accommodate a hiking bath it is worth choosing a river bank, a pond, lake or stream.
The construction of a hiking bath
Frame with an awning for hiking bath

The prepared racks of the future hiking bath with the stove are binding at the ends before receiving the design in the form of a cube. For dressings, you can apply a rope, tape, etc. The cavity of the stakes should be wrapped with a cloth, otherwise they make holes in the tent at its tension. If you connect the roof corners with jerles, then these hard diagonals will increase the stability of the structure.
Bath stove on hiking conditions

First of all, a stove is needed for heating the collected stones. In the presence of its finished frame, it is placed on the opposite two sides with major stones with minimal lumen between them. The two sides remain open, they will support cravings when burning firewood. Then closest stones are stacked on top and from two sides of the furnace. It will be the "heart" of the steam room.
Bath use in hiking conditions

The finished hiking can be taken in black and white. The main difference of these options is the location of the framework. Black baths are located above the oven or bone, and white contains only stones hot on it, which rolled into a bath with a tent with priests.
- Bath in black. In such a hiking bath from the furnace, ash and coals are absorbed, and the surrounding space is poured with water. Ready, covered with an awning or film frame is mounted over hot stones. A tanks with hot and cold water are entered into the premises. Water can be heated on the same stove. No shoes in such a bath should not go, since when cleaning the firebox, small coals remaining on Earth can burn foot feet.
For a full-fledged recreation in a hiking bath, you can in advance in a pair of brooms, in the field they are not sprinkled, but simply soaked in cold water. When heating water to moisturize hot stones in it, you can add plants for fragrance: juniper, cheeve or lingonberry leaves. They will complement the wellness effect of a hiking bath with a pleasant invigorating odor.
- Watering hot stones should be hot water, as the cold liquid can cause their destruction.
Collect the hiking bath with your own hands without the help of friends is unlikely to succeed. After all, it's hard to install and cover the frame, to ride water, stones and seize firewood for a fire. Resting the company, you can simply determine the responsibilities of each team member for such an event, and the case will immediately go to the way.
How to make a hiking bath do it yourself
Tourist campaigns and rest on the village of Nature gives preference quite a few people. But some annoying the problem of the lack of hot water and wash in the field. Output from this position
The hiking sauna is the simplest tent equipped with a stove. Both facilities are folded on the place of rest from the natural materials on hand or brought with them the collapsible structures of factory manufacture.
Hiking bath do it yourself
A mobile tent of a bath of a frame, covered with film, awning or tarpaulter. Inside install the stove. There are 2 versions of the organization of the baths: collect the design of the available materials or install the factory manufacturing tent.
In the first case, the frame of the hiking bath is optimally folded from metal thin tubes, but it will have to be transported to the resting place. In nature, a similar skeleton of structures are collected from long durable stories. Cobobugs use cobblestones for masonry.
The second version of the hiking bath is a finished factory tent. She will have to transport the place of recreation by car. Plus tent take a metal stove. She is small, but weight has, and manually transfer such a burrow hard.
Tip! When using a tent, optimally give preference to a product of another Soviet sample.
The choice is explained by the fact that tarpaulin serves such models. Material keeps heat, moisture, does not distinguish harmful evaporation when heated.
Features of the design of the hiking bath
The basic requirement for such designs is that the hiking bath must be lightweight, safe, quickly understand and gather.

The best for the bath is the frame of aluminum tubes. In collapsible form it is easy to transfer even manually. The collected frame is durable, fireproof. If the skeleton of the tent is made of wooden racks, the best material is the long thin trunks of young trees. Pilia can not be taken dry, as they are fragile and fasterly susceptible to ignition from the furnace.

The best observer material for the bath is the tarpaulin of the Soviet sample, but he is heavy, dear and not everywhere you can buy. Primitive shelter will serve as a regular film. For a tent designed for 5 people, you will need a piece of 6x6 m. The disadvantage of the film is rapid exercise when the spark from the stove is hit, but it is easy to wear with you in the hike.


Any bath tent must be equipped with a stove. There are 2 options to choose from:
- The furnace is folded at the place of rest from large cobblestones. The design resembles a well-closed well. On the side, leave the window to lining firewood in the furnace.
- Portable furnace for baths welded from metal. The design resembles a burzhuyk. From above on the stove organized a playground where you can heat the water and split the stones to organize the steam room.
A hiking furnace chamber can be folded inside the tent and beyond. The first option is called "in black", since inside the bath together with the ferry there is a smoke. The second option is called "in white". Smoke from the furnace does not penetrate the inside the tent. The stones warm outside the baths and are chosen to enter inside.
Important conditions

Install a portable bath-tent is not anywhere. Optimally choose a plot with suitable conditions:
- The presence of water. At hiking conditions, the appropriate option for the bath is the coast of any reservoir or river.
- Stones. If there is no metal portable oven, it will have to be folded from cobblestones. By proximity there must be stones, but not laminated, but solid. Otherwise, the cobblestones will crack from heating. The departing fragments can face a person. Optimal cobbled dimensions - from 10 to 12 cm. Small stones are quickly cooled, and large for a long time warmed the bone. The cobblestone shape is optimal slightly shiny, elongated. From round stones stove hard, as they will roll.
- Young trees. If there is no frame with you, it is collected from long jelia 3-4 cm thick. Material is looking for in the near forest or landing.
- Firewood. The furnace in the hiking bath is drowning about 3 hours. For firewood is needed. Trees are chosen from the thickness of the barrel of 10-15 cm.
In the campaign, it is not always possible to find a place under the bath with all the conditions, but you need to try to choose something average. First of all, in demand with water. Stones, firewood, rhe you can search and bring manually.
Making stages with their own hands
The tent sauna is equipped almost one principle, regardless of the material available. The difference is the location of the stove.
Production of a hiking bath "Po white"

"White" is equipped with a bath in a tent with their own hands without stove. It is built outside the steam. Only hot stones are entered into the tent. Plus this method is the absence of smoke. The disadvantage is a long warming of a hiking bath and its rapid cooling. The tent is optimal to build a little to have enough space for the necessary procedures. The bulk hiking charge will have to warm up for a long time, they will need a lot of stones, and it is almost impossible to achieve this in cold weather.

Due to the lack of inside the stove tent, the film can be used. The frame in the hiking option is most often made from Gheria. It will take 8 sticks with a length of more than 1 m. Between themselves are associated with wire or scotch. Must get a cube or parallelepiped.
Tip! With a collective rest, the bath is better to build for 4 people and bathe in turn.
For 1-2 people you can do the frame in the form of Wigwam. Three thrills set at an angle, forming a cone. Before pulling the film with scotch, wrapped all sharp knots on sticks. Polyethylene sleeve is blown with a knife. The resulting single-layer blade is covered with a frame. To the jerry, the film is primed up with scotch, fasten with linen clothespins.

From the side of the entrance, there are 2 large canvas of the film. Doors should be closed to the mustache so that steam does not go out of the hiking bath. Inside, plans for hot stones. It is fencing with a length of 30-50 cm long in the ground. The floor of the bathing bath ripped up with a snack. For seating, you can lay a rug or find a fuken.
The stove is equipped at a safe distance from the tent. Spark should not fly to film shelter. It is impossible to remove the stove too much, because you still have to wear hot stones into a tent. After the construction of the stove, the remaining stones are not thrown away. They pressed the bottom of the film shelter tent to the ground. Stones are important to put tightly with each other, otherwise steam will come out from under the non-pressed areas.
Production of bath-tent "in black"

"In the black" method of a bath in a campaign with your own hands is installed in the same way. The distinction of the design is the arrangement of the stove inside the tent. The frame of the hiking bath is associated with yawa rods or vines. The easiest option is to be made up with a tape 4 tape about about 1.5 m long. If you manage to find long sticks about 3 m, then 2 pieces will be enough. Peregi is just bend, tying a cross in the center so that the shag's shape turned out.

The shelter of the hiking bath can serve as a film, but polyethylene is afraid of fire. The stove will have to be folded qualitatively to protect the film tent from sparks to the maximum.

For a hiking bath "in black" it is better to establish a collapsible frame with thin aluminum tubes. It is guaranteed not to ignite the oven. Instead of film, the tent is covered with tarpaulo. Durable racks will withstand shelter, even if it is snowing with snow or rain will be accompanied by a strong wind.

A fast hiking bath with a stove is organized in a factory tent, only with tarp shelter. Frames in a few minutes are collected from folding arcs. For convenience, first in the tent lay out the stove from the stone, and then stretch the tarpaulin shelter.
Oven for hiking bath do it yourself

Kamenka-stove for hiking baths are made on the place of large cobblestones. In fact, the design resembles a bourgeois. First lay the furnace in the form of an unfinished ring, leaving the window to load firewood. The arch do, as shown in Figure: Solid, vaulted or with a jumper. The first scheme is worse due to the poor warm-up of the upper cobblestones, as the flame is missing.
The main stages of the device of the bathroom
The bath tent with the stove is raised by the exhalar travelers. Newbie should perform actions step by step, adhering to recommendations. After several workouts, a hiking bath will take no more than an hour.
Selection of place
The appropriate area for hiking bath is chosen with important conditions. Be sure to require any source of water, firewood and stones. Wear cobblestones from afar hard. The same goes for water. You can bring a couple of buckets, but the pleasure of bathing will be small. Stop well on the shore of the pond, where you can plunge after the steam.
When choosing a plot, it is necessary to explore the soil. The land must be solid. In soft and bulk soil it is impossible to reliably strengthen the tent arches.
Construction stove
The most responsible point is considered to install a furnace for the baths from the cobblestones found in the neighborhood. The simplest heater is built according to the following rules even before shelter the tent with a tarpaulter:
- Under the stove of the sharp spatula is cut off the top of the soil. In the deepening by cobblestones lay out the base. If there is a dry grass nearby, it is believed to be a spatula in order to avoid fire.
- Using the flashed cobbled cobblestones with a size of 200 mm, the focus lay out. Its height and diameter is approximately 700 mm. For bookmarking to the focus of firewood leave a small opening. From above, the focus is covered with a large flat stone. We're lucky if there is a sacking sackage. To the flat stone it is convenient to put a bucket with water.
- Bonfire in the stove hiking bath tents are bred 4 hours before swimming. The readiness of the stones will be aslaring their red or white color, which depends on their breed.
The first watering with water on the stove is made with caution. If the stones do not crack and fragments are not flying away - cobblestones are chosen correctly.
Frame device
In the collapsible tent, the frame is folded from the tubes. When using self-made design, the fired rods cleaned from the bitch. The most convenient and safe is the hiking sauna of two compartments. The skeleton of the tent makes that the steam room turns out slightly removed from the stove.
First, 4 racks are bought in the corners. They are connected on top of the perimeter and cross-cross-hour crossbars. The tents form a durable tent outline and do not allow to ride a tarpaulter on the ceiling. One way from any wall put two long rods under the tilt. From above, they are fixed to the carcass of the tent, and the bottom rest in the ground. It turns out the second compartment for the stove.
Color for hiking steam
For the tent it is desirable to use a solid piece of film or tarpaulin. In size, it must be greater than the frame so that the bottom of the edge can be well to strengthen. The canopy presses to the ground by cobblestones or the ground. The most successful option is to pull the trench around the frame, put the canopy, sprinkle with soil.
The warm floor inside the tent is laying out of the facothy. Top of the rug or lay thin twigs with foliage. Birch is ideal.

Use a bath tent is easy. Several tips will not prevent novice travelers:
- during burning firewood in the tent leave a small open window to weathering smoke;
- water bucket put on the stove for watering the heater;
- after heating stones, the burned out heat is carried out of the heating, and the tent is tightly closed to avoid the loss of heat;
- stones are watered as needed to form a comfortable amount of steam.
The cooling of stove stones lasts about 2 hours. During this time you can get comfortable. To protect the walls of the tent from fire and people from random burns, the stove is fencing against branches.
Conclusion
Hiking bath is not built too spacious. From a big tent leaves warmth. It is better to install a small design and bathe in turn.