Laying tile with your own hands step by step instructions. How to put a tiled on the wall: put the tile with your own hands with the photo of the instruction
The range of building stores is pleased with the constantly emerging innovations designed to perform the modern furnishings of the housing. But be that as it may, the ceramic tile does not lose much in its popularity, and remains one of the most popular materials for facing floors and walls in premises with specific operating conditions - with high humidity, with direct water from the water on the surface, with a pronounced abrasive load , with the need for frequent wet cleaning with the use of detergents. For such criteria, this can be attributed to the bathrooms, bathrooms and kitchens, hallways and corridors, balconies and loggias, entrance groups and some economic premises.
In a word, in any house or apartment such a finish, there will be widespread use. Therefore, the question is so relevant - how difficult is the laying of ceramic tiles with their own hands, is it worth inviting the masters, or is it possible to do with your own forces? It is impossible to agree with the opinions of the authors of individual articles, arguing that the facing of the cafeter is a very simple task. This finish requires accurate compliance with technology, knowledge of a set of nuances, a certain skill and increased accuracy. Nevertheless, it does not seem impracticable too - very many housing owners successfully completed finishing work on their own. We hope that this article will help the portal visitor to deal with the basics of laying ceramic tile, weighing their capabilities and take the right decision.
The ceramic tile itself is not very expensive if it takes into account its durability and practicality. But the laying can double the cost of facing works. The master must not just recreate the conceived pattern, but also correctly think over the layout to avoid ugly trimming, properly cut the tile and lay it out in the same plane. This is a complex and painstaking work, requiring experience, but if you want to save - laying the tiles with your own hands is quite real, and from this lesson you will learn the main points of technology.
Fast navigation on the article
Preparation
Starting with the removal of old finish. Installation of tiles can be done even on the old tile, if it is well holding down and there are no chisels on it, so that the glue was for what to grab. But the ideal will remove the old finish and plaster to the concrete base.
If the walls are uneven, you first need to launch them, or align the plasterboard. If this floor is a screed or bulk self-leveling floor. It will not only increase the convenience of work and reduce the glue consumption, but also will well affect the quality of the facing: it will be smooth and durable, the chance of cracking and tile separation will decrease. Do not rely on the fact that they hide all the irregularities due to the layer of glue.
Detailed video for cement plaster walls:
If an electric warm floor is planned on the floor, it is extremely desirable to drown it before in the screed.
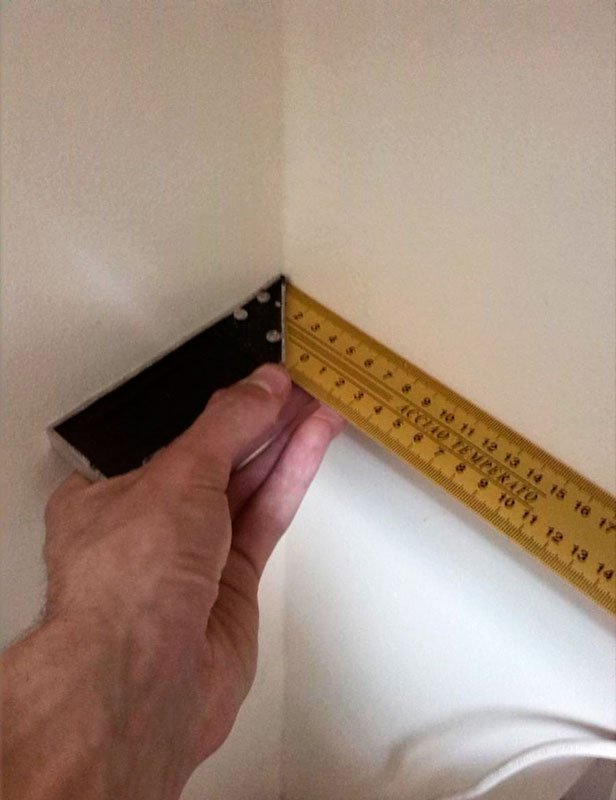
During the plaster you need not only to level the base, but also to achieve an angles of 90 degrees.
The base and plaster are carefully covered by primer deep penetration.
In wet rooms there is waterproofing of the floor. Waterproofing walls are made only in places directly contact with water (for example, shower walls).
We need to think about it in advance, where there may be narrow ugly trimming and try to minimize them, by shifting the layout. You also need to decide on the position of the decor, borders, a combination of a dark and light background. The decor cannot be cut at all, and the borders can only be shortened. It is best to draw a visual scheme of each wall with tile layout. In this matter, many nuances, which were written.
Often, tile even in one package may vary for several millimeters (especially domestic). It can deliver many inconvenience when working - the seams will not converge. Therefore, before installing the tile, it is necessary to sort the size of 2-3 groups.
Instruments
Directly for laying the tiles you need to have the following tools (not counting the preparation and removal of old finish):
- Level - to check the levels of base and cladding during styling. It is best to have a long (allows you to check the evenness of the entire row) and short (to determine the evenness of two adjacent tiles) bubble level, as well as a laser level. If there is no level, it can be replaced by purchasing a water level and a plumb for marking horizontal and vertical lines, respectively.
- Perforator or drill with a nozzle-mixer - for stamping dry mixtures.
- Rowling - for applying glue. The sizes of the rowing teeth depend on the size of the tile, and are indicated on the package with glue.
- Capacity for 10-20 liters for kneading glue.
- To preserve uniform gaps. Additional use will help achieve a good result.
- Tool cutting tools. It is more convenient to work, but if there is no, you can cut off the tile of a glass cutter or another girlfriend tool.
- Rubber spatula - to fill the seams of grout.
It is desirable to have 2 bubbles (long and short) to control the laying plane if there is no laser level - the exact horizon can be obtained by a water accurate vertical level is determined by a plugging on cement-based cubic capacity for 10 liters
Perforator with homemade nozzle for stirring dry mixtures Grebelka with teeth 10mm plastic crosses 2mm manual tiles rubber spatula
In addition, it is also necessary to buy materials themselves - glue and grout on a cement basis. Silicone grout-sealant is used to fill deformation seams, for example, between tiles and bathroom.
We mix the glue
Mix the solution is simpler: pour into the container near the liter of water and begin to fall asleep there a dry mixture, until a holmik is formed. Mix everything into a homogeneous solution without lumps, and in the process you will see if you need to add more water or mixtures.
The consistency should allow convenient to apply adhesive so that it will be smeared without effort on the surface, but also not glass from the rowing.
After that, it will be necessary to wait 5-10 minutes and mix the solution again before starting work.
Many glue do not need to do, especially at first sunset, as it takes the most time.
We put the tile
Each wizard has its own styling technology, I will tell you how I do it.

Before sticking the tile, I lubricate it with an involnery side and the base of the thin layer of the glue "on the Sadir" to increase the adhesion. Only after that I applied to the tile layer of glue with a thickness of about 1 cm and running around it with a comb. During the laying of the floor tile, it is more convenient to apply a comb-layer of glue on the floor.
So from under the tiles did not get out surplus, I try to apply glue with a small indentation from the edge. In any case, you need to follow and clean the surplus along the edges in time, otherwise it is then tortured to cleanse the seams from the frozen glue.
Such a technique is good because there is a laughing glue, and for good fixation it is not necessary to knock on each tile of the image, it will simply press it up to the desired level. For reliable fastening, press the tile is needed about half the thickness of the strips from the rowing.

After applying glue on the surface there is no more than 10-15 minutes to glue the tile to it. After that, there will be another 15-20 minutes when it can be corrected. Checking the levels level, if it has fallen a lot - we grind and apply the glue layer. Also watch the corners converge.
Laying ceramic tiles on the walls is made horizontal rows, ranging from bottom. Depending on the conditions and selected layouts, the first tile can be started either from the edge or in the center of the wall. On the floor, the styling is made from the far to the output of the angle.
Special attention should be paid to the places that will contact the deforming surfaces. For example, a cast-iron bath can be a little "walk", or change your dimensions from temperature. It may be imperceptible to the eye, but it will be enough to tear the tile from the wall. That this does not happen, between the tile and the bathroom you need to leave the gap at least 2 mm, which is filled with elastic sealant. It can be selected for the color of the main grout.
The width of the seams between directly affects how tile facing will look like. If you have a high-quality flat tile, you can make thin gaps of 1-2 mm. There are crosses of different thickness on sale, from 1 to 10 mm.
Cutting tile
The amount of marriage during cutting will be highly dependent on the availability and quality of the tool.
Straight lines are easy to trim with manual stoveturis. If it does not and the tile is rather soft, you can cut it off with any sharp object (glass cutter, nail, drill). It is necessary to carry out a flat scratch, and then split the tile on 2 parts by uniform pressing on the corner of the table.
Small pieces or curvilinear cutouts can be made using a grinder with a diamond disk.

Signed tiles under 45 degrees
Separately, it is worth talking about outer corners. Now in stores you can buy special plastic corners (layouts), which are simply put on adjacent tiles. Professionals do not use them, with the exception of traumatic sites where you can slip. Instead, angular tiles are peeled under 45 degrees, to create a beautiful junction. You can do it with the same grinder or electric stovetur. The tile is fed from the back side right up to the glaze, but it is impossible to damage it. The corner is advisable to do even a little more, so that there are no difficulty in docking. When the angle is reduced, it must be fixed with a painted scotch, so that the liquid glue is not sprayed.
You may also need to make a hole in the tile. Little holes are made using a drill in a cafée, and large cut with special nozzles on a drill - crowns or ballerns. Square holes can be cut with a grinder.
Shutkish seams
Most adhesive solutions allow walking along 12-24 hours after laying. But there is a quick-hardening glue, it will be ready after 4 hours.
We remove plastic crosses, clean the seams from the solution and proceed to the grout.
This stage is simple: I indulge in a cruise mixture with water and applied its cross-shaped movements inside the seams using a rubber spatula. Then we form a seam and remove the surplus with a clean cloth. If the cladding area is large, it will be more convenient to work with a rubber cooker.
Sometimes it comes across a very embossed decor, which is dangerous to smell - it is easier to stack it in advance.
In the wet premises of the seams additionally can be protected by a special impregnation.
Conclusion
You can write a whole book with your own tiles about how to put a tile - after all, in this case, many nuances, for the development of which years of experience are needed. In this article I only told the basics, so if some questions remained - welcome to the comments.
05-10-2014It is difficult to find such a popular facing material, which is the tile. It is used to finish at various premises. In most cases, laying the tile is carried out in the bathrooms, bathrooms, shower cabins, on the staircases and steps.

Advantages of using facing material
Using the tile is not a tribute to the former traditions. Her choice indicates the rational approach of the property owner. Despite the presence of many newest outdoor and wall coverings, the tile will never come out of fashion. Due to the unique performance characteristics, this facing material is much superior to most of the modern coatings.
The advantages of using the tile include:
- ecology and absolute harmlessness for human health (manufactured from natural clay);
- resistance to the negative effects of a wet and chemical medium;
- ease of installation;
- easy cleaning from various contaminants;
- excellent practicality;
- long operating period (up to 40 years);
- attractive appearance;
- fire safety;
- excellent antistatic properties;
- the coating does not absorb odors;
- affordable price;
- the preservation of the initial type throughout the service life;
- a variety of shapes, sizes and textures (tile, imitating natural stone, uses extremely popular).

Cafe production occurs by firing raw materials from which it is manufactured. Thanks to this, they are destroyed:
- substances that can cause an allergic reaction;
- all fungi and bacteria.
Perhaps the only minus of the tile is fragility. It is not very resistant to mechanical damage resulting from a hard or severe object.
To lay tile, we will need:

- facing material itself;
- primer;
- glue;
- mixture for grouting seams;
- a container for the solution;
- wooden rails;
- rags;
- flannel fabric;
- level (laser and usual);
- roulette;
- plumb;
- drill with a mixer;
- slab;
- glass cutter;
- marker;
- ticks;
- a set of spatulas (necessarily the presence of gear and rubber instruments);
- trowel;
- wooden hammer;
- plastic crosses;
- rule;
- a wide knife;
- plasterboard;
- polypropylene grid;
- pVA glue;
- brackets;
- water;
- soap;
- construction pistol.
Back to the category
Cafel installation technology
At the initial stage, the surface preparation is carried out on which the coating will be laid.

It is cleaned, aligned and dried. The surface is primed.
Placed a prepared base of gender. To ensure sufficient access to the walls, plinth and door facing are removed. Middes are measured on opposite walls. This is necessary to determine the axial lines of the room.
The acquired tile is folded with their own hands on the surfaced surface. It is thus determined whether the plots will be on which a whole tile does not fit. In the presence of such sites, you will have to deal with tile cutting.
There are the following ways of mounting a tile:
- traditional;
- in a checkerboard;
- diagonally;
- christmas tree;
- modular grid.
Depending on the installation method, the first row of the material will occur. The first type of laying is used in fairly spacious rooms, and start tile work from the middle of the wall. When working in smaller rooms, everything starts from the second row. Making a diagonal laying of cladding is best in spacious and large rooms, but this method is the most complicated and time consuming.
With diagonal laying:
- marking of frieze is made;
- in the perimeter, the whole and cut tiles are flattened;
- fries stacked.

The smooth arrangement of the facing material during the work is achieved using a level. You should also pay attention to the corners of the tile. Sometimes there is a tile, which is concave unenocomy or a protrusion is possible on it. In this case, to prevent the floor irregularities, the tile is located slightly below the planned level. One requirement is carried out unquestionable - seams should always be coincided in perpendicular directions.
The tap of the tile begins with the wall opposite to the entrance to the room. A wooden slat is fastened at the bottom of the wall, which will subsequently rely on the first row of tiles. The traditional tile installation technology (joint in the junction) provides for compliance with the matches of vertical and horizontal seams. To check the vertical deviation, you must use a plumb and level.
Very important stage is the preparation of a solution for high-quality tile clutch with a wall. The preparation of the adhesive mixture is carried out in any suitable container in which consistently:
- water is poured;
- the dry glue mixture is poured;
- careful mixing of the solution is carried out.
A few minutes later, the prepared solution is still mixed again and it is not up to a homogeneous consistency for 1-2 minutes.
The next step is to apply glue to the base under the tile. Working with severe (floor) facing material is made with a toothed spatula. On the base of the floor, the glue is applied with a smooth side, but is distributed over the surface of the toothed side of the tool. The required thickness of the glue layer should be slightly higher than the height of the teeth of the spatula.

By placing the tile on the floor or the first row of the wall, it should be very tightly pressing through the entire surface. For a larger effect, the tile is embedded with a wooden hammer. In order to get the same in the width and distance of interconnect seams, plastic cross-separators are used. Putting the tile on the glue, you need to catch up and pierce the cafe in the entire width and length of the tile, at the same time clearing it from the leaks of glue.
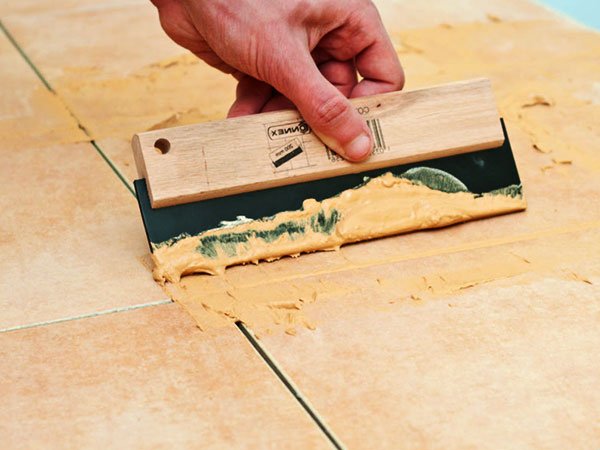
Crossings are filmed 1-2 hours after laying tiles. The next day you can close the interconnect seams. This work is carried out using a special grout. The rubber spatula is applied with a solution of grouts on intercutant seams, all the gaps, slots and holes are drained.
After the work on the finishing of the seams should be waited for about an hour. Grout must be frozen. The tile ished with a sponge or rag moistened in warm water. It is always necessary to wash the grout and unnecessary glue residues, since the upper (glazed) layer of the tile is very easily damaging. Created tile surface is polished with flannel cloth.
Back to the category
Cutter cut
In some cases, it is impossible to put the tile of the whole. You have to resort to its cutting. Before the implementation of this process, the tile is soaked in clean water for approximately 2-3 hours. The tile for the walls should be cut with the simplest glass cutter, and a thicker flooring with a stovetur.
When cutting the material with glass cutter, the end of the outbreak is on 10 mm from the edge of the tile. The glass cutter must be used after the lines of markings of the outbreak, evenly pressed on the tile and leaving a noticeable and clear mark. After that, the tile is placed on the edge of any solid object. Pressing is carried out on the site that must be cut off. The tile breaks exactly through the cutting glass cutter.
It is even easier to work with a plottle. The main thing is that the wheels of fixtures do not move from side to the side - this will lead to curves of cuts. The tile is placed marker and placed in the base of the plate. Next, the following actions are carried out:
- wheel tile cutter is combined with a drawn line:
- rises the knob of fixtures;
- the wheel concerns the line on the tile;
- moves the handle on itself;
- only one pass wheel is carried out.
The remaining unnecessary pieces of tiles are removed using tick-bodies. The tile is caught only once, after it becomes fragile and poor-quality. If it is necessary to create a hole in the tile, a glossy surface is removed in its place. And then the drilling of the opening of the drill is performed.
Laying tiles on the floor can be performed by any homemade master. It is only necessary to clearly comply with the recommendations of specialists and produce all actions in a strict sequence.
The tile (is the most often called tile products from ceramics) is a very popular material. It is characterized by excellent external data, durability during operation in various conditions, high strength and resistance to abrasion. It is also important that care for ceramic tiles is truly simple.
With competent installation, the tile has already been operating with all its special qualities from the first days of operation. Most often it is placed in the kitchens, in the hallway and bathrooms.
And here you need to know that the tile products for these premises should be chosen different. Each type of tile has its own special performance.
A variety of ceramic tile
For kitchens, for example, it is recommended to purchase and mount with your own hands the tile attributed by the level of abrasability to the third class. This is due to the fact that floor coverings in such premises are subjected to (and constantly) the effects of different negative factors.
Always scattered on the kitchen floors, falls, sheds. Therefore, they are simply obliged to resist such physicomechanical and chemical influences. Specialists, in addition, do not advise you to buy a tile with a porous or textured surface into the kitchen. It is very difficult for her to care.
For bathrooms and bathrooms fit the tiled products of a small class of abrasion. In these rooms for hygienic procedures, passability is not as high to spend money on the purchase of expensive ceramic tiles. Do not stop your choice on glossy products - they are truly slippery, and do not suit the bathroom. It is better to choose a tile with high levels of resistance to moisture and a variety of chemical compounds.
But on the floor in the hallway it makes sense to purchase the most durable tile (4th grade). Laying of such an expensive material fully justifies itself to long-term trouble-free operation in difficult conditions. It is in the hallways of apartments and residential buildings there is always a high passability of people.
To prepare an outdoor base for installation on it, tile products should be approached as responsibly. First you need to remove the old coating. This operation is carried out by a perforator with a nozzle in the form of a blade, or with a chisel and an ordinary hammer.
Performing your own hands dismantling of an old tile or other coating, do not forget to put on gloves. They will save your hands from injuries and serious wounds. Also there will also be glasses and a special mask, protecting the respiratory organs from dust. Instead, you can use the respirator.

Tile laying solution
High-quality laying of the tile with their own hands is impossible on the curve and oblique floor. The base must be absolutely even. Align it according to the following scheme:
- I exclude the likelihood of drafts in the room where the tile laying will be made on the floor (just carefully close all windows and doors).
- We sweep the floor base, remove all traces of oils, fatty connections, varnishes, paints, washing and vacuuming, then dry. Installation of the tile on the dirty and wet floor is not allowed.
- Laser level (in the absence of such - ordinary), determine the curvature of the base (all available concubuses and bulges). The maximum possible high-altitude differences - 0.5-0.9 cm.
- With the help of a mixture consisting of water, four parts and one part of the cement M400, close all potholes. If there is no desire to prepare this solution, just buy a special composition for alignment in the construction store. Divide it in accordance with the instructions and make the floor even.
- Wait until the mixture dries (10-12 hours).
Laying ceramic tiles on a prepared base is performed after that after 48-72 hours.
Wooden floor coverings are not aligned with sandy cement compositions. They are prepared in another way. Putting the floor with oily special paint, perform the installation of the waterproofing layer, on which the fine crushed stone and the reinforcement thin mesh are placed. From above, such a "pie" is poured with a liquid solution of cement. Then there is a complete frosting of the base.
The amount required for the work is easy to calculate. This is done like this:
- Measure the width and length of the room.
- Alternate the figures received.
- Share the amount calculated on the geometric indicator of one side of the tile you want to purchase. At the same time, it is necessary to take into account the width (about 3-5 mm) of the interlocking seams.

Installation tiles in the bath
On this calculations are over. You know how many tiles you need to purchase. But this accurate digit is recommended to add another percent of 12-15 material. Laying the tiles does not always go smoothly. Piece of tiled products crackle, some of them you will have to trim. It is better to rebuild and take a tile with a small margin.
Put the tile with your own hands is easiest than one of two ways:
- From the middle of the room to its edges.
- To the door from a long-range corner.
The first technique is considered more complicated. It is usually used when laying tile products on the floor is carried out in spacious rooms. To put the tile, you need to divide the outdoor base on equal sections (four sectors). To do this, you need to hold in the middle of the same wall line (straight) down, after which it is perpendicular to the first one line. From the point of their intersection, markup is made.
Laying the tiles after that can start from the corner you like in the center of the room. Moreover, the trimmed tile is identical to the geometric parameters with such a technique will always be mounted around the perimeter of the room.
The second way is better to apply for premises with original geometry and for rooms in which the floor has a relatively small area. This technique is always used by beginner masters who first decide to put ceramics with their own hands.
Whatever way of mounting the tile you have not selected, first execute the sample. Just decompose the tile on the room, take the place of its location, leave the place for intercutric seams. It will save you from serious mistakes, and therefore from excessive consumption of material, and from tightening installation work.
Acquire glue. It is sold in the form of dry compounds that need to be breeded with water, as well as in the ready-to-use form. Dry mixes are cheaper, and it is completely easy to breed them (all the information is in the instructions for glue). It is recommended to prepare a small amount of composition so that it does not have time to stick if the installation process is not very good.

Laying tiles in the bathroom
It is also necessary to stock special. It is with it that you will install the tile. Spatulas may have U-shaped teeth, V-shaped or square. The tools of the last type are ideal for you to qualitatively put tiled products of medium sizes. And for a large tile, it is better to use a spatula with cloths in the form of Litera U.
Ceramic tile laying scheme as follows:
- Apply primer to the floor base (it will increase the adhesion and protect the floor from the fungus). We are waiting for it drying, slightly moisturize the surface.
- Proceed with a toothed tool section of an outdoor base, inflicting the adhesive composition on it. At this stage, the glue should be very thoroughly (the maximum smooth layer must be obtained) by floor.
- The reverse side of the tile is also handled the adhesive mixture (a little solution is thrown on it, and then smear the spatula).
- Moving the ceramic product, apply it to the floor and attach. Distribute the pressure of pressure over the entire surface of the tile as evenly as possible.
- The accuracy of mounting tiles horizontally control the bypass thread or level. If the tile protrudes over the required level, remove a little adhesive composition from under the tile, if the product is overly deepened - throw it into it another portion of glue.
- Each tiled square after laying wipe the rags to remove the glue mass from the surface.
Between the tiles around the perimeter of the room you need to leave small (3-5 mm) slots. They are mounted with suture plastic separators in the form of crosses. It is not done for beauty. Such crosses do not allow the Kafel to crack, bend and removed after the installation is completed.
After drying the glue, remove all the fine garbage from the seams and process them with grouting with moisture-proof characteristics. Apply such a composition desirable rubber spatula. Then you need to wait a few hours and thoroughly wipe the laid with a soft cloth.
After a day, perform wet floor cleaning. You were able to independently put the tile. Congratulations!
Laying the tile with their own hands is not easy, but quite sat down. If the cost of these works will not pay for you on the pocket, but a beautiful bathroom and a kitchen do not leave your dreams, then with the right approach, everything can be done yourself.
If you take into account all our tips, strain, then definitely do your hand, and you will never be interested in the cost of laying tile. You yourself will be able to transform your room with this practical, durable, beautiful material.
Calculate the required amount of material
So, for this stage you will need: Level (plumb), roulette, paper and handle. Calculations need to be carried out very carefully.
The estimated location of the tile, be it wall or floor, is measured horizontally and vertical. According to the resulting result and the estimated size of the tile, the required amount of tiles is calculated. Separate attention should be paid to the corners. If the angles are curves, will additionally need several incomplete tiles in order to avoid gaps.
Next, it is necessary to draw a chart of the capel location and choose the type of facing. Possible options for laying tiles are: diagonal laying, "joint in the joint" and laying in the dispersion. At this stage, it is also necessary to decide on the presence and necessary number of decor elements: friezes, borders, plates with drawings.
In order not to be mistaken in the amount of purchased tile, on paper, you can make a mini-diagram in an appropriate scale, on which the location of both the tiles and decor themselves will be clearly indicated. After that, you can only start buying, and to laying tiles, the price is often quite high. Therefore, it should be trimmed by an important rule: "Some seven times, and one - a revenue!"
We put the tile on the floor

The tile is placed only on the perfectly smooth floor surface. Therefore, if the differences are impressive, it is worth thinking about the tie of the floor. Under the tile will be suitable all types of screeds. On top of the dry-fiber sheets with a dry tile, the tile is glued with "Flisencleber" glue. Only the implementation of all preparatory work is embarked directly to laying.
According to the rules for laying tiles on the floor, we first determine the drawing. For this, lay out two cross-rows along the longitudinal and transverse axis. And special plastic crosses inserted between the tiles will help control the thickness of the seam.

There are different ways to lay a tile.
Traditional

Diagonally

With displacement (rotary)

Christmas tree

Christmas tree with attmist

Modular grid

Depending on your chosen, the first row of tiles is stacked. When using a direct (traditional) method in large rooms, styling begins with the middle, and in small - from the second row.
When using a diagonal laying, the marking of the frieze is made first, then whole tiles are stacked around the perimeter, after - cutting tile, and then frieza is accommodated. Setting the first trial row, be sure to monitor its plane using the level.
Separate attention should be paid to the corners. Since the tile can be concave not equally, it is possible to perform the corners, therefore, in order to avoid the unevenness of the floor, the tiles must be placed just below the level. Be sure to ensure that the seams in perpendicular directions coincide.
With the help of level and corner we put the lighthouse tiles. If the floor is uneven, they are installed at the highest point. Next, a solution or glue is applied to the place where the tile will be applied, the tile is put on top and gently ripen rubber hammer. After you can fill in rows the remaining space, periodically tracking the level of laying tiles.
The tile is perfectly attached to the floor using:
- cement mortar;
- glue;
- cement mortification diluted with plasticizers;
- bitumen mastic.
We put the tile on the wall

Methods of laying
Laying the tile on the wall can be made in three ways: the traditional "joint in the joint", in a checker order ("first viewer") or diagonally.
In the first case, you need to constantly monitor the coincidence of vertical and horizontal seams, as well as measure the tile in size.
When using the "dressing" cladding, the middle of the tile from the top row is above the joint of the tiles of the lower row. Laying with this method is greatly simplified, because No need to constantly monitor the coincidence of the sizes of the tile.
Diagonal laying more often can be seen in large rooms. The method is considered rather laborious and difficult, so if you decide to use the services of specialists, the rates for laying tiles may not please you. The main points for which you need to pay attention are performed by the perpendicularity of the seams and the correct adjoining of tiles to the walls.
Surface preparation

To begin with, possible deviations of the surface from the axes are checked: horizontally for the floor and vertically for walls. The maximum percentage of deviation is 0.2%, i.e. It should not exceed 2 mm per meter length.
Using a plumb or level, check the vertical deviation for the walls. With the right installation, the error of the plumb will be less. It is best to hang a plumb on nails, specially driven around the corners of the room. A long ruler deviation is checked throughout the height and width.
Smooth surface plane is a key to success. Possible lumens immediately become visible if you attach a smooth bar or level. In the presence of large recesses, they must be accurately sharpened. Small lumens up to 2 mm can be left unchanged.
Now, the awesome surface, we produce its testing for strength. The presence of a bunk sounds about the fragile fit of the layer. In this case, the surface is cleared to brick masonry or concrete. During the climbing, sanding sand is also possible: this layer is removed or enhanced with specially intended means.
Technology laying tiles on a wooden surface involves the use of rubberoid and metal mesh. Rake, rubberoid, fastened the wall on the wall. From above, it is placed in a 15-millimeter layer of solution, after the drying of which the tile is laid.
Figure: 1 - Stuffed bars, 2 - Wooden base, 3 - Tol or Ruberoid, 4 - Grid, 5 - Cement Plaster, 6 - Tile
Fat stains, dirt, the remains of a soap solution, paint - nothing should be on the prepared surface, otherwise the tile is not firmly stuck. Painted walls deliver especially much trouble. Paint removal is a rather time-consuming process, but with a perforator with a spatula or cutting machine with a cardcheka, it can be significantly simplified and accelerated. The tile will be better to stay if the surface is projected.
Technology laying
Tile laying technology on the wall involves pre-laying of lighthouse tiles. In order for the beacons to install exactly, stretch the thread, which lags behind the surface by 5 mm. It is focused on the installation of beacons and equalizing the plane. At the same time, the parameters of the vertical and horizontal are necessarily tracked. To install, it is best to use alabaster, because It instantly freezes, and after laying a row, quickly and easily believes from the light-old tile, which is already installed on the constant basis.
Wooden starts from the center of the wall towards the corner. The center of the wall must be marked, spending a pencil vertical to the floor. From this place and start laying. If, with a chess order in the first row, the central line will take place on the joint of two tiles, then in the second row it will have to the whole tile.
Now we place the ranks horizontally and carefully laid the tile, starting from the bottom. If you are confident that the floors are smooth, then the tile can be installed directly on them.
If during the styling process you noticed that we deviated from the flat line, the already laid tile can be slightly lifted. This is done with the help of wedges, which are packed under the tile.
The tile can also be installed on the screwdriver, in the corners of which plays are placed with attached cord. All this is done in exactly to put the tile both horizontally and vertically. After the tile is laid, all devices are removed and fill with emptiness with a solution.

We produce directly styling: on the opposite side of the tile with the help of a trowel, we apply a solution (cement, glue), we distribute it with a comb, tightly press to the surface, we embarrass. To do this, use a rubber hammer. The tile level must match the level of previously stretched rope. The entire space between the tiles and the wall should be filled with a solution, otherwise adhesion will reduce and the tile can disappear. The applied layer of the solution should be from 7 to 15 mm. The residues of the solution that appeared on the seams, we remove the craftsman.

Between the tiles insert special crosses, which will allow you to control the thickness of the seam. After the laying process is finished, carefully clean the seams from the residuals of the solution and dust, pull out the cross.

Tile cutting
In some cases, if the size of the room requires, you need to trim the tile. For floor, cafeberes are used, for wall-mounted - roller glass either carbide cutter.

Before cutting, the tile is placed. Then along the applied metal line with pressure spend the cutter, after which they break the tile itself, laying under it a wooden bar, or special tongs.

Shutkish seams
The last stage is rubbing seams. Their width for the tile, the size of which is 10, 15, 20, 25, 30, 60 cm, should average 3 mm. The surface will look more aesthetic if the seams apply a colored grout. But even the usual white grout will give a wall with a laid cafeter, a neat and finished look.

The grout is applied by either a special scraper, grater, or using a package with a nozzle resembling a confectionery. After applying, the grout is evenly distributed to fill all the seams. Then the grater is removed dry surplus, handle the seams in a sponge moistened in water.

If the tile is glazed, then the grout can be carried out immediately after drying the solution. If the tile matte, then it is moistened to be moistened before the grout.
For grouting use cement mixture or epoxy resin. The unbalanced tile is additionally treated with sealant. This warns the appearance of spots both on the tile itself and in the seams.
Master class on laying tile (video) It is easy to find on the Internet. Are you interested in now how much does the tile laying cost? We are sure that you can do everything yourself!